
Папка уже используется при удалении или изменении — решение
При удалении, переименовании или перемещении какой-либо папки в Windows 11 и 10 пользователи могут получить сообщение об ошибке: «Папка уже используется. Операция не может быть завершена, так как эти папка или файл открыты в другой программе». В некоторых случаях имя программы указывается, но не всегда.
В этой инструкции подробно о том, как узнать, в какой именно программе открыта папка или файл в ней и решить проблему с удалением или другими действиями с папкой.
Как узнать, какой программой используется папка или файл и удалить её
Как было отмечено выше, текст сообщения об ошибке «Папка уже используется» может отличаться, ниже — два примера из Windows 11/10:
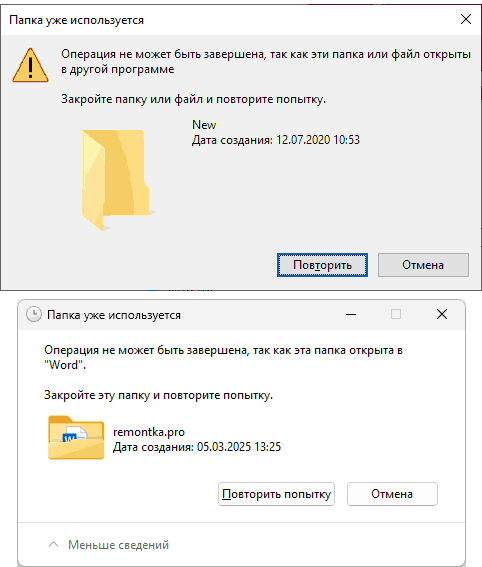
В первом случае прямо указывается, что папка (а точнее файл в ней) открыта в Word и в таком случае решением будет просто закрыть его, во втором случае лишь сообщение о том, что «Папка или файл открыты в другой программе», при этом не ясно в какой: а без её закрытия папка не удаляется и другие действия с ней выполнить также нельзя.
В некоторых случаях решением может быть простая перезагрузка компьютера, но иногда даже после этого ошибка продолжает появляться. В такой ситуации может потребоваться разобраться, какая программа или процесс использует папку или файл.
Можно использовать следующие способы для этого:
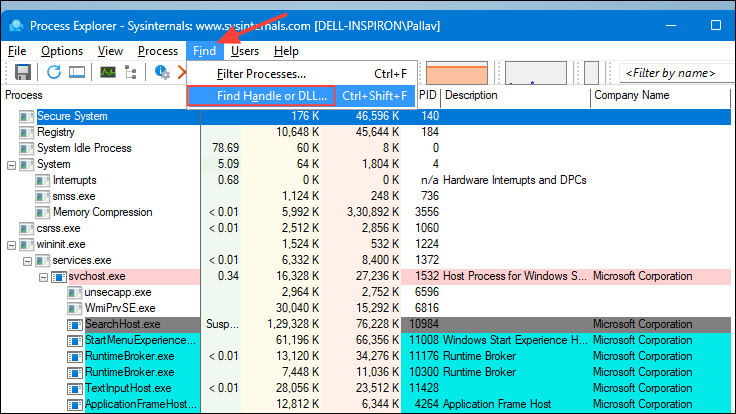
- Загрузить утилиту Process Explorer с сайта Майкрософт, запустить её (лучше от имени администратора), в главном меню (верхняя строка) выбрать Find — Find Handle or DLL, затем ввести путь к папке в поле поиска и нажать Enter. В результате отобразятся процессы, которые используют эту папку. Останется закрыть эти процессы или программы, но будьте осторожны, если речь идёт о каких-либо системных процессах Windows.

- Ещё одна простая программа, которая может помочь — Opened Files View, доступная для загрузке на сайте разработчика. После запуска программа отобразит список открытых файлов и папок, где они находятся. Вам потребуется найти те файлы, которые открыты в ваших папках, после чего вы можете использовать контекстное меню и пункт «Close Selected File Handles», чтобы закрыть их, тем самым «освободив» папку.

- Функция File Locksmith в Microsoft PowerToys, позволяющая показать использующие папку или файл процессы через контекстное меню. Подробно о File Locksmith — в отдельной инструкции.


В общем случае, для решения проблемы потребуется одно из следующих действий:
- Использовать «разблокировку» в случае File Locksmith или Opened Files View.
- Если это какая-то прикладная программа или не системный процесс, просто закрыть его (может потребоваться использовать диспетчер задач, если процесс не имеет окна), после чего вы сможете удалить папку или выполнить с ней другие действия.
- Если файл в папке открыт антивирусом, можно попробовать временно отключить его (если уверены в безопасности файла), либо добавить папку в исключения.
- В случае если папку использует системный процесс, при этом сама папка системной не является, постараться разобраться в чём дело. Иногда может помочь загрузка Windows в безопасном режиме.
Если же речь идёт о системных папках Windows 11/10, моя рекомендация — не трогать их и тем более не удалять, если только вы точно не знаете, что именно и зачем делаете и готовы к возможным последствиям. В последнем случае можно использовать, например, среду восстановления или WinPE для удаления.
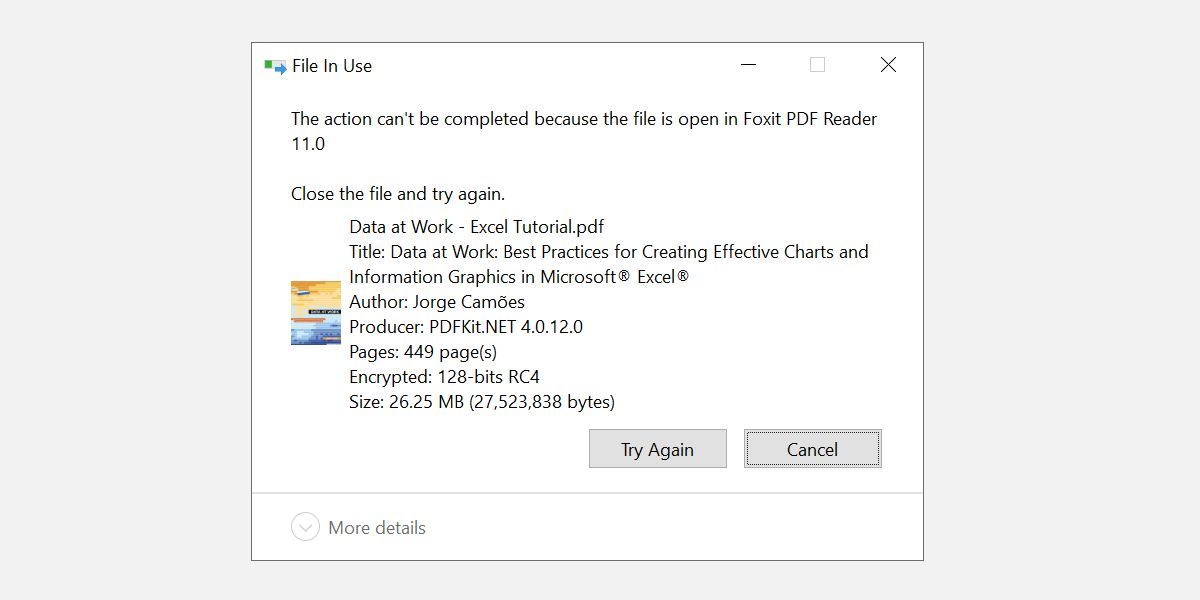
If a file or folder is in use, i.e. it’s open in an app, or a process on your system is using it, you cannot delete it. This becomes evident when you see the file or folder in use error box that prevents the deletion process from completing. Here’s what you can do to delete a file or folder in use.
Basic steps
Normally, a file or folder in use error is harmless. All you really have to do is make sure the file or folder you’re trying to delete isn’t being used by an app. In the case of a folder, if there’s a file within the folder is in use or open, it will prevent the folder from being deleted. Make sure everything is closed properly.
Sometimes Windows 10 thinks an app is still using a file when it is in fact done with it. For example, if you upload a file from Chrome to any website/web service, Windows 10 sometimes thinks the file is still open in Chrome even though the upload has finished. The same can happen with other apps so the safe thing to do is to close any apps that you might have used to access the file (or folder) in question.
If all that fails, there’s a simple way to get around it; safe mode.
Restart Windows 10 in Safe Mode. There are a few different ways to do this, however the easiest way is to open the Start Menu, click the power options, hold down the Shift key and click on Restart from the power options menu.
You will boot to a blue screen with various options. Select Troubleshoot>Advanced Options>start up settings and click on Restart. On the next screen, you will see a numbered list of actions. Enter the number that corresponds to Safe Mode. For me, it was 4 but you should go through the list you see and make sure you pick the right option.
Once you’re in safe mode, go ahead and delete the file or folder. This is also a good way to get rid of smaller, less malicious viruses however you should use Shift+Delete instead of regular delete if you suspect the folder or file is malicious.
To return to your normal Windows 10 desktop, simply restart your system.
If the file or folder comes back after being deleted, it means it is being created again by an app or process on the system. You might very likely need to scan your system for malicious apps in this case.

Fatima Wahab
Fatima has been writing for AddictiveTips for six years. She began as a junior writer and has been working as the Editor in Chief since 2014.
Fatima gets an adrenaline rush from figuring out how technology works, and how to manipulate it. A well-designed app, something that solves a common everyday problem and looks
Quick Links
-
Close the Program You Opened the File With
-
End the Application via the Task Manager
-
Change File Explorer Process Settings
-
Disable the File Explorer Preview Pane
-
Force Delete the File in Use via the Command Prompt
-
Unlock the File in Use With a Tool
When you can’t open, edit, or delete a file in Windows File Explorer, it’s either still open in a program running in the background or something didn’t close properly. Luckily, you can force delete, close, or edit a file using a few simple tricks.
1
Close the Program You Opened the File With
Let’s start with the obvious. Did you just open the file and not close it? If the file is closed, but the program is still running, close the application, then try again.
You should also, check the system tray to ensure it wasn’t just minimized there.
2
End the Application via the Task Manager
Task Manager can help manually end the process or application that holds your file hostage. This is one of the most promising methods to fix the «file is open in another program» error, as you might not always realize it didn’t close properly.
Press Ctrl + Shift + ESC on your keyboard to open the Task Manager. Alternatively, you can press Ctrl + Alt + Del to reach the menu or right-click the Taskbar and select Task Manager. If you’re on Windows 11, the Taskbar right-click won’t work.
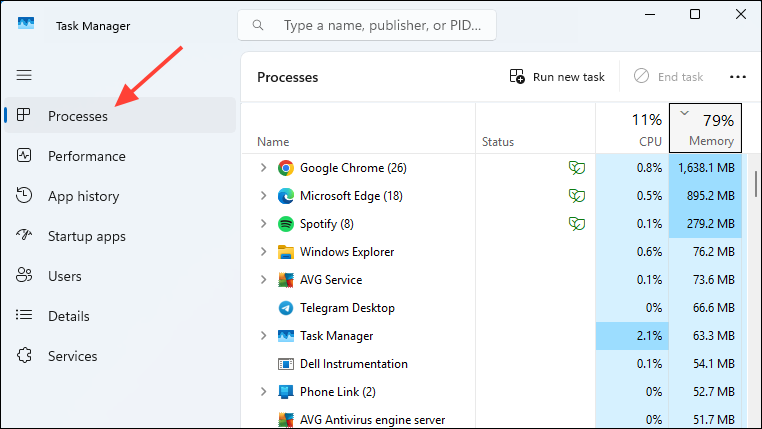
If you see the compact Task Manager version, click More details in the bottom left and make sure you’re in the Processes tab.
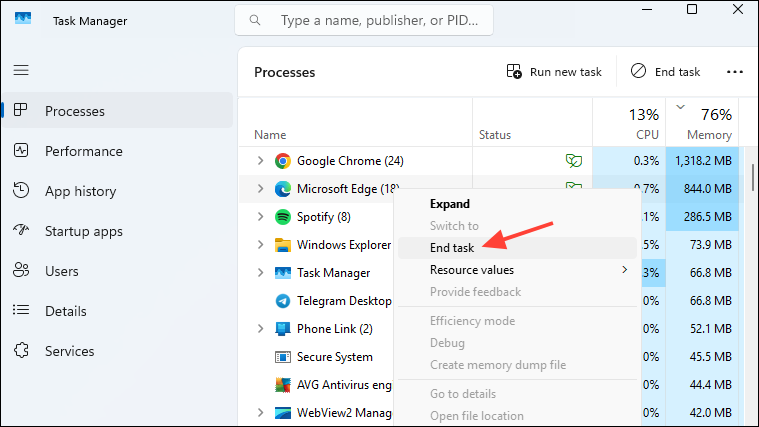
Browse for the application that you used to open the «file in use.» For example, if you were viewing a document, look for Microsoft Word.
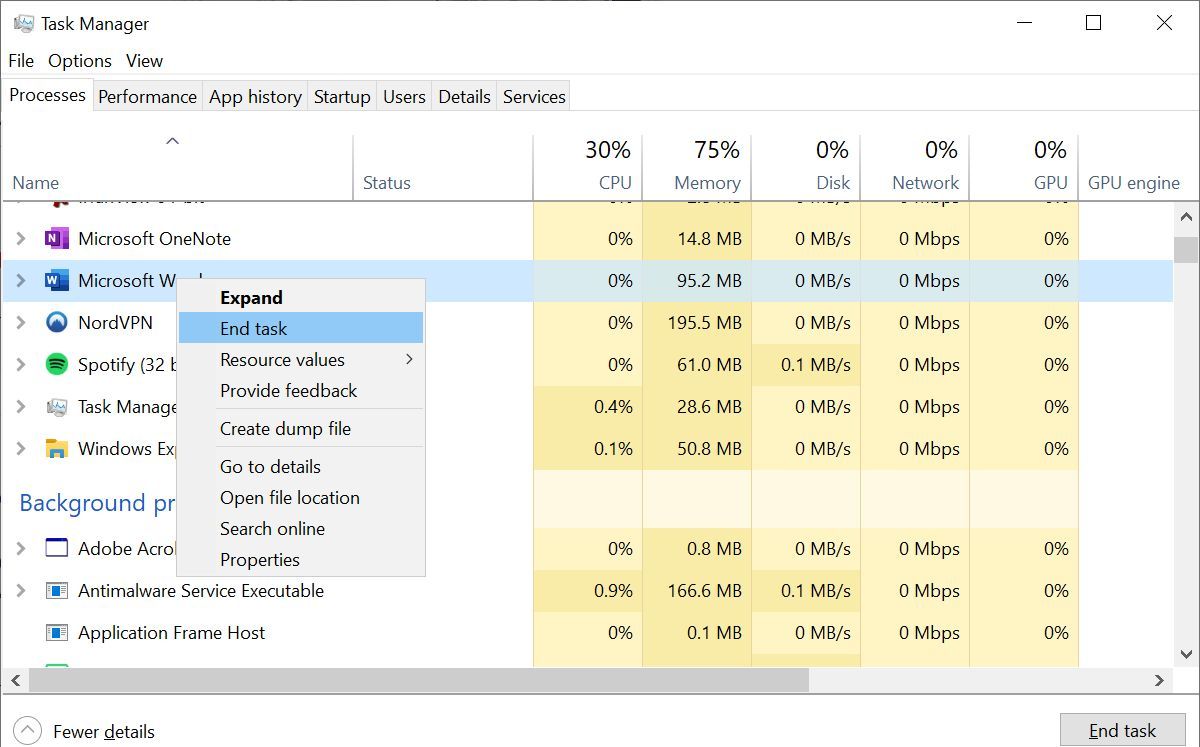
Once you find the process, select it and click End task in the bottom right. This will close all instances of the program.
3
Change File Explorer Process Settings
By default, File Explorer launches all its windows in a single process (explorer.exe). However, it could be that your settings force File Explorer to launch separate processes, which could cause a conflict between different processes.
Press the Windows key + E to open File Explorer. In Windows 10, go to View > Options > Change folder and search options.
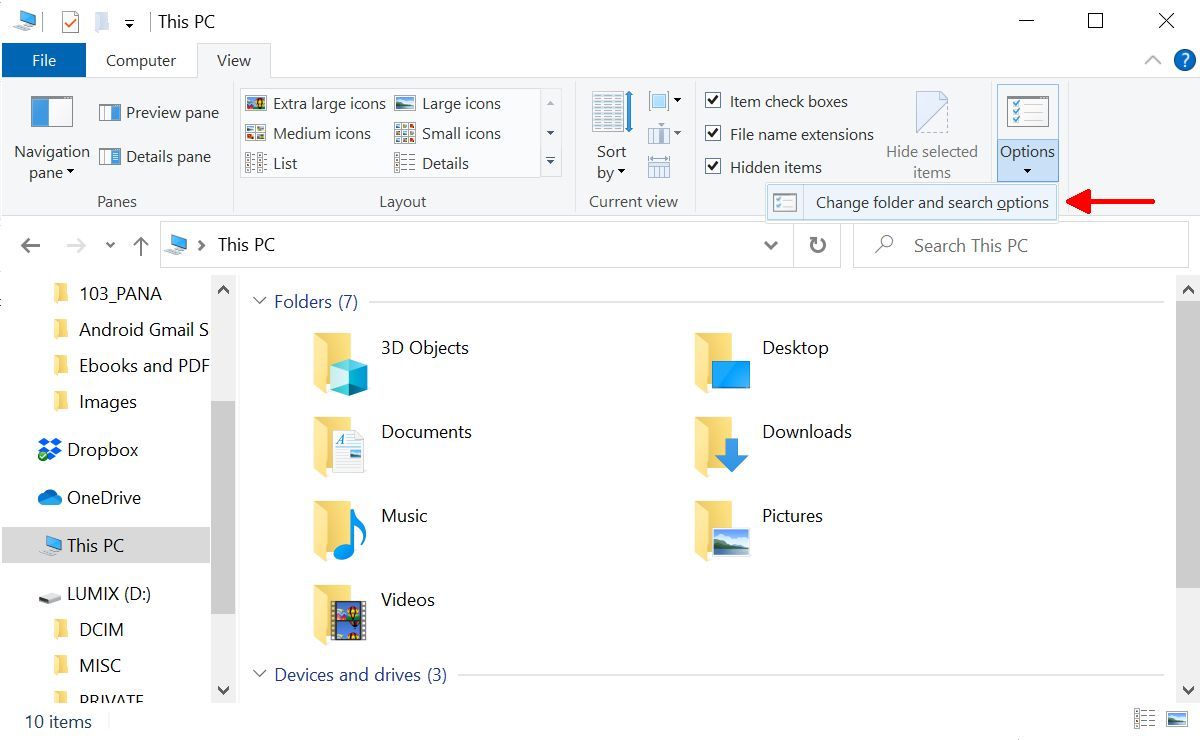
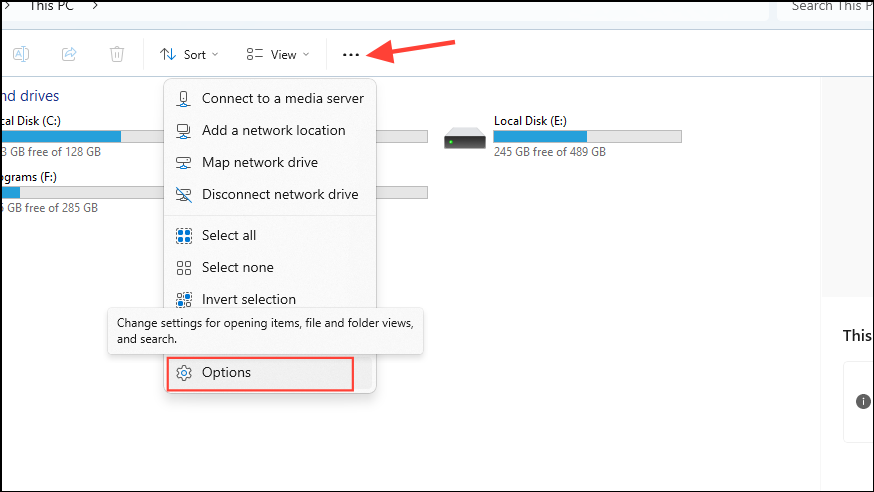
In Windows 11, click the three-dot «See more» icon next to View, then select Options.
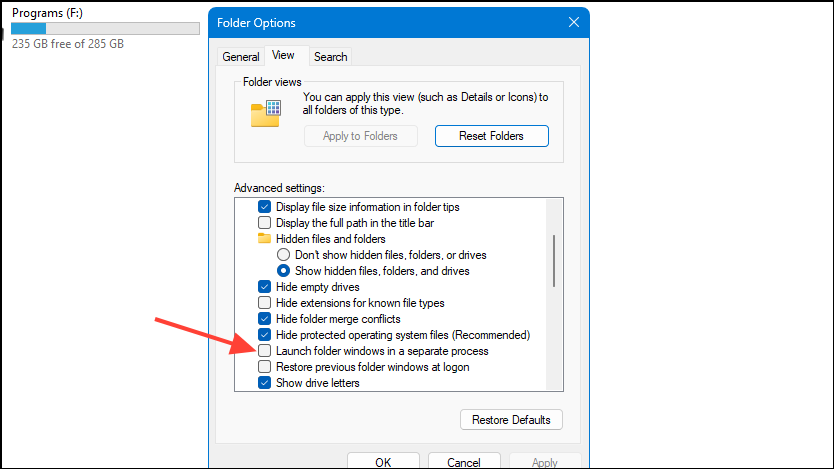
In the Folder Options window, switch to the View tab and find the Launch folder windows in a separate process option. Make sure it’s not checked. Click Apply to save any changes.
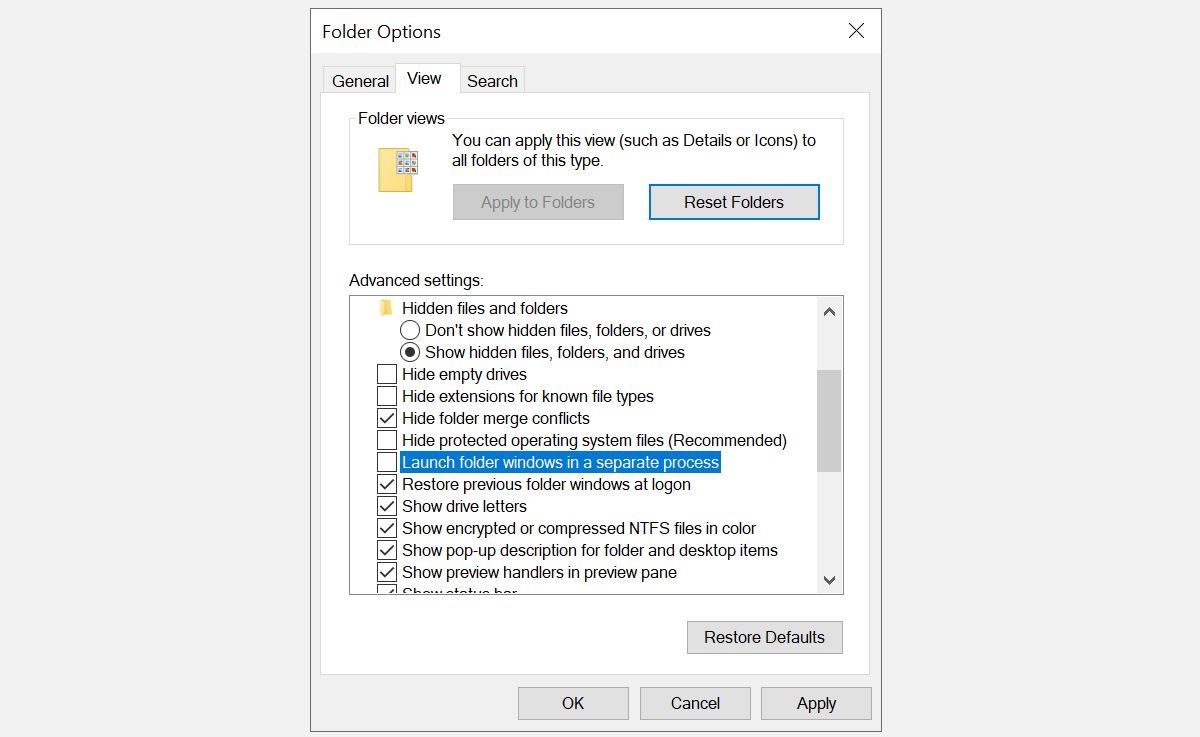
If the option was unchecked in the first place, you should check to see if this solves your issue.
4
Disable the File Explorer Preview Pane
Previews in File Explorer can also cause conflicts, like the «file is open in another program» error.
In Windows 10, press the Windows key + E, switch to the View tab, and press Alt + P to close the preview pane.
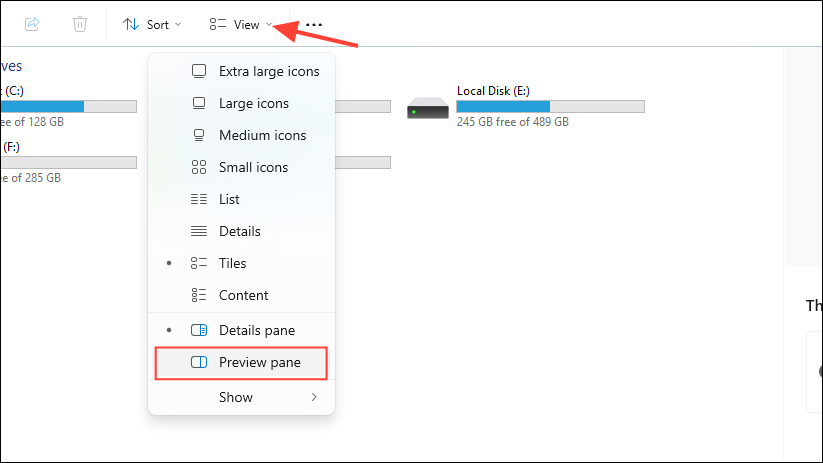
In Windows 11, open File Explorer (Windows key + E), then go to View > Show, and, if you see a checkmark next to Preview pane, click it to close the preview.
The screenshot below shows an open preview pane on the right.
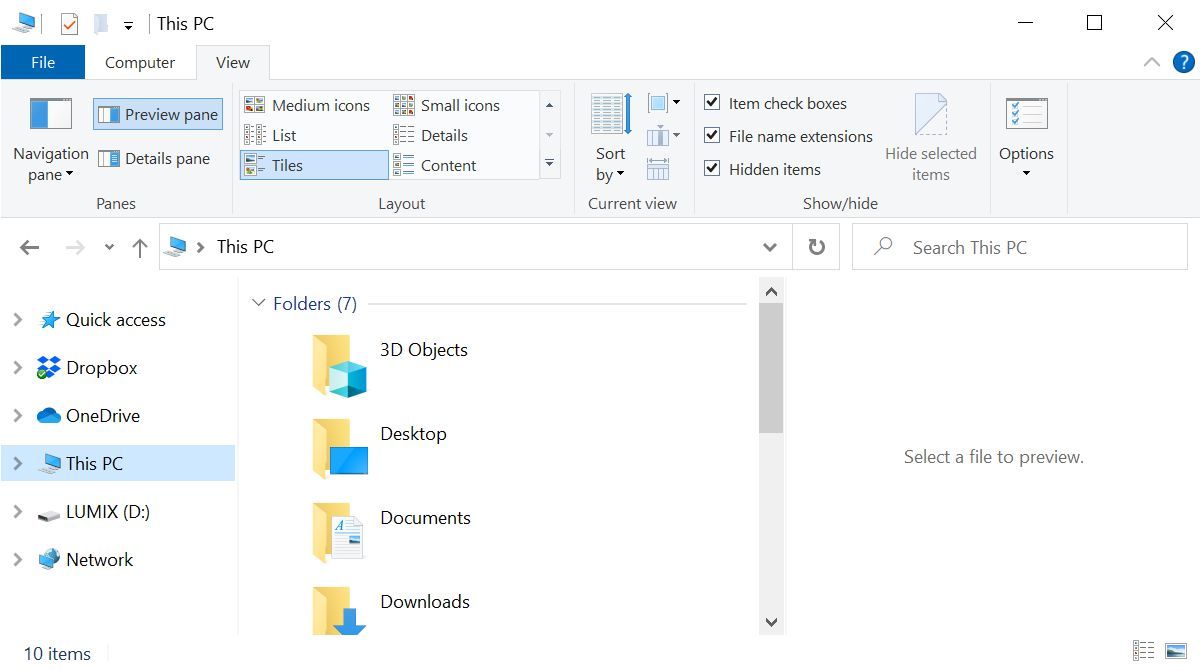
After closing the preview pane, try the operation again and see whether the «file in use» error has disappeared.
5
Force Delete the File in Use via the Command Prompt
You can bypass File Explorer and force delete the file using Command Prompt.
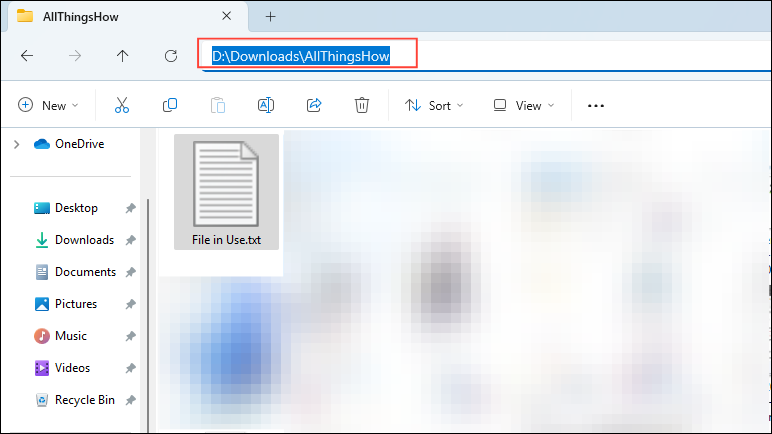
First, we need to track down the file path directory in File Explorer. Press the Windows key + E to open File Explorer, locate the affected file, and copy the file path from the adress bar at the top of the window.
Now right-click the Windows Start button and select Command Prompt (Admin) or Windows Terminal (admin). To navigate to the file directory of your file in use, enter cd [directory path you copied] and hit Enter.
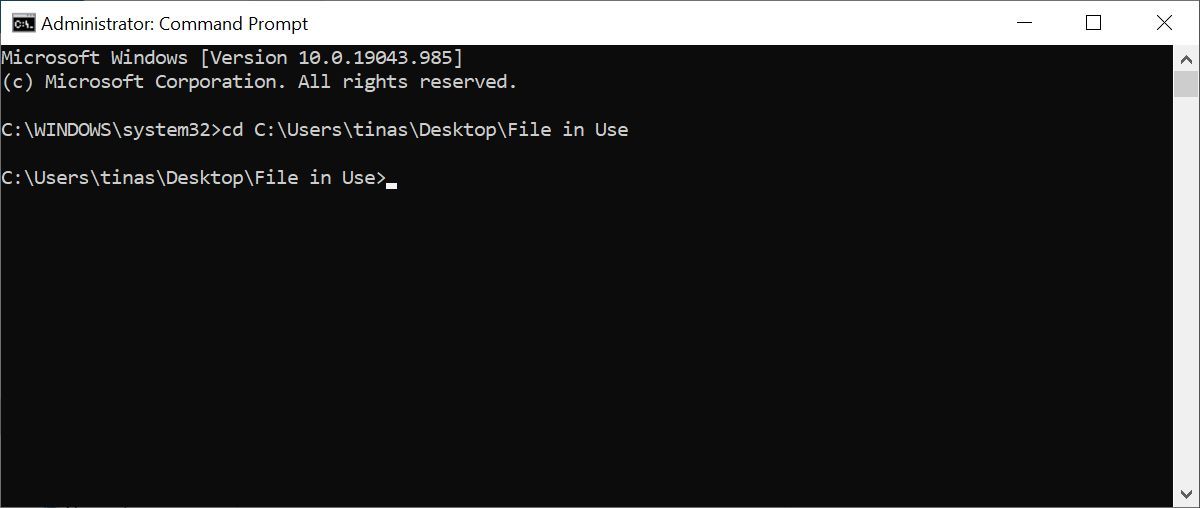
Before we can force delete the file in use, though, we have to temporarily kill the File Explorer process. This will cause your Taskbar, wallpaper, and open folders to disappear. But don’t worry, you can easily restart File Explorer and get everything back after.
- To close File Explorer, press Ctrl + Shift + ESC to open Task Manager.
- Find Windows Explorer in the list and right-click the process. Select End task.
- Return to the Command Prompt window where you entered the command before.
- Enter the command below to delete the file, replacing everything between the quotes with the actual file name:
del "file name"
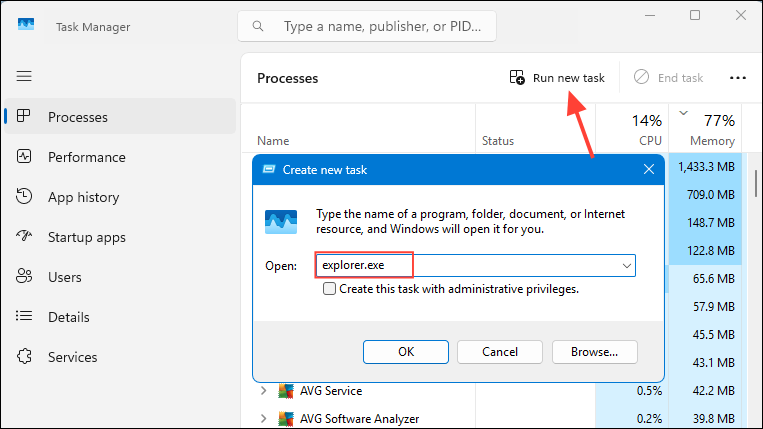
Now, to restart the File Manager all you need to do is open the Task Manager (Ctrl + Shift + ESC). Then click File > Run new task, enter explorer.exe, and click OK. This should restore your desktop to its usual appearance.
If trying to delete the file manually didn’t work or if you aren’t comfortable using Command Prompt, you can always use Microsoft’s Process Explorer
It is a more powerful version of the Task Manager that can show you which process took your file hostage.
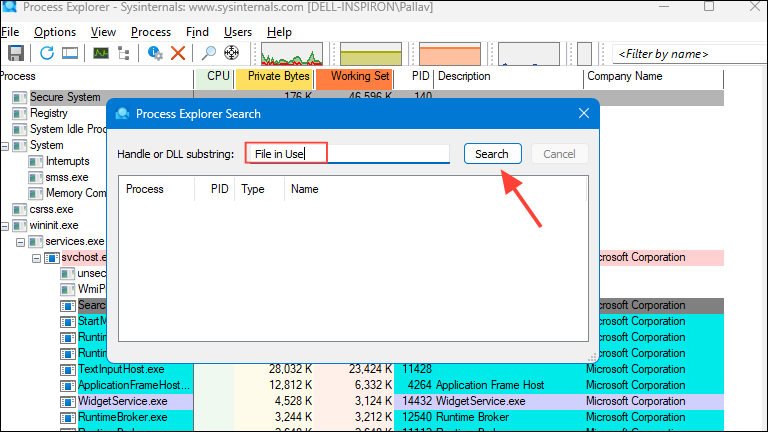
Open Process Explorer’s Search window by clicking on Find > Find Handle or DLL (or press Ctrl + Shift + F), enter the file name, and wait for the list of processes accessing your file.

You can’t close the process from the Search window, but you can use Process Explorer or Windows Task Manager to close the offending application. There are also alternatives, such as Unlocker and LockHunter, which can help you identify bothersome processes.
7
Boot Into Safe Mode
Sometimes, the file you’re trying to delete may automatically be loaded by another application. Apps like Unlocker should still work if that’s the case. However, if malware is involved or if you don’t want to deal with third-party tools, then booting into Safe Mode is your next best bet.
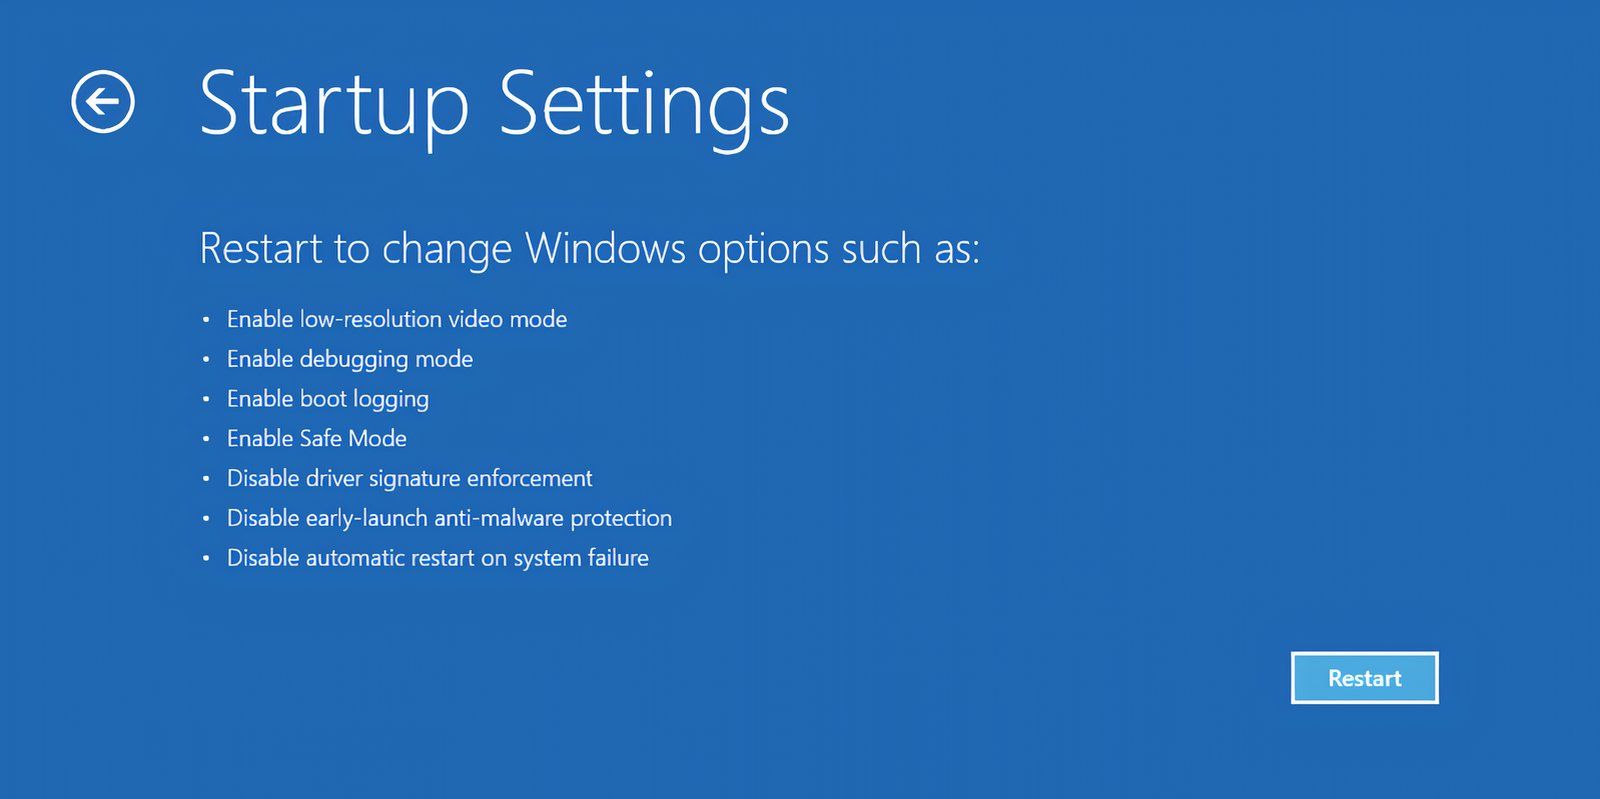
In Windows 10 or 11, press the Win key on your keyboard and click the Power icon. Hold the Shift key and select the Restart option. Your PC will boot to the Windows Recovery Environment (WinRE) page.
From the next screen, select Troubleshoot > Advanced Options > Startup Settings > Restart. When your computer reboots, you’ll see the Startup Settings screen. Choose Safe Mode and wait for Windows to boot up.
Once you’re in Safe Mode, navigate to the file in question and try to access or delete it.
Now, the next time Windows tells you a file is in use, you know how to free it up or force your PC to delete it. If you aren’t comfortable with third-party tools, you can always use Command Prompt, or boot into Safe Mode to help clear out any issues with the file in question.
Sometimes, when you try to delete a file in Windows, you may see a ‘File in use’ notification, which prevents you from deleting that file. In many cases, you will also not be able to open, move, or rename that file. This is because an application or process is using the file. You may be able to see which program is using that file, or it may be a hidden process running in the background. In any case, if you want to delete that file or modify it in any other way, there are a few methods by which you can do so successfully.
Method 1: Identify the program manually and close it
The simplest method of getting rid of the ‘File in use’ error is to determine which program is using it and close it. You may have opened the file and forgotten to close it. If you have closed the file, try closing the program with which you opened the file and then check whether you can delete the file.
It can also happen that you have opened multiple instances of the file, and have closed some of them but not all. Take a look at the taskbar and see whether the file is minimized and close all the instances before trying to delete it again. If you don’t remember which application you used to open the file, or cannot identify it, close all open programs and then try to delete the file again.
Method 2: End the process or application using Task Manager
You can use the Windows Task Manager built into the OS to check running processes and applications and close them from there.
- Right-click on the taskbar and select ‘Task Manager’ or use the
Ctrl+Shift+Esc/Ctrl+Alt+Delshortcuts to launch it.

- The Task Manager should launch with the ‘Processes’ tab selected by default. If it is not, click on the tab on the left to select it.
- Look for the program you use to open the file on the right side. For instance, you may have opened a PDF file in Microsoft Edge. So, right-click on Edge and then select ‘End task’.
- You can close all the programs you think might be using the file in this manner.
Method 3: Change the process settings in File Explorer
The Windows File Explorer opens all windows with a single ‘explorer.exe’ process by default but may sometimes start multiple processes due to certain settings on your system. If the file you want to delete is being used by any of these processes, you won’t be able to delete it. So, you will need to change the process settings in File Explorer.
- Open File Explorer, click on the three dots at the top next to ‘View’, and then click on ‘Options’.
- When the Options dialog box appears, go to the ‘View’ tab and disable the ‘Launch folder windows in a separate process’ option by clicking the checkbox next to it so it is not checked.
- Click on the ‘Apply’ button and then try deleting the file again.
Method 4: Turn off the Preview pane in File Explorer
If you’ve enabled the Preview pane in File Explorer to see file previews, it can also result in the ‘File in use’ error. Disabling it might get rid of the issue.
- Open File Explorer, click on ‘View’, and check that the ‘Preview pane’ is not selected. If it is, click on it again to disable it.
- Now, try deleting the file again and see if it works.
Method 5: Use Command Prompt to force delete the file
Command Prompt lets you force delete a file if you cannot do so using File Explorer.
- Open File Explorer and navigate to where the file you want to delete is located.
- Click on the address bar and copy the path to the file.
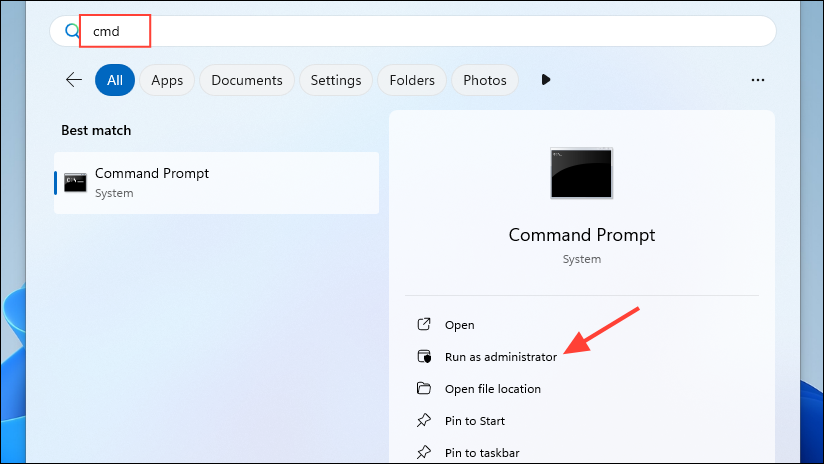
- Open the Start menu, type
cmdand click on ‘Run as administrator’.
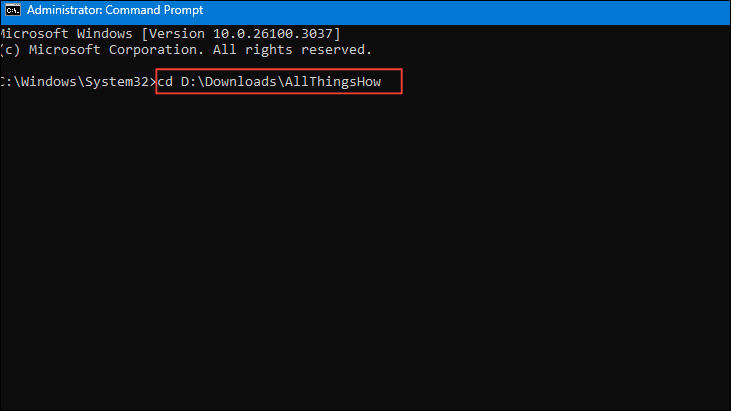
- When the Command Prompt window opens, type
cdfollowed by the path you copied and hit Enter.
- Now, open the Task Manager as explained earlier and right-click on ‘Windows Explorer’ before selecting ‘End task’.
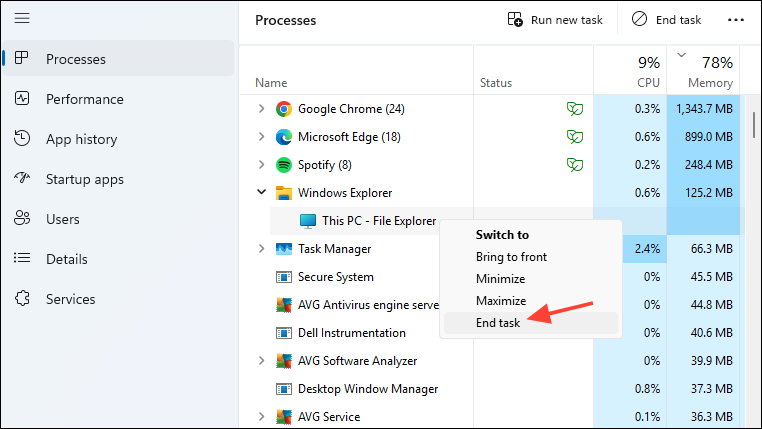
Note: If you do not see the ‘End task’ option directly, click on File Explorer to expand it. Then right-click on ‘This PC — File Explorer’ and you should see the ‘End task’ option.
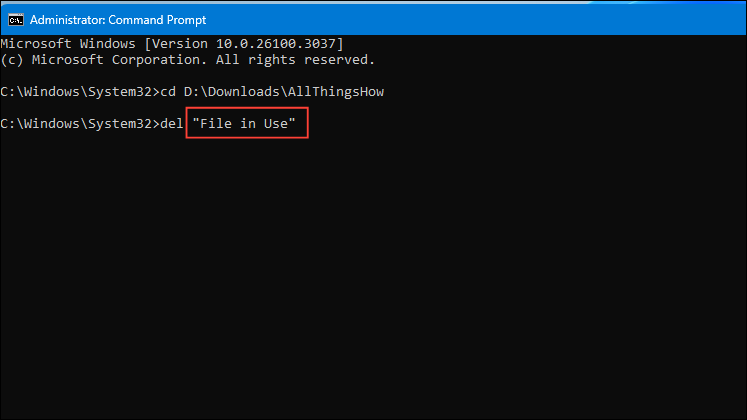
- Return to the Command Prompt window and type
del "file name"before hitting Enter to force delete the file. Replace ‘file name’ with the name of your file.
- Once the file is deleted, use the
Ctrl+Shift+Escshortcut to launch the Task Manager. - When the Task Manager opens, click on ‘Run new task’ and type
explorer.exeto restart File Explorer.
Method 6: Identify the program using the file with Resource Monitor
Resource Monitor is a built-in utility in Windows that shows you how different applications and processes are using the available resources. It can also help you find out which program is using the file you want to delete.
- Open the Start menu, type
resource monitor, and click on ‘Resource Monitor’ in the search results.

- When the Resource Monitor opens, go to the ‘CPU’ tab at the top and click on ‘Associated Handles’ to expand the section.
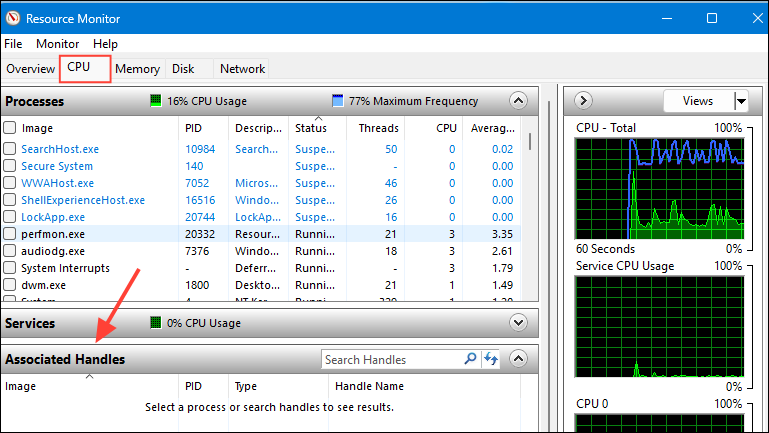
- Enter the name of the file you want to delete in the search box and Resource Monitor will show you all the processes using it currently.
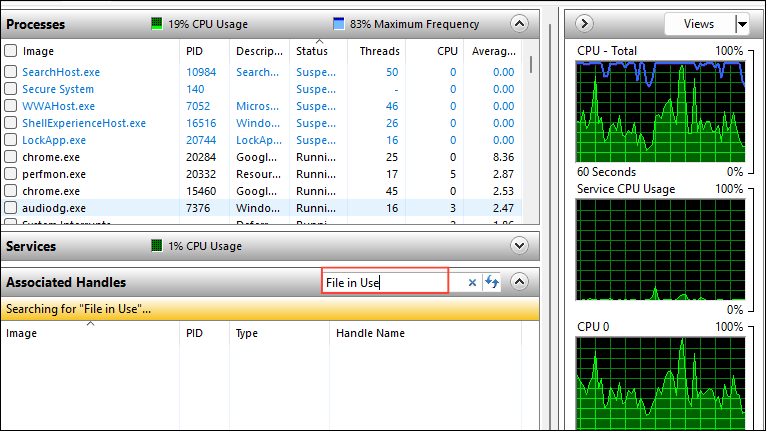
- You can stop the processes using the file by right-clicking on each process and selecting ‘End task’. Then go to the file and try to delete it.
Method 7: Use the Process Explorer to unlock the file
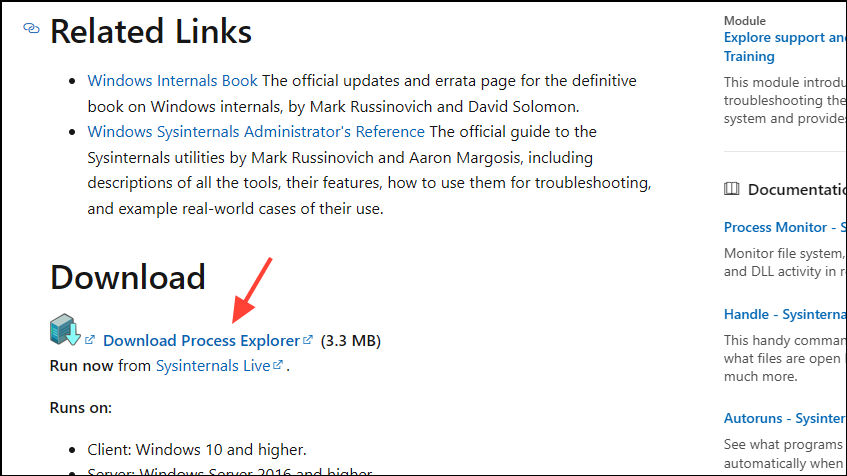
Microsoft’s Process Explorer is another tool that can help you free up the file you want to delete from whatever program or process is using it. However, it is not installed by default on Windows, so you will have to get it from Microsoft’s website.
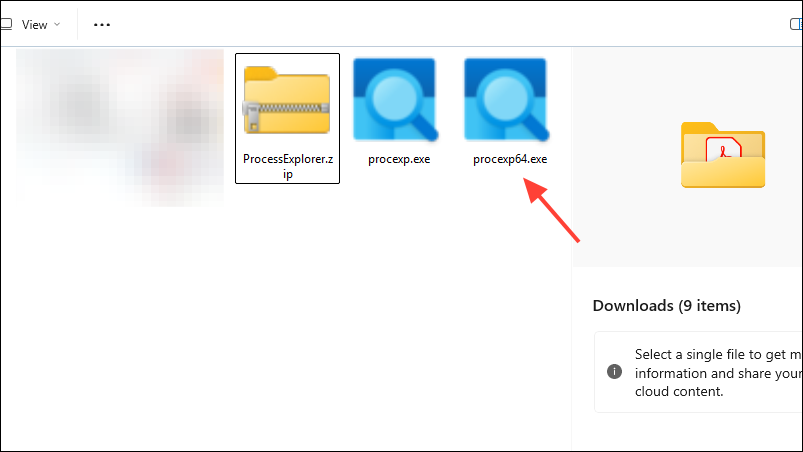
- Go to the Process Explorer download page and click on ‘Download Process Explorer’. This will download the tool as a zip file containing three .exe files.
- Once the .zip file is downloaded, extract it and open the .exe file which is compatible with your system.
- You will need to agree to the terms after which the Process Explorer will launch. Click on ‘Find’ at the top and then on ‘Find Handle or DLL’. Alternatively, you can use the
Ctrl+Shift+Fshortcut.
- Type in the name of the file you want to delete and click on the ‘Search’ button. The tool will show you the processes that are currently using the file.
- Once you find the process or application using the program, you can end it using the Task Manager. This should let you delete the file.
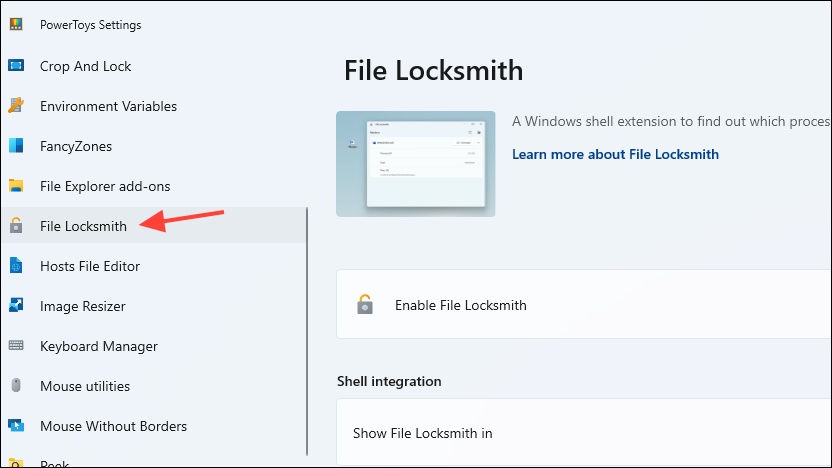
Method 8: Unlock the file using Powertoys
Powertoys is a powerful tool that can help you unlock the file you want to delete from whatever program is using it.
- Download Powertoys from the Microsoft Store.
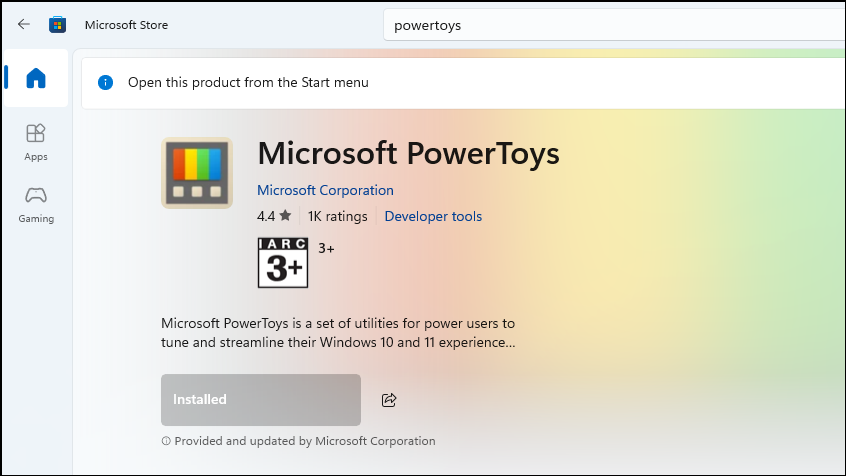
- Once Powertoys is installed, launch it from the Start menu and click on ‘File Locksmith’ on the left.
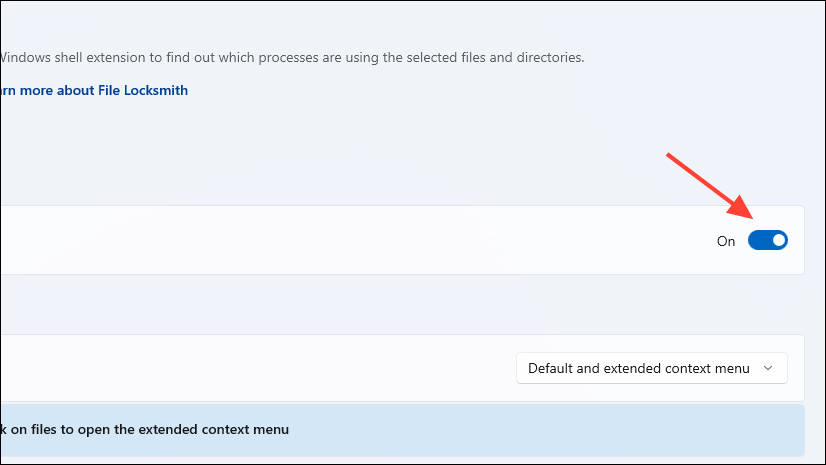
- Then click on the toggle on the right to enable File Locksmith.
- Head to the file you want to delete, right-click on it, and select ‘Unlock with File Locksmith’.
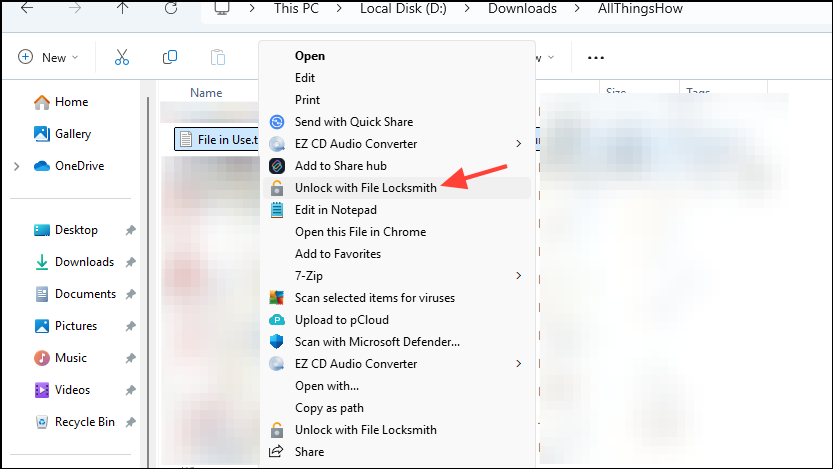
- You can directly close the program using the file from here by clicking on ‘End task’. Then you can try to delete the file again.
Method 9: Delete the file in Safe Mode
If you cannot delete the file using the above methods and do not wish to rely on third-party tools, booting into Safe Mode might help.
- Press and hold the
Shiftkey and restart your computer. - Your PC will boot into the Windows Recovery Environment. Click on ‘Troubleshoot’ and then on ‘Advanced Options’.
- On the Advanced Options page, click on ‘Startup Settings’ before clicking on the ‘Restart’ button.
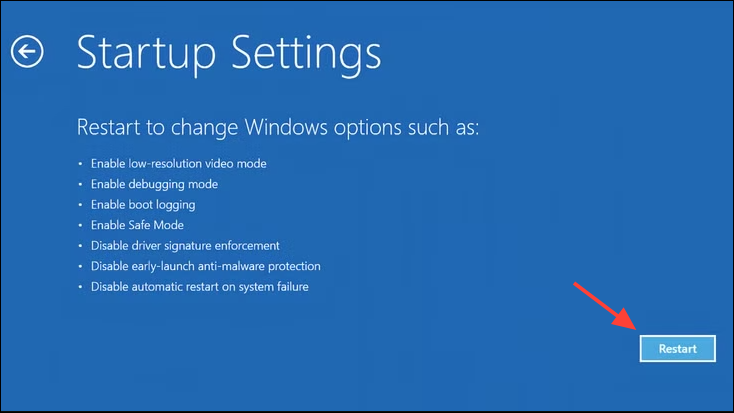
- Select ‘Safe Mode’ and let your PC boot up. Then go to the file and try deleting it.
Things to know
- Third-party tools like Unlocker and LockHunter can also help you unlock the file from the program using it so you can easily delete it.
- If you can successfully unlock the file you want to delete but cannot delete it, consider rebooting your PC and then trying again. This will end all unnecessary processes and give your computer a fresh start, which may help fix the problem.
- Handle is the command-line form of Process Explorer and can help you identify which application or process is using a particular file using Windows Powershell. However, using Process Explorer is much easier for most people.
- Make sure force-closing an application or ending a running process is safe before you do so. Ending a process while it is using your file can damage the file and make it unusable. You may want to create a backup of the file just in case something goes wrong when you stop the application using it and delete the file.