Windows defender заблокирован системным администратором

При открытии отдельных параметров встроенного антивируса Windows 11 и Windows 10, известного как Microsoft Defender или Защитник Windows, вы можете увидеть сообщение «Страница недоступна. Ваш системный администратор ограничил доступ к некоторым областям этого приложения, в том числе к элементу, к которому вы пытаетесь получить доступ».

В этой инструкции подробно о способах исправить ситуацию и получить доступ к нужным настройкам, а также о том, почему это может происходить.

Возможные причины
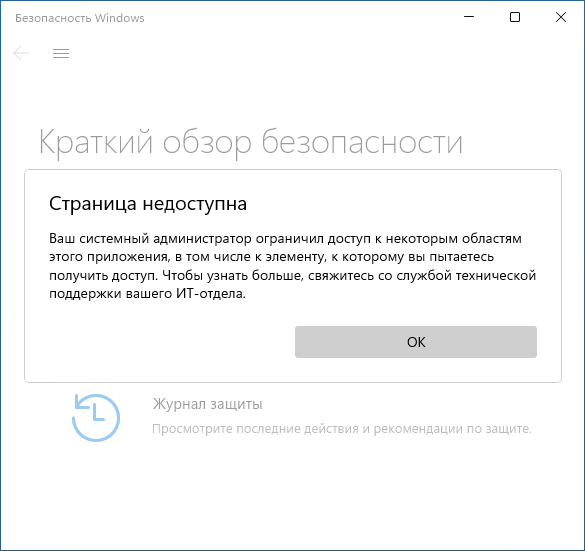
Сообщение Ваш системный администратор ограничил доступ к некоторым областям этого приложения в окне Безопасность Windows

Сначала о возможных причинах, по которым пользователь может получать сообщение о том, что «администратор ограничил доступ к некоторым областям этого приложения» в «Безопасность Windows»:

  • Был установлен сторонний антивирус, заблокировавший часть функций и настроек Microsoft Defender. Обычно это выполняется в целях обеспечения стабильной работы и в такой ситуации, возможно, не следует предпринимать каких-либо действий.
  • Вы использовали какие-либо средства для отключения Защитника Windows 11 и Windows Как и в предыдущем случае: если это было сделано вами целенаправленно, может иметь смысл оставить всё как есть.
  • Вами или сторонним ПО на компьютере (иногда — вредоносным) были настроены локальные политики Microsoft Defender, отключающие доступ к отдельным его параметрам.
  • Политики, ограничивающие доступ к настройкам, действительно были настроены вашим системным администратором (если речь идёт о компьютере организации). В такой ситуации, если есть необходимость в изменении параметров, возможно, действительно следует обратиться к системному администратору.

Не исключены и другие сценарии появления проблемы, например, в какой-либо «сборке» Windows соответствующие политики могут быть настроены изначально.

Для выполнения всех далее описанных действий вы обязательно должны иметь права администратора на компьютере. Если это не так, потребуется либо зайти под учетной записью администратора, либо каким-то образом получить необходимые права, например, включив скрытую системную учетную запись «Администратор».

Способы снять ограничения доступа в Microsoft Defender

Почти во всех случаях ограничения в окне «Безопасность Windows» задаются политиками Microsoft Defender, изменить которые можно в редакторе локальной групповой политики (если у вас Windows 11/10 Pro или Enterprise) или редакторе реестра (для любой версии Windows).

Прежде чем приступать, рекомендую проверить, есть ли точки восстановления системы на дату, когда проблемы ещё не было. Если есть — используйте их в первую очередь, а уже затем переходите к далее описанным подходам к решению. В частности, это может помочь, когда причиной ошибки стали обновления системы безопасности Windows, прецеденты чему уже были.

Windows Powershell (Терминал Windows)

Перед тем как прибегать к далее описанным методам решения проблемы, попробуйте следующий быстрый метод решения, иногда он оказывается работоспособным:

  1. Закройте окно «Безопасность Windows».
  2. Запустите Windows PowerShell или Терминал Windows от имени администратора, сделать это можно через меню по правому клику на кнопке Пуск.
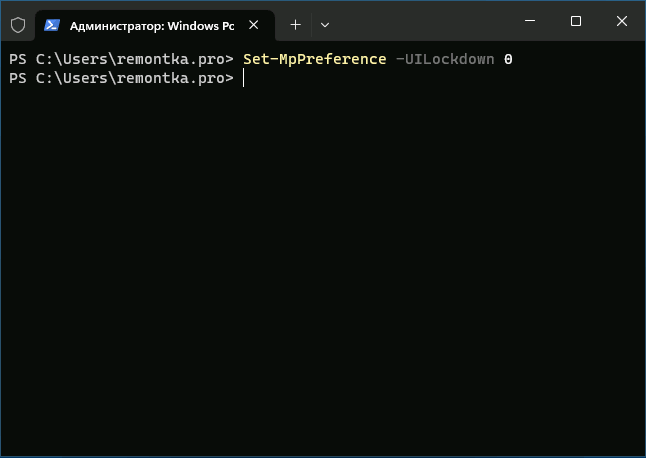
  3. Введите команду
    Set-MpPreference -UILockdown 0

    и нажмите Enter.

    Отключение блокировки интерфейса в окне Безопасность Windows

После успешного выполнения команды закройте окно консоли и проверьте, была ли решена проблема.

В реестре

Рекомендую начать с редактора реестра:

  1. Нажмите правой кнопкой мыши по кнопке «Пуск», выберите пункт «Выполнить», введите regedit и нажмите Enter.
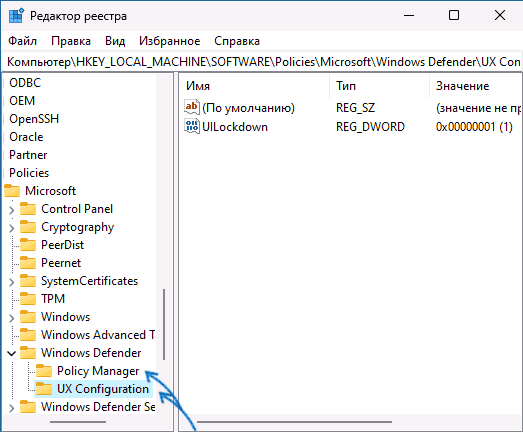
  2. В редакторе реестра перейдите к разделу
    HKEY_LOCAL_MACHINE\SOFTWARE\Policies\Microsoft\Windows Defender\
  3. По умолчанию в этом разделе должен быть лишь один подраздел — Policy Manager, при этом пустой. Если в нём есть значения кроме «По умолчанию» — удалите их (выбираем значение, правый клик — удалить). Если в этом расположении есть другие подразделы, например, UX Configuration — удалите их тоже.
    Политики Microsoft Defender в редакторе реестра

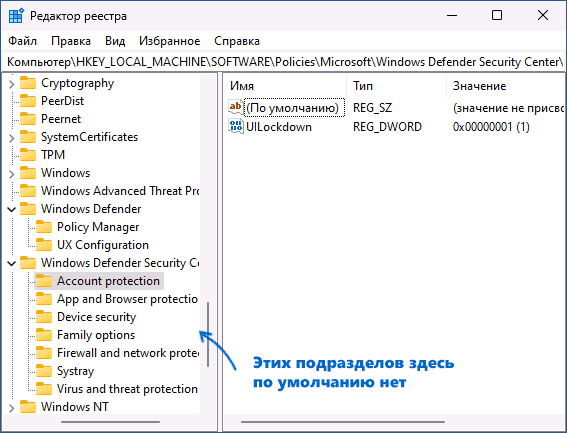
  4. Проверьте, существует ли раздел реестра
    HKEY_LOCAL_MACHINE\SOFTWARE\Policies\Microsoft\Windows Defender Security Center\

    Если он присутствует в реестре и содержит какие-либо значения или подразделы, удалите их тоже.

    Ограничения интерфейса Безопасности Windows в редакторе реестра

  5. Закройте редактор реестра и перезагрузите компьютер, затем проверьте, решило ли это проблему.

В ситуации, когда после перезагрузки компьютера проблема не решена, при этом какие-то из указанных разделов или значений реестра вы удаляли, проверьте: не появились ли они снова.

Если вы снова их там наблюдаете, при этом речь идёт о личном компьютере с личной учётной записью, есть вероятность что какое-то стороннее программное обеспечение добавляет эти изменения в реестр. Возможно, это антивирус, а возможно — наоборот. Если есть подозрения о наличии чего-то вредоносного, имеет смысл выполнить проверку с помощью таких средств как Dr.Web CureIt!, AdwCleaner и других.

В редакторе локальной групповой политики

В Windows 11 и Windows 10 Pro или Enterprise, можно использовать редактор локальной групповой политики для проверки настроенных политики и их отключения:

  1. Нажмите клавиши Win+R на клавиатуре, введите gpedit.msc и нажмите Enter.
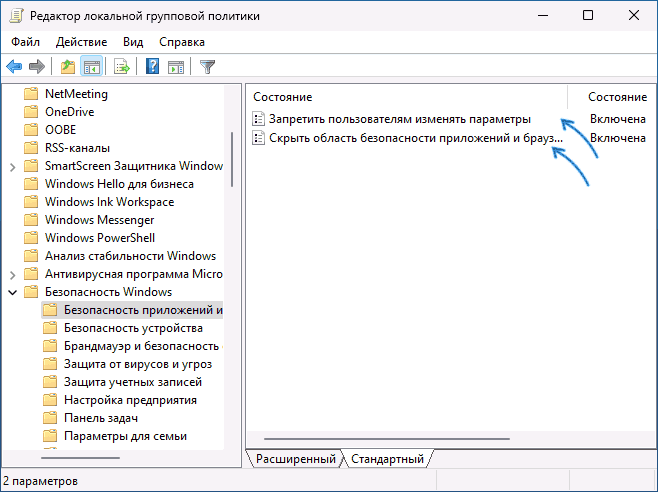
  2. В редакторе локальной групповой политики перейдите в раздел «Конфигурация компьютера» — «Административные шаблоны» — «Компоненты Windows».
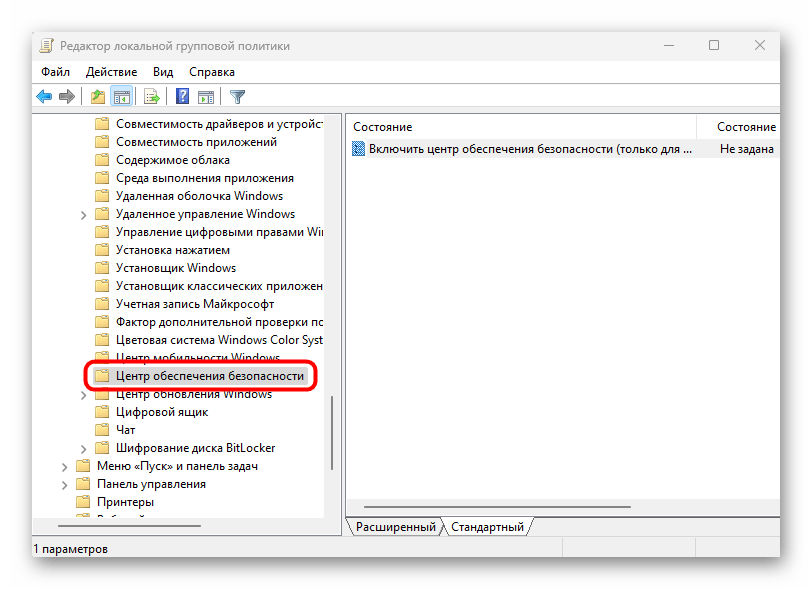
  3. Поочередно зайдите в подразделы «Безопасность Windows», «Центр обеспечения безопасности», «Антивирусная программа Microsoft Defender» и изучите политики в этих разделах и их подразделах: по умолчанию состояние всех должно быть «Не задана». Если для каких-то из политик вы видите «Включена» или «Отключена», дважды нажмите по такой политики и установите «Не задано», примените настройки.
    Политики Microsoft Defender в редакторе локальной групповой политики

  4. После выполнения этих действий, перезагрузите компьютер и проверьте, решило ли это проблему.

Также здесь может оказаться полезным материал: Как сбросить локальные групповые политики и политики безопасности в Windows.

Удаление всех настроенных политик, имеющих отношение к Защитнику Windows и не только к нему

При отсутствии желаемого результата после выполнения описанных выше шагов можно попробовать удалить вообще все настроенные политики из реестра.

Учитывайте, если в них было настроено что-то полезное, оно также будет потеряно, возможны и нежелательные последствия. Выполняйте эти действия только под свою ответственность. Желательно создать точку восстановления системы перед выполнением далее описанных действий.

Запустите командную строку от имени администратора, затем по порядку введите следующие команды, нажимая Enter после каждой. Выполнение некоторых из указанных команд может завершаться с ошибкой, в этом случае просто переходим к следующей.

reg delete "HKLM\Software\Microsoft\Windows\CurrentVersion\Policies" /f
reg delete "HKLM\Software\Microsoft\WindowsSelfHost" /f
reg delete "HKLM\Software\Policies" /f
reg delete "HKLM\Software\WOW6432Node\Microsoft\Policies" /f
reg delete "HKLM\Software\WOW6432Node\Microsoft\Windows\CurrentVersion\Policies" /f
reg delete "HKLM\SOFTWARE\Policies\Microsoft\Windows Defender" /v
reg delete "HKLM\SOFTWARE\Policies\Microsoft\Windows Defender Security Center" /v
reg delete "HKCU\Software\Microsoft\Windows\CurrentVersion\Policies" /f
reg delete "HKCU\Software\Microsoft\WindowsSelfHost" /f
reg delete "HKCU\Software\Policies" /f
reg delete "HKLM\Software\Microsoft\Policies" /f

Перезагрузите компьютер после выполнения команд и проверьте, была ли решена проблема.

Если описанные выше варианты не сработали, можно попробовать следующие подходы:

  • Запустить Терминал Windows или Windows PowerShell от имени администратора по правому клику на кнопке Пуск и выполнить команду
    Get-AppxPackage Microsoft.SecHealthUI -AllUsers | Reset-AppxPackage
  • Скачать обновление KB5007651 из каталога обновлений Майкрософт и установить его.
  • Один из читателей в комментариях предлагает следующий способ, который помог не только ему: нажать Win+R, ввести secpol.msc, перейти в раздел Локальные политики — Параметры безопасности — Учётные записи: Состояние учетной записи Администратор, включить опцию.

Если есть основания полагать, что сообщение «Ваш системный администратор ограничил доступ к некоторым областям этого приложения» — результат работы вируса или другого вредоносного ПО, предпримите меры для его поиска и удаления. Здесь может оказаться полезной инструкция: Что делать, если вирус блокирует сайты, установку и запуск антивирусов.

На одном из компьютеров в настройках встроенного антивируса Windows Defender (Защитник Windows) пропала вкладка «Защита от вирусов и угроз», а при попытке открыть окно с настройками появилось сообщение:

Страница недоступна. Ваш системный администратор ограничил доступ к некоторым областям этого приложения, в том числе к элементу, к которому вы пытаетесь получить доступ. Чтобы узнать больше, свяжитесь со службой технической поддержки вашего ИТ-отдела.
Page not available. Your IT administrator has limited access to some areas of this app, and the item you tried to access is not available. Contact IT helpdesk for more information.

В моем случае в приложении Windows Security отсутствовала вкладка Virus and Threat Protection. Эта проблема встречается в версиях Windows 10 и 11 начиная с билда 22H2.
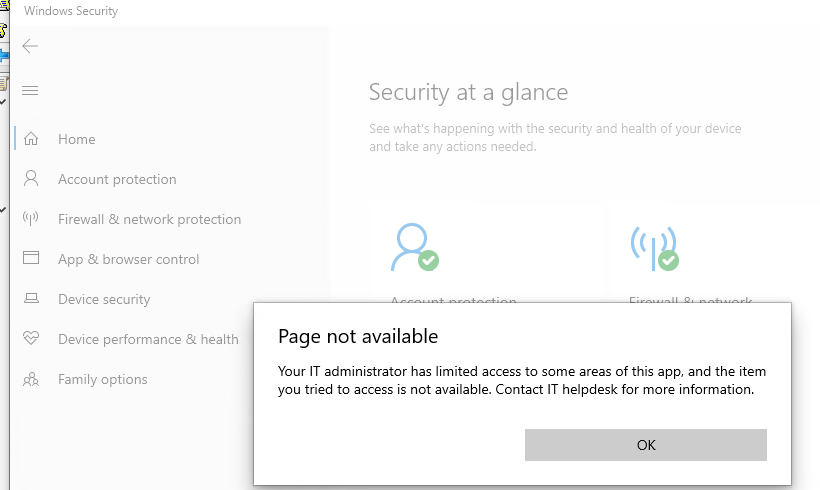
Не открывается настройки антивируса Windows Defedner

Это может произойти:

  • Если на компьютере установлен сторонний сертифицированный антивирус. В этом случае некоторые функции панели управления Security отключаются;
  • Параметры защитника Windows заданы администратором через групповые политики (выполните команду
    rsop.msc
    или
    GPResult /h GPResult.html & GPResult.html
    чтобы посмотреть примененные настройки GPO);
  • Включена блокировка графического интерфейса Защитника Windows

Чтобы проверить включена ли блокировка Windows Defender UI, выполните команду:

Get-MpPreference|select UILockdown

Чтобы разблокировать UI защитника выполните команду:

Set-MpPreference -UILockdown $false

Set-MpPreference -UILockdown - разблокировать графический интерфейс защитника Windows

После этого вкладка Virus and Thread у меня отобразилась в интерфейсе Windows Security.
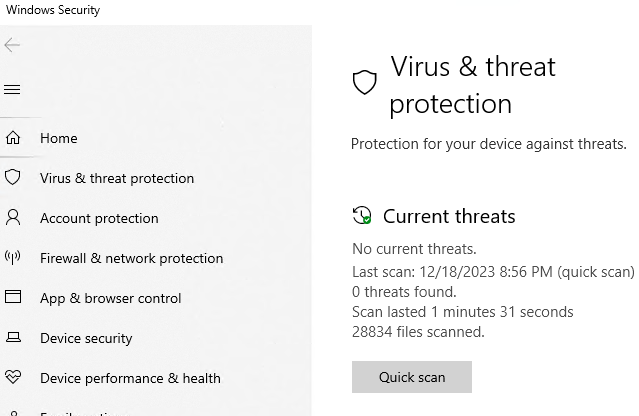
Показать вкладку Virus and Thread в Windows 10 и 11

Также можно заблокировать/разблокировать UI в Windows Defender через реестр. Если команда выше не помогла, проверьте следующее:

  1. Откройте
    regedit.exe
    ;
  2. Перейдите в HKLM\SOFTWARE\Policies\Microsoft\Windows Defender\
  3. Проверьте, что во вложенных ветках отсутствует параметра реестра UILockdown со значением 1;
  4. Если этот параметр присутствует, удалите его;
  5. Аналогично проверьте ветку HKLM\SOFTWARE\Policies\Microsoft\Windows Defender Security Center\Virus and threat protection и удалите параметр UILockdown, если имеется.
    Удалить параметр UILockdown Windows Defender в реестре

Этот параметр реестра может включаться политикой Hide the Virus and threat protection area in Windows Security в разделе редактора GPO (
gpedit.msc
) Computer Configuration -> Administrative Templates -> Windows Components -> Windows Security -> Virus and Thread Protection. Проверьте, что этот парамтер GPO не настроен или отключен.
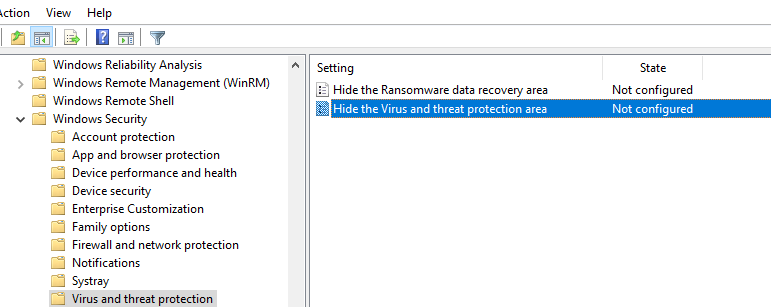
Параметр GPO: Hide the Virus and threat protection area in Windows Security

Если эта команда не помогла, попробуйте сбросить настройки приложения Безопасность Windows:

Get-AppxPackage Microsoft.SecHealthUI -AllUsers | Reset-AppxPackage

Если ни один из способов не помог попробуйте сбросить настройки Windows Defender в реестре, сбросить настройки локальной GPO, и перезагрузить компьютер:

reg delete "HKLM\SOFTWARE\Policies\Microsoft\Windows Defender" /v
reg delete "HKLM\SOFTWARE\Policies\Microsoft\Windows Defender Security Center" /v

RMDIR /S /Q "%WinDir%\System32\GroupPolicyUsers"
RMDIR /S /Q "%WinDir%\System32\GroupPolicy"

Table of contents

  • Causes of “This App Has Been Blocked by Your System Administrator”
  • How to Fix “This App Has Been Blocked by Your System Administrator”
    • Fix 1: Unblock the file
    • Fix 2: Disable Windows SmartScreen
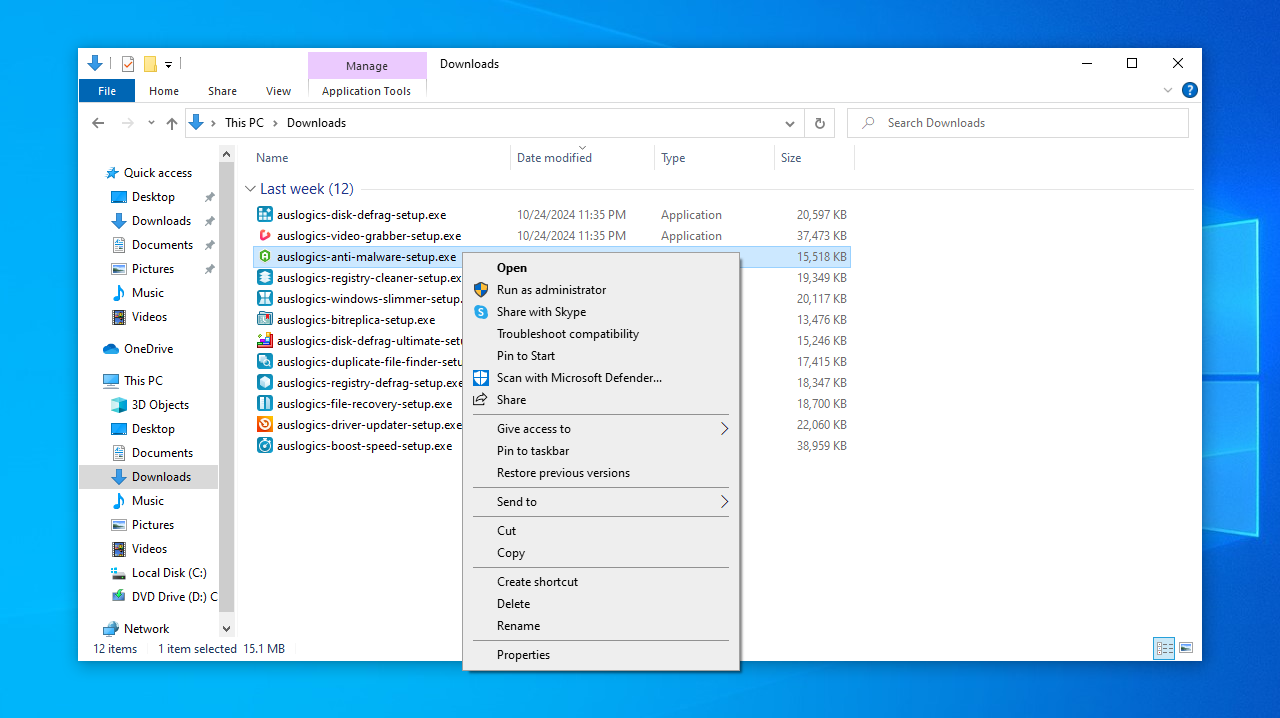
    • Fix 3: Run the file as administrator
    • Fix 4: Execute the file via the Command Prompt
    • Fix 5: Run the app using the hidden administrator account
    • Fix 6: Temporarily Disable Your Antivirus Program
    • Fix 7: Reset or repair a Microsoft Store app
    • Fix 8: Remove the admin block in the Windows Registry
    • Fix 9: Modify the Group Policy settings
  • “This App Has Been Blocked by Your System Administrator” Fixed
  • FAQ

This article will explore the causes of this issue and provide effective solutions.The notification that sometimes also manifests as “ An administrator has blocked you from running this app ” comes up when you try launching or installing a new program. It occurs due to the actions of Microsoft Defender and the User Account Control (UAC) software in trying to keep your PC safe from potential threats. That said, if you are not sure if the file you are trying to run is safe, it’s not advised to try and bypass the “ This app has been blocked by your system administrator ” message. However, if the message comes up even when you try installing and/or launching trusted software, then you may want to learn how to unblock apps to get that fixed.  But first, let’s explore the causes of the error message.

Causes of “This App Has Been Blocked by Your System Administrator”

The “ This app has been blocked by your system administrator ” error can be triggered by several reasons:

  • Lack of admin rights: One common cause is when the app doesn’t have the necessary administrative permissions to run.
  • Microsoft Defender settings: Microsoft Defender settings may block the app if it’s flagged as potentially unsafe.
  • SmartScreen: Windows SmartScreen may prevent the app from running if it’s not recognized as trusted.
  • Recent Windows updates: Sometimes, newly installed Windows updates may interfere with certain applications, leading to this error.
  • Antivirus software interference: Third-party antivirus programs may mistakenly identify the app as a threat and block it from running.

Now that we know what triggers the error, let’s find out how to unblock an app if an administrator has blocked you from running this app .

How to Fix “This App Has Been Blocked by Your System Administrator”

Fix 1: Unblock the file

Unblocking the file is the first step to take if you’re getting the “This app has been blocked by your system administrator” error. Follow these steps:

  • Right-click on the file to open the context menu.
  • From the context menu, select Properties.
  • In the Properties window, navigate to the General tab.
  • Locate and check the Unblock box within the General tab.
  • Click Apply and OK to close the Properties window.
  • Try running the file again to see if the error message persists.

Locate and check the <em>Unblock</em> box within the General tab » src=»https://www.auslogics.com/en/articles/wp-content/uploads/2024/03/0.png»></p>
<div class= Картинка с сайта: www.auslogics.com

Fix 2: Disable Windows SmartScreen

Windows has the SmartScreen feature, which is a cloud-based component that wards off phishing and malware attacks. It cross-references downloaded files against a list of programs and software websites that have been reported to be unsafe. You are also notified if the file you are trying to execute is not known to be trusted and popular amongst Windows users. To disable SmartScreen and see if it is behind the error, here’s what you have to do:

  • Press Windows key to open the Start menu.
  • In the search bar, type Smartscreen and select App and browser control from the results.
  • In the Windows Security Center that opens, go to Check apps and files (Reputation-based protection settings in Windows 11) and select Off.
  • Now, try running your file again to see if the issue has been fixed.

In the <em>search bar</em>, type smartscreen and select <em>App and browser control</em> from the results » src=»https://www.auslogics.com/en/articles/wp-content/uploads/2024/03/2.png»></p>
<div class= Картинка с сайта: www.auslogics.com

To avoid exposing your PC to malicious items, please ensure that you re-enable Windows SmartScreen after you’ve succeeded in running your file. Simply follow the steps indicated above, but select On instead of Off when you get to Step 3.

Fix 3: Run the file as administrator

Try running the file as administrator to resolve the “This app has been blocked by your system administrator” error. Here’s how:

  • Locate and right-click the file, then select Run as administrator.
  • Click Yes in the UAC window.
Click <em>Yes</em> in the <em>UAC</em> window » src=»https://www.auslogics.com/en/articles/wp-content/uploads/2024/03/%E2%80%98RaO%C2%ADc%C2%AEa-21-11-2024-100228.png»></p>
<div class= Картинка с сайта: www.auslogics.com

Fix 4: Execute the file via the Command Prompt

You can get through the error message by using the elevated Command Prompt to run your file. Simply follow these easy steps:

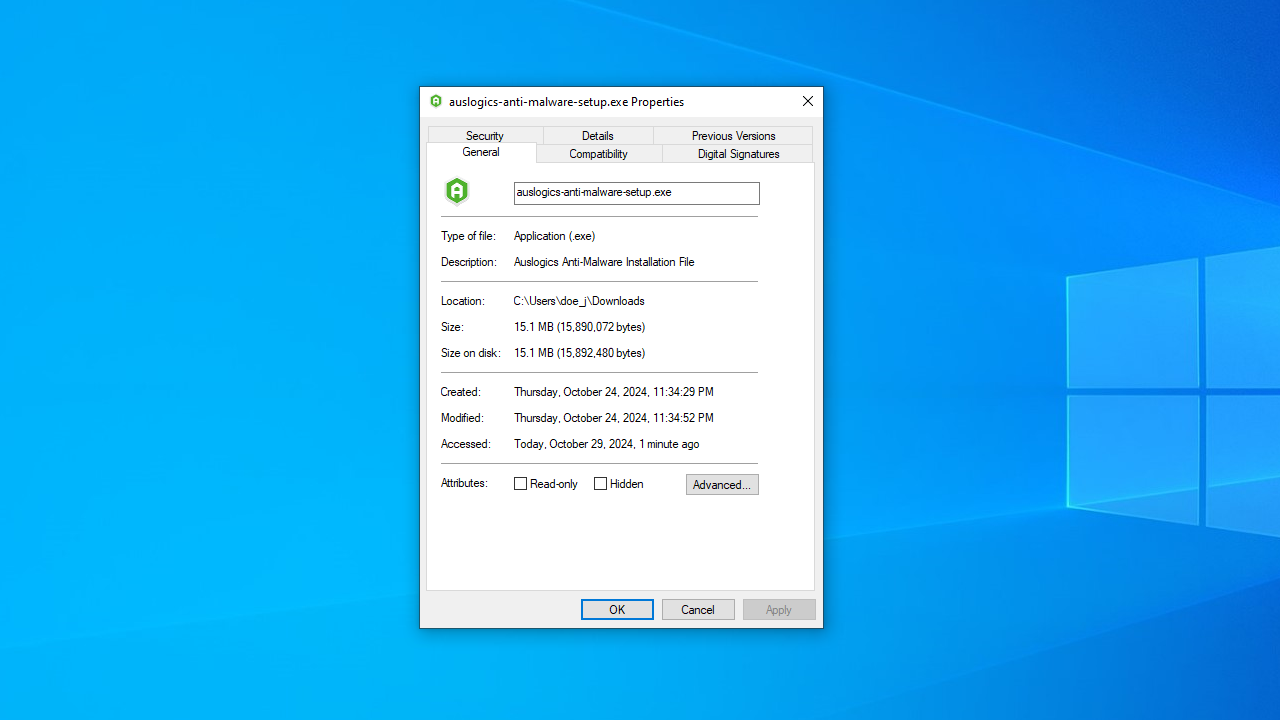
  • Right-click on the file and select Properties from the context menu.

Right-click on the file and select Properties from the context menu.

  • In the General tab, highlight and copy the entry under Location. For example, “C:\Users\Public\Downloads.”

In the General tab, highlight and copy the entry under Location.

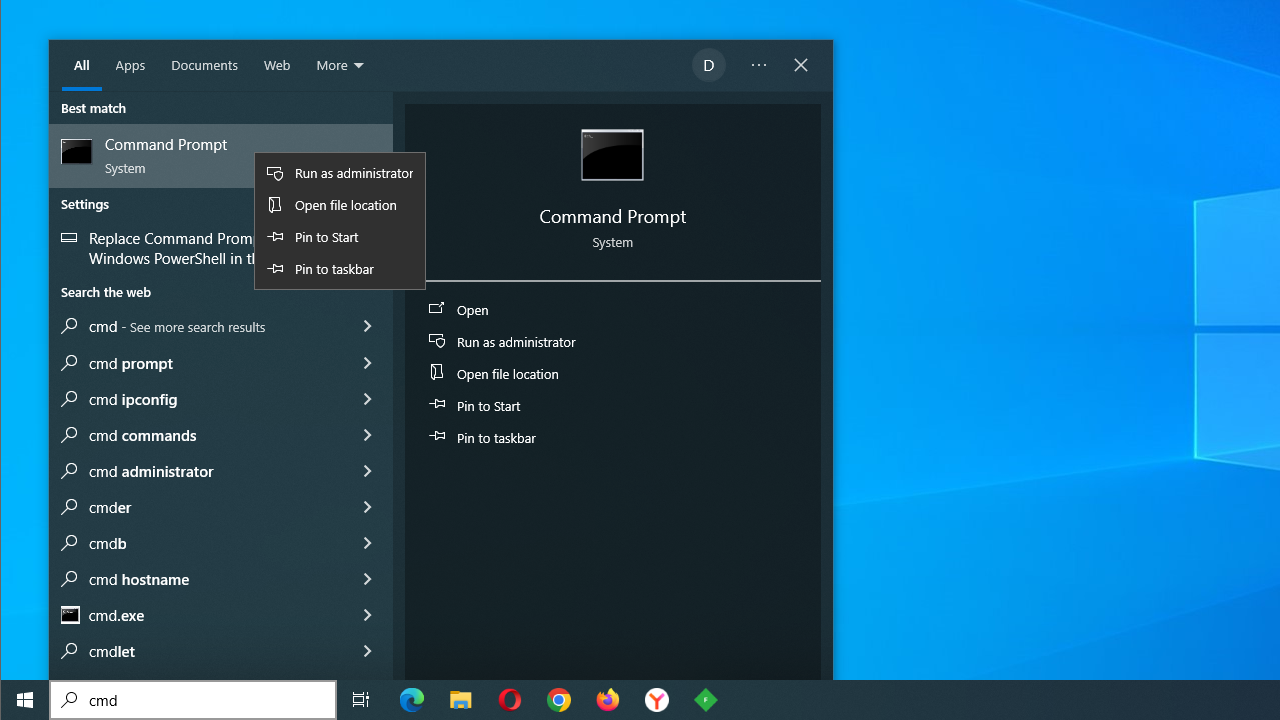
  • Now, in the search box, type cmd, right click the first option, and select Run as administrator from the menu.

Now, in the search box, type “cmd”, right click the first option, and select “Run as administrator” from the menu.

  • Paste the file location you copied in Step 2 in the elevated Command Prompt window.
  • Minimize the elevated Command Prompt and go back to the file’s Properties window (as shown in Step 1). Copy the name of the file (it is the entry in the box at the top of the page. For example, “auslogics-anti-malware-setup.exe”).
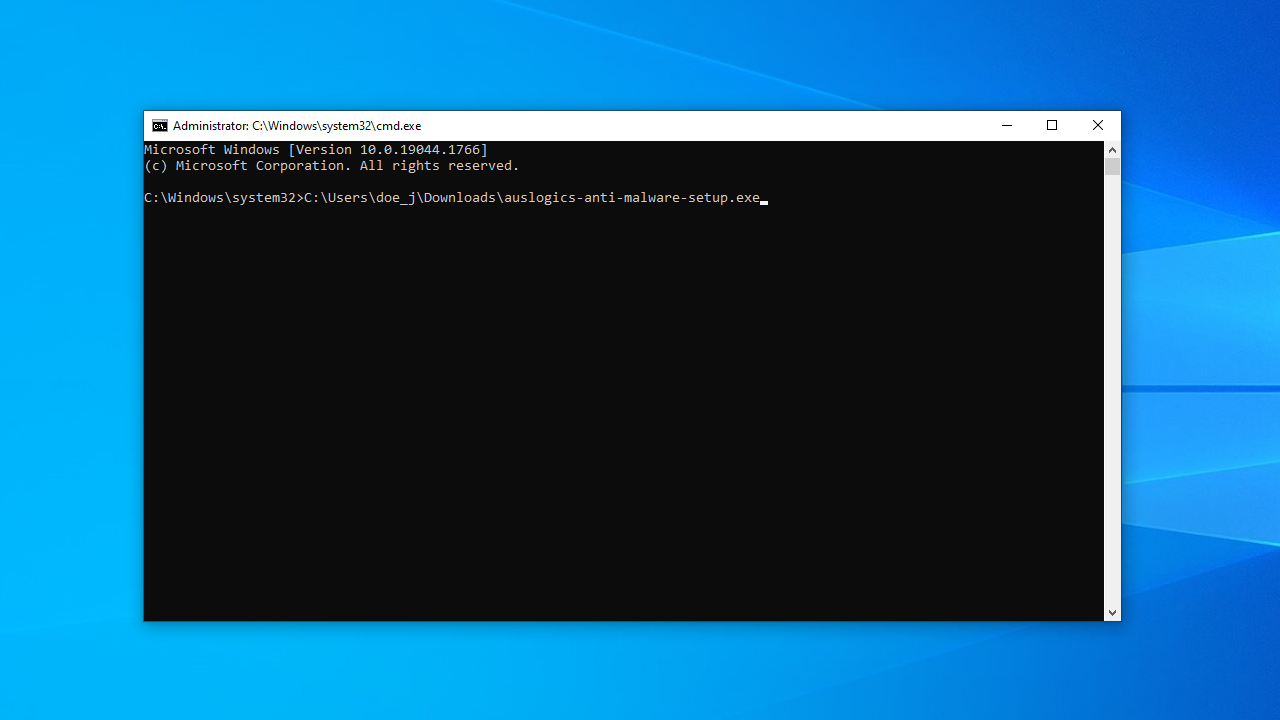
  • Maximize the elevated Command Prompt. Type “\” and then paste the entry you copied in Step 5. You will now have the location and name of the file. It should be something like this: “C:\Users\Public\Downloads\auslogics-anti-malware-setup.exe.”
  • Press Enter on your keyboard to execute the command. See if the error message will still appear.

Press Enter on your keyboard to execute the command.

Fix 5: Run the app using the hidden administrator account

Using the hidden administrator account might enable you to successfully run your application. Here’s what you have to do:

  • Run the Command Prompt as administrator by following the steps in the previous fix.

Now, in the search box, type “cmd”, right click the first option, and select “Run as administrator” from the menu.

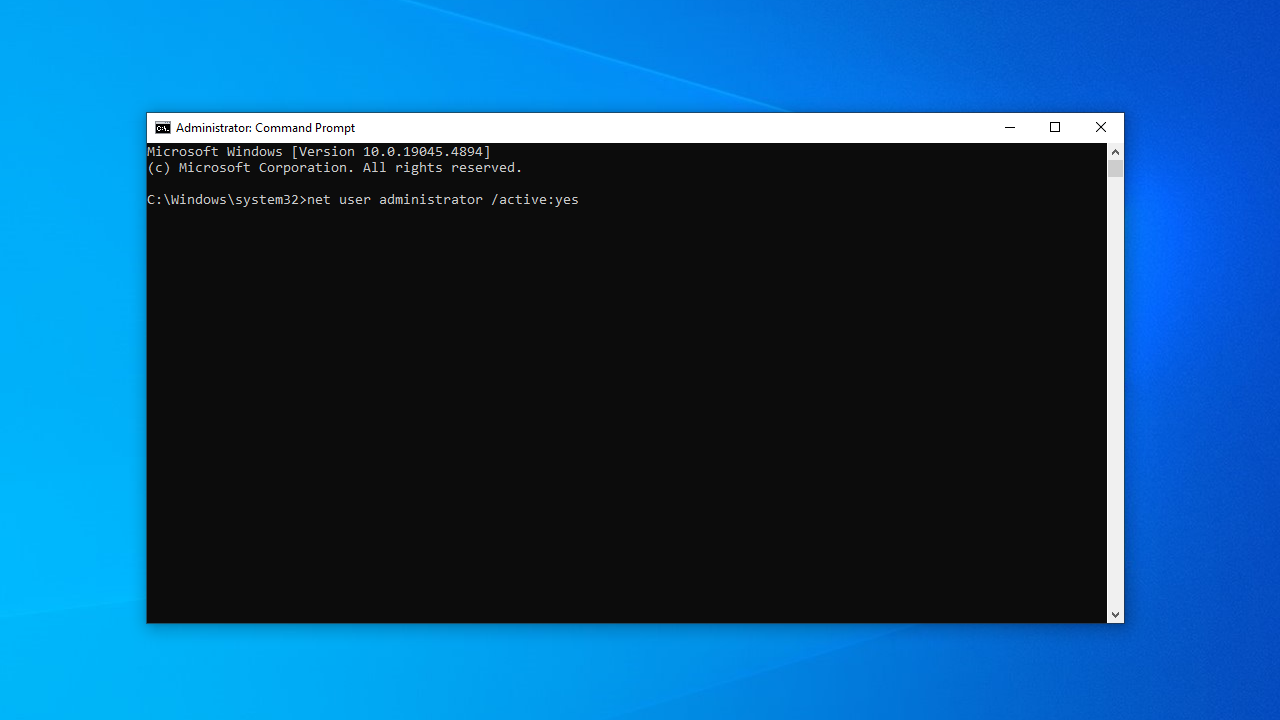
  • Copy and paste the following command in the elevated Command Prompt window and press Enter to execute it:
net user administrator /active:yes

Copy and paste the following command in the elevated Command Prompt window and press Enter to execute it

Once you’ve done so, the “The command completed successfully” confirmation should appear.

  • Sign out of your current user account. To do this, simply click the Windows icon displayed in the taskbar. Now click on your user logo and select “Sign out.”
  • Now, sign in to the administrator account.
  • Try running the file you were having issues with.

If you wish to disable the hidden administrator account after you’ve successfully executed the file, open the elevated Command Prompt, then copy and paste the following entry into the window, and then press Enter:

net user administrator /active:no

Fix 6: Temporarily Disable Your Antivirus Program

It may well be that it is the third-party antivirus program on your PC that is throwing up the “An administrator has blocked you from running this app” or similar message.

So, the first thing you have to do is to add an exception for the application you are trying to launch. To find this setting, we suggest consulting your antivirus program’s user manual or simply look it up on the web.

PRO TIP

You also have the option of completely disabling the antivirus software if you are unable to find a way of adding an exception for the problematic app. But keep in mind that it is important to have a strong and trusted security program active on your PC at all times to keep you safe from potential threats. In this regard, we recommend Auslogics Anti-Malware.

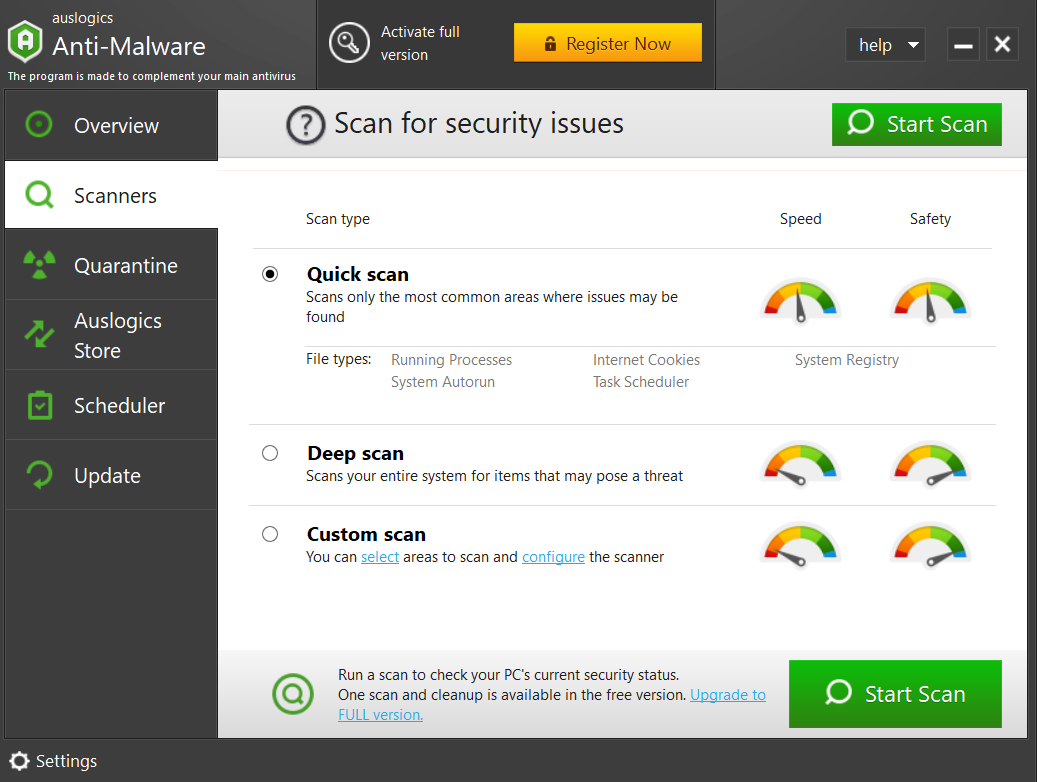
Scan for security issues with Auslogics Anti-Malware

Scan your PC for malware with the Auslogics Anti-Malware


Also Read:TOP-10 Cyber Security Threats: All You Need to Know


Fix 7: Reset or repair a Microsoft Store app

If it’s a Microsoft Store app that is triggering the “This app has been blocked by your system administrator” error, try resetting or repairing the app by following these steps:

  • Press Windows key + I to open the Settings app.
  • In the Settings window, navigate to Apps.
  • Click on Apps & features from the left sidebar (In Windows 11, select Installed apps).
  • Scroll through the list of installed apps to find the Microsoft Store app that’s causing the error.
  • Click on the app, then on Advanced options below the app’s name (In Windows 11, click on three vertical dots next to the app and select Advanced options).
  • In the Advanced options menu, you’ll see options to reset or repair the app. Choose either Reset or Repair depending on your preference. The reset option will revert the app to its default settings, while the repair option will attempt to fix any issues with the app.

Choose either <em>Reset</em> or <em>Repair</em> » src=»https://www.auslogics.com/en/articles/wp-content/uploads/2024/03/%E2%80%98RaO%C2%ADc%C2%AEa-21-11-2024-100018-copy.png»></p>
<div class= Картинка с сайта: www.auslogics.com

  • Follow any on-screen instructions that may appear to complete the reset or repair process.
  • After resetting or repairing the app, it’s a good idea to restart your PC to ensure the changes take effect.
  • Additionally, make sure the app is up to date by checking for updates in the Microsoft Store.

Fix 8: Remove the admin block in the Windows Registry

Removing the admin block through the Windows Registry is another proven solution to fix the “ This app has been blocked by your system administrator ” error. Here’s how to do it:

  • Press Windows key + R, type regedit and press Enter.
  • In Registry Editor, navigate to the following key:
HKEY_LOCAL_MACHINE\SOFTWARE\Microsoft\Windows\CurrentVersion\Policies\System 
  • Look for the entry named EnableLUA. Double-click on it and change its value to 0.
  • Close Registry Editor and restart your computer.
  • Check if the app can start now.
FIn Registry Editor, navigate to the following key HKEY_LOCAL_MACHINESOFTWAREMicrosoftWindowsCurrentVersionPoliciesSystem

Important

Tweaking registry settings is a risky business, where even a tiny typo can cause system instability and lead to unintended consequences. Proceed with this method only if you are absolutely confident about what you’re doing.


Related:What is the Windows Registry And Why Do You Need a Registry Cleaner?


Fix 9: Modify the Group Policy settings

If nothing else worked, try adjusting the Group Policy settings to disable Admin Approval Mode and other UAC policies. Note that this fix doesn’t work for Windows Home edition. If you own a Pro version, follow these steps:

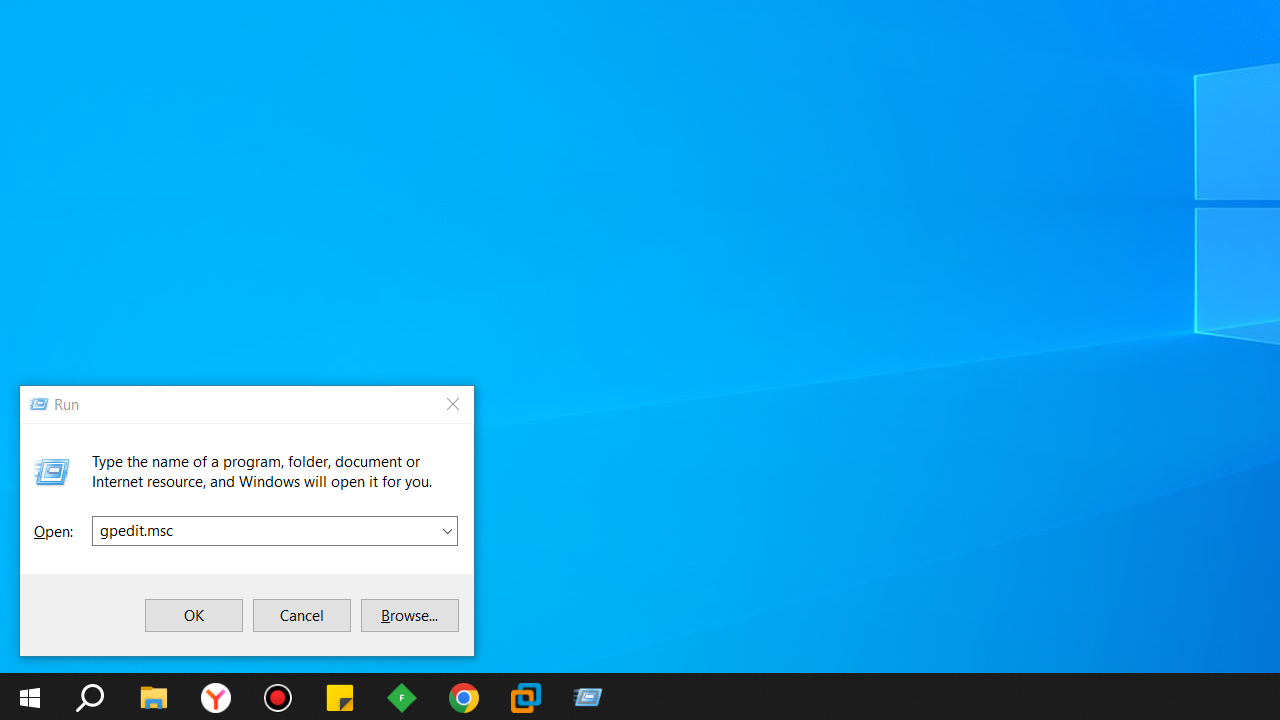
  • Press Windows key and R simultaneously to open the Run utility.
  • In the dialog box, type gpedit.msc and hit Enter to launch the Local Group Policy Editor.

Press Windows key and R simultaneously to open the Run utility. In the dialog box, type gpedit.msc and hit Enter to launch the Local Group Policy Editor.

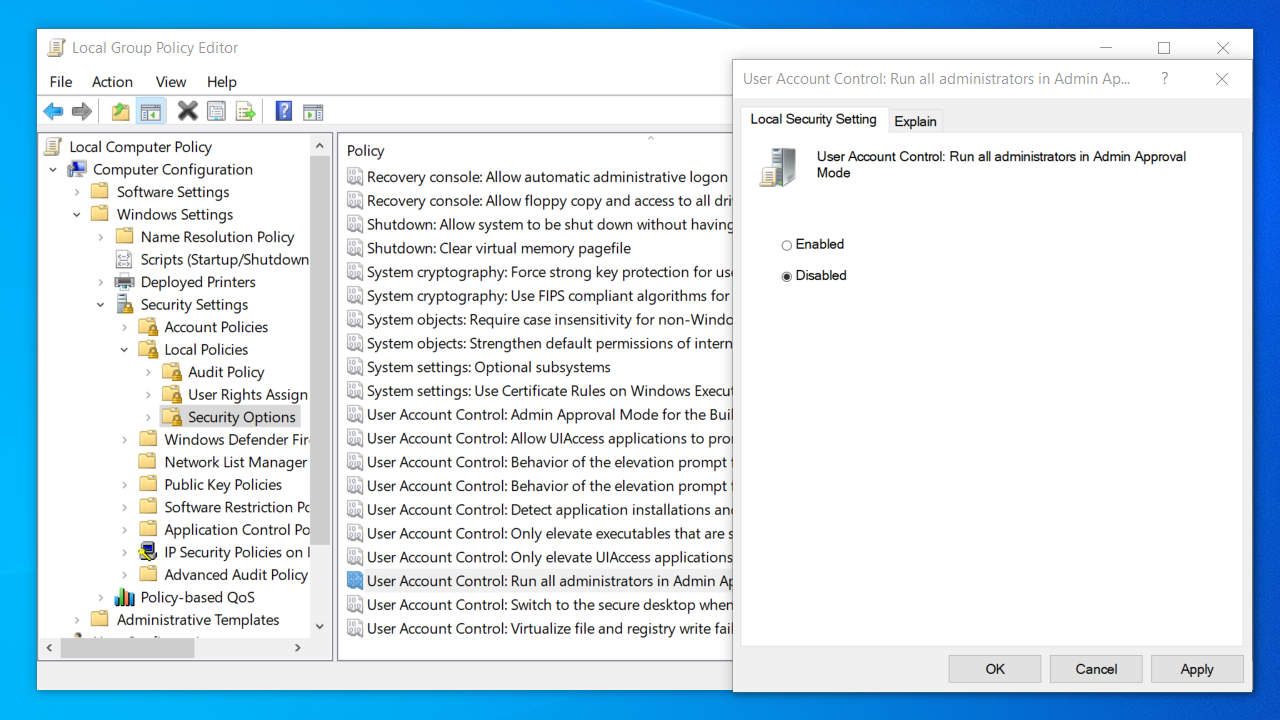
  • In the Local Group Policy Editor, go to the following path: Computer Configuration > Windows Settings > Security Settings > Local Policies > Security Options.
  • Double-click on the “User Account Control: Run all administrators in Admin Approval Mode” entry.
  • In the pop-up window, select the Disabled option.
  • Click on the Apply button, then close the window by clicking OK.

Click on the Apply button, then close the window by clicking OK.

  • Test whether you can run the file without encountering the error now.
“This App Has Been Blocked by Your System Administrator” Fixed

Now you know how to unblock an app if an administrator has blocked you from running this app. From simple fixes, like unblocking a file and disabling Windows SmartScreen, to complex ones, like making changes in the registry and Group Policy settings, now you have all the tools to get rid of the “This app has been blocked by your system administrator” error for good.
If you have any questions or thoughts, please feel free to drop them in the comments section below. We’d love to hear from you.

FAQ

Can I unblock an app without administrator privileges?

No, typically, you need administrator privileges to unblock an app. However, some methods may allow you to unblock certain apps without administrator privileges, depending on the security settings and permissions.

What should I do if I cannot unblock the app?

If you cannot unblock the app, try alternative methods such as running the app using the Command Prompt, disabling antivirus programs temporarily, or repairing/resetting the Microsoft Store app.

Can an app be blocked again after unblocking?

Yes, an app can be blocked again after unblocking, especially if it triggers security measures or violates system policies.

Источник

Все способы:

  • Способ 1: Удаление стороннего антивируса
  • Способ 2: Восстановление системы
  • Способ 3: Консоль
  • Способ 4: Редактирование реестра
  • Способ 5: «Редактор локальной групповой политики»
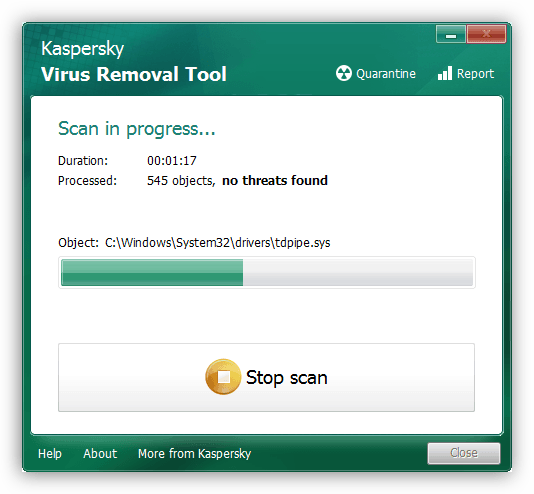
  • Способ 6: Проверка на вирусы
  • Способ 7: Удаление всех настроенных политик
  • Вопросы и ответы: 9

Способ 1: Удаление стороннего антивируса

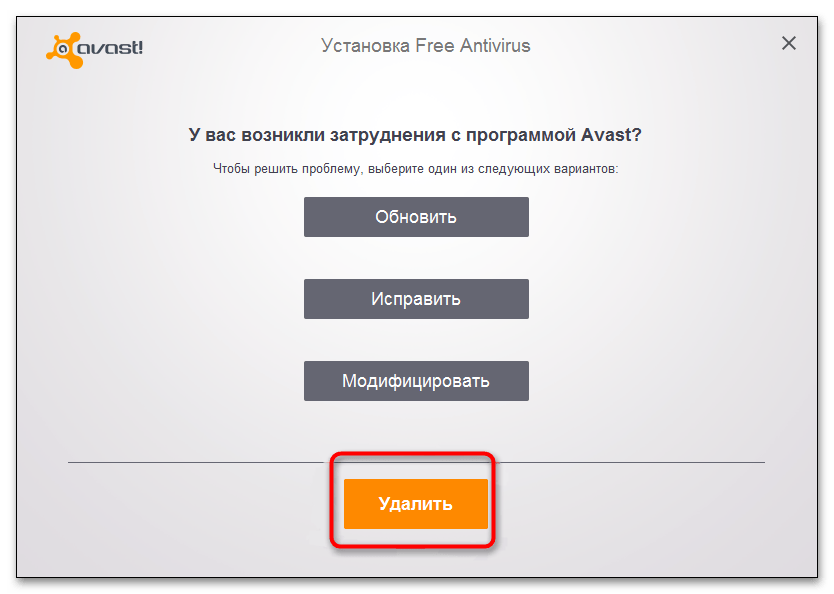
Чаще всего ошибка «Ваш системный администратор ограничил доступ» в Windows 11 появляется после установки стороннего антивирусного программного обеспечения. Вероятно, такой софт заблокировал часть функций и настроек встроенной защиты Microsoft Defender.

Как правило, такое сообщение является следствием обеспечения стабильной и безопасной работы операционной системы, поэтому никаких действий не требуется.

Но вы можете попросту удалить установленный антивирус от сторонних разработчиков, чтобы сообщение пропало. Учитывайте, что это не всегда просто, – понадобится воспользоваться либо фирменными утилитами от разработчиков защитного софта, либо специализированными программами. Более подробно читайте в нашем отдельном материале.

Подробнее: Удаление антивируса с компьютера

ошибка ваш системный администратор ограничил доступ в windows 11-1

Способ 2: Восстановление системы

Прежде чем переходить к следующим способам решения проблемы, попробуйте откатить состояние ОС до точки восстановления. Дело в том, что в большинстве случаев ограничение задается политиками безопасности Defender, при этом изменить параметры можно с помощью редактирования реестра или внесения корректировок в настройки групповых политик, но лучше сначала попытаться вернуться к тому моменту, когда не было подобного сообщения.

В Windows 11 предусматриваются несколько способов отката состояния системы до точки восстановления, причем некоторых из них сработают даже тогда, когда ОС отказывается стабильно работать или запускаться. Наш автор в отдельном руководстве уже подробно разбирал алгоритм действий по восстановлению Виндовс.

Подробнее: Восстановление системы Windows 11 с помощью точек восстановления

ошибка ваш системный администратор ограничил доступ в windows 11-02

Способ 3: Консоль

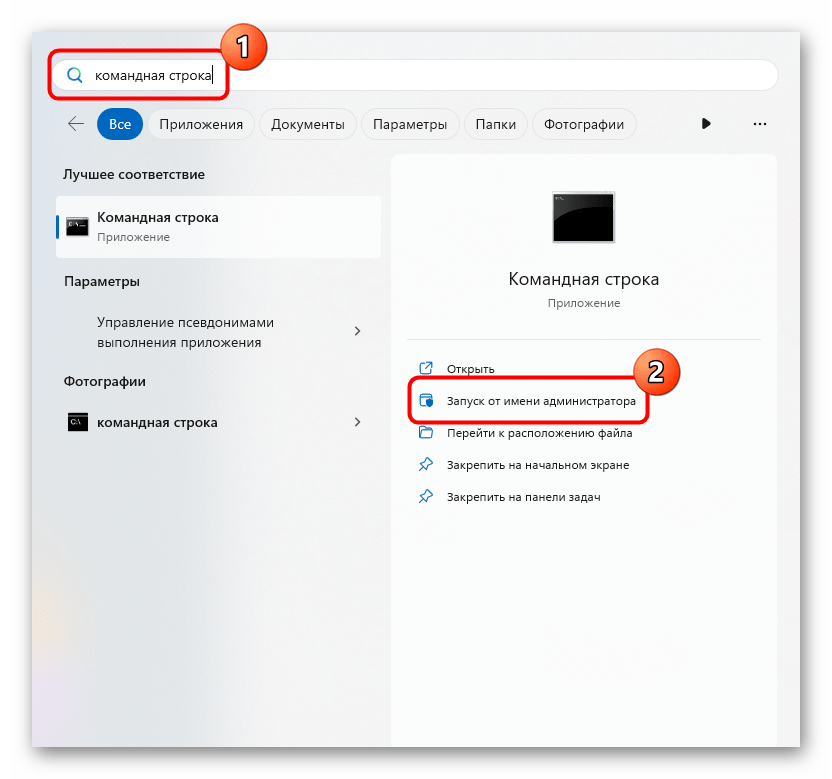
Если удаление стороннего антивируса и восстановление системы не помогли, то тогда проблема может быть гораздо глубже. Сначала попробуйте использовать быстрый вариант с помощью консоли – иногда он оказывается эффективным:

  1. Запустите любую консоль, которая вам удобнее: «Терминал» — через ПКМ по «Пуску», «Командную строку» или «Windows PowerShell» через системный поиск. Вне зависимости от выбранного приложения, оно обязательно должно быть открыто с правами администратора.
  2. ошибка ваш системный администратор ограничил доступ в windows 11-03

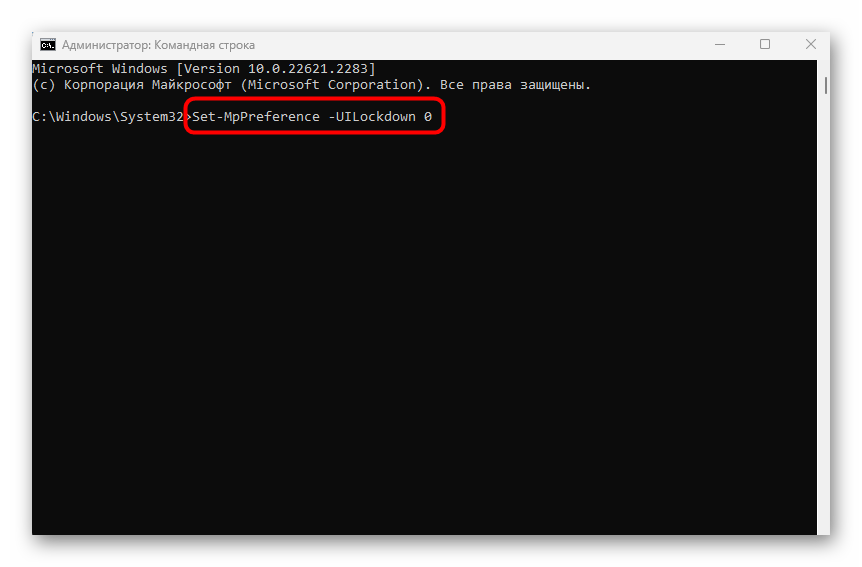
  3. Вставьте команду Set-MpPreference -UILockdown 0 и нажмите на клавишу «Enter», чтобы выполнить ее.
  4. ошибка ваш системный администратор ограничил доступ в windows 11-04

Если команда будет выполнена успешно, закройте окно консоли и проверьте, ушла ли ошибка.

Способ 4: Редактирование реестра

Универсальный способ, который подойдет для всех редакций операционной системы, — это ручное изменение реестра. Чтобы снять ограничение, проделайте несколько простых шагов:

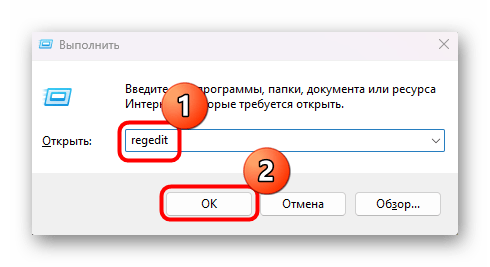
  1. Запустите окно «Выполнить», одновременно нажав на клавиши «Win + R», затем в текстовом поле введите regedit и нажмите на «ОК» или клавишу «Enter».
  2. ошибка ваш системный администратор ограничил доступ в windows 11-05

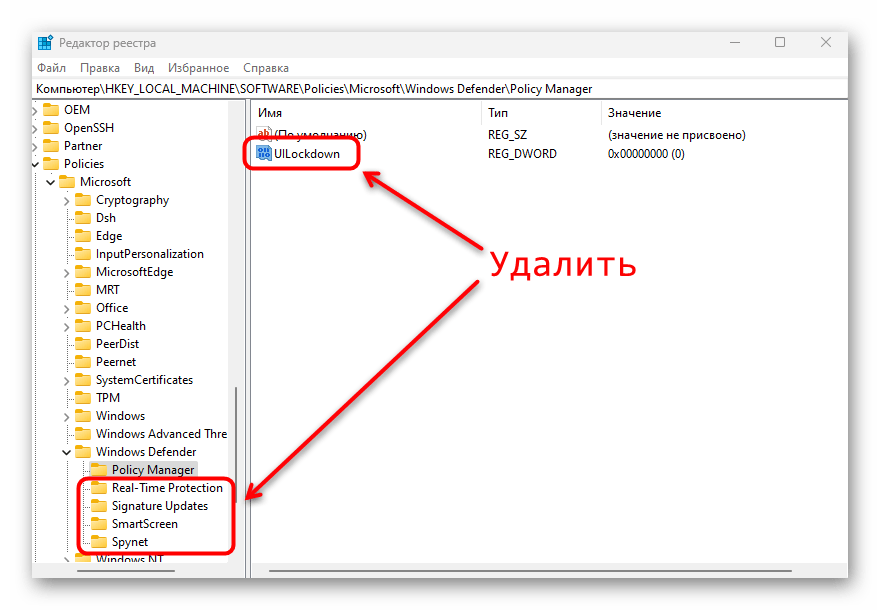
  3. Перейдите к разделу HKEY_LOCAL_MACHINE\SOFTWARE\Policies\Microsoft\Windows Defender\ в панели слева. Также можете вставить адрес в верхнюю строку и нажать «Enter».
  4. ошибка ваш системный администратор ограничил доступ в windows 11-06

  5. Для начала проверьте подраздел «Policy Manager» в центральной части окна – он должен быть пустой. Удалите все параметры, кроме «По умолчанию», кликнув по ключу правой кнопкой мыши и выбрав соответствующий пункт. Также обратите внимание на расположение «Windows Defender» — если помимо «Policy Manager» в нем есть другие папки, например «UX Configuration», то также удалите и их.
  6. ошибка ваш системный администратор ограничил доступ в windows 11-07

Еще рекомендуем зайти в раздел HKEY_LOCAL_MACHINE\SOFTWARE\Policies\Microsoft\Windows Defender Security Center\. При наличии в «Windows Defender Security Center» каких-либо каталогов или параметров их следует стереть – подобного там быть не должно.

После этого можете закрывать «Редактор реестра» и перезагружать компьютер. Если сообщение «Ваш системный администратор ограничил доступ» не пропало, тогда снова проверьте рассмотренные расположения в реестре. При повторном появлении удаленных подразделов и параметров есть большая вероятность, что их создает какое-то стороннее программное обеспечение автоматически. Возможно, это сторонний антивирус либо, наоборот, вирус. В таком случае есть смысл просканировать компьютер на вредоносные утилиты – для этого переходите к Способу 6.

Способ 5: «Редактор локальной групповой политики»

Обладатели Windows 11 редакций Корпоративная или Профессиональная могут воспользоваться «Редактором локальной групповой политики» для проверки и изменения настроенных политик:

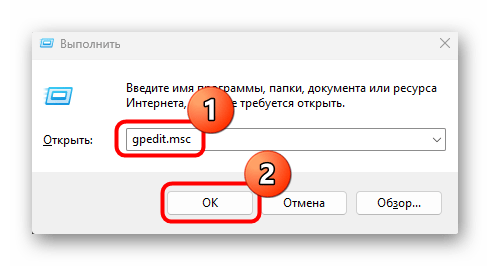
  1. С помощью диалогового окна «Выполнить» запустите встроенное средство, написав команду gpedit.msc и нажав на кнопку «ОК».
  2. ошибка ваш системный администратор ограничил доступ в windows 11-09

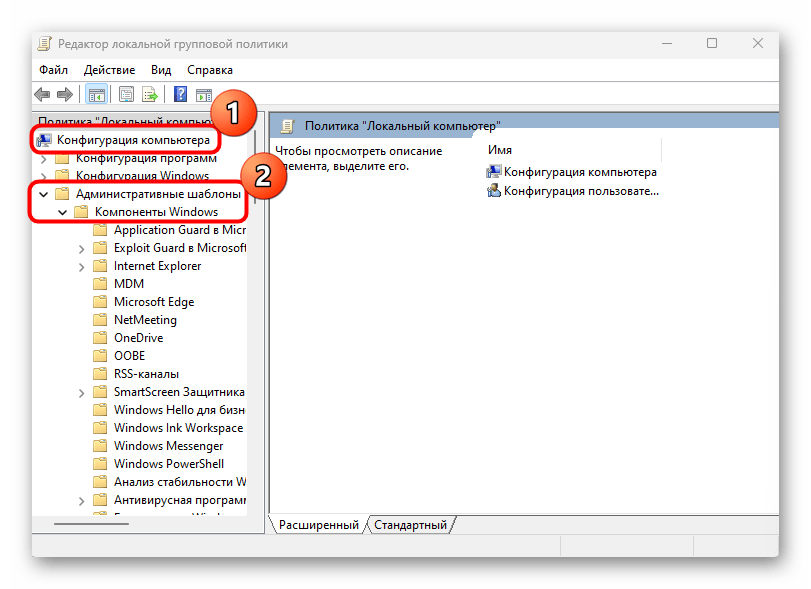
  3. Разверните меню «Конфигурация компьютера» на панели слева, затем выберите раздел «Административные шаблоны», а в нем – «Компоненты Windows».
  4. ошибка ваш системный администратор ограничил доступ в windows 11-10

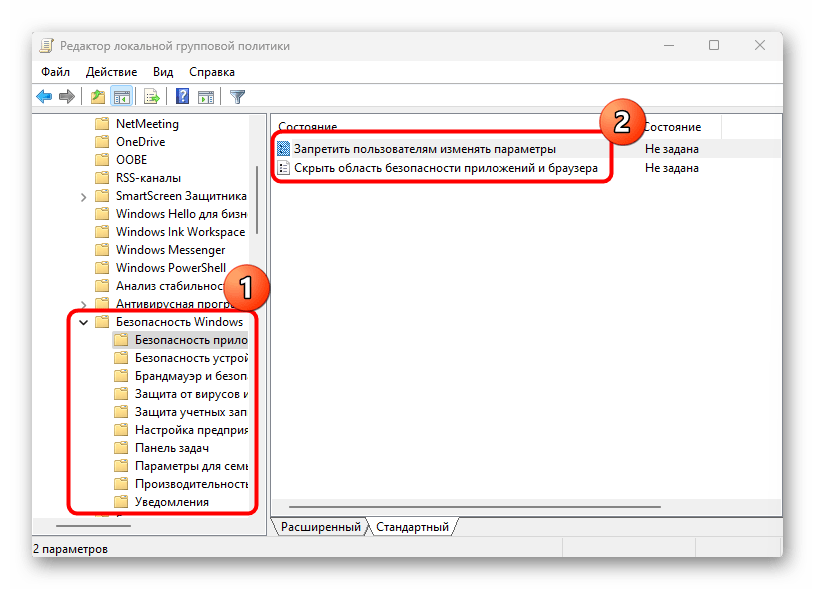
  5. Перейдите в каталог «Безопасность Windows», затем, поочередно нажимая на все подпапки в нем, изучите параметры, которые располагаются в центральной части окна. Дважды кликайте по каждому пункту левой кнопкой мыши, если для него установлено значение «Включено» или «Отключено».
  6. ошибка ваш системный администратор ограничил доступ в windows 11-11

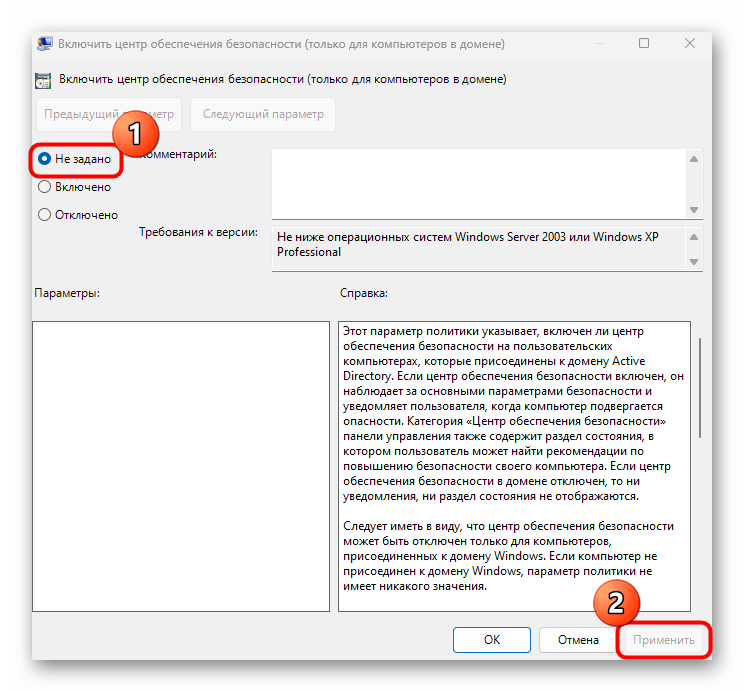
  7. Измените значение на «Не задано» и примените настройки. То же самое проделайте с каждым «неправильно» настроенным пунктом в каталоге.
  8. ошибка ваш системный администратор ограничил доступ в windows 11-12

  9. Аналогичным образом действуйте с подразделами «Центр обеспечения безопасности» и «Антивирусная программа Windows Defender».
  10. ошибка ваш системный администратор ограничил доступ в windows 11-13

Несмотря на то что способ довольно трудоемкий (просмотреть придется довольно много параметров), в некоторых случаях именно он является одним из наиболее эффективных. Если групповые политики менялись, то перезагрузите компьютер.

Способ 6: Проверка на вирусы

Как уже говорилось в статье, иногда изменения в системе, особенно в реестре, происходят из-за деятельности вирусного программного обеспечения. Такой софт действует в своих целях, нарушая работу встроенного средства защиты, поэтому если вы заметили автоматическое редактирование реестровых ключей или изменение параметров групповых политик, не лишним будет просканировать ОС на наличие вредоносных утилит. О том, как это сделать, мы писали ранее.

Подробнее: Борьба с компьютерными вирусами

ошибка ваш системный администратор ограничил доступ в windows 11-14

Способ 7: Удаление всех настроенных политик

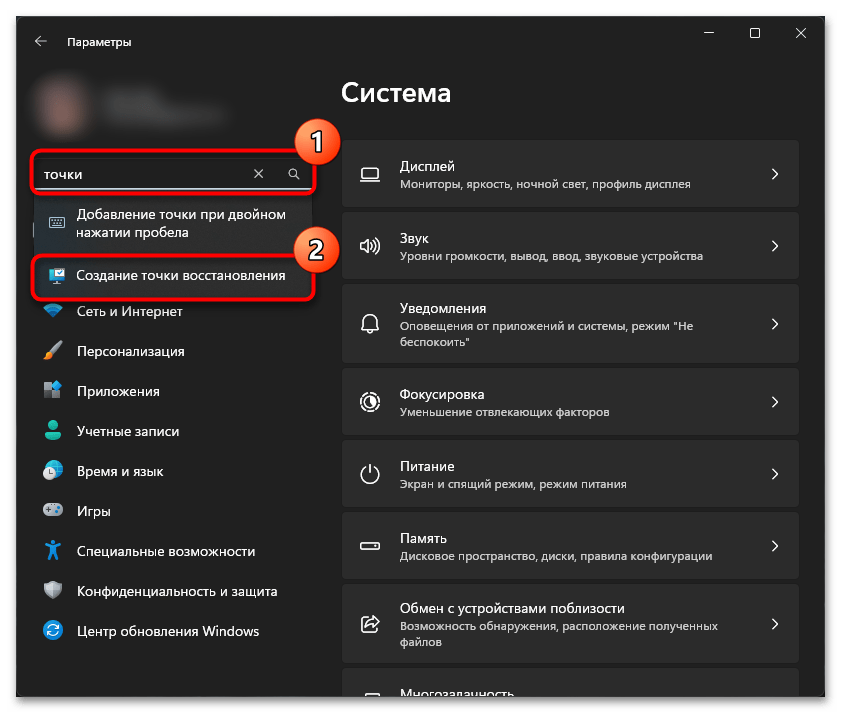
Тем, кому не помогла ни одна из предыдущих рекомендаций, остается прибегнуть к радикальному методу – удалению вообще всех настроенных политик безопасности из реестра. Следует учитывать, что среди них стерто будет все, в том числе и что-то полезное. В редких случаях такое действие может привести и к нежелательным последствиям, поэтому прежде чем выполнять эту процедуру, создайте точку восстановления системы.

Подробнее: Создание точки восстановления в Windows 11

ошибка ваш системный администратор ограничил доступ в windows 11-15

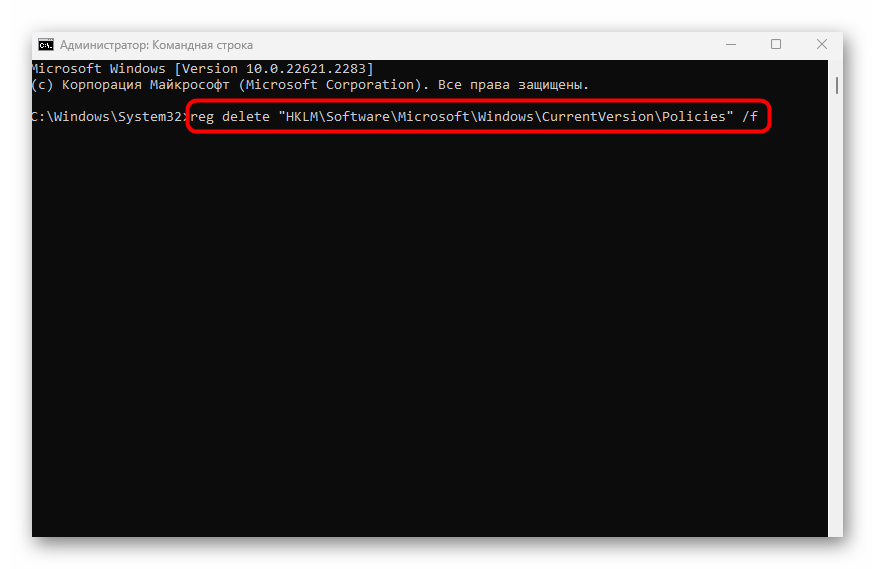
Запустите любую консоль от имени администратора, затем поочередно вставьте следующие команды, выполняя каждую из них нажатием на клавишу «Enter»:

Даже если какая-то команда будет завершаться с ошибкой, то просто переходите к следующей.

reg delete "HKLM\Software\Microsoft\Windows\CurrentVersion\Policies" /f
reg delete "HKLM\Software\Microsoft\WindowsSelfHost" /f
reg delete "HKLM\Software\Policies" /f
reg delete "HKLM\Software\WOW6432Node\Microsoft\Policies" /f
reg delete "HKLM\Software\WOW6432Node\Microsoft\Windows\CurrentVersion\Policies" /f
reg delete "HKLM\SOFTWARE\Policies\Microsoft\Windows Defender" /v
reg delete "HKLM\SOFTWARE\Policies\Microsoft\Windows Defender Security Center" /v
reg delete "HKCU\Software\Microsoft\Windows\CurrentVersion\Policies" /f
reg delete "HKCU\Software\Microsoft\WindowsSelfHost" /f
reg delete "HKCU\Software\Policies" /f
reg delete "HKLM\Software\Microsoft\Policies" /f

ошибка ваш системный администратор ограничил доступ в windows 11-16

После удаления настроенных политик из реестра перезагрузите ОС и посмотрите, пропало ли сообщение с рассматриваемой ошибкой.

Наша группа в TelegramПолезные советы и помощь

Источник

Getting the “Your IT administrator has limited access” error when accessing the Windows Security program in Windows 11 is pretty common. It could appear for various reasons. But despite that, it could also be easily fixed. And, this is what this guide will show you.

If you’re getting the same error when using Windows Security on the PC, read this in-depth fixes guide to know how to fix “Your IT administrator has limited access” error in Windows 11.

Why Does “Your IT Administrator Has Limited Access” Appear in Windows 11?

Your user account may not have administrative privileges, because of which the “Your IT administrator has limited access” error message is appearing. But besides this, there could be several more reasons for it. Below, we’ve listed all other potential reasons for this issue:

  • Interruptions by Third-Party Antivirus
  • Unnecessary School Accounts on the PC
  • Enabled Turn Off Microsoft Defender Antivirus Policy
  • Buggy Windows Security App
  • Interference From Microsoft Defender Firewall
  • Bugs and Glitches in the PC
  • Viruses and Malware
  • Outdated Windows 11
  • Limitations From the IT Desk

Fix “Your IT Administrator Has Limited Access” Error in Windows 11

In this section, we’ll share some working fixes to fix this error in Windows 11. You can follow the mentioned ways to fix “Your IT administrator has limited access” in Windows 11:

1. Change Your User Account to an Admin Account

One of the most common reasons for the “Your IT administrator has limited access” error in Windows 11 is the lack of admin rights. Thus, we suggest you change your current user account to an admin account. Follow the below-mentioned steps to know how to do this:

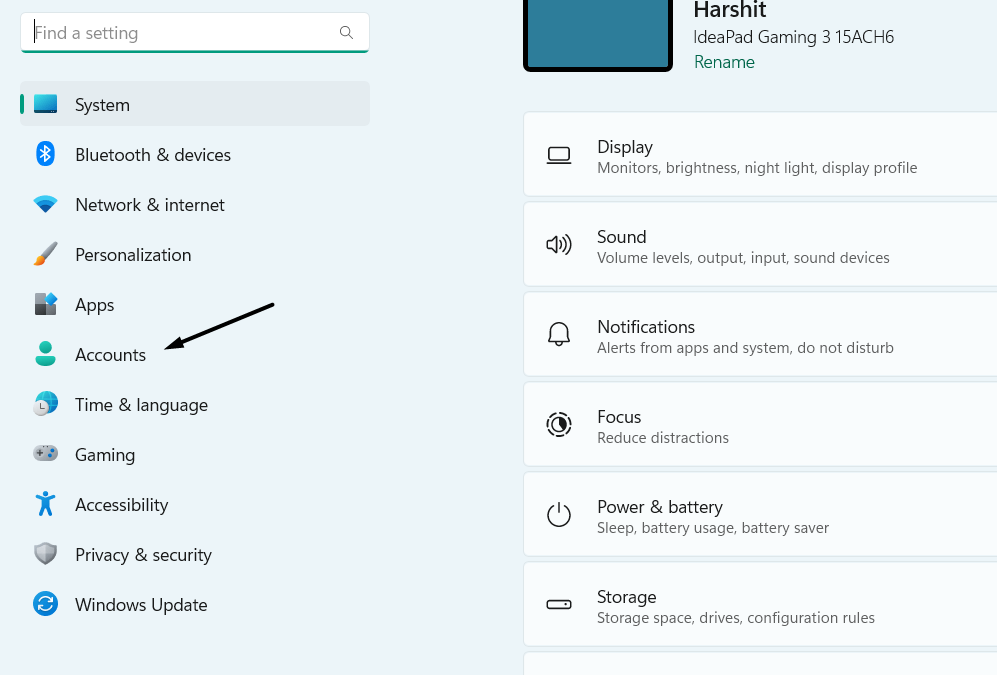
1. Open the Settings app and move to the Accounts section from the left navigation menu.

Select Accounts

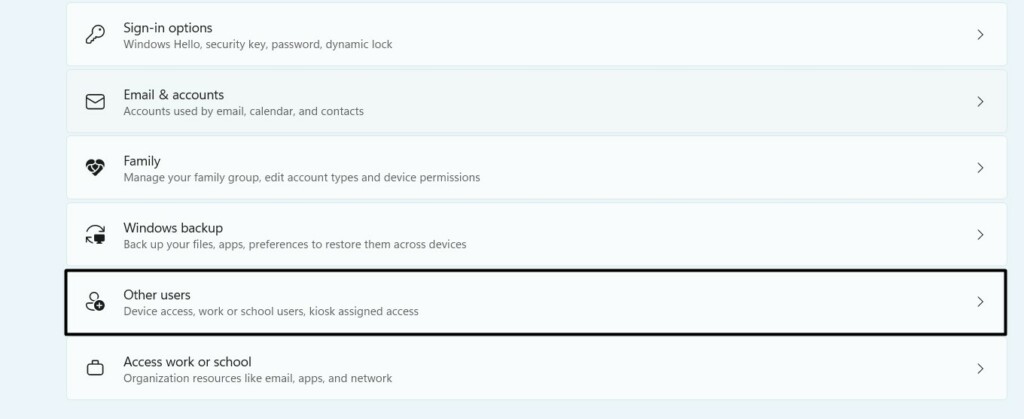
2. In the Accounts section, choose Other users under Account settings to view the active accounts.

Select Other Users

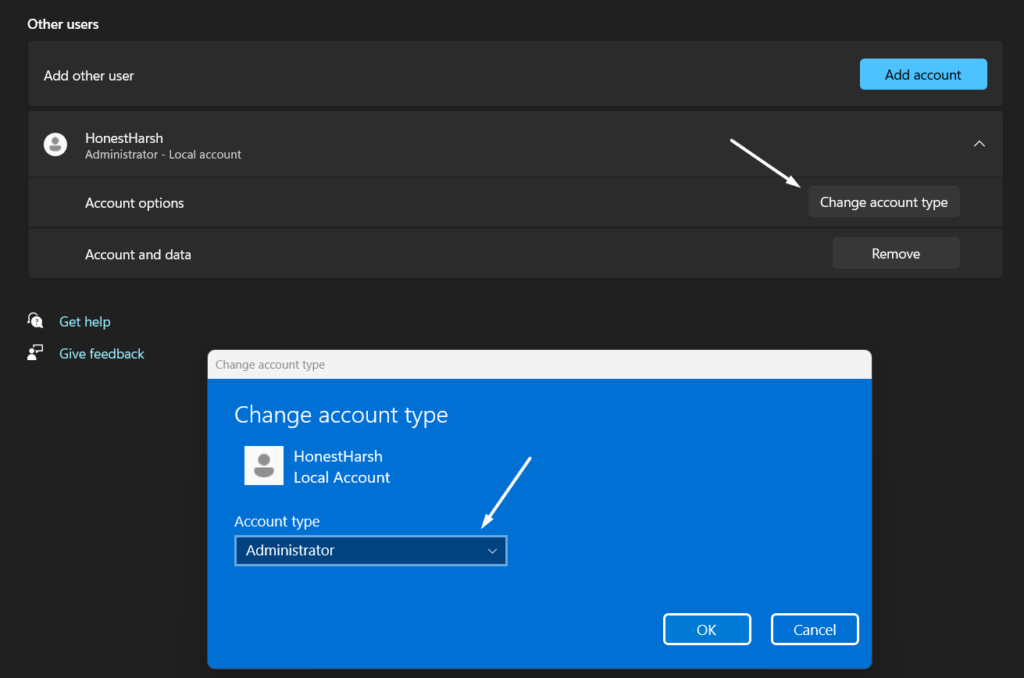
3. On the next screen, select your user account, and check if Administrator is added under it.

Choose User Account

4. If not, click the Change account type button, and choose Administrator from the dropdown.

Select Administrator

5. Once done, click OK to apply this change, and then simply restart your Windows 11 PC.

2. Create Another Administrator Account

If the issue is still there, create a new administrator account on your PC, as it could be possible that the current account has some issues. So try the same on your PC. You can check the below-mentioned steps to learn how to create another administrator account on your PC:

1. To create a new admin account on your Windows 11 system, go to the Accounts section of it.

Select Accounts

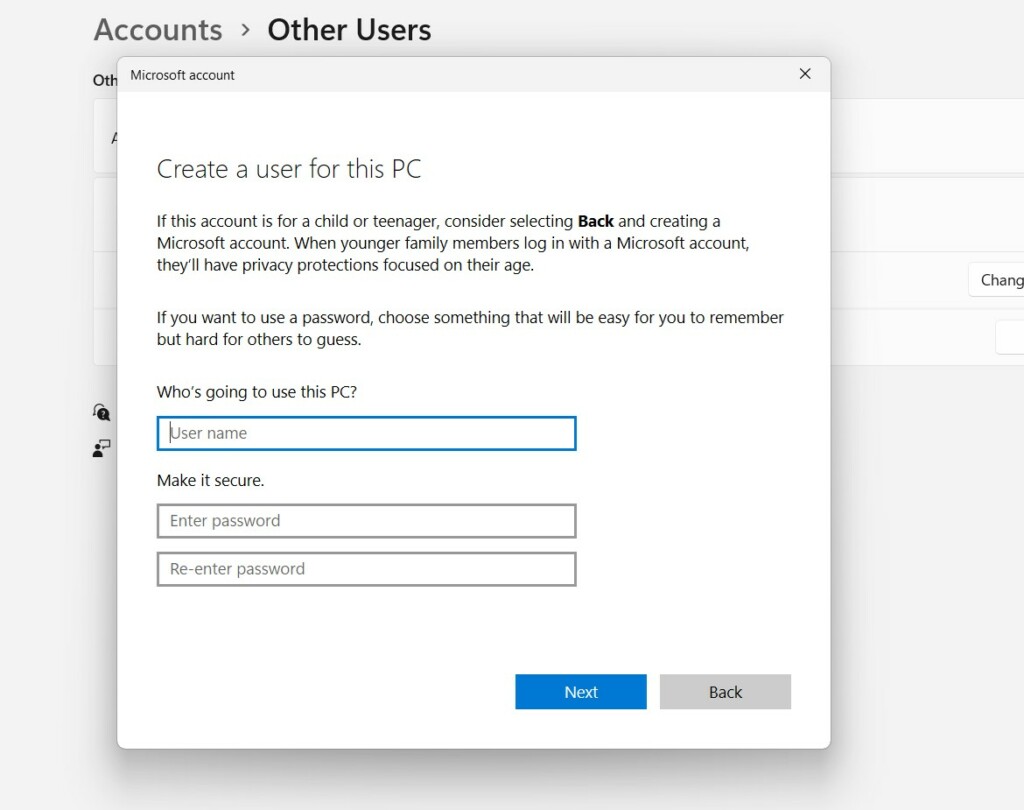
2. In the Accounts window, choose Other users, and then click Add account to get a new prompt.

Select Other Users

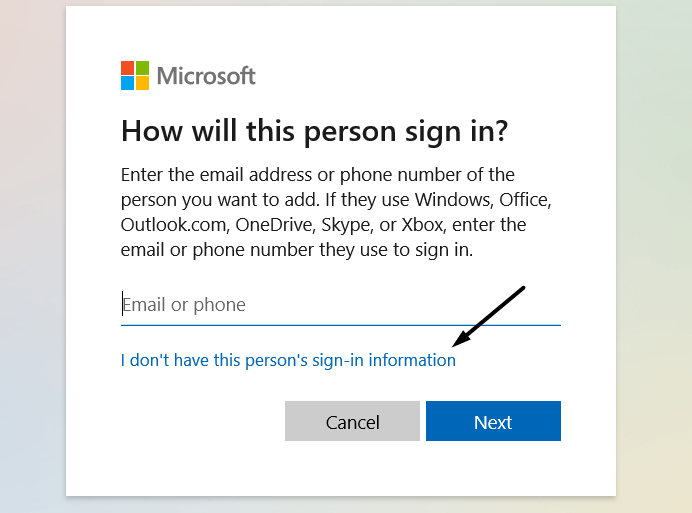
3. In the Microsoft account window, select the I don’t have this person’s sign-in information text.

Click on I dont have this persons infor

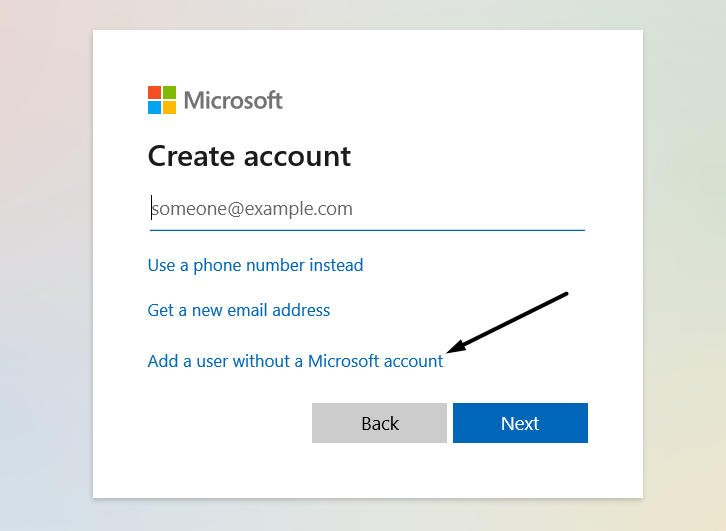
4. On the next screen, select Add a user without a Microsoft account and then enter the required details.

Click on Add a new users

5. Follow the on-screen instructions to create a new admin account on your Windows 11 PC.

Enter the Username Password

6. Finally, log in with the new account on your PC and check whether the issue is gone now.

3. Turn On the Hidden Administrator Account

Even if creating a new admin account doesn’t fix the issue on the PC, consider enabling the hidden admin account on it. You can easily enable it by running a few simple commands in Command Prompt. Check the mentioned prompts to know how to easily turn it on:

1. To enable the hidden admin account, boot your Windows 11 PC into Safe mode using any method.

2. Once you’re in Safe mode, open Command Prompt and copy-paste the below command in it:

net user administrator /active:yes

3. Once done, hit the Enter key to immediately ON the hidden administrator user account.

4. Reboot your Windows PC and choose the hidden admin account when logging into the PC.

4. Remove Any Work or School Accounts

Before trying other fixes, we want to give you a small suggestion, which is deleting any work or school accounts from the PC. It could be possible that your PC is connected to any other account, which doesn’t have rights to access Windows Security. Follow the below steps to do so:

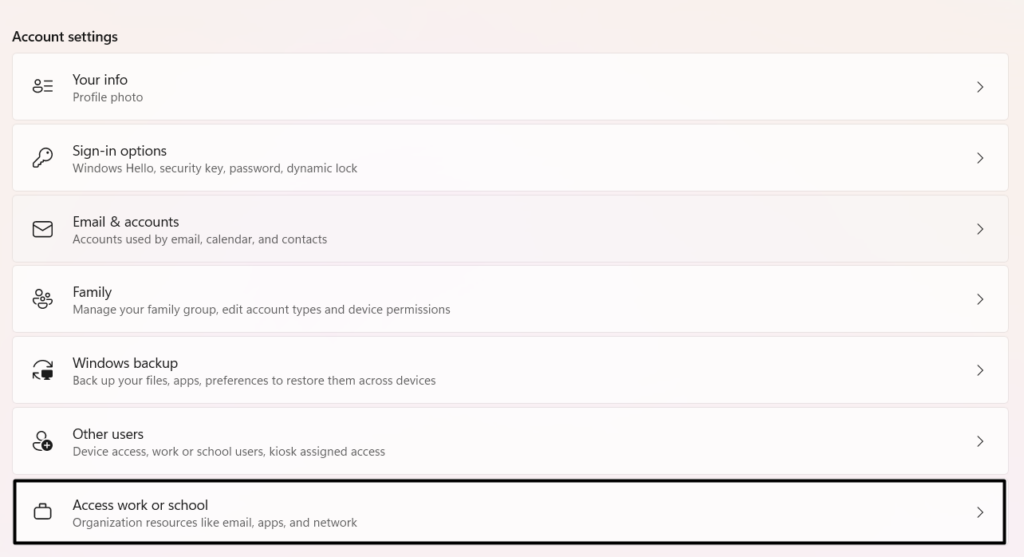
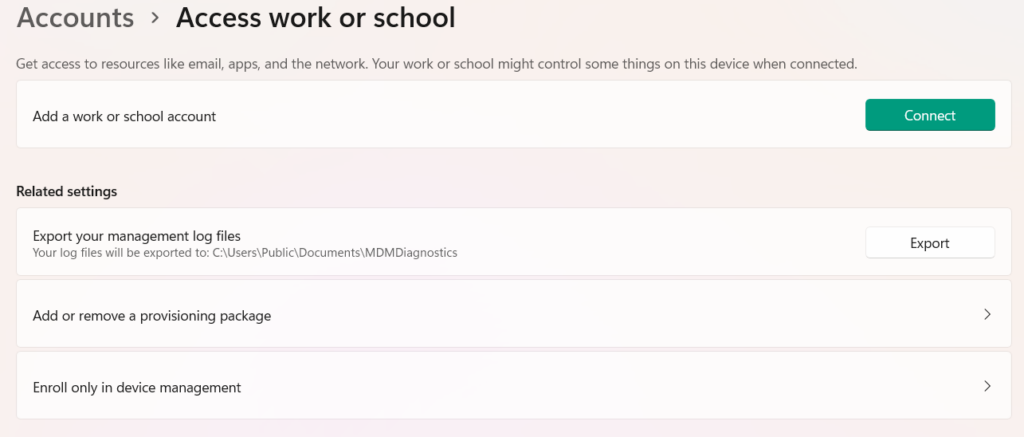
1. Go to the Accounts category of Settings and then scroll to Access work or school navigation.

Choose Access Work Or School

2. Under Access work or school navigation, look for the connected work or school account, and select it.

Click Disconnect

3. Hit Disconnect next to the account to disconnect it and once done, reboot your system.

5. Uninstall Other Security Apps

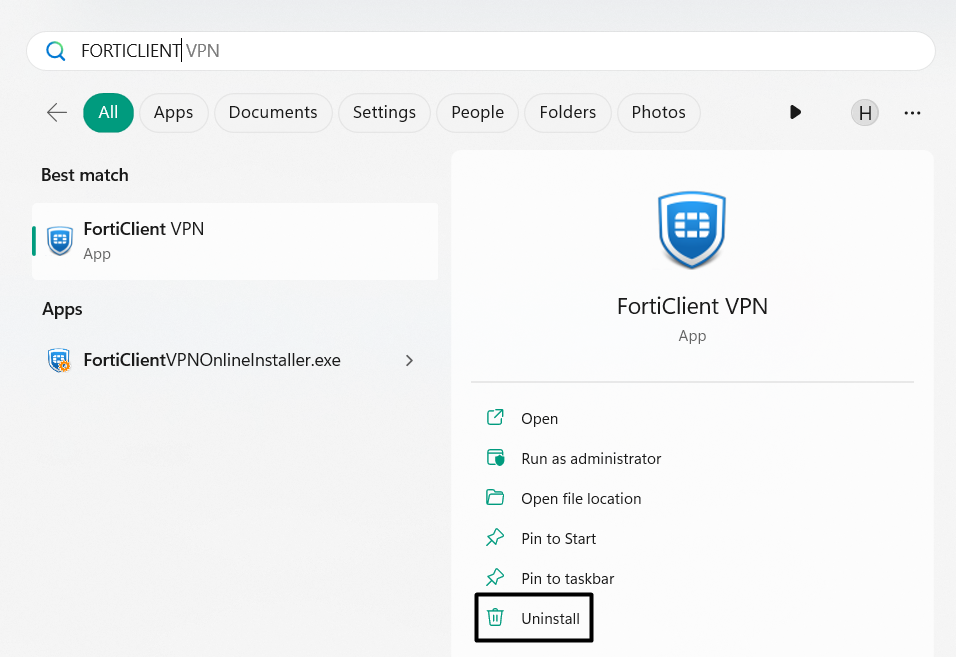
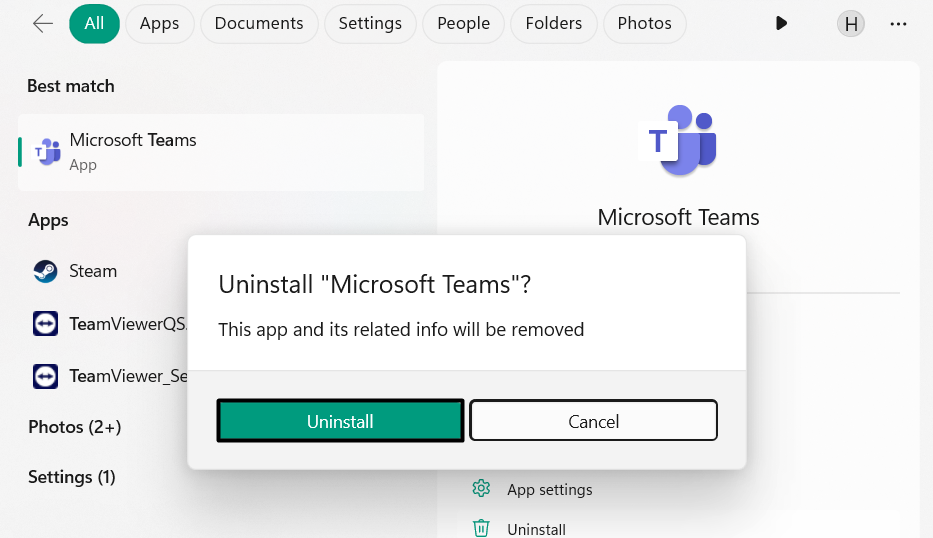
If you’ve recently installed a third-party security app on your PC, consider uninstalling it, as it could be possible that it’s interrupting the Windows Security app’s working and causing this issue. To know how to uninstall apps and programs in Windows 11, check the below steps:

1. Type the security app in the Windows Search Box, and choose Uninstall from the search results.

Choose Uninstall 2

If you don’t see the Uninstall option in the search results, go to the below path in the Settings app:

Settings App > Apps > Installed Apps > Search for the App > Click Three-Dots (…) > Uninstall

Select Uninstall

2. Choose the Uninstall button in the next prompt that appears after following any above methods.

Choose Uninstall 1 1

3. After uninstalling the app, restart your Windows 11 PC and check whether the issue is still there.

6. Disable the Turn Off Microsoft Defender Antivirus Policy

Some Windows Pro and Enterprise users in the Microsoft forum mentioned that they’re getting the “Page not available” error. If you’re also one of them, you need to disable the Turn Off Microsoft Defender Antivirus Policy in the Group Policy Editor on your PC. You can do this on your Windows 11 PC by taking the help of the below-mentioned steps:

1. Open the Group Policy Editor app and double-click the Computer Configuration option.

2. Select Administrative Templates in the app’s side menu and expand Windows Components.

3. Click Microsoft Defender Antivirus and open Turn off Microsoft Defender Antivirus on the left.

4. In the Turn off Microsoft Defender Antivirus window, choose the Disabled radio button and then select OK.

5. Open the Allow antimalware to startup with normal priority policy and then disable that too.

6. Choose the Client Interface policy in the same folder, and then double-click Enable headless UI mode.

7. Choose the Disable option to turn off this policy, and then click Apply to apply this change.

8. Lastly, close the opened window, and then restart your PC to check if the issue is fixed.

7. Run this PowerShell Command

One easy way to fix the “Your IT administrator has limited access” error is to run some commands in PowerShell. If you also get this error or “Page not available” error when trying to open Windows Security, do the same and check if it helps. Follow the added steps:

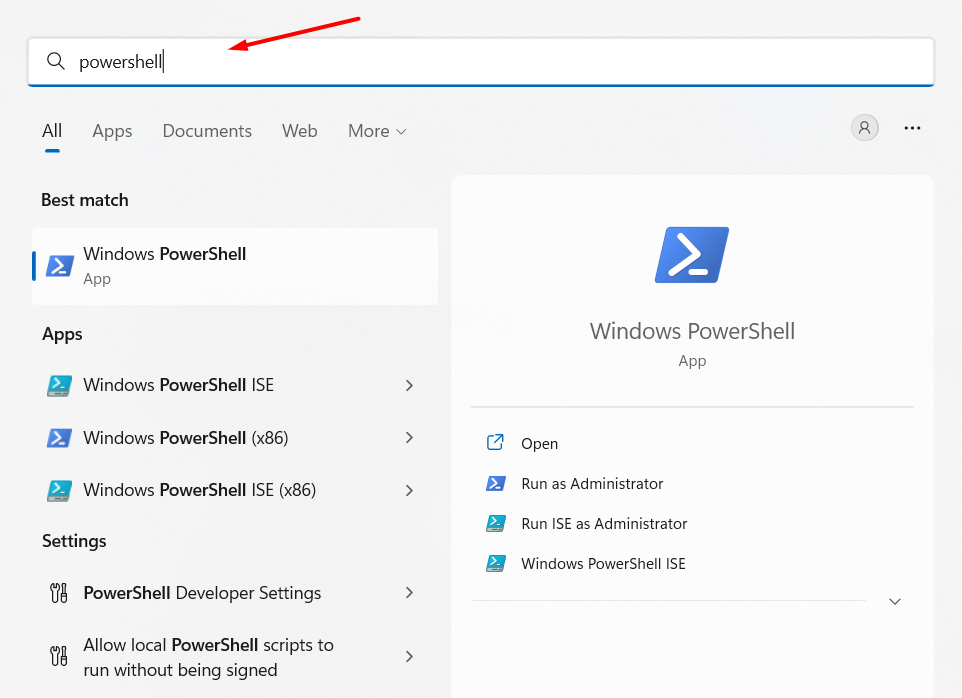
1. Open the Windows Search Box on your PC and then type Windows PowerShell in it.

Search Windows Powershell

2. Choose Windows PowerShell from the search results under Best match to open the console.

Windows PowerShell

Windows PowerShell

3. In the PowerShell window, copy-paste the following command, and then press enter to run MpPreference:

set-MpPreference -UILockdown

4. Finally, exit Windows PowerShell and then reboot your PC to get rid of this error message.

8. Repair or Reset the Windows Security App

Another way to get rid of the “Your IT administrator has limited access” error in Windows 11 is to repair and reset the Windows Security app. This will fix all the temporary bugs and glitches with it, and, also eliminate the error. So check the below steps to know the process:

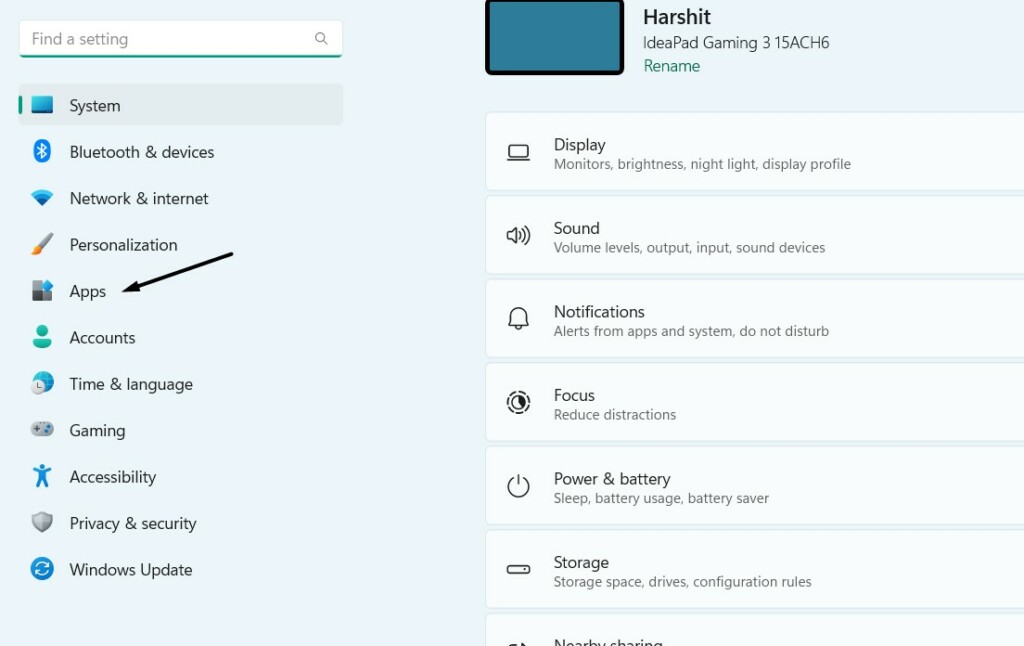
1. Open the Settings app on your Windows 11 PC and from the left navigation pane, choose Apps.

Click Apps

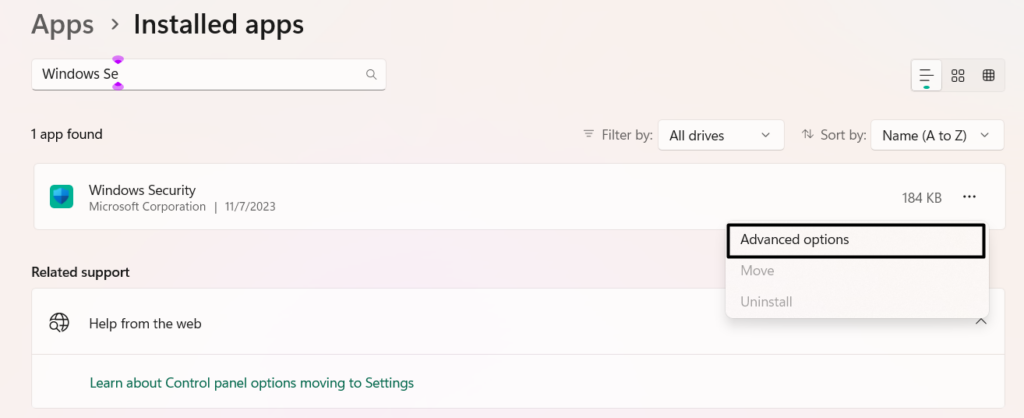
2. Choose Installed apps and on the next screen, find Windows Security and click three dots (…) next to it.

Search for Windows Security

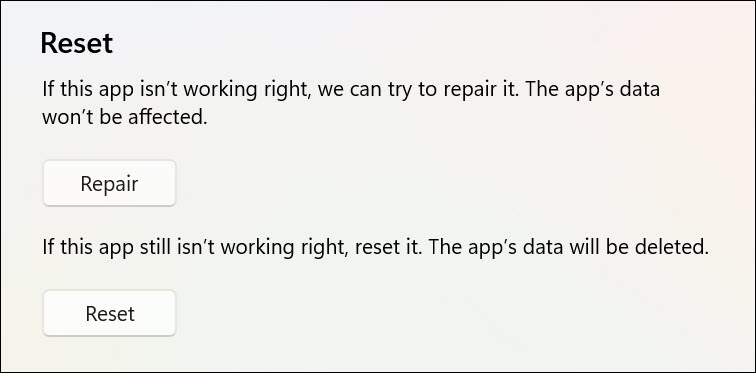
3. From the dropdown, choose Advanced options, go to the Reset section, and click Reset.

Choose Advanced Options

4. Once done, click Repair in the same section to begin repairing the Windows Security app now.

Reset or Repair Webex

5. Exit the Settings app, and then check if the “Your IT administrator has limited access” error still appears.

9. Modify the Registry via Command Prompt

Some users in the online forums mentioned that they eliminated the “Your IT administrator has limited access” error by running some simple commands in Command Prompt. We suggest you implement the same by following the mentioned steps:

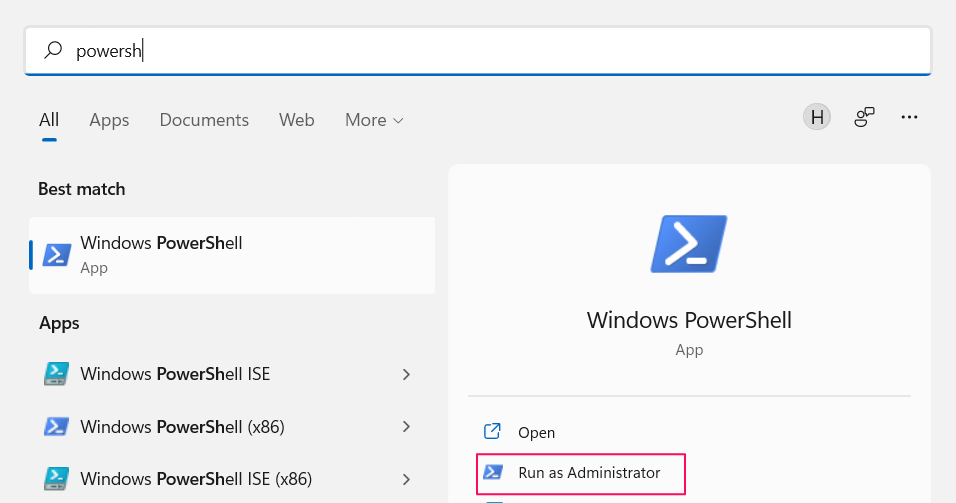
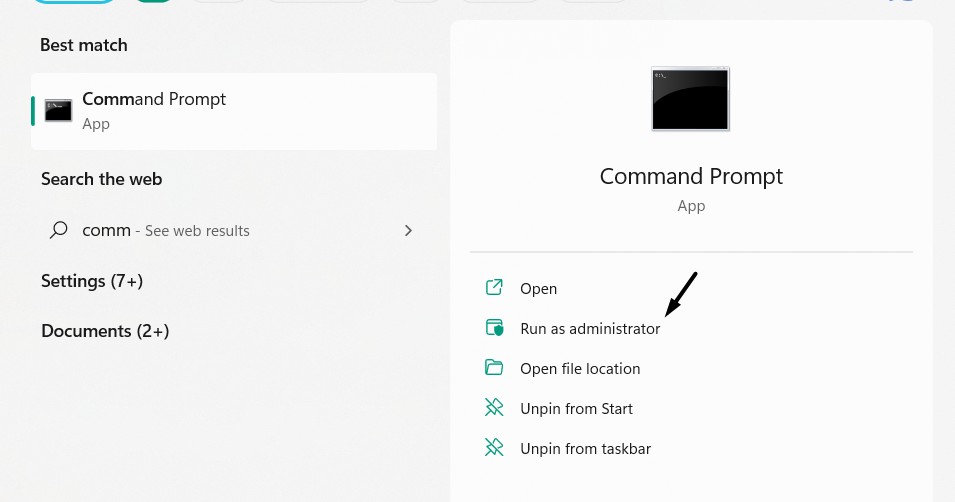
1. Type Command Prompt in the search box, and choose Run as administrator from the results.

Select Run as Administrator

2. In the Command Prompt window, execute the following commands one by one to make the changes:

reg delete "HKLM\Software\Microsoft\Windows\CurrentVersion\Policies" /f
reg delete "HKLM\Software \Microsoft\WindowsSelfHost" /f
reg delete "HKLM\Software\Policies" /f
reg delete "HKLM\Software\WOW6432Node\Microsoft\Policies" /f
reg delete "HKLM\Software\WOW6432Node\Microsoft\Windows\CurrentVersion\Policies" /f
reg delete "HKLM\SOFTWARE\Policies\Microsoft\Windows Defender" /v DisableAntiSpyware
reg delete "HKCU\Software\Microsoft\Windows\CurrentVersion\Policies" /f
reg delete "HKCU\Software\Microsoft\WindowsSelfHost" /f
reg delete "HKCU\Software\Policies" /f
reg delete "HKLM\Software\Microsoft\Policies" /f

3. Once done, type exit in the same window to close the console and get rid of this error message.

10. Search for Viruses and Malware

Malware and viruses in the PC could also be the reason for the “Your IT administrator has limited” access error in Windows 11. This could be the same in your case. Thus, we suggest you make sure that your PC is malware-free. Follow the below steps to ensure this:

1. As Windows Security isn’t working well, you need to use another method to run the antivirus scan on it. So, open Command Prompt with admin rights on your PC to do the same.

2. In the Command Prompt window, type in the below-mentioned command to open the antivirus tool:

cd C:\ProgramData\Microsoft\Windows Defender\Platform\4.18*

3. Type in the below command in it and then hit the Enter key to run the antivirus scan right now:

MpCmdRun -SignatureUpdate

4. Lastly, wait for the antivirus scan to complete on the PC, and once done, check the issue’s status.

11. Erase Windows Defender Records

An easy solution to fix “Your IT administrator has limited access” is to erase the Windows Defender records. You need to delete them in Registry Editor. Try the steps to do so:

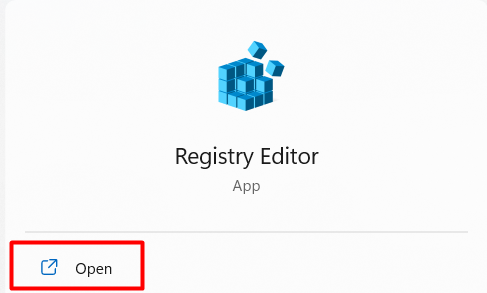
1. To delete the Windows Defender records from your Windows 11 PC, open Registry Editor on it.

open registry editor

2. In the Registry Editor program, navigate to the below-mentioned location using the address bar at the top:

HKEY_LOCAL_MACHINE\SOFTWARE\Policies\Microsoft\WindowsDefender\Policy Manager

3. Once you’re there, delete all the files in it, and then restart your PC to check the issue’s status.

Select Delete 1

12. Turn Off Microsoft Defender Temporarily

It may be possible that the Microsoft Defender Firewall is constantly interrupting the Windows Security app’s working, which is why the “Your IT administrator has limited access” error is appearing.

In that case, we suggest you turn off the firewall temporarily to check if it’s the cause of this error on the PC. You can simply follow the below-mentioned steps to know how to disable Windows Defender Firewall in Windows 11:

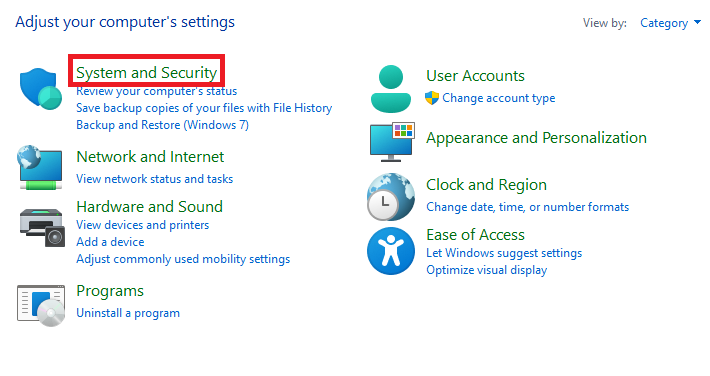
1. As we’re unable to launch the Windows Security app, we’ll use the Control Panel app to turn it off. So open Control Panel on your computer and go to System and Security.

System and Security settings

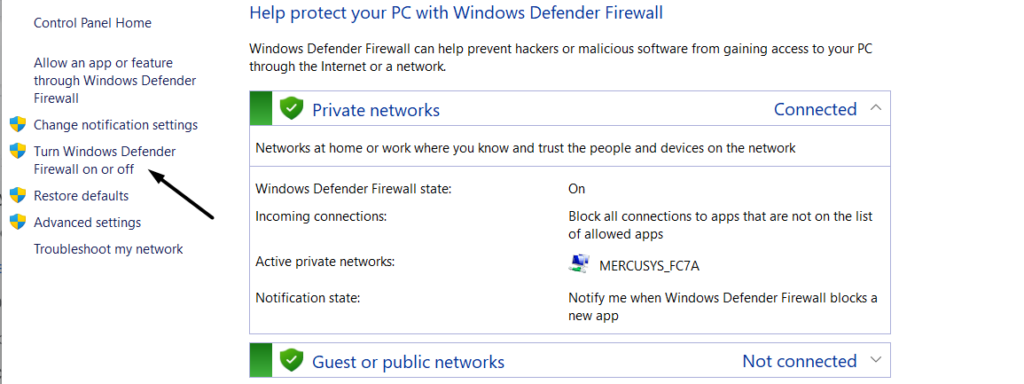
2. In the System and Security window, choose Windows Defender Firewall and then select Turn Windows Defender Firewall on or off on the left navigation menu of the utility.

click on turn Windows Defender Firewall on or off

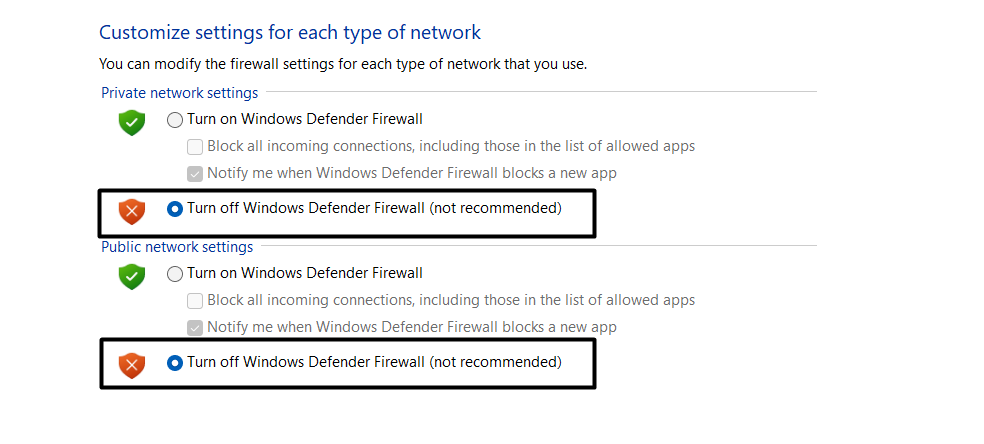
3. On the next screen, under both sections, choose Turn off Windows Defender Firewall (recommended).

turn off windows firewall

4. In the end, click OK to apply all the changes and then restart your Windows 11 PC or laptop.

13. Contact Your IT Helpdesk

It may be possible that your IT administrator has put restrictions on your user account, which is why the “Your IT administrator has limited access” error is appearing when accessing the Windows Security app on your PC.

In that case, you need to contact your IT helpdesk and ask them if that’s true. If yes, then ask them to give you the right permissions to use the Windows Security app on your Windows 11 PC without any issues.

14. Reset the PC

If none of the mentioned solutions help you get rid of the “Your IT administrator has limited access” error, then you’ve no other option left than resetting the Windows 11 PC back to default. Also, you don’t need to sacrifice your valuable data in this process. If you’re ready to reset your Windows 11 PC, follow the below-mentioned steps to do the same:

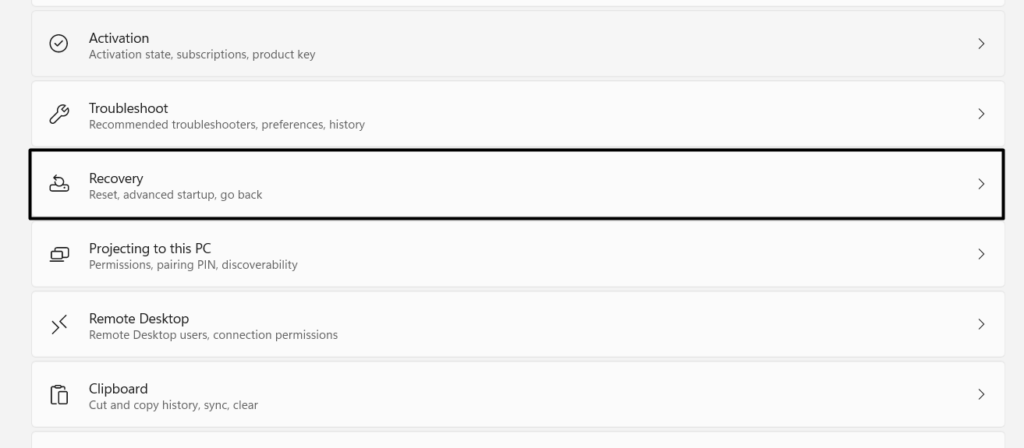
1. To reset your Windows 11 PC, open the Settings app and go to Recovery section of it.

Select Recovery

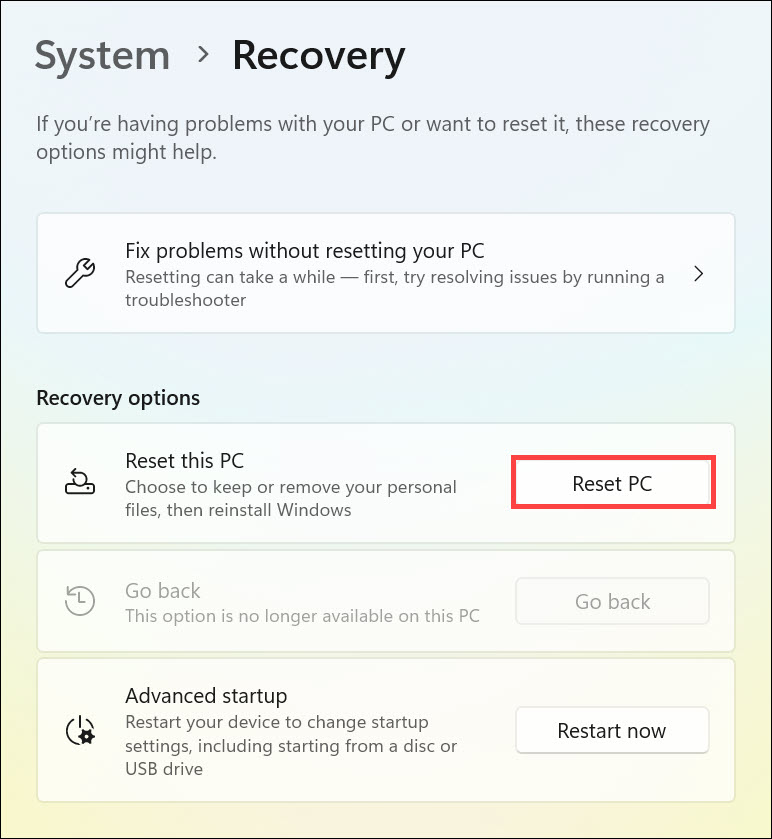
2. In the Recovery section of the Settings app, hit the Reset PC button next to Reset this PC.

reset pc button

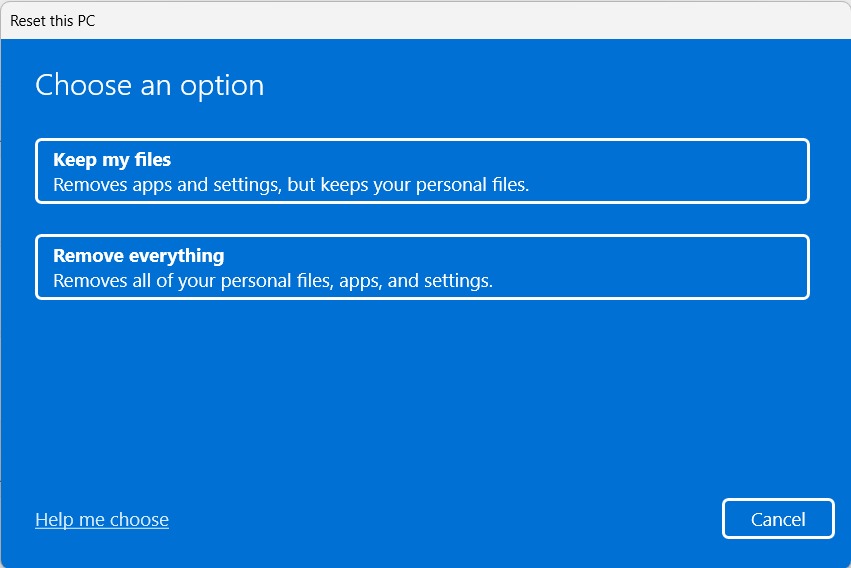
3. In the next window, choose the Keep my files option and then the Cloud install option.

Select Keep my files

4. In the end, follow the on-screen instructions to reset your Windows 11 PC back to default.

FAQs

How Do You Fix Your IT Administrator Has Limited Access to Some Areas of This App?

It could be possible that your user account doesn’t have admin rights, which is why “Your IT administrator has limited access to some areas of this app” is appearing when trying to open it.

How Do I Fix Page Not Available in Windows 11?

If you’re getting an error when trying to open a page in Windows 11, consider restarting your Windows 11 PC. In case this doesn’t resolve the issue, update the particular app on your PC.

How Do I Enable Headless UI Mode?

You need to enable the Headless UI mode on your Windows 11 PC in the Registry Editor app.

How Do I Disable Antivirus on Windows 11?

Follow the below path to enable the integrated antivirus utility on your Windows 11 PC or laptop:

Open the Windows Security App > Choose Virus & Threat Protection App > Manage Settings > Toggle off Real Time Protection.

How Do I Allow Administrator Permission in Windows 11?

You can assign your user account admin rights in the Accounts section of the Settings program on your PC.

Final Words

So, these are some good solutions (at least, according to us) that can quickly and easily fix the “Your IT administrator has limited access” error message in Windows 11. Here in this guide, we mentioned some great fixes to get rid of the “Your IT administrator has limited access” error.

We hope the fixes we shared in this guide helped you get rid of it with ease. If yes, do let us know which mentioned workarounds helped you resolve this issue. 

Источник

Понравилась статья? Поделить с друзьями:
0 0 голоса
Рейтинг статьи
Подписаться
Уведомить о
guest

0 комментариев
Старые
Новые Популярные
Межтекстовые Отзывы
Посмотреть все комментарии
  • Драйвер беспроводной сети windows 7 lenovo
  • Команда для смены пользователя windows 10
  • Где посмотреть сколько герц в мониторе windows 11
  • Как убрать автонастройку ipv4 в windows 10
  • Mac os extended journaled windows