
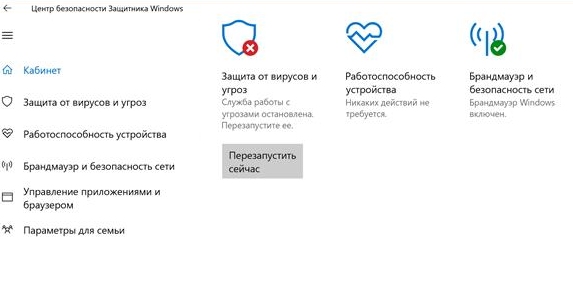
Привет, админ! Пытаюсь в Windows 10 включить Windows Defender, но в Центре безопасности Защитника Windows у компонента Зашита от вирусов и угроз висит надпись: «Служба работы с угрозами остановлена. Перезапустите ее». При попытке перезапустить Защитника Windows с помощью соответствующей кнопки появляется надпись: “
Непредвиденная ошибка. Извините, мы решаем проблему. Попробуйте еще раз
”. Как мне починить Windows Defender? Заранее спасибо!

Ответ
Давайте разберем типовые причины, из-за которых в Windows 10 может не работать функция зашиты от вирусов и угроз (встроенный антивирус Windows Defender). Последовательно проверьте все пункты.
Обратите внимание, что начиная с билда Windows 10 2004, Windows Defender Antivirus был переименован в Microsoft Defender Antivirus.
Содержание:
- На компьютере установлен сторонний антивирус
- Проверьте и включите службы Защитника Windows
- Включение Защитника Windows 10 в реестре
- Проверьте, что Защитник Windows включен в групповых политиках
- Перерегистрация библиотек Microsoft Defender
- Проверьте и установите обновления Windows
На компьютере установлен сторонний антивирус
Проверьте, возможно у вас на компьютере установлен сторонний антивирус, который препятствует работе Microsoft Defender. Антивирус Microsoft Defender автоматически отключается, если на компьютере установлена сторонняя антивирусной программа.
Решите, какой антивирус вы хотите использовать – сторонний или Microsoft Defender.
Если сторонний антивирус вам не нужен, отключите или удалите его.
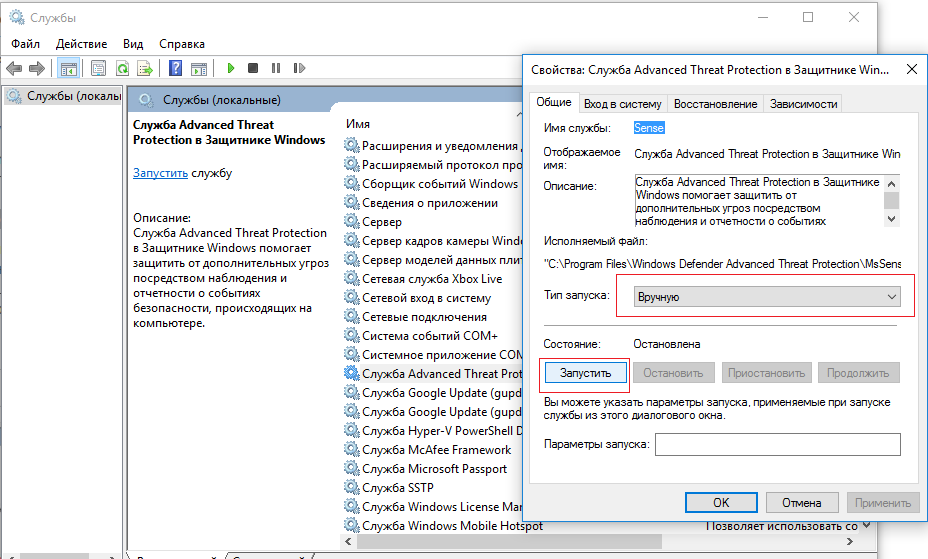
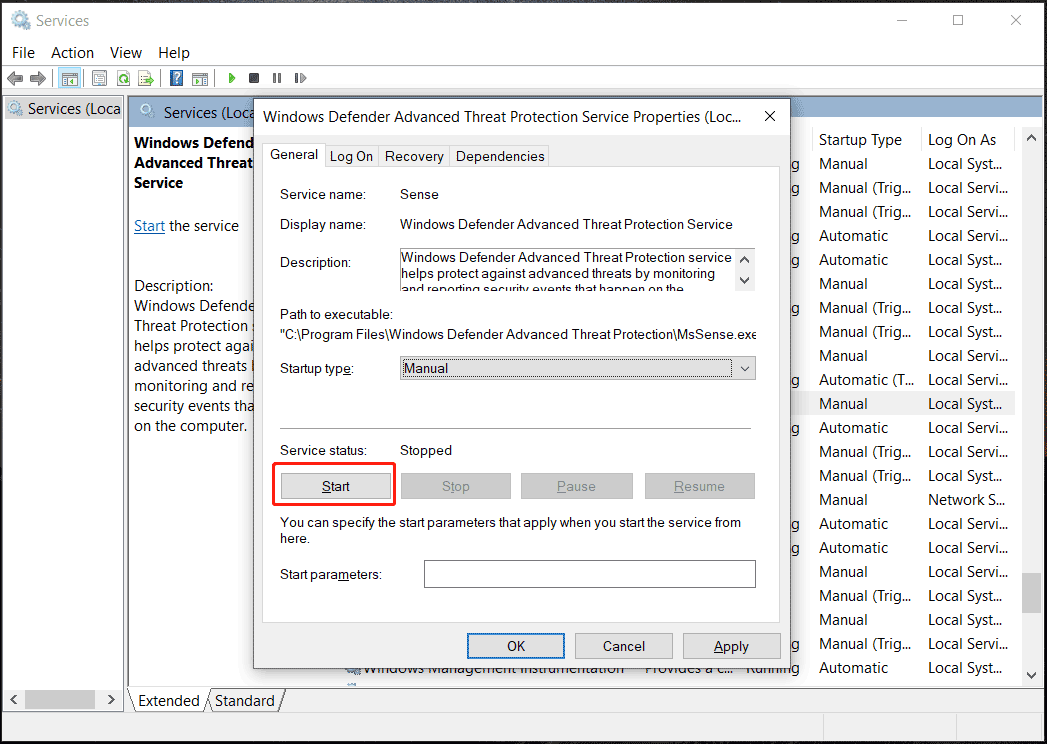
Проверьте и включите службы Защитника Windows
Для корректной работы Microsoft Defender в Windows 10 нужно проверить нескольких служб. Откройте консоль управления службами (services.msc) и проверьте, есть ли в списке служб следующие элементы:
- Служба Advanced Threat Protection в Защитнике Windows (Windows Defender Advanced Threat Protection Service) —
Sense
; - Служба проверки сети Защитника Windows (Microsoft Defender Antivirus Network Inspection Service) —
WdNisSvc
; - Служба Защитника Windows (Microsoft Defender Antivirus Service)
WinDefend
; - Служба Центра безопасности Защитника Windows (Security Center) —
WSCSVC
(Windows Security Center).
Состояние служб можно проверить с помощью PowerShell:
get-service Sense, WdNisSvc, WinDefend, wscsvc | select name,status,starttype

Для служб Sense и WdNisSvc тип запуска должен быть Manual.
Службы Security Center (WinDefend) и Microsoft Defender Antivirus (wscsvc) должны быть обязательно запущены. Если эти службы отключены, вы не сможете использовать Microsoft Defender.
Проверьте, что тип запуска у служб – Автоматический. Если какая-то служба остановлена, запустите ее вручную. Если все службы запущены, перезапустите их.
Включение Защитника Windows 10 в реестре
В версиях Windows 10 до билда 2004 можно было отключить защитник Windows через реестр. Для этого использовался параметр реестра DisableAntiSpyware. Этот параметр обычно включался OEM производителями или системными администраторами, когда на устройстве предполагалось использовать стороннее антивирусное приложение.
Запустите редактор реестра (regedit.exe) и перейдите в ветку HKEY_LOCAL_MACHINE\SOFTWARE\Policies\Microsoft\Windows Defender. Если в этой ветке есть параметры DisableAntiVirus и DisableAntiSpyware (хотя бы один), удалите их или измените значение на 0.

После этого, попробуйте перезапустить службу Защита от вирусов и угроз.
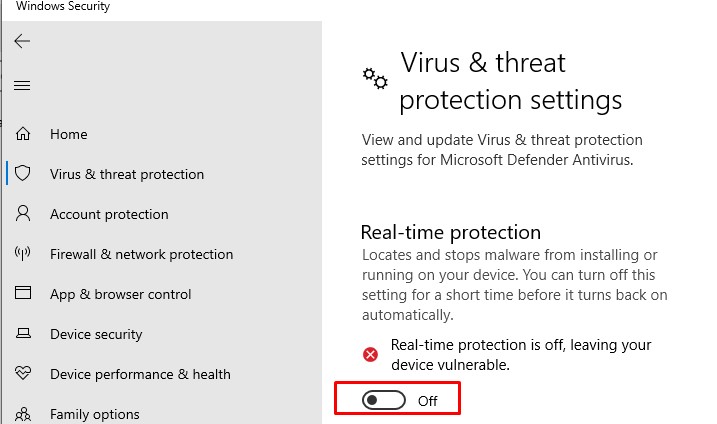
Затем перейдите в Settings -> Windows Security и нажмите на кнопку Virus & threat protection -> Turn on.

Также проверьте, что включена опция Real-time protection в Windows Security -> Virus & threat protection -> Manage settings.
В современных билдах Windows 10 нельзя отключить Microsoft Defender через параметр реестра
DisableAntiSpyware
(этой лазейкой пользовались многие вредоносы).
Microsoft Defender теперь автоматически отключается Windows 10, если он обнаруживает на компьютере сторонний антивирус. Если у вас не установлен сторонний антивирус и вам нужно отключить Microsoft Defender, сначала вам нужно отключить функцию защиты Microsoft Defender Tamper Protection. Данная защита от изменений в системе безопасности Windows помогает предотвратить изменение вредоносными приложениями важных параметров антивируса Microsoft Defender, включая защиту в реальном времени и облачную защиту. Отключить Tamper Protection можно только через приложение Windows Security, и для подтверждения отключения появится запрос User Account Control (UAC).
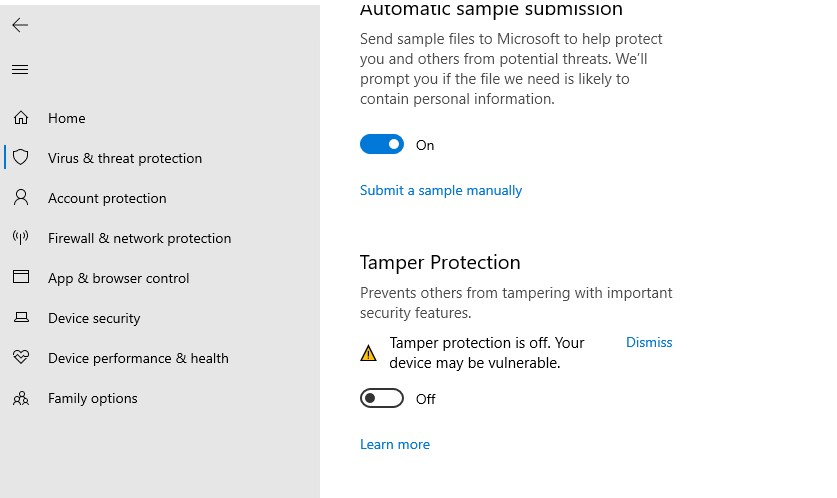
Отключить Tamper Protection можно и через реестр. Для этого в ветке HKEY_LOCAL_MACHINE\SOFTWARE\Microsoft\Windows Defender\Features нужно создать параметр типа DWORD с именем TamperProtection и со значением 0. Но перед этим сначала придется предоставить своей учетной записи права владельца на ветку Features.
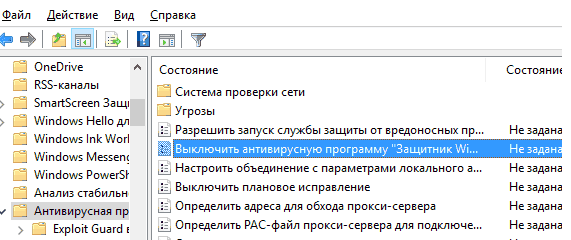
Проверьте, что Защитник Windows включен в групповых политиках
Откройте редактор локальной групповой политики (gpedit.msc) и проверьте, не отключен ли Windows Defender через GPO. Для этого, перейдите в раздел Computer Configuration -> Administrator Templates -> Windows Components -> Windows Defender Antivirus (Конфигурация компьютера -> Административные Шаблоны -> Компоненты Windows -> Антивирусная программа Защитник Windows). Проверьте, что политика Выключить антивирусную программу Защитник Windows (Turn off Windows Defender Antivirus) находится в состоянии Не задано или Отключена.
В Windows 10 2004 и выше ветка GPO с настройками Defender называется Microsoft Defender Antivirus.
Перерегистрация библиотек Microsoft Defender
Попробуйте выполнить перерегистрацию библиотек Защитника Windows. Для этого, откройте командную строку с правами администратора и выполните команды
regsvr32  atl.dll
regsvr32  wuapi.dll
regsvr32  softpub.dll
regsvr32  mssip32.dll
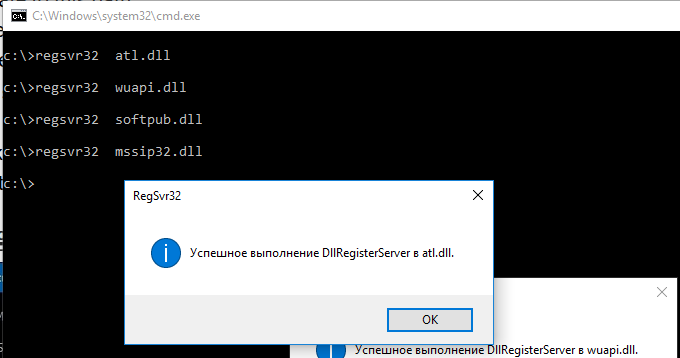
Перезапустите Windows Defender и проверьте, исправлена ли проблема.
Проверьте и установите обновления Windows
В редких случаях после установки ежемесячных обновлений Windows может перестать антивирус защитника Windows 10. Проверьте наличие новых обновлений и установите их через Settings -> Update & Security -> Windows Update -> Check for updates или с помощью PowerShell. Скорее всего, они исправят ситуацию.
Если ничего не помогло, проверьте целостность системных файлов и образа Windows командами:
sfc /scannow
и
DISM /Online /Cleanup-Image /RestoreHealth
Надеюсь, эта краткая инструкция помогла вам решить проблему с невозможностью запуска (остановкой) службы работы с угрозами.
,
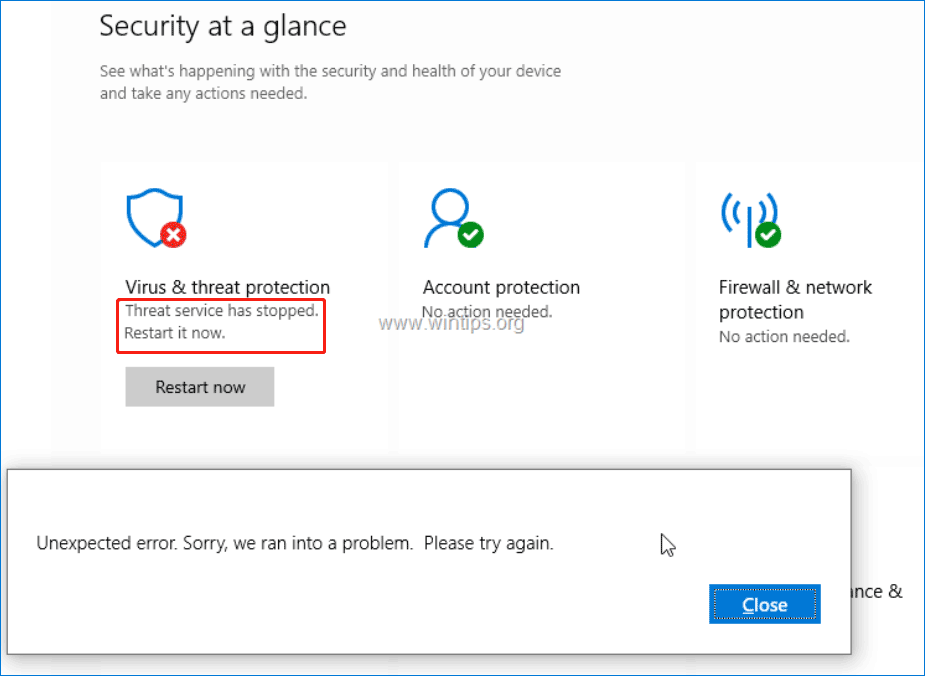
On a Windows 10-based computer, the Defender Antivirus Security Center may encounter the error: «Threat Service has stopped. Restart it now.» The easy way to fix the problem, is to press the «Restart now» button to start the threat service, but in some cases this doesn’t work and you receive a new error message that says «Unexpected error, Sorry, we ran into a problem. Please try again.»

This tutorial contains instructions to fix the following problem in Windows 10 Defender Virus & threat protection status: «Threat Service has stopped. Restart it now.»
How to FIX: Threat Service has stopped. Restart it now, in Windows 10.
Method 1. Uninstall Third-party Antivirus.
First of all ensure that you haven’t installed any other third-party antivirus on your machine, because when you install a third party antivirus in Windows 10, the Windows Defender security is disabled automatically, and the «Threat Service has stopped. Restart it now» error in Windows Security center is just an informational message..
Method 2. Check your system for viruses.
Important: The next step to resolve the Defender error «Threat Service has stopped. Restart it now» in Windows 10, is to make sure that your computer is 100% clean from harmful programs like rootkits, malware or viruses. To accomplish this task, follow the steps from this Quick Malware Scan and Removal Guide. If, after ensuring that your PC is virus free and the threat service is unable to start, continue to the methods below.
Method 3. Modify the Registry Policy for the Windows Defender.
1. Open Registry Editor. To do that:
1. Simultaneously press the Win + R keys to open the run command box.
2. Type regedit and press Enter to open Registry Editor.
2. Navigate to this key at left pane:
- HKEY_LOCAL_MACHINE\SOFTWARE\Policies\Microsoft\Windows Defender
3. Now look at the right pane if you can see a DWORD value named: DisableAntiSpyware
A. If you find the ‘DisableAntiSpyware DWORD then double click on it and change its value data from 1 to 0

B. If you don’t find the «DisableAntiSpyware’ DWORD value, then:
1. Right-click at an empty space on the right pane, and from the menu that appears, choose: New > DWORD (32-bit) Value.

2. Name the new value: DisableAntiSpyware and press Enter.

4. Close Registry Editor.
5. Restart your computer.
Method 4. Enable the Windows Defender Antivirus Service in Registry.
1. Open Registry Editor.
2. Navigate to this key at left pane:
- HKEY_LOCAL_MACHINE\SYSTEM\CurrentControlSet\Services\WinDefend
3. At the right pane, modify the Start REG_DWORD value, from 4 to 2

4. Close registry editor and restart your computer. *
* Note: If you cannot modify the Start value, with error: «Cannot Edit Start: Error writing the value’s contents«, then try to modify the registry in Safe Mode and if you fail again, continue to the next method.
Method 5. Enable the Windows Defender Antivirus Service in Registry OFFLINE
Step 1. Create a System Restore Point. *
* Note: This step is optional, but, for precautionary reasons I suggest to create a restore point of your system current state in order to restore your PC if something goes wrong.
To Create a restore point:
1. Open Windows Explorer.
2. At the left pane, right-click on «This PC» icon and select Properties.
3. Click System Protection.
4. At System Protection settings, click Configure.
5. At Restore Settings window:
a. Check the Turn on system protection.
b. Adjust the maximum disk space used for system protection, to (about) 10-15% of the maximum disk space.
c. Click OK.
6. Now click Create to create a restore point of the current state.
7. Type a recognizable name for the restore point and click Create.
8. When the operation is completed, continue to step-2.
Step 2. Modify the ‘WinDefend’ registry key Offline.
1. Proceed and start Windows 10 in recovery mode. To do that use one of the following ways:
A. From Windows GUI: Right click on Start menu and then press the Restart button while pressing the SHIFT key on your keyboard.
B. From Windows Sign-in screen: Click on the Power button and then choose Restart while pressing the SHIFT key on your keyboard.


2. At Recovery options, go to Troubleshoot -> Advanced Options -> Command Prompt. (Your computer will restart)
3. After restart, select an account with administrative privileges, type the password (if any) and click Continue.
4. In command prompt window type regedit and press Enter.

5. In Registry Editor, highlight the HKEY_LOCAL_MACHINE key.

6. From File menu, select Load Hive.

7. At ‘Look in’ select the disk where Windows are installed on (commonly is listed as disk «D:»).

8. Now navigate to the following path on the OS disk:
- Windows\system32\config\
9. Highlight the SYSTEM file and click Open.

10. Type a Key Name for the offline registry database (e.g. «Offline«) and press OK.

11. Now navigate at the following registry key:
-
HKEY_LOCAL_MACHINE\Offline\SYSTEM\ControlSet001\Services\WinDefend
12. At the right pane, modify the Start REG_DWORD value, from 4 to 2 and click OK.

13. When done, highlight the key you previously created (e.g. the «Offline» key ) and from the File menu, choose Unload Hive to write back the changes you made to the Registry.

14. Select Yes when asked to unload the current key,

15. Close the ‘Registry Editor’ and the ‘Command Prompt’ windows.
16. Click Turn off your PC.
17. Power On you PC and boot to Windows normally.
Method 6. FIX Windows Problems with DISM & SFC tools.
1. Open command prompt as administrator. To do that:
1. In the Search box type: cmd or command prompt
2. Right click on the command prompt (result) and select Run as Administrator.
2. At the command prompt window, type the following command & press Enter:
- Dism.exe /Online /Cleanup-Image /Restorehealth

3. Be patient until DISM repairs the component store. When the operation is completed, (you should be informed that the component store corruption was repaired), give this command and press Enter:
- SFC /SCANNOW

4. When SFC scan is completed, restart your computer.
Method 7. Repair Windows 10 with an in-place Upgrade.
Another method that usually works, to fix Windows problems, is to perform a Windows 10 Repair-Upgrade, by using the Media Creation tool to create an ISO or USB Windows 10 install media. For that task follow the detailed instructions on this article: How to repair Windows 10.
That’s it! Which method worked for you?
Let me know if this guide has helped you by leaving your comment about your experience. Please like and share this guide to help others.
If this article was useful for you, please consider supporting us by making a donation. Even $1 can a make a huge difference for us in our effort to continue to help others while keeping this site free:
- Author
- Recent Posts
Konstantinos is the founder and administrator of Wintips.org. Since 1995 he works and provides IT support as a computer and network expert to individuals and large companies. He is specialized in solving problems related to Windows or other Microsoft products (Windows Server, Office, Microsoft 365, etc.).
“Windows Security threat service has stopped restart it now” is a common issue. If you are hit by this unexpected error in Windows 10/11, what should you do to get out of the trouble? Take it easy and you can find some effective solutions from this post on the MiniTool website.
Windows Defender, also called Windows Security, is a powerful antivirus program that is built in Windows 10 and 11. It can help to scan the entire operating system and protect the PC against malware and viruses in real-time.
However, sometimes this antivirus software doesn’t function properly and you may run into some common issues, for example, Windows Defender not turning on, Windows Security not working, Windows Defender Offline Scan not working, and more. If you encounter one of these issues, click the given link to find solutions.
Besides, you may be hit by another common unexpected error – threat service has stopped restart it now. This is the topic that we will discuss today.
When trying to launch this antivirus program, you may see this error message. If you click the Restart now button, the service starts and the error disappears. That’s good. However, if not, another error occurs on the computer screen saying “Unexpected error. Sorry, we ran into a problem. Please try again”.
Well then, how can you get rid of the trouble? Don’t feel vexed since you can easily fix this error after trying the methods below.
Fixes for Threat Service Has Stopped Restart It Now
Enable Windows Defender Services in Services
To run Windows Defender or Windows Security, the related services should be running. Or else, you may get the error “Threat service has stopped. Restart it now” in Windows 11/10. The following is how to enable these services in the Services window:
Step 1: Open the services management console by typing services.msc in the search box and clicking Services. Or you can press Win + R, type services.msc and click OK.
Step 2: Locate the following services and make sure the startup type of these services is set to the default values:
- Windows Defender Advanced Threat Protection Service – Manual
- Windows Defender Antivirus Network Inspection Service – Manual
- Windows Defender Antivirus Service – Manual
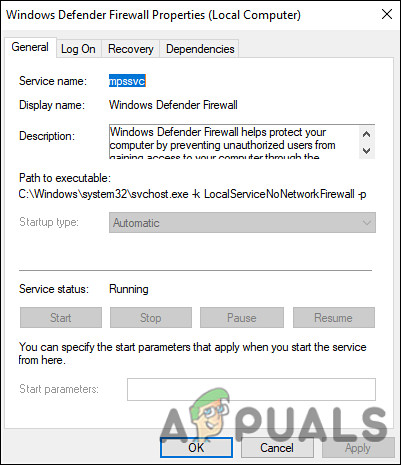
- Windows Defender Firewall Service – Automatic
If any service is stopped, start it. Just double-click on it and choose Start. To change the startup type, double-click on one service and choose the correct option from the drop-down menu in Startup type.
Edit Windows Registry
If the above fix cannot work to remove “threat service has stopped restart it now”, you can try to enable Windows Defender services in Windows Registry.
Tips:
Before you proceed with the modification of the Windows Registry, it is recommended to back up your registry items since mistaken operations may cause the system to go wrong. To do this work, follow the guide — How to Back up Individual Registry Keys Windows 10/11.
See how to do this task:
Step 1: Launch Windows Registry Editor by clicking Win + R, typing regedit to the text box, and clicking OK. Or, type regedit to the search box in Windows 10/11 and click the result to open this editor.
Step 2: Click Yes in the User Account Control window to continue.
Step 3: Navigate to this path step by step: HKEY_LOCAL_MACHINE\SOFTWARE\Policies\Microsoft\Windows Defender. Or you can copy & paste the path to the address bar and press Enter.
Step 4: If you see the two items – DisableAntiVirus and DisableAntiSpyware in the right pane, double-click on each one and set the value data to 0.
If these two items are not displayed, create them: right-click on the empty space and choose New > DWORD (32-bit) Value. Give a name to one. Then, change the value data of each item to 0.
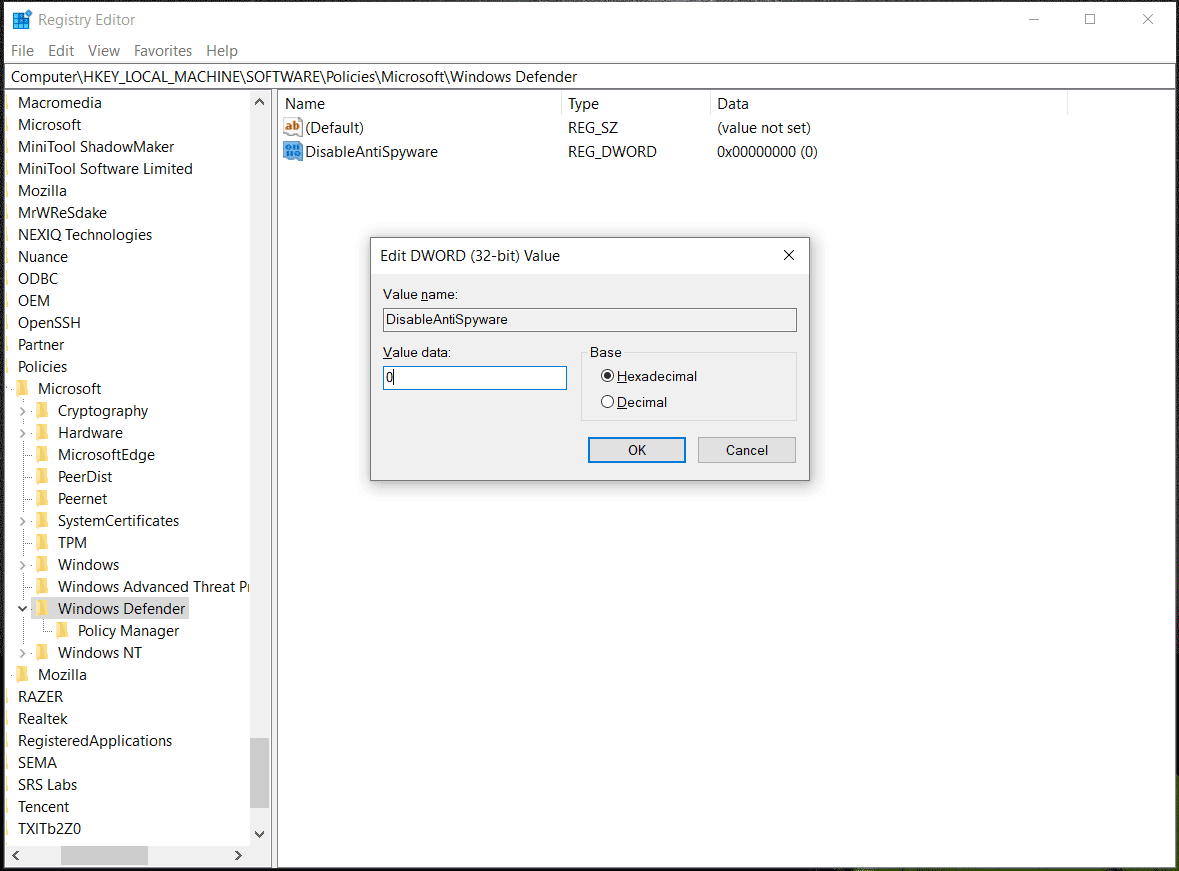
Step 5: Close Registry Editor and restart your Windows PC. Then, go to run Windows Defender to see if the issue is solved.
Besides, there is another thing you can have a shot.
Step 1: Go to the path: HKEY_LOCAL_MACHINE\SYSTEM\CurrentControlSet\Services\WinDefend.
Step 2: In the right pane, double-click on the Start item and change its value data to 2 from 4.
If your PC misses some required services like WinDefend and SecurityHealthService, you cannot see them in this path HKEY_LOCAL_MACHINE\SYSTEM\CurrentControlSet\Services. To fix “Windows Security threat service has stopped restart it now”, try the next method.
Export the Missing Security Service from Another PC
Note:
Make sure the system version of the Windows PC you will export the security services from is the same as yours. Besides, prepare a USB flash drive and connect it to another PC.
Step 1: Go to HKEY_LOCAL_MACHINE\System\CurrentControlSet\Services, right-click on SecurityHealthService or WinDefend and choose Export to export the file to your USB drive. Then, name the file as SecurityHealthService or WinDefend.
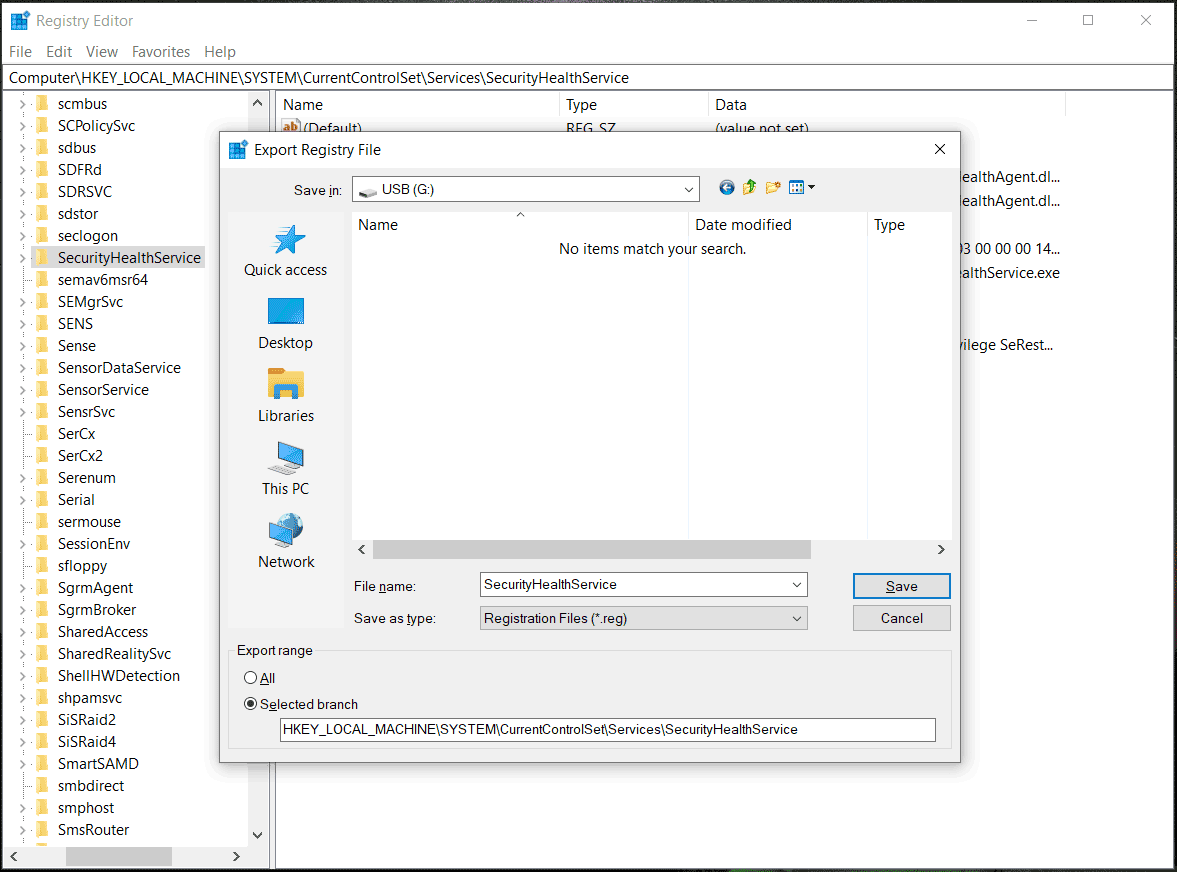
Step 2: Eject the USB drive from the PC and plug it into your computer.
Step 3: Copy the exported registry file to your desktop from the USB drive and double-click on it to merge it to Windows Registry.
Step 4: Restart the PC and see if the issue – Windows Security threat service has stopped restart it now is fixed.
Uninstall Third-Party Antivirus
Sometimes “Threat service has stopped. Restart it now” is only an informational message. If you install any third-party antivirus program on your Windows 10/11 PC, Windows Defender will stop working automatically and shows you the message. Go to uninstall this software since it can interfere with Windows Security/Windows Defender.
Just go to Control Panel and click Uninstall a program from the Program category. Right-click on the antivirus program and click Uninstall.
Run SFC and DISM
Sometimes “threat service has stopped restart it now unexpected error” is caused by missing or corrupted system files. So, you can try to run an SFC and DISM scan to check for the entire operating system and repair corruption to fix some issues like the Windows Security issue.
Step 1: Type command prompt in the search box in Windows 10/11 and click Run as administrator from the right pane.
Step 2: Type sfc /scannow and press Enter to begin verification.
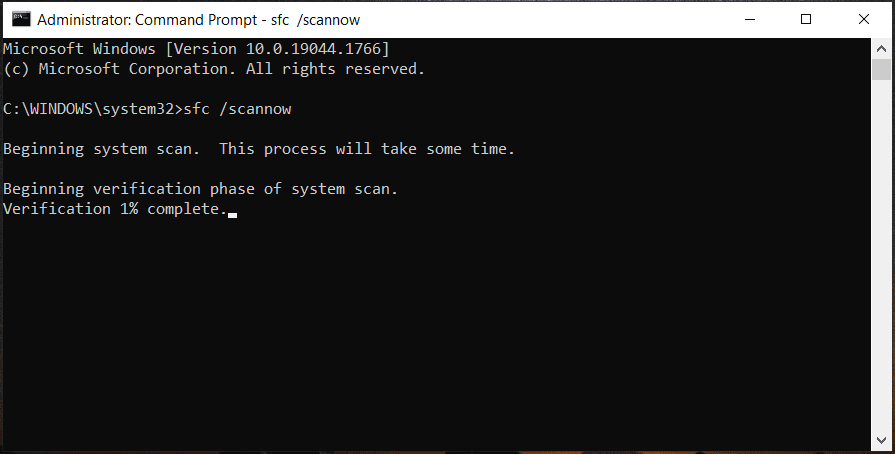
Tips:
Sometimes System File Checker fails to scan and it may get stuck at verification. If you are hit by this issue, go to find solutions from this related article — Windows 10 SFC /Scannow Stuck at 4/5/30/40/73, etc.? Try 7 Ways.
Step 3: After finishing the SFC scan, type Dism.exe /Online /Cleanup-Image /Restorehealth to the CMD window and press Enter. This process will take a few minutes and wait patiently.
Repair Windows 10/11 via an In-Place Upgrade
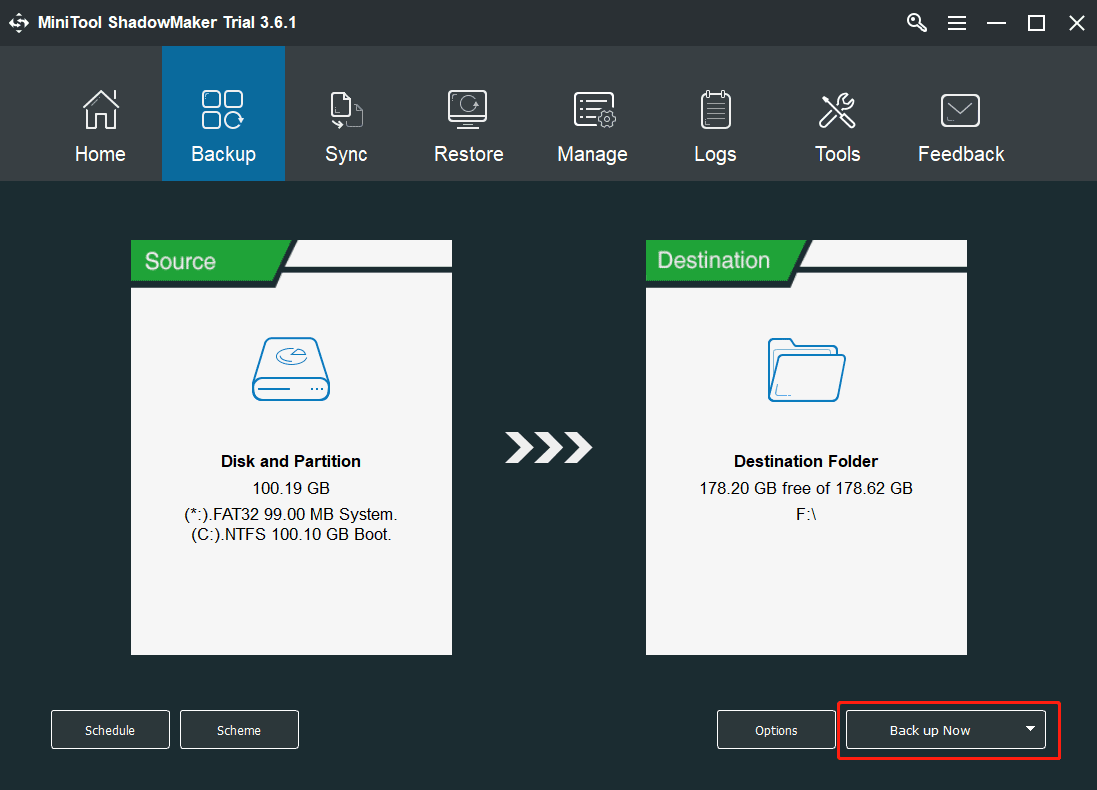
Another solution to fix the Windows Defender issue is to perform an in-place upgrade and you can also have a shot. Before you upgrade this PC, it is recommended to back up your important data and create a system image to avoid something wrong.
To do this task, we strongly recommend using MiniTool ShadowMaker, a professional PC backup software for Windows 11/10/8/7. It can be used to back up files, folders, systems, disks, and partitions. This program can meet your requirements well. It is free to use to enjoy all the features in 30 days. Just click the following button to download it.
MiniTool ShadowMaker TrialClick to Download100%Clean & Safe
Step 1: After downloading MiniTool ShadowMaker Trial Edition, double-click on the icon to launch it on your PC.
Step 2: Move to the Backup tab, you can find this software backs up the system by default since all the system-related partitions are selected as the backup source. If you want to back up data, go to Source > Folders and Files, check the items you want to back up, and click OK.
Step 3: Go to Destination and choose a path to save the backup. An external hard drive or a USB flash drive is recommended.
Step 4: Click the Back up Now button to execute this task at once.
Next, it is time to perform an in-place upgrade to fix “threat service has stopped restart it now”. See the guide below to know how to do this work.
Note:
To repair your Windows 10/11 via the upgrade, you need to ask Media Creation Tool for help and here we take Windows 10 as an example.
Step 1: Go to the Download Windows 10 page from Microsoft and download Windows 10 Media Creation Tool by clicking the Download tool now button.
Step 2: Double-click on the exe file on your PC and click Yes in the User Account Control interface.
Step 3: After a few things are ready, click the Accept button to agree to applicable notices and license terms.
Step 4: Check the option of Upgrade this PC now and click Next to go on.

Tips:
If you need to create a bootable USB drive or download an ISO file of Windows 10, tick the option of Create installation media (USB flash drive, DVD, or ISO files) for another PC.
Step 5: This tool is downloading Windows 10 and this can take a few minutes. During the process, you can feel free to keep using your PC.
Step 6: This tool is checking for updates and wait patiently.
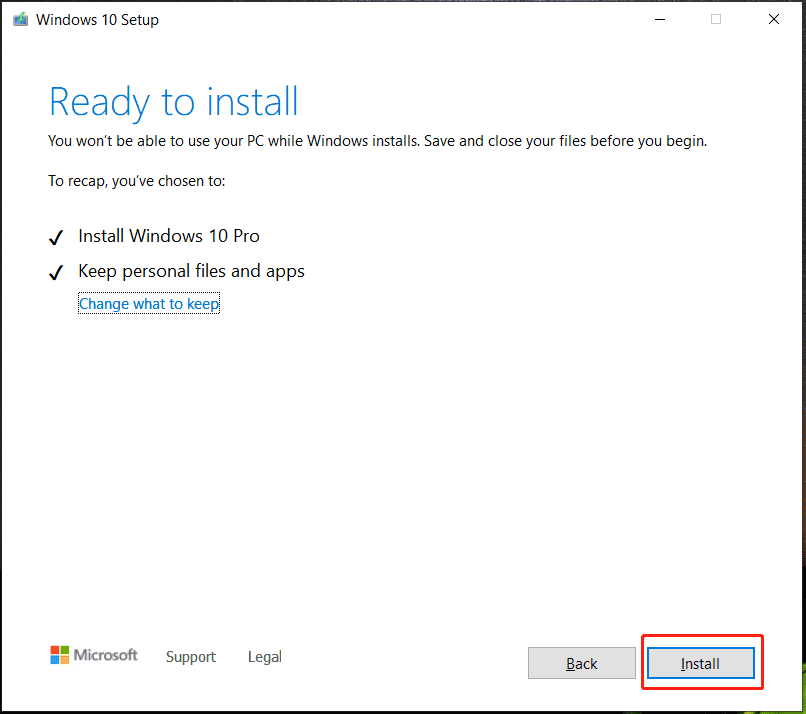
Step 7: When everything is ready, click the Install button to start installing Windows 10.
Tips:
If you want to keep other things during the installation, click Change what to keep and select the corresponding option.
If you are running Windows 11 and need to perform an in-place upgrade, refer to this post to find what you should do – How to Perform a Windows 11 In-Place Upgrade.
After finishing the update, now you can try to run Windows Defender or Windows Security and the issue should be removed.
Tips to Protect Your PC
Only running Windows Defender is not enough to keep your PC secure and you can find why from our previous post – Is Windows Defender Enough? More Solutions to Protect PC. To make sure your computer is safe and avoid some threats, there are some things you should do:
- Don’t Open Emails from Unfamiliar Users
- Turn on SmartScreen Filter
- Turn on User Account Control (UAC)
- Don’t Visit Suspect Websites
- Don’t Install Cracked Software
- Pay Attention to Your Downloaded Files
- Strengthen Your Internet Browser Security Settings
- More…
To find details, read our previous post – How to Protect Your Computer from Viruses? (12 Methods).
Final Words
“Threat service has stopped restart it now” is a common issue on Windows 10/11. If your PC confronts this annoying problem, try the solutions above one by one and you should easily get rid of the trouble. If you find some other methods to help you out, you can write it in the comment below.
Besides, after fixing the issue, we strongly recommend backing up your PC to keep the machine safe. In addition, try some other reliable ways to protect your PC against viruses and malicious programs since Windows Defender is not enough to keep the PC safe.
There are quite a few people encountering issues with Windows Defender on their newly installed Windows 11. This mainly happens after performing an upgrade from Windows 10, and surprisingly does not only affect people who have upgraded on unsupported hardware.

The users encountering this issue have reported that they see a blank screen whenever they launch Windows Security. Moreover, in some cases, the entire Privacy & Security menu in Windows Settings becomes unresponsive, leaving the users frustrated.
In this guide, we will walk you through several effective troubleshooting methods that helped users resolve the issues in no time. Let’s jump right in!
Reinstall Windows Security App
It turns out that the problem at hand occurs if a bug or corruption error is affecting the Windows Defender application and preventing it from functioning properly. The workaround that did the trick for several affected users was reinstalling the Windows Security application, which is why recommend you give it a shot.
This method is more likely to be effective for people who are still using Windows 11 Insider build.
Here is what you need to do:
- Type Powershell in the search area of the taskbar and click on Run as administrator.
- Click Yes in the User Account Control prompt to proceed.
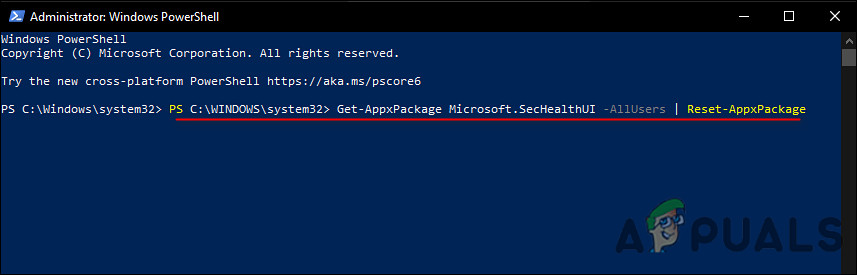
- Once you are in the Powershell window, type the command mentioned below and hit Enter to execute it.
PS C:\WINDOWS\system32> Get-AppxPackage Microsoft.SecHealthUI -AllUsers | Reset-AppxPackage

Reinstall the Windows Security App - Once the command is executed successfully, check if you can use the Windows Defender service without any issues.
- In the event that this does not work, you can re-deploy Windows applications. This involves installing an updated version of an application alongside an older version. To do so, launch elevated Powershell again.
- This time in the Powershell window, execute the following commands one by one.
PS C:\WINDOWS\system32> Set-ExecutionPolicy Unrestricted PS C:\WINDOWS\system32> Get-AppXPackage -AllUsers | Foreach {Add-AppxPackage -DisableDevelopmentMode -Register "$($_.InstallLocation)\AppXManifest.xml"} - Once done, close Powershell and check if doing so fixes the issue.
Reset or Repair Windows Security App
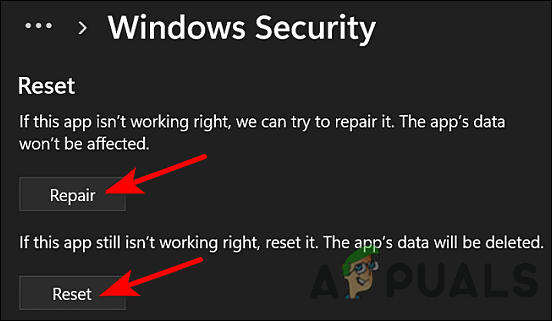
In case you do not want to reinstall the Windows Security application entirely, you can also reset or repair the application by following the steps mentioned below:
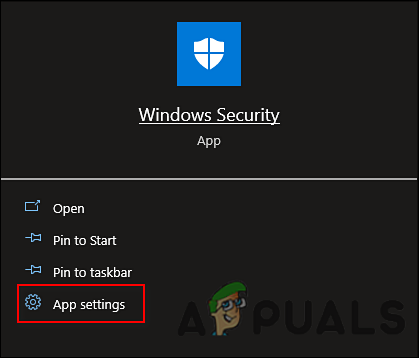
- Type Windows Security in the search area of your taskbar.
- Choose App settings from the context menu.

Launch Windows Security app settings - In the Apps menu, scroll a bit down to the Reset section and select Repair or Reset according to your preferences.

Click on either Repair or Reset button
Run System File Checker
In some cases, you might also not be able to use the Windows Defender and Windows Security service if a virus or a generic corruption error is infecting your operating system.
Fortunately, Windows comes with several built-in troubleshooting utilities that can help you scan for issues within the system and then resolve them without much user input. One such utility is the System File Checker, which allows you to repair corrupt system files in Windows. This program scans all of the protected system files and replaces the damaged ones with cached copies in the compressed folder C:\Windows\System32\dllcache.
Running SFC command via Command Prompt has proven to be useful for a lot of users, which is why we suggest you try it too. If this does not work, jump to the next method below.
Recheck Registry and Services Settings
Windows Registry is where low-level information about Windows programs and processes is stored, including that of Windows Security. This information is stored in the form of Registry keys. If due to any reason a key becomes corrupt, you are likely to encounter issues while using its corresponding services.
Likewise, in order to use a Windows feature or program, certain services need to be enabled in the Windows Services utility. If any of the relevant services are disabled completely or do not have the right to start automatically when you boot your system, you will encounter issues like the one at hand.
Regarding the Windows Security issue that is under discussion, we found several Registry keys that may be interfering with the service, preventing you from using it properly. If this scenario is applicable, deleting the Registry keys can fix the issue for you. In this method, we will also ensure that the relevant services are working properly in the Windows Defender utility.
However, before we proceed, we recommend you create a Registry backup, just in case.
Once you do that, follow the steps mentioned below.
- Type cmd in the search area of the taskbar and click on Run as administrator.
- Once you are inside the Command Prompt window, execute the commands mentioned below one by one:
reg delete "HKLM\Software\Microsoft\Windows\CurrentVersion\Policies" /f

reg delete "HKLM\Software\Microsoft\WindowsSelfHost" /f

reg delete "HKLM\Software\Policies" /f

reg delete "HKLM\Software\WOW6432Node\Microsoft\Policies" /f

reg delete

"HKLM\Software\WOW6432Node\Microsoft\Windows\CurrentVersion\Policies" /f

reg delete "HKLM\SOFTWARE\Policies\Microsoft\Windows Defender" /v DisableAntiSpyware

reg delete "HKCU\Software\Microsoft\Windows\CurrentVersion\Policies" /f

reg delete "HKCU\Software\Microsoft\WindowsSelfHost" /f

reg delete "HKCU\Software\Policies" /f

reg delete "HKLM\Software\Microsoft\Policies" /f
- Once done, type Windows Services in the search bar and click Open.
- In the Service window, locate and right-click on Windows Defender Firewall Service.
- Select Properties from the context menu.

- Set its start-up type to Automatic.

Set the service to automatic - Now in the same Services window, set the start-up type of the following services to Manual.

- Microsoft Defender Antivirus Service – Manual
- Windows Security Center Service- Manual
- Microsoft Defender Antivirus Network Inspection Service – Manual
- Windows Defender Advanced Threat Protection Service – Manual.
- Finally, close the Services window and check if doing so resolves the issue.
Clean Install Windows 11
If you have come this far and none of the methods above have worked, then your only viable option is to perform a clean installation of Windows 11.
When a device is having problems, a clean installation is a process of wiping out the hard drive and starting over with a new setup. During a clean installation, the hard drive is formatted and completely erased. Hopefully, clean installing Windows 11 will fix the Windows Defender issue once and for all.
Zainab Falak
Zainab Falak is a highly educated professional with a background in actuarial science and a strong passion for technology. Her expertise lies in the field of data analytics and she is a proficient programmer in languages such as Python and R. At Appuals, Zainab shares her extensive knowledge of Windows 8, 10, and 11, covering a broad range of topics related to these operating systems. Zainab’s ability to effectively communicate technical concepts in a clear and concise manner has earned her recognition and respect in the tech community. She is committed to staying up-to-date with the latest developments in the field and providing readers with insightful and informative content.
POCO, ACE, Loki и другие продвинутые C++ библиотеки
NullReferenced 13.05.2025
В C++ разработки существует такое обилие библиотек, что порой кажется, будто ты заблудился в дремучем лесу. И среди этого многообразия POCO (Portable Components) – как маяк для тех, кто ищет. . .
Паттерны проектирования GoF на C#
UnmanagedCoder 13.05.2025
Вы наверняка сталкивались с ситуациями, когда код разрастается до неприличных размеров, а его поддержка становится настоящим испытанием. Именно в такие моменты на помощь приходят паттерны Gang of. . .
Создаем CLI приложение на Python с Prompt Toolkit
py-thonny 13.05.2025
Современные командные интерфейсы давно перестали быть черно-белыми текстовыми программами, которые многие помнят по старым операционным системам. CLI сегодня – это мощные, интуитивные и даже. . .
Конвейеры ETL с Apache Airflow и Python
AI_Generated 13.05.2025
ETL-конвейеры – это набор процессов, отвечающих за извлечение данных из различных источников (Extract), их преобразование в нужный формат (Transform) и загрузку в целевое хранилище (Load). . . .
Выполнение асинхронных задач в Python с asyncio
py-thonny 12.05.2025
Современный мир программирования похож на оживлённый мегаполис – тысячи процессов одновременно требуют внимания, ресурсов и времени. В этих джунглях операций возникают ситуации, когда программа. . .
Работа с gRPC сервисами на C#
UnmanagedCoder 12.05.2025
gRPC (Google Remote Procedure Call) — открытый высокопроизводительный RPC-фреймворк, изначально разработанный компанией Google. Он отличается от традиционых REST-сервисов как минимум тем, что. . .
CQRS (Command Query Responsibility Segregation) на Java
Javaican 12.05.2025
CQRS — Command Query Responsibility Segregation, или разделение ответственности команд и запросов. Суть этого архитектурного паттерна проста: операции чтения данных (запросы) отделяются от операций. . .
Шаблоны и приёмы реализации DDD на C#
stackOverflow 12.05.2025
Когда я впервые погрузился в мир Domain-Driven Design, мне показалось, что это очередная модная методология, которая скоро канет в лету. Однако годы практики убедили меня в обратном. DDD — не просто. . .
Исследование рантаймов контейнеров Docker, containerd и rkt
Mr. Docker 11.05.2025
Когда мы говорим о контейнерных рантаймах, мы обсуждаем программные компоненты, отвечающие за исполнение контейнеризованных приложений. Это тот слой, который берет образ контейнера и превращает его в. . .
Micronaut и GraalVM — будущее микросервисов на Java?
Javaican 11.05.2025
Облачные вычисления безжалостно обнажили ахиллесову пяту Java — прожорливость к ресурсам и медлительный старт приложений. Традиционные фреймворки, годами радовавшие корпоративных разработчиков своей. . .