
Брандмауэр Microsoft Defender Firewall встроен во все современные версии Windows и Windows Server и позволяет настраивать правила фильтрации входящего и/или исходящего сетевого трафика на компьютере. Правила Windows Firewall можно настраивать локально на компьютере пользователя (с помощью консоли
wf.msc
, команды
netsh
или встроенного PowerShell модуля NetSecurity). На компьютерах Windows, которые добавлены в домен Active Directory вы можете централизованно управлять правилами и настройками Microsoft Defender Firewall с помощью групповых политик.
В крупных организациях правила фильтрации портов обычно выносятся на уровень маршрутизаторов, L3 коммутаторов или выделенных межсетевых экранах. Однако ничего не мешает вам распространить ваши правила ограничения сетевого доступа Windows Firewall к рабочим станциям или серверам Windows.
Содержание:
- Включить Windows Defender с помощью GPO
- Создать правила файервола Windows с помощью групповой политики
- Применить политики брандмауэра Microsoft Defender к компьютерам Windows
- Импорт и экспорт правил брандмауэра Windows в GPO
- Доменные и локальные правила Microsoft Defender
Включить Windows Defender с помощью GPO
Запустите консоль управления доменными групповыми политиками (Group Policy Management Console,
gpmc.msc
), создайте новую GPO с именем gpoFirewallDefault и перейдите в режим редактирования (Edit).
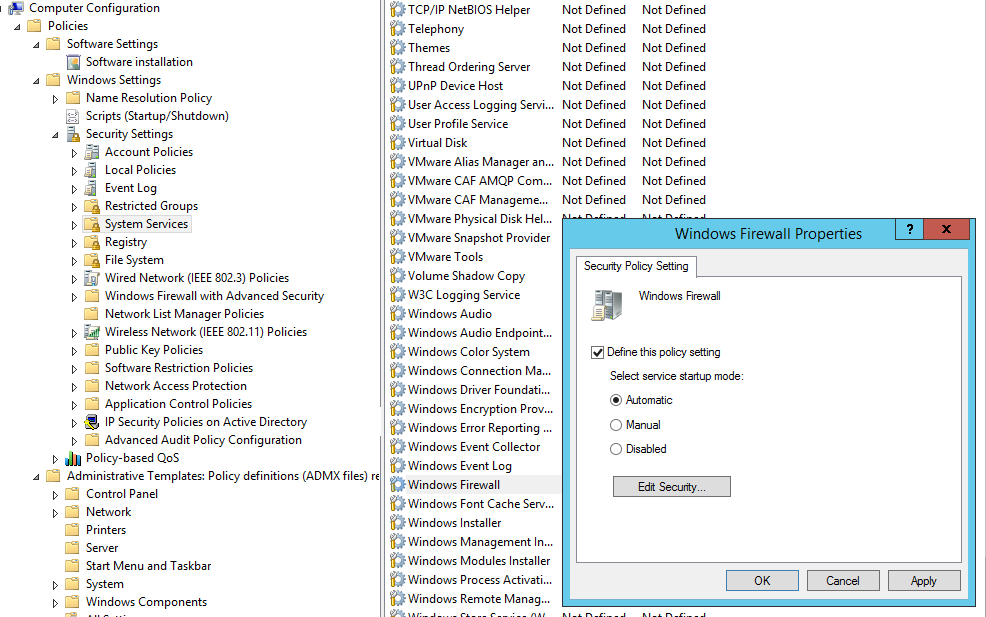
Чтобы пользователи (даже с правами локального админа) не могли выключить службу брандмауэра, желательно настроить автоматический запуск службы Windows Firewall через GPO. Для этого перейдите в раздел Computer Configuration -> Windows Settings -> Security Settings -> System Services. Найдите в списке служб Windows Firewall и измените тип запуск службы на автоматический (Define this policy setting -> Service startup mode Automatic). Убедитесь, что у пользователей нет прав на остановку служб.
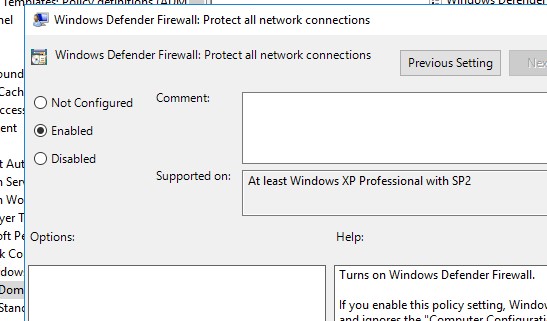
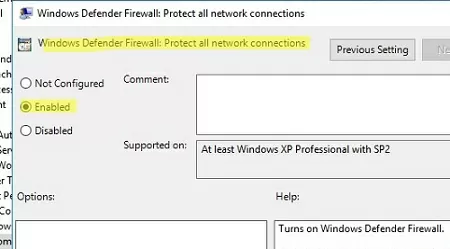
Затем перейдите в раздел Computer Configuration -> Policies -> Administrative Templates -> Network -> Network Connections -> Windows Defender -> Firewall -> Domain Profile и включите политику Windows Defender Firewall: Protect all network connections.
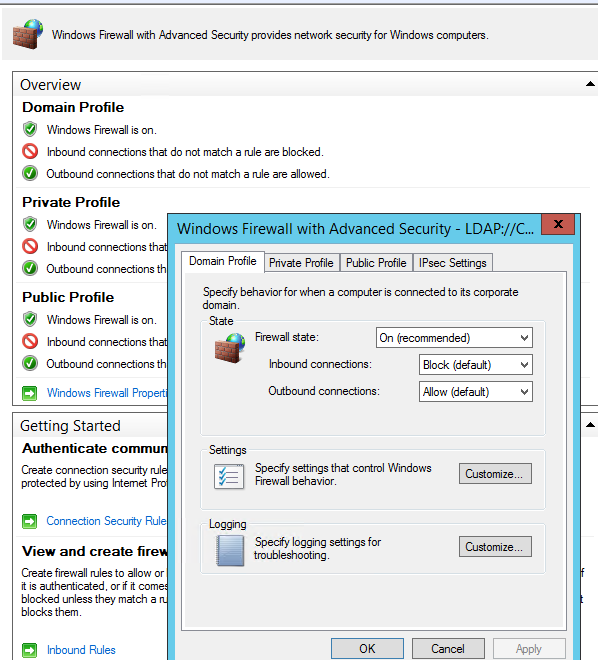
Откройте свойства Windows Firewall with Advanced Security в разделе GPO Computer Configuration -> Windows Settings -> Security Settings.
На всех трех вкладках Domain Profile, Private Profile и Public Profile (что такое профиль сети в Windows) измените состояние Firewall state на On (recommended). В зависимости от политик безопасности в вашей организации вы можете указать, что все входящие подключения по умолчанию запрещены (Inbound connections -> Block), а исходящие разрешены (Outbound connections -> Allow). Сохраните изменения.
В целях отладки правил файервола вы можете включить запись логов Windows Defender в текстовый файл %systemroot%\system32\logfiles\firewall\pfirewall.log (по умолчанию). Можно включить логирование отклоненных пакетов (Log dropped packets) или пакетов, который были разрешены правилами файервола (Log successfully connections). По-умолчанию логирование сетевых соединений в Windows отключено.
Создать правила файервола Windows с помощью групповой политики
Теперь рассмотрим, как создать правила файервола Microsoft Defender с помощью GPO. Для настройки правил, перейдите в раздел Computer Configuration -> Windows Settings -> Security Settings -> Windows Firewall with Advanced Security.
Интерфейс этого раздела напоминает локальную консоль управления брандмауэром Windows и состоит из трех секций:
- Inbound rules
- Outbound rules
- Connection security rules
Попробуем создать разрешающее входящее правило файервола. Например, мы хотим разрешить подключение к компьютерам по RDP (порт по умолчанию TCP 3389). Щелкните ПКМ по разделу Inbound Rules и выберите пункт меню New Rule. Запустится мастер создания нового правила брандмауэра.
Выберите тип правила. Можно разрешить доступ для:
- Программы (Program) – можно выбрать исполняемый exe программы;
- Порта (Port) – выбрать TCP/UDP порт или диапазон портов;
- Преднастроенное правило (Predefined) – выбрать одно из стандартных правил Windows, в которых уже имеются правила доступа (описаны как исполняемые файлы, так и порты) к типовым службам (например, AD, Http, DFS, BranchCache, удаленная перезагрузка, SNMP, KMS, WinRM и т.д.);
- Собственное правило (Custom) – здесь можно указать программу, протокол (другие протоколы помимо TCP и UDP, например, ICMP, GRE, L2TP, IGMP и т.д.), IP адреса клиентов или целые IP подсети.
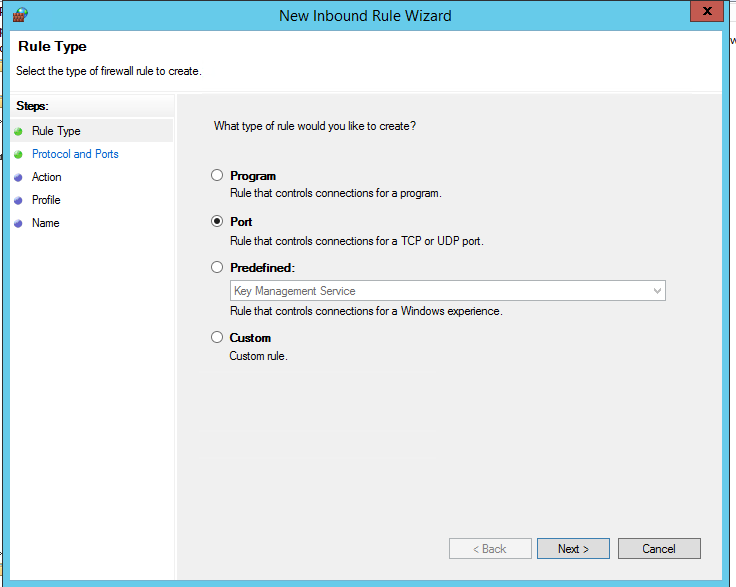
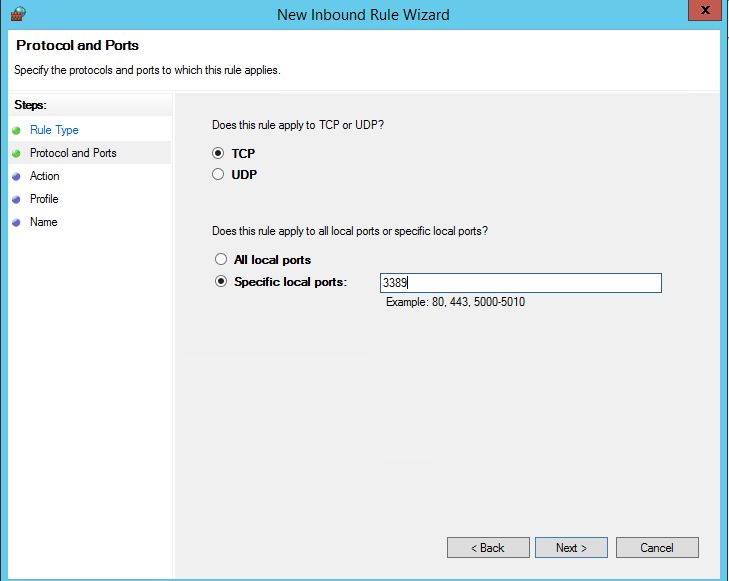
В нашем случае мы выберем правило Port. В качестве протокола укажем TCP, в качестве порта – Specific local ports -> 3389.

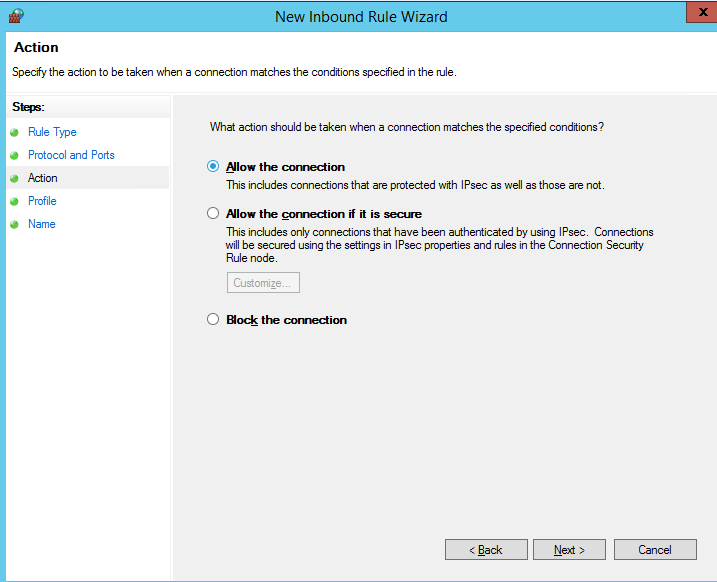
Далее нужно выбрать что нужно сделать с таким сетевым подключением: разрешить (Allow the connection), разрешить если оно безопасное или заблокировать (Block the connection).

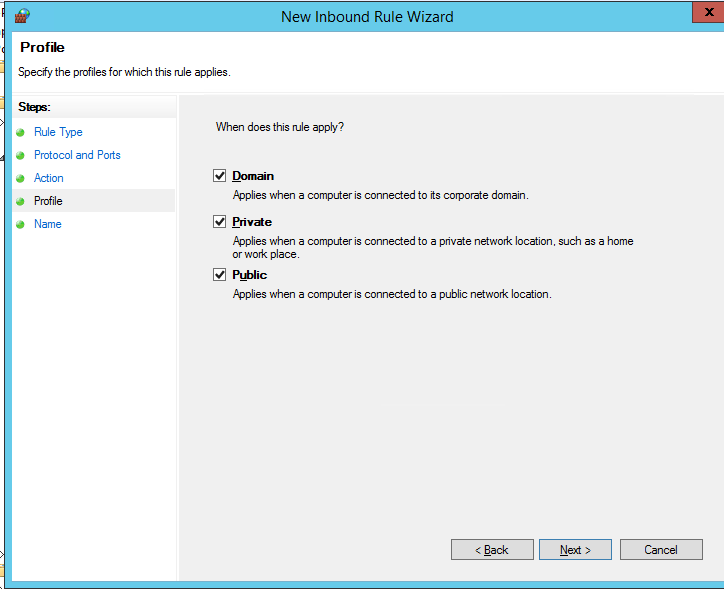
Осталось выбрать профили сети, для которых нужно применить это правило. Можно оставить все профили (Domain, Private и Public).
На последнем шаге нужно указать имя правило и его описание. Нажмите кнопку Finish и оно появится в списке правил брандмауэра.
В современных версиях Windows для трафика удаленного рабочего стола RDP также используется порт UDP 3389. Поэтому создайте второе правила Microsoft Defender и для этого порта.
Аналогичным образом вы можете настроить другие правила для входящего трафика, которые должны применятся к вашим клиентам Windows.

Вы можете создать правила как для входящего и исходящего трафика.
Выше мы рассмотрели, как использовать графический мастер для создания правил Windows Defender Firewall. Также вы можете сформировать список правил в простом текстовой форме и быстро создать правила для групповой политики Defender.
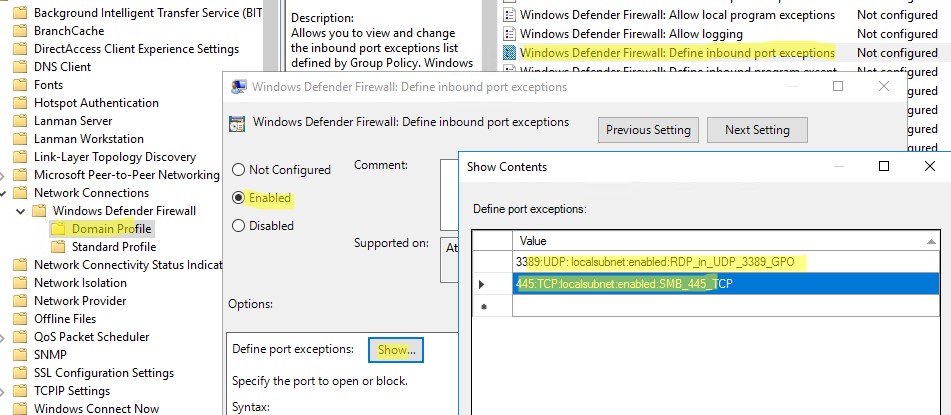
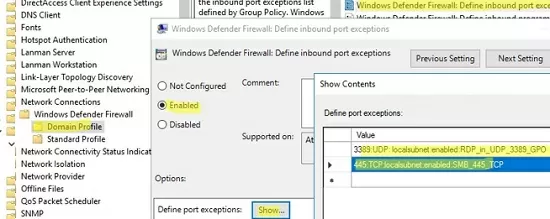
Перейдите в раздел Computer Configuration -> Policies -> Administrative Templates -> Network -> Network Connections -> Windows Defender Profile -> Domain Profile и откройте параметр Windows Defender Firewall: Define inbound port exceptions. Здесь вы можете создать список правил с помощью простых текстовых строчек.
Ниже представлен список правил, который я хочу добавить в групповую политику
3389:UDP:localsubnet:enabled:RDP_in_UDP_3389_GPO
445:TCP:localsubnet:enabled:SMB_445_TCP
443:TCP:192.168.100.10:enabled:HTTP_in_445_TCP
Нажмите кнопку Show и построчно скопируйте ваши правила в окно Define port exceptions.
Этот способ позволяет вам быстро создать большое количество входящих правил для файервола Windows.
Применить политики брандмауэра Microsoft Defender к компьютерам Windows
Теперь осталось назначить политику Firewall-Policy на OU (Organizational Unit) с компьютерами пользователей. Найдите в консоли Group Policy Management нужный OU, щелкните по нему правой кнопкой и выберите Link an Existing GPO. Выберите в списке вашу политику.
Важно. Прежде, чем применять политику файервола к OU с продуктивными компьютерами, настоятельно рекомендуется проверить ее на тестовых компьютерах. Из-за некорректной настройки брандмауэра вы можете полностью заблокировать сетевой доступ компьютерам. Для диагностики применения групповых политик используйте утилиту gpresult.exe.
Обновите настройки групповых политик на клиентах (
gpupdate /force
). Проверьте, что указанные вами порты открыты на компьютерах пользователей (можно использовать командлет Test-NetConnection или утилиту Portqry).
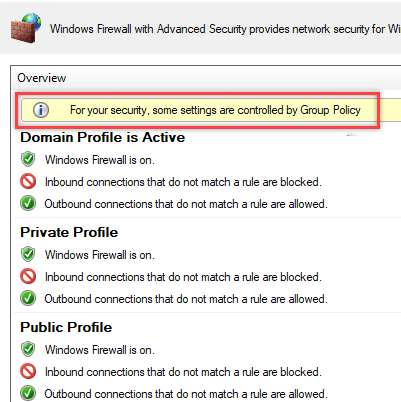
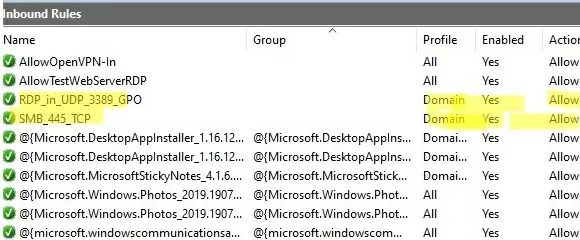
На компьютере пользователя откройте Панель управления\Система и безопасность\Брандмауэр Защитника Windows и убедитесь, что появилась надпись: Для обеспечения безопасности, некоторые параметры управляются групповой политикой (For your security, some settings are controlled by Group Policy), и используются заданные вами настройки брандмаэера.
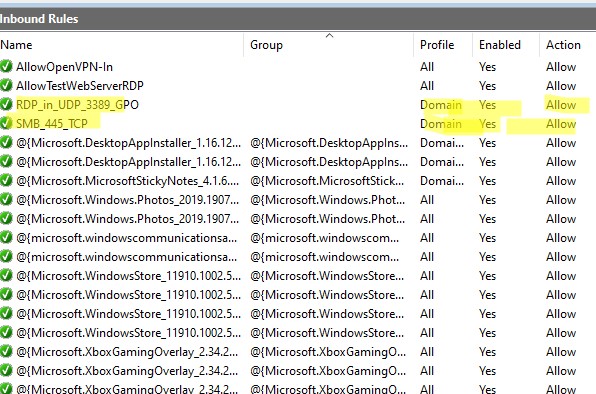
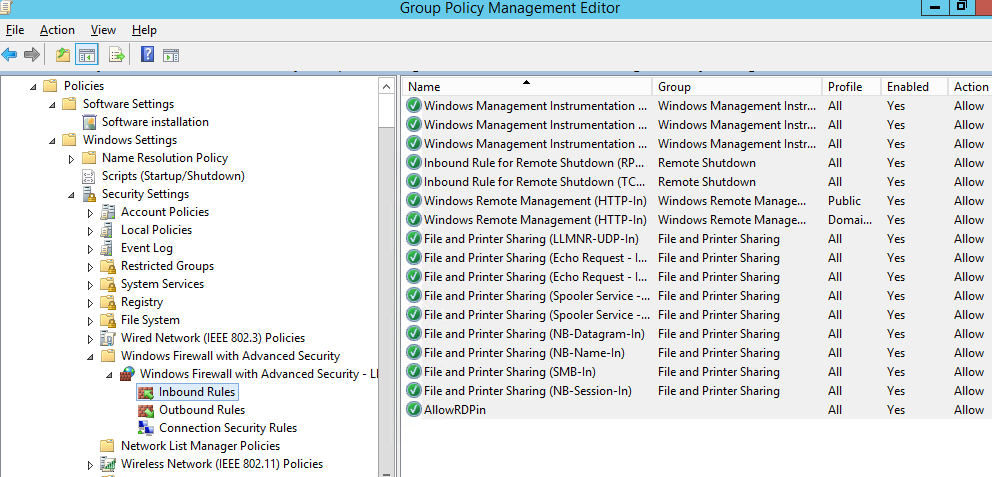
Пользователь теперь не может изменить настройки брандмауэра, а в списке Inbound Rules должны быть указаны все созданные вами правила. Обратите внимание, что по умолчанию новые правила из GPO добавляются к уже существующим локальным правилам файервола.
Также вы можете вывести текущие настройки Windows Defender с помощью команды:
netsh firewall show state
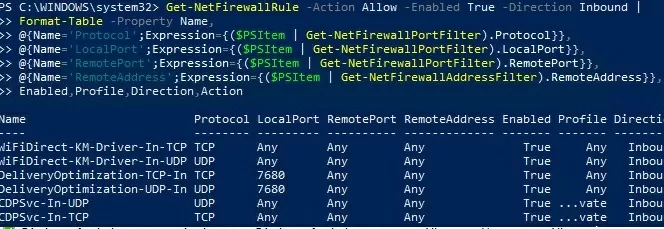
Или можно представить список правил в табличной форме с помощью скрипта PowerShell:
Get-NetFirewallRule -Action Allow -Enabled True -Direction Inbound |
Format-Table -Property Name,
@{Name='Protocol';Expression={($PSItem | Get-NetFirewallPortFilter).Protocol}},
@{Name='LocalPort';Expression={($PSItem | Get-NetFirewallPortFilter).LocalPort}},
@{Name='RemotePort';Expression={($PSItem | Get-NetFirewallPortFilter).RemotePort}},
@{Name='RemoteAddress';Expression={($PSItem | Get-NetFirewallAddressFilter).RemoteAddress}},
Enabled,Profile,Direction,Action

Импорт и экспорт правил брандмауэра Windows в GPO
Консоль Windows Defender Firewall позволяет экспортировать и импортировать текущие настройки файервола в текстовый файл. Вы можете настроить правила брандмауэра на эталонном компьютере и экспортировать их в консоль групповых политики.
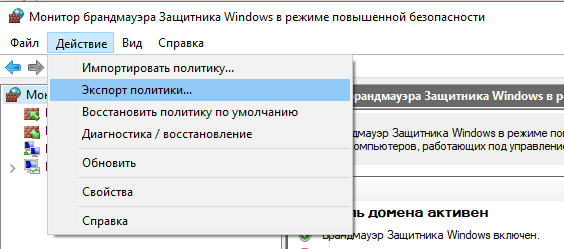
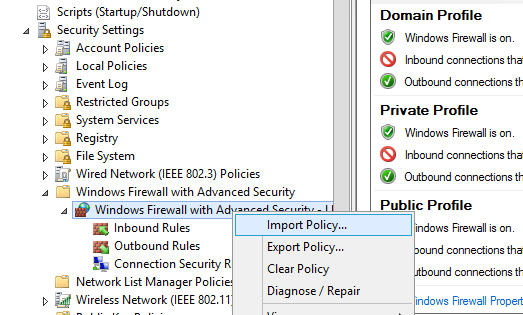
Настройте нужные правила, замет встаньте на корень оснастки брандмауэра (Монитор Брандмауэра Защитника Windows в режиме повышенной безопасности) и выберите пункт Действие -> Экспорт политики
Политика выгружается в WFW файл, который можно импортировать в редакторе Group Policy Management Editor, выбрав пункт Import Policy и указав путь к файлу wfw (текущие настройки будут перезаписаны).

Доменные и локальные правила Microsoft Defender
В GPO вы можете настроить, хотите ли вы разрешить локальным администраторам создавать на своих компьютерах собственные правила брандмауэра и как эти правила должны объединяться с правилами, назначенными через GPO.
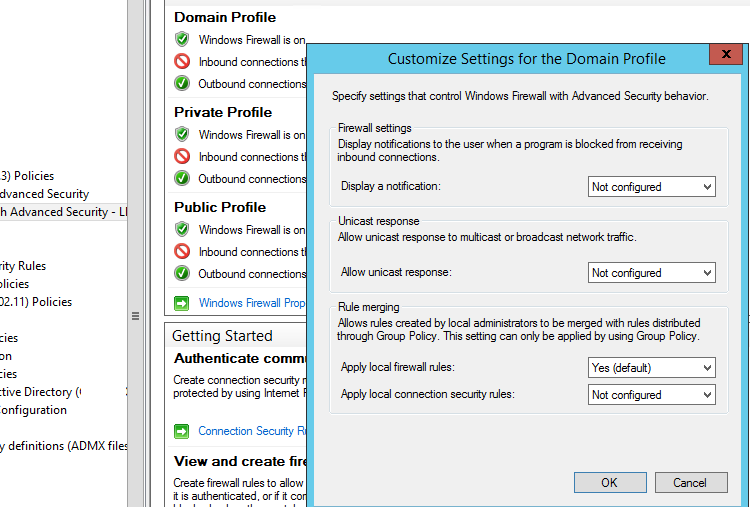
Откройте в GPO свойства политики (Windows Firewall Properties), выберите вкладку с профилем (Domain) и нажмите кнопку Customize.
Обратите внимание на настройки в разделе Rule merging. По умолчанию режим объединения правил включен. Вы можете принудительно указать, что локальный администратор может создавать собственные правила брандмауэра: в параметре Apply local firewall rules выберите Yes (default).

Совет. Блокирующие правила файервола имеют приоритет над разрешающими. Т.е. пользователь не сможет создать собственное разрешающее правило доступа, противоречащее запрещающему правилу, настроенному администратором через GPO. Однако пользователь может создать локальное запрещающее правило, даже если этот доступ разрешен администратором в политике.
Несколько советов об управлении брандмауэром Windows через GPO
- Создавайте отдельные политики с правилами брандмауэра для серверов и рабочих станций (для каждой группы одинаковых серверов возможно придется создать собственные политики в зависимости от их роли). Т.е. правила файервола для контроллера домена, почтового Exchange сервера, сервера с ролью Remote Desktop Services Host (RDSH) или Microsoft SQL Server будут отличаться;
- Для более точного нацеливания политики на клиентов можно использовать WMI фильтры GPO (например, вы можете привязать политику к хостам определенной IP подсети)
- Какие порты нужно открыть для той или иной службы нужно искать в документации на сайте разработчика. Процесс довольно кропотливый и на первый взгляд сложный. Но постепенно вполне реальной прийти к работоспособной конфигурации Windows файервола, который разрешает только одобренные подключения и блокирует все остальное. По опыту хочу отметить, что на ПО Microsoft можно довольно быстро найти список используемых TCP/UDP портов.
In an increasingly interconnected world, network security is paramount for any organization. Windows Defender Network Protection is a critical feature that helps prevent employees from accessing dangerous domains that might host phishing scams, exploits, and other malicious content on the Internet. Configuring this feature across an enterprise environment can be efficiently managed using Group Policy. This article will guide system administrators through the process of creating a Group Policy Object (GPO) to configure Windows Defender Network Protection.
Understanding Windows Defender Network Protection
Windows Defender Network Protection extends the malware and social engineering protection offered by Windows Defender to cover network traffic and connectivity on your organization’s devices. It is an essential layer in a defense-in-depth security strategy, providing an additional checkpoint for malicious content accessed via the web.
Prerequisites
- Administrative Access: Administrative privileges are required in your Active Directory (AD) environment.
- Group Policy Management Console (GPMC): This tool must be installed and accessible.
- Windows Defender Advanced Threat Protection (ATP): Ensure that Windows Defender ATP is part of your organization’s security suite.
Step-by-Step Instructions
Step 1: Access the Group Policy Management Console
Launch GPMC by searching for “Group Policy Management” in the Start menu or by running gpmc.msc.
Step 2: Create or Edit a Group Policy Object
- To create a new GPO, right-click on the desired domain or OU in GPMC and select “Create a GPO in this domain, and Link it here…”.
- To modify an existing GPO, locate it under the appropriate domain or OU, right-click it, and choose “Edit”.
Step 3: Navigate to Windows Defender Settings
In the Group Policy Management Editor, go to: Computer Configuration → Policies → Administrative Templates → Windows Components → Microsoft Defender Antivirus → Microsoft Defender Exploit Guard → Network Protection.
Step 4: Enable Network Protection
- Locate the setting “Prevent users and apps from accessing dangerous websites”.
- Set this policy to “Enabled”.
- Choose the mode of operation (Block, Audit, or Warn) for network protection. ‘Block’ mode will prevent users from accessing any dangerous domains, ‘Audit’ will allow access but log the action, and ‘Warn’ will alert the user of the dangers but permit bypassing the warning.
Step 5: Configure Additional Network Protection Settings (Optional)
- If there are specific needs or exceptions, configure them accordingly in the policy settings.
- This might include whitelisting certain domains or tailoring the warning messages.
Step 6: Apply and Enforce the GPO
- Click “Apply” and then “OK” to save your policy settings.
- Link the GPO to the relevant OU(s).
- The policy will be applied at the next Group Policy refresh cycle, or you can force it immediately by running
gpupdate /forceon the client machines.
Advanced Configuration and Use Cases
- High-Security Departments: Apply stricter network protection policies to departments with higher security needs, like R&D or finance.
- Compliance and Regulatory Requirements: In certain industries, maintaining stringent network security is part of regulatory compliance. Configuring network protection can be integral to these efforts.
- Different Policies for Different User Groups: Customize network protection policies based on the risk profile and needs of different user groups within the organization.
Security Considerations
- Balancing Security and Accessibility: Ensure that network protection policies do not overly restrict legitimate business activities. Regularly review and update the whitelist as needed.
- User Training and Awareness: Educate users about the importance of network security and the role of network protection in safeguarding organizational data.
- Monitoring and Reporting: Implement mechanisms to monitor and report on network protection alerts and blocks, especially in ‘Audit’ mode.
Troubleshooting
- Policy Not Applying: If the GPO does not appear to be taking effect, use tools like Resultant Set of Policy (RSoP) or
gpresultto diagnose and troubleshoot. - Over-blocking Issues: If legitimate websites are being blocked, adjust the policy settings or whitelist those specific domains.
Conclusion
Implementing a GPO to configure Windows Defender Network Protection is a critical step in securing an organization’s network. By following the steps outlined in this guide, system administrators can ensure robust protection against web-based threats, enhancing their organization’s overall cybersecurity posture.
Posted by
on April 17, 2017
While Windows Defender can be configured at a high level through the graphical user interface, we can instead configure Windows Defender using group policy which gives us more control and allows us to roll out the settings to the whole domain from a central location.
This post is part of our Microsoft 70-744 Securing Windows Server 2016 exam study guide series. For more related posts and information check out our full 70-744 study guide.
Configure Windows Defender using Group Policy
We’ll start by opening Server Manager, selecting Tools, followed by Group Policy Management.
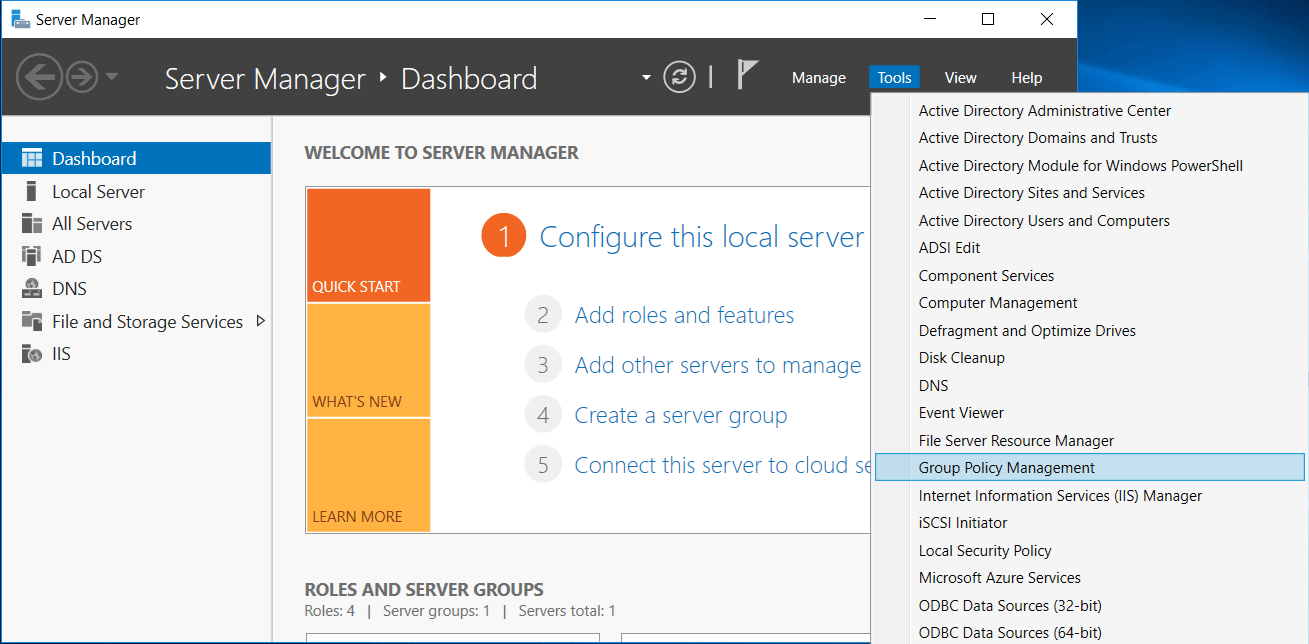
We can also open this by instead running ‘gpmc.msc’ in PowerShell or Command Prompt.
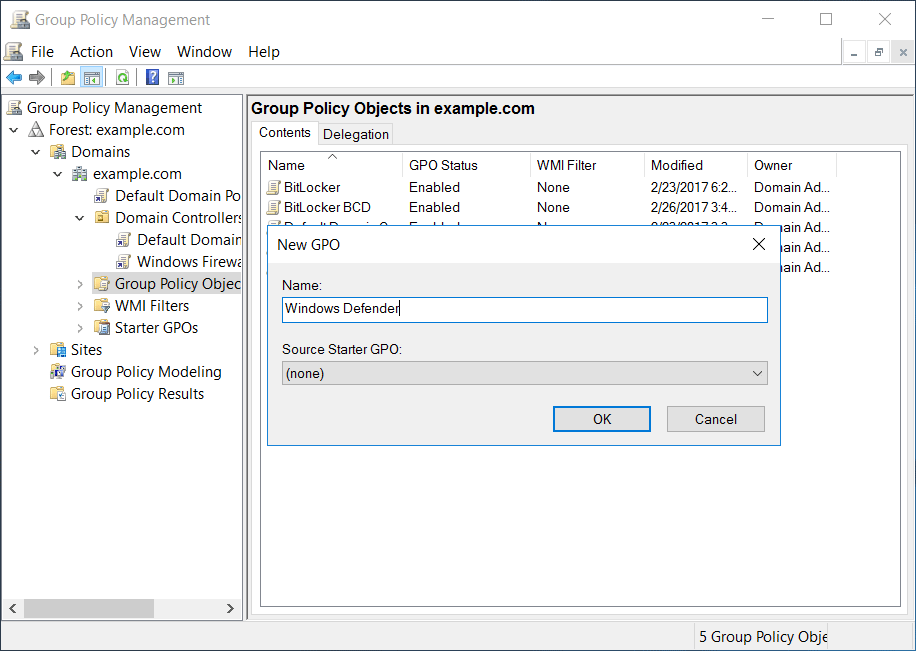
From the Group Policy Management window that opens, we’ll select the group policy objects folder within the domain, right click and select new to create a new group policy object (GPO). In this example we’ll name our GPO “Windows Defender”.
Once the base GPO has been created, right click it and select Edit. This will open the Group Policy Management Editor (GPME). From within GPME, select Computer Configuration > Policies > Administrative Templates > Windows Components > Windows Defender.
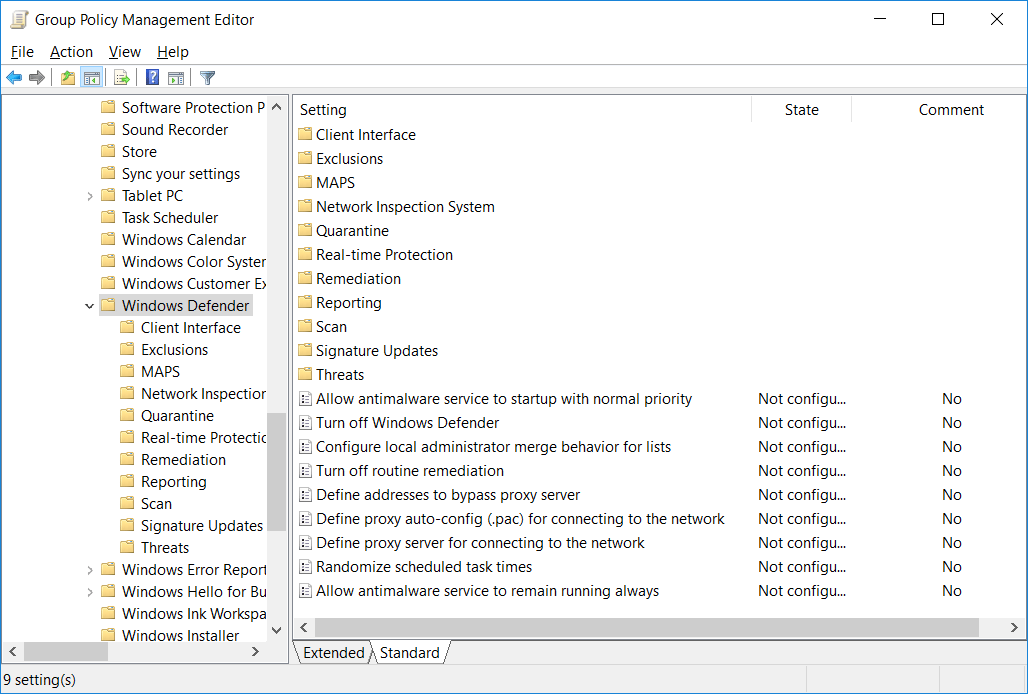
As you can see there are a lot of sub folders containing quite a few different policies that can be applied, we’ll cover some of the most useful items here.
- Turn off Windows Defender: We can set this policy to disabled, or leave it as not configured to have Windows Defender on and scanning for malware. As the policy is not configured by default, Windows Defender is enabled.
- Client Interface > Suppress all notifications: By default Windows Defender notifications will display to all clients, this policy can be enabled to stop clients from receiving notifications.
- Client Interface > Enable headless UI mode: If enabled this policy will not display the user interface to users, which may be preferable if Defender is centrally managed and users do not need to view information from it.
- Exclusions: We can define file extension, path, or process exclusions here. This will prevent the specified file, path, or process from being scanned by Windows Defender on all machines where the policy is applicable to.
- Quarantine > Configure removal of items from Quarantine folder: This policy defines the duration in days that a detected item should remain in the quarantine folder prior to being removed. By default items will be stored indefinitely and are not automatically removed.
- Scan > Allow users to pause scan: By default a user can pause a scan, this policy setting can be disabled to prevent users from pausing Defender scans.
- Scan > Specify the maximum percentage of CPU utilization during a scan: By default this is set to 50%, however we can modify it to the specific value we desire.
- Signature Updates > Turn on scan after signature update: By default straight after a definition update Windows Defender will automatically perform a scan, this can instead be disabled if needed by configuring this policy.
- Specify the day of week to run a scheduled scan: This policy allows us to set a custom day of the week to run the scans.
- Specify the time of day to run a scheduled scan: This policy allows us to set a custom time to run the scans.
Most of the policy options are pretty sensible and provide a good level of baseline security. Once you’ve made your policy changes, close the GPME window and link your policy to a site, domain, or organizational unit (OU) to apply it.
Remember that this is not an exhaustive list, I recommend looking through all of the available policy options for Windows Defender so that you can get an understanding of how you can configure Windows Defender using group policy for the 70-744 exam.
Summary
As shown we can configure Windows Defender using group policy, allowing us to customize the way Defender operates within our Windows domain.
This post is part of our Microsoft 70-744 Securing Windows Server 2016 exam study guide series. For more related posts and information check out our full 70-744 study guide.
Provide feedback
Saved searches
Use saved searches to filter your results more quickly
Sign up
Appearance settings
The Microsoft Defender Firewall is built into all modern versions of Windows and Windows Server and allows you to configure rules for filtering incoming and/or outgoing network traffic on your computer. Windows Firewall rules can be configured locally on the user’s computer (using the wf.msc console, the netsh command, or the built-in NetSecurity PowerShell module). On Windows computers joined to an Active Directory domain, you can centrally manage Microsoft Defender Firewall rules and settings using Group Policies.
In enterprise networks, the port filtering rules are usually set at the level of routers, L3 switches, or dedicated firewall devices. However, nothing prevents you from deploying your Windows Firewall network access rules to workstations or Windows servers.
Contents:
- Enable Microsoft Defender Firewall via GPO
- How to Create Windows Firewall Rule with GPO?
- Applying Microsoft Defender Firewall Rules to Windows Computers
- How to Export and Import Firewall Rules on Windows?
- Merging Domain and Local Microsoft Defender Firewall Rules
Enable Microsoft Defender Firewall via GPO
Open the domain Group Policy Management console (gpmc.msc), create a new GPO object (policy) with the name gpoFirewallDefault, and switch to Edit mode.
In order to prevent users (even having local admin permissions) to stop the firewall service, it is recommended to configure the automatic startup of the Windows Firewall using GPO. To do it, go to Computer Configuration- > Windows Settings -> Security Settings -> System Services. Find Windows Firewall in the list of services and change the startup type to automatic (Define this policy setting -> Service startup mode Automatic). Make sure that your users don’t have the permission to stop the service.

Then go to Computer Configuration -> Policies -> Administrative Templates -> Network -> Network Connections -> Windows Defender -> Firewall -> Domain Profile and enable the policy Windows Defender Firewall: Protect all network connections.
Go to the Computer Configuration -> Windows Settings -> Security Settings section in the GPO console. Right-click Windows Firewall with Advanced Security and open the properties.
Change the Firewall state to On (recommended) in all three tabs: Domain Profile, Private Profile, and Public Profile (What are network profiles (locations) in Windows?). Depending on the security policies in your company, you can specify that all inbound connections are blocked by default (Inbound connections -> Block), and outbound connections are allowed (Outbound connections -> Allow). Save the changes.

You can debug your Windows Defender Firewall rules on clients’ computers by enabling logging in %systemroot%\system32\logfiles\firewall\pfirewall.log. By default, network connection logging is disabled in Windows. You can log only rejected packets (Log dropped packets) or packets that were allowed by firewall rules (Log successful connections).
How to Create Windows Firewall Rule with GPO?
Now let’s look at how to create Microsoft Defender firewall rules via Group Policy. To configure your rules, go to Computer Configuration -> Windows Settings -> Security Settings -> Windows Firewall with Advanced Security.
The following sections are available in Firewall GPO:
- Inbound rules
- Outbound rules
- Connection security rules
Let’s try to create an allowing inbound firewall rule. For example, we want to allow the incoming RDP connection on Windows (the default RDP port is TCP 3389). Right-click the Inbound Rules section and select New Rule. The New Firewall Rule Wizard starts.
The firewall rule wizard has an interface similar to that of the local Windows Firewall on the user’s desktop computer.
Select the rule type. You can allow access to:
- Program – you can select a program executable (.exe);
- Port – you can select a TCP/UDP port or a port range;
- Predefined – select one of the standard Windows rules, which already contain access rules (both executable files and ports are described) to typical services (e. g., AD, HTTP(s), DFS, BranchCache, Remote restart, SNMP, KMS, WinRM, etc.);
- Custom – here you can specify a program, a protocol (protocols other than TCP or UDP, like ICMP, GRE, L2TP, IGMP, etc.), client IP addresses, or an entire IP network (subnet).

In our case, we’ll select the Port rule. Let’s specify TCP as the protocol, and 3389 as the local port number.
Then you must select what to do with such a network connection: Allow the connection, Allow the connection if it is secure, or Block the connection.
Then select the network profiles to apply the firewall rule. You can leave all profiles enabled (Domain, Private and Public).

In the last step, specify the name and description of the rule. Click Finish, and it will appear in the list of firewall rules.
Modern versions of Windows also use UDP port 3389 for Remote Desktop (RDP) traffic. Therefore, create a second Microsoft Defender rule for that port as well.
In the same way, you can configure other inbound firewall rules to apply to your Windows clients. You can create rules for both inbound and outbound traffic.
Above, we looked at how to use the graphical wizard to create Windows Defender Firewall rules. You can also create a list of rules in plain text form and quickly add a large number of exceptions to Defender Firewall GPO.
Go to Computer Configuration -> Policies -> Administrative Templates -> Network -> Network Connections -> Windows Defender Profile -> Domain Profile and open the Windows Defender Firewall: Define inbound port exceptions policy. Here you can create a list of firewall rules with simple text strings.
Below is the list of inbound firewall rules that I want to add to the Group Policy:
3389:UDP:localsubnet:enabled:In_RDP_UDP_3389
445:TCP:localsubnet:enabled:In_SMB_TCP_443
443:TCP:192.168.110.11:enabled:In_HTTP_TCP_445
Click the Show button and copy your rules line by line into the Define Port Exceptions form.
This method allows you to quickly create a large number of inbound rules for the Windows firewall.
Applying Microsoft Defender Firewall Rules to Windows Computers
Now it remains to assign the Firewall-Policy policy to the OU (Organizational Unit) with the user’s computers. Locate the desired OU in the Group Policy Management console, right-click on it, and select Link an Existing GPO. Select your firewall policy from the list.
Important. Before applying a firewall policy to OU with production computers, it is strongly recommended to try it out on some test computers. Otherwise, due to wrong firewall settings, you can completely block network access on computers. To diagnose how your Group Policy is applied, use the gpresult tool.
Update the Group Policy settings on your clients (gpupdate /force). Verify that the ports you specified are open on users’ computers (you can use Test-NetConnection cmdlet or Portqry tool to check for open ports).
On a user’s computer, open the Control Panel -> System and Security -> Windows Defender Firewall and make sure that there is the message For your security, some settings are controlled by Group Policy and your firewall settings are used.
Now a user cannot change the firewall settings, and all rules that you have created must appear in the Inbound Rules list. Note that by default, new rules from the GPO are added to existing local firewall rules.
You can also display the current Windows Defender settings with the command:
netsh firewall show state
Or you can get the list of inbound rules in a table form using a PowerShell script:
Get-NetFirewallRule -Action Allow -Enabled True -Direction Inbound |
 Format-Table -Property Name,
 @{Name='Protocol';Expression={($PSItem | Get-NetFirewallPortFilter).Protocol}},
 @{Name='LocalPort';Expression={($PSItem | Get-NetFirewallPortFilter).LocalPort}},
 @{Name='RemotePort';Expression={($PSItem | Get-NetFirewallPortFilter).RemotePort}},
 @{Name='RemoteAddress';Expression={($PSItem | Get-NetFirewallAddressFilter).RemoteAddress}},
 Enabled,Profile,Direction,Action
How to Export and Import Firewall Rules on Windows?
The Windows Defender Firewall Console allows you to export and import the current firewall settings to a text file. You can configure firewall rules on the reference computer and export them to the Group Policy console.
Configure the rules you need, then go to the root of the firewall snap-in (Windows Defender Firewall Monitor with Advanced Security) and select Action -> Export Policy
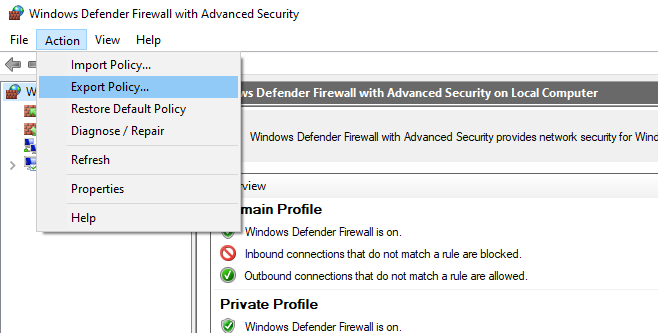
Your firewall rules will be exported into a WFW file, which can be imported to the Group Policy Management Editor by selecting the Import Policy option and specifying the path to the .wfw file (the current policy settings will be overwritten).
Merging Domain and Local Microsoft Defender Firewall Rules
In the GPO, you can specify whether you want to allow local administrators to create their own firewall rules on their computers, and how these rules should be merged with the rules assigned through the GPO.
Open the Windows Firewall policy properties in the GPO, select the tab with the profile (Domain) and click the Customize button. Check the settings in the Rule merging section. By default, rule merging is enabled. You can force a local administrator can create their own firewall rules: select Yes (default) in the Apply local firewall rules option.
Tip. Blocking firewall rules have a higher priority than allowing ones. It means that a user cannot create an allowing access rule if it contradicts the deny rule configured by an administrator using GPO. However, a user will be able to create a local blocking rule, even if the access is allowed in the policy by the administrator.
Some tips on managing the Windows Firewall using a GPO:
- Create separate GPOs with firewall rules for servers and workstations (you may need to create your own policies for each group of similar servers depending on their role. This means that the firewall rules for a domain controller, an Exchange server, a server with the Remote Desktop Services Host (RDSH) role, or Microsoft SQL Server will differ;
- You can use WMI GPO filters to target policies more precisely to clients (for example, you can apply the policy to hosts on a specific IP subnet);
- You can find out which ports must be opened for each service in the documentation on the vendor’s website. The process is quite painstaking and complicated at the first glance. However, you can finally get a working Windows Firewall configuration that allows only approved network connections and blocks the rest. From my experience, I’d like to note that you can quickly find the list of used TCP/UDP ports for most Microsoft services.