
Microsoft Windows Defender Exploit Guard is antimalware software that provides intrusion protection for Windows 10 OS users. Exploit Guard is available as a part of Windows Defender Security Center and can protect machines against multiple attack types. For example, Exploit Guard provides memory safeguards that protect against attacks that manipulate built-in memory. Other intrusion protection offered by Exploit Guard include application attack surface reduction, preventing malware from accessing folders and protecting networks from malware.
Sometimes referred to as WDEG, Exploit Guard settings can be changed through the Windows Defender Security Center app or Windows PowerShell. The Windows Defender Advanced Threat Protection (ATP) management console can also be used to manage Exploit Guard. The ATP management console provides detailed reports, such as activity alerts against suspicious traffic.
Windows Defender Exploit Guard features
Microsoft said the four main components of Windows Defender Exploit Guard are the following:
- Exploit mitigation. This protects applications. Exploit Guard works with Windows Defender Antivirus (AV) and third-party antivirus software to reduce the severity of possible exploits.
- Attack surface reduction. This minimizes the attack surface of an application. For example, it can help stop Office, mail and script-based malware. This component also requires Windows Defender AV.
- Network protection. This extends malware protection from Windows Defender SmartScreen in Microsoft Edge to endpoints. This component also requires Windows Defender AV.
- Controlled folder access. This protects files in system folders from malicious applications. This component also requires Windows Defender AV.
Attack surface reduction rules and network protection are offered in Windows 10 Pro version 1709 or later, Windows 10 Enterprise version 1709 or later, Windows 11 Pro and Windows 11 Enterprise. Windows Defender Exploit Guard can also run in audit mode to provide users with basic event logs.
Advantages and disadvantages of Windows Defender Exploit Guard
Advantages of Exploit Guard include the following:
- It is lightweight and does not use up a lot of system resources.
- It is free.
- It requires little user input.
- It is similar to the retired Enhanced Mitigation Experience Toolkit. Users experienced in EMET will notice the same features in Exploit Guard.
Some disadvantages of using Exploit Guard include the following:
- Some features require additional Windows software to run.
- Attack surface reduction rules and network protection are not available on all Windows editions and versions.
- Logging can be slow.
This was last updated in February 2023
Continue Reading About Windows Defender Exploit Guard
- Key native features for Windows 10 security and maintenance
- What Microsoft Defender Antivirus features are on Windows?
- How can IT enable Windows Defender Device Guard?
- Windows security tips for the enterprise
- Create and deploy an Exploit Guard policy
Dig Deeper on Application and platform security
-

virtualization-based security (VBS)
By: Rahul Awati
-
Key native features for Windows 10 security and maintenance
By: Ed Tittel
-
Microsoft Defender ATP taps into cloud for added protection
By: Dan Franciscus
-
What’s the deal with Microsoft Defender for Android and iOS?
By: Kyle Johnson


Previously, we have talked about the Microsoft Defender Application Guard and how it can be used to keep your computer safe from cyber threats. Today, we will be discussing another safety feature of Microsoft Defender, which is the “Exploit Guard.”
Exploit Guard, as the name suggests, prevents your computer from being exploited by online threats and malware. Several components make up the Exploit Guard, but today we will be discussing “Network Protection,” which can be used to intimate a user when they are accessing a malicious or untrusted site/domain using a web browser or blocking it completely.
If you want your computer to be safe and do not want anyone who uses your computer to infect it with a virus, dive deep into the details and the configurations needed to configure Exploit Guard Network Protection.
Note: This article focuses on Windows client PCs, but Exploit Guard Network Protection can also be allowed to be configured on Windows Servers.
Table of Contents
This Page Covers
What is Microsoft Defender Exploit Guard
Microsoft Defender Exploit Guard uses a number of defense mechanisms to fend off malware and phishing scams. Controlled folder access, a smaller attack surface, and network protection are the three components of Microsoft Defender Exploit Guard.
One of the components of the Exploit Guard is Network Protection. This feature is somewhat similar to SmartScreen. Like Network Protection, SmartScreen also protects a user against phishing scams and potential IP addresses or websites with malware. However, SmartScreen is only limited to the Microsoft Edge browser.
On the other hand, Network Protection is capable of implementing system-wide protection status across all browsers and apps. Exploit Guard can be configured in one of two methods:
- Only prompt a user when a domain or IP address is malicious.
- Block the user from accessing it completely.
That said, Microsoft defender Exploit Guard cannot be configured from the Settings app, or the Windows Security app. Instead, it can only be configured using the Group Policies or Windows PowerShell.
Additionally, your system must meet the following requirements for the Exploit Guard to be configured:
- Windows edition must be Professional or Enterprise
- Windows 10 or 11 is required
- Windows Defender Antivirus real-time protection and cloud-based protection must be enabled
- PC must be able to communicate with “smartscreen.microsoft.com” and “smartscreen-prod.microsoft.com”
To check your OS version and edition, type in “winver” in the Run Command box.
You can enable real-time and cloud-delivered protection at the following location:
Settings app >> Privacy & security >> Windows Security >> Virus & threat protection >> Manage Settings (under Virus & thrat protection settings)

Once the requirements are met, let us discuss the two methods to configure Exploit Guard Network Protection.
Configure Exploit Guard Network Protection
Configure Exploit Guard Network Protection using Group Policy
Using the Windows Group Policies, you can configure Network Protection for both Windows client computers as well as Servers. Follow these steps to configure the feature for Windows client computers:
-
Open the Group Policy editor by typing in “gpedit.msc” in the Run Command box.

Open the Group Policy editor -
Navigate to the following from the left pane:
Computer Configuration >> Administrative Templates >> Windows Components >> Microsoft Defender Antivirus >> Micosoft Defender Exploit Guard >> Network Protection
-
Open the policy “Prevent users and apps from accessing dangerous websites.”

Open Network Protection policy for Windows client PC -
Select the “Enabled” radio button, and then select either of the following options from the drop-down menu in the Options section:
- Block -The user won’t be permitted to access the website
- Audit Mode – The user will be intimated of the danger where they can choose to exit or continue to the website

Configure the Network Protection policy to Audit or Block -
When selected, click Apply and Ok.
-
Now run the following cmdlet in an elevated Command Prompt to enforce the policy changes:
GPUpdate /Force
Enforce policy changes


Windows Defender Exploit Guard will now be configured for Network Protection. You will either be prompted when accessing a malicious website, or it will be blocked, depending on what you chose in Step 4 above.
If you want to configure Network Protection on Windows Server 2016 or later, then you must enable the policy “This setting controls whether Network Protection is allowed to be configured into block or audit mode on Windows Server” instead.

Configure Exploit Guard Network Protection using PowerShell
Managing Network Protection using Windows PowerShell gives more control to the administrators as it allows them to manage the different features individually.
Note: All of the following commands and steps are to be performed in an elevated PowerShell instance.
Let us start by checking the current status of the Network Protection feature. This can be done by running the following cmdlet in PowerShell:
Get-MpPreference | select *NetworkProtection* | Format-List
The image above shows that Network Protection is disabled. More importantly, it also shows 4 different attributes. Here is what these different attributes stand for:
- AllowNetworkProtectionDownLevel – Used on Windows 10 1809 and older, is now obsolete
- AllowNetworkProtectionOnWinServer – Allows Network Protection to be configured on Windows Server
- DisableNetworkProtectionPerfTelemetry – sends anonymized performance data relating to the monitored connections to Microsoft
- EnableNetworkProtection – Tells the status of the Network Protection feature
Now that we understand what these attributes are, you can use the following command to configure Network Protection’s attributes for different behaviors:
-
To enable Network Protection and block malicious websites:
Set-MpPreference -EnableNetworkProtection Enabled -
To enable Network Protection in audit mode:
Set-MpPreference -EnableNetworkProtection AuditMode -
To disable Network Protection:
Set-MpPreference -EnableNetworkProtection Disabled -
To allow Network Protection to be configured on Windows Server:
Set-MpPreference -AllowNetworkProtectionOnWinServer $trueReplace “true” with “false” to disallow it.
-
To enable telemetry:
Set-MpPreference -DisableNetworkProtectionPerfTelemetry $trueReplace “true” with “false” to disable telemetry.

This is everything you need to know about what Microsoft Defender Exploit Guard is and how it can be used to keep you safe online.
Takeaway
Windows client operating systems as well as the Servers have identical security enhancements available (to some extent). However, one may be enabled by default on the Server while it is disabled by default on a client OS.
You can still take your own device’s security into your own hands and enable the Network Protection feature to make your device secure, regardless of who is using it. The Network Protection feature is similar to SmartScreen but is implemented across the whole system.
In the face of phishing scams and other malicious online content, Windows Defender Exploit Guard Network Protection can establish a layer of security over endpoints. This guide will walk you through different ways to configure Windows Defender Network Protection and help your IT infrastructure withstand cyberattacks.
Steps to configure Windows Defender Network Protection
-
Use the Local Group Policy Editor:
- Press the Windows key + R, type gpedit.msc, and press Enter.
- Under the Network Protection folder, enable the “Prevent users and apps from accessing dangerous websites” policy.
-
Use an elevated PowerShell:
- Press the Windows key + S and type powershell. Click Run as administrator under the Windows PowerShell icon.
- Input the cmdlet Set-MpPreference -EnableNetworkProtection Enabled and press Enter.
-
Use the WindowsSecurity App:
- Open Windows Security by launching the Start menu, typing security, and pressing Enter.
- Select App & browser control, Exploit protection settings, and Program settings. Choose the apps you want to apply exploit protection mitigations to.
-
Verify your settings through the Registry Editor:
- Press the Windows key + R, type regedit, and press Enter. Navigate to the Network Protection registry key via this path: Computer\HKEY_LOCAL_MACHINE\SOFTWARE\Microsoft\Windows Defender\Windows Defender Exploit Guard\Network Protection\EnableNetworkProtection.
- After selecting the EnableNetworkProtection policy in the Network Protection folder, check the corresponding value to see if Network Protection is disabled (0), enabled (1), or in audit mode (2).
-
Manually audit web pages via the Windows Event Viewer:
- Open the Start menu, type event viewer, and click on Event Viewer.
- While in the Windows Defender (Operational) folder, refer to event ID 1125 to review logs of web pages flagged by Network Protection.
Understanding Network Protection in Windows 10/11
Before we get into setting up Network Protection, let’s first define what Network Protection in Windows 10/11 is and how it defends your devices from online threats.
What is Windows Defender Exploit Guard Network Protection?
Exploit Guard has been an integral part of Windows Defender’s operations. It first appeared on Windows 10 version 1709. Windows Defender Exploit Guard Network Protection uses the Intelligent Security Graph (ISG), a vast database comprising insights on security intelligence across all Microsoft products and services, in determining and analyzing common patterns and practices among rampant cyberattacks.
Windows Defender Exploit Guard operates through four components:
- Attack surface reduction: This focuses on blocking threats originating from Microsoft Office, scripts, and email-based.
- Controlled folder access: This involves limiting access to sensitive data in your computer’s files and folders.
- Exploit protection: This entails configuring exploit mitigations for your system and applications.
- Network protection: This focuses on protecting the device from web-based threats, usually by deceptive domains and IPs.
For this guide, we’ll focus on Exploit Guard’s network protection component.
How Windows Defender Network Protection helps prevent access to potentially dangerous domains and phishing sites
Despite strengthening cybersecurity measures, internet-based attackers have learned to adapt by enhancing strategies to steal information. They do so through methods such as phishing, scams, social engineering, unauthorized access to a command-and-control (C&C) center, and more.
Network Protection in Windows 10/11 aims to spot and terminate outbound connections to potentially dangerous domains. It uses information the ISG collates and reputation checks based on domains’ IP addresses. This filtering capability blocks and suspends the connection, once it recognizes a domain as a potential host to attacks.
Comparison between Windows Defender Network Protection and other security features in Microsoft Defender
Windows Defender’s Network Protection shares numerous similarities with Microsoft Defender SmartScreen, an anti-malware tool built into Microsoft Edge. The tools help protect computers from phishing attacks and suspected malicious files and programs. Additionally, both tools use the ISG to identify possible cyberattacks.
While they both aim to protect your system, they differ in mechanism. SmartScreen analyzes suspicious web pages, checks recent downloads, and notifies the user of a potential online threat through an early warning system. On the other hand, Network Protection promptly terminates the outbound connection at the first sign of danger, keeping attackers from establishing contact with vulnerable users.
Prerequisites and system requirements for Network Protection
Supported Windows versions of Exploit Guard Network Protection
Listed below are the versions of Windows that support Windows Defender and, by extension, Network Protection under Exploit Guard:
| Windows 10 | Windows 11 | Windows Server |
|
|
|
Licensing requirements for Windows Defender Network Protection
If your computer uses an enterprise-grade security platform called Microsoft Defender for Endpoint, the following licensing requirements for Windows Defender Network Protection should be met:
- Microsoft Defender for Endpoint Plan 1
- Microsoft Defender for Endpoint Plan 2
- Microsoft Defender for Business
The first two can be standalone licenses or as part of other Microsoft 365 plans, while the last one is usually reserved for small and medium-sized businesses.
Necessary permissions for Windows Defender Network Protection
To enable Network Protection on your device, you will need administrator-level permissions to configure settings in Windows Defender. If your computer is privately owned, you should already have such permissions by default. However, if your device is enterprise-owned, you may need to ask your IT team for administrator access.
Through Microsoft Defender for Endpoint, an administrator can use role-based access control (RBAC) to manage permissions and assign roles to different users or user groups. With RBAC, you can modify other users’ access to the Defender for Endpoint portal. The users can then enable Network Protection on their own devices.
Methods to enable Windows Defender Exploit Guard Network Protection
Now that we’ve discussed everything you need to know about Network Protection, let’s walk you through enabling the feature.
Using the Group Policy Editor to enable Windows Defender Network Protection
- Open the Local Group Policy Editor by pressing the Windows key + R. Type gpedit.msc and click OK.
- In the left section of the window, navigate to the Network Protection folder using the steps below:
Computer Configuration → Administrative Templates → Windows Components → Windows Defender Antivirus → Windows Defender Exploit Guard → Network Protection
- In the right section of the window, double-click on Prevent users and apps from accessing dangerous websites. This enables you to edit the policy.
- Select Enabled, select Block under Options, and click OK.
If you’re managing several endpoints in an enterprise environment and you want to deploy Network Protection to them, follow these steps:
- Open the Group Policy Management Console (GPMC) by pressing the Windows key + R. Type gpmc.msc and click OK.
- Double-click Group Policy Objects and look for the group policy object (GPO) you want to edit. Right-click this GPO and click Edit.
- Repeat steps 2–4 in the previous section.
Enabling Windows Defender Network Protection via PowerShell
- Open an elevated PowerShell by pressing the Windows key + S. Type powershell and click Run as administrator under the Windows PowerShell icon.
- Type Set-MpPreference -EnableNetworkProtection Enabled and press Enter.
- Close the elevated PowerShell and restart your computer.
You can also verify whether Network Protection has been enabled by using the “Get-MpPreference” cmdlet. The number next to the “EnableNetworkProtection” property signifies one of the following states:
- 0 — Disabled
- 1 — Enabled
- 2 — Audit Mode
Enabling exploit protection mitigations via the WindowsSecurity app
- Open the Windows Security app by launching the Start menu, typing security in the search bar, and pressing Enter.
- Click on the App & browser control tile and then select Exploit protection settings.
- Navigate to Program settings and choose the app/s to which you want to apply exploit protection mitigations.
-
- Select the app and then Edit if the app is already listed.
- Otherwise, select Add program to customize to add the app.
- Choose which mitigations you want to enable for your selected app. Repeat this process until you’ve applied all your preferred configurations. Note that you may be prompted to restart the process, app, or even Windows.
- To configure a specific exploit protection mitigation, navigate to System settings and specify one of the following settings:
-
- On by default
- Off by default
- Use default (this depends on the default configuration during Windows 10/11 installation)
- Finally, once you’ve made all the changes you want, click on Apply.
Verifying and testing Network Protection in Windows 10/11
Methods to confirm that Windows Defender Network Protection is active
In the PowerShell section, we briefly explained how to confirm whether Network Protection is enabled on the device. This can also be done through the Registry Editor. Here’s how:
- Open Registry Editor by clicking on the Start button. Type regedit and press Enter. On the left panel, select HKEY_LOCAL_MACHINE.
- Navigate to Network Protection. You can follow either of these paths:
- SOFTWARE → Policies → Microsoft → Windows Defender → Windows Defender Exploit Guard → Network Protection
- SOFTWARE → Microsoft → Windows Defender → Windows Defender Exploit Guard → Network Protection
- Click on EnableNetworkProtection and confirm whether Network Protection is enabled, disabled, or on audit mode using the following values:
- 0 — Disabled
- 1 — Enabled
- 2 — Audit Mode
Testing blocked URLs and logs in the Microsoft Defender Security Center
To check on specific URLs and logs to which you have blocked access for multiple endpoints under Network Protection, observe the steps below:
- Log into the Microsoft Defender portal.
- Click on Settings in the left panel, and then click on Endpoints.
- Under Rules, select Indicators.
- The blocked URLs should be listed under URLs/Domains.
Troubleshooting issues while configuring Network Protection
Common problems when enabling Windows Defender Network Protection
As your device uses Network Protection to log the web pages you access in real-time, there’s a chance that it will tag a safe website as a threat (false positive) or a malicious website as safe (false negative).
When this scenario occurs, you can report the tagged website as a false positive/negative via this Windows Defender Security Intelligence form.
In addition, Network Protection can slow your computer’s performance or internet connectivity as it actively functions to monitor and block potential online threats. If this problem persists despite an up-to-date Windows Defender, try switching to Network Protection’s audit mode by doing the following:
- Open an elevated PowerShell.
- Type Set-MpPreference -EnableNetworkProtection AuditMode and press Enter.
In audit mode, Network Protection allows all connections but still alerts you to possible risks, leaving you to manage these risks directly. All logs can be viewed in Windows Event Viewer, which we’ll discuss in the next section.
Logs and event viewer insights for debugging in Network Protection
To view Network Protection events logged in audit mode, perform these steps:
- Open Windows Event Viewer by clicking the Start button, typing event viewer, and selecting Event Viewer.
- Navigate to the Windows Defender (Operational) folder using this path:
Applications and Services Logs → Microsoft → Windows → Windows Defender (Operational)
- Use Event ID 1125 to filter events triggered by Network Protection in audit mode. From here, you can address the web pages flagged by Network Protection and mark them as threats.
Disabling Windows Defender Network Protection if needed
While we usually advise against turning off Windows Defender, remember that Windows Defender is automatically disabled when you use a third-party antivirus program. Using the two security tools simultaneously can lead to compatibility issues and may slow down your endpoint’s performance.
If you prefer using a non-Windows antivirus tool and wish to disable Windows Defender:
- Open an elevated PowerShell.
- Type Set-MpPreference -EnableNetworkProtection Disabled and press Enter.
Best practices for IT administrators when enabling Network Protection in Windows
Combining Network Protection with other Windows security features
To further optimize the protection of your device from cyberattacks, we recommend enabling Network Protection alongside these Windows security features:
- Web Protection: As part of Microsoft Defender for Endpoint, Web Protection provides content filtering as support for custom compromise indicators.
- Exploit Protection: Built into the operating system as a Windows Defender Exploit Guard component, Exploit Protection combats malware (in the form of programs and applications).
- Windows Firewall: Enabled by default on every Windows device, this restricts access between your device and online domains it deems untrustworthy (usually based on your installed software and preapproved permissions).
Configuring exclusions for trusted domains in Network Protection
Creating a list of trusted domains and IPs through Network Protection lowers the occurrence of false positives and reduces unnecessary disruptions for end users. You can allow access to a specific domain via these steps:
- Log into the Microsoft Defender portal.
- Click on Settings and then Endpoints.
- Under Rules, select Indicators.
- Click on URL/Domain, followed by Add Item.
- Type in the domain of the site and set the policy action to Allow.
Monitoring security logs for threat insights in Network Protection
For a more direct approach to viewing and acting on security logs, you can either use Network Protection’s audit mode or Windows Event Viewer, or both. Regularly updating your list of allowed and blocked domains also helps minimize steps in barring access from potentially dangerous domains.
On the overall importance of Windows Defender Network Protection
Enabling Windows Defender’s Network Protection offers various advantages in terms of safeguarding personal or enterprise devices and data. It can strengthen precise online security measures for personal computers. Additionally, it can help bar access between an unsafe domain and enterprise-managed endpoints.
Users can enable Windows Defender Network Protection in different ways. The feature can complement other Windows-based anti-malware tools to strengthen defenses against the latest cyberattacks and viruses. Just remember to update Windows Defender Exploit Guard regularly for more robust and up-to-date protection against emerging threats.
Теперь я тебя вижу: выявление бесфайловых вредоносных программ
Время на прочтение8 мин
Количество просмотров22K
Злоумышленники твердо намерены применять для обхода средств защиты все более сложные методы. Использование бесфайловых вредоносных программ повышает незаметность и эффективность атаки. В прошлом году бесфайловые методы применялись в ходе двух крупномасштабных кампаний по распространению программ-вымогателей (Petya и WannaCry).

В основе бесфайловых атак лежит простая идея: если на устройстве уже имеются средства, способные выполнить задачи злоумышленника (например, PowerShell.exe или wmic.exe), то зачем размещать на нем специальные программы, которые могут быть распознаны как вредоносные? Если злоумышленник сможет перехватить управление процессом, запустить в пространстве памяти такого процесса свой код и использовать его для вызова средств, которые уже имеются на устройстве, обнаружить атаку будет сложнее.
Успешное применение данного подхода с использованием локальных ресурсов представляет собой сложную задачу. Помимо прочего, злоумышленникам необходимо решить проблему сохраняемости. При выключении питания информация в памяти не сохраняется, и, если файлы не записаны на диске, перед злоумышленниками встает вопрос: как обеспечить автозапуск своего кода и сохранить контроль над скомпрометированной системой после перезагрузки?
Misfox: бесфайловая угроза для сетей
В апреле 2016 года в группу Microsoft по реагированию на инциденты обратился клиент по поводу кибервымогательства. Злоумышленники требовали от него значительную сумму за то, чтобы не публиковать конфиденциальную корпоративную информацию, похищенную со скомпрометированных компьютеров клиента. При этом они угрожали «раздавить» его сеть, если клиент обратится в правоохранительные органы. Ситуация была сложной.
Справка
Количество обнаружений Misfox средствами Windows Defender Antivirus в II квартале 2017 года по сравнению с I кварталом того же года выросло более чем в два раза.
Группа Microsoft по реагированию на инциденты исследовала компьютеры в сети, обнаружила целевые импланты и проанализировала степень компрометации. Клиент использовал известный сторонний антивирусный продукт, который был установлен на большинстве компьютеров. Несмотря на обновление с последними версиями сигнатур, антивирус не обнаружил ни один из целевых имплантов.
Также исследователи Microsoft узнали, что злоумышленники дважды пытались зашифровать файлы при помощи программы-вымогателя. К счастью, эти попытки не удались. Как выяснилось, угроза уничтожить сеть представляла собой «план Б» по извлечению прибыли из атаки на случай, если «план А» не сработает.
Более того, исследователи также обнаружили, что злоумышленники скрытно присутствовали в сети уже минимум семь месяцев, используя для этого два разных канала.
- Первый из этих каналов включал бэкдор под названием Swrort.A, который был развернут на нескольких компьютерах. Этот бэкдор был легко обнаружен антивирусом.
- Второй канал оказался гораздо более изысканным и интересным:
- Он не заражал файлы на устройстве.
- Он не оставлял артефактов на диске.
- Его нельзя было обнаружить при помощи обычных способов проверки файлов.
Пора отключать PowerShell?
Нет. PowerShell — это мощный и безопасный инструмент, который важен для многих функций системы и ИТ-инфраструктуры. Используемые злоумышленниками вредоносные сценарии PowerShell являются последствием внедрения вредоносных программ и могут быть реализованы только после осуществления первичной компрометации. Злонамеренное использование PowerShell — симптом атаки, которая началась с других вредоносных действий, таких как использование уязвимостей программного обеспечения, применение методов социальной инженерии или хищение учетных данных. Поэтому нужно не дать злоумышленникам использовать PowerShell в своих целях. О том, как обеспечить такую защиту, читайте дальше.
Вторым инструментом оказалась бесфайловая вредоносная программа под названием Misfox. При выполнении в памяти Misfox делала следующее:
- Создавала раздел реестра, который запускал однострочный командлет PowerShell.
- Запускала замаскированный сценарий PowerShell, сохраненный в реестре BLOB-объектов. Этот замаскированный сценарий PowerShell содержал загрузчик переносимого исполняемого файла (PE), который загружал из реестра PE-файл, закодированный с помощью алгоритма Base64.
Misfox не размещала на компьютере исполняемых файлов, однако сценарий, записанный в реестре, обеспечивал сохраняемость вредоносной программы.
Бесфайловые методы
Misfox представляет собой пример того, как в последовательность этапов кибератаки могут быть встроены бесфайловые компоненты. Злоумышленники используют разные бесфайловые методы, которые затрудняют обнаружение вредоносных имплантов. Среди них:
- Рефлексивное внедрение библиотек DLL
Рефлексивное внедрение библиотек DLL позволяет загружать библиотеки DLL в память процесса без сохранения их на локальном диске. Вредоносная библиотека DLL может размещаться на удаленном компьютере, которым управляет злоумышленник, и доставляться через скомпрометированный сетевой канал (например, по протоколу TLS). Также она может внедряться в замаскированной форме, например, через макросы и сценарии. В результате злоумышленникам удается обойти средства мониторинга и отслеживания загрузки исполняемых модулей в операционной системе. Примером вредоносного ПО, использующего рефлексивное внедрение библиотек DLL, является HackTool:Win32/Mikatz!dha. - Эксплойты в памяти
Злоумышленники используют бесфайловые эксплойты в памяти для удаленного запуска произвольного кода на пораженных компьютерах. Например, угроза UIWIX использует эксплойт EternalBlue, который был задействован в Petya и WannaCry. По наблюдениям, он устанавливал бэкдор DoublePulsar, который полностью помещается в памяти ядра (таблица отправки SMB). В отличие от Petya и Wannacry, UIWIX не размещает файлов на диске. - Методы на основе сценариев
Языки сценариев предлагают эффективные средства для доставки полезной нагрузки, полностью исполняемой в памяти. Файлы сценариев могут внедрять зашифрованные шелл-коды или двоичные объекты, расшифровка которых возможна без записи на диск в процессе выполнения через объекты .NET или непосредственно при помощи API. Сами сценарии могут быть спрятаны в реестре (как в случае Misfox). Они могут считываться из сетевых потоков или запускаться злоумышленником вручную при помощи командной строки без обращения к диску. - Сохранение в WMI
В ряде наблюдавшихся случаев злоумышленники использовали репозиторий инструментария управления Windows (WMI) для сохранения вредоносных сценариев, которые затем периодически вызывались через привязки WMI. Развернутые примеры использования такой техники приведены в этой статье [PDF].
Способы защиты от бесфайловых вредоносных программ в Microsoft 365
Microsoft 365 включает набор технологий безопасности нового поколения для защиты устройств, приложений SaaS, электронной почты и инфраструктуры от широкого спектра атак. Ниже перечислены компоненты Microsoft 365, связанные с Windows, которые позволяют обнаруживать бесфайловые атаки и предотвращать заражение.
Совет
Наряду со специальными средствами защиты от бесфайловых атак Windows 10 включает и другие технологии безопасности нового поколения для противодействия атакам в целом. Например, Windows Defender Application Guard позволяет остановить загрузку и запуск вредоносных программ (как бесфайловых, так и иных) через Microsoft Edge и Internet Explorer. Подробнее о функциях безопасности и управления Microsoft 365, представленных в обновлении Windows 10 Fall Creators Update, вы можете прочитать здесь.
Windows Defender Antivirus
Windows Defender Antivirus (WDAV) блокирует подавляющее большинство вредоносных программ при помощи общих, эвристических и поведенческих методов обнаружения, используя как локальные, так и облачные модели машинного обучения. Windows Defender Antivirus обеспечивает защиту от вредоносного ПО за счет следующих возможностей:
- Обнаружение атак, использующих сценарии, при помощи интерфейса противовредоносного сканирования AMSI, который позволяет проверять сценарии PowerShell и других типов даже при нескольких уровнях маскировки.
- Обнаружение и удаление вредоносного ПО, пытающегося сохраняться через WMI, посредством сканирования репозитория WMI — как периодического, так и при регистрации аномального поведения.
- Обнаружение рефлексивного внедрения библиотек DLL при помощи методов углубленной проверки памяти и мониторинга поведения.
Windows Defender Exploit Guard
Windows Defender Exploit Guard (WDEG) — это новый набор функций для защиты от вторжения на уровне хостов, который помогает уменьшить уязвимую зону, блокируя широкий спектр векторов атаки на устройство. Для остановки бесфайловых атак используются следующие способы:
- Защита от эксплойтов ядра памяти, таких как EternalBlue, при помощи службы целостности кода гипервизора (HVCI), которая с высокой эффективностью препятствует внедрению вредоносного кода через уязвимости программного обеспечения, работающего в режиме ядра
- Предотвращение эксплойтов памяти в режиме пользователя при помощи модуля защиты от эксплойтов, который включает ряд средств для предотвращения эксплойтов, применяемых на уровне операционной системы или на уровне отдельных приложений
- Защита (в числе прочего) от различных бесфайловых атак, использующих сценарии, посредством правил уменьшения уязвимой зоны (ASR), которые блокируют определенное поведение приложений
Совет
В дополнение к техническим средствам контроля важен также эффективный административный контроль сотрудников и процессов. Чтобы использовать на удаленном компьютере бесфайловые техники с применением сценариев PowerShell и инструментария WMI, злоумышленнику необходим привилегированный доступ к такому компьютеру. Такой доступ можно получить, если применяются недостаточно безопасные методы администрирования (например, настройка выполнения службы Windows в контексте учетной записи администратора домена), которые позволяют похитить учетные данные. Подробнее об обеспечении безопасности привилегированного доступа читайте здесь.
Windows Defender Application Control
Windows Defender Application Control (WDAC) предлагает механизм для реализации строгих политик обеспечения целостности кода и разрешает выполнение только доверенных приложений. Для борьбы с бесфайловыми атаками этот компонент переводит PowerShell в режим ограниченного языка, который не дает использовать расширенные средства языка, способные запустить код, который невозможно проверить, — например, прямые сценарии .NET, вызов API Win32 через командлет Add-Type и взаимодействие с COM-объектами. Это эффективно предотвращает атаки с рефлексивным внедрением библиотек DLL через PowerShell.
Windows Defender Advanced Threat Protection
Служба Windows Defender Advanced Threat Protection (WDATP) — это интегрированная платформа средств защиты рабочих мест (Windows Endpoint Protection, EPP) и средств обнаружения атак на конечные точки и реагирования на эти атаки (Endpoint Detection and Response, EDR). Если безопасность системы уже нарушена, ATP оповещает пользователей компании об изощренных атаках повышенной сложности на устройства и корпоративные сети, которые не удалось предотвратить при помощи других профилактических средств защиты. Для обнаружения таких атак служба использует подробные данные из глобальных систем безопасности, расширенный анализ поведения и машинное обучение. Она позволяет обнаружить бесфайловые вредоносные программы несколькими способами:
- Выявление при помощи специальных инструментов, которые регистрируют аномальное выделение памяти, скрытых атак, использующих такие бесфайловые методы, как рефлексивное внедрение библиотек DLL.
- Обнаружение бесфайловых атак на основе сценариев при помощи интерфейса противовредоносного сканирования AMSI, который осуществляет проверку при выполнении PowerShell и других компонентов, использующих сценарии, и применение моделей машинного обучения.
Браузер Microsoft Edge
Согласно результатам независимого эксперта в сфере безопасности NSS Labs, браузер Microsoft Edge блокирует больше фишинговых сайтов и вредоносного ПО, использующего методы социальной инженерии, чем другие браузеры. Microsoft Edge противодействует бесфайловым атакам благодаря функциям защиты от произвольного кода, которые блокируют выполнение произвольного кода, включая вредоносные библиотеки DLL. Это помогает избежать атак с рефлексивным внедрением библиотек DLL. Кроме того, Microsoft Edge предоставляет широкий набор средств защиты от бесфайловых и иных угроз благодаря интеграции Windows Defender Application Guard и технологии Windows Defender SmartScreen.
Заид Арафех (Zaid Arafeh)
Старший менеджер программы, исследовательская группа Windows Defender
Первоисточник
Quick Links
-
How Windows Defender’s Exploit Protection Works
-
How to Confirm Exploit Protection is Enabled
-
How to Configure Windows Defender’s Exploit Protection
Microsoft’s Fall Creators Update finally adds integrated exploit protection to Windows. You previously had to seek this out in the form of Microsoft’s EMET tool. It’s now part of Windows Defender and is activated by default.
How Windows Defender’s Exploit Protection Works
We’ve long recommended using anti-exploit software like Microsoft’s Enhanced Mitigation Experience Toolkit (EMET) or the more user-friendly Malwarebytes Anti-Malware, which contains a powerful anti-exploit feature (among other things). Microsoft’s EMET is widely used on larger networks where it can be configured by system administrators, but it was never installed by default, requires configuration, and has a confusing interface for average users.
Typical antivirus programs, like Windows Defender itself, use virus definitions and heuristics to catch dangerous programs before they can run on your system. Anti-exploit tools actually prevent many popular attack techniques from functioning at all, so those dangerous programs don’t get on your system in the first place. They enable certain operating system protections and block common memory exploit techniques, so that if exploit-like behavior is detected, they’ll terminate the process before anything bad happens. In other words, they can protect against many zero-day attacks before they’re patched.
However, they could potentially cause compatibility problems, and their settings might have to be tweaked for different programs. That’s why EMET was generally used on enterprise networks, where system administrators could tweak the settings, and not on home PCs.
Windows Defender now includes many of these same protections, which were originally found in Microsoft’s EMET. They’re enabled by default for everyone, and are part of the operating system. Windows Defender automatically configures appropriate rules for different processes running on your system. (Malwarebytes still claims their anti-exploit feature is superior, and we still recommend using Malwarebytes, but it’s good that Windows Defender has some of this built-in now as well.)
This feature is automatically enabled if you’ve upgraded to Windows 10’s Fall Creators Update, and EMET is no longer supported. EMET can’t even be installed on PCs running the Fall Creators Update. If you already have EMET installed, it will be removed by the update.
Windows 10’s Fall Creators Update also includes a related security feature named Controlled Folder Access. It’s designed to stop malware by only allowing trusted programs to modify files in your personal data folders, like Documents and Pictures. Both features are part of «Windows Defender Exploit Guard». However, Controlled Folder Access isn’t enabled by default.
How to Confirm Exploit Protection is Enabled
This feature is automatically enabled for all Windows 10 PCs. However, it can also be switched to «Audit mode», allowing system administrators to monitor a log of what Exploit Protection would have done to confirm it won’t cause any problems before enabling it on critical PCs.
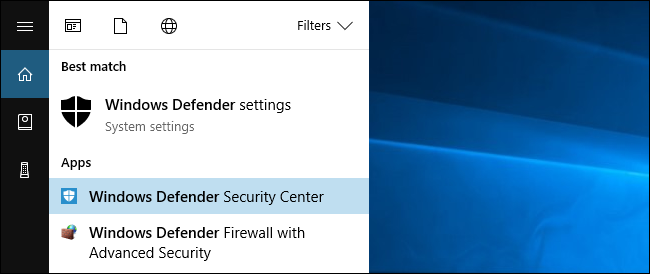
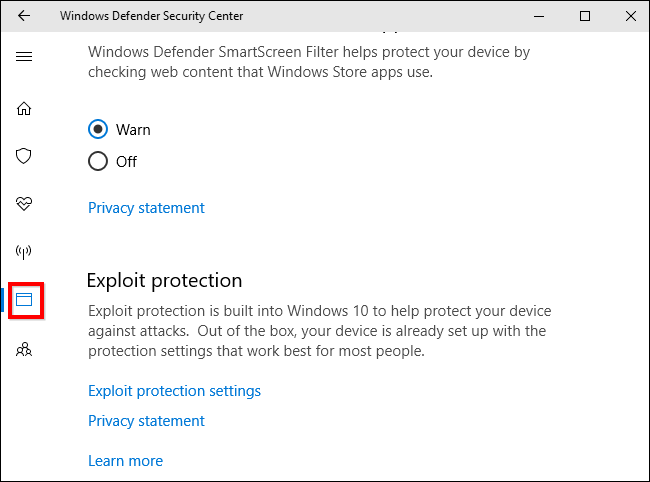
To confirm that this feature is enabled, you can open the Windows Defender Security Center. Open your Start menu, search for Windows Defender, and click the Windows Defender Security Center shortcut.
Click the window-shaped «App & browser control» icon in the sidebar. Scroll down and you’ll see the «Exploit protection» section. It will inform you that this feature is enabled.
If you don’t see this section, your PC probably hasn’t updated to the Fall Creators Update yet.
How to Configure Windows Defender’s Exploit Protection
Warning: You probably don’t want to configure this feature. Windows Defender offers many technical options you can adjust, and most people won’t know what they’re doing here. This feature is configured with smart default settings that will avoid causing problems, and Microsoft can update its rules over time. The options here seem primarily intended to help system administrators develop rules for software and roll them out on an enterprise network.
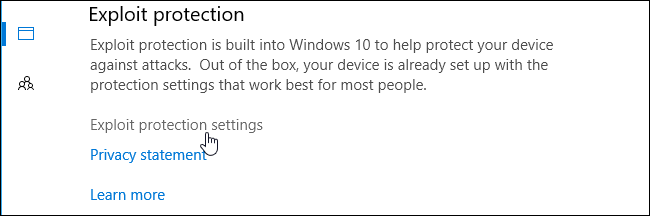
If you do want to configure Exploit Protection, head to Windows Defender Security Center > App & browser control, scroll down, and click «Exploit protection settings» under Exploit protection.
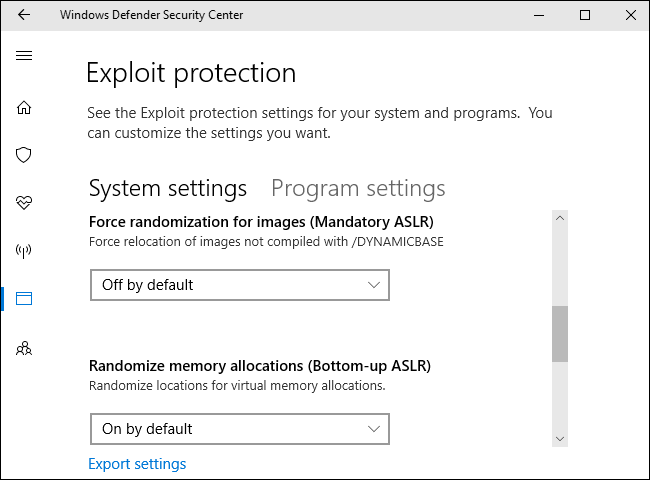
You’ll see two tabs here: System settings and Program settings. System settings controls the default settings used for all applications, while Program settings controls the individual settings used for various programs. In other words, Program settings can override the System settings for individual programs. They could be more restrictive or less restrictive.
At the bottom of the screen, you can click «Export settings» to export your settings as an .xml file you can import on other systems. Microsoft’s official documentation offers more information about deploying rules with Group Policy and PowerShell.
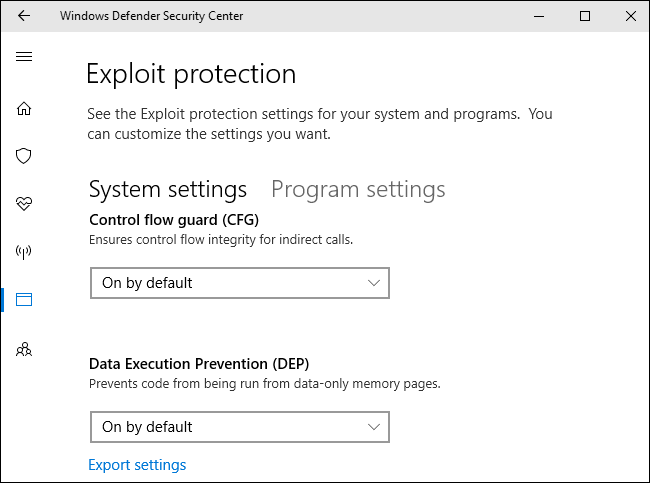
On the System settings tab, you’ll see the following options: Control flow guard (CFG), Data Execution Prevention (DEP), Force randomization for images (Mandatory ASLR), Randomize memory allocations (Bottom-up ASLR), Validate exception chains (SEHOP), and Validate heap integrity. They’re all on by default except the Force randomization for images (Mandatory ASLR) option. That’s likely because Mandatory ASLR causes problems with some programs, so you might run into compatibility issues if you enable it, depending on the programs you run.
Again, you really shouldn’t touch these options unless you know what you’re doing. The defaults are sensible and are chosen for a reason.
The interface provides a very short summary of what each option does, but you’ll have to do some research if you want to know more. We’ve previously explained what DEP and ASLR do here.
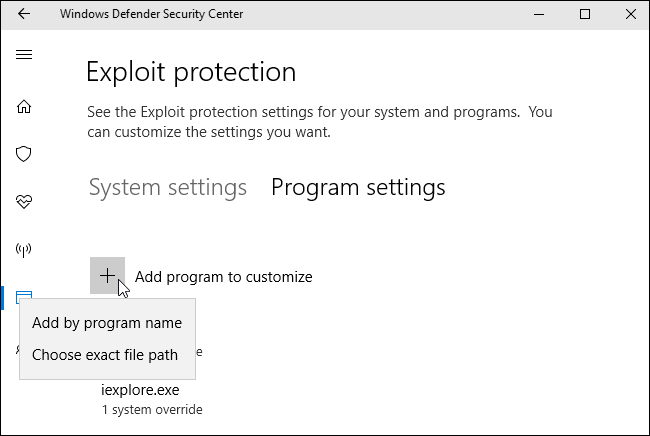
Click over to the «Program settings» tab, and you’ll see a list of different programs with custom settings. The options here allow the overall system settings to be overridden. For example, if you select «iexplore.exe» in the list and click «Edit», you’ll see that the rule here forcefully enables Mandatory ASLR for the Internet Explorer process, even though it’s not enabled by default system-wide.
You shouldn’t tamper with these built-in rules for processes like runtimebroker.exe and spoolsv.exe. Microsoft added them for a reason.
You can add custom rules for individual programs by clicking «Add program to customize». You can either «Add by program name» or «Choose exact file path», but specifying an exact file path is much more precise.
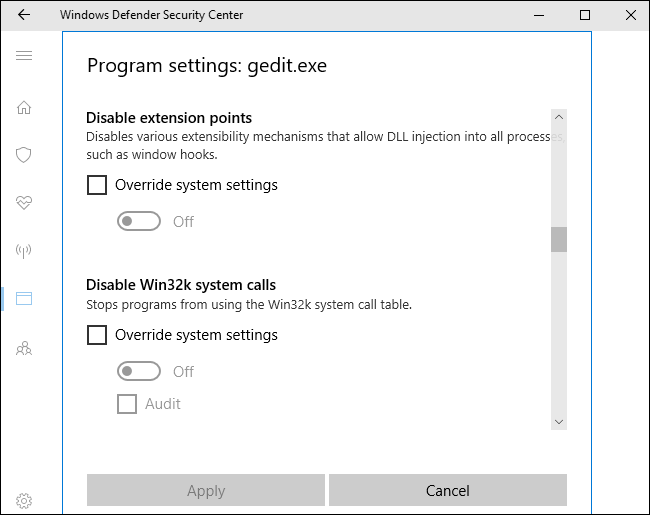
Once added, you can find a long list of settings that won’t be meaningful to most people. The full list of settings available here is: Arbitrary code guard (ACG), Block low integrity images, Block remote images, Block untrusted fonts, Code integrity guard, Control flow guard (CFG), Data Execution Prevention (DEP), Disable extension points, Disable Win32k system calls, Do not allow child processes, Export address filtering (EAF), Force randomization for images (Mandatory ASLR), Import Address Filtering (IAF), Randomize memory allocations (Bottom-up ASLR), Simulate execution (SimExec), Validate API invocation (CallerCheck), Validate exception chains (SEHOP), Validate handle usage, Validate heap integrity, Validate image dependency integrity, and Validate stack integrity (StackPivot).
Again, you shouldn’t touch these options unless you’re a system administrator who wants to lock down an application and you really know what you’re doing.
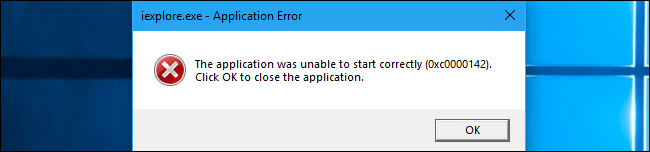
As a test, we enabled all the options for iexplore.exe and tried to launch it. Internet Explorer just showed an error message and refused to launch. We didn’t even see a Windows Defender notification explaining that Internet Explorer wasn’t functioning because of our settings.
Don’t just blindly attempt to restrict applications, or you’ll cause similar problems on your system. They’ll be difficult to troubleshoot if you don’t remember you changed the options, too.
If you still use an older version of Windows, like Windows 7, you can get exploit protection features by installing Microsoft’s EMET or Malwarebytes. However, support for EMET will stop on July 31, 2018, as Microsoft wants to push businesses toward Windows 10 and Windows Defender’s Exploit Protection instead.