
Installing Windows Defender on Server 2012 R2 is a common challenge faced by system administrators and IT professionals. Windows Defender is a built-in antivirus solution offered by Microsoft that provides real-time protection against viruses, malware, and other threats. While Server 2012 R2 does not come with Windows Defender pre-installed, there are methods available to install and configure it on the server.
This blog post aims to provide a detailed guide on how to install Windows Defender on Server 2012 R2. We will explore different methods, their pros and cons, as well as provide alternative solutions and bonus tips to enhance the security of your server.
The Challenge of Installing Windows Defender on Server 2012 R2
Installing Windows Defender on Server 2012 R2 can be challenging due to the following reasons:
- Lack of pre-installed Windows Defender: Unlike Windows client operating systems, Server 2012 R2 does not come with Windows Defender pre-installed. Therefore, additional steps are required to install and enable it on the server.
- Incompatibility with other antivirus products: If you already have an antivirus product installed on your server, there might be compatibility issues with Windows Defender. It is important to consider this before proceeding with the installation.
- Minimal documentation: Microsoft does not provide detailed documentation on how to install Windows Defender on Server 2012 R2, which can make the process confusing and time-consuming for administrators.
Now let’s explore the different methods to install Windows Defender on Server 2012 R2.
Video Tutorial:
Method 1: Using PowerShell
Method: PowerShell is a powerful command-line tool in Windows that allows users to automate administrative tasks. We can use PowerShell commands to install and enable Windows Defender on Server 2012 R2.
Pros:
1. PowerShell offers a streamlined and efficient way to install Windows Defender.
2. It allows for automation, making it easier to deploy Windows Defender on multiple servers.
3. PowerShell commands are well-documented and widely supported by the Microsoft community.
Cons:
1. Requires administrative privileges to run PowerShell commands.
2. Users should have a basic understanding of PowerShell syntax and commands.
3. In some cases, PowerShell scripts can be blocked by security policies, preventing the installation of Windows Defender.
Now, let’s go through the steps to install Windows Defender using PowerShell:
1. Open PowerShell with administrator privileges.
2. Run the following command to install Windows Defender:
Install-WindowsFeature -Name Windows-Defender, GUI-Management-Tools
3. Once the installation is complete, restart the server for the changes to take effect.
Method 2: Using Server Manager
Method: Server Manager is a management console in Windows that allows administrators to manage server roles and features. We can use Server Manager to install and enable Windows Defender on Server 2012 R2.
Pros:
1. Server Manager provides a user-friendly interface for installing and managing server roles and features.
2. It is a built-in tool in Windows Server, eliminating the need for additional downloads or installations.
3. Server Manager supports remote management, making it easier to install Windows Defender on multiple servers.
Cons:
1. Requires administrative privileges to access and use Server Manager.
2. The graphical interface of Server Manager might be overwhelming for users who are not familiar with it.
3. Server Manager can be slower compared to PowerShell when installing large features like Windows Defender.
Here are the steps to install Windows Defender using Server Manager:
1. Open Server Manager.
2. Click on “Manage” and select “Add Roles and Features”.
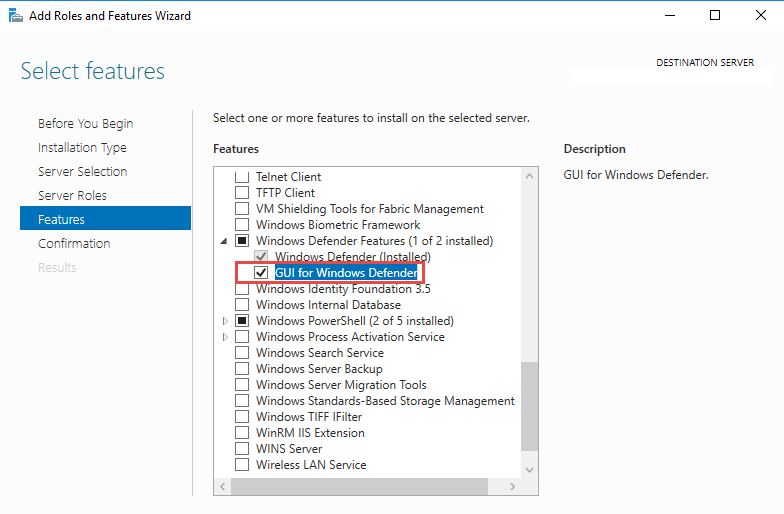
3. Follow the on-screen instructions in the “Add Roles and Features” wizard, ensuring that you select “Windows Defender” as a feature to install.
4. Once the installation is complete, restart the server for the changes to take effect.
Method 3: Using DISM (Deployment Image Servicing and Management)
Method: DISM is a command-line tool in Windows that allows users to service and manage Windows images offline or in a running operating system. We can use DISM to install Windows Defender on Server 2012 R2.
Pros:
1. DISM provides a flexible and versatile approach to install Windows components, including Windows Defender.
2. It is a built-in tool in Windows, eliminating the need for additional downloads or installations.
3. DISM commands are well-documented and widely supported by the Microsoft community.
Cons:
1. Requires administrative privileges to run DISM commands.
2. Users should have a basic understanding of DISM syntax and commands.
3. DISM commands can be complex and may require additional parameters for successful installation.
To install Windows Defender using DISM, follow these steps:
1. Open Command Prompt with administrator privileges.
2. Run the following command to check the available editions of Windows Defender:
Dism /online /Get-Features /Format:Table
3. Identify the feature name for Windows Defender by locating “Windows-Defender” in the output of the previous command.
4. Run the following command to install Windows Defender:
Dism /online /Enable-Feature /FeatureName:Windows-Defender
5. Once the installation is complete, restart the server for the changes to take effect.
Method 4: Using Group Policy
Method: Group Policy is a feature in Windows that allows administrators to manage user and computer settings centrally. We can use Group Policy to enable and configure Windows Defender on Server 2012 R2.
Pros:
1. Group Policy provides a centralized and scalable way to enable Windows Defender on multiple servers.
2. It allows for granular control over the configuration settings of Windows Defender.
3. Group Policy settings can be easily modified and updated as per organizational requirements.
Cons:
1. Requires administrative privileges to access and modify Group Policy settings.
2. Users should have a good understanding of Group Policy concepts and settings.
3. Group Policy changes might take time to propagate to all network resources.
To enable Windows Defender using Group Policy, follow these steps:
1. Open Group Policy Management console.
2. Create or select a Group Policy Object (GPO) linked to the desired Organizational Unit (OU) or domain.
3. Navigate to “Computer Configuration” > “Policies” > “Administrative Templates” > “Windows Components” > “Windows Defender”.
4. Double-click on “Turn off Windows Defender” to open the policy settings.
5. Select the “Disabled” option to enable Windows Defender.
6. Apply the changes to the desired OU or domain.
7. Update the Group Policy on target servers using the following command:
gpupdate /force
Alternatives: What to Do If You Can’t Install Windows Defender
If you cannot install Windows Defender on Server 2012 R2 for any reason, here are some alternative solutions you can consider:
1. Install a third-party antivirus software: There are various antivirus solutions available in the market that are compatible with Server 2012 R2. Research and choose a reputable antivirus software that meets your organization’s security requirements.
2. Utilize Windows Defender Offline: If you suspect a malware infection on your server, you can use Windows Defender Offline, a bootable antivirus scanner that can detect and remove malware before the operating system loads.
3. Implement Microsoft Security Essentials: Although Microsoft discontinued support for Microsoft Security Essentials on Server 2012 R2, you can still consider using it as an alternative antivirus solution. However, keep in mind that it does not offer the same level of features and protection as Windows Defender.
Bonus Tips
Here are some bonus tips to enhance the security of your Server 2012 R2:
1. Keep the server up to date: Regularly install Windows updates, including security patches, to protect against new threats and vulnerabilities.
2. Enable Windows Firewall: Configure and enable the built-in Windows Firewall to add an extra layer of protection to your server.
3. Implement strong password policies: Enforce strong password policies and regularly prompt users to change their passwords to prevent unauthorized access.
5 FAQs about Installing Windows Defender on Server 2012 R2
Q1: Can I install Windows Defender alongside another antivirus software on Server 2012 R2?
A: It is generally not recommended to run multiple antivirus software on the same server. They can conflict with each other and cause performance issues. It is best to choose one antivirus solution and disable or uninstall any other competing antivirus software.
Q2: Is Windows Defender sufficient for protecting my Server 2012 R2 from all types of threats?
A: While Windows Defender provides basic protection against common threats, it is recommended to complement it with other security measures such as regular updates, strong passwords, and a secure network infrastructure. Consider additional security solutions based on your specific requirements and risk profile.
Q3: Can I install Windows Defender on Server Core installations of Server 2012 R2?
A: Unfortunately, Windows Defender is not available for Server Core installations of Server 2012 R2. It is only available for installations with a graphical user interface (GUI).
Q4: How often should I run Windows Defender scans on my Server 2012 R2?
A: It is recommended to perform regular scans using Windows Defender to ensure the ongoing security of your server. The frequency of scans can vary depending on your organization’s security requirements and risk profile. Consider scheduling weekly or monthly scans to detect and mitigate any potential threats.
Q5: Can I install Windows Defender on older versions of Windows Server, such as Server 2008 R2?
A: Windows Defender is not available for older versions of Windows Server, such as Server 2008 R2. It was introduced in Windows Server 2016 and later versions. For older versions, consider using alternative antivirus solutions or upgrading to a supported version of Windows Server.
In Conclusion
Installing Windows Defender on Server 2012 R2 can be a challenge, but with the methods and tips outlined in this blog post, you can successfully implement this antivirus solution on your server. Whether you choose to use PowerShell, Server Manager, DISM, or Group Policy, make sure to consider the pros and cons of each method and select the one that best suits your requirements.
If you cannot install Windows Defender, explore alternative antivirus solutions or utilize Windows Defender Offline to mitigate malware threats. Additionally, follow the bonus tips provided to enhance the overall security of your Server 2012 R2. Remember to keep your server up to date, enable Windows Firewall, and implement strong password policies to ensure a robust defense against malicious activities.
В Windows Server 2016 и 2019 по умолчанию установлен и включен “родной” бесплатный антивирус Microsoft — Windows Defender (начиная с Windows 10 2004 используется название Microsoft Defender). В этой статье мы рассмотрим особенности настройки и управления антивирусом Windows Defender в Windows Server 2019/2016.
Содержание:
- Графический интерфейс Windows Defender
- Удаление антивируса Microsoft Defender в Windows Server 2019 и 2016
- Управление Windows Defender с помощью PowerShell
- Добавить исключения в антивирусе Windows Defender
- Получаем статус Windows Defender с удаленных компьютеров через PowerShell
- Обновление антивируса Windows Defender
- Управление настройками Microsoft Defender Antivirus с помощью GPO
Графический интерфейс Windows Defender
В версиях Windows Server 2016 и 2019 (в том числе в Core редакции) уже встроен движок антивируса Windows Defender (Защитник Windows). Вы можете проверить наличие установленного компонента Windows Defender Antivirus с помощью PowerShell:
Get-WindowsFeature | Where-Object {$_. name -like "*defender*"} | ft Name,DisplayName,Installstate

Однако в Windows Server 2016 у Windows Defender по-умолчанию нет графического интерфейса управления. Вы можете установить графическую оболочку Windows Defender в Windows Server 2016 через консоль Server Manager (Add Roles and Features -> Features -> Windows Defender Features -> компонент GUI for Windows Defender).
Установить графический компонент антивируса Windows Defender можно с помощью PowerShell командлета Install-WindowsFeature:
Install-WindowsFeature -Name Windows-Defender-GUI
Для удаления графического консоли Defender используется командлет:
Uninstall-WindowsFeature -Name Windows-Defender-GUI
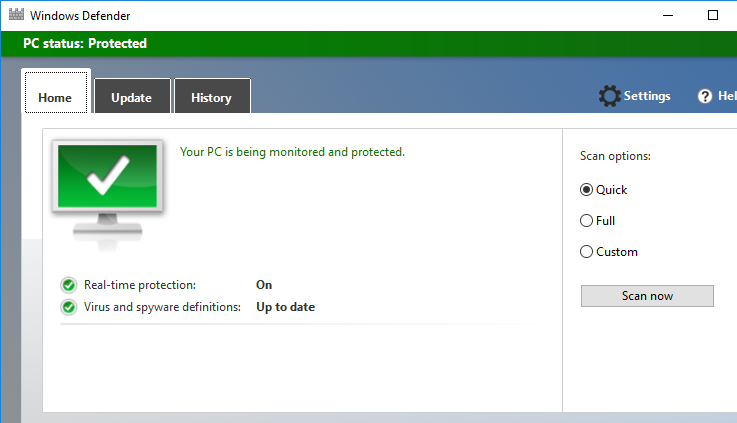
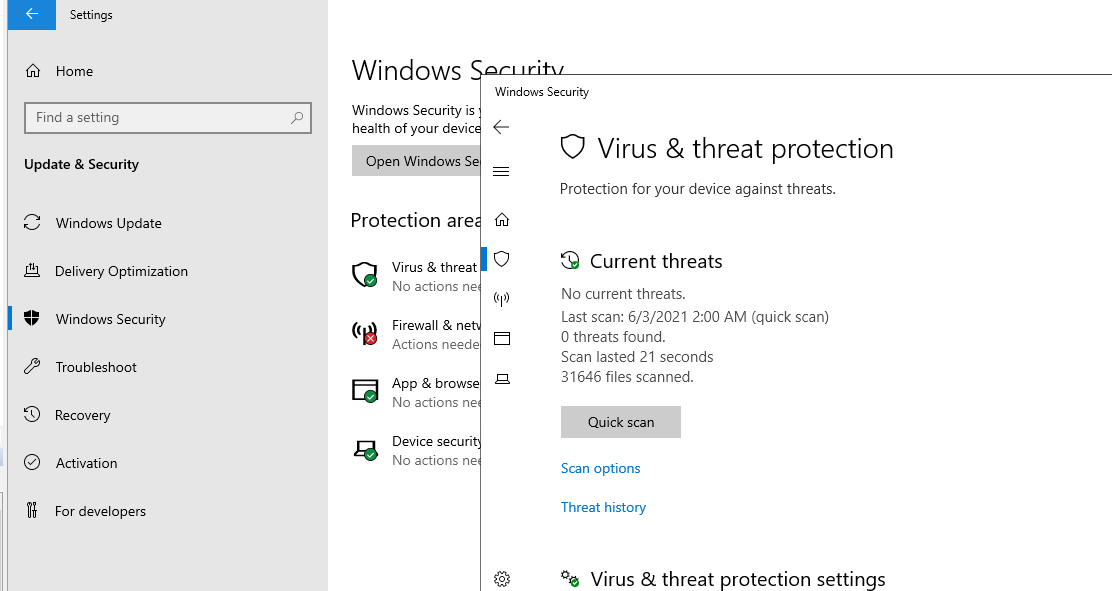
В Windows Server 2019 графический интерфейс Defender основан на APPX приложении и доступен через меню Windows Security (панель Settings -> Update and Security).
Настройка Windows Defender производится через меню “Virus and threat protection”.
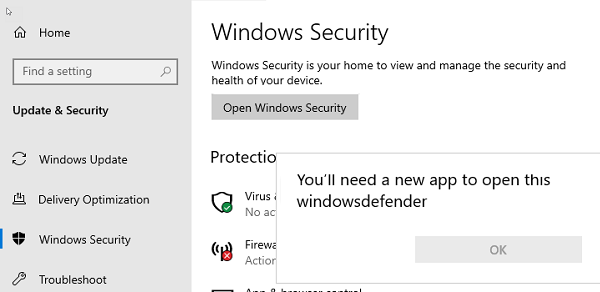
Если вы не можете открыть меню настроек Defender, а при запуске апплета Windows Security у вас появляется ошибка “You’ll need a new app to open this windowsdefender”, нужно перерегистрировать APPX приложение с помощью файла манифеста такой командой PowerShell:
Add-AppxPackage -Register -DisableDevelopmentMode "C:\Windows\SystemApps\Microsoft.Windows.SecHealthUI_cw5n1h2txyewy\AppXManifest.xml"
Если APPX приложение полностью удалено, можно его восстановить вручную по аналогии с восстановлением приложения Micorosft Store.
Удаление антивируса Microsoft Defender в Windows Server 2019 и 2016
В Windows 10 при установке любого стороннего антивируса (Kaspersky, McAfee, Symantec, и т.д.) встроенный антивирус Windows Defender автоматически отключается, однако в Windows Server этого не происходит. Отключать компонент встроенного антивируса нужно вручную (в большинстве случаев не рекомендуется использовать одновременно несколько разных антивирусов на одном компьютере/сервере).
Удалить компонент Windows Defender в Windows Server 2019/2016 можно из графической консоли Server Manager или такой PowerShell командой:
Uninstall-WindowsFeature -Name Windows-Defender
Не удаляйте Windows Defender, если на сервере отсутствует другой антивирус.
Установить службы Windows Defender можно командой:
Add-WindowsFeature Windows-Defender-Features,Windows-Defender-GUI

Управление Windows Defender с помощью PowerShell
Рассмотрим типовые команды PowerShell, которые можно использовать для управления антивирусом Windows Defender.
Проверить, запущена ли служба Windows Defender Antivirus Service можно с помощью команды PowerShell Get-Service:
Get-Service WinDefend
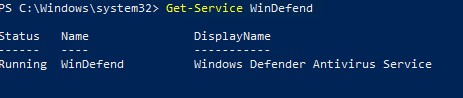
Как вы видите, служба запушена (статус –
Running
).
Текущие настройки и статус Defender можно вывести с помощью командлета:
Get-MpComputerStatus

Вывод комадлета содержит версию и дату обновления антивирусных баз (AntivirusSignatureLastUpdated, AntispywareSignatureLastUpdated), включенные компоненты антвируса, время последнего сканирования (QuickScanStartTime) и т.д.
Отключить защиту в реальном времени Windows Defender (RealTimeProtectionEnabled) можно с помощью команды:
Set-MpPreference -DisableRealtimeMonitoring $true
После выполнения данной команды, антивирус не будет сканировать на лету все обрабатываемые системой файлы.
Включить защиту в реальном времени:
Set-MpPreference -DisableRealtimeMonitoring $false
Более полный список командлетов PowerShell, которые можно использовать для управления антивирусом есть в статье Управление Windows Defender с помощью PowerShell.
Добавить исключения в антивирусе Windows Defender
В антивирусе Microsoft можно задать список исключений – это имена, расширения файлов, каталоги, которые нужно исключить из автоматической проверки антивирусом Windows Defender.
Особенность Защитника в Windows Server – он автоматически генерируемый список исключений антивируса, который применяется в зависимости от установленных ролей сервера. Например, при установке роли Hyper-V в исключения антивируса добавляются файлы виртуальных и дифференциальных дисков, vhds дисков (*.vhd, *.vhdx, *.avhd), снапшоты и другие файлы виртуальных машин, каталоги и процессы Hyper-V (Vmms.exe, Vmwp.exe)
Если нужно отключить автоматические исключения Microsoft Defender, выполните команду:
Set-MpPreference -DisableAutoExclusions $true
Чтобы вручную добавить определенные каталоги в список исключения антивируса, выполните команду:
Set-MpPreference -ExclusionPath "C:\Test", "C:\VM", "C:\Nano"
Чтобы исключить антивирусную проверку определенных процессов, выполните команду:
Set-MpPreference -ExclusionProcess "vmms.exe", "Vmwp.exe"
Получаем статус Windows Defender с удаленных компьютеров через PowerShell
Вы можете удаленно опросить состояние Microsoft Defender на удаленных компьютерах с помощью PowerShell. Следующий простой скрипт при помощи командлета Get-ADComputer выберет все Windows Server хосты в домене и через WinRM (командлетом Invoke-Command) получит состояние антивируса, время последнего обновления баз и т.д.
$Report = @()
$servers= Get-ADComputer -Filter 'operatingsystem -like "*server*" -and enabled -eq "true"'| Select-Object -ExpandProperty Name
foreach ($server in $servers) {
$defenderinfo= Invoke-Command $server -ScriptBlock {Get-MpComputerStatus | Select-Object -Property Antivirusenabled,RealTimeProtectionEnabled,AntivirusSignatureLastUpdated,QuickScanAge,FullScanAge}
If ($defenderinfo) {
$objReport = [PSCustomObject]@{
User = $defenderinfo.PSComputername
Antivirusenabled = $defenderinfo.Antivirusenabled
RealTimeProtectionEnabled = $defenderinfo.RealTimeProtectionEnabled
AntivirusSignatureLastUpdated = $defenderinfo.AntivirusSignatureLastUpdated
QuickScanAge = $defenderinfo.QuickScanAge
FullScanAge = $defenderinfo.FullScanAge
}
$Report += $objReport
}
}
$Report|ft

Для получения информации о срабатываниях антивируса с удаленных компьютеров можно использовать такой PowerShell скрипт:
$Report = @()
$servers= Get-ADComputer -Filter 'operatingsystem -like "*server*" -and enabled -eq "true"'| Select-Object -ExpandProperty Name
foreach ($server in $servers) {
$defenderalerts= Invoke-Command $server -ScriptBlock {Get-MpThreatDetection | Select-Object -Property DomainUser,ProcessName,InitialDetectionTime ,CleaningActionID,Resources }
If ($defenderalerts) {
foreach ($defenderalert in $defenderalerts) {
$objReport = [PSCustomObject]@{
Computer = $defenderalert.PSComputername
DomainUser = $defenderalert.DomainUser
ProcessName = $defenderalert.ProcessName
InitialDetectionTime = $defenderalert.InitialDetectionTime
CleaningActionID = $defenderalert.CleaningActionID
Resources = $defenderalert.Resources
}
$Report += $objReport
}
}
}
$Report|ft
В отчете видно имя зараженного файла, выполненное действие, пользователь и процесс-владелец.

Обновление антивируса Windows Defender
Антивирус Windows Defender может автоматически обновляться из Интернета с серверов Windows Update. Если в вашей внутренней сети установлен сервер WSUS, антивирус может получать обновления с него. Убедитесь, что установка обновлений одобрена на стороне WSUS сервера (в консоли WSUS обновления антивирусных баз Windows Defender, называются Definition Updates), а клиенты нацелены на нужный сервер WSUS с помощью GPO.
В некоторых случаях, после получения кривого обновления, Защитник Windows может работать некорректно. В этом случае рекомендуется сбросить текущие базы и перекачать их заново:
"%PROGRAMFILES%\Windows Defender\MPCMDRUN.exe" -RemoveDefinitions -All
"%PROGRAMFILES%\Windows Defender\MPCMDRUN.exe" –SignatureUpdate
Если на сервере нет прямого доступа в Интернет, вы можете настроить обновление Microsoft Defender из сетевой папки.
Скачайте обновления Windows Defender вручную (https://www.microsoft.com/en-us/wdsi/defenderupdates) и помесите в сетевую папку.
Укажите путь к сетевому каталогу с обновлениями в настройках Defender:
Set-MpPreference -SignatureDefinitionUpdateFileSharesSources \\fs01\Updates\Defender
Запустите обновление базы сигнатур:
Update-MpSignature -UpdateSource FileShares
Управление настройками Microsoft Defender Antivirus с помощью GPO
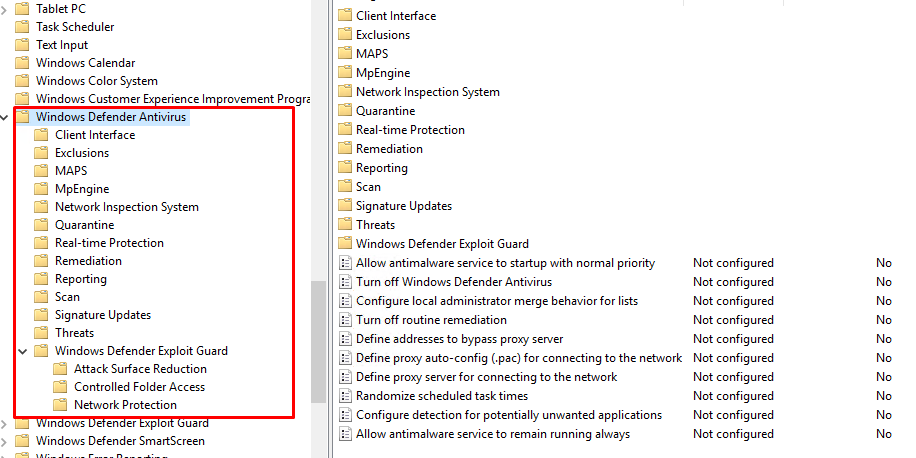
Вы можете управлять основными параметрами Microsoft Defender на компьютерах и серверах домена централизованно с помощью GPO. Для этого используется отдельный раздел групповых политик Computer Configurations -> Administrative Template -> Windows Component -> Windows Defender Antivirus.
В этом разделе доступно более 100 различных параметров для управления настройками Microsoft Defender.
Например, для отключения антивируса Microsoft Defender нужно включить параметр GPO Turn off Windows Defender Antivirus.
Более подробно о доступных параметрах групповых политик Defender можно посмотреть здесь https://docs.microsoft.com/en-us/microsoft-365/security/defender-endpoint/use-group-policy-microsoft-defender-antivirus
Централизованное управление Windows Defender доступно через Advanced Threat Protection доступно через портал “Azure Security Center” (ASC) при наличии подписки (около 15$ за сервер в месяц).
Since April 11th, 2022, the new unified Microsoft Defender for Endpoint solution is generally available for Server 2016 and Server 2016. The unified Microsoft Defender for Endpoint solution enables more features that were previously only available on Windows Server 2019 and later. The new modernized solution stack enables more security features for Server 2012R2 and Server 2016.
August 18, 2022; Blog completely rewritten based on latest announcement and improvements; included MECM/ Defender for Cloud and updated information since GA release.
Previous method
Previously there was a large gap between the latest Server 2019 build and the down-level OS systems. In comparison with Server 2019, the onboarding process was quite complex with the Microsoft Monitoring Agent. The MMA agent was required as the EDR sensor wasn’t built-in, for Server 2016 en Server 2012R2.
Server 2016 is by default installed with Microsoft Defender Antivirus. For Server 2012R2 there was no installed AV by default, and you had to install System Centre Endpoint Protection (SCEP).
With the Microsoft Monitoring Agent and Defender AV/SCEP, there were still some missing protection features – like Attack Surface Reduction, Automated Investigation, Network Protection, and many more protection features.
Now the good news. Currently in general availability is the new unified solution for Server 2012R2 and Server 2016. The new unified solution reduces complexity by removing dependencies and installation steps – and more important no more SCEP, MMA, and all the latest security features available.
The new unified package brings the following major improvements directly to the new Defender for Endpoint solution:
- Attack Surface Reduction rules
- Network protection
- Controlled Folder Access
- Potentially Unwanted Application blocking
- Improved detection capabilities
- Response capacibiliteits
- EDR in block mode
- Automated Investigation and Response (AIR)
- Tamper Protection
- Live Response
Overview of all features
New Defender for Endpoint agent
The new unified solution is available in one single package for all the down-level systems. Summary for Windows Server systems:
Built-in Defender AV and EDR sensor. Only onboarding package needed for onboard
- Windows Server 1803
- Windows Server 2019
- Windows Server 2022
New unified MDE installation package and onboarding package are needed for onboard
- Windows Server 2012R2
- Windows Server 2016
Windows Server 2008R2 is currently only supported for onboarding using the legacy MMA-agent and SCEP. Advised is to migrate Server 2008R2, which makes it possible to manage all systems with a single solution and the same configuration. SCEP is legacy and missed critical protection capabilities provided by Microsoft.
Microsoft announced in the last couple of months multiple improvements which make the installation of the new unified agent way more easier from products like; Microsoft Defender for Cloud and Microsoft Endpoint Configuration Manager. Currently it is possible to migrate all existing MMA-based Defender for Endpoint solutions to the new unified agent.
Download new Defender for Endpoint agent
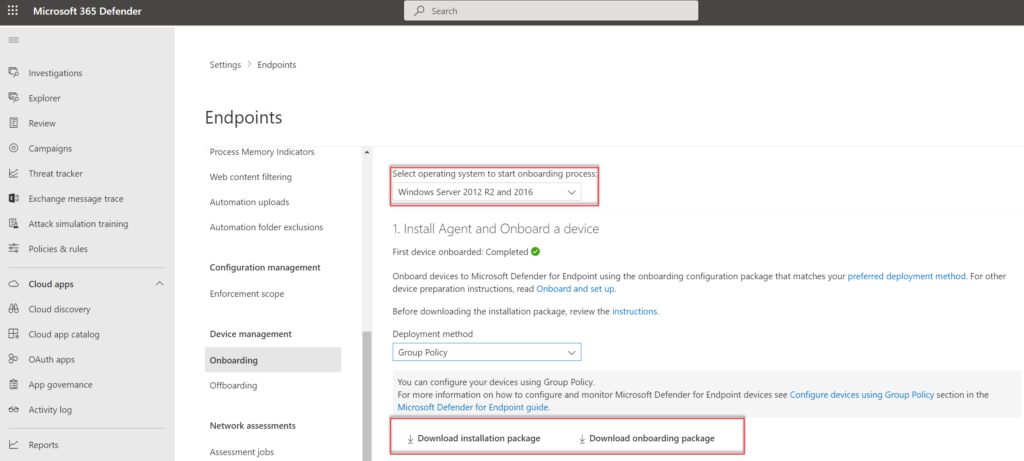
The new Defender for Endpoint installation and onboarding packages can be downloaded directly from the security.microsoft.com portal.
- Go to Security.Microsoft.com
- Open Settings -> Endpoints -> Onboarding
- Select Windows Server 2012R2 and Server 2016
- Select Deployment method; Group Policy or one of the other deployment methods
Download the installation package (md4ws.msi) and onboarding package (WindowsDefenderATPOnboardingScript.cmd).
NOTE: The package is updated monthly with new improvements. Make sure to download always the latest package before usage. The package contains the Defender product version and additional improvements.
Prerequisites for Windows Server 2012R2 and Windows Server 2016
For the new unified solution, fewer requirements are needed in comparison with the legacy method. The following requirements are needed before installing the new Defender solution.
Network
Ensure connectivity requirements are configured. Network requirements are the same as Windows Server 2019. Important: There is no OMS Gateway support for the new agent. Follow the instructions for configuring the network connectivity. Download here the spreadsheet including all URLs (WW + Defender Geography)
Server 2012R2 requirements
When the latest monthly rollup is installed – no additional prerequisites are needed for Server 2012R2. During the installer the package checks for the following updates:
- Update for customer experience and diagnostic telemetry / KB3080149
- Update for Universal C Runtime in Windows / KB2999226
Make sure both updates are correctly installed. Important; when already using SCEP it is needed to remove the SCEP agent first. Recommended is to use the installer script which automatically removes SCEP and installs additional prerequisites. (more information later in this blog)
Server 2016 requirements
For Server 2016 the build-in Defender server must be enabled. For correctly installing the new agent make sure the following prerequisites are in place.
- The Servicing Stack Update (SSU) from September 14, 2021 or later must be installed. (latest version recommended)
- The Latest Cumulative Update (LCU) from September 20, 2018 or later must be installed. (latest version recommended)
- Enable build-in Defender Antivirus
- Update the latest Defender Antivirus platform version (download package from Microsoft Update Catalog or MMPC)
Manual installation
Installation of the new Defender for Endpoint agent is simple when the prerequisites are correctly in place. md4ws.msi supports additional parameters:
Silent installation:
Msiexec /i md4ws.msi /quietSilent installation + configuration in passive mode:
Msiexec /i md4ws.msi /quiet FORCEPASSIVEMODE=1Passive mode
If there is a default non-Microsoft antivirus/antimalware solution available it is directly possible to enable the passive mode for the Microsoft Defender Antivirus components. using FORCEPASSIVEMODE=1
For making sure Defender for Endpoint is correctly configured in passive mode after the initial onboarding the “ForceDefenderPassiveMode” need to be added.
- Path:
HKLM\SOFTWARE\Policies\Microsoft\Windows Advanced Threat Protection - Name:
ForceDefenderPassiveMode - Type:
REG_DWORD - Value:
1
During the installation the following error can be visible; Please update Windows Defender. When the error is showing make sure the latest Defender platform update is installed for Server 2016.
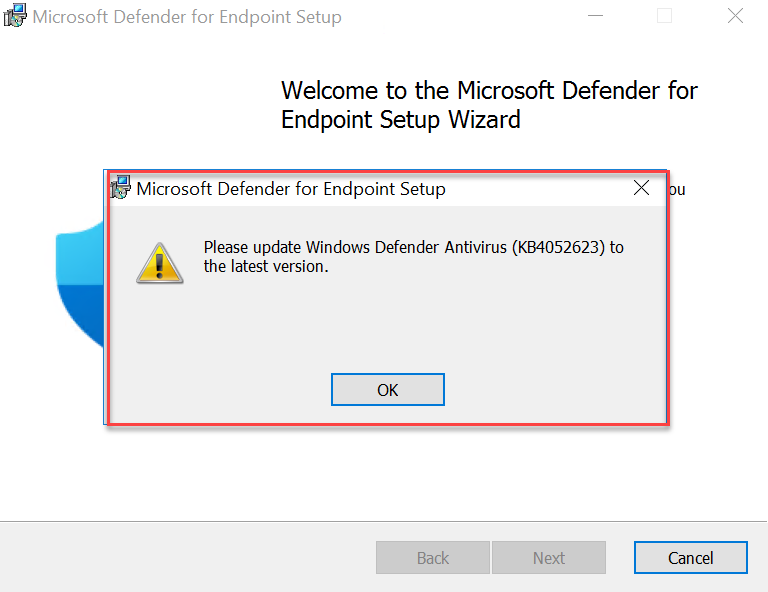
For checking the current platform version. Use the PowerShell command: Get-MpComputerStatus and check the value: AMProductVersion

Scripted installation
Microsoft published a GitHub installation script that automated most of the migration/ installation steps. The script can help with automating the following steps:
- Remove the OMS workspace for Microsoft Defender for Endpoint
- Remove System Center Endpoint Protection (SCEP) client if installed on Server 2012R2
- Download and install (Windows Server 2012 R2) prerequisites if required.
- Trying to active Defender on Windows Server 2016
- If Defender is installed and running but outdated, it updates to the latest platform version on Windows Server 2016 when the state is upgradeable (see prerequisites)
- Install Microsoft Defender for Endpoint
- Onboard Defender for Endpoint
More information and download: upgrade script | Github
Install and remove the MMA agent (replace <WORKSPACE_ID> with the actual MMA agent ID)
.\Install.ps1 -RemoveMMA <WORKSPACE_ID> -OnboardingScript ".\WindowsDefenderATPOnboardingScript.cmd"Install and configure passive mode
.\Install.ps1 -OnboardingScript ".\WindowsDefenderATPOnboardingScript.cmd" -Passive-Passive
The parameter -Passive enabled Defender Antivirus in passive mode. Make sure to set the “ForceDefenderPassiveMode” registry key on all servers for getting the passive mode enabled after the Defender for Endpoint onboarding.
Path: HKLM\SOFTWARE\Policies\Microsoft\Windows Advanced Threat Protection
Name: ForceDefenderPassiveMode
Type: REG_DWORD
Value: 1
Passive mode can be disabled when changing the value from 1 to 0. Passive mode can be used when migrating from non-Microsoft antivirus solutions.
The result after installing and onboarding with the installer script:

For Server 2012R2 and Server 2016 the Sense service is enabled after completing the MDE onboarding script.

Install/Migrate in Defender for Cloud
When using Defender for Cloud for Server 2012R2 and Server 2016 onboarding the new Defender for Servers Plan 1/2 integration can be used for automatically installing or migrating from the MMA-based Defender solution.
MDE integration with Defender for Servers P2 is by default the new solution for new Defender for Cloud activations or new subscriptions. When Defender for Servers P2 was enabled before June 20th, 2022, or MDE integration was enabled before June 20th, 2022, the new Enable Unified Solution button is visible.
The following options are available:
- Migrate all machines in subscriptions using Enable Unified Solution button
- Testing particular machines using REST API without enabling the complete subscription
- Deploying using Azure Policy
One of the following situations is mostly available in environments;
- Defender for Servers is already enabled and Microsoft Defender for Endpoint was deployed (MMA solution)
- Defender for Servers integration was never enabled
To enable the MDE unified solution in existing subscriptions you can easily opt-in to the unified solution on the subscription environment settings/integrations page. For opening the settings:
- Go to Defender for Cloud
- Go to Environment settings and select the subscription
- Go to Integrations
The button Enable unified solution is visible when the MDE integration was enabled before June 20th, 2022.

After enablement, it can take up to 12 hours before the extension is installed and MMA is replaced with the new Defender solution. Microsoft uses a version of the Defender script for uninstalling SCEP and installing the new solution. View the following blog for more information; How to upgrade from MMA-based Defender for Endpoint to MDE unified solution in Defender for Cloud?
Install using Microsoft Endpoint Configuration Manager
Since update 2207 for Microsoft Endpoint Configuration Manager current branch the improved Defender for Endpoint onboarding for Windows Server 2012R2 and Windows Server 2016 is finally available.
Since version 2207 Configuration Manager version 2207 supports the automatic installation of the new unified Microsoft Defender for Endpoint agent.
Migration is possible using the Client Settings which are used previously for MMA/ SCEP.
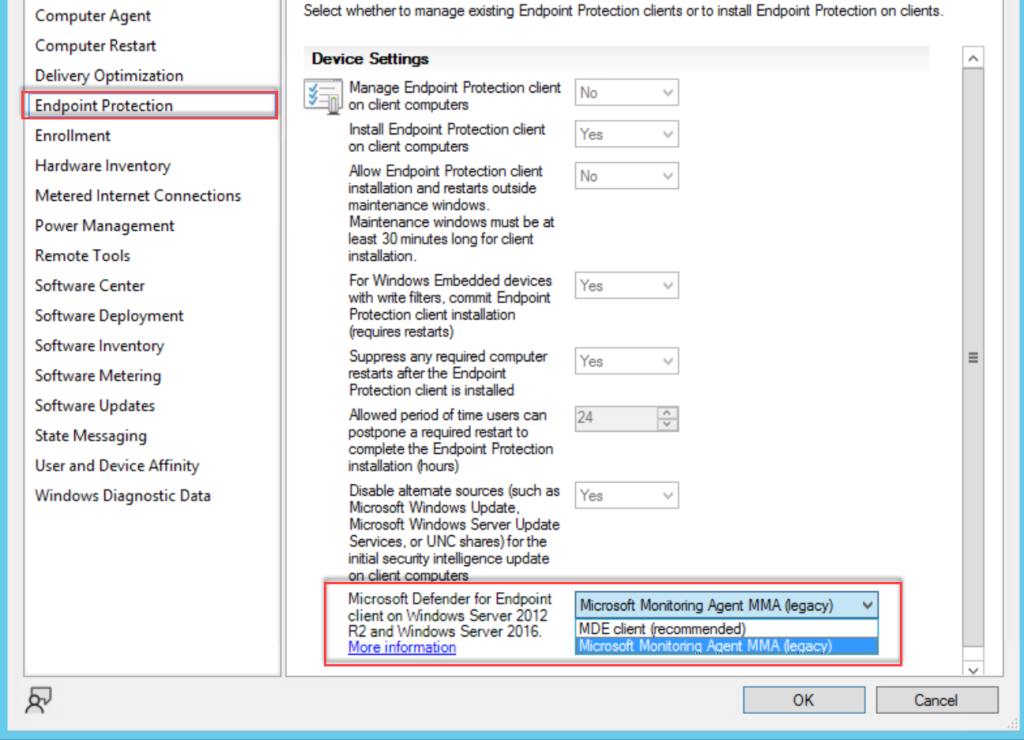
Migrating from SCEP
- Change the Client settings used for Endpoint Protection and change from Microsoft Monitoring Agent MMA (legacy) to MDE client (recommended).
- Configure the Defender for Endpoint onboarding file downloaded from security.microsoft.com
- Upload the .onboarding file and configure file sample collection
Client settings can be founded under Endpoint Protection
Go to Assets and Compliance > Endpoint Protection > Microsoft Defender ATP Policies and select Create Microsoft Defender ATP Policy and upload the downloaded onboarding file from security.microsoft.com. (use the Deployment method; Microsoft Endpoint Configuration Manager current branch and later)

Note: For Server 2008R2 and older MDE-supported down-level systems it is still needed to use Microsoft Monitoring Agent (MMA) (legacy) in the Client Settings and use the workspace key + workspace ID. Server 2012R2/ Server 2016 works via the .onboardingfile and the new MDE client setting; where Server 2008R2 works only with the MMA configuration.
Differences in portal
After onboarding, the new features are visible on the device page. The following actions are now available in comparison with the legacy MMA situation:
- Isolate devices
- Run Antivirus Scan
- Collect Investigation Package
- Initiate Live Response Session (now supported)
- Initiate Automated Investigation (now supported)
Server 2016 ( legacy MMA)

Server 2016 (new MDE unified solution agent)

Configuration
With the new Unified Solutions all the Group Policy, PowerShell commands, and other management options similar to Server 2019 are available for Server 2012R2 and Server 2016. You can use the Group Policy templates for Server 2019 to manage Defender on Windows Server 2012R2 and 2016. The following methods are available:
- Microsoft Endpoint Configuration Manager
- GPO
- PowerShell
- Security Management feature in MEM (advised and supported for the new agent)
View the following blog for more in-depth MEM for MDE management details; Managing Microsoft Defender for Endpoint with the new Security Management feature in MEM
Configuration – Attack Surface Reduction
Attack Surface Reduction is with the new unified solution available. Based on the Server OS there are some differences in the ASR support.
| ASR Rule | ID | Server 2016 | Server 2012R2 |
| Block abuse of exploited vulnerable signed drivers | 56a863a9-875e-4185-98a7-b882c64b5ce5 | Yes | Yes |
| Block Adobe Reader from creating child processes | 7674ba52-37eb-4a4f-a9a1-f0f9a1619a2c | Yes | Yes |
| Block all Office applications from creating child processes | d4f940ab-401b-4efc-aadc-ad5f3c50688a | Yes | Yes |
| Block credential stealing from the Windows local security authority subsystem (lsass.exe) | 9e6c4e1f-7d60-472f-ba1a-a39ef669e4b2 | Yes | Yes |
| Block executable content from email client and webmail | be9ba2d9-53ea-4cdc-84e5-9b1eeee46550 | Yes | Yes |
| Block executable files from running unless they meet a prevalence, age, or trusted list criterion | 01443614-cd74-433a-b99e-2ecdc07bfc25 | Yes | Yes |
| Block execution of potentially obfuscated scripts | 5beb7efe-fd9a-4556-801d-275e5ffc04cc | Yes | Yes |
| Block JavaScript or VBScript from launching downloaded executable content | d3e037e1-3eb8-44c8-a917-57927947596d | Yes | No |
| Block Office applications from creating executable content | 3b576869-a4ec-4529-8536-b80a7769e899 | Yes | Yes |
| Block Office applications from injecting code into other processes | 75668c1f-73b5-4cf0-bb93-3ecf5cb7cc84 | Yes | Yes |
| Block Office communication application from creating child processes | 26190899-1602-49e8-8b27-eb1d0a1ce869 | Yes | Yes |
| Block process creations originating from PSExec and WMI commands | d1e49aac-8f56-4280-b9ba-993a6d77406c | Yes | Yes |
| Block untrusted and unsigned processes that run from USB | b2b3f03d-6a65-4f7b-a9c7-1c7ef74a9ba4 | Yes | Yes |
| Use advanced protection against ransomware | c1db55ab-c21a-4637-bb3f-a12568109d35 | Yes | Yes |
| Block Win32 API calls from Office macros | 92e97fa1-2edf-4476-bdd6-9dd0b4dddc7b | No | No |
| Block persistence through WMI event subscription | e6db77e5-3df2-4cf1-b95a-636979351e5b | No | No |
Configuration – Network Protection
For enabling Network Protection, additional configuration is required. For Server 2012R2 and Server 2016 additional configuration is needed for Network protection. Use the below PowerShell commands for enabling the NetworkProtection feature.
Set-MpPreference -EnableNetworkProtection Enabled
Set-MpPreference -AllowNetworkProtectionOnWinServer 1
Set-MpPreference -AllowNetworkProtectionDownLevel 1
Set-MpPreference -AllowDatagramProcessingOnWinServer 1
Set-MpPreference -AllowSwitchToAsyncInspection $True
Update maintenance
Important is to apply the latest updates which are supported for Server 2012R2 and Server 2016. KB5005292 is released for updating Microsoft Defender for Endpoint. This update services the EDR sensor included in the new Microsoft Defender for Endpoint unified solution and is needed for Server 2016 / 2012R2 based on the EDR sensor component. Important: Make sure the new update is deployed to receive features and fixes.
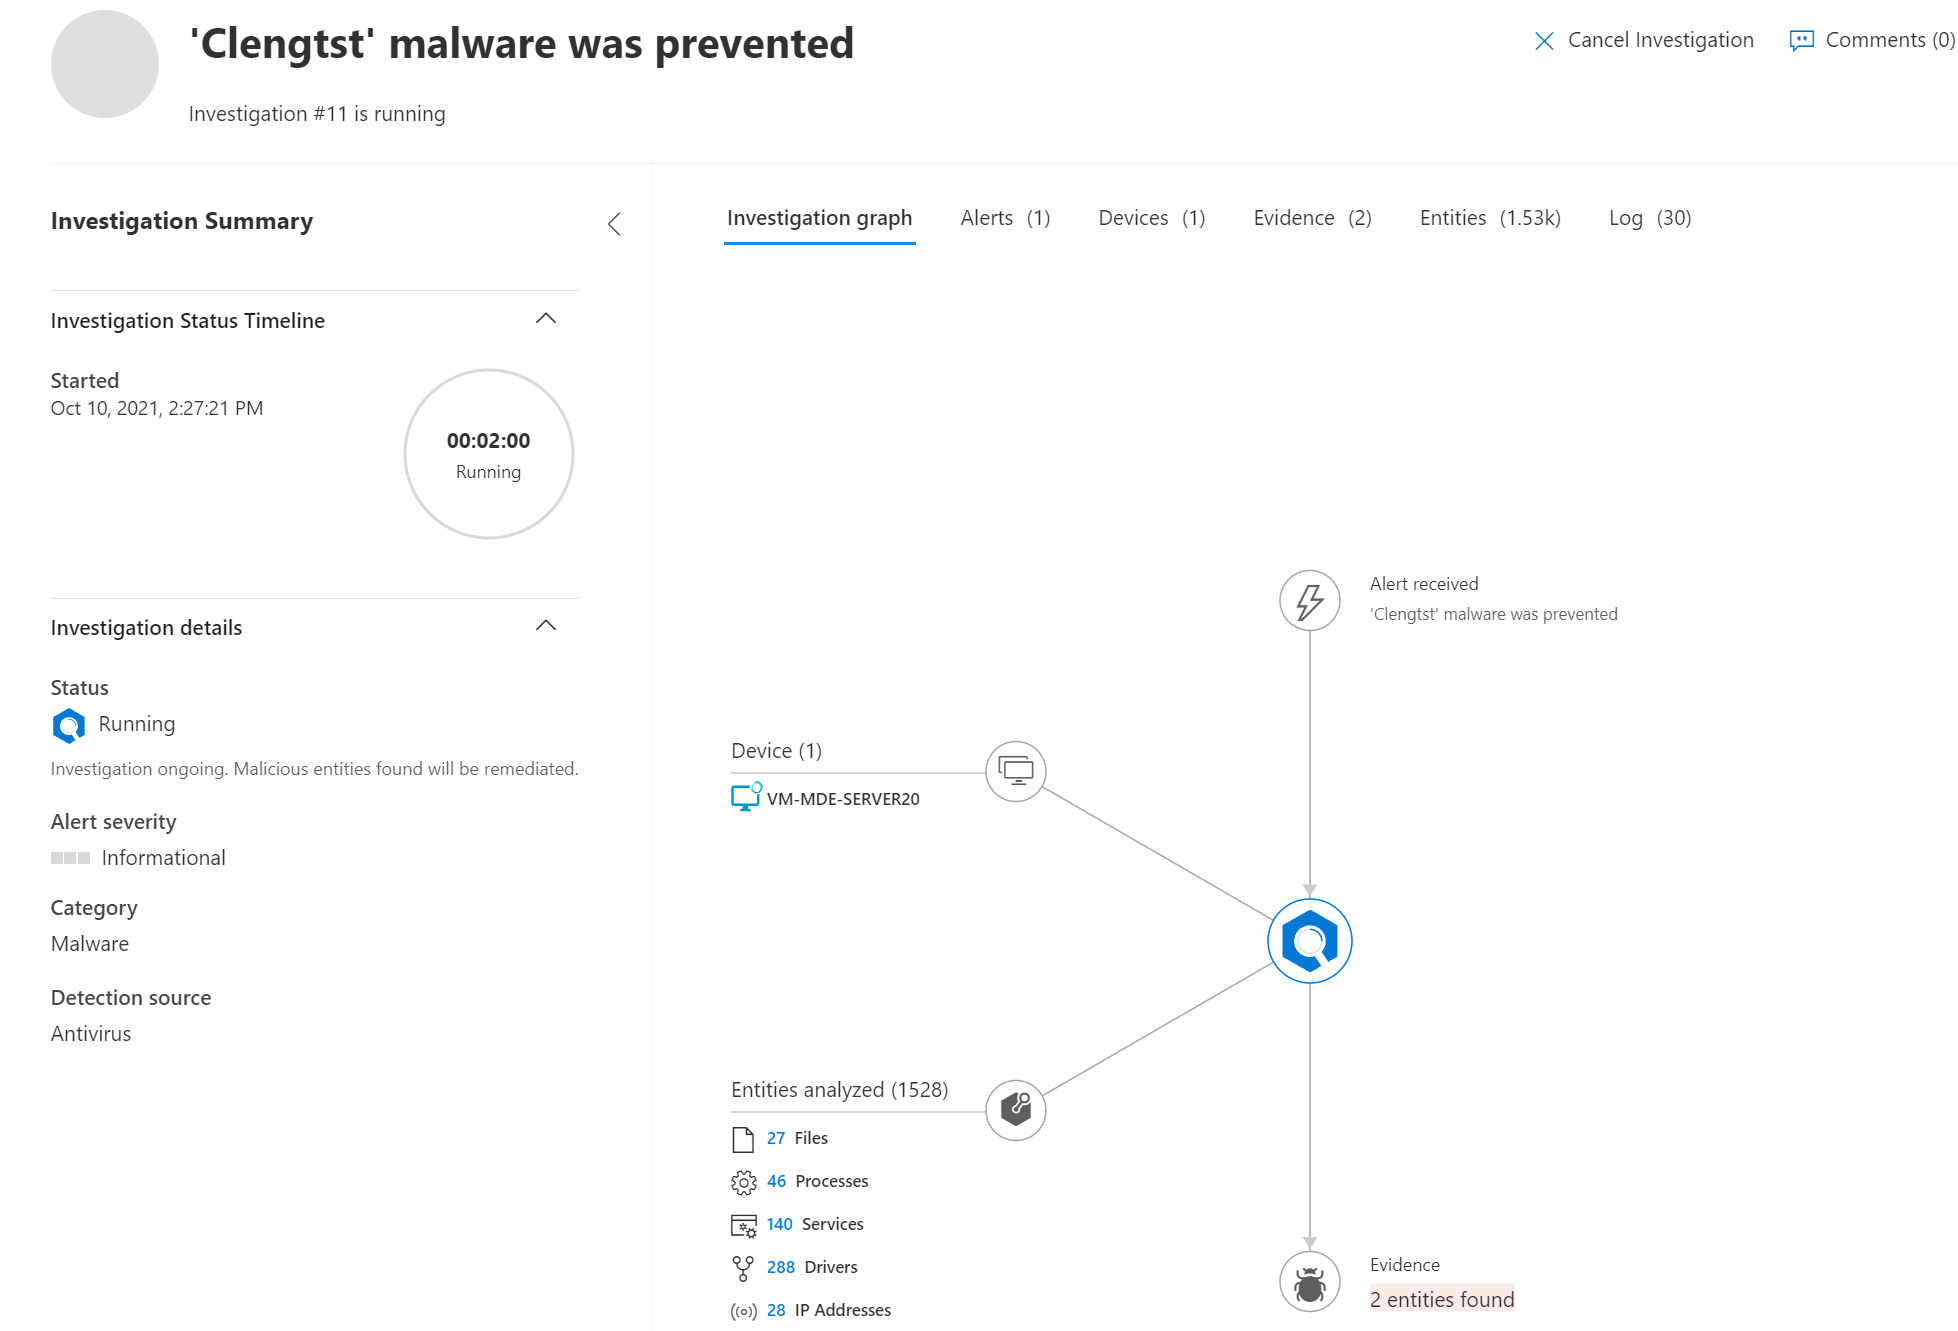
Result: Automated Investigation & Response AIR
Automated Investigation and response (AIR) is working and exactly the same in comparison with Windows 10+/ Server 2019+
Server 2016:

Server 2012R2:
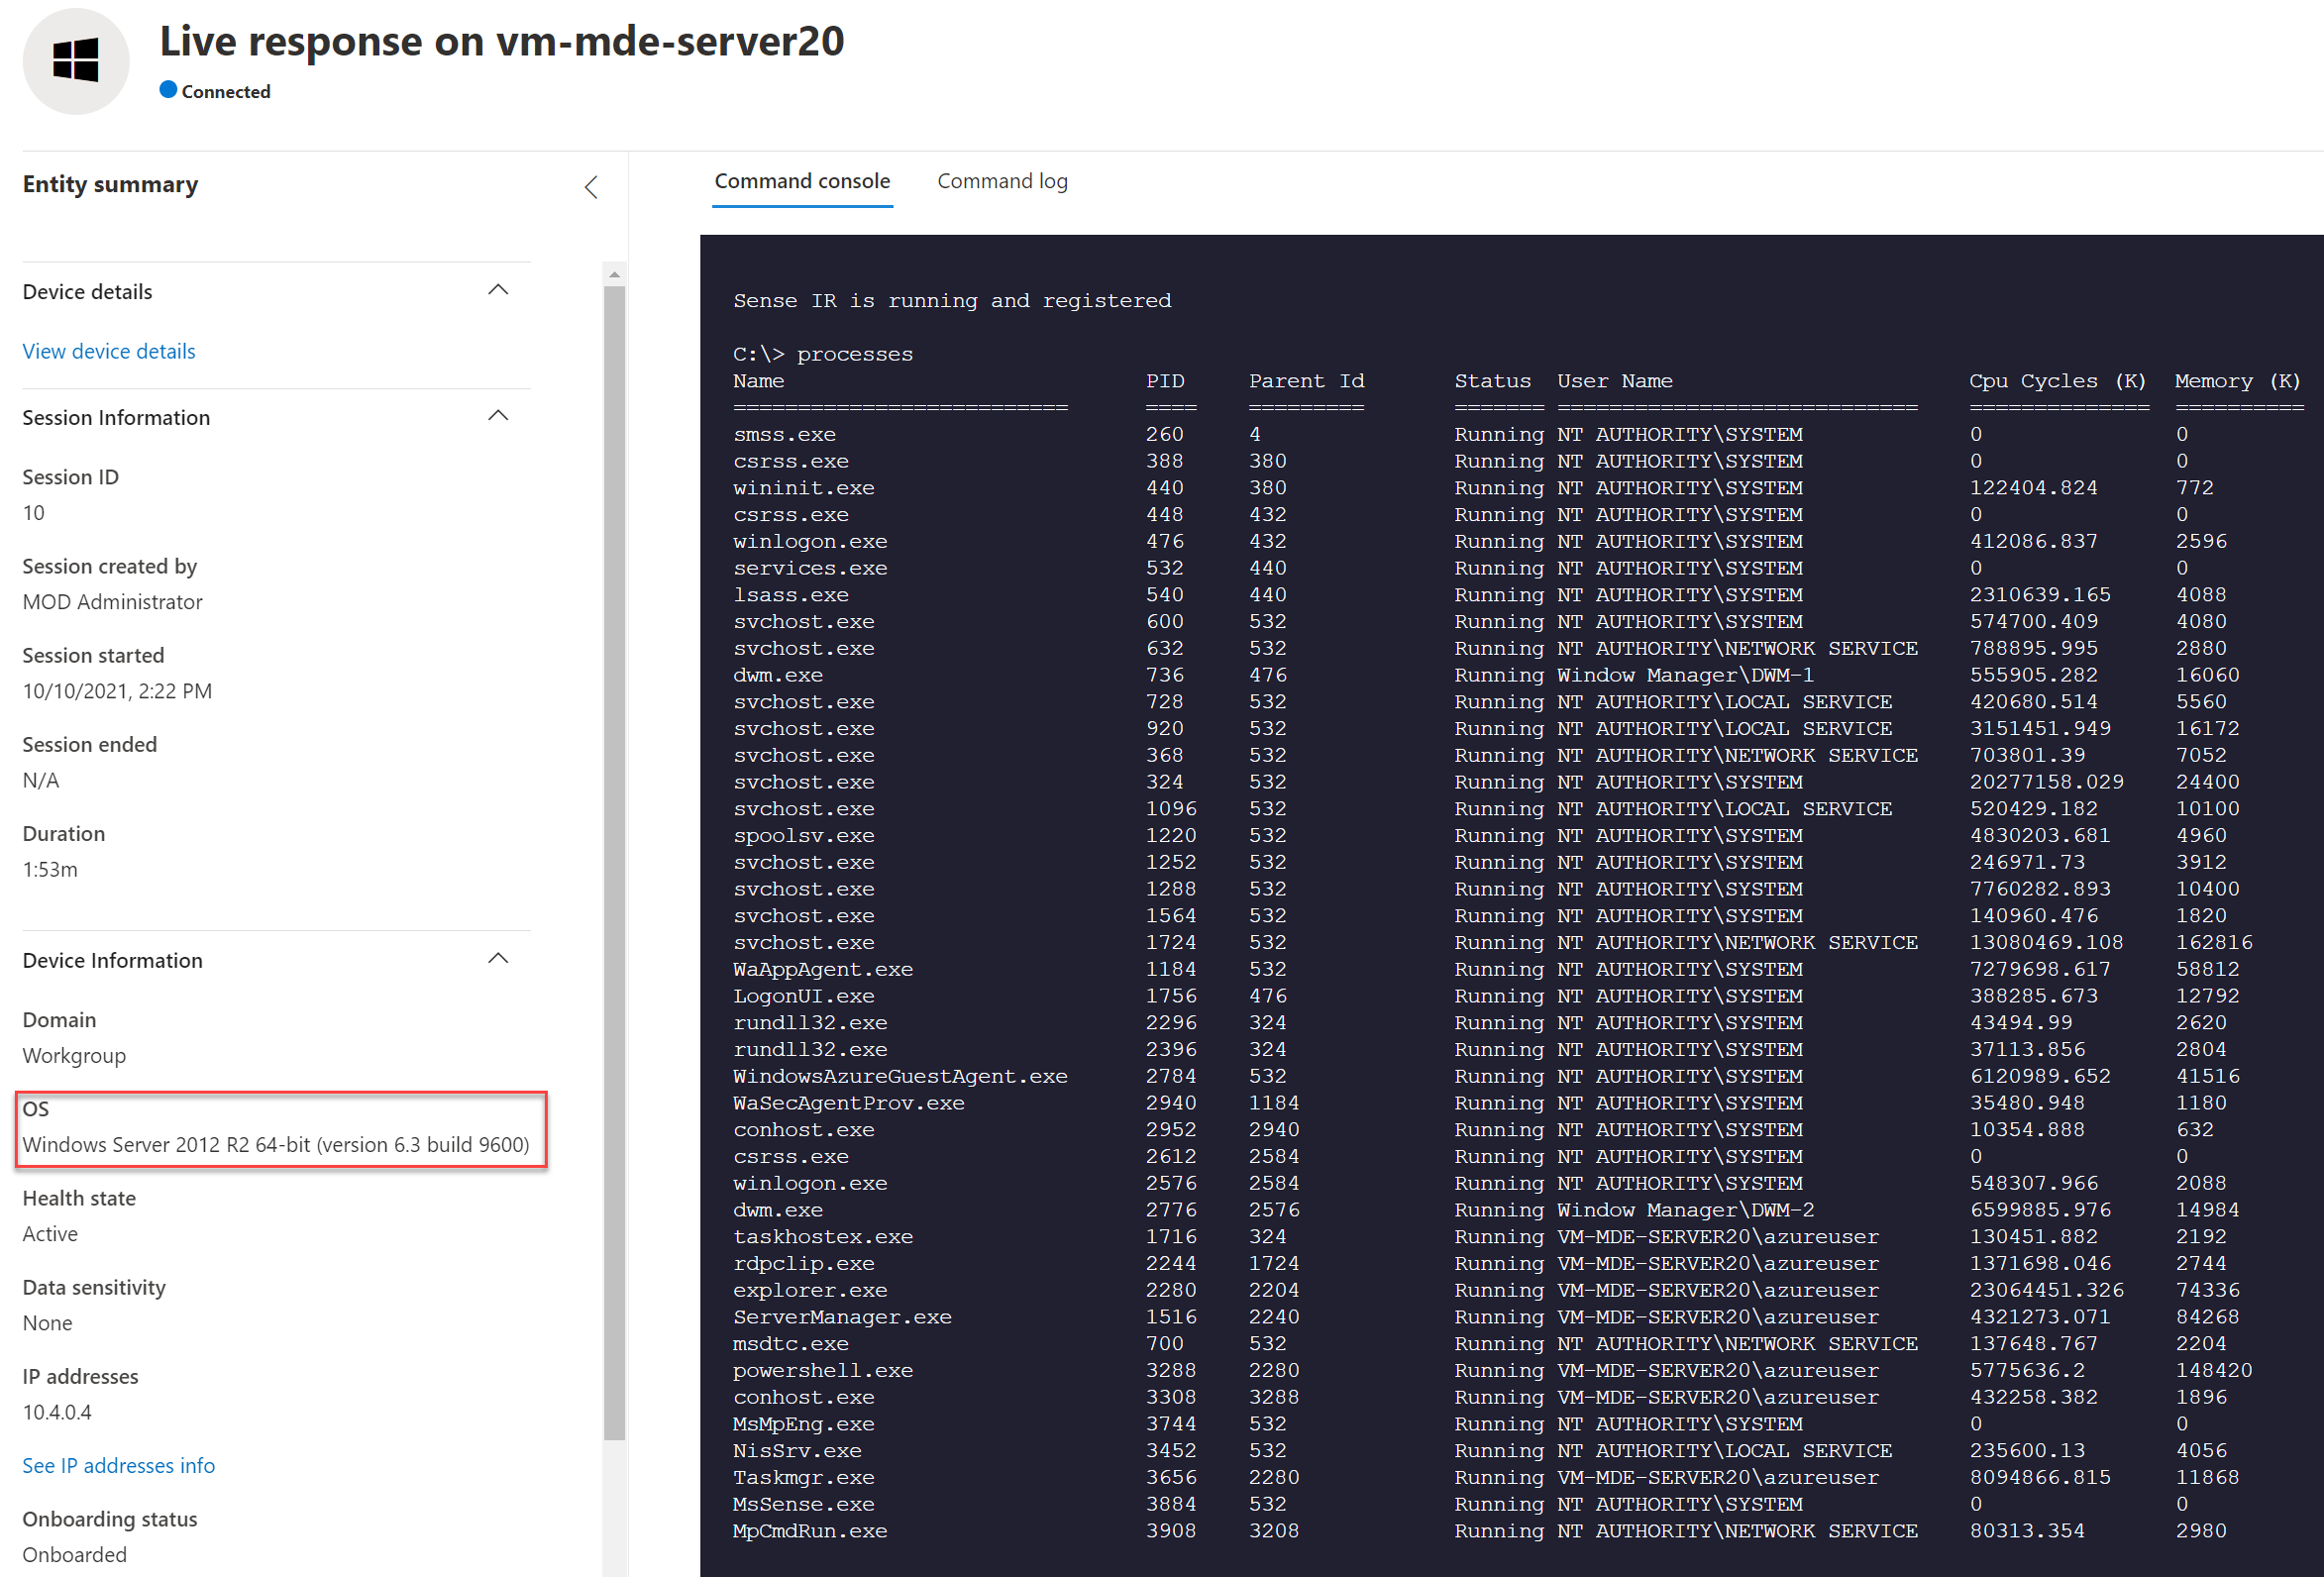
Result: Live Response
Live response is supported and working exactly the same in comparison with Windows 10/ Server 2019.
Server 2016:
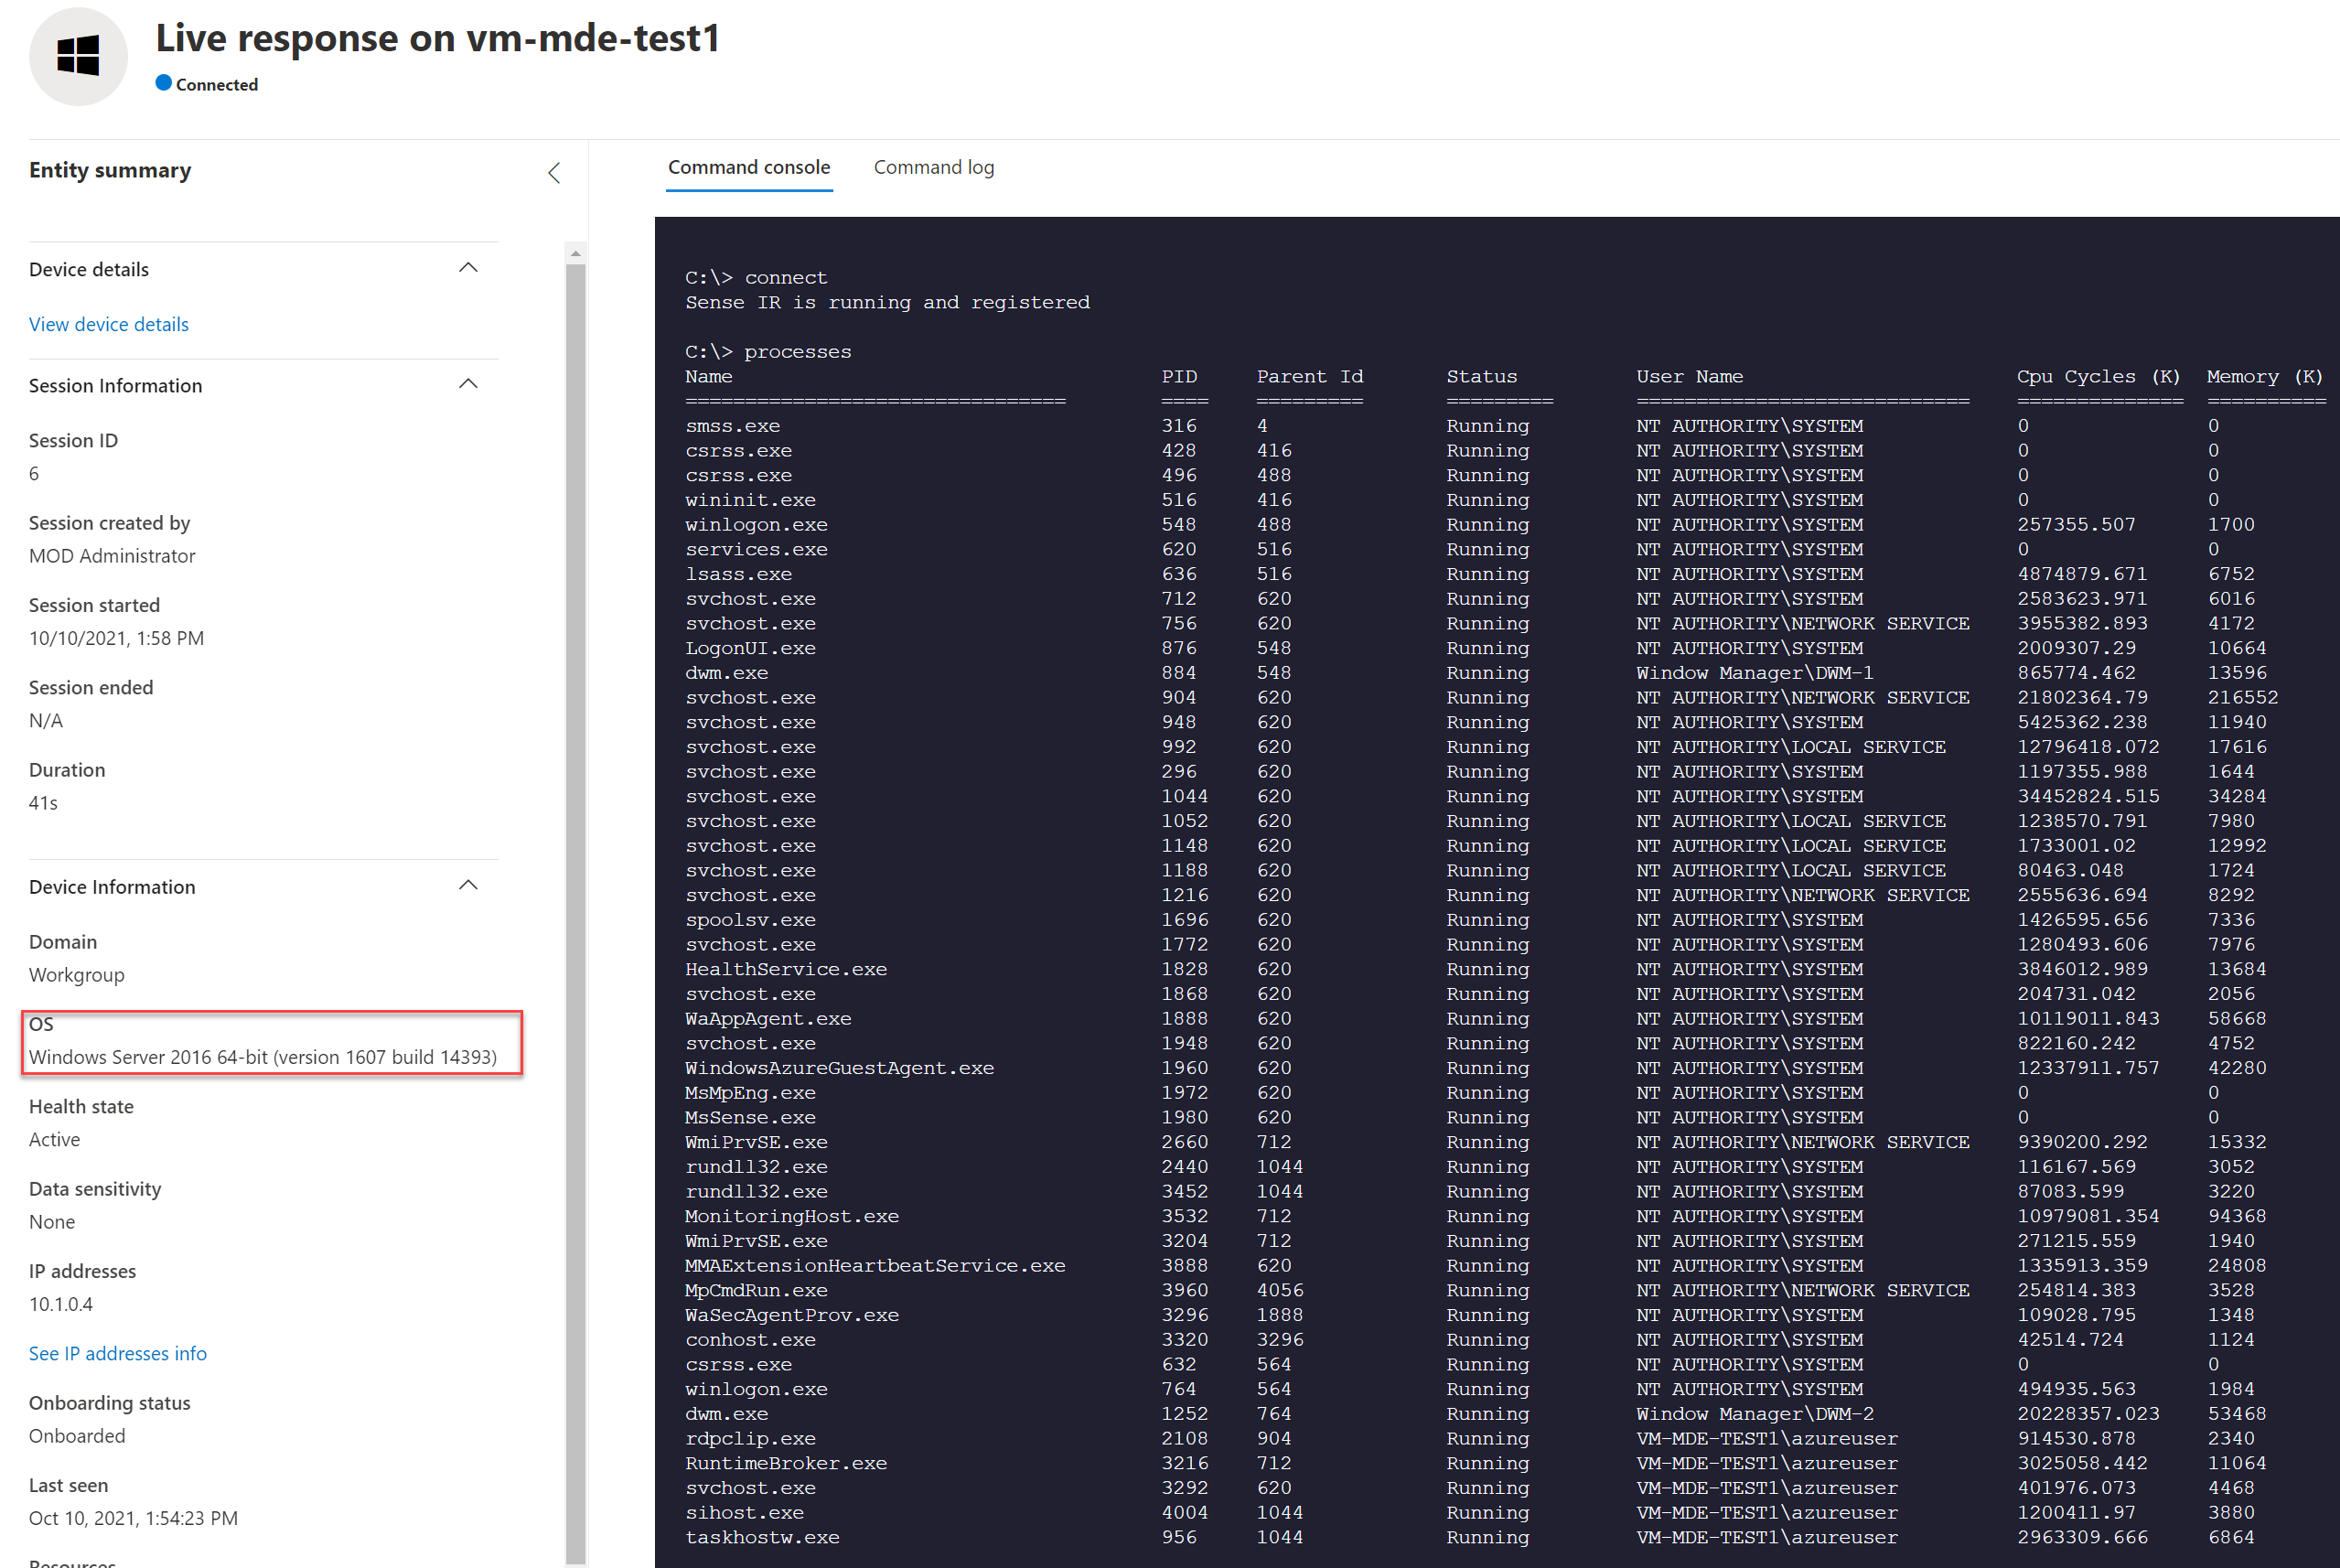
Server 2012R2:
Good to know
- Operating system upgrades aren’t supported. Offboard then uninstall before upgrading
- Automatic exclusions for server roles aren’t supported on Windows Server 2012 R2
- No UI is available on Windows Server 2012R2 (use PowerShell cmdlets)
More limitations can be founded here
Conclusion
The new Defender for Endpoint unified solution for Server 2012R2 and 2016 works way easier in comparison with the legacy MMA onboarding method. The new unified solution package reduces complexity by removing dependencies and installation steps. It also standardizes capabilities and functionality for the complete Defender for Endpoint stack.
Oh.. and it is always a good idea to upgrade Server 2012R2 and 2016 to one of the latest Server versions. Don’t stay behind if you can upgrade easily to Server 2019 or higher.
Sources
- Microsoft: Defending Windows Server 2012 R2 and 2016
- Jeffreyappel.nl: How to upgrade from MMA-based Defender for Endpoint to MDE unified solution in Defender for Cloud
- GitHub: MDE installer script
- Microsoft: Onboard Windows servers to the Microsoft Defender for Endpoint service
- Microsoft: Attack Surface Reduction (ASR) rules
В этой статье мы разберём, что делать, если встроенный антивирус Microsoft Defender (также известный как Защитник Windows) не обновляется автоматически. Вы узнаете, как диагностировать и устранить типичные проблемы, связанные с обновлением антивирусных баз и движка. Мы рассмотрим как встроенные инструменты Windows, так и ручные методы исправления ошибок.
Приобрести оригинальные ключи активации Windows 11 можно у нас в каталоге от 1690 ₽
Как работает обновление Microsoft Defender?
В Windows 10 и 11 обновления для Microsoft Defender происходят через два основных механизма:
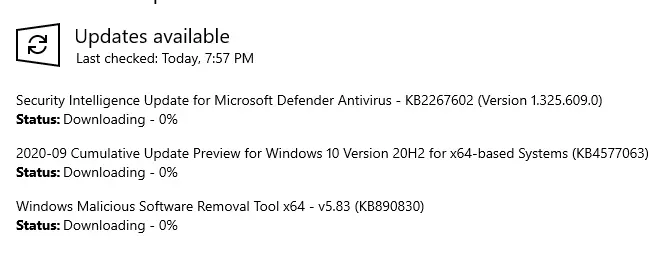
1. Windows Update — автоматически скачивает и устанавливает обновления, включая антивирусные базы и движок. В истории обновлений вы можете найти запись Security Intelligence Update for Microsoft Defender Antivirus — KB2267602 в разделе Definition Updates.
2. Встроенный механизм обновления — Microsoft Defender самостоятельно проверяет наличие новых баз на серверах Microsoft и обновляет их, даже если служба Windows Update отключена.

Если обновление KB2267602 не скачивается (например, зависает на 0%) или возникают ошибки (например, 80072f8f или 0x80072ee2), это может быть связано с проблемами доступа к интернету, настройками Windows Update или повреждением служб. Однако Windows Update — не единственный способ обновления антивируса.
Как проверить состояние обновлений Microsoft Defender?
1. Проверка последнего обновления
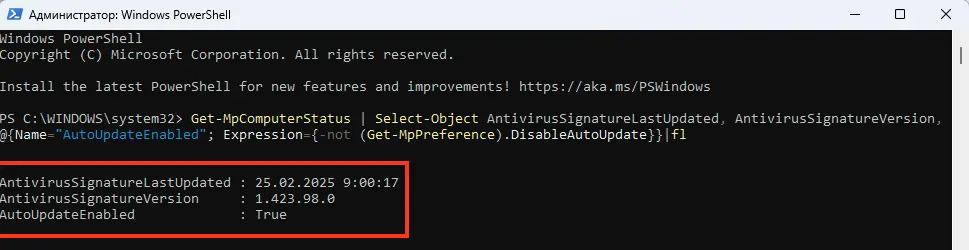
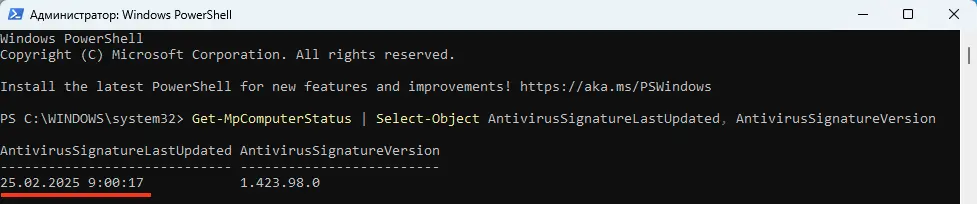
Чтобы узнать, когда последний раз обновлялись антивирусные базы и включено ли автоматическое обновление, выполните команду в PowerShell:
Get-MpComputerStatus | Select-Object AntivirusSignatureLastUpdated, AntivirusSignatureVersion, @{Name="AutoUpdateEnabled"; Expression={-not (Get-MpPreference).DisableAutoUpdate}}|fl
Эта команда покажет дату последнего обновления, версию баз и статус автоматического обновления.
2. Проверка через графический интерфейс
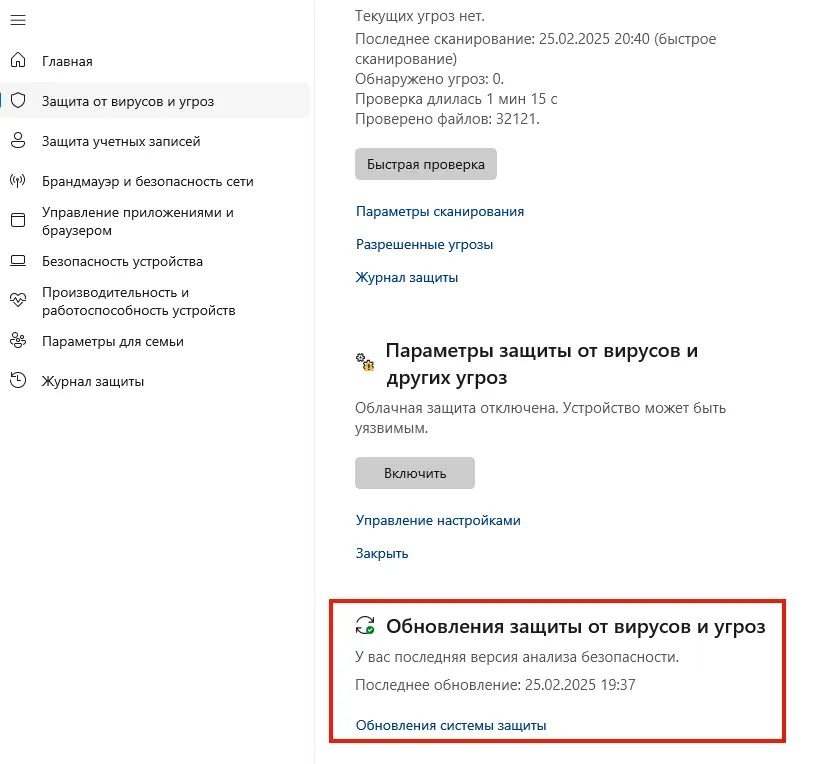
Откройте приложение Безопасность Windows (можно через команду ms-settings:windowsdefender).
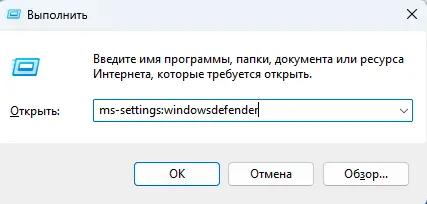
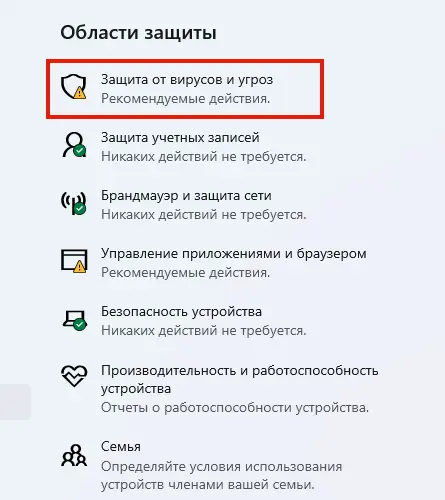
В разделе Защита от вирусов и угроз вы увидите информацию о версии баз и времени последнего обновления.
Типичные проблемы и их решение
1. Ошибка «Не удалось обновить определение системы защиты»
Если вы видите ошибку Не удалось обновить определение системы защиты (800704с6 или 80072f8f), выполните следующие шаги:

1. Проверьте настройки обновления:
Get-MpPreference | Select-Object SignatureScheduleDay, SignatureScheduleTime
Убедитесь, что параметры обновления заданы корректно.
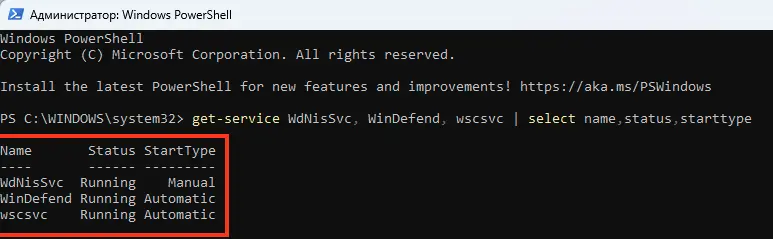
2. Проверьте состояние служб Microsoft Defender:
get-service WdNisSvc, WinDefend, wscsvc | select name,status,starttype
Убедитесь, что службы WinDefend, WdNisSvc и wscsvc запущены.
3. Попробуйте обновить базы вручную:
"%ProgramFiles%\Windows Defender\MpCmdRun.exe" -SignatureUpdate
Если возникнет ошибка, проверьте лог %userprofile%\AppData\Local\Temp\MpCmdRun.log.

2. Ошибка 0x8024401b (невозможно подключиться к серверам обновлений)
Эта ошибка указывает на проблемы с доступом к интернету или настройками прокси.
Выполните следующие действия:
1. Проверьте доступность серверов обновлений:
tnc fe2cr.update.microsoft.com -port 443
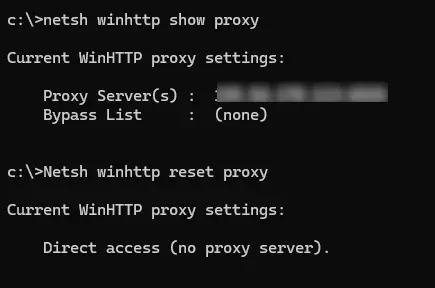
2. Проверьте настройки прокси:
netsh winhttp show proxy
Если прокси настроен некорректно, сбросьте его:
Netsh winhttp reset proxy
3. Повреждение антивирусных баз
Если базы повреждены, выполните сброс и обновление:
"%ProgramFiles%\Windows Defender\MpCmdRun.exe" -removedefinitions -all
Update-MpSignature -Verbose

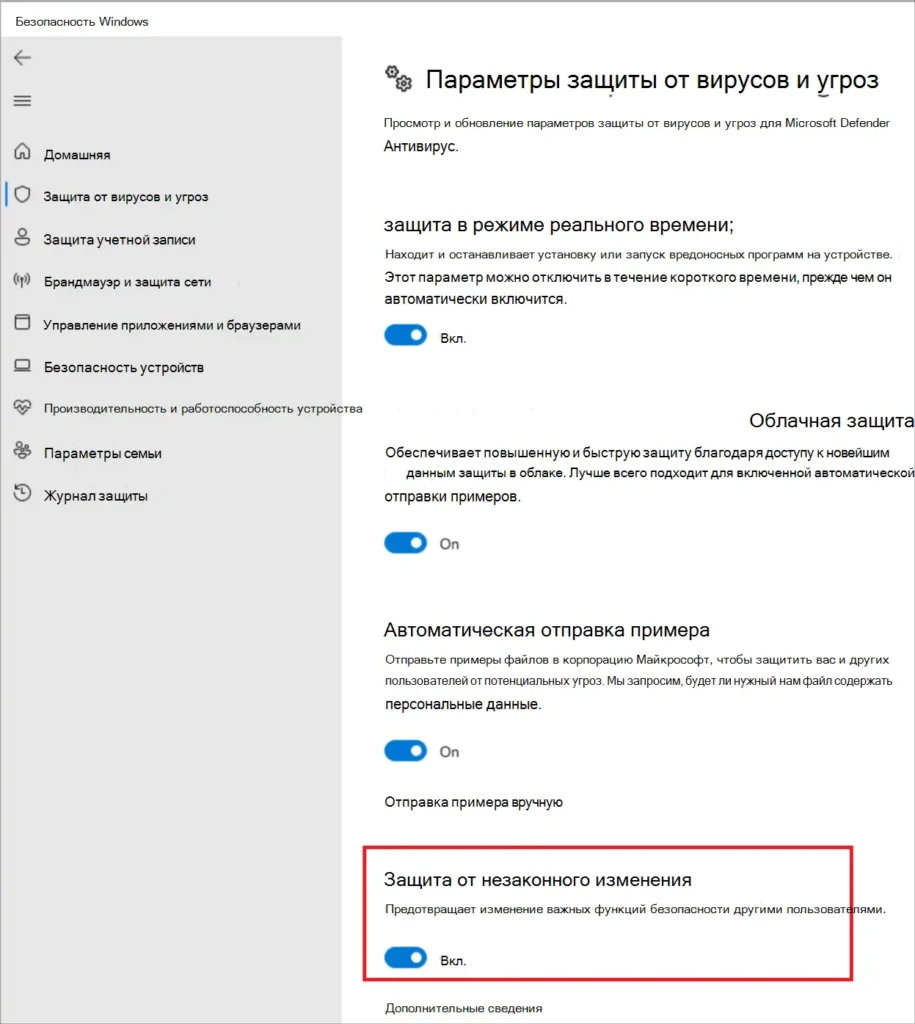
Если возникнет ошибка 0x80070005 (Access Denied), временно отключите Защита от незаконного изменения в приложении Безопасность Windows.
4. Проверка групповых политик
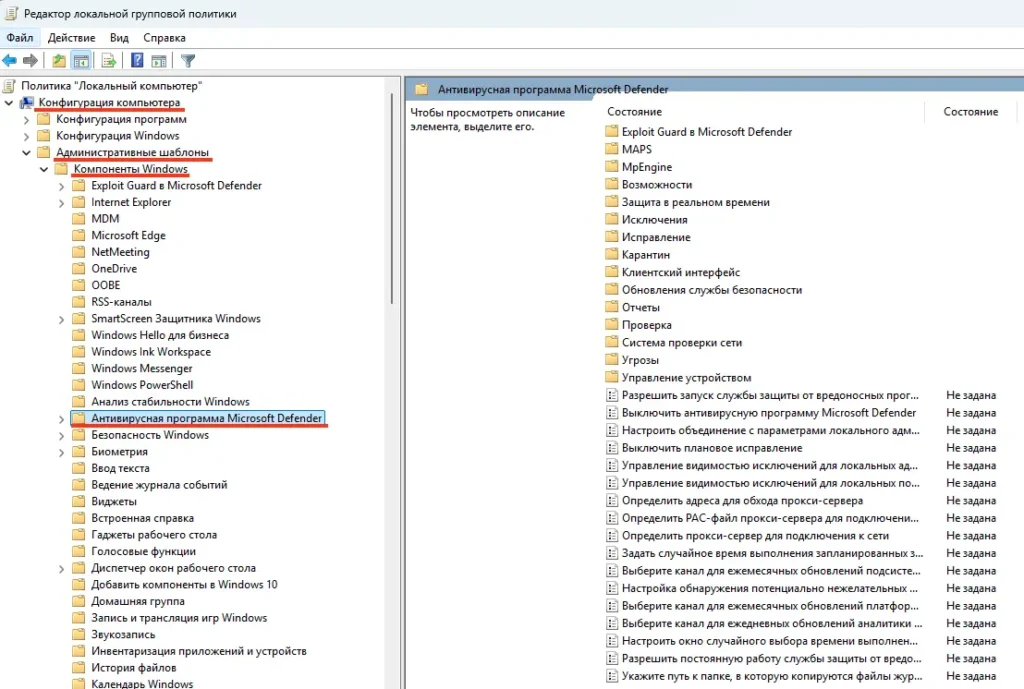
Если настройки Microsoft Defender заданы через групповые политики, выполните команду rsop.msc и проверьте раздел:
Конфигурация компьютера -> Административные шаблоны -> Компоненты Windows -> Антивирусная программа Microsoft Defender. При необходимости сбросьте настройки.
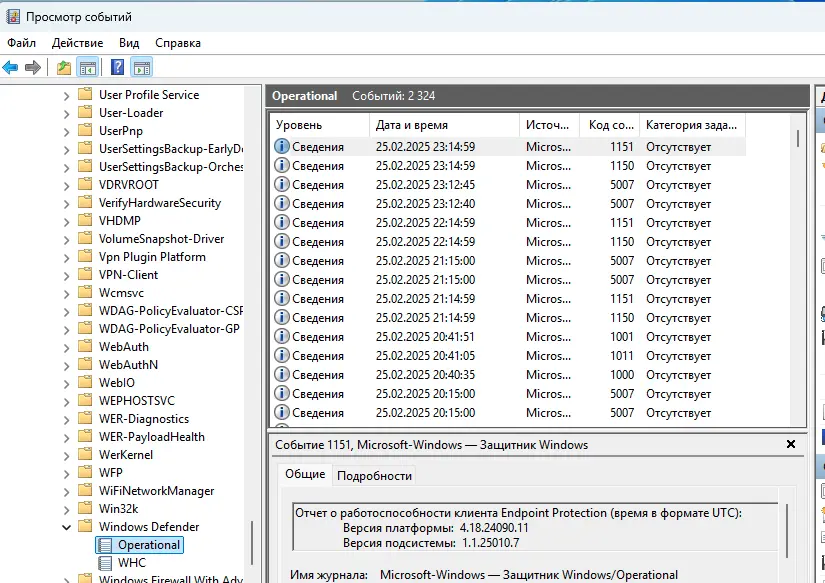
При диагностике ошибок полезно изучить логи событий антивируса в журнале:
— Откройте «Просмотр событий»
Перейдите: Журналы приложений и служб -> Microsoft -> Windows -> Windows Defender -> Operational
5. Ручное обновление баз
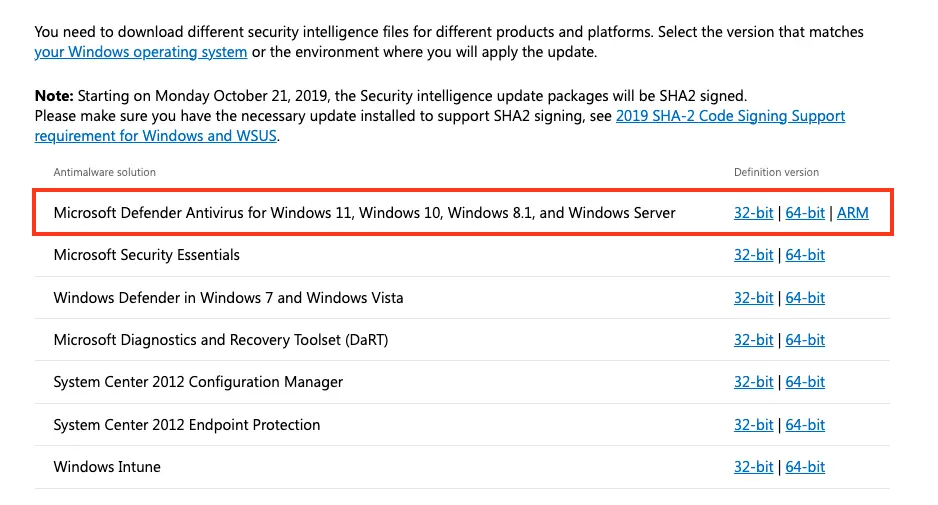
Если автоматическое обновление не работает, скачайте обновления вручную:
1. Перейдите на страницу Microsoft Defender Updates и скачайте файл mpam-fe.exe.
2. Сбросьте текущие базы:
cd %ProgramFiles%\Windows Defender
MpCmdRun.exe -removedefinitions -all
3. Запустите файл mpam-fe.exe с правами администратора.
4. Проверьте, что дата последнего антивирусных баз обновлена:
Get-MpComputerStatus | Select-Object AntivirusSignatureLastUpdated, AntivirusSignatureVersion
Если Microsoft Defender не обновляется, это может быть связано с проблемами доступа к интернету, настройками служб или повреждением баз. Следуя инструкциям выше, вы сможете диагностировать и устранить большинство ошибок. Если проблема сохраняется, попробуйте ручное обновление баз или сбросьте настройки антивируса.
Начиная с Windows 8 продукт Windows Defender (Защитник Windows) получил функционал Microsoft Security Essentials и из
простейшего сканера шпионских программ теперь стал полнофункциональным антивирусным решением, способным обнаруживать
широкий спектр потенциально вредоносного ПО.
Поставляется бесплатно, функционирует как служба и обеспечивает проверку до входа пользователя в систему, а поэтому он
интересен не только для персонального применения, но и для организаций, которые по тем или иным причинам не могут
внедрить System Center 2012 Endpoint Protection или другие антивирусные решения.
На данный момент Windows Defender входит в состав клиентских версий ОС и Windows Server 2012 R2 в варианте установки
Server Core и включен по умолчанию (https://technet.microsoft.com/en-us/library/b92b04bc-95db-4732-b4ec-d35b3f639275#BKMK_WindowsDefender).
Это удобно, так как эти системы защищены сразу после установки. В недавно появившейся бета-версии Windows Server его
можно установить как компонент (Install-WindowsFeature-Name Windows-Server-Antimalware).
Проверить статус работы службы можно, введя sc query Windefend.
Кроме GUI, настройки Windows Defender устанавливаются с помощью групповых политик (Computer Configuration — Admin
Templates — Windows Components — Windows Defender). Кроме этого, в PowerShell 4.0 появился модуль Defender, состоящий из
11 командлетов (
https://technet.microsoft.com/en-us/library/dn433280.aspx). Просмотреть их список можно, введя комманду:
PS> Get-Command -Module Defender
Командлеты Get-MpComputerStatus и Get-MpPreference выводят данные о состоянии антивируса – версии антивируса и баз,
включенные параметры, расписание, дату проверки и так далее. Все командлеты могут выполняться как локально, так и
удаленно.
PS> $session = NewCimSession -ComputerName comp1
PS> Get-MpComputerStatus -CimSession $session
В настройках по умолчанию отключены IPS, проверка съемных дисков, email и некоторые другие. Для установки параметров
используется командлет Set-MpPreference. Например, чтобы включить проверку внешних носителей, установим
DisableRemovableDriveScanning в false (по умолчанию true):
PS> Set-MpPreference -DisableRemovableDriveScanning $false
Два командлета Add-MpPreference и Remove-MpPreference позволяют добавлять и удалять параметры. Наиболее часто они
используются, чтобы исключить каталоги, процессы и файлы с определенным расширением из проверки. Например, исключим
сканирование каталога с временными файлами:
PS> Add-MpPreference -ExclusionPath C:\Temp
Для обновления баз следует применять командлет Update-MpSignature, по умолчанию используются настройки компьютера, но
с помощью дополнительных параметров можно указать другие источники (сервер WSUS, сервер обновлений Microsoft, MMPC или
каталог). В случае применения для обновлений каталога следует скачать обновления с Microsoft Malware Protection Center
(http://www.microsoft.com/security/portal/mmpc)
и положить в папку, на которую указать с помощью SignatureDefinitionUpdateFileSharesSources:
PS> Set-MpPreference -SignatureDefinitionUpdateFileSharesSources \\server\update
PS> Update-MpSignature -UpdateSource FileShares
Запуск сканирования осуществляется командлетом Start-MpScan, по умолчанию производится т.н. быстрая проверка только
критически важных файлов. Тип проверки можем изменить с помощью параметра ScanType — FullScan, QuickScan или СustomScan.
PS> Start-MpScan -ScanType FullScan
Два параметра – Get-MpThreat и Get-MpThreatDetection – позволяют просмотреть информацию по угрозам, обнаруженным на
компьютере. Командлет Remove-MpThreat позволяет удалить активные угрозы:
PS> Get-MpThreat
PS> Remove-MpThreat
Список известных Windows Defender угроз выводит Get-MpThreatCatalog.
PS> Get-MpThreatCatalog | select SeverityID, ThreatName