
Devices may be susceptible to cyberattacks, making Microsoft Defender Antivirus useful in protecting them. This built-in Windows tool helps secure devices from viruses, malware, and more. However, since digital threats evolve, Windows has a system that can accurately identify and neutralize the latest dangers, known as virus definition updates. These updates contain the latest data about known threats and are essential for effective protection.
Keeping your system up to date with the security intelligence update for Microsoft Defender Antivirus ensures optimal performance. In this article, we will guide you through updating the Security Intelligence Definition in Windows 10.
What are Microsoft Defender security definitions?
Security definitions contain the latest data about evolving threats, which is vital for Microsoft Defender to identify, obstruct, and remove malicious software from devices. Otherwise, Microsoft Defender may not recognize newer threats without these updates, leaving your device vulnerable.
Methods to update Microsoft Defender security definitions
Method 1: Update via Windows Security (recommended)
- Open the Start menu, then search for and open Windows Security.
- Select Virus & threat protection from the sidebar.
- Scroll to the Virus & threat protection updates section.
- Click Check for updates.
- Windows will search for and install the latest security definitions automatically.
Method 2: Update via Windows Update
- Press Windows + I to open Settings.
- Navigate to Update & Security → Windows Update.
- Click Check for updates.
- If a Microsoft Defender update is available, it will download and install automatically.
Method 3: Update via Command Prompt (advanced users)
- Click Start, type cmd, right-click Command Prompt, and select Run as administrator.
- Enter the following command: “%ProgramFiles%\Windows Defender\MpCmdRun.exe” -SignatureUpdate
- Press Enter and wait for the update to complete.
- Restart your PC if prompted.
Method 4: Download updates manually (offline method)
- Go to the Microsoft Security Intelligence website.
- Select and download the appropriate update package for your Windows version (32-bit or 64-bit).
- Transfer the downloaded file to your offline PC using a USB thumb drive or other external storage.
- Run the installer to apply the update.
- Restart your PC to complete the process if necessary.
How to verify that Microsoft Defender is up to date
To confirm that your Defender definitions are current:
- Open Windows Security > Virus & threat protection.
- Scroll down to Virus & threat protection updates.
- Check the Last update date. If it’s recent, your system is up to date.
Why keep security definitions updated?
- Protection against the latest threats: Digital threats become more sophisticated over time. Updated definitions allow Defender to keep up with newly discovered threats such as malware, viruses, trojans, etc.
- Reduced vulnerabilities: Updating security definitions reduces the chances of your system being targeted by cyberattacks.
- Enhanced real-time protection: Microsoft Defender accurately responds to attacks if security definitions are up-to-date.
Troubleshooting update issues
Defender definitions won’t update
When Microsoft Defender security definitions are not updating, you can try the following procedures:
- Restart your device. Next, check if the security definitions have been updated by following the steps in the “How to verify that Microsoft Defender is up to date” section.
- Check if Windows Update is turned on and working properly. Go to Settings > Update & Security > Windows Update and click Check for updates. If the process goes through without errors, Windows Update functions properly.
Error messages during update
You may stumble upon Microsoft Defender Antivirus error codes when updating security definitions. Here’s how you can mitigate the issue:
- Run the Windows Update Troubleshooter from Settings > Update & Security > Troubleshoot.
- You can also check if a third-party antivirus program interferes with Defender updates.
Microsoft Defender is disabled or missing
Some users may have difficulty turning on Microsoft Defender because it is disabled or missing from the settings. Here’s how you can potentially fix the problem:
- Ensure that there is no other antivirus installed. Otherwise, Microsoft Defender may be turned off automatically.
- Open Windows Security settings and ensure Defender is enabled as your active antivirus.
Frequently Asked Questions (FAQ)
How often does Microsoft Defender receive updates?
Microsoft Defender security definition receives updates frequently. On most occasions, as often as a few times every day.
Can I schedule automatic Defender updates?
Yes. Defender updates are automatically managed through Windows Update. Like other parameters under Windows Update, you can schedule automatic Defender updates to fit your schedule.
What should I do if updates keep failing?
You can try restarting your computer and then running the Windows Update Troubleshooter (See “Error messages during update” under the “Troubleshooting update issues” section for the steps). Additionally, you can also update security definitions manually (See Method 4: Download updates manually (offline method) above for the steps)
Does Microsoft Defender work without an internet connection?
Yes, but real-time protection and threat detection may be limited without regular updates.
Are Microsoft Defender updates free?
Yes, all updates to Microsoft Defender Antivirus, including security intelligence updates, are free.
Updating the Security Intelligence Definition version
Keeping Microsoft Defender updated is essential for protecting your system against the latest security threats. You can update it through various methods, including Windows Security, Windows Update, or manual downloads. Regularly checking for updates and resolving any issues can help ensure that your system remains well-protected and secure.
Время на прочтение7 мин
Количество просмотров27K
Продолжаю серию статей по администрированию операционной системы Windows. В предыдущей статье работа велась с пакетами обновлений, а в этой с компонентами системы. Дополнительные компоненты расширяют функциональные возможности ОС, но многие из них попросту бесполезны для большинства пользователей. Я предлагаю удобный скрипт отключающий «ненужные» компоненты. Команды скрипта обращаются к средствам DISM и могут быть применимы как к установленной системе, так и к автономному образу. Скрипт определяет версию утилиты dism.exe и подставляет нужные команды. Реализовано ветвление по версии целевой ОС, таким образом что в одном скрипте можно указать отключаемые компоненты для разных версий Windows.
Отключение компонентов данным скриптом обратимо. Я делаю это главным образом для того, чтобы убрать из меню Пуск ссылки на ненужные мне программы. Здесь для примера указано по два компонента для каждой версии Windows, которые будут отключены. Тем, кто будет использовать данный скрипт в своей работе, необходимо дополнить его. Определите компоненты, которые вам не понадобятся и добавьте их отключение в скрипт. Путём нехитрых изменений, можно наоборот — включать компоненты. Для своих нужд Я оставляю только Internet Explorer, Media Player, Windows Search и .NET Framework 3.5.1. Последний отключён производителем в новых версиях Windows, с удалением файлов, и чтобы его включить у меня есть отдельный скрипт, о котором Я напишу позже.
Скрипт
@echo off
title Disabling features in Windows image

set _file=install.wim
set _img=Online
set _mnt=mount
set _tool=7
set _word=Wim

dism /English /LogLevel:1 /Get-Help | find "Version: 6.1" > nul || set _tool=8
if %_tool% GTR 7 set _word=Image

:pre_menu
cls
if not exist %_file% goto :version
dism /English /LogLevel:1 /Get-%_word%Info /%_word%File:%_file%
echo -------------------------------------------------------------------------------
if %ERRORLEVEL% NEQ 0 pause & exit
set /p _ind=Input index or press [Enter] for quit: || exit
if %_ind% EQU 0 goto :version
if %_ind% GTR 0 if %_ind% LEQ 24 goto :ind_menu
goto :pre_menu

:ind_menu
cls
dism /English /LogLevel:1 /Get-%_word%Info /%_word%File:%_file% /Index:%_ind%
echo -------------------------------------------------------------------------------
if %ERRORLEVEL% NEQ 0 pause & goto :pre_menu
choice /c abcdefghijklmnopqrstuvwxyz /n /m "Mount selected image? [m] "
if %ERRORLEVEL% EQU 13 goto :mount
goto :pre_menu

:version
dism /%_img% /English /LogLevel:1 /Get-Help | find "Image Version: 6.1" > nul && goto :disable-7
dism /%_img% /English /LogLevel:1 /Get-Help | find "Image Version: 6.3" > nul && goto :disable-9
dism /%_img% /English /LogLevel:1 /Get-Help | find "Image Version: 10" > nul && goto :disable-A
goto :unmount

:disable-7
cls
echo Getting list of features. Please wait...
dism /%_img% /English /LogLevel:1 /Get-Features /Format:Table > %TEMP%\features.txt
echo -------------------------------------------------------------------------------
set /a _num+=1
echo %_num% Disable: WindowsGadgetPlatform
call :state WindowsGadgetPlatform &&^
dism /%_img% /English /LogLevel:1 /Disable-Feature /FeatureName:WindowsGadgetPlatform /NoRestart
echo -------------------------------------------------------------------------------
set /a _num+=1
echo %_num% Disable: MediaCenter
call :state MediaCenter &&^
dism /%_img% /English /LogLevel:1 /Disable-Feature /FeatureName:MediaCenter /NoRestart
echo -------------------------------------------------------------------------------
del %TEMP%\features.txt
if not exist %_file% exit
goto :unmount

:disable-9
cls
echo Getting list of features. Please wait...
dism /%_img% /English /LogLevel:1 /Get-Features /Format:Table > %TEMP%\features.txt
echo -------------------------------------------------------------------------------
set /a _num+=1
echo %_num% Disable: Printing-Foundation-Features
call :state Printing-Foundation-Features &&^
dism /%_img% /English /LogLevel:1 /Disable-Feature /FeatureName:Printing-Foundation-Features /NoRestart
echo -------------------------------------------------------------------------------
set /a _num+=1
echo %_num% Disable: Windows-Defender-Default-Definitions
call :state Windows-Defender-Default-Definitions &&^
dism /%_img% /English /LogLevel:1 /Disable-Feature /FeatureName:Windows-Defender-Default-Definitions /NoRestart
echo -------------------------------------------------------------------------------
del %TEMP%\features.txt
if not exist %_file% exit
goto :unmount

:disable-A
cls
echo Getting list of features. Please wait...
dism /%_img% /English /LogLevel:1 /Get-Features /Format:Table > %TEMP%\features.txt
echo -------------------------------------------------------------------------------
set /a _num+=1
echo %_num% Disable: MicrosoftWindowsPowerShellV2Root
call :state MicrosoftWindowsPowerShellV2Root &&^
dism /%_img% /English /LogLevel:1 /Disable-Feature /FeatureName:MicrosoftWindowsPowerShellV2Root /NoRestart
echo -------------------------------------------------------------------------------
set /a _num+=1
echo %_num% Disable: NetFx4-AdvSrvs
call :state NetFx4-AdvSrvs &&^
dism /%_img% /English /LogLevel:1 /Disable-Feature /FeatureName:NetFx4-AdvSrvs /NoRestart
echo -------------------------------------------------------------------------------
del %TEMP%\features.txt
if not exist %_file% exit
goto :unmount

:state
findstr %1 %TEMP%\features.txt | find "Enable" > nul
exit /b

:mount
cls
md %_mnt%
dism /English /LogLevel:1 /Mount-%_word% /%_word%File:%_file% /Index:%_ind% /MountDir:%_mnt%
if %ERRORLEVEL% NEQ 0 rd %_mnt% & pause & exit
set _img=Image:%_mnt%
goto :version

:unmount
cls
if not %_img%==Online (
dism /English /LogLevel:1 /Unmount-%_word% /MountDir:%_mnt% /Commit
rd %_mnt%
)
set _img=Online
goto :pre_menu
Использование
Данный скрипт может отключать компоненты как в онлайн системе так и в автономном образе. Если в папке запуска отсутствует файл образа — install.wim, то скрипт выполняет отключение компонентов в полностью автоматическом режиме. Если в папке запуска присутствует файл образа — install.wim, то скрипт выполняет считывание из него информацию об имеющихся «индексах» и предлагает ввести номер. После этого отображается расширенная информация о выбранном «индексе» выдаётся запрос на монтирование. Нажатие любой клавиши приводит к возврату, а нажатие клавиши [m] запускает следующую цепочку действий: монтирование образа, отключение компонентов, размонтирование образа, возврат в меню выбора «индеска». После чего можно выбрать другой «индекс» для отключения компонентов. Выбор «индекса» под номером 0 запускает отключение компонентов на «живой» ОС.
Разбор кода
Вначале командой set происходит установка переменных. Можно изменить предполагаемое имя файла образа install.wim (например, на install.esd). Можно изменить имя папки монтирования или задать путь, если папка монтирования должна находится за пределами папки запуска. От установки «уровня» логирования, как в предыдущем скрипте по пакетам обновления, решил отказаться и напрямую прописал во всех командах информирование только об ошибках — /LogLevel:1. Также во всех командах добавил ключ /English чтобы все сообщения отображались на английском языке.
Скрипт может быть запущен на разных версиях ОС, и таким образом обращаться к разным версиям системы DISM, которые отличаются набором команд. Так, в версиях после 6.1 во всех командах, слово Wim заменено на Image, хотя и оставлены старые «наименования» команд для обратной совместимости. В самом начале работы скрипта определяется версия утилиты dism.exe и в дальнейшем во все команды подставляется нужное слово. Без определения версии можно было бы и обойтись, но данный функционал Я использую в своём скрипте по получению информации из образа Windows, поэтому просто не стал переписывать код.
:pre_menu
Предварительное меню. Получение основной информации о wim-файле с контролем ошибок. Если отсутствует файл образа, то запуск в режиме Online. Не нашел информацию о максимальном количестве «индексов» в одном образе и установил значение 24.
:ind_menu
Индексное меню. Получение расширенной информации о выбранном «индексе» в wim-файле с контролем ошибок. Предложение смонтировать «индекс».
:version
Определение версии целевой системы. Если находится необходимая строка, то осуществляется переход к указанной метке. Если строка не обнаруживается, то происходит размонтирование.
:disable-7 :disable-9 :disable-A
Метки целевых систем обслуживания. Я называю Windows 8.1 — девяткой, а Windows 10 — Windows A (кто в теме тот поймёт), поэтому такие имена у меток. Вначале данного блока происходит запрос состояния всех компонентов с сохранением в файл features.txt. В дальнейшем, чтобы ускорить процесс отключения и не пытаться отключить то, что и так отключено, происходит предварительная проверка состояния каждого компонента. В конце блока — удаление временных файлов и размонтирование.
:state
Проверка состояния компонента. Псевдо-функция, возвращающая результат по коду ошибки в глобальную переменную %ERRORLEVEL%. Строка с именем компонента ищется в файле features.txt и если находится и также обнаруживается слово «Enable», то сигнал к отключению.
:mount
Монтирование образа. Предварительно создаётся папка монтирования. Контроль ошибок. Изменяется переменная определяющая спецификацию образа, теперь указывает на путь к автономному образу.
:unmount
Размонтирование образа. Если выполнялось интерактивное обслуживание (/Online), то размонтировать не нужно. Возвращение переменных к исходным значениям.
Возможные проблемы
При обслуживании образа вышестоящей версии на системе нижестоящей версии возможны зависания и ошибки. То есть, не нужно пытаться на Windows 7 обрабатывать файл образа Windows 8.1 или 10. Также для успешного выполнения всех команд требуется отключить Контроль учётных записей — параметр EnableLUA установить в значение 0.
Вопрос
Отключаю все компоненты связанные с печатью и при этом мой принтер продолжает печатать, а сканер — сканировать. Предполагаю, что компоненты печати (например Printing-Foundation-Features и д.р.) используются для расширенных возможностей — например, для установки принтера доступным по сети. Так ли это?
You are here:
Home » Windows 10 » How To Manually Update Windows Defender In Windows 10
Windows Defender is the default antivirus software in Windows 10. The Defender program helps protect your Windows operating system as well as data from common threats like viruses, spyware, and malware.
With default settings, Windows Defender automatically downloads antivirus definitions from Microsoft servers when new updates are available. Usually Microsoft releases new definitions every day through Windows Update service. So it’s important to keep the Windows Update turned on in order to automatically update Windows Defender.

Many users turn off Windows Update for a number of reasons. While some users disable Windows Update to avoid future updates, there are many users who prefer to manually update Windows operating system.
If you have also turned off Windows Update service in Windows 10 and now want to manually update Windows Defender in Windows 10, you will be happy know that manually updating Windows Defender is quite easy. All you need to do is, download Windows Defender updates from Microsoft and then run the update in Windows 10 to update Windows Defender.
NOTE: This method can also be used to update offline Windows 10 PC.
Complete the given below directions to manually update Windows Defender in Windows 10.
Step 1: Before downloading Defender definition updates, open Windows Defender program either using Start menu search or clicking its icon in system tray, and then check the current version and installed date of definition.

After launching Windows Defender, click on Update tab to know when was the last time updates were installed. Note down definitions last updated and virus & spyware definition version before proceeding further.

If the definition updates were installed less than a day ago, you don’t need to update it again. That said, it’s recommended to keep antivirus definition up-to-date.
Step 2: Visit this page of Microsoft and scroll down the page to see definition updates for Windows Defender for Windows 10, Windows 8 and Windows 7.
As you can see in the picture below, the page offers separate update files for x86 and x64 types of Windows 10. So check if you are running 32-bit or 64-bit Windows 10 and then download updates for either x86 or x64.

Be sure to click the download link next to Windows Defender in Windows 10 and Windows 8.1.
Step 3: Once the update is downloaded to your PC, you need to run the update in order to install. To do so, simply double-click on the update file to begin updating Windows Defender. Note that you won’t see any window or dialog box during the process.

Windows Defender should be updated in a few seconds. That’s it!
Step 4: Open Windows Defender program, switch to Update tab and check the update version and install date just to make sure that latest definition updates are installed.
You can now perform a full scan or offline scan using Windows Defender.
How to remove Scan with Windows Defender from right-click menu in Windows 10 guide might also be of interest to you.
How to Manually Update Security Intelligence Definitions for Windows Defender Antivirus in Windows 10
Windows Defender Antivirus uses security intelligence definitions to detect threats. Windows 10 automatically downloads the most recent intelligence available through Windows Update. You can download them and update definitions manually when needed, e.g. to secure an offline device.
Windows Defender is the default antivirus app shipped with Windows 10. Earlier versions of Windows like Windows 8.1, Windows 8, Windows 7 and Vista also had it but it was less efficient previously as it only scanned spyware and adware. In Windows 8 and Windows 10, Defender is based on the Microsoft Security Essentials app which offers better protection by adding full blown protection against all kinds of malware. Microsoft is renaming the app Microsoft Defender.
Recent Windows 10 version come with is a new app called Windows Security. The application, formerly known as «Windows Defender Dashboard» and «Windows Defender Security Center», has been created to help the user control his security and privacy settings in a clear and useful way. It includes all the settings related to Windows Defender. The Security Center app is reviewed in the post Windows Defender Security Center in Windows 10 Creators Update.
Note: Windows 10 allows to only temporary disable Windows Defender with a special option in Windows Security. After some period of time, it will be re-enabled automatically. If you need to disable it permanently, see Disable Windows Defender in Windows 10.
Microsoft continually updates security intelligence in antimalware products to cover the latest threats and to constantly tweak detection logic, enhancing the ability of Windows Defender Antivirus and other Microsoft antimalware solutions to accurately identify threats. This security intelligence works directly with cloud-based protection to deliver fast and powerful AI-enhanced, next-generation protection.
Here’s how to update definitions manually if you are connected to the Internet
Trigger a definition update for Windows Defender Antivirus
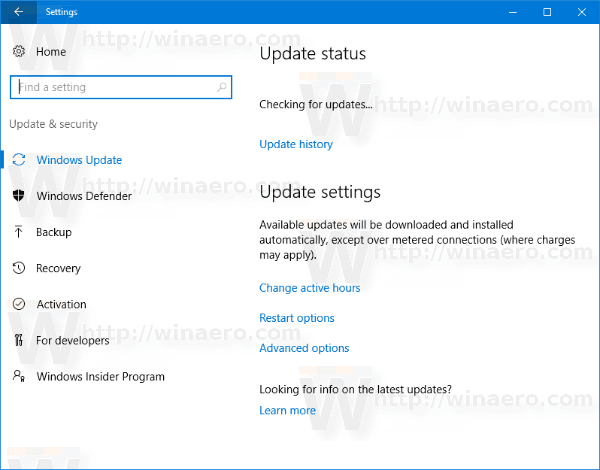
- Open the Settings app.

- Go to Update & security -> Windows Update.

- On the right, click Check for updates.

- Windows 10 will download and install definitions for Defender (if available).


Alternatively, you can trigger the update from the command prompt. This is possible with the console MpCmdRun.exe utility which is part of Windows Defender and used mostly for scheduled scanning tasks by IT administrators. The MpCmdRun.exe tool has a number of command line switches which can be viewed by running MpCmdRun.exe with «/?».
Trigger a definition update for Windows Defender Antivirus using command prompt
- Open an elevated command prompt.
- Type or copy-paste the following command to update definitions:
"%ProgramFiles%\Windows Defender\MpCmdRun.exe" -SignatureUpdate
- You are done.
Note: You may want to clear the definition cache before updating them. To do this, run the commands:
- Clear the cache:
"%ProgramFiles%\Windows Defender\MpCmdRun.exe" -removedefinitions -dynamicsignatures. - Update definitions:
"%ProgramFiles%\Windows Defender\MpCmdRun.exe" -SignatureUpdate.
Finally, if you need to update a device that is not connected to the Internet, or need a local copy of security definitions for Windows Defender Antivirus, do the following.
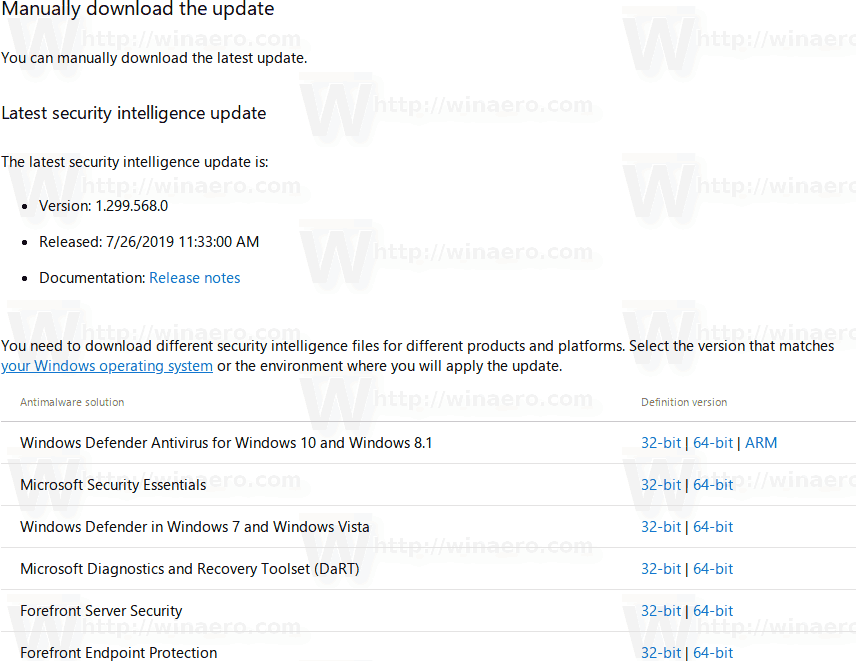
- Point your browser to the following page: Security Definitions Download
- Scroll down to the Manually download the update section.

- Select 32-bit or 64-bit update package matching your operating system. See how to determine if you are running 32-bit Windows or 64-bit.
- Download and run the mpam-fe.exe file.
You are done!
As of this writing, the following download links were available for Windows 10 and Windows 8:
- 32-bit
- 64-bit
- ARM
That’s it.
Support us
Winaero greatly relies on your support. You can help the site keep bringing you interesting and useful content and software by using these options:
If you like this article, please share it using the buttons below. It won’t take a lot from you, but it will help us grow. Thanks for your support!
By Timothy Tibbetts |
It’s a well-known fact that any antivirus is only as good as its updates. Windows Defender updates daily, but should you run into a problem updating, here’s how you can update Windows Defender manually.
Updating your Windows Defender antivirus is simple, so if your updates aren’t working, see Steps 2 and 3 for workarounds to force Windows Defender updates. We’ve seen problems including viruses or malware that break Windows Defender and other antivirus programs and they aren’t always repaired correctly after clean up.
1: Update in Settings
Click on Start > Settings > Update & Security > Windows Updates.
If your status shows that you last updated today, you’re all set.
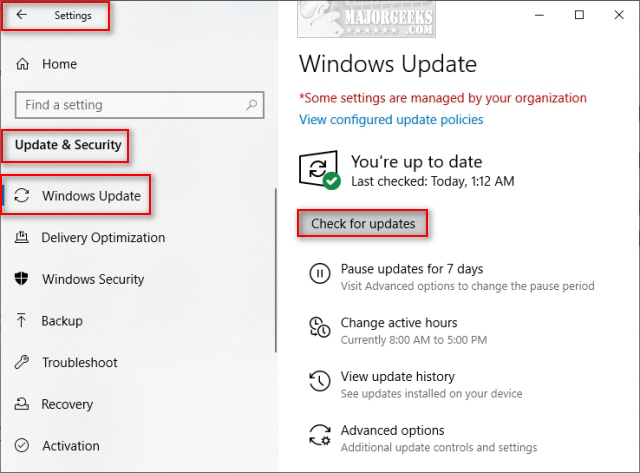
Otherwise, click on Check for updates.
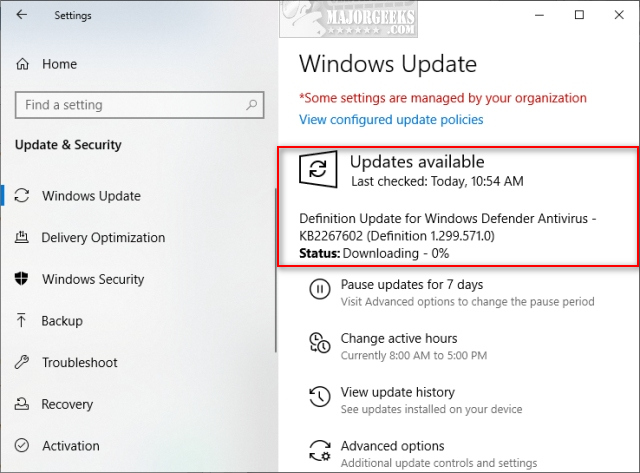
If there are updates to be downloaded, you will see Updates available and a progress bar. This step should complete within minutes.
2: Run Windows Updates Troubleshooter
The Windows Update troubleshooter can find and fix problems with Windows Updates, including your definition updates.
Click on Start > Settings > Update & Security > Troubleshoot.
Click on Windows Update and then Run the troubleshooter.
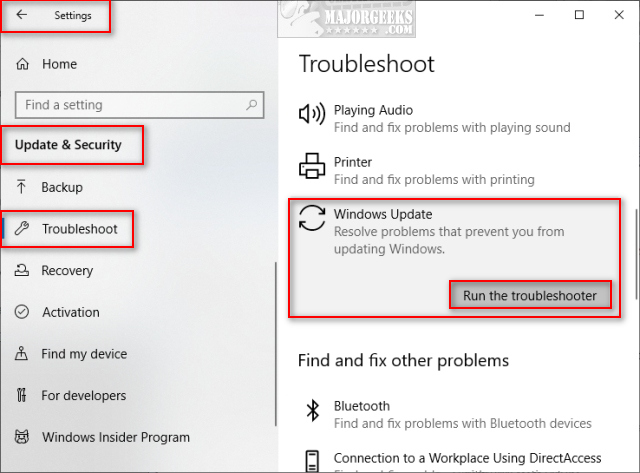
Windows will next check for problems and repair them or tell you if there weren’t any found problems.
3: Update With Microsoft Official Download
You can download the latest Windows Defender definitions here on MajorGeeks.
These are executables, something no one else seems to do, so double-click the downloaded file and the latest definitions will install for you.
Additional instructions can be found on the download page.
4: Update With PowerShell
If all else has failed, there’s always PowerShell to the rescue. We’re going first to clear your cache and then try to update manually.
Press the Windows Key + X and click on Windows PowerShell (Admin)
Copy and paste the following two lines one at a time followed by pressing the Enter key:
«%ProgramFiles%Windows DefenderMpCmdRun.exe» -removedefinitions -dynamicsignatures.
«%ProgramFiles%Windows DefenderMpCmdRun.exe» -SignatureUpdate.
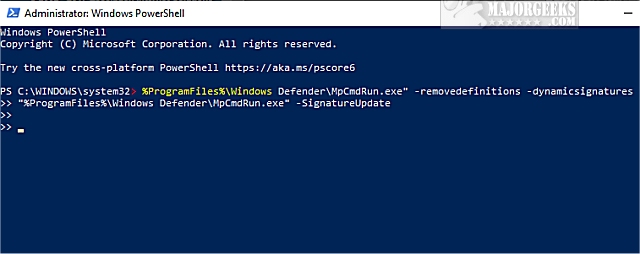
There are no notifications so wait until you see >> before entering the second line.
This code is repeated, and slightly different on multiple websites. The code also changed for Windows 10, so your success here is hit or miss, and you should only try this step if the other steps failed.
Similar:
What’s the Best Antivirus and Is Windows Defender Good Enough
Fix: Some Settings Are Managed by Your Organization
How to Enable Possibly Unwanted Applications Protection With Windows Defender
Hide the Windows Defender Security Center Icon on the Windows 10 Taskbar
Solved: Microsoft Defender Threat Service Has Stopped
comments powered by Disqus