
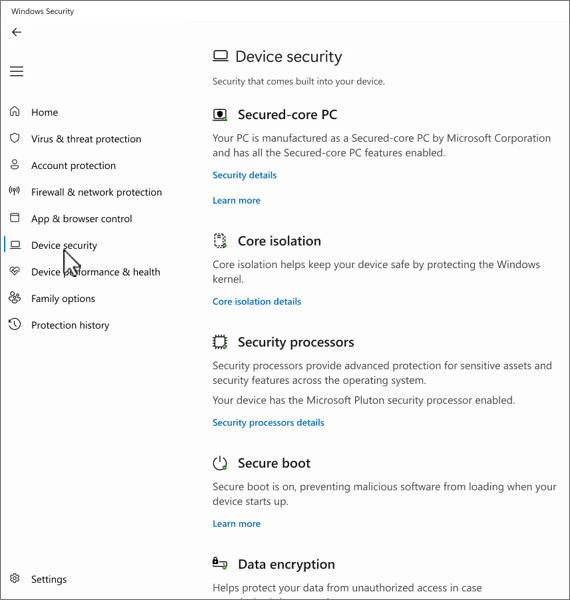
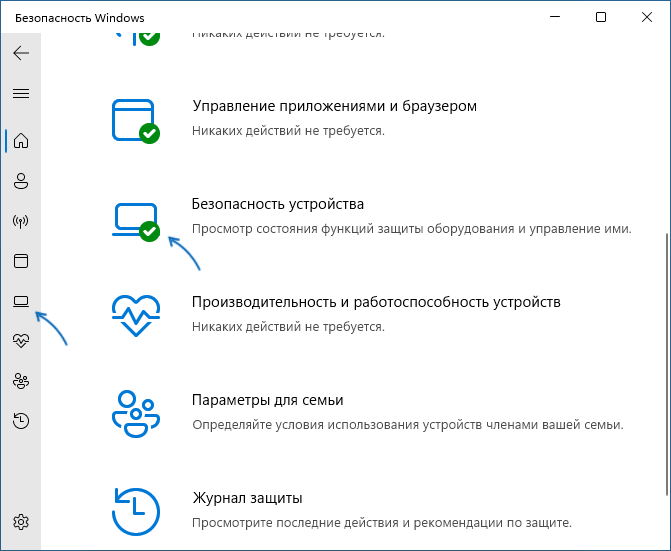
The device security page of the Windows Security app is designed to manage the security features built into your Windows device. The page is divided into the following sections:
-
Secured-core PC: If your device is a Secured-core PC, it shows information about the Secured-core PC features
-
Core isolation: Here you can configure security features that protect the Windows kernel
-
Security processor: Provides information about the security processor, which is call the trusted platform module (TPM)
-
Secure boot: If secure boot is enabled, you can find more information about it
-
Data encryption: Here you can find a link to Windows Settings, where you can configure device encryption and other BitLocker settings
-
Hardware security capability: Assesses your device’s hardware security features
In the Windows Security app on your PC, select Device security, or use the following shortcut:
Device security
Secured-core PC
A Secured-core PC is designed to provide advanced security features right out of the box. These PCs integrate hardware, firmware, and software to offer robust protection against sophisticated threats.
In the Windows Security app on your PC, select Device security > Security details.
For more information, see Windows 11 Secured-core PCs.
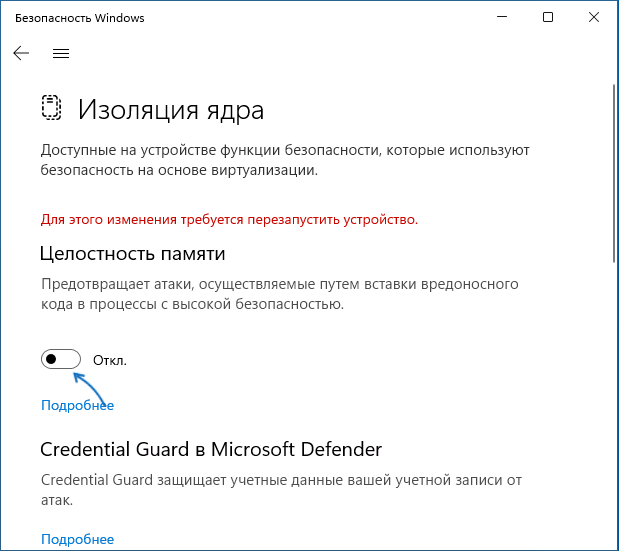
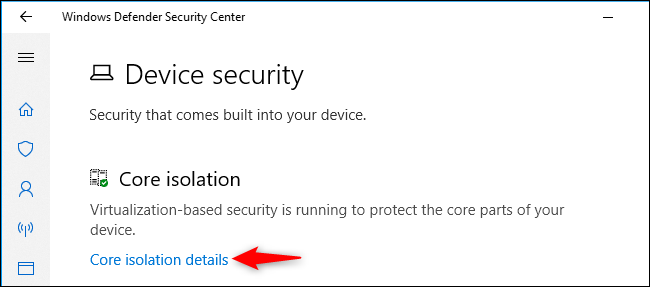
Core isolation
Core isolation provides security features designed to protect core processes of Windows from malicious software by isolating them in memory. It does this by running those core processes in a virtualized environment.
In the Windows Security app on your PC, select Device security > Core isolation details or use the following shortcut:
Core isolation
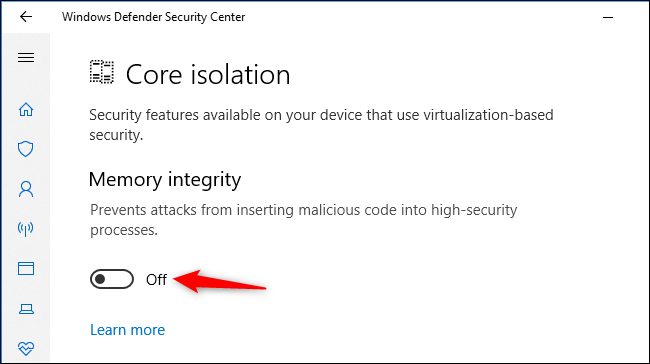
Note: the features exposed on the core isolation page vary depending on what version of Windows you’re running, and the hardware components installed.
Memory integrity, also known as Hypervisor-protected Code Integrity (HVCI) is a Windows security feature that makes it difficult for malicious programs to use low-level drivers to hijack your PC.
A driver is a piece of software that lets the operating system (Windows in this case) and a device (like a keyboard or a webcam) talk to each other. When the device wants Windows to do something, it uses the driver to send that request.
Memory integrity works by creating an isolated environment using hardware virtualization.
Think of it like a security guard inside a locked booth. This isolated environment (the locked booth in our analogy) prevents the memory integrity feature from being tampered with by an attacker. A program that wants to run a piece of code which may be dangerous has to pass the code to memory integrity inside that virtual booth so that it can be verified. When memory integrity is comfortable that the code is safe it hands the code back to Windows to run. Typically, this happens very quickly.
Without memory integrity running, the security guard stands right out in the open where it’s much easier for an attacker to interfere with or sabotage the guard, making it easier for malicious code to sneak past and cause problems.
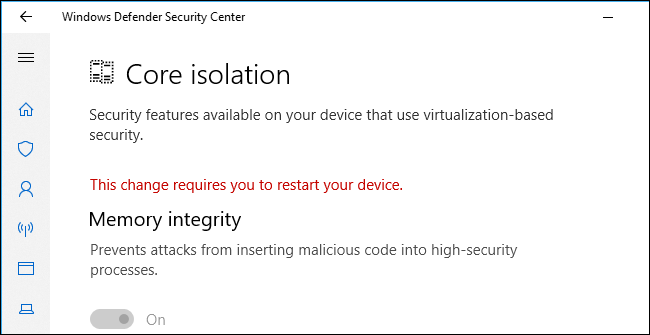
You can turn memory integrity On or Off using the toggle button.
Note: To use memory integrity, you must have hardware virtualization enabled in your system’s UEFI or BIOS.
What if it says I have an incompatible driver?
If memory integrity fails to turn on, it may tell you that you have an incompatible device driver already installed. Check with the manufacturer of the device to see if they have an updated driver available. If they don’t have compatible driver available, you might be able to remove the device or app that uses that incompatible driver.
Note: If you try to install a device with an incompatible driver after turning on memory integrity, you might receive the same message. If so, the same advice applies — check with the device manufacturer to see if they have an updated driver you can download, or don’t install that particular device until a compatible driver is available.
Hardware enforced stack protection is a hardware-based security feature that makes it difficult for malicious programs to use low-level drivers to hijack your PC.
A driver is a piece of software that lets the operating system (Windows in this case) and a device (like a keyboard or a webcam) talk to each other. When the device wants Windows to do something, it uses the driver to send that request.
Hardware enforced stack protection works by preventing attacks that modify return addresses in kernel-mode memory to launch malicious code. This security feature requires a CPU that contains the ability to verify the return addresses of running code.
When executing code in kernel-mode, return addresses on the kernel-mode stack can be corrupted by malicious programs or drivers in order to redirect normal code execution to malicious code. On supported CPUs, the CPU maintains a second copy of valid return addresses on a read-only shadow stack that drivers cannot modify. If a return address on the regular stack has been modified, the CPU can detect this discrepancy by checking the copy of the return address on the shadow stack. When this discrepancy occurs, the computer prompts a stop error, sometimes known as a blue screen, to prevent the malicious code from executing.
Not all drivers are compatible with this security feature, as a small number of legitimate drivers engage in return address modification for non-malicious purposes. Microsoft has been engaging with numerous driver publishers to ensure that their latest drivers are compatible with hardware enforced stack protection.
You can turn hardware enforced stack protection On or Off using the toggle button.
To use hardware enforced stack protection, you must have memory integrity enabled, and you must be running a CPU that supports Intel Control-Flow Enforcement Technology or AMD Shadow Stack.
What if it says I have an incompatible driver or service?
If hardware enforced stack protection fails to turn on, it might tell you that you have an incompatible device driver or service already installed. Check with the manufacturer of the device or the application publisher to see if they have an updated driver available. If they don’t have a compatible driver available, you might be able to remove the device or app that uses that incompatible driver.
Some applications might install a service instead of a driver during the application’s installation and install the driver only when the application is launched. For more accurate detection of incompatible drivers, services that are known to be associated with incompatible drivers are also enumerated.
Note: If you try to install a device or app with an incompatible driver after turning on hardware enforced stack protection, you may see the same message. If so, the same advice applies — check with the device manufacturer or app publisher to see if they have an updated driver you can download, or don’t install that particular device or app until a compatible driver is available.
Also known as Kernel DMA protection this security feature protects your device against attacks that can occur when a malicious device is plugged into a Peripheral Component Interconnect (PCI) port like a Thunderbolt port.
A simple example of one of these attacks would be if someone leaves their PC for a quick coffee break, and while they were away, an attacker steps in, plugs in a USB-like device and walks away with sensitive data from the machine, or injects malware that allows them to control the PC remotely.
Memory access protection prevents these kinds of attacks by denying direct access to the memory to those devices except under special circumstances, particularly when the PC is locked, or the user is signed out.
Every device has some software that’s been written to the read-only memory of the device — basically written to a chip on the system board — that is used for the basic functions of the device, such as loading the operating system that runs all the apps we’re used to using. Since that software is difficult (but not impossible) to modify we refer to it as firmware.
Because the firmware loads first and runs under the operating system, security tools and features that run in the operating system have a difficult time detecting it or defending against it. Like a house that depends on a good foundation to be secure, a computer needs its firmware to be secure in order to ensure that the operating system, applications, and data on that computer are safe.
System Guard is a set of features that helps to ensure that attackers can’t get your device to start with untrusted or malicious firmware.
Platforms that offer firmware protection typically also protect the System Management Mode (SMM), a highly privileged operating mode, to varying degrees. You can expect one of the three values, with a higher number indicating a greater degree of SMM protection:
-
Your device meets firmware protection version one: this offers the foundational security mitigations to help SMM resist exploitation by malware, and prevents exfiltration of secrets from the OS (including VBS)
-
Your device meets firmware protection version two: in addition to firmware protection version one, version two ensures that SMM can’t disable Virtualization-based Security (VBS) and kernel DMA protections
-
Your device meets firmware protection version three: in addition to firmware protection version two, it further hardens the SMM by preventing access to certain registers that have the ability to compromise the OS (including VBS)
Local Security Authority (LSA) protection is a Windows security feature to help prevent the theft of credentials used for signing into Windows.
The Local Security Authority (LSA) is a crucial process in Windows involved in user authentication. It’s responsible for verifying credentials during the login process and managing authentication tokens and tickets used to enable single sign-on for services. LSA protection helps prevent untrusted software from running inside LSA or from accessing LSA memory.
How do I manage Local Security Authority protection?
You can turn LSA protection On or Off using the toggle button.
After you have changed the setting, you must reboot for it to take effect.
Note: To help keep credentials safe, LSA protection is enabled by default on all devices. For new installs, it is enabled immediately. For upgrades, it is enabled after rebooting after an evaluation period of five days.
What if I have incompatible software?
If LSA protection is enabled and it blocks the loading of software into the LSA service, a notification indicates the blocked file. You might be able to remove the software loading the file, or you can disable future warnings for that file when it’s blocked from loading into LSA.
Note: Credential Guard is available on devices running Enterprise or Education versions of Windows.
While you’re using your work or school device it will be quietly signing into and gaining access to a variety of things such as files, printers, apps, and other resources in your organization. Making that process secure, yet easy for the user, means that your PC has a number of authentication tokens on it at any given time.
If an attacker can gain access to one, or more, of those tokens, they might be able to use them to gain access to the organizational resource (sensitive files, etc) that the token is for. Credential Guard helps to protect those tokens by putting them in a protected, virtualized, environment where only certain services can access them when necessary.
A driver is a piece of software that lets the operating system (Windows in this case) and a device (like a keyboard or a webcam) talk to each other. When the device wants Windows to do something, it uses the driver to send that request. Because of this, drivers have a lot of sensitive access in your system.
Windows 11 includes a blocklist of drivers that have known security vulnerabilities, have been signed with certificates used to sign malware, or that circumvent the Windows Security Model.
If you have memory integrity, Smart App Control, or Windows S mode on, the vulnerable driver blocklist will be on too.
Note: If you encounter a banner titled Program Compatibility Assistant with a message indicating that a driver cannot load, or that a security setting is preventing a driver from loading, check for updated drivers via Windows Update or through Device Manager. If no updates are available, contact your hardware manufacturer for an updated driver.
Security processor
The Security processor settings under the Device Security page in the Windows Security app provide details about the Trusted Platform Module (TPM) on your device. The TPM is a hardware component designed to enhance security by performing cryptographic operations.
Note: If you don’t see a Security processor entry on this screen then it’s likely that your device doesn’t have the TPM (Trusted Platform Module) hardware necessary for this feature or that it’s not enabled in UEFI (Unified Extensible Firmware Interface). Check with your device manufacturer to see if your device supports TPM and, if so, steps to enable it.
This is where you’ll find info about the security processor manufacturer and version numbers, as well as about the security processor’s status.
In the Windows Security app on your PC, select Device security > Security processor details or use the following shortcut:
Security processor details
If your security processor isn’t working properly, you can select the Security processor troubleshooting link to see any error messages and advanced options, or use the following shortcut:
Security processor troubleshooting
The security processor troubleshooting page provides any relevant error messages about the TPM. Here’s a list of the error messages and details:
|
Message |
Details |
|---|---|
|
A firmware update is needed for your security processor (TPM). |
Your device’s motherboard doesn’t appear to support TPM currently, but a firmware update might resolve this. Check with your device’s manufacturer to see if a firmware update is available and how to install it. Firmware updates are usually free. |
|
TPM is disabled and requires attention. |
The trusted platform module is probably turned off in the system BIOS (Basic Input/Output System) or UEFI (Unified Extensible Firmware Interface). Refer to your device manufacturer’s support documentation, or contact their technical support, for instructions on how to turn it on. |
|
TPM storage is not available. Please clear your TPM. |
The clear TPM button is on this page. You’ll want to make sure you have a good backup of your data before proceeding. |
|
Device health attestation isn’t available. Please clear your TPM. |
The clear TPM button is on this page. You’ll want to make sure you have a good backup of your data before proceeding. |
|
Device health attestation isn’t supported on this device. |
This means the device doesn’t give us enough information to determine why TPM may not be working properly on your device. |
|
Your TPM isn’t compatible with your firmware and may not be working properly. |
Check with your device’s manufacturer to see if a firmware update is available and how to get and install it. Firmware updates are usually free. |
|
TPM measured boot log is missing. Try restarting your device. |
|
|
There is a problem with your TPM. Try restarting your device. |
If you still encounter problems after addressing an error message, contact your device manufacturer for assistance.
Select Clear TPM to reset your security processor to its default settings.
Caution: Make sure to back up your data before you clear the TPM.
Secure boot
Secure boot prevents a sophisticated and dangerous type of malware — a rootkit — from loading when your device starts. Rootkits use the same permissions as the operating system and start before it, which means they can completely hide themselves. Rootkits are often part of an entire suite of malware that can bypass local logins, record passwords and keystrokes, transfer private files, and capture cryptographic data.
You might have to disable secure boot to run some graphics cards, hardware, or operating systems such as Linux or earlier versions of Windows.
To learn more, see Secure boot.
Hardware security capability
The last section of the device security page displays information indicating the security capability of your device. Here’s a list of messages and details:
|
Message |
Details |
|---|---|
|
Your device meets the requirements for standard hardware security. |
This means your device supports memory integrity and core isolation and also has:
|
|
Your device meets the requirements for enhanced hardware security. |
This means that in addition to meeting all the requirements of standard hardware security, your device also has memory integrity turned on. |
|
Your device has all Secured-core PC features enabled. |
This means that in addition to meeting all the requirements of enhanced hardware security, your device also has System Management Mode (SMM) protection turned on. |
|
Standard hardware security not supported. |
This means that your device does not meet at least one of the requirements of standard hardware security. |
Improving hardware security
If the security capability of your device isn’t what you’d like it to be, you might need to turn on certain hardware features (such as secure boot, if supported) or change the settings in your system’s BIOS. Contact your hardware manufacturer to see what features are supported by your hardware and how to activate them.
PC Manager
|
The PC Manager app may also be useful in this scenario. For more information, see Microsoft PC Manager. Note: Microsoft PC Manager isn’t available in all locales. |
Изоляция ядра — одна из функций защиты устройства Windows на основе виртуализации (Hypervisor-protected Code Integrity или HVCI), изолирующая сторонние процессы от процессов Windows, призванная повысить защиту от угроз, направленных на ядро Windows. Несмотря на пользу, в некоторых случаях её отключение может повысить производительность системы в играх и сторонних приложениях.
В этой пошаговой инструкции подробно о способах отключить изоляцию ядра в Windows 11 и Windows 10, а также дополнительная информация на тему, которая может оказаться полезной.
Отключение изоляции ядра в «Безопасность Windows»
Базовый способ — использование соответствующей настройки в окне «Безопасность Windows». Шаги для отключения изоляции ядра будут следующими:
- Откройте окно «Безопасность Windows», используя значок в области уведомлений или поиск в панели задач.
- В открывшемся окне «Безопасность Windows» перейдите в раздел «Безопасность устройства».

- В пункте «Изоляция ядра» нажмите «Сведения об изоляции ядра».

- Отключите пункты «Целостность памяти». При появлении запроса контроля учетных записей подтвердите действие.

- В случае, если отключение производится из-за невозможности работы какого-либо драйвера, также отключите пункт «Список заблокированных уязвимых драйверов».
- Появится уведомление о необходимости перезагрузки. Перезагрузите компьютер для применения сделанных настроек.
В результате изоляция ядра и основная её составляющая — «Целостность памяти» будут отключены.
Примечание: открыть «Безопасность Windows» вы можете через «Параметры»:
- В Windows 11 — Параметры — Конфиденциальность и защита — Безопасность Windows
- В Windows 10 — Параметры — Обновление и безопасность — Безопасность Windows
Отключение в редакторе реестра
Вы можете полностью отключить функции изоляции ядра HVCI, используя редактор реестра. Для этого:
- Нажмите правой кнопкой мыши по кнопке «Пуск», выберите пункт «Выполнить», введите regedit и нажмите Enter.
- Перейдите к разделу реестра
HKEY_LOCAL_MACHINE\SYSTEM\CurrentControlSet\Control\DeviceGuard\Scenarios\HypervisorEnforcedCodeIntegrity
При отсутствии такого раздела, создайте его.
- В правой панели редактора реестра дважды нажмите по параметру DWORD с именем «Enabled» и измените его значение на 0.

- Примените настройки и перезагрузите компьютер.

В результате изоляция ядра и сопутствующие функции HVCI будут отключены на компьютере.
Вместо ручного редактирования реестра вы можете создать reg-файл со следующим содержимым:
Windows Registry Editor Version 5.00

[HKEY_LOCAL_MACHINE\SYSTEM\CurrentControlSet\Control\DeviceGuard\Scenarios\HypervisorEnforcedCodeIntegrity]
"Enabled"=dword:00000000
Либо использовать команду в командной строке, запущенной от имени Администратора:
reg add "HKLM\SYSTEM\CurrentControlSet\Control\DeviceGuard\Scenarios\HypervisorEnforcedCodeIntegrity" /v "Enabled" /t REG_DWORD /d 0 /f
Настройка HVCI в редакторе локальной групповой политики
Если на вашем компьютере установлена Windows 11/10 Pro или Enterprise, вы можете использовать редактор локальной групповой политики для отключения изоляции ядра и других функций HVCI:
- Нажмите клавиши Win+R на клавиатуре, введите gpedit.msc и нажмите Enter.
- Перейдите в раздел Конфигурация компьютера — Административные шаблоны — Система — Device Guard.
- Дважды нажмите по политике «Включить средство обеспечения безопасности на основе виртуализации».

- Установите значение «Отключено».

- Примените настройки и перезагрузите компьютер.


В результате функции изоляции ядра Windows будут полностью отключены.
Проверка статуса изоляции ядра
Проверить текущий статус функций безопасности на основе виртуализации можно с помощью команды PowerShell (Терминала Windows):
Get-CimInstance -ClassName Win32_DeviceGuard –Namespace root\Microsoft\Windows\DeviceGuard

На скриншоте видно, что все функции HVCI отключены (SecurityServicesRunning и VirtualisationBasedSecurityStatus равны 0).
Еще один способ проверить, включена ли изоляция ядра — в редакторе реестра открыть раздел
HKLM\System\CurrentControlSet\Control\CI\State
Если раздел отсутствует или параметр HVCIEnabled в нём равен 0, изоляция ядра отключена. При значении HVCIEnabled равном 1 — включена.

После отключения изоляции ядра безопасность Windows будет сигнализировать о проблемах в части «Безопасность устройства», а на значке в области уведомлений будет отображаться восклицательный знак. Чтобы этого не происходило, зайдите в раздел «Безопасность устройства» и нажмите «Закрыть» или «Закрыть все».

Насколько безопасно отключать изоляцию ядра Windows? Точного ответа о степени риска дать не получится. В общем случае, при отсутствии каких-либо проблем с производительностью и работой необходимых драйверов лучше оставлять встроенные функции безопасности Windows 11/10 включенными. Но, как отмечалось, иногда отключение изоляции ядра и целостности памяти позволяет повысить производительность в играх, что отмечала и Майкрософт.
Учитывайте, что не на всех устройствах изоляция ядра включена по умолчанию. Если она отключена, чаще всего причина — в неподдерживаемых драйверах устройств, список которых будет отображаться в «Безопасность Windows». Вторая возможная причина — отсутствие необходимых для работы HVCI функций виртуализации.
Cyber-attacks have changed over the past few years. Rogue hackers can now take over your PC and lock down files unless you are ready to pay them money. These types of attacks are called Ransomware, and they use kernel-level exploits that attempt to run malware with the highest privileges, e.g., WannaCry and Petya ransomware. In order to mitigate these types of attacks, Microsoft has rolled out a feature that allows you to enable Core Isolation and Memory Integrity to prevent such attacks.
What is Core Isolation?
Core isolation is a security feature in Windows that protects important core processes of Windows from malicious software by isolating them in memory, by running those core processes in a virtualized environment. Core Isolation feature include Memory integrity and Kernel-mode Hardware-enforced Stack Protection.
What is Memory Integrity?
Memory integrity, also known as Hypervisor-protected Code Integrity (HVCI) is a security feature in Windows that makes it difficult for malicious programs to use low-level drivers to hijack your computer.
Windows Defender Security Center offer these features. Called Device Security, it offers status reporting and management of security features built into your devices – including toggling features on to provide enhanced protection. However, It doesn’t work on a software level; the hardware needs to support it as well. Your firmware should support Virtualization, which enables the Windows 11/10 PC to run applications in a container, so they don’t get access to other parts of the system.
Your device must meet the requirements for standard hardware security This means your device should support memory integrity and core isolation and also have:
- TPM 2.0 (also referred to as your security processor)
- Secure boot enabled
- DEP
- UEFI MAT.
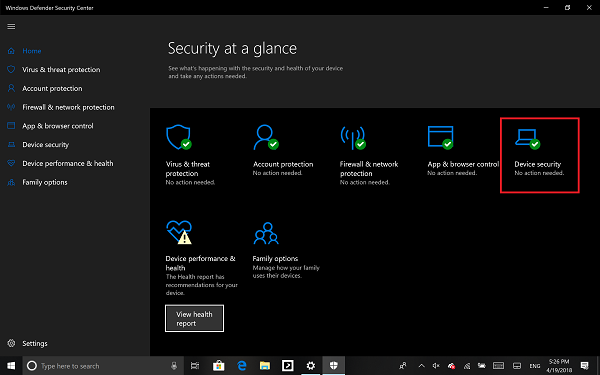
- Sign in as an administrator and open Windows Defender Security Center
- Look for Device Security option.
- Here you should check if Core Isolation under Virtualization is enabled on your PC.
- Core isolation provides virtualization-based security features to protect core parts of your device.
- Click on Core isolation details, and you will be offered to enable Memory Integrity.
Memory integrity (hypervisor-protected code integrity) is a security feature of Core isolation that prevents attacks from inserting malicious code into high-security processes. Toggle to turn it On.

Once enabled, it will ask you to restart the PC to completely enable Memory Integrity.
If later on, you face application compatibility issues, you may need to turn this off.
Related: Memory Integrity greyed out or won’t Turn On/Off.
Enable or Disable Core Isolation and Memory Integrity using Registry
You can also use the Registry, to enable or disable Core isolation Memory integrity using Registry Editor, follow these steps:
- Press Win+R to open the Run dialog.
- Type regedit and hit the Enter button.
- Click on the Yes option.
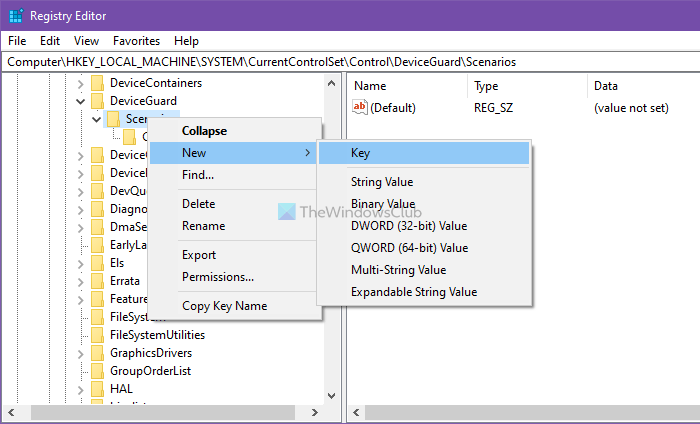
- Navigate to Scenarios in HKEY_LOCAL_MACHINE.
- Right-click on Scenarios > New > Key.
- Name it as HypervisorEnforcedCodeIntegrity.
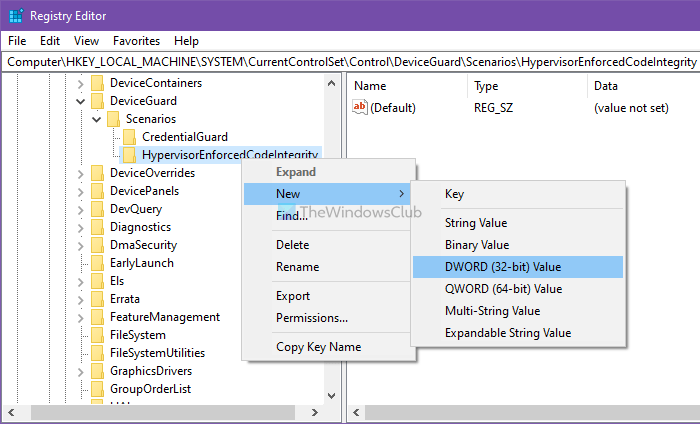
- Right-click on it > New > DWORD (32-bit) Value.
- Name it as Enabled.
- Double-click on it to set the Value data as 1 to enable and 0 to disable.
- Click the OK button.
- Restart your computer.
To learn more about these steps, keep reading.
Precaution: Before heading to the REGEDIT steps, don’t forget to create a System Restore point.
To get started, press Win+R to open the Run dialog, type regedit, and hit the Enter button. If the UAC prompt appears on your screen, click on the Yes option to open the Registry Editor.
Next, navigate to the following path:
HKEY_LOCAL_MACHINE\SYSTEM\CurrentControlSet\Control\DeviceGuard\Scenarios
Right-click on the Scenarios key > New > Key, and name it as HypervisorEnforcedCodeIntegrity.
Then, you have to create a REG_DWORD value. For that, right-click on HypervisorEnforcedCodeIntegrity > New > DWORD (32-bit) Value, and name it as Enabled.
By default, it comes with a Value data of 0, meaning it is disabled. However, if you want to enable this functionality, double-click on it to set the Value data as 1.
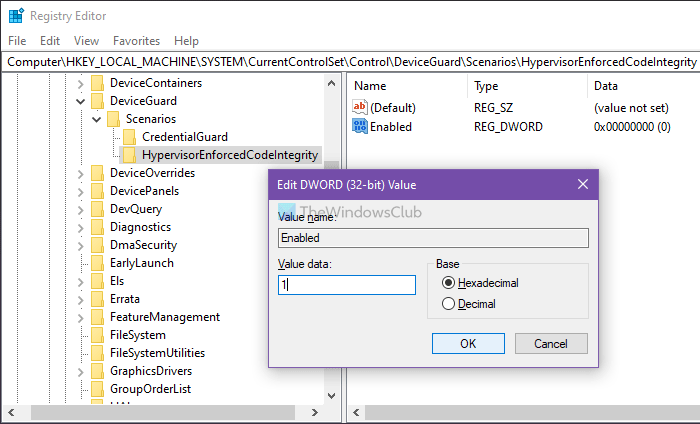
Click the OK button and restart your computer.
Related:
- Core Isolation turned off by itself
- Kernel-mode Hardware-enforced Stack Protection is off
That said, there are two more options that might be available depending on the hardware of your PC.
- Security Processor only shows up if you have TPM available with your PC hardware. They are discrete chips soldered to a computer’s motherboard by the OEM. To get the most out of TPM, OEM must carefully integrate system hardware and firmware with the TPM to send it commands and react to its responses. The newer TPMs can also provide security and privacy benefits to the system hardware itself. So make sure to check for all of these if you are buying a new PC.
- Secure Boot prevents malicious code to load up before your OS. They are hard to crack but with secure boot it’s taken care of.
Windows 11/10 also offers Hypervisor Protected Code Integrity (HVCI) when you start with clean installs. Those who are on old hardware, will have the ability to opt-in post the upgrade using the UI in Windows Defender Security Center (WDSC). This enhancement will ensure that the kernel process that verifies code integrity runs in a secure runtime environment.
What is Memory Integrity Scan Tool?
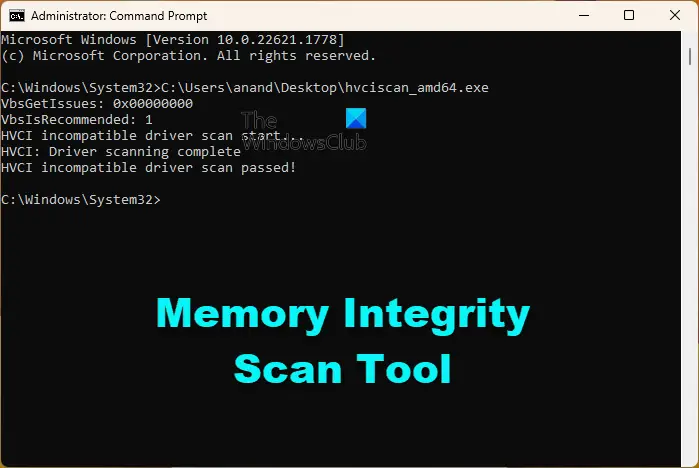
Memory Integrity Scan Tool is a free tool from Microsoft to check your computer’s compatibility with Memory Integrity or HVCI (Hypervisor-protected code integrity).
You can download the hvciscan.exe for your system architecture (AMD64 or ARM64) from the Microsoft Download Center and from an elevated command window or PowerShell, run hvciscan.exe. This will help you review the resulting output to identify any incompatibilities.
Read: Turn off Windows Security Making sure it’s you message
What is Memory access protection?
Kernel DMA protection or Memory access protection protects your device against attacks that can occur when a malicious device is plugged into a PCI (Peripheral Component Interconnect) port like a Thunderbolt port, by denying direct access to the memory to those devices except under special circumstances, particularly when the PC is locked or the user is signed out.
Read:
- Incompatible driver turns off Memory Integrity in Windows 11
- Standard hardware security not supported in Windows 11
- Virtualization-based Security not enabled in Windows 11.
Windows 11 is Microsoft’s newest operating system. One of the features that were introduced in Windows 10, but perfected in Windows 11 is Core Isolation. This feature isolates core components of the OS to ensure memory integrity and stability on each component. We will go over what this means for you as a user, so keep reading!
What is Virtualization-Based Security (VBS)?
Windows 11 also introduces a new security feature called Virtualization-Based Security (VBS). This allows for the operating system to run in a secure virtual environment. This isolates critical components of the OS, such as the kernel and user mode processes, from malicious or accidental modifications. By doing this, it helps protect your computer against attacks that try to exploit these vulnerabilities. Core Isolation is a virtualization-based security feature of Windows.
To fix various Windows 10/11 problems, we recommend Outbyte PC Repair:
This software will repair common computer errors, protect you from file loss, malware damage, hardware failure, and optimise your computer for peak performance. In three simple steps, you can resolve PC issues and remove virus damage:
- Download Outbyte PC Repair Software
- Click Start Scan to detect Windows 10/11 issues that may be causing PC issues.
- Click Repair All to fix issues with your computer’s security and performance.
This month, Outbyte has been downloaded by 23,167 readers.
When you have a computer, whether it is for personal or business use, the last thing that any user wants to experience is instability. We all know how frustrating and time-consuming issues can be when they occur on your machine. This type of interruption in workflow generally leads to lost productivity which results in lost revenue opportunities. Windows 11 Core Isolation was developed with this knowledge in mind; to provide businesses and users alike with added stability by isolating certain components of the operating system from each other.
So what does this mean? It means that if one component malfunctions (for example, an application), only that specific component will be impacted rather than harming others like antivirus software running alongside it since they are isolated from each other! This also helps to protect the system from malware and other attacks that may try to exploit vulnerabilities.
What is Memory Integrity?
Memory Integrity is a component of Core Isolation that helps prevent apps from reading and manipulating memory that doesn’t belong to them. This is done by creating isolated containers for each app. This prevents data leaks and malicious code injection, which can both occur when an app has access to another app’s memory.
Memory Integrity was first introduced in Windows Server 2016. This feature monitors the pages of memory loaded into physical RAM to ensure that they have not been corrupted by malware or other threats. If a page of memory has been compromised, it will be replaced with a clean copy from storage ensuring that your data and applications are protected. Together, Core Isolation and Memory Integrity provide an added layer of security for your computer’s operation, keeping you productive and safe!
How does Core Isolation work?
When you open an application on Windows 11, it will be executed within its own sandboxed container. This is where memory integrity will come into play. The isolated containers are protected by the VBS (Virtualization-Based Security) feature of Windows 11 which keeps them secure from another app that may try to access the data or manipulate the process.
As new containers are created for apps, they do not interact with other processes outside their container unless authorized to do so via a user request (for example, opening a document). If one of these sandboxes were to crash or malfunction due to outside interference or corruption caused by malware, only that specific sandbox would be affected rather than the entire system! Furthermore,
What are the benefits of Core Isolation?
There are several key benefits that businesses and users can expect from Core Isolation.
1. Increased Stability – As we mentioned earlier, one of the main goals of Core Isolation is to provide increased stability for users by isolating certain components of the OS from each other. This helps protect against crashes and malfunctions that can occur when multiple applications are running at the same time.
2. Enhanced Security – The added security that Memory Integrity provides helps to protect your computer data leaks and malicious code injection.
3. Protection from malware – Since the entire system is protected from malfunctions or crashes caused by malicious code, you will be able to work uninterrupted and without fear of your computer being compromised.
4. Enhanced Privacy – The isolated containers protect apps from data leaks which helps to keep your information private.
5. Enhanced Compatibility – Memory Integrity allows Windows to run trusted and un-trusted code in separate containers. This enhances the compatibility of apps which reduces application conflicts and lets you run any app without risk.
How to enable Memory Integrity?
Memory Integrity uses hardware virtualization and Hyper-V to prevent attempts of any malware injection. Here are the steps to enable it:
- On your Windows 11 system, open Settings and navigate to Privacy & security -> Windows Security.

- Click on Device Security.

- Under Core Isolation, click on Core isolation details.

- Enable the Memory Integrity by toggling the switch ON.

- Reboot the device to make the changes effective.


Summing Up
Core Isolation is a big step forward in the evolution of Microsoft’s Windows OS. Not only does it enhance security, but also stability and compatibility under the hood while giving users more control over their PC system settings.
As you can see, Core Isolation and Memory Integrity provide a number of benefits that businesses and users can take advantage of. By keeping your applications isolated from each other, you can maintain productivity while being safe from data leaks, crashes, and malware. If you’re looking for an added layer of security for your computer, be sure to enable Memory Integrity under the Core Isolation.
Which editions of Windows 11 include Core Isolation?
The Core Isolation is available on Windows 11 Pro, Enterprise, and Education editions on x64 systems.
Will Hyper-V support Virtualization Based Security features in Windows 11?
Yes! Virtualization Based Security features are supported on trusted VBS-enabled applications, but this does not include all apps.
Will the Android subsystem support Core Isolation?
Currently, there are no plans for Android apps to support the Memory Integrity feature, but it might be implemented in future updates.
Can I turn off Core Isolation if I don’t want or need it?
Yes. Core Isolation can be turned off in the Windows Defender Security Center. However, we recommend leaving it on as it provides important protection for your computer. If you choose to disable it, please be sure to understand the risks involved!
Peter is an Electrical Engineer whose primary interest is tinkering with his computer. He is passionate about Windows 10 Platform and enjoys writing tips and tutorials about it.
Quick Links
-
What Is Memory Integrity?
-
Why Is It Disabled By Default?
-
How to Enable Core Isolation Memory Integrity
-
More Windows Defender Exploit Guard Features
Windows 10’s April 2018 Update brings «Core Isolation» and «Memory Integrity» security features to everyone. These use virtualization-based security to protect your core operating system processes from tampering, but Memory Protection is off by default for people who upgrade.
What is Core Isolation?
In the original release of Windows 10, virtualization-based security (VBS) features were only available on Enterprise editions of Windows 10 as part of «Device Guard.» With the April 2018 Update, Core Isolation brings some virtualization-based security features to all editions of Windows 10.
Some Core Isolation features are enabled by default on Windows 10 PCs that meet certain hardware and firmware requirements, including having a 64-bit CPU and TPM 2.0 chip. It also requires your PC supports the Intel VT-x or AMD-V virtualization technology, and that it’s enabled in your PC’s UEFI settings.
When these features are enabled, Windows uses hardware virtualization features to create a secure area of system memory that’s isolated from the normal operating system. Windows can run system processes and security software in this secure area. This protects important operating system processes from being tampered with by anything running outside the secure area.
Even if malware is running on your PC and knows an exploit that should allow it to crack these Windows processes, the virtualization-based security is an additional layer of protection that will isolate them from attack.
What Is Memory Integrity?
The feature known as «Memory Integrity» in Windows 10’s interface is also known as «Hypervisor protected Code Integrity» (HVCI) in Microsoft’s documentation.
Memory Integrity is disabled by default on PCs that upgraded to the April 2018 Update, but you can enable it. It will be enabled by default on new installations of Windows 10 going forward.
This feature is a subset of Core Isolation. Windows normally requires digital signatures for device drivers and other code that runs in low-level Windows kernel mode. This ensures they haven’t been tampered with by malware. When «Memory Integrity» is enabled, the «code integrity service» in Windows runs inside the hypervisor-protected container created by Core Isolation. This should make it nearly impossible for malware to tamper with the code integrity checks and gain access to the Windows kernel.
Virtual Machine Problems
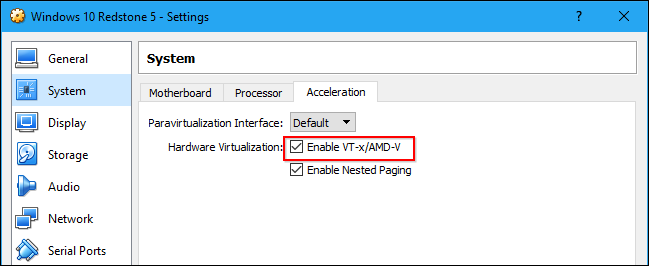
As Memory Integrity uses the system’s virtualization hardware, it’s incompatible with virtual machine programs like VirtualBox or VMware. Only one application can use this hardware at a time.
You may see a message saying Intel VT-X or AMD-V is not enabled or available if you install a virtual machine program on a system with Memory Integrity enabled. In VirtualBox, you may see the error message «Raw-mode is unavailable courtesy of Hyper-V» while Memory Protection is enabled.
Either way, if you encounter a problem with your virtual machine software, you must disable Memory Integrity to use it.
Why Is It Disabled By Default?
The main Core Isolation feature shouldn’t cause any problems. It’s enabled on all Windows 10 PCs that can support it, and there’s no interface for disabling it.
However, Memory Integrity protection can cause problems with some device drivers or other low-level Windows applications, which is why it’s disabled by default on upgrades. Microsoft is still pushing developers and device manufacturers to make their drivers and software compatible, which is why it’s enabled by default on new PCs and new installations of Windows 10.
If one of the drivers your PC requires to boot is incompatible with Memory Protection, Windows 10 will silently turn Memory Protection off to ensure your PC can boot and work properly. So, if you try enabling it and reboot only to find it’s still disabled, that’s why.
If you encounter problems with other devices or malfunctioning software after enabling Memory Protection, Microsoft recommends checking for updates with the specific application or driver. If no updates are available, turn off Memory Protection.
As we mentioned above, Memory Integrity will also be incompatible with some applications that require exclusive access to the system’s virtualization hardware, such as virtual machine programs. Other tools, including some debuggers, also require exclusive access to this hardware and won’t work with Memory Integrity enabled.
How to Enable Core Isolation Memory Integrity
You can see whether your PC has Core Isolation features enabled and toggle Memory Protection on or off from the Windows Defender Security Center application. (This tool will be renamed «Windows Security» as part of the October 2018 Update.)
To open it, search for «Windows Defender Security Center» in your Start menu or head to Settings > Update & Security > Windows Security > Open Windows Defender Security Center.
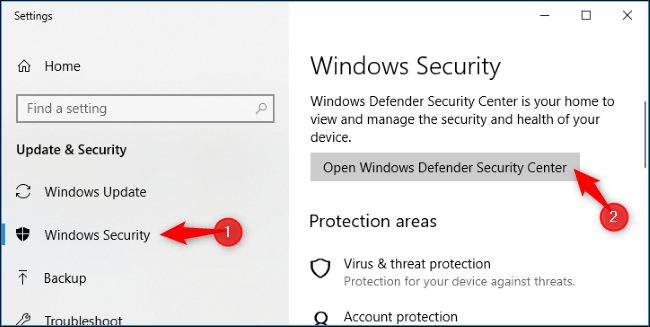
Click the «Device Security» icon in the Security Center.
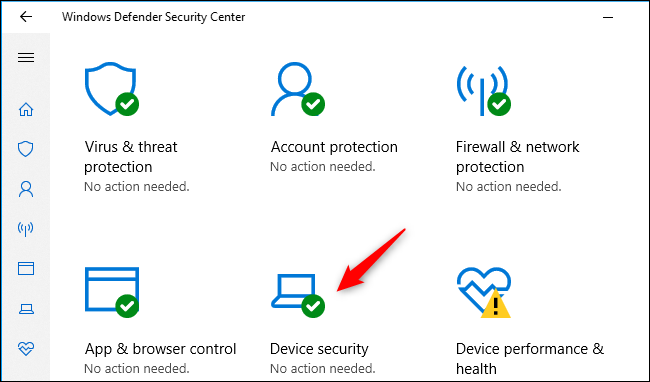
If Core Isolation is enabled on your PC’s hardware, you’ll see the message «Virtualization-based security is running to protect the core parts of your device» here.
To enable (or disable) Memory Protection, click the «Core Isolation Details» link.
This screen shows you whether Memory Integrity is enabled or not. That’s the only option here for now.
To enable Memory Integrity, flip the switch to «On.» If you encounter application or device problems and need to disable Memory Integrity, return here and flip the switch to «Off.»
You’ll be prompted to restart your computer, and the change will only take effect once you have.
More Windows Defender Exploit Guard Features
Core Isolation and Memory Integrity are some of the many new security features Microsoft has added as part of Windows Defender Exploit Guard. This is a collection of features designed to secure Windows against attack.
Exploit protection, which protects your operating system and applications from many types of exploits, is enabled by default. This replaces Microsoft’s old EMET tool, and includes anti-exploit features we previously recommended installing Malware Anti-Exploit for. All Windows 10 users now have exploit protection.
There’s also Controlled Folder Access, which protects your files from ransomware. It’s not enabled by default because it requires some configuration. If you enable this feature, you’ll have to allow applications access before they can access files in your personal file folders.
Going forward, Memory Integrity will be enabled by default on all new PCs, providing additional protection against attacks. Only advanced users who use virtual machine software and other tools that require access to the system virtualization hardware will have to disable it.