
Львиная доля случаев заражения компьютера вирусами приходится на веб-серфинг, на момент посещения пользователем сайта с вредоносным программным обеспечением. Хорошо, если антивирус вовремя распознает и остановит угрозу, но ведь хорошо известно, что так бывает не всегда. Да и как быть, если подозрительный сайт всё же нужно посетить? В таких случаях здорово могут выручить инструменты виртуализации, тот же VirtualBox или иная похожая программа. Но есть и другой, альтернативный вариант, реализуемый средствами самой операционной системы. В инсайдерских сборках Windows 10 есть такая функция как Windows Defender Application Guard, позволяющая запускать штатные браузеры Internet Explorer и Microsoft Edge в изолированной виртуальной среде, тем самым предотвращая проникновении вирусов в систему. Все данные, получаемые браузером при посещении сайтов сохраняются в особый контейнер, который по закрытии обозревателя автоматически очищается.
Как в Windows 10 включить песочницу Defender Application Guard
Оценить новое средство дополнительной защиты могут пользователи Windows 10 Enterprise не младше сборки 16227 и Windows 10 Pro не младше сборки 17063. Также важными условиями для корректной работы браузерной песочницы являются:
{banner_google1}
1. 64-битная операционная система.
2. Поддержка аппаратной виртуализации.
3. Наличие на компьютере как минимум 8 Гб оперативной памяти.
Теперь давайте посмотрим, как включить песочницу. Командой optionalfeatures.exe
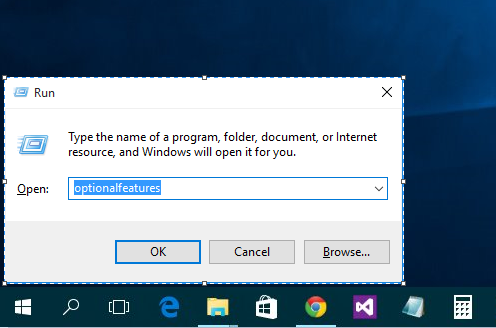
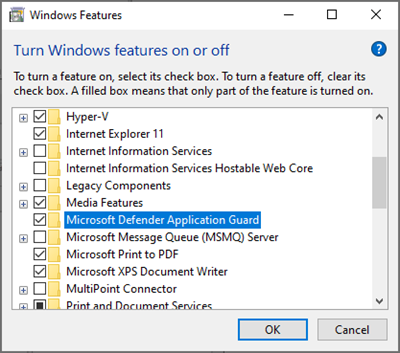
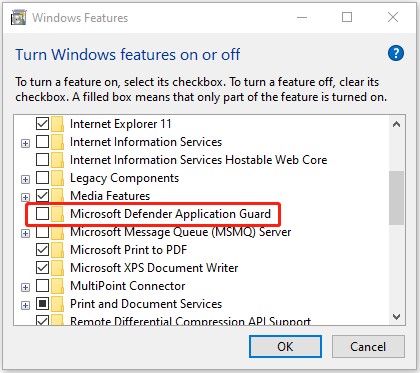
или через Панель управления откройте апплет включения/отключения компонентов Windows, найдите в списке пункт Windows Defender Application Guard и отметьте его флажком.
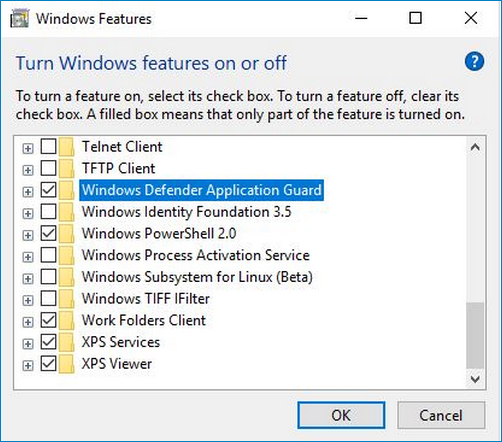
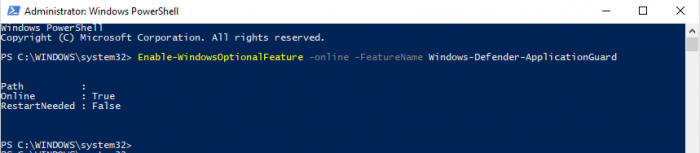
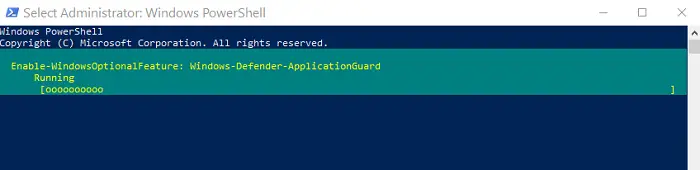
По завершении установки компонента вам будет предложено перезагрузить компьютер. Активировать компонент можно также с помощью консоли PowerShell, выполнив в ней такую команду:
Enable-WindowsOptionalFeature -online -FeatureName Windows-Defender-ApplicationGuard
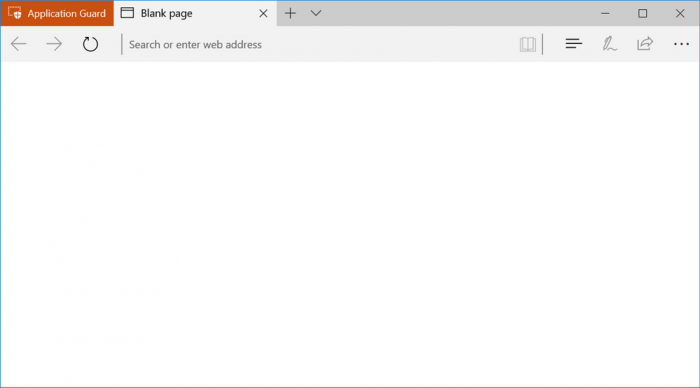
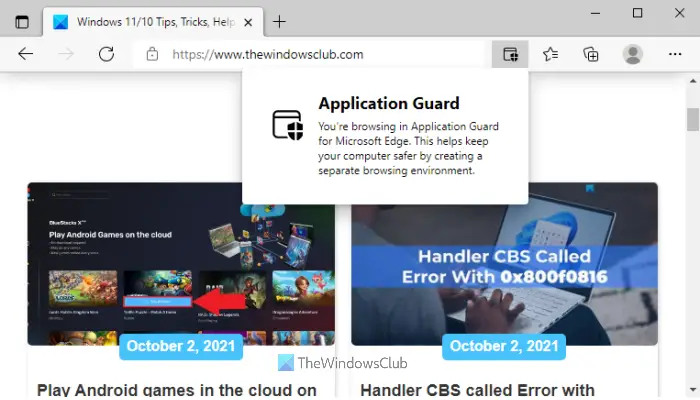
А теперь представим, что вам нужно пошариться на неком подозрительном сайте. Откройте Microsoft Edge, нажатием на три точки в правом верхнем углу вызовите его меню и выберите в опцию New Application Guard window (Открыть приложение в новом окне).
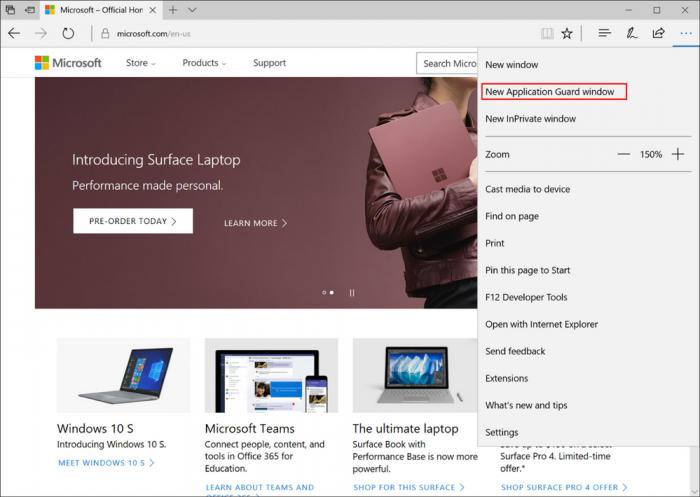
Сайт будет открыт в новом окне, при этом в левом верхнем углу окна появится оранжевая «кнопка», указывающая на активность Defender Application Guard.
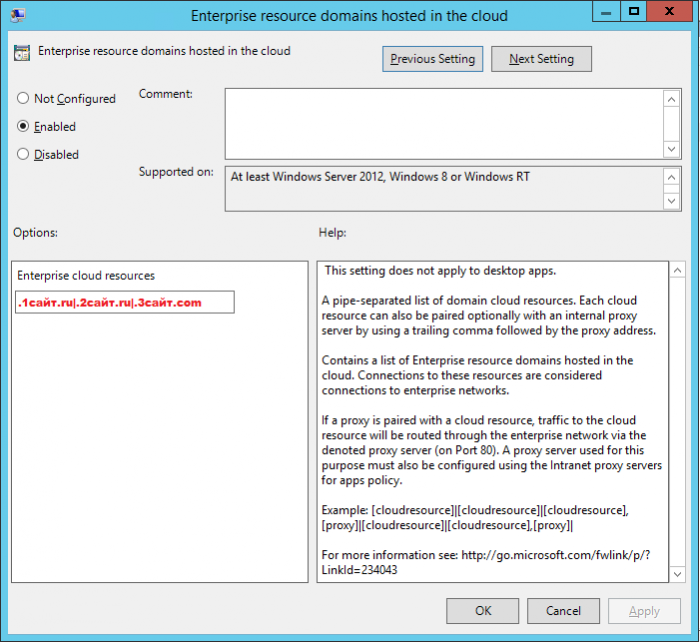
Если у вас Windows 10 Enterprise и при этом вы намерены пользоваться песочницей на постоянной основе, можете занести доверенные сайты в белый список. Для этого вам нужно перейти в редакторе локальных групповых политик по цепочке настроек Конфигурация компьютера → Административные шаблоны → Сеть → Сетевая изоляция, выбрать справа политику «Домены корпоративных ресурсов, расположенные в облаке» и добавить в открывшемся окне доверенные сайты через вертикальный разделитель как показано на скриншоте.
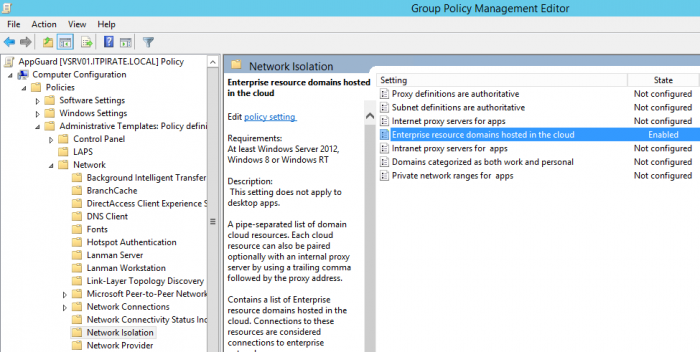
Есть также и другие политики, позволяющие управлять функцией Application Guard. Если вы ими заинтересуетесь, подробные сведения об их применении можете получить на официальной странице компании:
docs.microsoft.com/ru-ru/windows/threat-protection/windows-defender-application-guard/configure-wd-app-guard
Microsoft Defender Application Guard prevents potentially risky files from accessing trusted system resources. It opens untrusted documents in an isolated environment with hardware virtualization. It protects your system from malicious software in this isolated container, single standalone, and automated modes. The administrator will define some trusted websites in the automated mode, AKA Enterprise Management Mode.
Any document or app originating from the defined domains will normally open on your computer. Meanwhile, Application Guard launches files from websites outside these defined trusted sites in the virtual environment.
Microsoft Defender Application Guard helps prevent untrusted files from accessing trusted resources, keeping your enterprise safe from new and emerging attacks. This article walks admins through setting up devices for a preview of Application Guard for Office. It provides information about system requirements and installation steps to enable Application Guard for Office on a device, says Microsoft.
To enable and disable Microsoft Defender Application Guard on your Windows computer. We’ll explore the following:
- Enable or disable Application Guard in Windows Features.
- Enable or disable Application Guard using PowerShell.
- Install Microsoft Defender Application Guard for Edge using Command Prompt.
- Turn on Microsoft Defender Application Guard in Managed Mode group policy.
1] Turn On or Off Microsoft Defender Application Guard in Windows Features
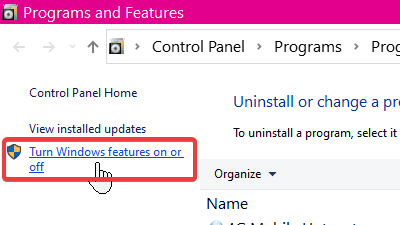
Right-click on the Start button and select Run to open the Run dialog box. Enter appwiz.cpl in the Run dialog box and click on the OK button.
Click on the Turn Windows features on or off link at the left-hand panel of the Programs and Features window.
Find Microsoft Defender Application Guard from the list on the Windows Features screen and mark the checkbox next to this option to enable it. Hit the OK button.
After enabling Microsoft Defender Application Guard, you must restart your machine.
To disable Microsoft Defender Application Guard, simply uncheck the option on the Windows Features screen and restart your computer.
Read: Windows Defender Application Guard Extension for Chrome, Edge, & Firefox.
2] Enable or disable Application Guard using PowerShell
You can also enable Microsoft Defender Application Guard using PowerShell. To open PowerShell as an administrator, right-click on the Start button and select Windows PowerShell (Admin).
Copy and paste the following command in the PowerShell window to enable Windows Defender Application Guard and hit the ENTER key:
Enable-WindowsOptionalFeature -online -FeatureName Windows-Defender-ApplicationGuard
On running the above command, you’d have enabled Application Guard for Office. Restart your computer following this to finish the process.
To disable Application Guard, enter the following command:
Disable-WindowsOptionalFeature -online -FeatureName Windows-Defender-ApplicationGuard
3] Install Microsoft Defender Application Guard for Edge using Command Prompt

You need to open an elevated Command Prompt window and take the help of a built-in DISM tool to enable Application Guard for Edge browser. Here are the steps:
- Open an elevated Command Prompt window
- Run the command to install Application Guard
- Press the Y key
- Press Enter key to restart the computer and complete the operation.
Let’s check all these steps in detail.
The very first step is to open an elevated Command Prompt window. For doing this, click on the Windows 11 Search box, type cmd, right-click on Command Prompt option visible in the search results, and click on the Run as administrator option.
Now, you need to execute the following command:
Dism /online /Enable-Feature /FeatureName:"Windows-Defender-ApplicationGuard"
As soon as you execute this command, it will start the process of enabling Application Guard. It may take a couple of minutes. After that, the Command Prompt window will prompt you to restart your computer. Press Y and then use the Enter key.
This will immediately restart your computer and start the installation process for Application Guard. Once your PC is started, the feature will be activated immediately.
4] Turn on Microsoft Defender Application Guard in Managed Mode group policy

The two options above are ways to enable or disable the Application Guard for Office. After completing either of the two methods, you must turn on the feature in the Managed Mode group policy.
To do this, go to Computer Configuration > Administrative Templates > Windows Components > Microsoft Defender Application Guard.
Here, change the value under Options to 2 or 3. Click on the OK button to save your settings and close the window. Restart your computer after this.
Read: Configure Microsoft Defender Application Guard settings using GPEDIT and REGEDIT
Disable or uninstall Application Guard using CMD in Windows 11/10

If you don’t want to use the Application Guard feature anytime, you can do this easily with the following steps:
- Open an elevated Command Prompt window
- Run the command to uninstall Application Guard
- Press the Y key
- Press Enter key for restarting your PC.
Type cmd in the Search box and click on the Run as administrator option visible in the search result to open the elevated Command Prompt window.
Now execute the following command:
Dism /online /Disable-Feature /FeatureName:"Windows-Defender-ApplicationGuard"
Wait till the command is processed completely.
When it prompts you if you want to restart the computer, press the Y key, and then hit the enter key. Wait until the PC is restarted. This will complete the operation and remove the Microsoft Defender Application Guard.
I hope this helps.
Also read:
- How to enable Print from Application Guard for Edge
- How to enable Advanced Graphics in Application Guard for Edge
- How to enable Advanced Graphics in Application Guard for Edge
- Enable Camera and Microphone in Microsoft Defender Application Guard for Edge.
What is Microsoft Defender Application Guard?
Microsoft Defender Application Guard has been created to target 3 types of enterprise systems:
- Enterprise desktops
- Enterprise mobile laptops
- Bring your own device (BYOD) mobile laptops.
This feature uses virtualization technology to open links clicked while browsing the Internet or checking email in a sandboxed environment (an isolated environment to test or analyze software in a protected environment) to keep malicious scripts out of the user’s network and devices.
Says Microsoft,
Application Guard helps to isolate enterprise-defined untrusted sites, protecting your company while your employees browse the Internet. As an enterprise administrator, you define what is among trusted web sites, cloud resources, and internal networks. Everything not on your list is considered untrusted. If an employee goes to an untrusted site through either Microsoft Edge or Internet Explorer, Microsoft Edge opens the site in an isolated Hyper-V-enabled container, which is separate from the host operating system. This container isolation means that if the untrusted site turns out to be malicious, the host PC is protected, and the attacker can’t get to your enterprise data.
Considering the latest developments in which many business establishments worldwide have come under direct security threat, this new layer of defense-in-depth protection offered by Microsoft Defender Application Guard is welcome.
It is a fact that over 90% of attacks are initiated via a hyperlink designed specifically to:
- Steal credentials
- Install malware
- Exploit vulnerabilities.
So, initially, a corrupt email, often disguised as a legitimate authority in the company, may request the employee click a link to read a supposedly important document.
The link is specially crafted to install malware on the user’s machine. Once a connection is established on that computer, the attackers can easily steal credentials and look for vulnerabilities in other computers on the same network.
With virtualization technology supported in Microsoft Defender Application Guard, potential threats are identified, segregated from the network and system, and removed completely when the container is closed.
Secondly, when an employee browses to a site not trusted by the network administrator, the Application Guard immediately removes the potential threat. As shown in the image below outlined in red, Application Guard creates a new instance of Windows at the hardware layer with a completely different copy of the kernel. The underlying hardware (Windows Defender Application Guard) enforces that this separate copy of Windows has no access to the user’s normal operating environment, which includes access to memory, local storage, other installed applications, and corporate network endpoints.

In-depth defense for Enterprise
Microsoft Defender Application Guard can offer its customers a trouble-free browsing experience by protecting enterprise systems from advanced attacks that seek entry to the network and devices via the Internet. It even has a definite plan of action when malicious code manages to enter the network. The ingenious tool silently coordinates with Microsoft Edge to open that site in a temporary and isolated copy of Windows. In this case, even if the attacker’s code successfully exploits the browser, the attacker finds their code running in a clean environment with no interesting data, no access to any user credentials, and no access to other endpoints on the corporate network. The attack thus loses its prominence and invariably gets disrupted.
Soon after the browsing session is complete, the temporary container is thrown away alongside the malware. All this happens quickly and the user does not even get a hint of an attack taking place. After deletion, a fresh new container is created for future browsing sessions.
Web developers and Application Guard
The news that brings much joy for web developers is that they do not need to do anything different or new with their site code – Microsoft Edge renders sites in Application Guard fundamentally the same way it does in the host version of Windows. There is no essential requirement to detect malicious code when Microsoft Edge is running in this mode, nor is there any need to account for behavior differences. Since this temporary container is destroyed when the user is done, cookies or local storage are not allowed when the user is finished.
In addition, Microsoft made other security announcements like Microsoft Defender Application Guard and Office 365 ATP, which now have the capacity to mutually share intelligence and assist IT professionals in investigating and responding to security threats across both Windows and Office 365 in a timely manner.
How to Install Microsoft Defender Application Guard for Microsoft Edge?
Execute the following command to Install Microsoft Defender Application Guard for Microsoft Edge:
Dism /online /Enable-Feature /FeatureName:"Windows-Defender-ApplicationGuard"
As soon as you execute this command, it will start enabling Application Guard.
If you are a Windows user, then it is likely that you are familiar with Windows Security, formerly known as “Microsoft Defender.” Windows Security is a Windows-native application that protects your PC from malware and attacks – a replacement for third-party antivirus software.
An integral part of Windows Security is Microsoft Defender Application Guard. This is a component of Windows Security that keeps you protected from online threats while browsing in Microsoft Edge, or from opening malicious files in Microsoft office.
That said, this feature needs to be installed and enabled manually on our computer. Only when will you be able to provide additional security for your computer and time spent online.
Moreover, the Microsoft Defender Application Guard can be used in enterprise environments so that the network is not penetrated due to an employee’s negligence while surfing the web.
In this article, you will find all there is to know about the Microsoft Defender Application Guard, how to enable it, how it works, and how to manage it.
Table of Contents
What is Microsoft Defender Application Guard
Microsoft Defender Application Guard is a security feature in Windows 11 and Windows 10 that helps prevent old and new cyberattacks. This utility works with Microsoft Office, Internet Explorer (deprecated), and Microsoft Edge.
In the case of Microsoft Edge, Application Guard isolates all websites running that are not mentioned in the whitelist created by the IT administrator by running them in a virtualized bubble using a Hyper-V container.
In other words, any URL not mentioned in the whitelist will automatically run in an isolated environment. This way, if an attacker attempts to penetrate your session, and then tries to gain access t your computer or network, they would not be able to. This is due to the fact that the online session would be in standalone mode.
Similarly, in the case of Microsoft Office, if an employee opens a malicious file in Word or Excel (or any other Office application), it would be isolated from the rest of the network, hence securing it from threats.
Microsoft Defender Application Guard can be installed on your Windows 10/11 PC to be used in Edge or Office, or you can install its extension for Chrome and Firefox (links shared below). But before we show you how to install and configure it, the question you should be asking is do you really need it?
Which Devices should Run Microsoft Defender Application Guard
Although the Application Guard can be installed on any supported device, you should know whether you need it or not.
Of course, no amount of digital security is sufficient these days, but not all security parameters should be used simultaneously.
Here is a list of the supported devices that can run Application Guard:
-
Standalone devices:
- Windows 10 Enterprise edition, version 1709 or higher
- Windows 10 Pro edition, version 1803 or higher
- Windows 11
-
Domain-controlled devices:
- Windows 10 Enterprise edition, version 1709 or higher
- Windows 11
-
System requirements:
- 64-Bit CPU architecture
- Supports virtualization
- Minimum 8 GB of RAM
- Minimum 5 GB of free storage space
We believe that all enterprise devices, may it be desktops, laptops, mobile devices, or tablets, should be running Application Guard.
Since these devices are usually joined to a domain, they are more likely at risk as they can lead to greater enterprise secrets and data sources. Therefore, all necessary security features ought to be enabled on enterprise devices.
In the case an enterprise allows you to connect your own device to their network, Application Guar should be enabled beforehand. Even though it is obvious why, connecting to an enterprise network gives access to any non-isolated devices.
In case you have a personal device, like a private laptop, then the decision comes down to an individual user. If they have sensitive information stored on their computer, such as financial passwords, client information, etc., then enabling Microsoft Defender Application Guard is recommended.
However, if they only use it for casual work, then the Application Guard might be overkill.
Now that you know what Microsoft Defender Application Guard is and where it can be used, let us discuss how it works.
How Microsoft Defender Application Guard Works

Considering Microsoft Edge as an example, the process starts when a user clicks on a link or enters a URL. If the URL is found within the whitelist created by the sysadmin, then it runs in a regular Edge instance without isolating it.
However, if the URL is not in the whitelist, then Microsoft Edge automatically opens the URL inside a Hyper-V container and remains there till the URL is open.
This is a simple mechanism that Microsoft Defender Application Guard uses to protect your devices and networks.
How to Enable/Install Microsoft Defender Application Guard
As we mentioned earlier, Microsoft Defender Application Guard needs to be installed manually. Once it is installed, you can configure it to allow or restrict further functionality.
You can enable Application Guard using the Optional Features applet, or from Windows PowerShell.
From Optional Features
Here are the steps to enable the feature using the Optional Features applet:
-
Open the Optional Features window by typing in “optionalfeatures” in the Run Command box.
Open Windows Optional Features -
Select “Microsoft Defender Application Guard” and click Ok.

Enable Microsoft Defender Application Guard The feature will now install on your PC.
-
Click “Restart now” to finalize the installation.

Restart computer


Using PowerShell
Perform these steps to install Microsoft Defender Application Guard using PowerShell:
-
Launch an elevated PowerShell instance.
-
Now run the following cmdlet:
Enable-WindowsOptionalFeature -Online -FeatureName Windows-Defender-ApplicationGuard
Enable Microsoft Defender Application Guard using PowerShell When asked to restart the computer, enter “Y” for Yes.

When the computer reboots, Microsoft Defender Application Guard will be enabled. By default, it will have the maximum restriction mode, which means that you would not be able to copy, data, save data, print files, or access the camera or microphone while running the Edge browser inside Application Guard.
However, these features can be enabled on demand.
Allow Copy, Paste, Saving, Printing, Camera, Mic Access in Application Guard
Once Microsoft Defender Application Guard is enabled, it is pretty restrictive towards resource access. It blocks all URLs inside the protective bubble from accessing your storage, RAM, connected peripherals, network, etc. However, you can allow certain access. Here is how:
-
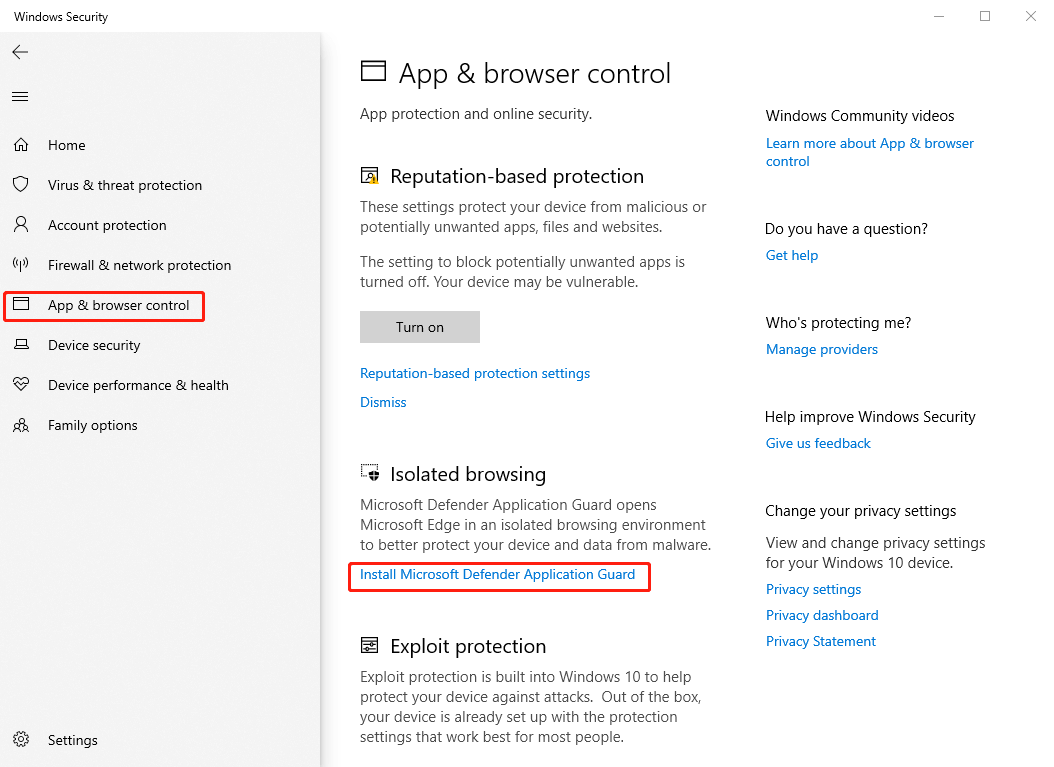
Navigate to:
Settings app >> Privacy & security >> Windows Security >> App & browser control

App and browser control in Windows Security -
Click “Change Application Guard settings” under the Isolated browsing section.

Change Application Guard settings -
Here, toggle the slider into the On position under the setting that you want to allow.
Allow changes to Application Guard settings -
When done, restart the computer for the changes to take effect.


Alternatively, you can also manage Microsoft Defender Application Guard from Group Policy settings. These settings can be found at the following path within the Group Policy editor:
Local Computer Policy >> Computer Configuration >> Administrative Templates >> Windows Components >> Microsoft Defender Application Guard

Open Application Guard in Microsoft Edge
Although Edge automatically isolates the tabs/windows for the URLs that are not found inside the whitelist, you can also optionally open a new, isolated Edge window manually.
Inside Edge, click on the 3 dots in the top-right corner of the browser, then click “New Application Guard window.”

Alternatively, you can also use the CTRL + Shift + Q shortcut keys to open a new Application Guard window in Edge.
Inside the new window, you may scroll through the different website URLs as they will now be isolated from the rest of your environment.
Additionally, if you use Google Chrome or Mozilla Firefox, then you may use the Application Guard browser extension to keep your systems safe:
Download Microsoft Defender Application Guard extension for Chrome
Download Microsoft Defender Application Guard extension for Firefox
Final Thoughts
Microsoft Defender Application Guard uses Hyper-V virtualization technology to isolate web URLs in Edge from the rest of your environment, keeping it safe in case of an attack.
This functionality can be useful for both enterprise users as well as individuals. Additionally, you can also get Application Guard on your mobile devices, which we recommend you should use.
After closing an Application Guard instance, all data is deleted and removed from your PC, with zero chance of infiltration.
-
Home
-
News
- How to Enable Windows Defender Application Guard? [5 Ways]
By Daisy | Follow |
Last Updated
Microsoft Defender Application Guard prevents potentially risky files from accessing trusted system resources on Windows 10/11. This post from MiniTool provides 5 ways for you to enable Windows Defender Application Guard.
Windows Defender Application Guard
Microsoft Defender Application Guard protects your network and data from malicious applications running in your web browser. It opens untrusted documents in an isolated environment through hardware virtualization. It protects your system from malware in an isolated container in standalone and automated mode.
Microsoft Defender Application Guard works with Group Policy to help you manage your organization’s computer settings. By using Group Policy, you can configure settings once and then replicate them on multiple computers.
Tips:
Tip: VM and VDI environments do not support Microsoft Defender Application Guard.
Windows Defender Application Guard is available on the following operating systems:
- Windows 10 Enterprise edition, version 1709 and later
- Windows 10 Pro edition, version 1803 and later
- Windows 11 and later
How to Enable Windows Defender Application Guard
Before using Windows Defender Application Guard, you need to enable it from your Windows. Here are 5 ways for you.
Way 1: Via Windows Features
Step 1: Type Windows Features in the Search box to open the Turn Windows Features on or off window.
Step 2: Find the Microsoft Defender Application Guard box and check it. Then, click OK to save the changes.
Way 2: Via Windows Security
Step 1: Press the Windows + I keys together to open the Settings application.
Step 2: Click Update & Security > Windows Security > Open Windows Security.
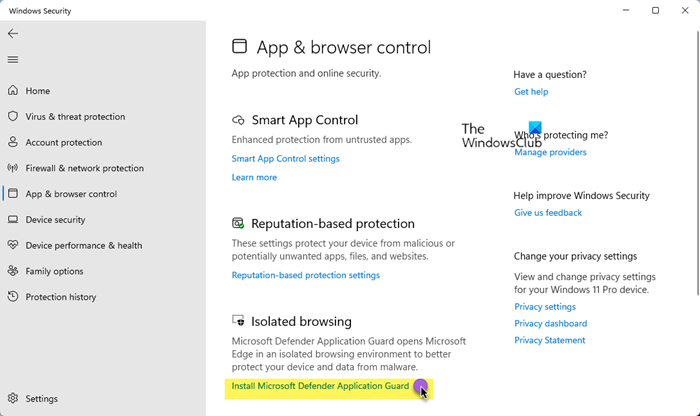
Step 3: Go to the App & browser control part. Under the Isolated browsing part, click the Install Microsoft Defender Application Guard link.
Way 3: Via PowerShell
Step 1: Type PowerShell in the Search box. Then, choose Run as administrator.
Step 2: Type the following command and press the Enter key.
Enable-WindowsOptionalFeature -Online -FeatureName Windows-Defender-ApplicationGuard
Way 4: Via Local Group Policy Editor
Step 1: Type group policy in the Search box and then select Edit group policy from the start menu list.
Step 2: Go to Computer Configuration > Administrative Templates > Windows Components > Microsoft Defender Application Guard.
Step 3: Find the Turn on Microsoft Defender Application Guard in Managed Mode option. Then, double-click it to choose Enabled.
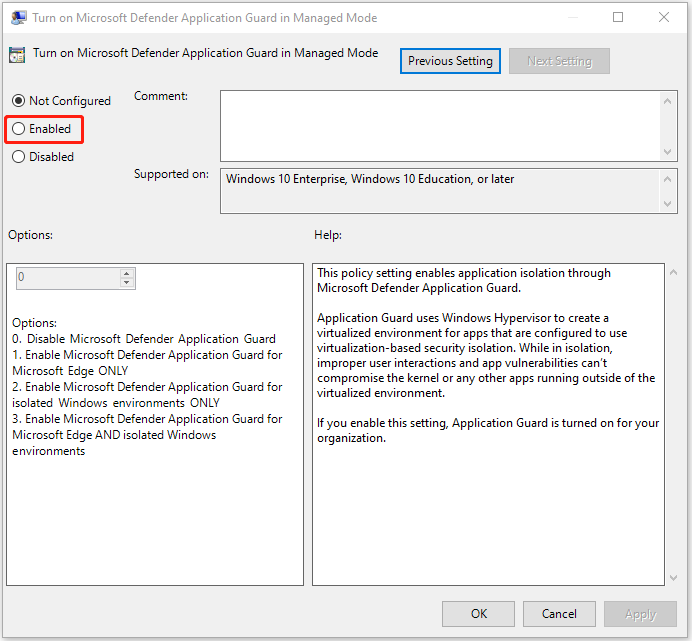
Step 4: You can now go to Options and change it to 2 or 3.
Way 5: Via Command Prompt
Step 1: Type PowerShell in the Search box. Then, choose Run as administrator.
Step 2: Type the following command and press the Enter key.
Dism /online /Enable-Feature /FeatureName:”Windows-Defender-ApplicationGuard”
Tips:
Tip: Whether using Microsoft Defender Application Guard or not, it’s recommended to back up your important data regularly to protect it since virus attacks or malware attacks may cause your data lose. To do that, you can try the free backup software – MiniTool ShaodwMaker. It can back up files, folders, systems, and disks.
MiniTool ShadowMaker TrialClick to Download100%Clean & Safe
Final Words
How to enable or disable Microsoft Defender Application Guard? This post provides 5 ways and you can choose one of them based on your needs. I hope that this post can be useful to you.
About The Author
Position: Columnist
Having been an editor at MiniTool since graduating college as an English major, Daisy specializes in writing about data backups, disk cloning, and file syncing as well as general computer knowledge and issues. In her free time, Daisy enjoys running and going with friends to the amusement park.
In today’s online world, security attacks are increasing at a challenging level. Attackers are developing new ways continually to target victims. On the other side of boat, tech giants are creating new solutions safeguard their customers. Windows Defender Application Guard (WDAG) is one of such solution which can help enterprise employees to remain safe from security breaches.
So the WDAG is a feature designed to help IT or enterprise admins to define trusted sites for their employees. Rest of the sites, which is not in the list defined by admins will be considered untrusted. This will prevent employees to visit untrusted website. When the employees hit untrusted site, they’ll be open in a virtualization based isolated container, which is independent of host operating system. In this way, the host operating system remains safe and couldn’t be compromised.
WDAG is disabled by default on Windows 10. Here’s how you can manage it.
Page Contents
How To Enable/Disable Windows Defender Application Guard
Windows Defender Application Guard System Requirements
WDAG have some basic requirements to operate. You can visit this Microsoft documentation to read about them.
How To Enable Windows Defender Application Guard
1. Open Control Panel > click Programs and Features.
2. In left pane of Programs and Features, click Turn Windows features on or off link.

3. Under Windows Features box, scroll down and look for Windows Defender Application Guard option and check it. Click OK. In case if you see Turn Windows features on or off blank, see this fix.
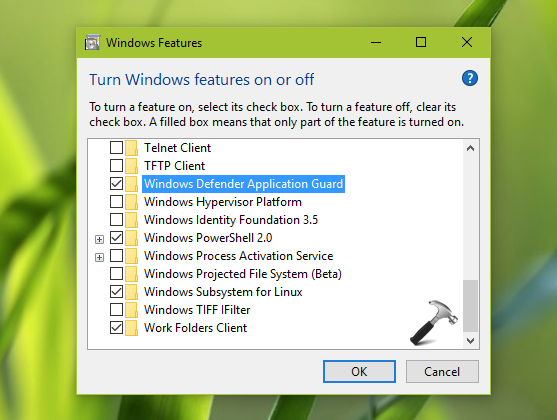
4. Now open Microsoft Edge and from its menu, select New Application Guard window and thus Edge can then be used in protected mode leveraging power of this security feature.
How To Disable Windows Defender Application Guard
To disable this security feature anytime, you need to open Turn Windows features on or off and untick Windows Defender Application Guard option. This would immediately deactivate the feature.
That’s it!