
Table of contents:
1. Why to Change or Restore Default location of Picture folders on Windows
2. How to Restore Default Location of pictures on Windows
User query — I have been using Windows 10 OS on my PC. However, recently I upgraded my Windows 10 to 11. Before going for the upgrade, I backed up my important files. After reinstallation finishes, I opened my backup folder to restore my picture folder. I didn’t find My Picture folder? I don’t know what is happening. Can anyone help me to restore my pictures folder in Windows 10/11? Thanks in advance.
— A User Query from Quora
If you have come across a scenario like above or if you are unable to find your default picture folder location on your Windows 10/11, this article is for you.
Usually after upgrading the Windows or reinstallation of the Operating System, you may commonly encounter such a problem. However, we have effective solutions on how to restore the default picture folder and also how to change the location of the ‘My Picture Folder‘. So let’s get started.
Why to Change or Restore Default location of Picture folders on Windows?
- For better organising the files.
- Due to insufficient storage space of your C drive. You can move your pictures folder to the other partition or the drive in order to free up some space on your C drive.
- In order to prevent the accidental data loss on your computer sometimes users tend to store or move the default pictures folder to the other drive.
- The file path of the picture folder has been altered during the upgrade from Windows 10 to 11.
- Virus intrusion and malware usually makes your ‘My picture Folder’ corrupt and inaccessible
For the above-listed or any specific reasons if you want to restore or change the location, move to the next section of the article.
How to Restore Default Location of pictures on Windows
You can restore default location of pictures on windows using the below mentioned methods
Method 1: How to Change default Pictures Folder Windows 10/11
To change the default pictures folder on Windows 10/11. Follow the given steps in the below section
- Launch Run command using Windows + R keys
- In the run box enter the following command shell:UsersFilesFolder
- After that, please select a folder by clicking on it to move to a new location. For example, you can move to a desired new path.
- Once you have implemented the above-listed method, right-click the pathway folder in which you to choose to move My Pictures Folder
- Then, click on Properties option
- In properties, choose the Location tab and click Move option
- When File Explorer opens, select the destination folder and then click the Select Folder button.
- Click on Apply to complete the process
Method 2: How to Restore Default Missing Pictures Folder Location on Windows 10/11
- First, launch the Run command box using Windows + R keys.
- Type shell:UsersFilesFolder and hit Enter from the keyboard to view all personal folders items
- Once you have hit Enter, please select a folder by clicking on it to restore it to its original location.
- Right Click on Properties Option
- Next, on the Properties window, select the Location tab and then click the Restore Default button.
- Click on Apply button to complete the procedure
Method 3: Reset Quick Access Folders View
In some instances, the Pictures folder could disappear from Quick Access. To resolve this, simply reset the Quick Acces folders view:
- Open File Explorer and right-click on Quick Access.
- Click on Options.
- Navigate to the View tab and click on Reset folders.
Method 4: Restore My Pictures Folder in Windows 10 Using the Registry Editor
The Registry Editor can be used to find the My Pictures folder, and subsequently change the location of the Pictures folder in Windows 10. However, editing the Registry can have a negative impact on your PC, if done incorrectly. So ensure that you follow the steps carefully:
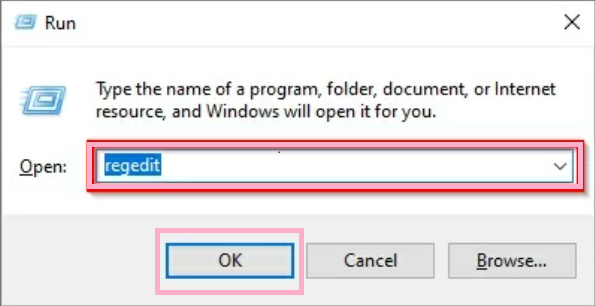
1. Press Windows Key + R, to open the Run program.
2. Type regedit in the text box and hit Enter.
3. In the Registry Editor, use the left pane to navigate to
HKEY_CURRENT_USER\SOFTWARE\Microsoft\Windows\CurrentVersion\Explorer\Shell Folders.
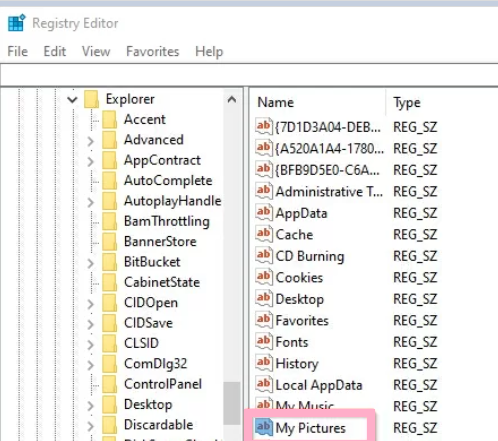
4. Locate the My Pictures entry and double-click on it.
5. Under Value data, check if the location is C:\Users\<username>\Pictures.
6. If it’s not, edit the value to the location mentioned in the previous step, replacing <username> with your actual Windows username.
7. Click OK.
8. Close the Registry Editor and reboot your PC.
Method 5: Restore Default Location of the Pictures Folder using BAT File
- Go to Notepad and copy and paste the following commands.
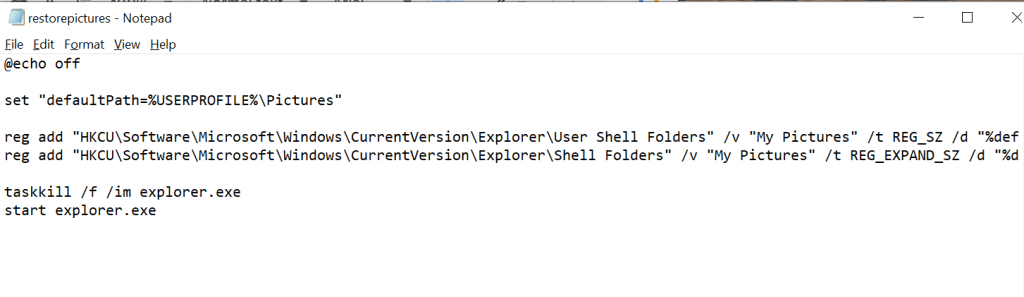
@echo off
set «defaultPath=%USERPROFILE%\Pictures»
reg add «HKCU\Software\Microsoft\Windows\CurrentVersion\Explorer\User Shell Folders» /v «My Pictures» /t REG_SZ /d «%defaultPath%» /f
reg add «HKCU\Software\Microsoft\Windows\CurrentVersion\Explorer\Shell Folders» /v «My Pictures» /t REG_EXPAND_SZ /d «%defaultPath%» /f
taskkill /f /im explorer.exe
start explorer.exe
- Now save the notepad file where you have entered the commands, save the files in the .bat file extension.
- Now right click on the saved file and select the Run as Administrator. Now the script will execute and restore the default location of the pictures in the following path %USERPROFILE%\Pictures.
The above solutions will help you in moving and restoring the picture folder according to your preferences. If you are still unable to access your data on the ‘My Picture Folder’ you will need to recover them. Data loss has been an unpredictable and inevitable scenario.
If you encounter an unforeseen data loss and are wondering how to access your “My Picture Folder” you will need a reliable data recovery utility like Remo Recover.
Remo Recover Software is built with an advanced data recovery algorithm that can recognize almost any file type and recover it in no time. The tool can help you recover files like photos, videos, documents, etc. from any version of Windows operating system. Download now and recover your missing picture folder with ease.
- Download Now For Windows
Trustpilot Rating 4.5⭐Out of 5⭐

Steps to Recover Deleted Photos from My Pictures Folder
Step 1: Download and install Remo Recover on your Windows computer.
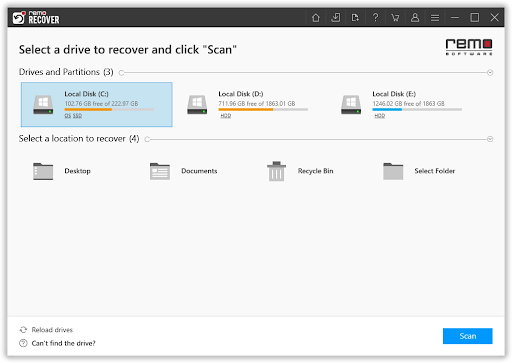
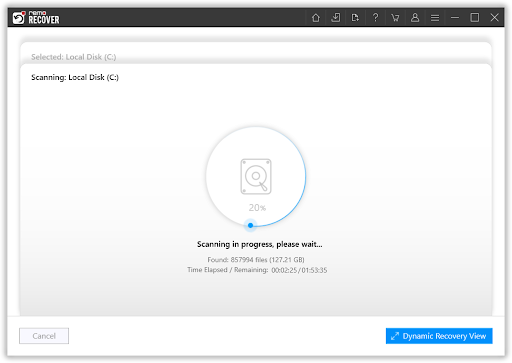
Step 2: Select the drive from where you want to recover your deleted images from.
Step 3: Now click on the Scan option.
Step 4: Once the Quick Scan option completes the tool will directly initiate the Deep Scan option. Now navigate to the Deleted folder in the Tree Structure and click on the Double click on the picture to Preview it.

Step 5: Finally, select the pictures you want to restore and click on the Recover option.
Conclusion
The article summarizes how to move or change default location and restore the picture folder on Windows. Fortunately, if you have encountered a data loss scenario you can always make use of Remo Recover to effortlessly restore your files, pictures and videos. If you have any further queries regarding the article, make use of comment section below.
Frequently Asked Questions:
1. Will moving My Photos Folder affect the Application?
Most programs that rely on the pictures folder’s default location. Usually moving the default folder will not affect the application.
2. Is it Possible to Move the My Photos Folder to its Default Location?
Yes, it is possible to move the My Photos folder to its default Location. Sometimes Windows will ask the confirmation to move the photos folder to the default location then you need to confirm Yes, before moving the folder we recommend you to take a backup of your important photos.
3. What will Happen after Moving the Original Default Pictures folder?
Moving the default My Pictures folder to a new location, the original folder will become empty. All the files will be transferred to the new location.
About the Author: John Harris
With a decade of experience in data recovery, John Harris, Senior Editor at Remo Software, is your go-to specialist. His focus includes partition management, Windows solutions, and data troubleshooting, delivering insightful content that serves both users and search engines. John’s expertise shines through in illuminating blog posts, untangling data loss intricacies across diverse storage platforms.…

This tutorial will show you how to move or restore the default location of the Pictures folder for your account in Windows 10 and Windows 11.
The Pictures folder (shell:My Pictures) is a component of the user profile that is used as a unified location for storing personal data. By default, the Pictures folder is a shell folder in the user’s profile (%UserProfile%) that is used as a default storage location for saved pictures, images, screenshots, and camera roll.
If you like, you can move the Pictures folder and its content to a location you want it at instead.
If the current Pictures folder path is incorrect or is no longer available, you can use the Restore Default option to restore the default path.
Contents
- Option One: Move Location of Pictures Folder in Properties
- Option Two: Restore Default Location of Pictures Folder in Properties
- Option Three: Restore Default Location of Pictures Folder using BAT file
Option One
Move Location of Pictures Folder in Properties
1 If you turned on back up Pictures folder to OneDrive, then you will need to temporarily turn off back up Pictures folder to OneDrive until after you moved the Pictures folder.
2 Open File Explorer (Win+E).
3 Navigate to the location (ex: «D») you want to move your Pictures folder to, and create a new folder named Pictures at this location. (see screenshot below)

4 Right click on the Pictures folder in the navigation pane of File Explorer, and click/tap on Properties. (see screenshot below)
If you don’t see the Pictures folder in the navigation pane, then type shell:My Pictures into the address bar of File Explorer, and press Enter to open the Pictures folder no matter where it may be located.
You can then right click or press and hold on an empty area in the opened Pictures folder, and click/tap on Properties.

5 Click/tap on the Location tab, and click/tap on the Move button. (see screenshot below)

6 Navigate to and select the new Pictures folder from step 3, and click/tap on Select Folder. (see screenshot below)

7 Click/tap on OK. (see screenshot below)
8 Click/tap on Yes to move all the files from the old location to the new location. (see screenshot below)

Option Two
Restore Default Location of Pictures Folder in Properties
1 If you turned on back up Pictures folder to OneDrive, then you will need to temporarily turn off back up Pictures folder to OneDrive until after you restored the default location of the Documents folder.
2 Open File Explorer (Win+E).
3 Right click on the Pictures folder in the navigation pane of File Explorer, and click/tap on Properties. (see screenshot below)
If you don’t see the Pictures folder in the navigation pane, then type shell:My Pictures into the address bar of File Explorer, and press Enter to open the Pictures folder no matter where it may be located.
You can then right click or press and hold on an empty area in the opened Pictures folder, and click/tap on Properties.
4 Click/tap on the Location tab, and click/tap on the Restore Default button. (see screenshot below)
5 Click/tap on OK. (see screenshot below)
6 If prompted to create a Pictures folder at the default location, click/tap on Yes. (see screenshot below)

7 Click/tap on Yes to move all the files from the old location to the default location. (see screenshot below)
Option Three
Restore Default Location of Pictures Folder using BAT file
This option can be very useful if Option Two is not available.
This option will not move the contents of the Pictures folder from the old location to the default location. You will need to manually move the contents after restoring the default location if wanted.
1 If you turned on back up Pictures folder to OneDrive, then you will need to temporarily turn off back up Pictures folder to OneDrive until after you restored the default location of the Pictures folder.
2 Click/tap on the download button below to download the Restore_default_location_of_Pictures_folder.zip file.
(Contents of BAT file for reference)
Code:
@echo off

taskkill /f /im explorer.exe

timeout /t 2 /nobreak>null

if not exist "%UserProfile%\Pictures" mkdir "%UserProfile%\Pictures"

reg add "HKCU\SOFTWARE\Microsoft\Windows\CurrentVersion\Explorer\Shell Folders" /v "My Pictures" /t REG_SZ /d "C:\Users\%USERNAME%\Pictures" /f

reg add "HKCU\SOFTWARE\Microsoft\Windows\CurrentVersion\Explorer\User Shell Folders" /v "{0DDD015D-B06C-45D5-8C4C-F59713854639}" /t REG_EXPAND_SZ /d %%USERPROFILE%%"\Pictures" /f

reg add "HKCU\SOFTWARE\Microsoft\Windows\CurrentVersion\Explorer\User Shell Folders" /v "My Pictures" /t REG_EXPAND_SZ /d %%USERPROFILE%%"\Pictures" /f

attrib +r -s -h "%USERPROFILE%\Pictures" /S /D

timeout /t 1 /nobreak>null

start explorer.exe
3 Save the ZIP file to your desktop.
4 Unblock the ZIP file.
5 Extract the BAT file from the ZIP file.
6 Run the BAT file.
7 You will now see a command prompt open and close to kill the explorer process, run the commands to restore the default location and attributes of the Pictures folder, and restart the explorer process.
8 You can now delete the BAT file if you like.
That’s it,
Shawn Brink
Related Tutorials
- Add or Remove Location tab in Folder Properties in Windows 11
- Move or Restore Default Location of Desktop Folder in Windows 11
- Move or Restore Default Location of Documents Folder in Windows 11
- Move or Restore Default Location of Downloads Folder in Windows 11
- Move or Restore Default Location of Music Folder in Windows 11
- Move or Restore Default Location of OneDrive Folder in Windows 11
- Move or Restore Default Location of Saved Games Folder in Windows 11
- Move or Restore Default Location of Searches Folder in Windows 11
- Move or Restore Default Location of Screenshots Folder in Windows 11
- Move or Restore Default Location of Videos Folder in Windows 11
-
Restore_default_location_of_Pictures_folder.zip
Restore_default_location_of_Pictures_folder.zip
710 bytes
· Views: 1,294
3K View(s)

I am currently in the process of setting up my new laptop with all the software and files. A few days ago, I showed you how to quickly download the Adobe Creative Cloud Desktop App installer, without signing into your account.
Now, I was about to copy my Lightroom catalog to my new system. By standard, Lightroom saves the catalog in your user directory in the “Pictures” folder. That’s perfect and that’s where I would like to have it. However, Windows 11 ships with all kinds of Microsoft bloatware, including OneDrive. Because of that, the default paths to folders have changed and are now set in the OneDrive folder rather than your user profile. These folders are called User Shell Folders. Because OneDrive comes pre-installed with a new installation of Windows 11 right now, these three folders are now located in the OneDrive folder under your User Profile (C:\Users\your_username\OneDrive).
- Desktop
- Documents
- Pictures
Even if you delete the Documents or Pictures folder in the OneDrive directory, they will always come back, even when you uninstall OneDrive completely.
Normally you would be able to change the default paths of these User Shell Folders by right clicking on one of them in Windows Explorer, selecting Properties and then Location. There is even a button to restore to the default paths, but this button won’t work with the Documents and Pictures directory.
The only way to fix this is in the Windows Registry. To make changes in the Windows Registry, your user account needs to have Administrator privileges. If you make these changes and you already have files in Documents or Pictures, they won’t be moved to the new location. You will have to manually move them.
Disclaimer
You are making these changes on your own and I am not responsible for any damage to your system. Windows Registry is very delicate, and you can mess up your entire system.
Method 1: Change values manually
The registry values you need to change to reset the default paths are located here:
HKEY_CURRENT_USER\SOFTWARE\Microsoft\Windows\CurrentVersion\Explorer\User Shell Folders
HKEY_CURRENT_USER\Software\Microsoft\Windows\CurrentVersion\Explorer\Shell Folders

For Documents, change the following values
HKEY_CURRENT_USER\Software\Microsoft\Windows\CurrentVersion\Explorer\Shell Folders
- Change the path in Personal to C:\Users\%USERNAME%\Documents
HKEY_CURRENT_USER\SOFTWARE\Microsoft\Windows\CurrentVersion\Explorer\User Shell Folders
- Change the path in {24D89E24-2F19-4534-9DDE-6A6671FBB8FE} to %USERPROFILE%\Documents
- Change the path in {F42EE2D3-909F-4907-8871-4C22FC0BF756} to %USERPROFILE%\Documents
- Change the path in Personal to %USERPROFILE%\Documents
For Pictures, change the following values
HKEY_CURRENT_USER\Software\Microsoft\Windows\CurrentVersion\Explorer\Shell Folders
- Change the path in My Pictures to C:\Users\your_username\Pictures
HKEY_CURRENT_USER\SOFTWARE\Microsoft\Windows\CurrentVersion\Explorer\User Shell Folders
- Change the path in {0DDD015D-B06C-45D5-8C4C-F59713854639} to %USERPROFILE%\Pictures
- Change the path in My Pictures to %USERPROFILE%\Pictures
Method 2: Use a Batch Script
While doing my research on how to fix this problem, I found a batch script online which would reset the picture folder to the default path of C:/Users/your_username/Pictures
It worked flawlessly for me, and I created a second script based on this one to reset the Documents folder to C:/Users/your_username/Documents
If there is already a folder called Pictures or Documents in that location, this script will create a new one. If you have files in the old folder move them after that and delete the old folder or just delete the folder if it is empty.
Both scripts are available for download below.
Picture Script
@echo off

taskkill /f /im explorer.exe

timeout /t 2 /nobreak>null

if not exist "%UserProfile%\Pictures" mkdir "%UserProfile%\Pictures"

reg add "HKCU\SOFTWARE\Microsoft\Windows\CurrentVersion\Explorer\Shell Folders" /v "My Pictures" /t REG_SZ /d "C:\Users\%USERNAME%\Pictures" /f

reg add "HKCU\SOFTWARE\Microsoft\Windows\CurrentVersion\Explorer\User Shell Folders" /v "{0DDD015D-B06C-45D5-8C4C-F59713854639}" /t REG_EXPAND_SZ /d %%USERPROFILE%%"\Pictures" /f

reg add "HKCU\SOFTWARE\Microsoft\Windows\CurrentVersion\Explorer\User Shell Folders" /v "My Pictures" /t REG_EXPAND_SZ /d %%USERPROFILE%%"\Pictures" /f

attrib +r -s -h "%USERPROFILE%\Pictures" /S /D

timeout /t 1 /nobreak>null

start explorer.exe
Document Script
@echo off

taskkill /f /im explorer.exe

timeout /t 2 /nobreak>null

if not exist "%UserProfile%\Documents" mkdir "%UserProfile%\Documents"

reg add "HKCU\SOFTWARE\Microsoft\Windows\CurrentVersion\Explorer\Shell Folders" /v "Personal" /t REG_SZ /d "C:\Users\%USERNAME%\Documents" /f

reg add "HKCU\SOFTWARE\Microsoft\Windows\CurrentVersion\Explorer\User Shell Folders" /v "{24D89E24-2F19-4534-9DDE-6A6671FBB8FE}" /t REG_EXPAND_SZ /d %%USERPROFILE%%"\Documents" /f

reg add "HKCU\SOFTWARE\Microsoft\Windows\CurrentVersion\Explorer\User Shell Folders" /v "{F42EE2D3-909F-4907-8871-4C22FC0BF756}" /t REG_EXPAND_SZ /d %%USERPROFILE%%"\Documents" /f

reg add "HKCU\SOFTWARE\Microsoft\Windows\CurrentVersion\Explorer\User Shell Folders" /v "Personal" /t REG_EXPAND_SZ /d %%USERPROFILE%%"\Documents" /f

attrib +r -s -h "%USERPROFILE%\Documents" /S /D

timeout /t 1 /nobreak>null

start explorer.exe
Conclusion
I really hate that Microsoft forces all their services and software on the user, no matter if they want it or not. It’s an abuse of their power and position in the market. Microsoft got so bad; now you need a working internet connection to even set up a new PC when you get it out of the box.
There are ways around it, but they are overly complicated. When I got my new PC, I had no internet, so my choice was either not use my PC at all or drive about an hour to get on the Internet. Yes, that might be a special case, but why? It was never a problem in the past, now they just want to force all their stuff on users.
Since the “Restore Defaults” button wasn’t working, I contacted Microsoft for help to fix their screw up and which I thought to be a simple problem. The end of story was that I only got lucky enough to get help, because I pay for office. I knew after the first few minutes of talking to the agent that she wasn’t truly knowledgeable as the stuff she told me to do.
She requested remote access and I always declined that, and my fears were right, she wanted me to activate the hidden administrator account and leave my PC vulnerable. If you don’t know Windows, you would have followed her steps and not everyone can get on your PC by logging in to the Administrator account which is not password protected.
By the way, this step was not at all needed to fix the issue. Anyway, after two hours, we got to the point, where she gave up and transferred me to Enterprise support, where they wanted a whopping $499 to fix the issue.
I hope this was helpful for you. If you have any questions let me know in the comments below. Even let me know if it worked for you and share this post with your friends and on your favorite social media channels.
Peter is an award-winning photographer who travels all over the world to capture the beauty of our planet as well as the achievements of humanity. Follow Peter on his travel blog Gate to Adventures for more amazing places to go and explore.
После того, как несколько человек в комментариях к разным статьям на сайте написали о том, что делают скриншоты понравившихся обоев рабочего стола из тех, что доступны в Windows 10 по умолчанию, а также посетовали на то, что нельзя сделать скриншот экрана блокировки, решено было рассказать, где хранятся обои рабочего стола по умолчанию, обои экрана блокировки и текущие обои в Windows 10.
Все файлы фотографий и изображений, использующиеся в качестве обоев Windows 10, всегда можно достать из соответствующих папок на системном диске вашего компьютера или ноутбука. Таких папок несколько и именно о том, где их найти и пойдет речь в этой короткой инструкции.
Папка с обоями рабочего стола по умолчанию и с текущими обоями рабочего стола
В Windows 10 присутствует сразу несколько различных папок, в которых находятся фотографии и изображения, которые устанавливаются на рабочий стол как обои.
Далее — расположение этих папок (пути, начинающиеся с указания папок наподобие %LocalAppData% достаточно просто скопировать и вставить в адресную строку проводника, чтобы попасть в нужное расположение):
Где хранятся фоновые фотографии экрана блокировки
Если вас интересуют обои (фоновые изображения) экрана блокировки Windows 10, вы также легко их можете найти. Стандартные обои, присутствующие сразу после установки, расположены в папке C:\Windows\Web\Screen\.
Однако, мало кого интересуют обои по умолчанию, чаще бывают интересны те, что ОС загружает из Интернета. Их вы можете обнаружить в папке
%LocalAppData%\Packages\Microsoft.Windows.ContentDeliveryManager_cw5n1h2txyewy\LocalState\Assets

Просто скопируйте и введите указанный путь в адресную строку проводника, откроется папка, содержащая множество файлов без расширения. Вы можете скопировать их куда-либо и установить для этих файлов расширение .jpg, либо просто открыть с помощью какого-либо графического редактора или программы для просмотра фото.
В указанной папке обычно хранится множество файлов обоев, но, одновременно, там есть и другие, ненужные изображения, не являющиеся фонами экрана блокировки. Если вы хотите добавить расширение .jpg сразу для всех из них и скопировать в папку «Изображения\LockScreen», можно создать и использовать следующий bat файл (см. Как создать bat-файл):
cd /D %userprofile%\AppData\Local\Packages\Microsoft.Windows.ContentDeliveryManager_cw5n1h2txyewy\LocalState\Assets
mkdir "%userprofile%\Pictures\LockScreen\" 1>nul 2>&1
copy * "%userprofile%\Pictures\LockScreen\*.jpg"
Finding and organizing photos on your Windows 10 PC can sometimes seem like a daunting task, especially if your collection spans years and countless folders. With the vast array of storage options—ranging from the Pictures library to OneDrive and external drives—it’s easy to lose track of where everything is. This article aims to guide you through the various methods of locating all the photos stored on your Windows 10 computer. Whether for housecleaning, backup, or simply revisiting your cherished memories, you’ll learn effective strategies for locating, organizing, and managing your photo files.
Understanding Windows 10’s Storage System
Windows 10 offers several default folders for storing your files, including the Pictures Library, Documents, and Downloads. The Pictures Library is specifically dedicated to images and photos, which makes it a primary location to explore. However, photos may also reside in other directories such as Desktop, external storage, or cloud services like OneDrive.
When looking for photos, it’s important to first understand where they might be saved. Common locations include:
- Pictures Folder: The designated library for images.
- Documents Folder: Sometimes users save images in related documents.
- Desktop: Users may save images directly onto their desktop for easy access.
- Downloads Folder: Many images downloaded from the internet end up here.
- External Drives: USB drives or external hard drives may house photos that were transferred.
- Cloud Services: If you use OneDrive or other cloud storage, your images could be stored online.
Using File Explorer
File Explorer is your primary tool for navigating files and folders on your Windows PC.
- Open File Explorer: Click the folder icon on your taskbar or press
Windows + Eon your keyboard. - Access the Pictures Library: On the left sidebar, you’ll see ‘Pictures’. Click on it to view images saved in the standard Pictures folder.
- Search Function: If you have a large number of files, utilize the search bar located in the upper-right corner of the File Explorer window. Type relevant keywords, such as «.jpg,» «.png,» or even just «photo», to filter through files.
- Customizing Your View: Change how files are displayed by selecting the ‘View’ tab at the top of File Explorer. You can choose between different layouts like List, Details, or Thumbnails to easily identify your images visually.
Categorizing Photos Using Folders
Once you’ve located your photos, organizing them into folders is a wise move. This not only keeps your collection orderly but also makes it easier to find specific images later. Consider the following organizational methods:
- By Date: Create folders for each year or month of your photo-taking activity. This is especially useful for family or holiday photos.
- By Event: Organize images into folders based on events, such as vacations, birthdays, or holidays.
- By People or Subjects: Use folders to categorize images based on the people in them or the subjects—nature, pets, etc.
- Use Descriptive Naming: When creating folders, opt for meaningful names that will help you quickly recognize the contents.
Utilizing Windows Search Function
Beyond File Explorer, Windows 10 integrates a robust search function that can help you locate photos across your entire system:
- Taskbar Search: Click on the search bar next to the Start Menu and type “photos.” This will prompt the built-in Photos application to reopen.
- Searching by File Type: Enter search criteria such as “type: .jpg” to find all JPEG images or “tag: vacation” if you’ve tagged some images. The type: and tag: parameters are helpful for quickly narrowing down search results.
- Filtering Search Results: After running a search, you can filter results by selecting the ‘Photos’ tab or applying other filters like size or date modified.
Exploring the Photos App
Windows 10 comes with a built-in Photos app that functions as both a viewer and an organizer for your images.
- Accessing the Photos App: You can quickly launch the app by typing “Photos” into the search bar and selecting it from the results.
- Viewing Your Collection: The app will automatically aggregate photos from various locations, including the Pictures library and any connected cloud services.
- Automatic Organization: It provides features like Albums, Folders, and even a ‘People’ section where you can see photos of specific individuals if you’ve tagged them.
- Managing Photos: In the app, you can delete or move images, create albums, and even edit photos using built-in tools.
Searching through OneDrive
If you have OneDrive integrated into your Windows 10 system, your photos may be automatically uploaded there, depending on your settings.
- Accessing OneDrive: Ensure you’re logged in to OneDrive by clicking on the cloud icon in the notification area on your taskbar.
- Viewing Photos in OneDrive: You can access your OneDrive folder through File Explorer (listed under ‘Quick Access’) or through the web app at onedrive.live.com.
- Search Functionality: Use the search bar within OneDrive to find images easily, similar to File Explorer.
- Sync Settings: If your OneDrive syncing is enabled, ensure that you’re updating regularly. This helps in accessing the most recent photos across devices.
Using Third-Party Software
In some cases, third-party software can enhance your ability to locate and organize photos effectively.
- Photo Management Applications: Consider applications like Adobe Lightroom, Google Photos, or specialized software like ACDSee. These tools offer advanced organization, tagging, and searching features.
- Indexing Software: Programs like Everything or Copernic Desktop Search allow you to index your photo library, making locating files quicker than Windows’ built-in search functionalities.
- Cloud Options: Services such as Google Photos or Dropbox not only provide backup but also advanced searching features, including image recognition that identifies people and objects in your photos.
Deleting Duplicate Photos
As your photo collection grows, duplicates can take up unnecessary space. Many tools help identify and remove duplicate images, freeing up valuable storage.
- Use Duplicate File Finders: Software options like Duplicate Cleaner or CCleaner can assist you in finding and removing duplicate photos.
- Manual Checks: While software can help, manually checking for duplicates—especially among similar shots taken in series—can ensure memorable images aren’t mistakenly deleted.
Backing Up Your Photos
Finding and organizing is only half the battle; ensuring those memories are preserved is crucial.
- Regular Backups: Utilize external hard drives or cloud services for regular backups of your photo library.
- Create Backups for Important Folders: Focus on directories where your most cherished photos are retained and ensure they are included in your backup routine.
- Use Backup Software: Applications that perform automated backups can streamline this process, ensuring you don’t forget to manually back up important images.
Conclusion
Locating, organizing, and managing photos stored on your Windows 10 PC may initially seem overwhelming, but with the right approaches, it can be a straightforward task. Whether you choose to use File Explorer, the Photos app, OneDrive, or various third-party tools, you have multiple resources at your disposal.
By developing a consistent organizational system, regularly checking for duplicates, and implementing a backup strategy, you can not only find your images with ease but also preserve the memories captured through your camera.
Being attentive to the state of your digital photo collection can facilitate smooth navigation and safeguard against the loss of cherished memories. With these methods, you can transform your photo collection into an organized treasure trove filled with memories, accessible whenever you need to relive those special moments.