
How to Change Text Sizes and Fonts in Windows 10
Windows 10, as an operating system, provides users with a multitude of features that enhance accessibility, usability, and personalization. One of the most important and user-friendly aspects of Windows 10 is the ability to modify text sizes and fonts. Whether your purpose for changing text size is to improve readability due to visual impairments, enhance aesthetic appeal, or customize your workspace, Windows 10 accommodates a wide range of preferences and needs.
In this comprehensive guide, we will explore how to change text sizes and fonts in Windows 10 in various contexts, including system-wide settings, individual application adjustments, and web browser modifications. The objective is to empower you with the knowledge required to personalize your Windows experience, ensuring that your screen is visually comfortable and tailored to your personal preferences.
Understanding Display Scaling and Font Size
Before diving into the methods for changing text sizes and fonts, it’s essential to understand the difference between display scaling and font size adjustments. Display scaling is a feature that affects the overall size of interface elements on your screen, including text, icons, and the taskbar. It helps in making everything on the desktop larger or smaller based on your needs.
Font size, on the other hand, refers specifically to the size of the typeface used in applications, files, and web browsers. Windows 10 allows you to adjust both to achieve a comfortable viewing experience.
Adjusting Display Scaling and Text Size System-Wide
To begin changing text sizes and fonts, follow these steps to adjust display scaling and text size for the entire operating system.
-
Open Settings: Click on the Start menu (Windows icon) located at the bottom left corner of your screen. Then click on the ‘Settings’ gear icon to open the Settings window.
-
Navigate to System Settings: In the Settings window, select the ‘System’ option, which should be the first option in the list.
-
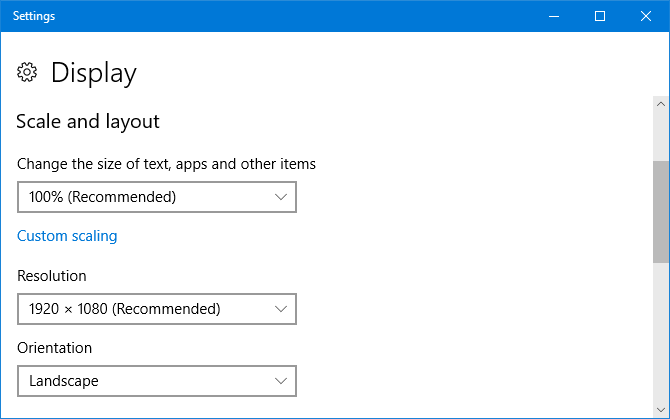
Access Display Settings: In the left sidebar of the System settings, click on ‘Display.’ This section will allow you to adjust display-related settings.
-
Change Scale and Layout: Under the ‘Scale and layout’ section, you will find a drop-down menu titled ‘Change the size of text, apps, and other items.’ You can select a percentage (like 100%, 125%, 150%, etc.) to increase or decrease the size of text and interface elements. A higher percentage will make everything appear larger on your screen.
-
Custom Text Size (Optional): If you prefer to set a specific text size without altering the overall scaling, scroll down to the ‘Scale and layout’ section and click on the ‘Advanced scaling settings’ link. Here, you can enter a custom scaling percentage. This can be especially useful if you have a unique screen resolution or visual needs.
-
Apply Changes: After making adjustments, you may need to sign out and sign back into your Windows account for the changes to take effect. Alternatively, some changes will apply immediately.
-
Restart Applications: Certain applications may also need to be restarted for the new settings to take effect.
Changing Font Size Using the Ease of Access Settings
Windows 10 includes an «Ease of Access» settings feature specifically designed to help users with visual impairments or preferences that differ from standard configurations. Here is how you can change the font sizes through the Ease of Access settings:
-
Open Ease of Access Settings: Go back to the Settings window by clicking the Start menu and selecting the ‘Settings’ gear icon. From there, click on ‘Ease of Access.’
-
Text Size Option: In the Ease of Access settings, look for the ‘Text size’ option in the left sidebar. Click on it to access text formatting settings.
-
Adjust the Slider: You will find a slider under the ‘Make text bigger’ section. Adjust the slider to make the text larger or smaller per your preferences. This change directly modifies the size of text across various system applications.
-
Preview Your Changes: As you adjust the slider, a preview box at the top of the window shows how the text will look. This allows you to find a suitable size before applying it.
-
Apply Changes: Once you are satisfied with the text size, click the ‘Apply’ button. Again, sign out or restart applications if necessary.
Customizing Fonts in Windows 10
While Windows 10 allows you to change font sizes easily, it offers limited options for changing the actual fonts used across the system. However, you can change fonts via the Control Panel or through third-party software. Here’s how you do it using the built-in method and via other tools:
Changing Default Font in Windows 10 via Registry Editor
-
Backup Your Registry: Before making any changes to the registry, it’s crucial to back it up. Press
Windows + Rto open the Run dialog, type ‘regedit’, and hit Enter. Once in the Registry Editor, click on ‘File’ in the menu, then ‘Export’ to save your current registry settings. -
Navigate to Font Settings: In the Registry Editor, navigate to the following path:
HKEY_LOCAL_MACHINESOFTWAREMicrosoftWindows NTCurrentVersionFonts -
Find the Font You Want to Change: In the fonts folder, you will see a list of fonts that are available in your operating system.
-
Change Font Details: The next step involves locating the entries for the default system font like ‘Segoe UI’ or others you wish to change. To modify the font, you can either right-click and choose ‘Modify’ or create a new entry for your desired font.
-
Editing Values: In the ‘Value data’ field for the font, enter the name of the new font you want to apply. Be aware that not all fonts will work perfectly in every aspect of the operating system; some may be more suitable for headings, while others work better for body text.
-
Restart Your Computer: Once you have made your changes, close the Registry Editor and restart your computer. Check to see if the changes have been applied.
Using Third-Party Tools to Change Fonts
If altering the registry seems daunting, or you want more extensive customization options, you can turn to third-party applications like ‘Winaero Tweaker’ or ‘FontBase.’ These applications allow users to modify fonts with simplified interfaces:
-
Download Winaero Tweaker: Visit the official Winaero website, download and install the Winaero Tweaker.
-
Open Winaero Tweaker: Launch the app and navigate to the ‘Fonts’ section on the left sidebar.
-
Select Your Font: You will see several options to change system fonts according to header styles, window text, and more. Choose the desired font from the dropdown menu provided, or add new fonts to your system if you wish.
-
Apply Changes: Save your adjustments and restart your system for the changes to take effect.
Changing Font Size in Specific Applications
Beyond altering system-wide settings, there may be times when you want to change font sizes specifically in individual applications like Microsoft Word, Excel, or web browsers. Here’s how you can do that:
Microsoft Office Suite (Word, Excel)
-
Open Your Document: Start by opening Microsoft Word or Excel.
-
Highlight Text: For adjusting font size, select the text you wish to modify.
-
Change Font Size: On the Home tab of the Ribbon, find the ‘Font’ group and locate the font size dropdown menu. Here you can choose from predefined sizes or enter a custom size.
-
Apply Changes to Whole Document or Sheet: If you’d like to change the font size throughout the entire document, press
Ctrl + Ato select all text before changing the font size. -
Using Styles for Consistency: Consider using ‘Styles’ to maintain consistency throughout your document. You can modify Heading styles or Body text styles to ensure a uniform look.
Changing Font Size in Web Browsers (Chrome, Firefox, Edge)
-
Google Chrome:
- Open Chrome and click on the three vertical dots located in the upper right corner to access the menu.
- Select ‘Settings’ and scroll down to find ‘Appearance.’
- Under ‘Font Size,’ select your preferred size from the dropdown menu. To customize further, click on ‘Customize fonts’ to adjust specific font types and sizes.
-
Mozilla Firefox:
- Open Firefox and click on the three horizontal lines at the upper-right corner.
- Select ‘Options’ or ‘Preferences.’
- Navigate to ‘Language and Appearance’ where you can adjust the font size and type.
-
Microsoft Edge:
- Open Edge and click on the three horizontal dots in the upper right corner.
- Select ‘Settings’ then go to ‘Appearance.’ You will find the ‘Fonts’ section to customize your settings.
Accessibility Features for Better Text Viewing
For users with vision impairments or those who simply want a more readable interface, Windows 10 provides several accessibility features that go beyond standard font and scaling adjustments.
-
Narrator: This built-in screen reader allows users to hear spoken descriptions of items on the screen, enhancing usability for those with limited vision.
-
Magnifier: A built-in tool that allows users to zoom in on parts of the screen, making it easier to read and interact with content.
-
High Contrast Settings: By setting a high contrast theme, you can significantly enhance readability, making text appear bolder and more distinct against backgrounds.
-
Color Filters: These allow users to apply specific color filters to enhance visibility as per individual visual requirements.
To access these features, go to Settings > Ease of Access and select the specific options that best suit your needs.
Conclusion
Changing text sizes and fonts in Windows 10 is a straightforward process that can greatly enhance your computing experience. Whether you’re looking to improve visibility through display scaling or tailor the aesthetic aspects of your system via font changes, Windows 10 provides ample functionality to meet those needs.
By following the procedures outlined in this guide, you can customize your user interface effectively, ensuring that your workspace is both functional and visually appealing. With the right adjustments, you can create a comfortable and personalized digital environment conducive to your specific tasks, whether it’s writing documents, browsing the web, or managing spreadsheets.
As technology continues to evolve, so too will the methods and tools available for customizing our digital experiences; thus, staying informed about the available options is a key to maximizing the potential of your operating system.

Struggling with small text and straining your eyes on Windows 11? Don’t worry! Adjusting the default fonts and text size is actually quite easy. By making a few simple tweaks, you can enhance your viewing experience and make everything on your screen easier to read.
To get started, click on the Start button and select the gear icon to access the Settings menu.
From there, choose System followed by Display. In the Display settings, you’ll find a section called Scale and layout. This is where you can customize the size of text, applications, and other elements on your screen.
If you prefer a larger display, simply adjust the settings accordingly. With these modifications, you can enjoy a more comfortable and legible experience while using your Windows 11 device.
Click here to learn more about computers, computer repair, and technology
Basics of Adjusting Fonts and Text Size in Windows
When it comes to modifying text size in Windows, there are a few important factors that can enhance your display and enhance your overall user experience. By personalizing the display settings in Windows, you can customize fonts and text size to your liking.
Whether you want a unique text size or desire to change the font style, these options are readily available to improve your visual comfort.
it’s important to mention that adjusting the default font size in Windows can greatly benefit individuals with visual impairments.
With these straightforward changes, you can ensure that your Windows operating system is visually attractive and easy to navigate.

Windows offers users the ability to customize fonts and text size, allowing them to find the perfect combination that suits their preferences and enhances readability. With a diverse selection of typefaces to choose from, users can personalize the typography to their liking, whether it be a classic serif font or a contemporary sans-serif.
Windows allows users to resize the text size, benefiting those with visual impairments or those who prefer larger or smaller text.
This feature ensures a comfortable reading experience tailored to each individuals specific needs.
Users can modify the appearance of text through font settings for specific applications or windows, optimizing readability.
Step by Step Guide to Modifying Fonts and Text Size in Windows
In this step-by-step guide, we will explore the process of customizing fonts and text size in Windows to enhance readability and visual appeal. By resizing the font size and adjusting the text display, you can personalize your computer’s appearance.
Whether you have trouble reading small text or simply want to make your screen more personal, this guide will provide you with the necessary instructions.
We will delve into the different methods available for customizing font styles in Windows using both the traditional Control Panel and the newer Settings app.
Throughout the guide, we will answer common questions and provide thorough explanations to ensure a smooth customization process.
Best Practices for Adjusting Font Settings in Windows
When it comes to personalizing the appearance of text in Windows, there are some best practices to follow. Customizing font settings allows users to modify the default font, adjust text scaling, and change font size according to their preferences.
It is important to choose a visually appealing and easy-to-read typeface for better legibility and overall experience.
Users can also optimize the way text appears on the screen by trying out different smoothing options.
Ultimately, finding the font settings that suit your personal preferences is key. By following these recommendations, you can enhance the visual appeal and readability of text in Windows.
Tips and Tricks for Personalizing Text Appearance in Windows
When it comes to personalizing the text appearance in Windows, there are multiple ways to make it unique to your preferences. One method is by changing the default fonts in Windows.
With a wide range of font options available, you can discover the ideal style that suits your taste, whether it’s a modern and sleek look or a traditional and elegant feel.
Another option to customize the text appearance is by adjusting the text size in Windows.
This feature is particularly helpful for individuals with visual impairments or those who prefer larger or smaller text. By resizing the typography, you can enhance the comfort of reading for your eyes.
Windows also provides various accessibility features that can improve your text appearance. For instance, you can enable ClearType, a feature that enhances text readability on LCD screens.
This feature can greatly enhance the overall viewing experience.
Comprehensive Tutorial on Resizing Default Text Size in Windows
If you’re looking to customize your Windows experience, changing the text scaling is a great place to start. By adjusting the default text size, you can ensure that the text displayed is easy to read and meets your preferences.
Windows offers several options for modifying the font size, allowing you to personalize the typography settings to your liking.
Whether you prefer a larger font for better readability or a smaller font for a more stylish look, Windows gives you the flexibility to customize the text display.
In this section, we’ll guide you through the steps to resize the system text size in Windows, empowering you to create a personalized text display that suits your needs.
Enhancing Readability and Accessibility with Typography Adjustment in Windows
Typography plays a crucial role in improving readability and accessibility on Windows. By altering font settings in Windows, users can customize the appearance of the default font to optimize their reading experience.
With a wide variety of font customization options available, users can choose a visually pleasing and easy-to-read font.
Adjusting the size of the text enables users to personalize the display of the text according to their preferences.
This versatility empowers users to create a comfortable reading environment, minimizing eye strain and enhancing overall readability. By modifying the default scaling of text and altering text properties, Windows ensures that users have the necessary tools to improve readability and accessibility.
Exploring Font Customization Options in Windows
When it comes to font customization, Windows offers a wide range of options to suit every users preferences. Resizing default typography in Windows allows you to adjust the size of the text to your liking, whether you prefer a larger, more easily readable font or a smaller, compact style.
In addition to resizing, Windows also enables you to customize font styles, giving you the freedom to choose a font that matches your personal taste and enhances the overall aesthetics of your computer.
Customizing system text size in Windows goes beyond just changing the appearance.
It can greatly improve accessibility for those with visual impairments or specific reading preferences. By adjusting the default text appearance in Windows, you can create a personalized experience that is easier on the eyes and enhances readability.
Another powerful feature offered by Windows is the ability to modify text scaling settings. This allows you to fine-tune the display of text to your preference. With these font customization options, Windows provides a user-friendly experience that allows you to tailor your computer to your exact text scaling preferences.
Benefits of Font Customization in Windows
- Resizing default typography in Windows allows users to adjust the size of the text according to their preferences.
- Customizing font styles in Windows gives users the freedom to choose a font that matches their personal taste and enhances the overall aesthetics of their computer.
- Modifying text scaling settings in Windows allows users to fine-tune the display of text to their preference.
- Font customization in Windows can greatly improve accessibility for those with visual impairments or specific reading preferences.
Tips for Changing Font Properties and Text Scaling in Windows
Modifying font and text scaling options in Windows can significantly enhance your computing experience. Whether you prefer a larger, more easily readable font or a smaller, compact style, adjusting default typography allows you to personalize the text according to your preferences.
Not only can you modify the size, but you also have the freedom to customize font styles to match your personal taste and improve the overall aesthetics of your computer.
Windows provides custom text scaling options, enabling you to fine-tune the display of text to ensure optimal readability and reduce eye strain.
By changing font properties and text scaling, you can create a more comfortable and visually appealing Windows experience.
Customizing Font Style in Windows
One important aspect of customizing font styles in Windows is the ability to adjust the text size to suit individual preferences. Windows provides users with the option to resize the default font size, which not only enhances readability but also reduces eye strain.
Whether users prefer a larger, more noticeable font or a more compact style, modifying the default text size in Windows is a straightforward and efficient way to personalize the computer experience.
By simply clicking a few buttons, users can find the perfect text size that enhances readability and provides a comfortable digital content consumption.
Take control of your Windows experience and personalize it by adjusting the text scaling in Windows.
Benefits of Adjusting Text Size in Windows
- Enhances readability for users with visual impairments
- Reduces eye strain and fatigue
- Allows for a more personalized and comfortable computer experience
- Improves accessibility by accommodating individual preferences
How to Use System Restore to Undo Recent Windows Changes
Steps to Resolve Annoying Windows Update Failures
Applies ToWindows 11 Windows 10
Here’s how to change the size of text, images, and apps in Windows.
To change your display in Windows, select Start > Settings > Accessibility > Text size. To make only the text on your screen larger, adjust the slider next to Text size. To make everything larger, including images and apps, select Display , and then choose an option from the drop-down menu next to Scale.

To zoom in or zoom out on parts of your screen in Windows, use Magnifier. To turn on Magnifier, press the Windows logo key + Plus (+). Zoom in by continuing to press the Windows logo key + Plus (+). Zoom out by pressing the Windows logo key + Minus (-). To turn off Magnifier, press the Windows logo key + Esc.
Need more help?
Want more options?
Explore subscription benefits, browse training courses, learn how to secure your device, and more.
-
Home
-
Partition Magic
- How to Change the Default Font on Windows 11? Read This Post
By Sherry |
Last Updated
Have you upgraded your PC to Windows 11, the latest operating system provided by Microsoft? In this post, MiniTool Partition Wizard offers a tutorial on how to change the default font on Windows 11. You can have a try if you are using this operating system.
What Is the Windows 11 Default Font
A font is a particular size, weight, and style of a typeface. It is the visual representation of language. On Windows 11, an operating system announced by Microsoft a few months ago, the default system font is Segoe UI Variable. It is a new version of the classic Segoe and uses variable font technology.
Compared with previous versions of Segoe UI font, Windows 11 Segoe UI Variable is designed to scale better with monitors with a higher amount of dots per inch. It means that this new font provides higher legibility and readability in the UI (user interface).
If you don’t like the Windows 11 default font, don’t be upset. You can change the default font on Windows 11 easily. For more details, please keep reading.
How to Change the Default Font on Windows 11
Windows 11 provides many different fonts for users. If you don’t like the default one, you can follow the steps below to change the default font on Windows 11.
Step 1: Click the Search button on the Windows 11 taskbar and search for Notepad. Then open Notepad and paste the following content:
Windows Registry Editor Version 5.00
[HKEY_LOCAL_MACHINESOFTWAREMicrosoftWindows NTCurrentVersionFonts]
“Segoe UI (TrueType)”=””
“Segoe UI Bold (TrueType)”=””
“Segoe UI Bold Italic (TrueType)”=””
“Segoe UI Italic (TrueType)”=””
“Segoe UI Light (TrueType)”=””
“Segoe UI Semibold (TrueType)”=””
“Segoe UI Symbol (TrueType)”=””
[HKEY_LOCAL_MACHINESOFTWAREMicrosoftWindows NTCurrentVersionFontSubstitutes]
“Segoe UI”=”FONT-STYLE”
Step 2: Minimize Notepad and press Win + I to open the Windows 11 Settings.
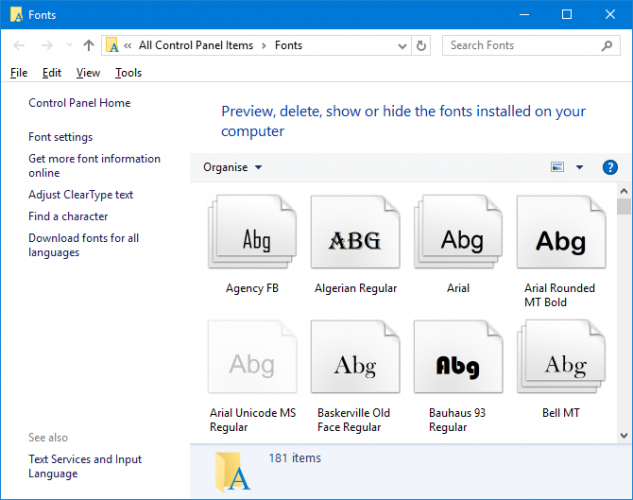
Step 3: In the left pane, select the Personalization tab. In the right pane, select Fonts. Then you can view the available fonts on Windows 11.
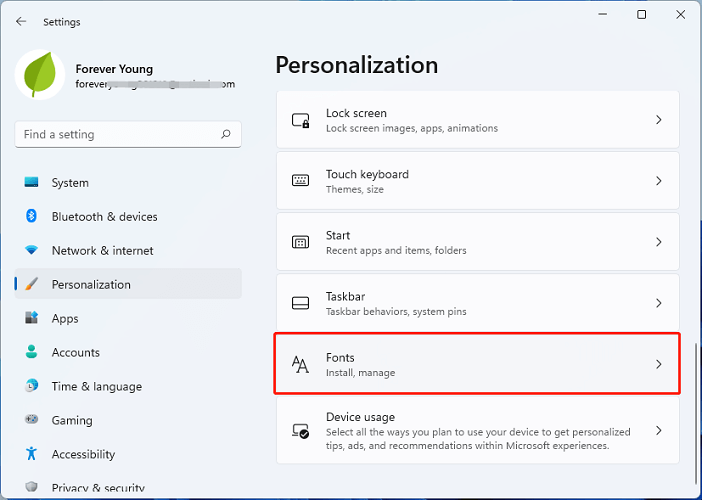
Step 4: Scroll down to find the font you want to use and copy its name.
Step 5: Go back to Notepad and replace FONT-STYLE with the desired font’s name.
Step 6: Click File > Save as. In the pop-up window, choose a location, name the file and add .reg at the end. Then click Save.
Step 7: Double-click the file you just saved to open it. In the pop-up window, click Yes to confirm the operation. This will change some Windows Registry entries.
Now, you can restart your computer and you should change the default font on Windows 11 successfully.
By the way, it seems to be more difficult to change desktop icon spacing on Windows 11. But don’t worry. You can click here to get the tutorial.
How to Change Windows 11 Font Size
If you just want to change the default font size on Windows 11, you can:
Step 1: Open Windows 11 Settings.
Step 2: In the left pane, click Accessibility. Then select Text size in the right pane.
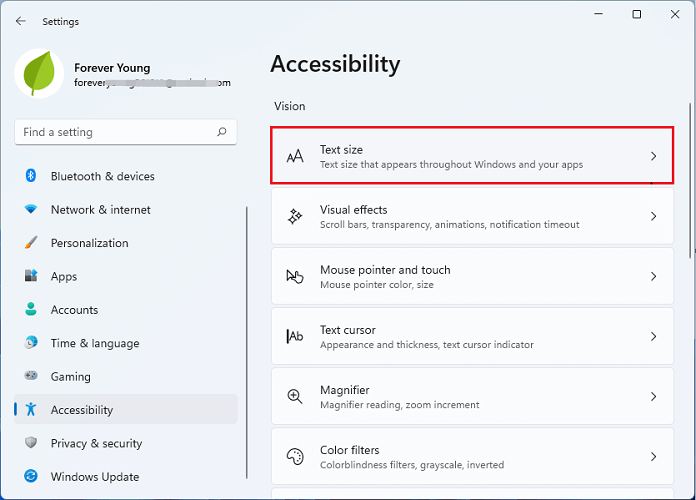
Step 3: In the following window, drag the toggle next to the Text size to change the font size. Then click the Apply button to save the changes.
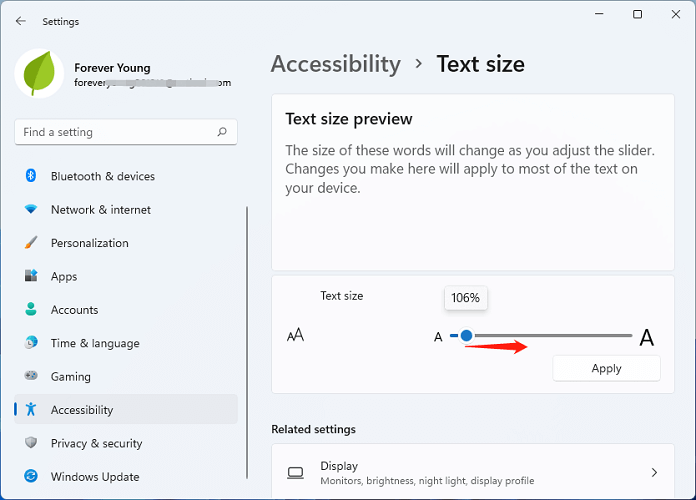
Tip: After changing the default font size, the text size of most of the built-in apps in Windows 11 will be changed as well, such as File Explorer, Control Panel, Settings, Paint, etc. the text size of third-party programs might not be changed.
If you want to get the default font back after you change fonts in Windows 11, don’t worry. It is easy to restore to the default font on Windows 11. You just need to:
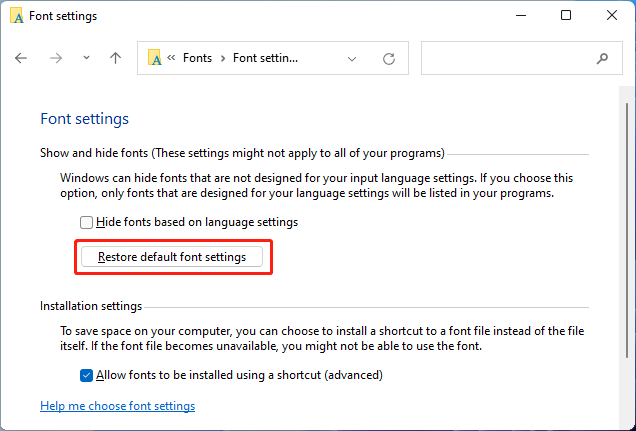
Step 1: Search for Control Panel and open it.
Step 2: Select View by Category at the top right corner of Control Panel. Then click Appearance and Personalization.
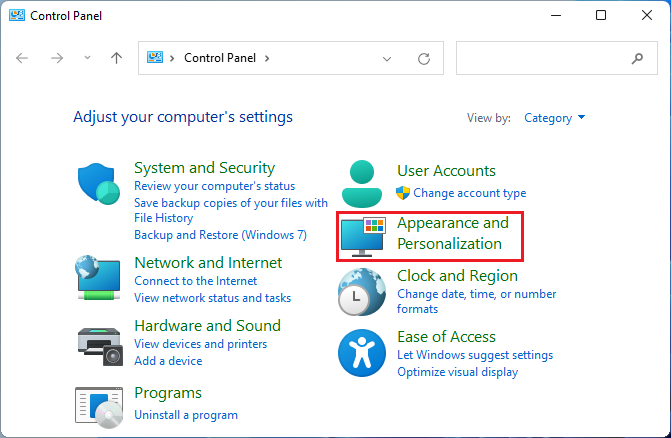
Step 3: In the following window, click Change Fonts settings > Restore default font settings.
About The Author
Position: Columnist
Sherry has been a staff editor of MiniTool for a year. She has received rigorous training about computer and digital data in company. Her articles focus on solutions to various problems that many Windows users might encounter and she is excellent at disk partitioning. She has a wide range of hobbies, including listening to music, playing video games, roller skating, reading, and so on. By the way, she is patient and serious.
The default font size in Windows 10 can be too small for some, especially when on a higher resolution screen. We’re going to show you how to adjust your system text size to your liking, along with how to change the font while you’re at it.
If you want to enlarge more than just the fonts, or only want a temporary zoom, we’ll also show you how to use some simple and in-built Windows tools to achieve that.
Change Your Text Sizes
If you’re running the Creators Update or beyond for Windows 10, you’ll need a third-party program to be able to easily change the size of your system fonts. It’s unknown why Windows decided to remove this basic feature.
Creators Update and Later
To get started, download the lightweight System Font Changer utility from WinTools. On first opening it’ll ask if you want to save your default settings, so click Yes and choose where to save it. This will let you easily go back to your standard font sizes after changing them.
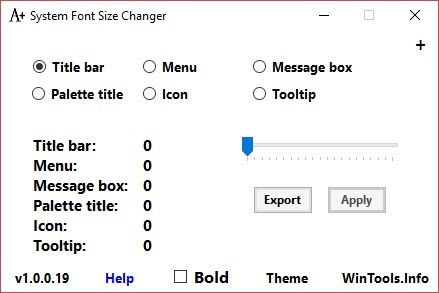
When the program opens, select which element you want to change the size of, like the Title bar or Message box. Then use the slider, on a scale of 0 to 20, along with toggling Bold if you desire. Click the Apply button, log out and back in, and your changes will take effect.
Before the Creators Update
Press Windows key + I to open Settings and select System > Display. Click Advanced display settings > Advanced sizing of text and other items.
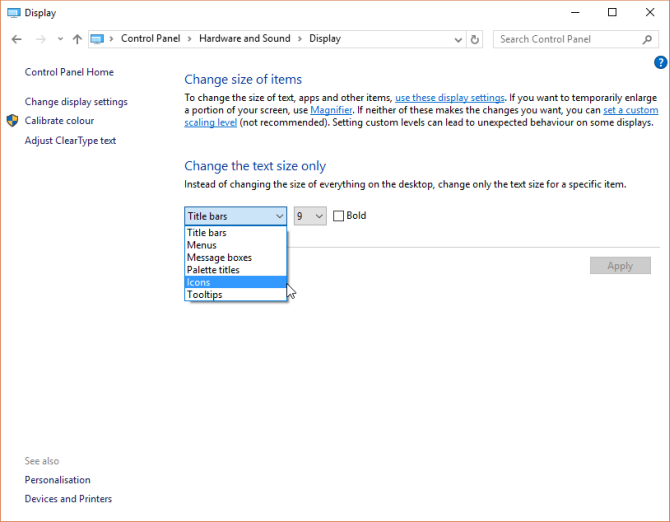
This will open a Control Panel window. Here you can use the two dropdowns: the first to select what element you want to change, the second the font size to change it to. You can choose to tick Bold if desired. When done, click Apply.
Change Your System Font
The default system font in Windows 10 is Segoe UI. Some previous versions of Windows let you easily change the system font, but in Windows 10 it’s a bit trickier. As such, we’ll need to perform a registry edit, the method of which comes from TenForums.
Before we begin, a couple of notes. Firstly, we’re not directly going into the registry here, but always proceed with caution when editing anything in the registry as it can cause severe problems if you mess with the wrong settings.
Secondly, some fonts are not designed to be used system-wide and won’t have the full character set. If you’ve downloaded fonts and try using them, you might find some things look unintelligible because it doesn’t have all the necessary characters that your system needs for some elements.
Finally, this change won’t impact everything and is unreliable for modern applications, like your Settings, Action Center and the Start Menu. However, it will work on older Windows applications and things like the Taskbar.
To get going, open Notepad and paste the following:
            [HKEY_LOCAL_MACHINE\SOFTWARE\Microsoft\Windows NT\CurrentVersion\Fonts]
"Segoe UI (TrueType)"=""
"Segoe UI Bold (TrueType)"=""
"Segoe UI Bold Italic (TrueType)"=""
"Segoe UI Italic (TrueType)"=""
"Segoe UI Light (TrueType)"=""
"Segoe UI Semibold (TrueType)"=""
"Segoe UI Symbol (TrueType)"=""

[HKEY_LOCAL_MACHINE\SOFTWARE\Microsoft\Windows NT\CurrentVersion\FontSubstitutes]

"Segoe UI"="NEW FONT"
Replace NEW FONT in the speech marks to whatever you want to change your system font to be. For example: Arial, Verdana, or Comic Sans (okay, maybe not that last one). Do a system search for your Fonts folder if you’re unsure of the choices. You could even go advanced and learn how to make your own font.
In Notepad, go to File > Save As… and set Save as type as All Files. Set the File name as anything with .reg on the end. Click Save.
Now locate the file and open it (Windows will detect that it’s a registry file) to process the change. Click Yes to confirm and then OK. Restart your computer and your changes will be fully applied.
To revert your changes, download this registry file from TenForums, open it, and click Yes > OK. Then start your system.
Resize Your Entire Display
If you want to resize everything on your screen, including text, Taskbar and the Start Menu, you can do so within your Display settings. To access this, press Windows key + I to open Settings and navigate to Display. If you’re not running the Creator’s Update then you’ll have a sliding bar to adjust your scaling percentage. If you don’t see that, you’ll have a dropdown where you can do the same thing, with Custom scaling allowing you to get more refinement.
To revert back to the default, just look for the option that has (Recommended) after it. Using the percentage scales will smoothly up-scale fonts to the size desired, so it’s recommended to just stick with that rather than adjusting the Resolution which tends to make things blurry if not set to your monitor’s default.
Temporary Enlargement
If you don’t want to enlarge text everywhere, an alternative is to use the zoom in functions that some programs offer. This is often actioned by pressing Ctrl and + (the Plus key) or by going to the View options. It’s likely that your internet browser will work with it, so feel free to try it out now! Ctrl and — (the Minus key) will zoom out.
An alternative approach is to use the Magnifier that is built into Windows. Do a system search to find it and you can click the Plus and Minus buttons to zoom in and out. Click the cog icon to access the settings and change things like whether the magnifier follows the mouse pointer or has keyboard focus.
See With Clarity
With your fonts enlarged you can now clearly see everything on your system. And maybe you’re rocking an entirely new font while you’re at it! If you want another font trick, check our guide on how to have Windows fonts looking like those on a Mac.
And if all of that has got you in the customizing mood, see our top tips and tricks on how to change the look and feel of your desktop. Your system will feel completely fresh and new when you’re done.
Do you need to change your system font size? Is there a method you use that we haven’t covered?