
Changing the default communication device on Windows 10 can be useful when you have multiple audio devices connected to your computer and want to prioritize one for communication purposes, such as for video calls or voice chats. In this tutorial, we will guide you through the steps to change the default communication device on Windows 10.
Step 1: Right-click on the speaker icon located in the system tray at the bottom-right corner of the screen.
Step 2: From the context menu, select «Open Sound settings.«
Step 3: In the Sound settings window, scroll down to the «Input» section and click on the «Sound Control Panel» link.
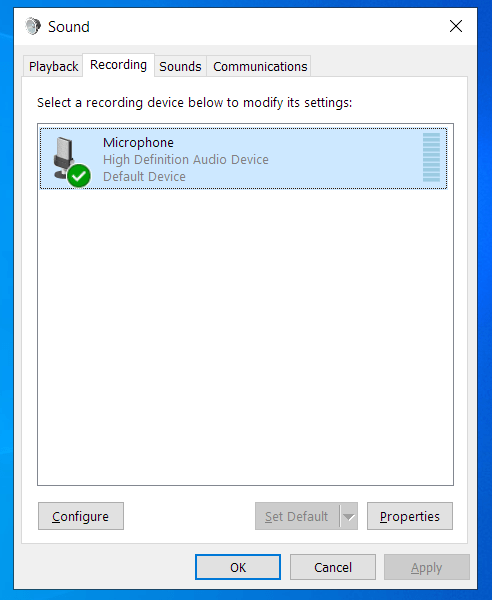
Step 4: The Sound window will open. In the «Recording» tab, you will see a list of available audio devices. Right-click on the device you want to set as the default communication device.
Step 5: From the context menu, select «Set as Default Communication Device.«
Step 6: Once you have set the desired device as the default communication device, click «OK» to save the changes.
Step 7: Close the Sound window and the Sound settings window.
Now you have successfully changed the default communication device on Windows 10. Any communication application you use, such as video conferencing software or voice chat programs, will now use the selected device as the default for audio input.
| Pros | Cons |
|---|---|
| 1. Provides control and flexibility in choosing the preferred communication device. | 1. May require adjusting settings in different applications to reflect the changes made. |
| 2. Ensures optimal audio quality for communication purposes by prioritizing the chosen device. | 2. Can lead to confusion if multiple users share the same computer with different device preferences. |
| 3. Saves time by automatically using the selected device for communication applications. | 3. Requires manual adjustment if the default device needs to be changed frequently. |
Video Tutorial:How do I change the output device in Windows 10?
What is the difference between default device and default communication device in Windows 10?
In Windows 10, the terms «default device» and «default communication device» refer to different audio output settings. Here’s a breakdown of the difference between these two settings:
1. Default Device:
The «default device» setting in Windows 10 refers to the primary audio output device that is used for all types of audio playback on your computer. This includes system sounds, media playback, and applications that utilize the audio output. The default device is typically the one you use for general audio purposes, such as speakers or headphones connected to your computer.
To set the default device in Windows 10, follow these steps:
– Right-click on the speaker icon in the taskbar.
– Click on «Sounds» to open the Sound settings.
– In the Playback tab, you’ll see a list of available audio devices. Right-click on the device you want to set as the default and choose «Set as Default Device.«
– Click «Apply» and «OK» to save the changes.
2. Default Communication Device:
The «default communication device» setting in Windows 10 specifically pertains to audio calls and communication applications like Skype, Microsoft Teams, or any other software that uses audio for communication purposes. It allows you to differentiate between the device you generally use for audio playback and the one you want to use exclusively for communication.
To set the default communication device in Windows 10, follow these steps:
– Open the Sound settings as described earlier.
– In the Playback tab, select the device you want to set as the default communication device.
– Right-click on it and choose «Set as Default Communication Device.«
– Click «Apply» and «OK» to save the changes.
The default communication device setting is particularly useful in scenarios where you might have separate audio devices for different purposes. For example, you might have speakers for regular audio playback and a dedicated headset for communication applications, ensuring that calls and notifications come through the appropriate device.
By allowing separate settings for default device and default communication device, Windows 10 offers users greater flexibility in managing audio settings for both general multimedia playback and specific communication needs.
How do I change the audio output to headphones in Windows 10?
To change the audio output to headphones in Windows 10, follow these steps:
1. Connect your headphones to the audio jack or USB port on your computer. Ensure they are properly plugged in.
2. Right-click on the volume icon in the system tray located at the bottom right corner of the screen.
3. From the context menu that appears, select «Open Sound settings.» This will open the Sound settings window.
4. In the Sound settings window, under the «Output» section, you will see a list of available audio devices. Look for your headphones in the list, it may be listed as «Headphones,» «Speakers,» or the manufacturer’s name.
5. Once you identify your headphones, click on them to select them as the default audio output device.
6. After selecting your headphones, the audio output will be switched to them. You can now close the Sound settings window.
Alternatively, you can quickly switch the audio output to headphones by using the volume icon in the system tray:
1. Click on the volume icon in the system tray.
2. A volume slider will appear. Next to the volume slider, you will see a small up-arrow icon. Click on it.
3. A list of available output devices will appear. Select your headphones from the list.
4. The audio output will be changed to your headphones.
Remember to adjust the volume accordingly after changing the audio output to headphones to ensure a comfortable listening experience.
In Windows 10, the default communication device refers to the audio device that is set to handle communication applications like voice calls and video conferencing. By default, Windows 10 sets the default communication device based on the audio devices available on your computer.
To find the default communication device settings in Windows 10, follow these steps:
1. Right-click on the volume icon in the system tray located at the bottom-right corner of the screen.
2. From the context menu that appears, select «Open Sound settings.«
3. In the Sound settings window, scroll down to the section labeled «Input» and click on the «Sound Control Panel» link on the right side.
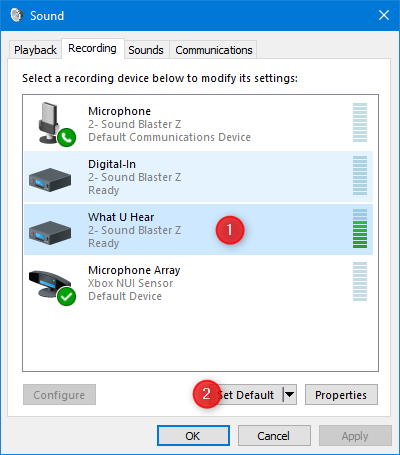
4. The Sound Control Panel will open. Switch to the «Recording» tab.
5. In the Recording tab, you will see a list of audio devices available for input. The default communication device will be marked with a green checkmark and labeled as «Default Communication Device.«
6. You can adjust the default communication device by selecting another device from the list and clicking on the «Set Default» button.
Furthermore, Windows 10 allows additional settings for the default communication device. To access these settings, follow these steps:
1. Right-click on the volume icon in the system tray.
2. From the context menu, select «Sounds.«
3. In the Sounds window, switch to the «Communications» tab.
4. Here, you can choose how Windows handles communication activities when it detects activity on the default communication device.
5. You have four options to choose from: «Reduce the volume of other sounds,» «Mute all other sounds,» «Do nothing,» or «Show a notification when Windows detects communications activity.«
By accessing the Sound Control Panel and adjusting the settings within the Communications tab, you can manage your default communication device and how Windows handles communication activities on your Windows 10 computer.
How do I change the default audio device in Windows?
To change the default audio device in Windows, follow these steps:
1. Right-click on the volume icon located in the taskbar on the bottom right corner of your desktop.
2. From the context menu that appears, select «Open Sound settings.«
3. In the Sound settings window, you will see a section titled «Choose your output device,» which lists the available audio devices connected to your computer.
4. Click on the drop-down menu under the «Choose your output device» section to reveal the list of available audio devices.
5. Select the desired audio device you want to set as the default.
6. Once you’ve chosen the desired audio device, it will automatically become the default device for both playback and recording.
7. Optionally, you may also adjust the volume level for the selected audio device by using the volume slider provided under the «Choose your output device» section.
By following these steps, you can easily change the default audio device in Windows without the need for any third-party software or advanced configurations.
How do I change the default audio input device in Windows?
To change the default audio input device in Windows, follow these steps:
1. Right-click on the speaker icon in the taskbar located at the bottom-right corner of your screen.
2. From the context menu, select «Open Sound settings.» This will open the Sound settings window.
3. In the Sound settings window, scroll down to the section labeled «Input.» Here, you will see a list of available audio input devices recognized by your computer.
4. Click on the drop-down menu under the «Choose your input device» heading. This will display a list of all the input devices.
5. Select the desired audio input device from the list. You can choose from various options such as microphone, line-in, or any other audio input device connected to your computer.
6. Once you’ve selected the preferred audio input device, close the Sound settings window.
By following these steps, you will have successfully changed the default audio input device on your Windows computer.
In today’s hyper-connected world, seamless communication is paramount. Whether you’re video conferencing with colleagues, catching up with family, or simply making a phone call, having the right communication device set as your default can significantly enhance your experience. Windows 10, with its versatile nature, allows you to choose your preferred communication device, ensuring that your calls, messages, and video chats flow smoothly. But navigating the settings to establish this default can sometimes feel like deciphering a code.
This comprehensive guide will walk you through the process of setting your default communication device in Windows 10, empowering you to take control of your digital interactions. We’ll explore the different types of communication devices Windows 10 supports, delve into the settings menu, and provide step-by-step instructions to make your preferred device the go-to for all your communication needs.
Understanding Communication Devices in Windows 10
Windows 10 recognizes a variety of communication devices, each designed for different purposes. These include:
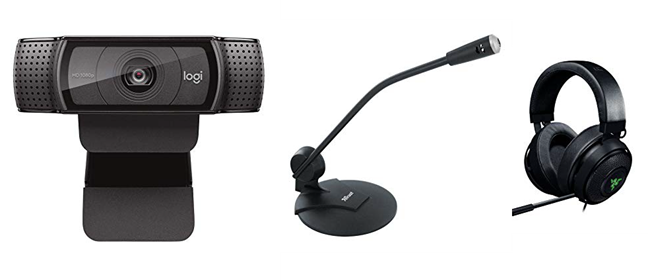
- Headsets: Perfect for hands-free calling and conferencing, headsets offer both microphone and speaker functionality.
- Webcams: Essential for video calls and recordings, webcams capture your image and transmit it to others.
- Microphones: Standalone microphones provide clear audio input for calls and recordings.
- Speakers: Speakers deliver audio output for calls, music, and other multimedia content.
Each of these devices can be individually configured as the default for specific communication applications or system-wide.
Accessing the Sound Settings
To configure your default communication devices, you’ll need to access the Sound settings in Windows 10. Here’s how:
1.
Click the Start button in the bottom-left corner of your screen.
2.
Type “Sound” in the search bar and select “Sound settings” from the results. (See Also: Define Real Time Communication? The Power Of Instant Connection)
This will open the Sound settings window, where you can manage your audio devices.
Setting the Default Communication Device
Within the Sound settings window, you’ll find a tab labeled “Communication.” This is where you can designate your preferred communication device.
Choosing a Default Device
1. Click the “Communication” tab.
2. Under “Device for communication,” select the desired device from the dropdown menu. This could be your headset, webcam, microphone, or speakers.
3. Choose the “Do nothing” option if you want to keep the default device as is.
Managing Device Behavior
The “Communication” tab also offers options to control how your devices behave during communication:
- “Do nothing”: This option leaves your current audio device unchanged during incoming calls or communication.
- “Automatically switch to the device that is being used for communication”: This setting automatically switches to your selected communication device when an incoming call or communication session begins.
- “Only use the device that is being used for communication”: This option prioritizes the communication device, muting other audio outputs during calls or communication sessions.
Troubleshooting Common Issues
If you encounter any issues setting your default communication device, try the following troubleshooting steps:
*
Restart your computer: A simple restart can often resolve temporary glitches. (See Also: What Are the Three Standard Models of Communication? Unlocking Effective Communication)
*
Check device connections: Ensure all your communication devices are properly connected to your computer.
*
Update device drivers: Outdated drivers can cause compatibility issues. Visit the manufacturer’s website to download the latest drivers for your devices.
*
Run the Windows troubleshooter: Windows has built-in troubleshooters that can diagnose and fix audio problems. Search for “troubleshoot sound problems” in the Start menu and follow the on-screen instructions.
Frequently Asked Questions
Q: My headset isn’t showing up in the Sound settings. What should I do?
Ensure your headset is properly plugged in and turned on. If it’s a Bluetooth headset, make sure it’s paired with your computer. You can also try restarting your computer or updating your audio drivers.
Q: Can I set different default devices for different applications?
Yes, you can. When you right-click on a program in the taskbar, select “Properties,” and then go to the “Details” tab, you can choose the default audio device for that specific program. (See Also: What Is Communication Article? The Key to Success)
Q: What if I want to revert to the default Windows settings?
You can reset your default communication device settings by clicking the “Reset” button in the “Communication” tab of the Sound settings window.
Q: How do I know which device is currently set as the default?
In the “Sound” window, under the “Playback” or “Recording” tabs, the device that is currently active will have a green checkmark next to it.
Q: Can I use multiple devices simultaneously for communication?
Windows 10 doesn’t natively support simultaneous use of multiple devices for communication. However, some applications might offer this functionality.
Recap
Setting your default communication device in Windows 10 is a straightforward process that can significantly enhance your communication experience. By following the steps outlined in this guide, you can easily choose your preferred headset, webcam, microphone, or speakers as the go-to for all your calls, video chats, and recordings. Remember to explore the different settings within the “Communication” tab to customize your device behavior and ensure seamless communication across various applications.
Don’t hesitate to troubleshoot any issues you encounter by restarting your computer, checking device connections, updating drivers, or running the Windows troubleshooter. With a little effort, you can optimize your Windows 10 setup for clear, efficient, and enjoyable communication.
Table of contents
- How to Set the Default Microphone in Windows 10
- Option 1: Select the Default Input Device Using the Control Panel
- Option 2: Select the Default Input Device in Windows 10 Using the Settings App
- Conclusion
It is possible to connect more than one recording device to your Windows PC. After doing so, you have to choose which device your system and apps will use.
Let’s assume that you connected a Bluetooth headset, and later on, you set up a webcam with an integrated microphone. Meanwhile, a friend of yours just paid you a visit and brought along this cool wired headphone, and you decide to see how it sounds. So you plug it into your computer’s headphone jack.
Can you now see that you have multiple recording devices connected to your PC at the same time? And that’s in addition to the microphone that’s built into your computer. But Windows will use only one of these sound input devices at a time. So you have to indicate the one you prefer.
In this guide, we will show you the different ways of selecting the default recording device in Windows 10. Let’s go.
How to Set the Default Microphone in Windows 10
Here are the options:
- Use the Sound option in the Control Panel to choose your default sound input device
- Set your default input device via Windows Settings
Here is a step-by-step guide on how to apply each of the above options.
Option 1: Select the Default Input Device Using the Control Panel
Here’s how to choose your preferred microphone:
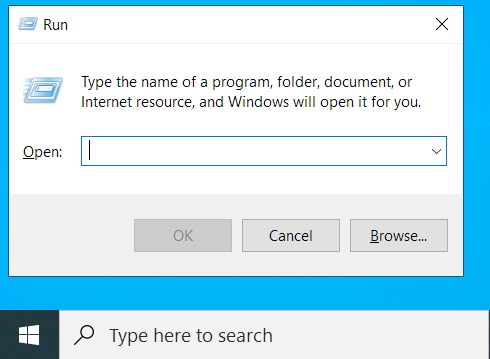
- Open the Run dialog box: Hold down the Windows logo key and press R.

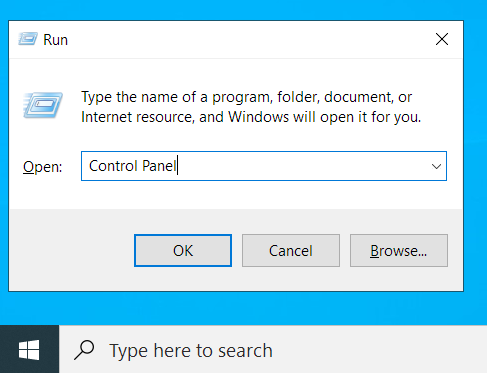
- Type ‘Control Panel’ into the text field and press Enter or click the OK button.

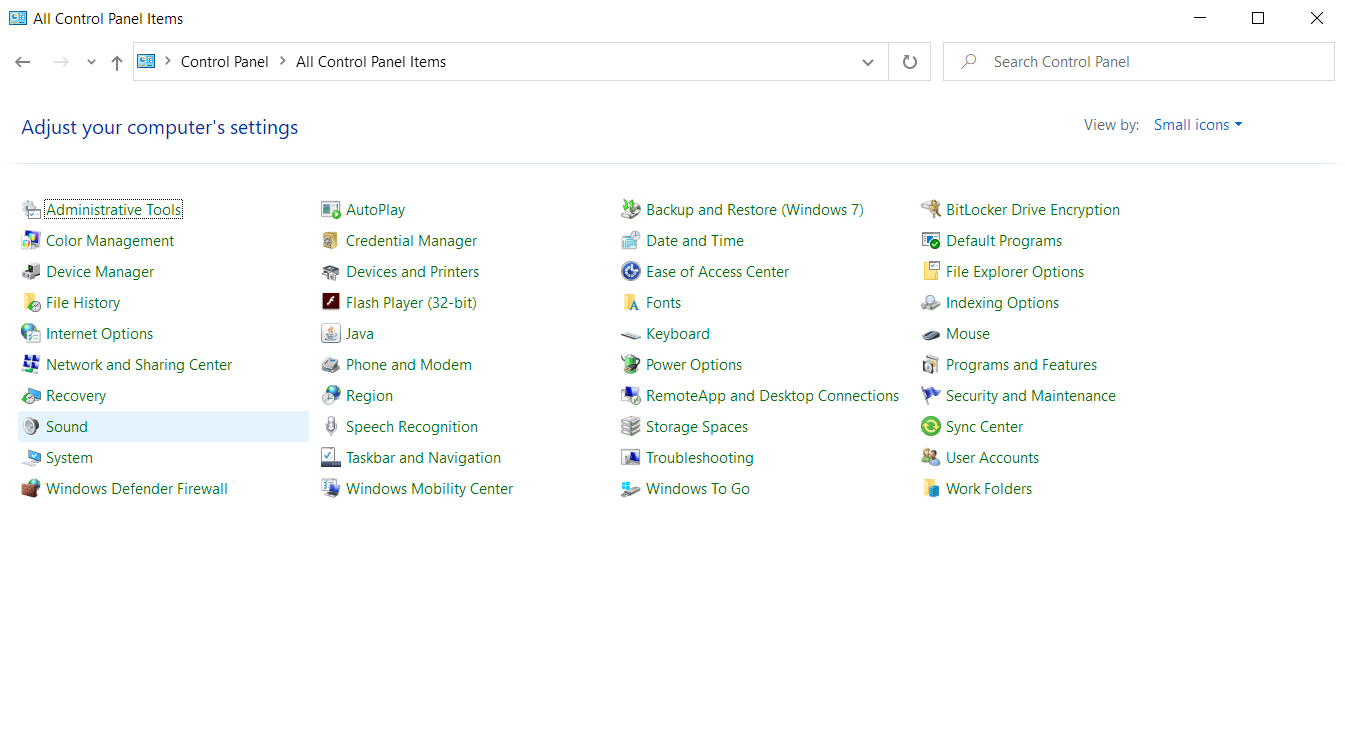
- Once you are in the Control Panel window, click on the ‘View-by:’ drop-down in the top-right corner of your screen and select ‘Small icons.’

- Click on Sound from the list of options.

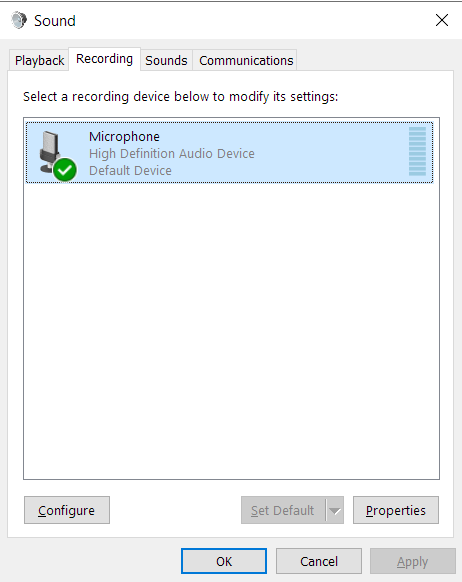
- Switch to the Recording tab.

Tip: There are other alternatives for opening the Sound panel:
Using the Sound icon on the system tray:
- Right-click on the Sound icon (the speaker) in the bottom-left corner of your screen (the system tray or notification area).
- Click on ‘Sounds’ from the context menu. Then open the Recording tab on the Sound panel.
Using the Run dialog box:
- Press and hold the Windows logo key on your keyboard and press R to invoke the Run dialog.
- Type the following command into the text field and click OK or press Enter:
rundll32.exe shell32.dll,Control_RunDLL mmsys.cpl,,1

- The command will open the Recording tab of the Sound panel.

- Right-click on your preferred device and select ‘Set as default device’ from the context menu.
Note: When you get to step 6, you have the option of choosing your microphone as the default communication device. In that case, communication platforms, such as Skype or Zoom, will use that microphone during video and audio calls, but the system will use another recording device on other occasions.
Select your preferred microphone and click the Set Default button to set the microphone as both the default device and the default communication device.
If you want to set your microphone only as the default communication device, select the microphone and click the drop-down arrow beside the Set Default button. Then click on Default Communication Device.
If you’d rather set your microphone as the default device and not the default communication device, then click the drop-down arrow beside the Set Default button and click on the ‘Set as default device’ option.
- Click the OK button and close the Sound panel.
Option 2: Select the Default Input Device in Windows 10 Using the Settings App
If you are a fan of the Windows Settings app, you can use it to change the default sound input device on your Windows 10 computer. Here’s how to get it done:
- Open the Settings app. To open Windows Settings, go to the Start menu (press the Windows logo button on your keyboard or click the Windows logo icon in the lower-left corner of your screen) and click on the cogwheel icon.

Alternatively, you can invoke the Windows Settings app by pressing the Windows logo key + I combination on your keyboard.
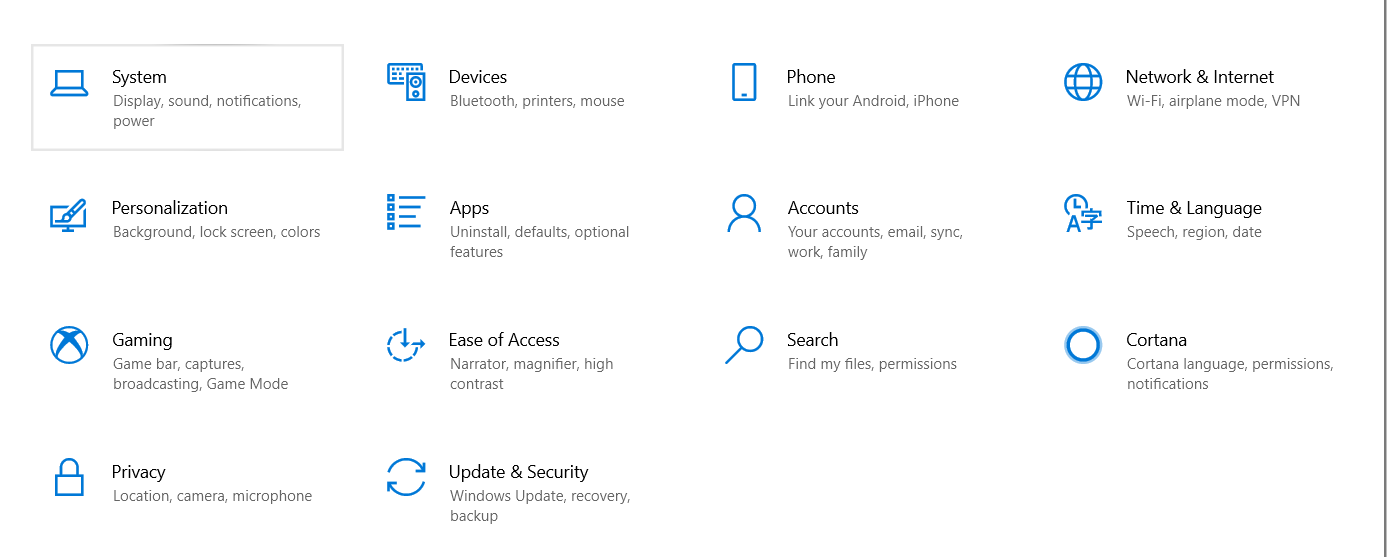
- Click on System on the Settings home page.

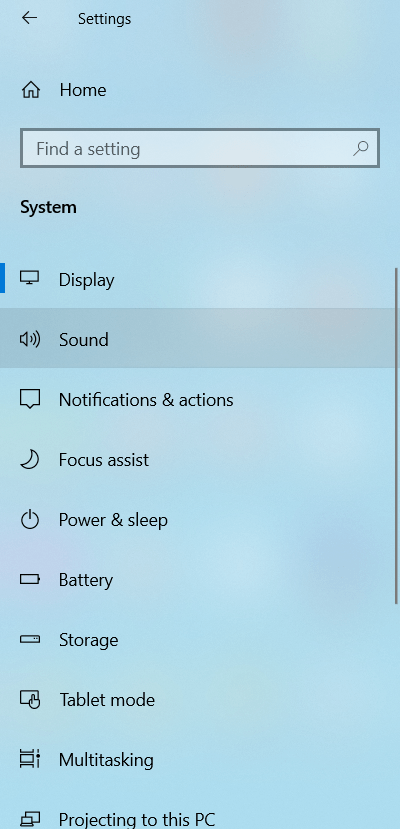
- Click on Sound in the left pane of the System page.

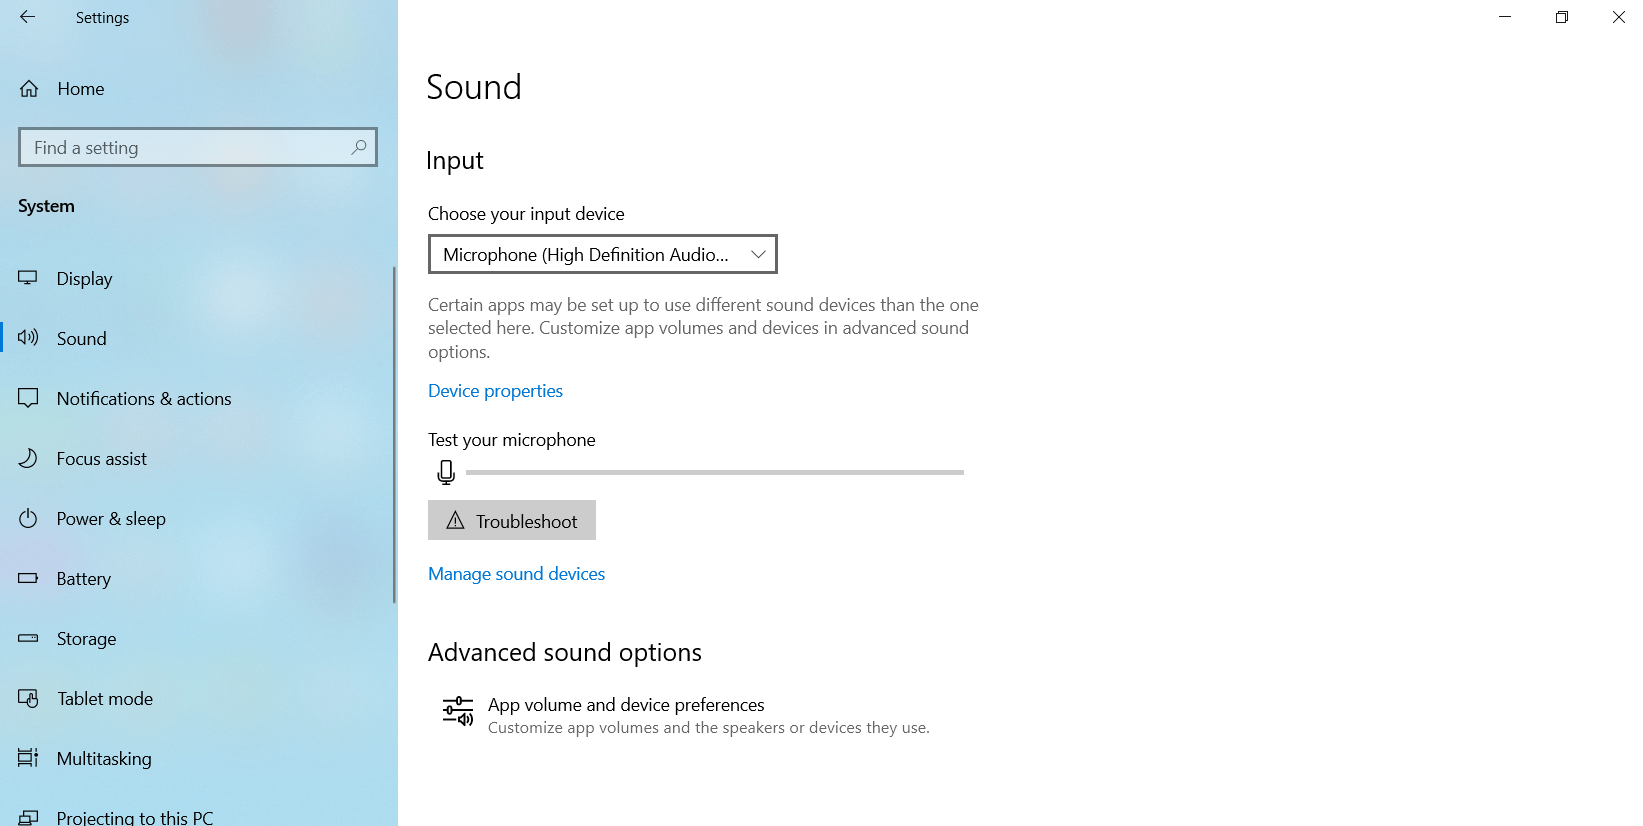
- Expand the ‘Choose your input device’ drop-down on the right-hand side of the screen and select the microphone you want to use.

- Exit the Settings screen.
You can use either of the two options to choose your default recording device on Windows 10. However, you can make an app neglect the system-wide settings and use a different default recording device instead. If that’s what you want, you’ll have to set your preferred device within the application’s settings.
For instance, if you want to set the default microphone on Skype, these are the steps to take:
- Launch Skype.
- Click the Settings icon (the three dots).
- Click Settings.

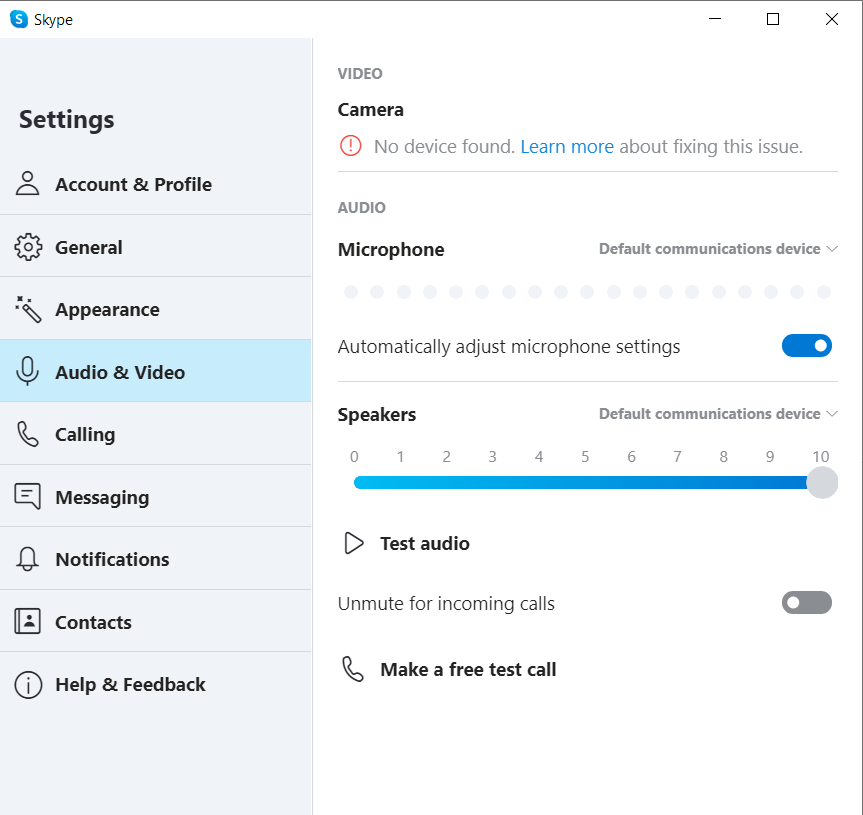
- Select Audio & Video.

- Go to Audio and click on ‘Default communications device’.

- Select the microphone you wish to use for Skype audio calls.

Conclusion
Connecting one or more external recording devices to your computer necessitates choosing the default device. Otherwise, the device you wish to use will probably not work when you need it to.
In this guide, we’ve shown different methods of selecting the default sound input device on Windows 10.
It is also important to note that your preferred microphone will not work if the required drivers are not available on your PC. When that happens, you’ll have to update the drivers via Device Manager, or you can use a third-party driver updater, such as Auslogics Driver Updater.
Auslogics Driver Updater will scan your PC for missing, outdated, incompatible, and corrupt drivers.
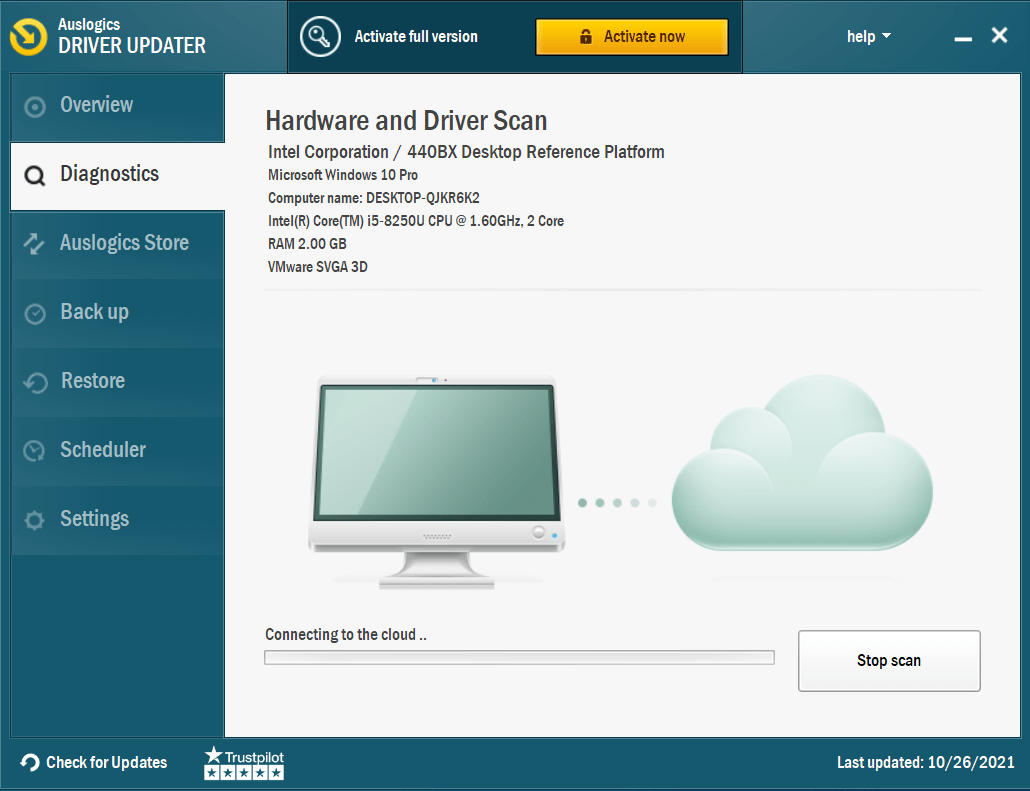
Afterward, it updates the drivers automatically, ensuring that it installs driver software that matches the specs of your PC. You can also roll back your drivers if you need to.
One of the many creative options built into Windows is the ability to record and play multimedia files of all kinds. Windows 10 makes it simple to select a default device for audio recording and playback. However, what if you would prefer that another device be used from your devices with similar capabilities? For example, you may have a webcam and a microphone on your computer, and you want the microphone to be the default recording device. Or, you may have both headphones and speakers available, and you want the headphones to be the default audio playback device. Let’s take a look at how to change the default audio devices in Windows 10:
What do you want to achieve?
Before we make any changes, it is important to know what we’re dealing with. For example, some Windows PCs have a large monitor with built-in speakers (which usually are of poor quality) and also external speakers which are connected to the PC. You may want to use the external speakers instead of the built-in ones for playing audio.
We record audio using microphones, for example, and play them through speakers. We can also record sounds from devices inside the computer, like the optical drive, and play them back through headphones. Many people have more than one audio device attached (like the microphone included in a webcam plus a standalone microphone plus a microphone built into a headset), and it is important to pick a default so that the sound is recorded and played back with the highest fidelity.
You do not want your voice to sound like you’re in an empty hallway because your default is the webcam microphone three feet away from you instead of the microphone in your headset or on your desk.
Therefore, before moving forward with this tutorial, you must be clear on what you want to achieve: which audio devices do you want to use for each task?
How to select the default playback device in Windows 10, using the Sound flyout
The simplest way to change your playback device in Windows 10 is to select it from the Sound flyout. Click or tap on the sound volume icon from the system tray, and then click/tap on the current playback device.
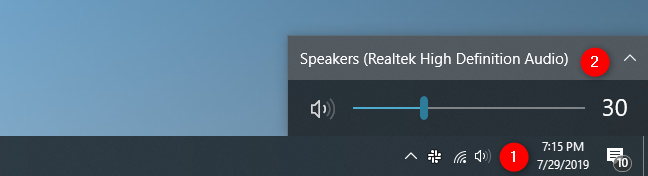
The Sound flyout then shows you all the playback audio devices that are available for you to use. All you have to do is to select the one you prefer from the list.

How to select the default playback device in Windows 10, using the Settings app
Similarly, you can also choose what audio device you prefer to use for playback, from the Settings app. However, this method involves a few more steps. Start by opening the Settings app: a fast way is to click or tap on its button from the Start Menu.
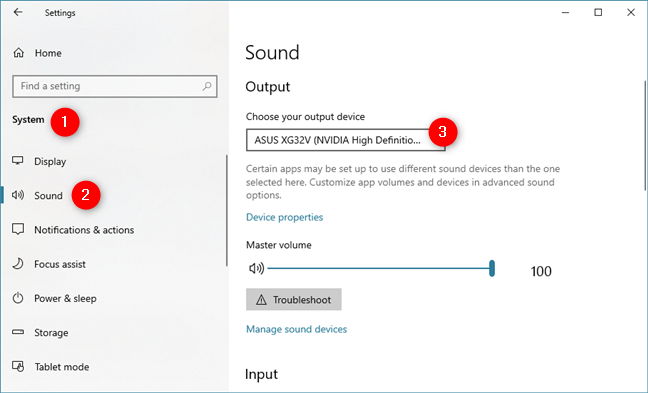
In the Settings app, navigate to System, and then to Sound. On the right side of the window, click or tap on the currently selected playback device under «Choose your output device.»
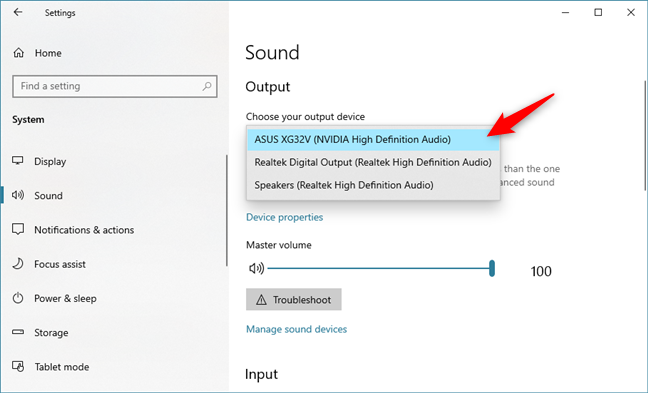
The Settings app should show you a list of all the audio playback devices available on your system. Select the one you prefer.
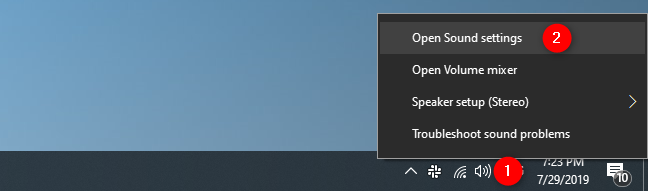
NOTE: There are also slightly faster ways to get to the Sound section from the Settings app. For instance, you can use the search, or you can right-click or press and hold on the sound volume icon from the system tray, and then click or tap on «Open Sound settings.»
How to select the default playback device in Windows 10, using the Sound settings from the Control Panel
You can also use the classic Sound window to change the default playback device on your Windows 10 system. However, getting to it is a bit more cumbersome than it used to be in the past. Open the Control Panel, navigate to Hardware and Sound, and click or tap on Sound.
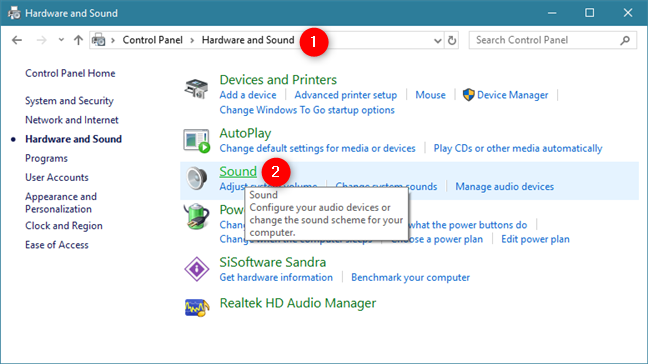
This action opens the Sound window, where you set your default audio devices.
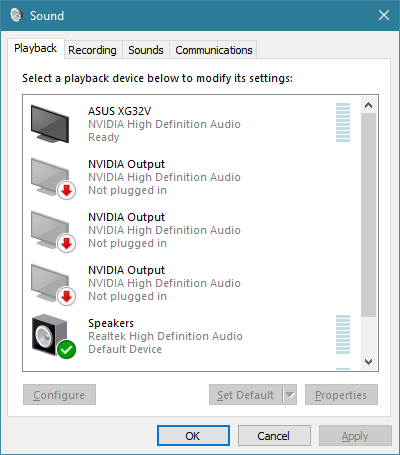
In the Playback tab, you are shown all the playback devices that are available on your Windows computer. Each system is different, and what you see reflects that. You can also see which devices are actually available. Some devices might not be plugged in, so they are greyed out. A green checkmark indicates the current default device.
To choose another audio device as your default playback device, click or tap on it, and then the Set Default button.
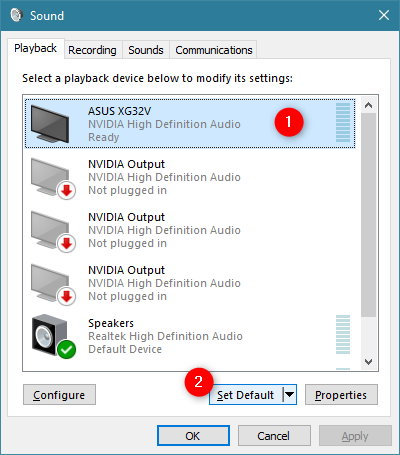
The selected device is now your default playback device in Windows. All playback audio is now routed through that device.
How to select the default recording device in Windows 10, using the Settings app
In the Settings app, navigate to System, and then to Sound. On the right side of the window, click or tap on the currently selected recording device under «Choose your input device.»
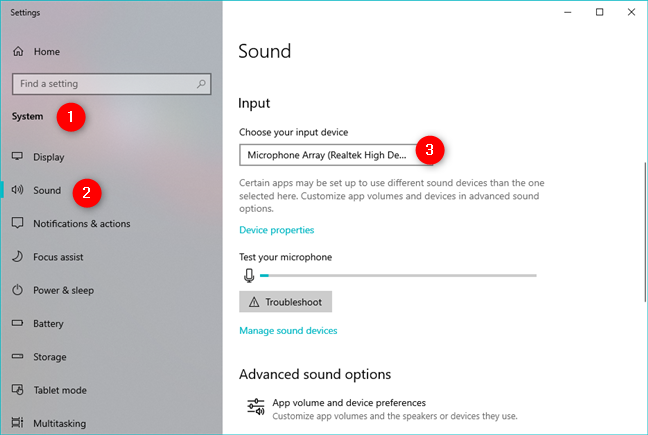
The Settings app should show you a list of all the input devices available on your system. Just select the one you prefer from the list.

The choice is immediately applied, as soon as you select the recording device you prefer.
How to select the default recording device in Windows 10, using the Sound settings from the Control Panel
Alternatively, you can also go to the Sound window: «Control Panel -> Hardware and Sound -> Sound.»

In the Sound window, click or tap the Recording tab. Here you see the devices you have available to record sound. Again, your current default device is indicated by a green checkmark. Choose your preferred device and click or tap Set Default.
TIP: You can see if the sound recording device is working by watching for movement in the bar beside each device when you talk as if you are trying to record sound.
How to set a different communications device in Windows 10
The Sound window also lets you set different default devices for communications. Note that this is the only place in Windows 10 where you can do this change, as it has not yet been added to the Settings app.
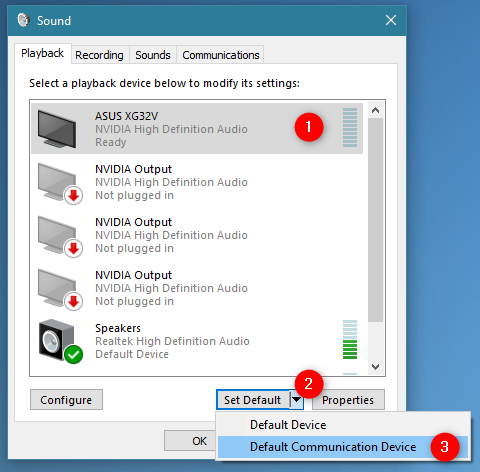
For example, you may want to use a headset or the speakers that are built into your monitor for Skype and your external speakers for everything else. To set this, first, select the device you want to use, and then click or tap on the down-arrow on the Set Default button. You can then assign a device to communications (Default Communication Device) or general playback (Default Device).
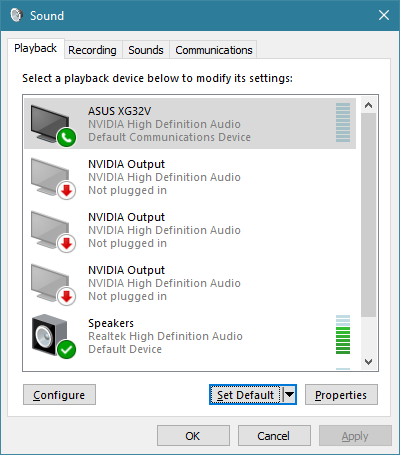
You can see that the default communication device has a different green icon from the default playback audio device.
When you are done setting your default playback communication devices, click or tap OK or repeat the same process for setting your default input devices for communications.
Troubleshooting: Why can’t I see my preferred audio device listed?
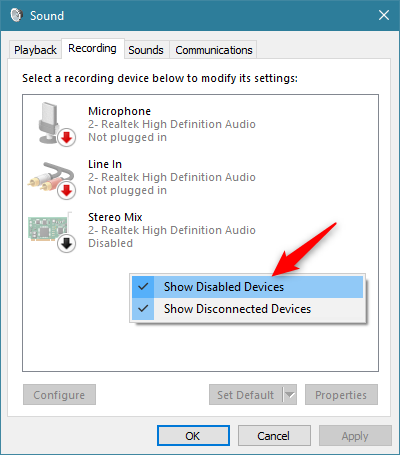
What if the audio device that you want to use for recording isn’t listed? Remember, speech recognition devices are also configured through the Sound window. By default, Windows does not show you devices that are disabled or disconnected or those without their correct drivers installed. If your device is not listed, right-click or press and hold anywhere in the blank space in the Sound window. You can then choose to see the devices that would otherwise be invisible, by clicking or tapping «Show disabled devices.»
The same goes for showing disabled audio playback devices in the Playback tab of the Sound window.
Did you manage to change your default sound devices in Windows 10?
As you can see, setting the default audio devices for playback and recording is a quick and easy process in Windows 10, and you can adjust the settings from multiple places. You can change them anytime you need to, to make the best of Windows 10’s recording and playback capabilities. Have you had a good or bad experience with recording or playback defaults? Let’s talk about it in the comments section below.
Windows 10 allows users to connect different types of audio devices to a system. These devices can be connected via an audio jack, a USB port, or Bluetooth. In some cases, an HDMI cable can also be used to send audio from the system to a TV.
The audio devices that a user can connect to a Windows 10 system aren’t limited to output devices. Input devices i.e., microphones can also be connected. In fact, users can connect multiple microphones to a system if they use it for recording.
Windows 10 allows users to connect multiple hardware devices of the same type i.e., multiple webcams, multiple hard drives, multiple mics, but it will still always default to one device when an app needs to use it.
This is to be expected since not every app has an option to select a device from those that are connected. Apps normally use the default device that’s set and if you want to change the device, you have to change the default device in Windows 10.
Change default microphone Windows 10
If you’ve connected more than one microphone to your Windows 10 system, you can use the following steps to change which is set as the default microphone on Windows 10.
- Connect the microphone that you want to use as the default microphone on Windows 10.
- Open Control Panel.
- Go to Hardware and Sound.
- Click Sound.
- Go to the Recording tab.
- Make sure all microphones connected to the system are listed. If they aren’t, they haven’t been configured correctly.
- Right-click the microphone you want to use as the default microphone.
- Select ‘Set as default device’. Windows 10 will now use this device for all non-call related apps e.g., recording apps.
- Right-click the device again and select ‘Set as default communication device’ and Windows 10 will use it as the default device for all calling apps (Skype, Discord, Microsoft Teams) as well.
- Click Apply.
Conclusion
Changing the default microphone on Windows 10 isn’t hard as long as you’ve set it up correctly. If a mic that you’ve connected and set as the default device is disconnected, Windows 10 will automatically switch to using the next available device as the default. When you connect the mic again, you will have to change the default.
You may have to restart an app for it to detect the new default mic. If an app allows you to select a mic from a list of connected devices, you can select the mic from the app’s settings and you won’t need to change the default microphone on Windows 10.

Fatima Wahab
Fatima has been writing for AddictiveTips for six years. She began as a junior writer and has been working as the Editor in Chief since 2014.
Fatima gets an adrenaline rush from figuring out how technology works, and how to manipulate it. A well-designed app, something that solves a common everyday problem and looks