
Readers help support Windows Report. We may get a commission if you buy through our links.
Read our disclosure page to find out how can you help Windows Report sustain the editorial team. Read more
Microsoft Date and Time Picker Control helps you enter multiple date and time entries in Microsoft 365 desktop apps, like Excel, Word, and more.
For example, you might need to regularly update dates and times for employee attendance, meeting schedules, project timings, etc. Date and Time Picker Control steps in to make tasks like this more convenient.
However, enabling this feature is a challenging task because these Microsoft apps don’t activate the service by default. Luckily, I’ll show you how to use it and enable it.
Also, if your Microsoft app isn’t compatible with it, you’ll learn which alternatives you should try. Let’s get started!
What Is the Microsoft Date and Time Picker Control?
Microsoft Date and Time Picker Control is an ActiveX Control service for compatible Microsoft 365 apps, like Excel, Word, PowerPoint, etc. It allows you to type in the date and time in a convenient way. You don’t have to worry about the date and time format of your entries.
You can just visually select your data for the MM-DD-YYYY format or the DD-MM-YYYY format.

The MSCOMCTL.OCX file and Visual Basic 6.0 ensure that this feature works smoothly.
System Requirements for Microsoft Date and Time Picker Control
At the time of writing, this ActiveX Control element is only available in Microsoft 365 and Microsoft Office desktop apps for 32-bit architecture.
Also, you might need to register the MSCOMCT2.OCX file in your Excel or Word software. You’ll have to do this if the feature isn’t readily available in the More Controls menu of the ActiveX Control command.
You might be able to register the above-mentioned OCX file if you own the Microsoft 365 64-bit app. However, the service won’t work when you call it. Instead, you’ll get an error message.
So, if you’re a 64-bit Microsoft Excel or Word user, you’ll need to try the alternatives mentioned later in this article.
Registering the MSCOMCT2.OCX Service
To activate the binary file, follow these steps on your Windows PC. You should be logged in using an administrator account to execute a few commands.
- Go to the Windows OS installation drive and enter the following search query into the Search this PC field:
MSCOMCT2.OCX- Wait for the Windows File System Search tool to find the file in the device.
- There should be one instance of the MSCOMCT2.OCX file.
- When you see the result, right-click on it and choose Open file location from the context menu.

- Go into the directory and press the Windows + R keys together to launch the Run command tool.
- Into the Open field, enter the following command and hit Enter.
cmd admin- The Command Prompt console will open with administrator privileges.
- Enter the following command into the CLI and hit Enter:
C:\Windows\System32\regsvr32.exe mscomct2.ocx
Or
C:\Windows\SysWoW64\regsvr32.exe mscomct2.ocx- To verify that the binary file has been registered successfully, run the following command inside the same Command Prompt window:
regsvr32 -u MSCOMCT2.OCX
- A message box will tell you that the file has been loaded. This confirms that you’ve activated the required file successfully.
How To Get Microsoft Date and Time Picker Control
Now that you’ve activated the MSCOMCT2.OCX file, you’re all set to enable the Date and Time Picker Control. Follow along with the steps in Excel as outlined below:
- Click on the File tab to open the Excel sidebar.
- Find and select the Options menu at the bottom.
- The Excel Options dialog box will open.
- Click on the Customize Ribbon category on the right.
- You’ll see two columns of options on the right.
- Below the Customize the Ribbon column, checkmark the box for the Developer tab.
- Click OK to save the changes you’ve made.

- You should now see the Developer tab in the Excel ribbon menu. Click on that.
- Now, click on the Insert drop-down menu in the Controls commands block of the Developer tab.
- Select the More Controls tool in the ActiveX Controls section of the context menu.

- You should see the More Controls dialog box.
- Scroll through the list of available ActiveX Controls to find and select the Microsoft Date and Time Picker Control 6.0 (SP6) item.
- Click OK to enable the tool.

- Now, click on any cell and a date and time picker will pop up.
Alternatives for Microsoft Date and Time Picker Control
If you can’t enable the built-in feature yet want to use similar automation in Microsoft 365 apps, you can try these alternatives:
Use a Third-Party Add-In
You can install the Mini Calendar and Date Picker from the Office Add-ins Store. It’s free and works exactly as the Date and Time Picker ActiveX Control tool does. Here’s how:
- Go to the destination Excel worksheet and click on the Developer tab.
- Click on the Add-ins command inside the Add-ins commands block.
- The Office Add-ins dialog will open.
- Click on the Store tab.
- In the Search field, type Mini and hit Enter.
- The Mini Calendar and Date Picker add-in will show.
- Click Add and follow the on-screen instructions to install the service.

- Once installed, the date and time picker will open on the active worksheet.
- Click the destination cell and pick a date and time from the dialog box.
- Mini Calendar and Date Picker will insert the date and time instantly.

- To add a time, click on the adjacent cell.
- Select the Time clock on the calendar tool.
- It’ll insert the time.

Here are the customizations available in this date and time add-in:
- Toggle Calendar Size: If you need to reduce the dialog box size, click on this button.

- Change Calendar Theme: To cycle through different dialog box themes, you can use this option.
- Change Calendar System: It helps you to switch the calendar system between the U.S. Calendar System and the ISO Calendar System.

- Toggle Week Numbers: If you need the week number, add that using this button.
- Highlight Range of Dates: Click this button to visualize the cell range containing date and time entries.
The Microsoft Date and Time Picker Control 6.0 (SP6) feature is totally absent in the Excel online or web app. So, you can click on the Add-ins command on the Home tab and search for Mini Calendar.

Summary
You can now easily activate Microsoft Date and Time Picker Control in Excel or Word. Ensure that the Microsoft Office app is a 32-bit program before trying these steps.
If it’s a 64-bit app or you don’t want to downgrade to a 32-bit program, try the alternative method to automate the data entry for date and time values.
Did the article help you? Comment below to let us know. If you want to share a better method, feel free to add that in your comment.
Vlad Turiceanu
Windows Editor
Passionate about technology, Windows, and everything that has a power button, he spent most of his time developing new skills and learning more about the tech world.
Coming from a solid background in PC building and software development, with a complete expertise in touch-based devices, he is constantly keeping an eye out for the latest and greatest!
In the fast-paced world of modern business and technology, efficiency is key. And when it comes to organizing and managing schedules, the Microsoft Date and Time Picker tool is a valuable asset that can streamline your workflow and boost productivity. Mastering this tool can empower you to effortlessly schedule meetings, track deadlines, and coordinate tasks with precision.
This quick guide aims to provide you with the knowledge and skills needed to maximize the capabilities of the Microsoft Date and Time Picker. Whether you are a seasoned professional looking to enhance your time management skills or a beginner seeking to improve your scheduling efficiency, this comprehensive resource will help you harness the full potential of this powerful tool.
Quick Summary
To use the Microsoft Date and Time Picker control in Excel, go to the Developer tab, click on the Insert drop-down menu, and select the Date and Time Picker control. Place the control on your worksheet and customize its properties as needed. To select a date or time, simply click on the drop-down arrow and choose the desired value. You can link the control to a cell to display the selected date or time.
Understanding Date And Time Picker Controls
Date and Time Picker controls are essential elements in Microsoft applications that allow users to select dates and times conveniently. These controls streamline the process of inputting dates and times, eliminating the need for manual typing and reducing errors. Understanding how Date and Time Picker controls function is crucial for efficient data entry and user experience in various software applications.
The Date Picker control enables users to select a date from a calendar interface, simplifying the selection process and ensuring accuracy. Users can navigate through months and years to pinpoint the desired date quickly. On the other hand, the Time Picker control allows users to input a specific time by selecting hours and minutes from dropdown menus. This feature is particularly useful for applications that require precise time entries, such as scheduling appointments or setting reminders.
By mastering Date and Time Picker controls, users can enhance their productivity and accuracy when working with date and time inputs in Microsoft applications. Being proficient in utilizing these controls will improve user experience and efficiency, making data entry tasks smoother and error-free.
Customizing Date And Time Formats
When it comes to customizing date and time formats in Microsoft Date and Time Picker, users have a range of options to tailor the appearance to suit their specific needs. One common approach is adjusting the date format to reflect the preferred layout such as MM/dd/yyyy or dd/MM/yyyy depending on regional conventions or personal preference. Additionally, users can modify the time format to display hours in 12-hour or 24-hour format, include seconds, or even choose to display time zones.
Furthermore, Microsoft Date and Time Picker offers the flexibility to customize the separator characters between date and time components, enabling users to achieve a visually appealing and functional display. Users can choose from symbols like dashes, slashes, periods, or even customize with their preferred characters. By having control over these formatting options, users can create a personalized date and time picker interface that enhances usability and aligns with their design requirements. Experimenting with these customization features can help users master Microsoft Date and Time Picker to best suit their needs.
Setting Default Date And Time Values
Setting default date and time values in Microsoft Date and Time Picker is a useful feature that allows users to predefine the initial date and time displayed when the control is first opened. This can save time and improve user experience by providing a starting point that is relevant to the context in which the date and time picker is being used.
To set default date and time values, users can programmatically assign specific dates and times to the respective properties of the control. By doing so, they can ensure that the date and time picker initially displays the desired values without requiring users to manually input them each time. This feature is particularly handy in scenarios where there are commonly used dates or times that users need to select frequently.
Additionally, setting default date and time values can help streamline data entry processes and enhance the overall efficiency of applications that utilize the Microsoft Date and Time Picker control. By taking advantage of this functionality, developers can create more intuitive interfaces that anticipate user needs and facilitate smoother interactions with date and time inputs.
Handling Date And Time Inputs
When it comes to handling date and time inputs in Microsoft Date and Time Picker, precision and accuracy are key. To ensure smooth data entry, users should be guided on the correct format required for inputting dates and times. Clear instructions on whether to use a 12 or 24-hour clock format, as well as any specific date formatting preferences, can help minimize errors and improve user experience.
Validation of date and time inputs is crucial to prevent any discrepancies in the data entered. Implementing checks to verify that the inputted dates and times fall within the acceptable ranges can enhance the reliability of the information collected. Additionally, offering users the option to select dates from a calendar view can assist in accurately picking dates without the need to manually input them, reducing the likelihood of errors occurring.
By providing users with intuitive prompts and user-friendly features, such as auto-formatting options and tooltips for date and time entry, the process of handling date and time inputs can be streamlined. Empowering users with the tools and guidance needed to input dates and times accurately can contribute to the overall efficiency and effectiveness of utilizing the Microsoft Date and Time Picker functionality.
Implementing Date And Time Validation
When implementing date and time validation in Microsoft Date and Time Picker, it is crucial to ensure that users input correct and valid information. One way to achieve this is by setting up validation rules that restrict users from entering invalid dates or times. By specifying the acceptable date and time formats, you can prevent errors and enhance the user experience.
Additionally, consider implementing range validation to restrict users from selecting dates or times outside a certain range. This helps maintain data integrity and prevents potential issues that may arise from incorrect inputs. By defining minimum and maximum allowable values, you can guide users to select appropriate dates and times within the specified boundaries.
Furthermore, make use of built-in error messages or custom validation alerts to notify users when they input invalid dates or times. Providing clear feedback on the expected format or range can help users correct their inputs efficiently. By incorporating effective date and time validation techniques, you can improve the accuracy and reliability of data captured using Microsoft Date and Time Picker.
Utilizing Date And Time Picker Events
When utilizing Date and Time Picker events in Microsoft applications, it’s essential to understand how these events function to enhance user interaction and functionality. Date and Time Picker events can be triggered based on user actions, such as selecting a date or time, allowing for dynamic responses within the application. By leveraging these events effectively, developers can create a more intuitive and user-friendly experience for their software.
One key aspect to consider when working with Date and Time Picker events is event handling. Developers can define specific actions or functions that should be executed when a certain event occurs, such as updating other parts of the application interface or processing user input. This level of control over event handling enables customization and tailored responses to user interactions, ultimately improving the overall usability of the application.
Furthermore, understanding the different types of Date and Time Picker events available, such as change events or click events, can help developers design more responsive and interactive interfaces. By incorporating these event triggers thoughtfully into the application logic, developers can optimize the user experience and streamline date and time selection processes.
Enhancing User Experience With Date And Time Pickers
Enhancing the user experience with date and time pickers is crucial for ensuring a seamless and intuitive interface. By customizing the appearance and behavior of these pickers, you can create a more user-friendly experience for your website or application. Implementing clear labels, intuitive layouts, and responsive designs can help users easily select dates and times without confusion.
One effective way to enhance user experience is by providing suggestions or constraints when selecting dates or times. By offering predefined options or smart suggestions based on common user behaviors, you can streamline the selection process and guide users towards making accurate choices. Additionally, using animations or visual cues to highlight the selected date or time can provide instant feedback to users, improving their overall interaction with the date and time picker.
Ensuring accessibility is also essential when enhancing the user experience with date and time pickers. By following best practices for web accessibility, such as providing keyboard navigation options and ensuring compatibility with assistive technologies, you can make the picker more inclusive and user-friendly for all individuals, including those with disabilities.
Advanced Tips And Tricks For Date And Time Pickers
When using Microsoft Date and Time Picker, there are several advanced tips and tricks that can enhance your experience and efficiency. One important tip is to familiarize yourself with keyboard shortcuts to quickly navigate and select dates and times. For instance, using the arrow keys to move through dates or times can save time compared to clicking each individual option. Additionally, understanding formatting options can help customize the appearance and behavior of the picker to better suit your specific needs.
Another useful trick is to utilize callbacks and event listeners to add custom functionalities to the date and time picker. By incorporating these features, you can enhance the user experience by implementing actions such as validation checks, auto-populating fields, or triggering certain events based on selected dates or times. Furthermore, exploring available APIs and documentation can provide further insights into optimizing the functionality and integration of the picker within your applications. By leveraging these advanced tips and tricks, you can maximize the capabilities of Microsoft Date and Time Picker for a seamless and tailored user experience.
Frequently Asked Questions
How Can I Display The Date And Time Picker Control In A Form In Microsoft Excel?
To display the Date and Time Picker control in a form in Microsoft Excel, you can go to the Developer tab, click on “Insert” in the Controls group, and then select “More Controls.” From the list of available controls, choose “Microsoft Date and Time Picker Control” and click “OK.” Once the control is added to your form, you can customize its properties and format to suit your preferences. This allows users to easily select dates and times within the form interface.
Can I Customize The Date And Time Format In The Microsoft Date And Time Picker Control?
Yes, you can customize the Date and Time format in the Microsoft Date and Time Picker control. The format can be modified by changing the properties of the control in your code. You can specify whether you want the date to be displayed in a specific format (e.g., MM/dd/yyyy, dd/MM/yyyy) and customize how the time is shown (e.g., 12-hour or 24-hour format). Additionally, you can adjust the appearance of the control to suit your application’s design and user preferences.
Is It Possible To Restrict The Selection Range Of Dates And Times Using The Control?
Yes, it is possible to restrict the selection range of dates and times using controls such as date pickers and time pickers. These controls often come with options to set minimum and maximum dates and times that can be selected by the user, thus limiting the selection within a specified range. This feature is commonly used in applications where users need to choose dates or times within certain parameters, ensuring data accuracy and consistency.
Are There Any Keyboard Shortcuts Available When Using The Date And Time Picker In Microsoft Applications?
Yes, keyboard shortcuts are available when using the Date and Time Picker in Microsoft applications. In Windows, you can press Alt+down arrow to open the drop-down menu for the Date and Time Picker. Then, use the arrow keys to navigate and select the desired date or time. In addition, pressing Enter will confirm the selection. These keyboard shortcuts can help users efficiently input dates and times without relying solely on a mouse or touchpad.
How Can I Link The Selected Date And Time From The Control To Other Cells Or Functions Within My Spreadsheet?
To link the selected date and time from the control to other cells or functions within your spreadsheet, you can use cell references. Simply select the cell where the date and time control output is displayed, then enter a formula in another cell that refers to this cell. For example, if the date and time are in cell A1, you can use a formula like “=A1” in another cell to link to that value. This way, any changes in the selected date and time will automatically update in the linked cells or functions.
The Bottom Line
In mastering Microsoft Date and Time Picker, users are equipped with a powerful tool that streamlines date and time selection within various applications. The flexibility and customization options available make it a valuable resource for enhancing user experience and optimizing workflow efficiency. By following this quick guide, users can unlock the full potential of Microsoft Date and Time Picker, gaining increased productivity and improved accuracy in managing date and time inputs.
With practice and familiarity, users can seamlessly integrate the Date and Time Picker into their daily tasks, eliminating manual entry errors and ensuring consistency across platforms. As technology continues to evolve, proficiency in utilizing such tools becomes essential for staying competitive in the digital landscape. Embracing the features and functionality of Microsoft Date and Time Picker positions users to navigate date and time-related challenges with ease, contributing to a more polished and professional user experience.
Последнее обновление: 31.10.2015
Для работы с датами в Windows Forms имеются элементы DateTimePicker и MonthCalendar.
DateTimePicker
DateTimePicker представляет раскрывающийся по нажатию календарь, в котором можно выбрать дату. собой элемент, который с помощью перемещения ползунка позволяет вводить числовые значения.
Наиболее важные свойства DateTimePicker:
-
Format: определяет формат отображения даты в элементе управления. Может принимать следующие значения:
Custom: формат задается разработчикомLong: полная датаShort: дата в сокращенном форматеTime: формат для работы с временем -
CustomFormat: задает формат отображения даты, если для свойства
Formatустановлено
значениеCustom -
MinDate: минимальная дата, которую можно выбрать
-
MaxDate: наибольшая дата, которую можно выбрать
-
Value: определеяте текущее выбранное значение в DateTimePicker
-
Text: представляет тот текст, который отображается в элементе
При выборе даты элемент генерирует событие ValueChanged. Например, обработаем данное собатие и присвоим выбранное значение
тексту метки:
public partial class Form1 : Form
{
    public Form1()
    {
        InitializeComponent();
		dateTimePicker1.Format = DateTimePickerFormat.Time;
        dateTimePicker1.ValueChanged+=dateTimePicker1_ValueChanged;
    }

    private void dateTimePicker1_ValueChanged(object sender, EventArgs e)
    {
        label1.Text = String.Format("Вы выбрали: {0}", dateTimePicker1.Value.ToLongTimeString());
    }
}
Свойство Value хранит объект DateTime, поэтому с ним можно работать как и с любой другой датой. В данном случае выбранная дата
преобразуется в строку времени.
В вышеприведенном случае значение dateTimePicker1.Value.ToLongTimeString() аналогично тому тексту, который отображается в элементе.
И мы могли бы написать так:
label1.Text = String.Format("Вы выбрали: {0}", dateTimePicker1.Text);
MonthCalendar
С помощью MonthCalendar также можно выбрать дату, только в данном случае этот элемент представляет сам календарь, который не надо раскрывать:
Рассмотрим некоторые основные свойства элемента.
Свойства выделения дат:
-
AnnuallyBoldedDates: содержит набор дат, которые будут отмечены жирным в календаре для каждого года
-
BoldedDates: содержит набор дат, которые будут отмечены жирным (только для текущего года)
-
MonthlyBoldedDates: содержит набор дат, которые будут отмечены жирным для каждого месяца
Добавление выделенных дат делается с помощью определенных методов (как и удаление):
monthCalendar1.AddBoldedDate(new DateTime(2015, 05, 21));
monthCalendar1.AddBoldedDate(new DateTime(2015, 05, 22));
monthCalendar1.AddAnnuallyBoldedDate(new DateTime(2015, 05, 9));
monthCalendar1.AddMonthlyBoldedDate(new DateTime(2015, 05, 1));
Для снятия выделения можно использовать аналоги этих методов:
monthCalendar1.RemoveBoldedDate(new DateTime(2015, 05, 21));
monthCalendar1.RemoveBoldedDate(new DateTime(2015, 05, 22));
monthCalendar1.RemoveAnnuallyBoldedDate(new DateTime(2015, 05, 9));
monthCalendar1.RemoveMonthlyBoldedDate(new DateTime(2015, 05, 1));
Свойства для определения дат в календаре:
-
MinDate: определяет минимальную дату для выбора в календаре
-
MaxDate: задает наибольшую дату для выбора в календаре
-
FirstDayOfWeek: определяет день недели, с которого должна начинаться неделя в календаре
-
SelectionRange: определяет диапазон выделенных дат
-
SelectionEnd: задает конечную дату выделения
-
SelectionStart: определяет начальную дату выделения
-
ShowToday: при значении true отображает внизу календаря текущую дату
-
ShowTodayCircle: при значении true текущая дата будет обведена кружочком
-
TodayDate: определяет текущую дату. По умолчанию используется системная дата на компьютере, но с помощью данного
свойства мы можем ее изменить
Например, при установке свойств:
monthCalendar1.TodayDate= new DateTime(2015, 05, 22);
monthCalendar1.ShowTodayCircle = true;
monthCalendar1.ShowToday = false;
monthCalendar1.SelectionStart = new DateTime(2015, 05, 1);
monthCalendar1.SelectionEnd = new DateTime(2015, 05, 11);
будет следующее отображение календаря:
Наиболее интересными событиями элемента являются события DateChanged и DateSelected, которые возникают
при изменении выбранной в элементе даты. Однако надо учитывать, что выбранная дата будет представлять первую дату из диапазона выделенных дат:
public partial class Form1 : Form
{
    public Form1()
    {
        InitializeComponent();
		monthCalendar1.DateChanged += monthCalendar1_DateChanged;
    }

    void monthCalendar1_DateChanged(object sender, DateRangeEventArgs e)
    {
        label1.Text = String.Format("Вы выбрали: {0}", e.Start.ToLongDateString());
		// или так - аналогичный код
        //label1.Text = String.Format("Вы выбрали: {0}", monthCalendar1.SelectionStart.ToLongDateString());
    }
}
The DateTimePicker control (System.Windows.Forms.DateTimePicker) is used to pick a single date. The control appears by default, as a combo box with a calendar icon at the right part. You can select each date component and such as the month and use the arrow keys to adjust individual components.
The DateTimePicker control shows (by default) the current date or the selected date. By clicking the calendar icon during runtime, you will be presented with a calendar where you can choose dates.
You can then use this calendar to choose a specific date. You use the left and right navigation arrows to move to the previous or next month.
The initial view of the calendar shows all the days plus some trailing dates of the past and next months. Clicking the Title that displays the month and year changes the view and shows all the available month of the current year.
Clicking the year will show all the years in the current decade and clicking it even more allows you to easily choose dates way back in the past.
There are several properties that allow you to customize the appearance and behavior of the DateTimePicker control.
| Property | Description |
|---|---|
| CalendarFont | Gets or sets the font style applied to the calendar. |
| CalendarForeColor | Gets or sets the foreground color of the calendar. |
| CalendarMonthBackground | Gets or sets the background of the calendar month. |
| CalendarTitleBackColor | Gets or sets the background color of the calendar title. |
| CalendarTitleForeColor | Gets or sets the foreground color of the calendar title. |
| CalendarTrailingForeColor | Gets or sets the foreground color of the calendar trailing dates. |
| Checked | The ShowCheckBox property should be set to false to work with this property. When this value is true, the date is changed/updated. When this is false, the selected date cannot be changed. |
| CustomFormat | Accepts a custom format string the will format the date displayed. |
| Format | Determines the format of the date displayed by the control. |
| MaxDate | Gets or sets the greatest date and time that can be chosen in the control. |
| MinDate | Gets or sets the minimum date and time that can be selected in the control. |
| ShowCheckBox | If true shows a text box to the left part of the DateTimePicker control. When checked, the selected date can be changed. When unchecked, the selected date cannot be changed. |
| ShowUpDown | When set to true, shows an up-down button in place of the drop down button. You can’t access the calendar when this is shown. Instead, you need to select a date component and use the up-down arrows to adjust the date. |
| Value | The currently selected date. |
Figure 2 – DateTimePicker Properties
If you are using Windows Vista or Windows 7 and using themes such as Aero, then the properties that modify the color of the calendar has no effect. To see the results of fixing the colours of the calendar, we’d like to disable Visual designs. For the sake of demonstration, we’ll do exactly that. Find Program.cs in the solution explorer and open it by double clicking it. Comment out or delete the line:
Application.EnableVisualStyles();Just note that when you do this, the controls will use the old style classic look. You can now change the colors of the calendar using the different properties that modify the color.
You can change the format of the date displayed using the Format property. You can use the Long, Short, Time, or Custom formats. When the Custom format is selected, you can specify a format string in the control’s CustomFormat property. For example, setting the format to MM-dd-yy shows the date using the month number, the date, and the last two digits of the year where each date component is separated with dashes. Example output would be 04-08-11. For a list of format specifiers for date and time, go here.
The ShowCheckBox property indicates whether to show a checkbox at the left side of the control.
When the check box is checked, you can select the date or time components and modify them using the arrow keys. If the check box is unchecked, then you are not allowed to do that. Clicking the dropdown button that shows the calendar checks the checkbox. The state of the checkbox can be accessed using the Checked property.
The ShowUpDown property transforms the dropdown button into an up-down button and hides the calendar icon as shown by the following screenshot.
This will prohibit you from accessing the calendar and limits you to using the up-down button. You select a date or time component and use the up-down button to adjust their values.
We can use the Value property to get or set the selected date of the DateTimePicker control. We can also handle the ValueChangedevent of the control to react to changes in date.
Guide
When you purchase through links on our site, we may earn an affiliate commission. Here’s how it works.
· Hot!
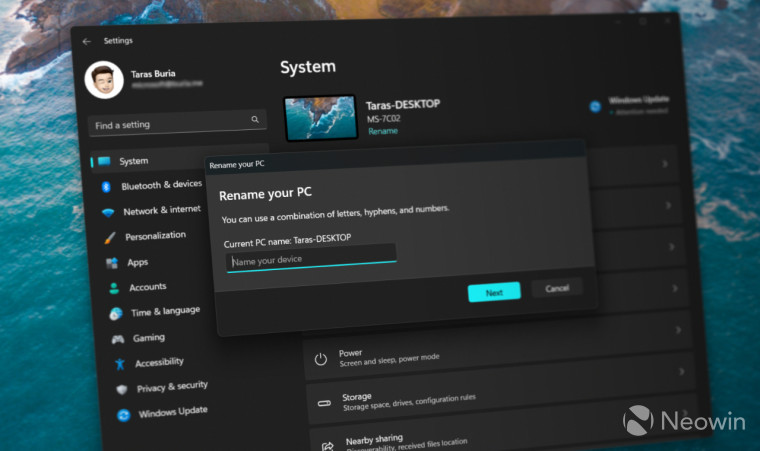
Traditionally, the latest Windows 11 Dev update has a public changelog (some neat changes there) and a bunch of new stuff that Microsoft considers not ready for unveiling. As spotted by @PhantomOfEarth, Windows 11 build 25201 finally gets a redesigned «Rename this PC» and date/time picker UI, ditching the decade-old Windows 8-like UI in favor of a much better-looking and modern interface.
Here is how the old dialog box compares to the new one:
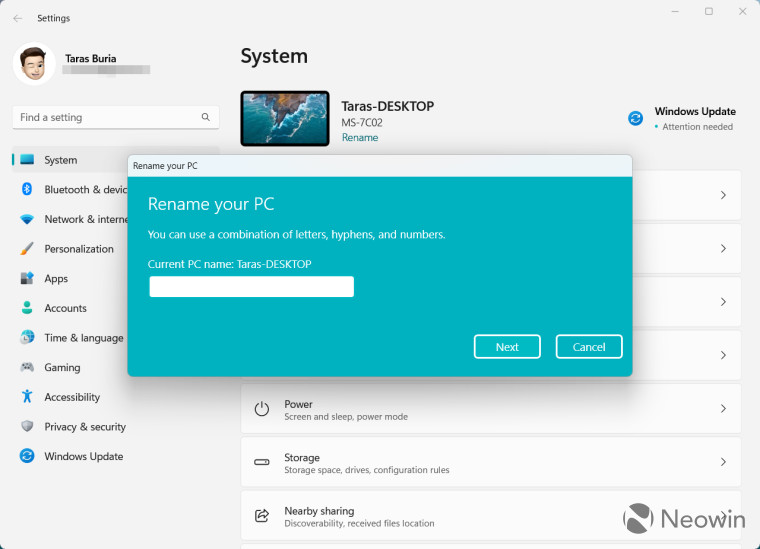
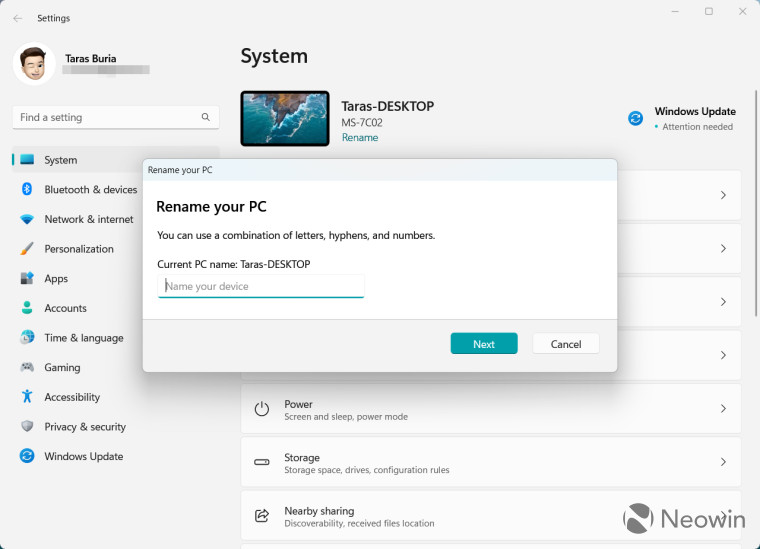
Besides «Rename this PC,» Windows 11 build 25201 adds a redesigned date and time picker, which people use much more often. You can enable those UI goodies using the ViveTool app, a must-have utility for Windows enthusiasts wanting to test hidden and experimental features in Windows 11.
Important: Back up important data beforehand. Enabling experimental changes in Windows 11 preview builds can lead to instabilities and serious bugs. Avoid early updates and projects like ViveTool if you are not ready for emergency troubleshooting or Windows reinstall.
How to enable the redesigned «Rename this PC» UI in Windows 11 build 25102?
- Begin with downloading ViveTool from GitHub.
- Go to disk C, create a new folder, and rename it to Vive.
- Extract the downloaded files in C:\Vive.
- Right-click the Start menu button and select Terminal (Admin). Note that this action requires Administrator privileges. Windows will ask you to enter the Administrator password if your profile has no such access.
- Press Ctrl + Shift + 2 to switch Terminal to Command Prompt. Alternatively, click the arrow-down button on the tab strip and select Command Prompt.

- Navigate to the Vive folder using the CD C:\Vive command.
- Execute the following commands one after another:
- vivetool /enable /id:36390579
- vivetool /enable /id:38228963
- vivetool /enable /id:39811196
- Now press Win + I to open the Settings app and click Rename.

- Go to Time & language > Date & time and turn off Set time automatically.
- Click the Change button.


What do you think about the redesigned dialog boxes in Windows 11 build 25201?
Tags
- Windows 11
- Microsoft
- Hidden features
- Vivetool
- Vive
- Windows settings
- Windows insider
- Dev channel
- Guide
- Build 25201