
Дата последнего обращения к файлу или папке — очень важный параметр, особенно когда начинаешь удалять ненужные файлы с диска. Иной раз видишь файл с довольно важным на первый взгляд названием и думаешь, нужен он или нет. Если в этот момент знать, что файл уже 3 года лежит и его никто не трогает, то вопрос решился бы быстрее.
Рис.1. Запуск консоли от имени администратора
Windows не хранит по умолчанию дату последнего доступа к файлу, поскольку это сильно скажется на производительности. Потому для включения этого параметра потребуются не только права администратора, но и некоторые навыки работы с консолью, чтоб снизить риск случайного нажимания пальцами куда не надо.
Для включения сохранения информации о дате последнего доступа к файлу потребуется включить соответствующий параметр. Чтобы определить, включен параметр сохранения и отслеживания информации о дате последнего доступа к файлу или нет, нужно в консоли, запущенной от имени администратора (Рис.1), ввести команду:
fsutil behavior query disablelastaccess
Если значение выключено, то результат будет такой:
DisableLastAccess = 1
Чтобы включить сохранение информации о дате последнего доступа к файлу, нужно в консоли ввести команду:
fsutil behavior set disablelastaccess 0
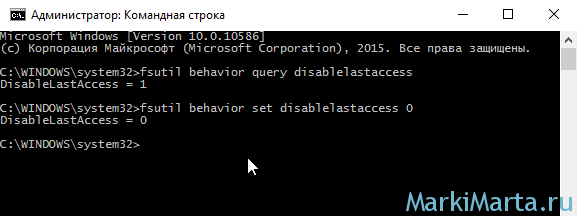
Рис.2. Включение поддержки сохранения информации о дате последнего доступа к файлу
Соответственно, для отключения параметра нужно изменить значение с 0 на 1:
fsutil behavior set disablelastaccess 1
После присвоения параметру disablelastaccess значения 1 можно посмотреть дату последнего обращения к файлу в Windows через обычный проводник. По умолчанию проводник ее не показывает, ограничиваясь такими полями как Имя, Дата изменения, Тип и Размер (Рис.3.). Но заставить отображаться еще один столбец – не проблема.
Рис.3. Отображаемые столбцы в проводнике по умолчанию
Чтобы показывать дату последнего обращения к файлу в проводнике Windows, нужно нажать правой кнопкой мыши на строку с названиями отображаемых полей, в контекстном выпадающем меню нажать на кнопку «Подробнее» (Рис.4).
Рис.4. Добавление нового поля в Проводнике Windows, шаг 1
В открывшемся окне будет показан список полей, которые можно добавить для отображения в проводнике. После манипуляций с консолью появится новое поле «Дата доступа» (Рис.5).
Рис.5. Добавление нового поля в Проводнике Windows, шаг 2.Новое поле Дата доступа
Теперь в проводнике при выбранном режиме отображения «Таблица» (как переключиться показано на Рис.7) будет отображаться поле Дата доступа, в котором показана дата последнего обращения к файлу (Рис.6).
Рис.6. Отображение табличного представления с полем Дата доступа
Рис.7. Переключиться к виду Таблица в проводнике
Если после добавления отображения поля «Дата доступа» в консоли отключить параметр отслеживания даты последнего изменения (fsutil behavior set disablelastaccess 1), то из представления столбец автоматически не пропадет, только будет показывать неверную информацию.
Если вы откроете свойства любого файла в Windows 10, 8.1 или Windows 7, среди прочей информации вы увидите три поля: Создан, Изменен и Открыт. Если по той или иной причине вам потребуется поменять их, это вполне можно сделать.
В этой инструкции подробно о том, как изменить дату создания, изменения и открытия файла с помощью простой бесплатной утилиты для этих целей, а также некоторая дополнительная информация, которая может оказаться полезной, когда речь идет о файлах фотографий, медиа и документов.
- Как поменять дату и время изменения, создания или открытия файла
- Видео инструкция
Как поменять дату и время изменения, создания или открытия файла в бесплатной программе BulkFileChanger
Наверняка многие из вас знают о небольших утилитах от NirSoft, среди них есть и программы, предназначенные для изменения указанных дат в свойствах файла. Первая версия программы называлась FileDate Changer, актуальная на сегодня, исправно работающая в Windows 10, 8.1 и Windows 7 — Bulk File Changer.
Для того, чтобы поменять дату и время создания, изменения и открытия файла в программе, достаточно выполнить следующие простые шаги:
- Запустите программу, лучше всего сделать это от имени администратора (правый клик по exe-файлу программы — «Запустить от имени администратора», иначе можем получить сообщение «Отказано в доступе» при изменении).
- Нажмите по кнопке добавления файлов в список и добавьте нужный файл или несколько файлов (дату и время можно менять сразу для группы файлов).
- В списке выделите те файлы, сведения для которых нужно изменить и нажмите по кнопке изменения даты и времени в свойствах файлов (кнопка с часами).

- Поменяйте значения на нужные вам в соответствующих полях. Created — дата и время создания, Modified — изменения, Accessed — открытия.

- Нажмите кнопку «Do it» для применения новых параметров.


Если всё прошло успешно, Bulk File Changer был запущен от администратора, а среди файлов нет открытых в других приложениях или заблокированных системой, выбранные вами даты будут изменены на указанные.
А теперь обещанная дополнительная информация: при изменении дат в файлах фотографий, документов и медиа следует учитывать, что некоторые данные хранятся в дополнительных мета-данных файла, увидеть вы их можете, открыв вкладку «Подробно» в его свойствах.
Если хранящиеся там данные нужно очистить, вы можете сделать это встроенными средствами Windows — просто нажмите по пункту «Удаление свойств и личной информации», а затем либо удалите ненужные свойства прямо в этом файле, либо создайте копию без этих свойств.
Вторая возможность — изменить и эти даты тоже в той же утилите Bulk File Changer. Для этого на этапе изменения дат нажмите по стрелке в пункте «No Change» и выберите, какую дату и время и для какого типа файла следует поменять.
Укажите новые сведения, примените изменения кнопкой «Do It», готово.
Скачать Bulk File Changer для изменения дат в свойствах файлов можно с официального сайта разработчика https://www.nirsoft.net/utils/bulk_file_changer.html
Изменение дат в свойствах файла — видео инструкция
Надеюсь, для кого-то инструкция оказалась полезной и позволила добиться желаемого результата.
Недавно мы разобрались, что такое файл, где он хранится и что может находиться внутри него. Но у файла есть ещё несколько неочевидных свойств, которые могут пригодиться в разных ситуациях — или, наоборот, рассказать всем то, чем вы не хотели бы делиться.
💡 Все доступные свойства файла на компьютере можно посмотреть, щёлкнув правой кнопкой мыши по файлу и выбрав пункт «Свойства». Он есть и в Windows, и в Mac OS. Единственный нюанс — конкретные свойства зависят от типа файла (документ, картинка или музыка).
Дата создания
Когда вы создаёте и сохраняете новый файл, у него появляется время создания. Оно берётся из настроек компьютера, где создан файл, поэтому теоретически дата создания может быть любой.
Часто по дате создания можно понять, в какой момент работа была начата. Например, если коллега говорит, что работал над отчётом всю неделю, а в дате создания стоит сегодняшнее утро, то… Ну, вы понимаете.

Дата изменения
Дата изменения показывает, когда последний раз в файл вносили какие-то изменения — что-то добавляли или удаляли оттуда. По этому параметру можно понять, доделывал ли кто-то файл после создания.


Вам может быть интересно:
Дата последнего доступа к файлу
Это свойство легко можно увидеть в Windows. Оно показывает, когда последний раз открывался этот файл, причём необязательно с изменениями. Windows фиксирует сам факт открытия.
Допустим, вы кому-то поручили проанализировать показатели прошлого года по продажам и на их основе составить отчёт. Исходные файлы лежат на Windows-сервере, удалённый доступ к которому есть у всех сотрудников. Два дня спустя вам приносят файл, в котором явно что-то не то с цифрами. Вы идёте на сервер, находите исходные файлы и смотрите на дату последнего доступа. Если она старше этих пары дней, значит сотрудник их вообще не открывал.

Кто автор или владелец файла
Многие офисные программы добавляют в свойства файла имя автора или владельца документа. Они его берут из своих настроек (если их кто-то заполнил при установке) или из имени пользователя, который прописан в системе.
Про этот параметр многие забывают, а зря. Есть случаи, когда зарубежные ведомства выкладывали на свои сайты, казалось бы, простую документацию или разъяснения, а другая разведка по данным о владельце выясняла автора документа и пыталась его завербовать.

Программа, в которой создавался или редактировался файл
Часть программ записывают в файл информацию о себе, когда идёт работа над документом. Это нужно, чтобы понимать, обрабатывали ли фотографию в Фотошопе (например). Выглядит примерно так:

Сколько времени работали над файлом
Многие офисные программы умеют считать время, потраченное на работу с документом. Это для тех, кто жалуется, что убил на документ все выходные, а на самом деле…

Геопозиция
Эти данные сейчас по умолчанию добавляет к фотографии каждый смартфон и каждая умная камера. Чаще всего они записывают географические координаты, иногда высоту над уровнем моря. Это удобно, когда вам нужно отсортировать фото из поездки по разным городам — телефоны уже делают это автоматически.
В обратную сторону это тоже работает: если поделиться с кем-то фотографией, то по геометке человек может узнать, где был сделан снимок. Например, друг присылает вам фото с пляжа и говорит «Смотри, какой классный пляж в Анталии!». А вы открываете свойства и видите, что, судя по координатам, фото сделано на пляже в Сочи:

Что дальше
Следующий логичный шаг — защитить свою приватность (и свои данные) при пересылке важных файлов. Для этого их нужно очистить от всей этой шелухи метаданных и оставить только содержимое документа. Как это сделать — в следующей статье. Подписывайтесь, чтобы не пропустить продолжение.
Художник:
Даня Берковский
Вёрстка:
Кирилл Климентьев
When you create or copy a folder / file on a computer, it is automatically assigned a set of attributes such as date, size, and type. These attributes can be helpful when you want to search for a specific file. The date attributes show details of when the file was created, modified and last accessed. You may want to change the date attributes to synchronize file dates, hide track of your activities or for whatever other reason. This guide shows you the various ways of changing the date attributes of a folder or a file in Windows 10.
Related: How to find last updated date of a webpage?
How to View File / Folder Date Attributes?
Follow the below instructions to find the date attributes of any file or folder in Windows computer.
- Open the folder / file location right-click the folder or file and select “Properties”.
- Under the “General” tab, you will find the creation date.
- Alternatively, open the file explorer and navigate to where you have saved the file.
- Click the “View” menu and enable the “Details pane”.

- When you click the file, you will see the date attributes on the right-hand pane.
Now, let’s move on to changing the date attributes using different methods.
Method 1: Working Around the System Date
You can modify the file or folder creation date by adjusting the system time and then copy and save the file / folder afresh.
Step 1: Change the System Date and Time
- Right-click the date and time on the notification area and select “Adjust date/time” from the resulting menu.
- Slide the toggle switch to the left to switch off the “Set time automatically” option.
- Click the “Change” button to manually set the date and time. Adjust the date and
- Change the time to the preferred file or folder creation time and click the “Change” button to save the changes.

Step 2: Copy or Save File as New
- Now copy and rename the folder or open the file, go to the file menu and select “Save as” option to save the file as a new one.
- The date attributes of the newly copied folder will take the value of the current system date and time.
- Open the file properties to confirm that the attributes have been changed.
- You can now restore the correct system date and time.
Method 2: Change File / Folder Attributes in Windows PowerShell
You can modify the file attributes using commands in PowerShell.
Step 1: Show File Attributes
- Right-click the windows start button and select “Windows PowerShell (Admin) from the resulting menu.
- Type the following command in PowerShell and press enter:
Get-ItemProperty File_Path | Format-list -Property * -Force- Remember to replace the file-path in the command with the actual path.
- This will display all the attributes for the file.
Step 2: Change the Date Attributes
- Run the following command in PowerShell
$(Get-Item File-name).creationtime=$(Get-Date "mm/dd/yyyy")- Replace the File-name with the name of your file and the set your preferred creation date.
- List the attributes again to check whether the creation date has been changed.

- You can also change the last modified and last write time using the following two commands:
$(Get-Item File-Name).lastaccesstime=$(Get-Date "mm/dd/yyyy")
$(Get-Item  File-Name).lastwritetime=$(Get-Date "mm/dd/yyyy")
Method 3: Change Date Attributes Using Third-Party Apps
The above two methods are effective but are not easy for everyone. Fortunately, there are several third-party solutions that you can use to save time. In this guide we will explore two of such solutions which are free and work smoothly in Windows 10.
Solution 1: Using Change Timestamp Software
Change Timestamp is a free and a light app that you can use to modify the date and time properties of files and folders. The app is downloadable in a portable executable file.
Step 1: Download and Run Change Timestamp in Windows 10
- You can download Change Timestamp from this link and save the zip file in your computer.
- Extract the content of the zip file and run the .exe file to launch the tool.
- The tool opens in a small window that contains all the features you need to modify the file or folder attributes.
Step 2: Change the Created, Modified and Accessed Time
- Under the “New Date” and “New Time” sections, type in or use the arrows to set the preferred date and time.
- Below the date and time fields, you can tick the option to retain the original time or date.
- You can also right click anywhere on the interface and choose the option to set the date and time value to the current system date and time.
- Tick the appropriate box to change the “The file was created”, “Last Modified” and “Last Accessed for reading” timestamps.

Step 3: Applying the New Timestamp to Folder/File
- Once you are done setting the Timestamps on the interface, now you need to apply the changes to your target file or folder.
- To do so, open the folder / file location and then drag and drop the folder or file over the Change Timestamp window.
- The folder will automatically take the new date and time properties.
Solution 2: How to Modify File/ Folder Date Attributes Using BulkFileChanger (BFC)
BulkFileChanger (BFC) is another free utility that enables you to change created, modified and last accessed timestamps among other attributes of multiple files all at once.
Step 1: Download and Open the BFC Utility
- Visit the BFC Download page, scroll down and click the link to download the zip file with either the 64 bit or 32 bit version.
- Extract the downloaded zip file and double click “BulkFileChanger.exe” to launch the tool.
- No installations or any other software required and you are ready to go.
Step 2: How to Add Files to BFC?
There are several ways of loading files to the BFC utility:
- Navigate to the target files or folder copy and paste the files on the BFC window to add them to the tool.
- Another option is to select the files you want to add. Then drag and drop them on the interface.
- Alternatively, click the BFC “File” at the top-left corner and select the “Add files” option.
- Browse your PC and select the multiple files you want to add.
- Your added files will be listed on the BFC dashboard.

- You can right click a file and select “Properties” to view the current attributes.

- If you accidentally added a file, you can remove it by clicking it and then press the delete button.
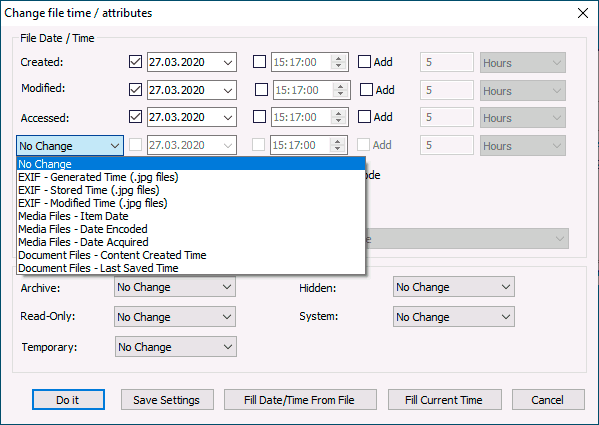
Step 3: Modifying the File Attributes in BFC
- You can modify the properties of a single file or multiple files. Select the file(s) you want to modify or press “Ctrl + A” keys to select all added files.
- Click the “Actions” tab and select “Change file time / Attributes” options.
- On the resulting popup, you can edit “Accessed”, “Modified” and “Created” timestamps using the arrow for date and time fields.
- You can also modify time by adding or subtracting time to the current settings.
- Once you are done with the time settings, click the “Do it” button at the bottom of the window.

Wrapping Up
Time attributes enable you to search for files / folders by time they were created, modified or last accessed. If you want to change the timestamp for folders or files maybe to synchronize your files or for another reason, the above guide shows you the various ways of modifying file attributes in Windows 10.
Your PC records the date you create, modify, and access all the files on your computer. The date and time information is tagged to your files and can be accessed by anyone. Changing these attributes before sharing a file can help cover your tracks. This article will show you how to change the modified date of a file on your Windows computer.
There are several ways to change a file’s attributes in Windows. You can use built-in tools (like Windows PowerShell and File Explorer) or third-party applications. This tutorial covers instructions on using PowerShell and File Explorer to change a file’s modified date in Windows. Our YouTube video below explains how to use third-party apps to change the date you modified a file.
Change File Attributes Using Windows PowerShell
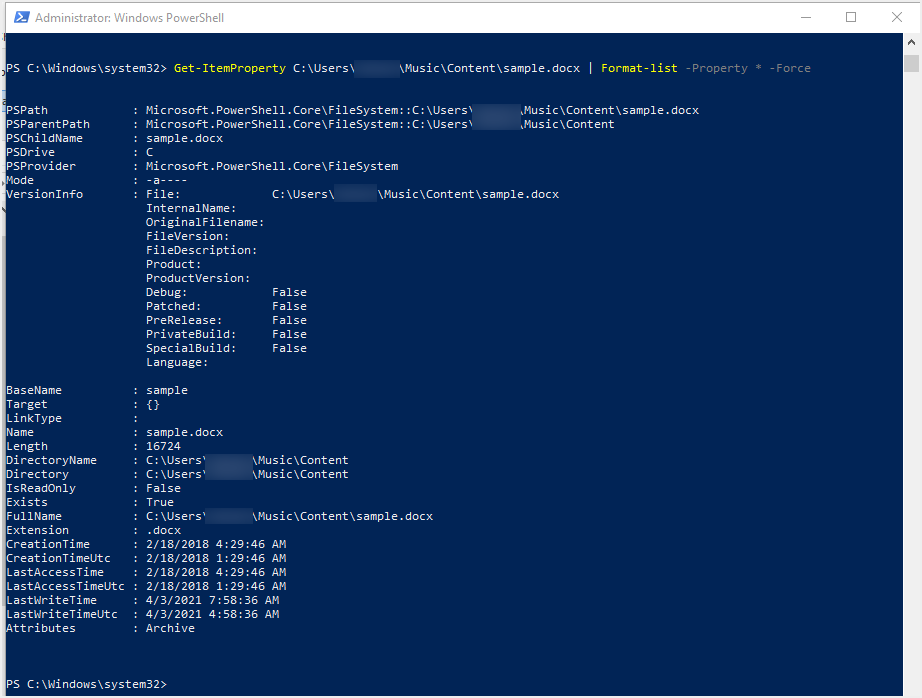
Modifying the original date(s) attributed to files using Windows PowerShell is straightforward. For this tutorial, we used PowerShell to change the last time/date we edited an Excel document. Here’s how:
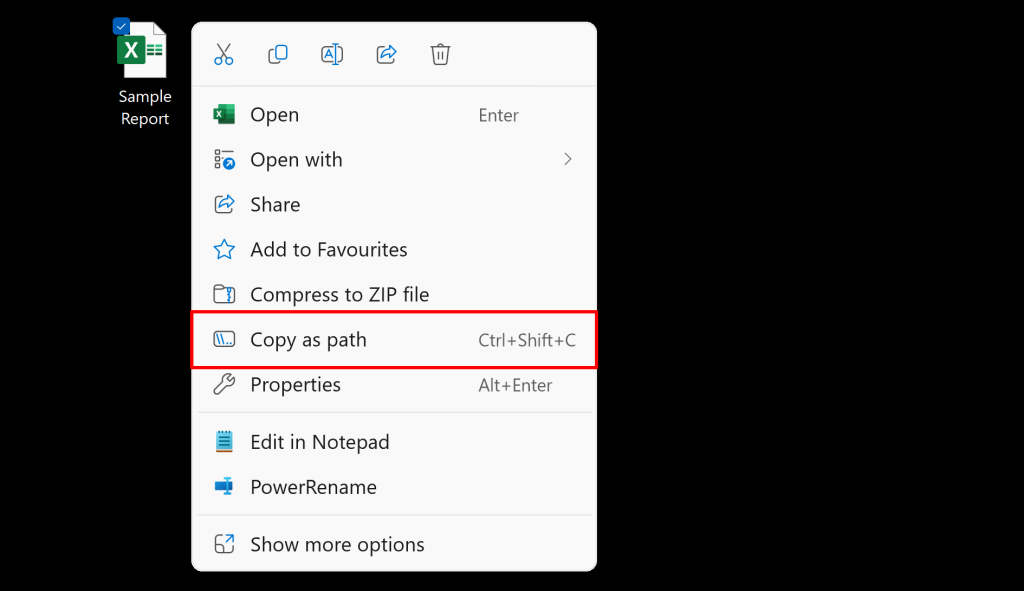
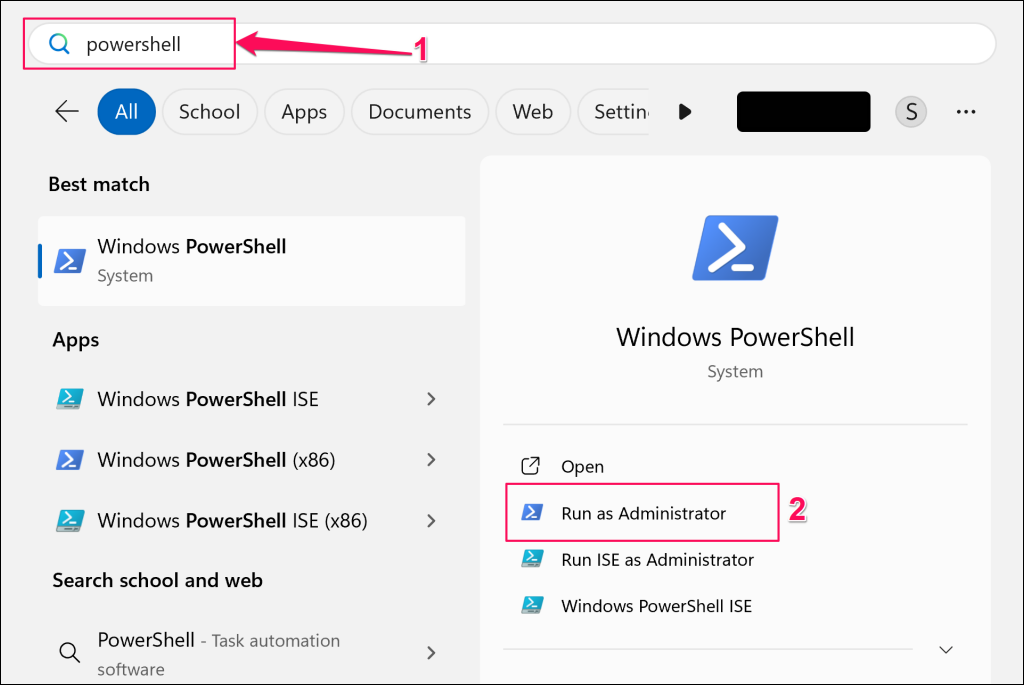
- Copy the file’s location/directory to your computer’s clipboard. Right-click the file and select Copy as path.
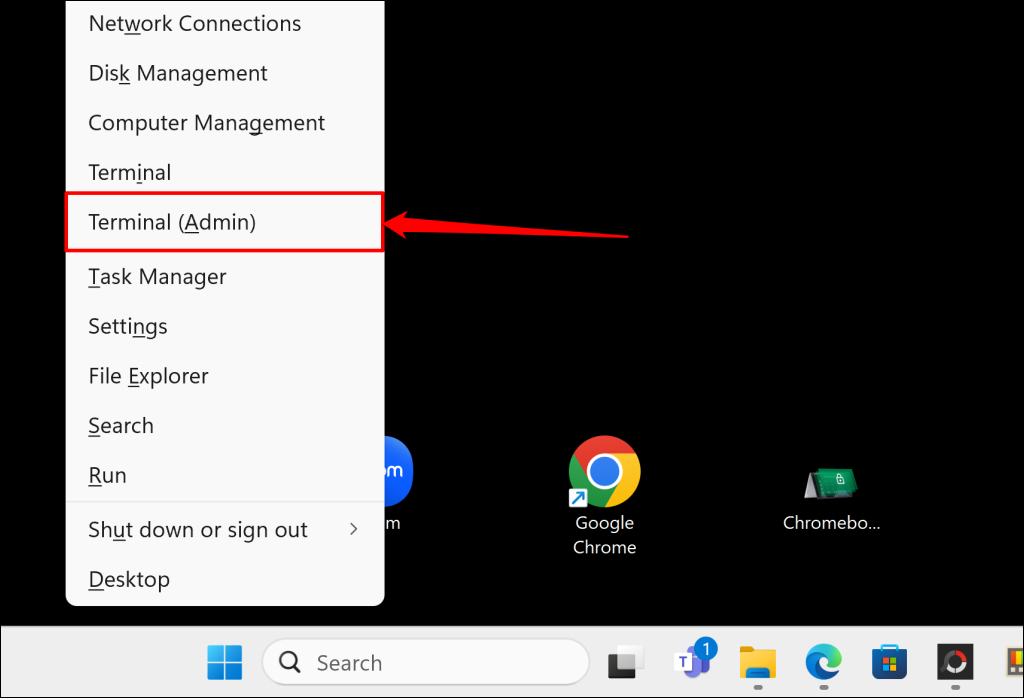
- Press Windows key + X and select Terminal (Admin) in the Quick Link menu.
Alternatively, type “powershell” in the Windows Search bar and select Run as Administrator in the Windows Powershell menu.
- Paste the following command in the PowerShell terminal and hit Enter to change the date of creation:
(Get-Item "file_path").CreationTime=("Day Month Year HH:MM:SS")Replace file_path with the file directory you copied in step #1 and the other attributes (Day, Month, Year, HH, MM, and SS) with your preferred value. HH, MM, and SS stand for hour, minute, and second, respectively.
The resulting command for the sample document we’re modifying looks like this:
(Get-Item "C:\Users\olanr\OneDrive\Desktop\Sample Report.xlsx").CreationTime=("21 May 2024 19:50:46")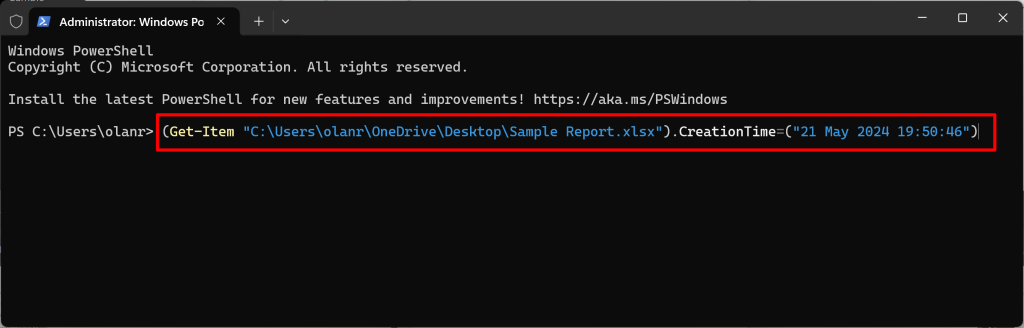
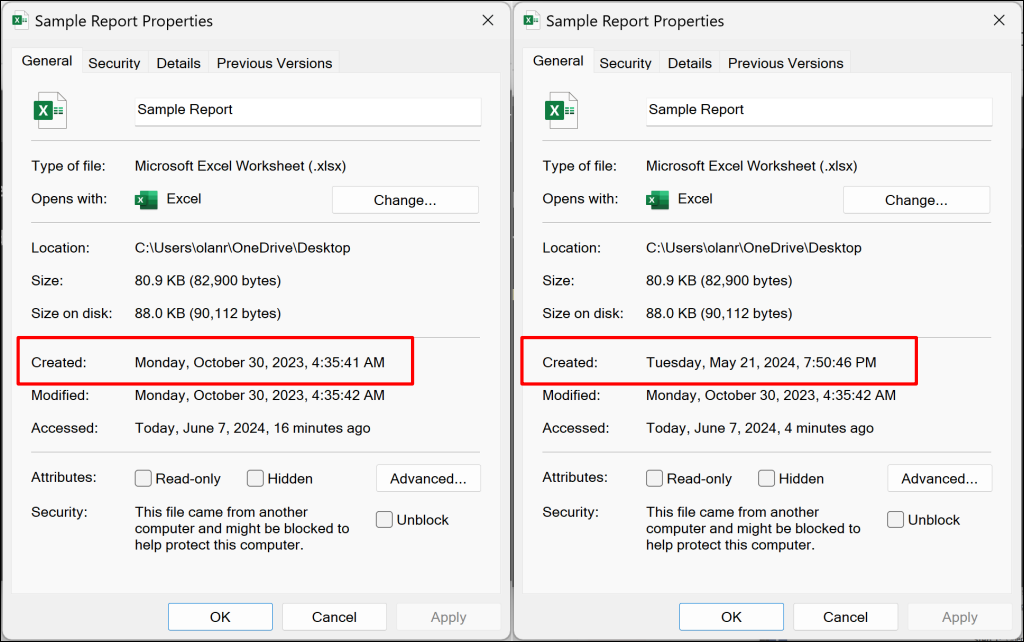
We successfully changed an Excel document’s creation date and time from “Monday, October 20, 2023, 4:35:41 AM” to “Tuesday, May 21, 2024, 7:50:46 PM.”
- Paste the following in the terminal and hit Enter to change the file’s modified date:
(Get-Item "file_path").LastWriteTime=("Day Month Year HH:MM:SS")Again, replace file_path with the file path you copied in step #1 and the other attributes (Day, Month, Year, HH, MM, and SS) with your preferred value. The command should look like the one below:
(Get-Item "C:\Users\olanr\OneDrive\Desktop\Sample Report.xlsx").LastWriteTime=("26 May 2024 19:50:46")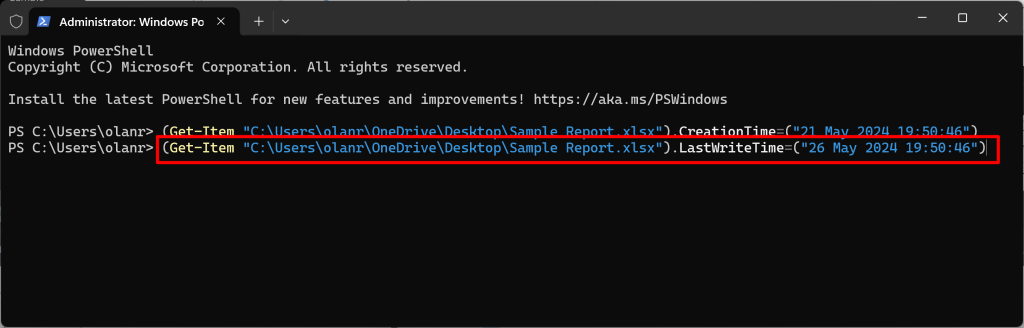
That should change the file’s modification date immediately. Check the file properties to verify.
- To change a file’s date accessed value, paste the following in PowerShell and hit Enter:
(Get-Item "file_path").LastAccessTime=("Day Month Year HH:MM:SS")Replace file_path with the file path you copied in step #1 and the other attributes (Day, Month, Year, HH, MM, and SS) with your preferred value. The command should look like the one below:
(Get-Item "C:\Users\olanr\OneDrive\Desktop\Sample Report.xlsx").LastAccessTime=("30 May 2024 20:25:57")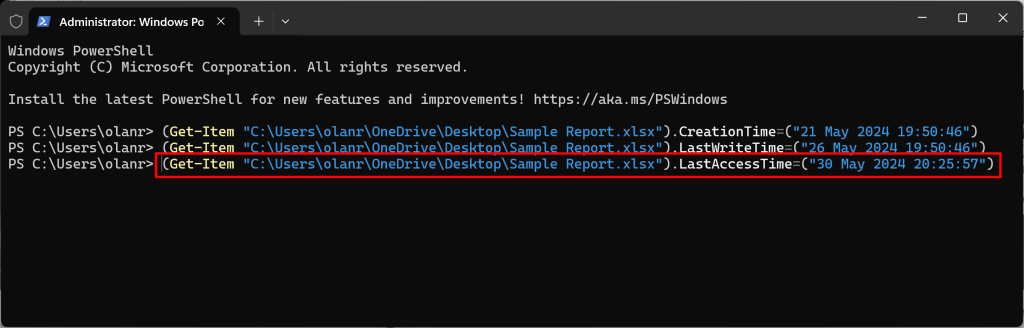
Windows will change the date accessed to the values provided in the command.
Note: These commands permanently change a file’s “Created,” “Modified,” and “Accessed” dates. However, opening or editing the file updates its modification or accessed date. If you intend to share a file with the new date(s), don’t open it (in any app) after running these PowerShell commands. Doing so discards your changes and restores the modified attributes to their original dates.
Remove File Attributes Using Windows File Explorer
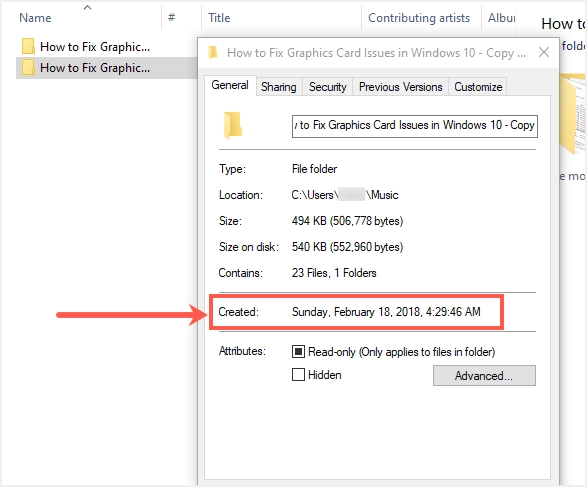
You can’t change a file’s last viewed, edited, or creation date through File Explorer. However, you can use the utility to remove dates (and other personal data) from files you intend to share.
- Right-click the file whose attribute you want to remove and select Properties.
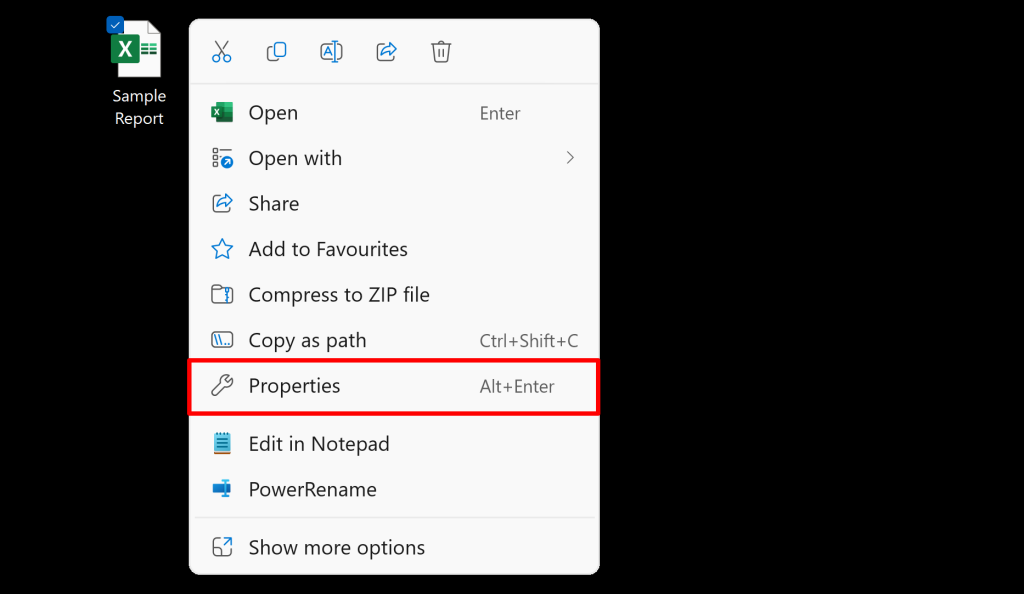
- Open the Details tab and select Remove Properties and Personal Information.
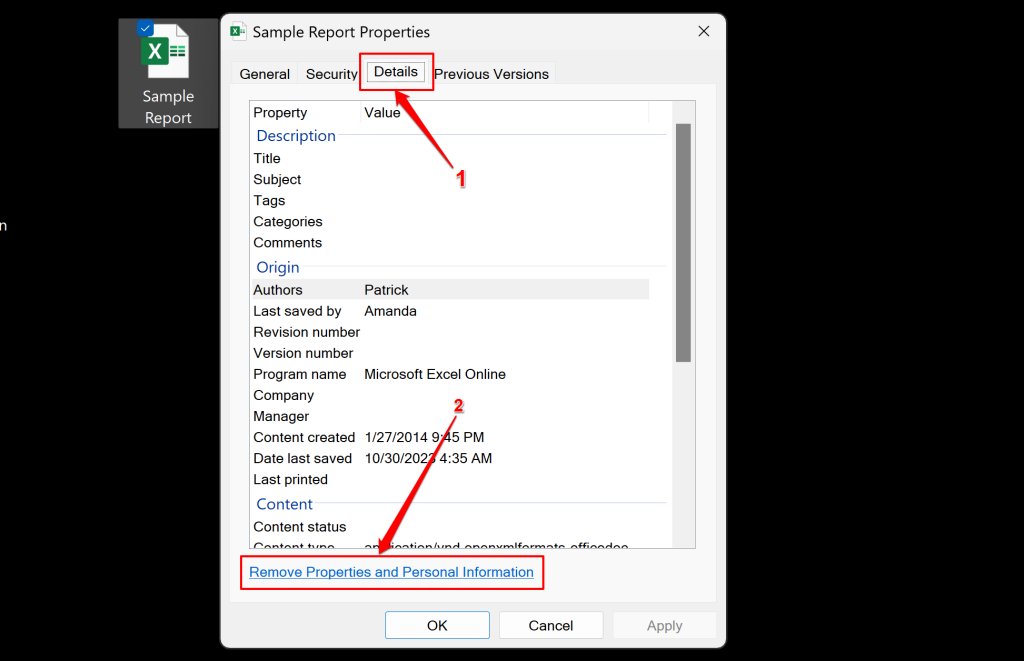
- Choose Remove the following properties from this file: and select the Manager checkbox. The option removes the “Content created,” “Date last saved,” and “Last printed” dates from files. Select OK to proceed.
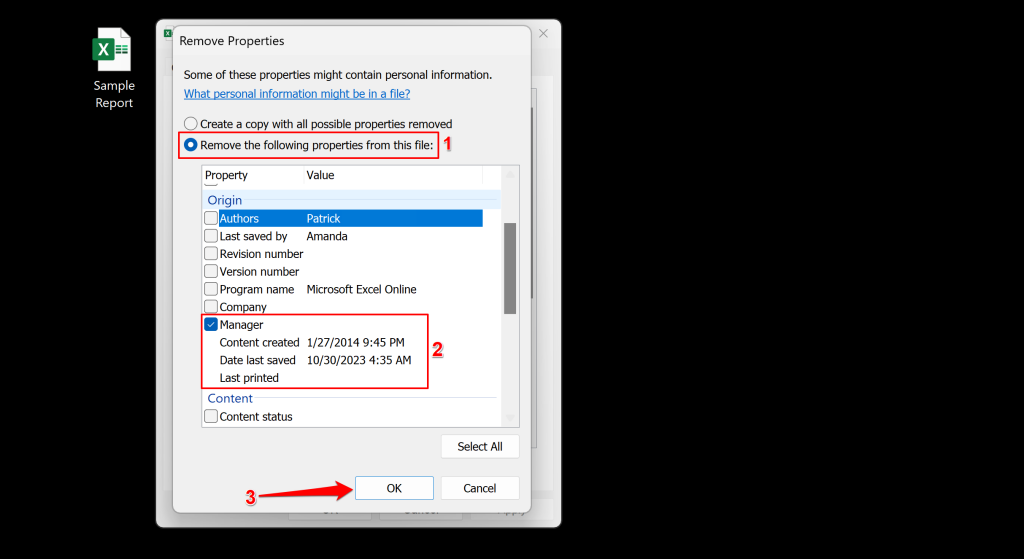
- If you want to remove all attributes from the file, choose Create a copy with all possible properties removed and select OK.
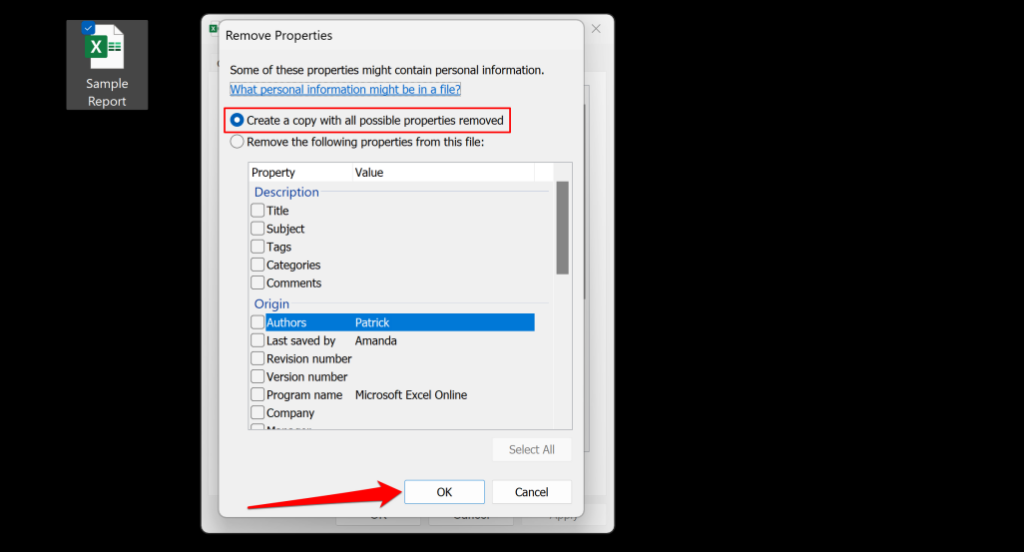
File Explorer will create a new copy of the file (without any personal information) in the same folder as the original file.
- Select OK on the file properties window to save the changes.
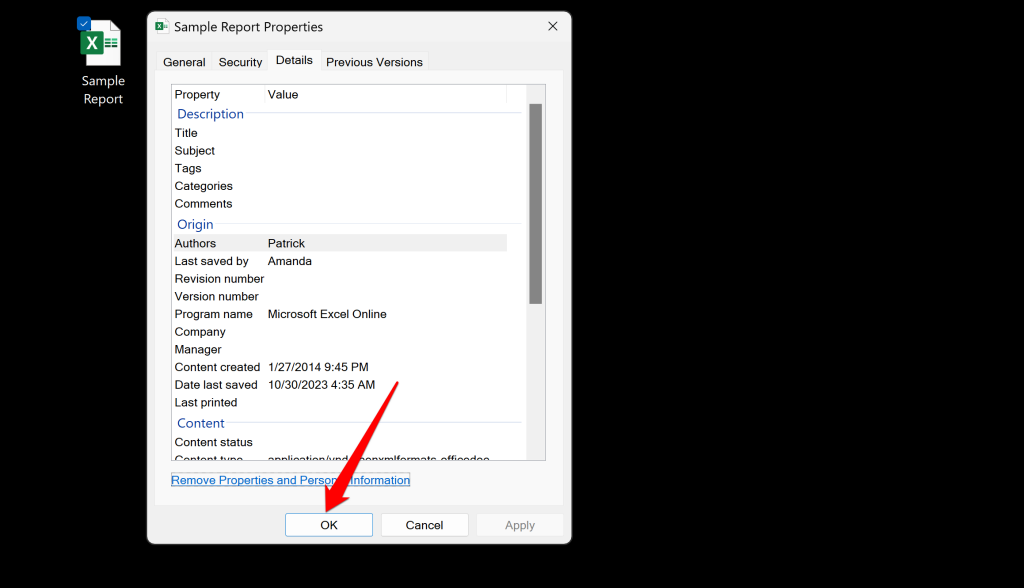
You can also remove attributes like author name, comment, etc. The attributes you can remove will vary depending on the file type or format. For image files, you can remove authors, dates, and parameters like copyright, tags, rating, etc.
Use Attribute Changer to Change File Attributes in Windows
Third-party apps expedite changing a file’s modified date on Windows computers. The Attribute Changer software supports Windows 11, 10, 8, and 7 and is free for personal and commercial use. It can modify the date and time attributed to documents, folders, and multimedia files.
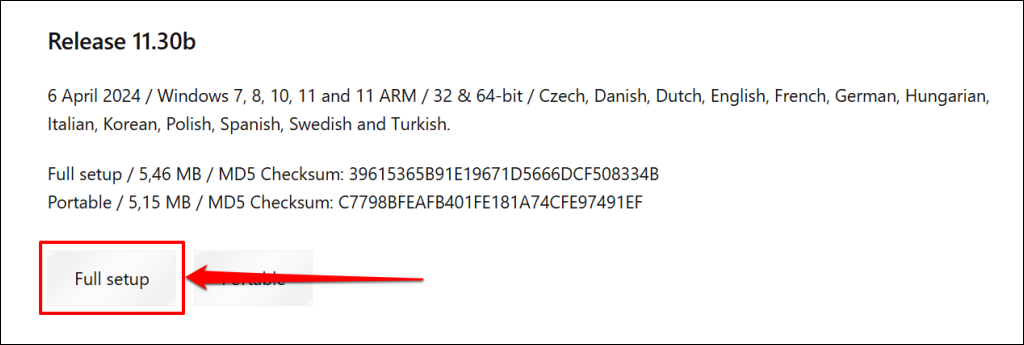
- Download the latest Attribute Changer version from the developer’s website.
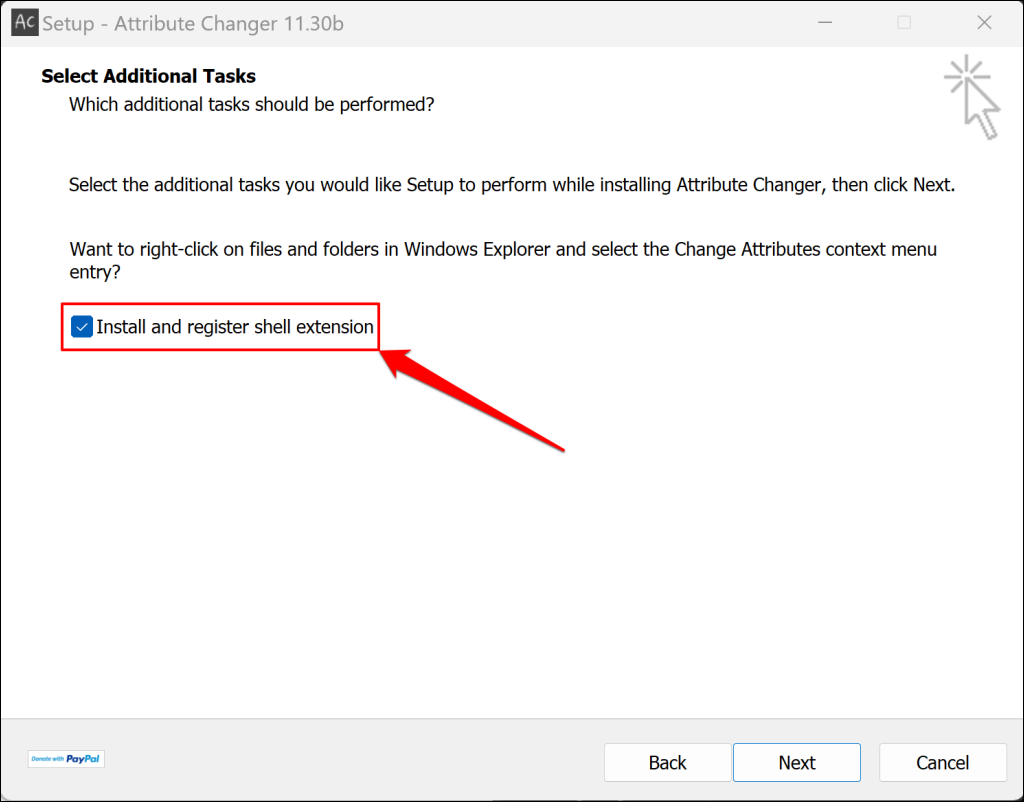
- Double-click the downloaded setup file and follow the installation instructions. Select the Install and register shell extension checkbox if it isn’t checked by default. Installing the extension adds Attribute Changer options to your PC’s right-click menu.
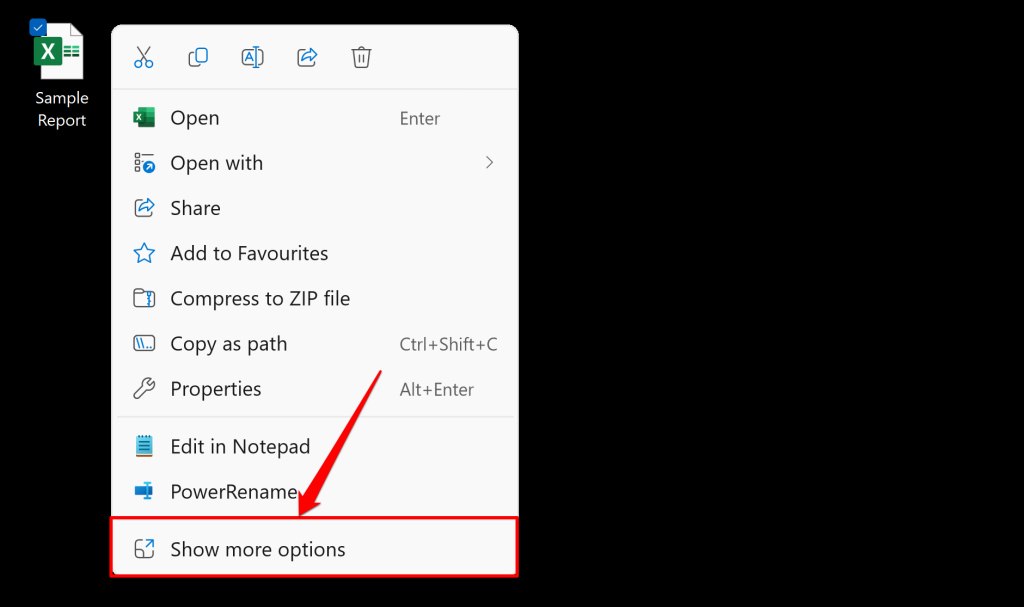
- Right-click the file whose attribute you want to edit and select Show more options.
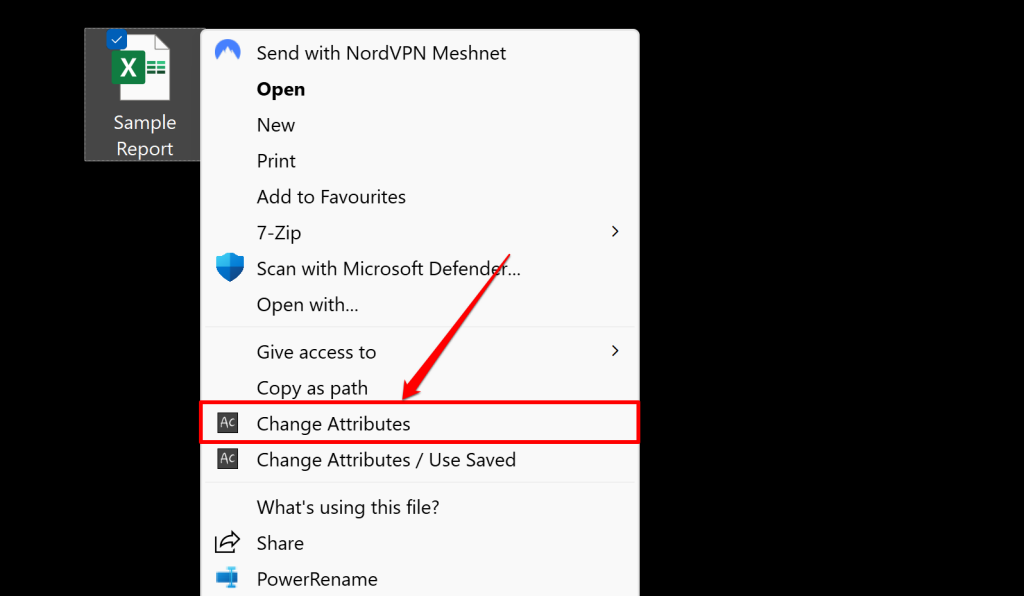
- Select Change Attributes.
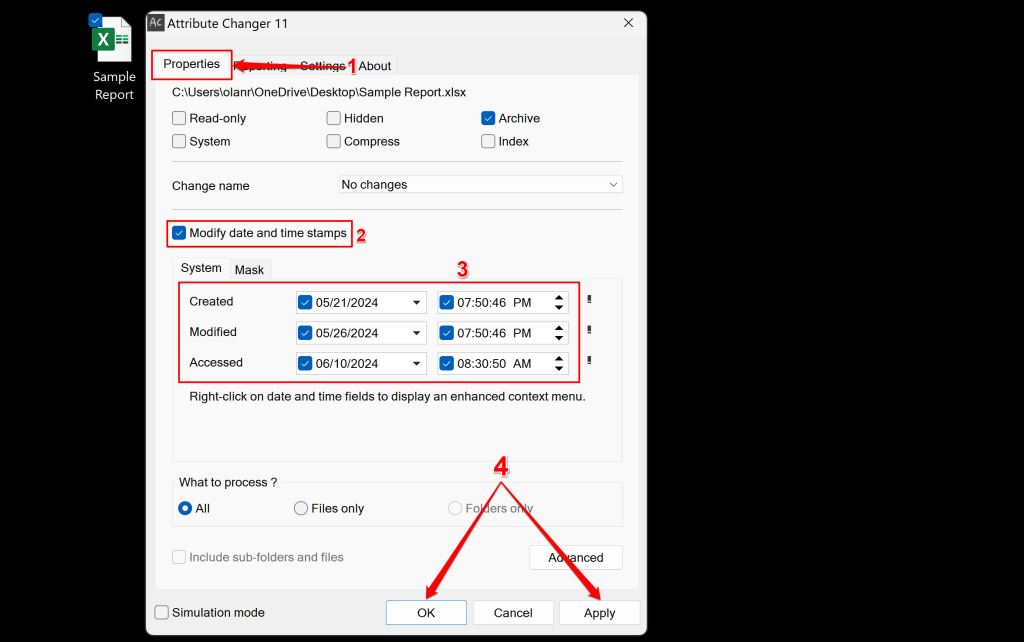
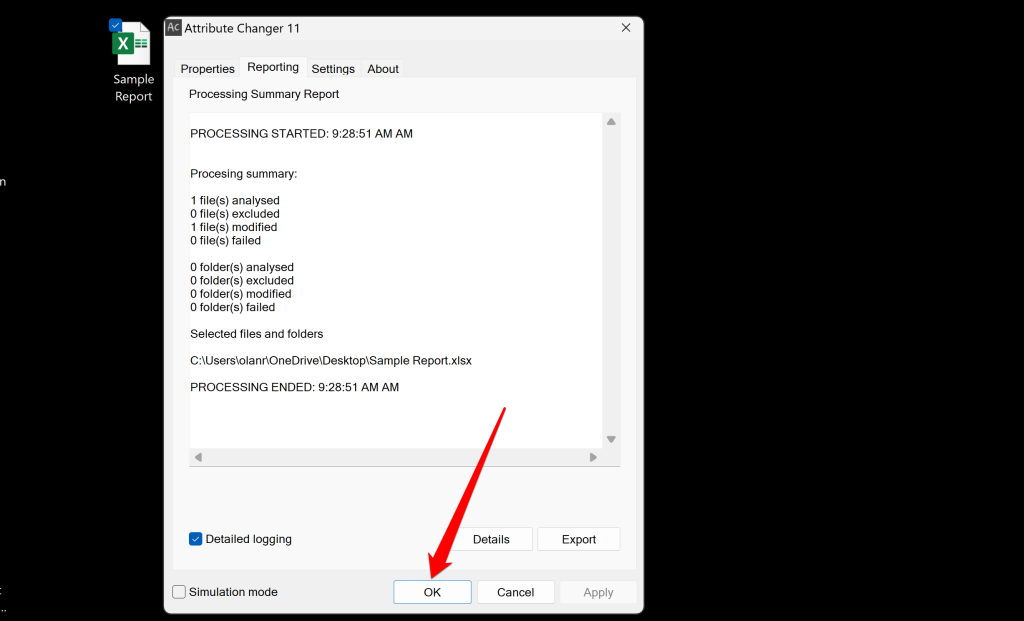
- Open the Properties tab and select the Modify date and time stamps checkbox. Use the drop-down menus to edit the file’s creation, access, and modification date to your preference. Then select Apply and OK to save the changes.
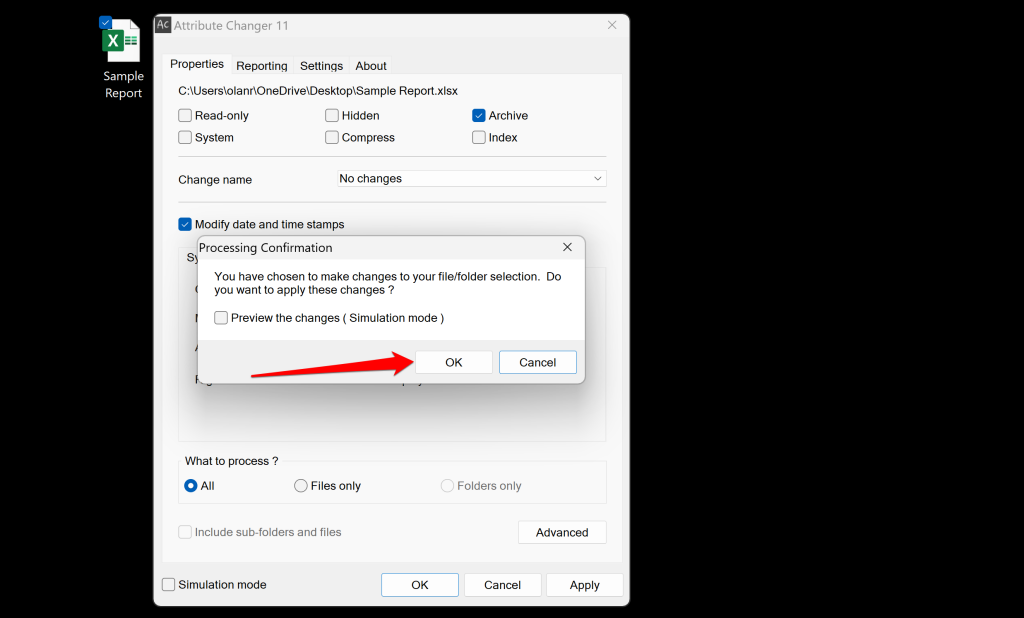
- Select OK on the confirmation prompt to save the edited dates.
- The app will switch to the “Reporting” tab and list changes made to the file’s attributes. Select OK again to close the tool.
Date Modification Made Easy for Windows Files
Now you know all available options for modifying file attributes in the Windows operating system. You can change a file’s modification date (and other dates) by running the correct commands in PowerShell. If you need to remove personal information from your files, then File Explorer is your best option. Attribute Changer performs date changes and attribute removal in a few mouse clicks. Download the tool if you frequently edit the dates attributed to your files.
Related Posts
- How to Check VRAM in Windows 10, 11, and macOS?
- Ultimate Guide to Removing or Resetting a BIOS Password
- How to Fix Slow Wi-Fi on Your Smartphone
- 7 Best Machine Translation Software (or AI) to Try in 2025
- What Does the Green Dot Mean on Facebook?