
Registering an Application to a URI Scheme
- Article
- 07/13/2016
- 5 minutes to read
The About Asynchronous Pluggable Protocols article describes how to develop handlers for Uniform Resource
Identifier (URI) schemes. In some cases, it may be desirable to invoke another application to handle a custom URI scheme. To do so, register the existing application as a URI pluggable protocol handler and associate it with the custom URI scheme. Once the application has successfully launched, it can use command-line parameters to retrieve the URI that launched it. These settings apply to pluggable protocol handlers launched from within Windows Internet Explorer and from Windows Explorer using the Run… command (Windows logo key+R).
| Security Warning: |
|---|
| Applications that handle URI schemes must consider how to respond to malicious data. Because handler applications can receive data from untrusted sources, the URI and other parameter values passed to the application may contain malicious data that attempts to exploit the handling application. |
This topic contains the following sections:
- Registering the Application Handling the Custom URI Scheme
- Launching the Handler
- Security Issues
- Example Pluggable Protocol Handler
- Related topics
Registering the Application Handling the Custom URI Scheme
To register an application to handle a particular URI scheme, add a new key, along with the appropriate subkeys and values, to HKEY_CLASSES_ROOT. The root key must match the URI scheme that is being added. For instance, to add an «alert:» scheme, add an alert key to HKEY_CLASSES_ROOT, as follows:
HKEY_CLASSES_ROOT
   alert
      URL Protocol = ""
Under this new key, the URL Protocol string value indicates that this key declares a custom pluggable protocol handler. Without this key, the handler application will not aunch. The value should be an empty string.
Keys should also be added for DefaultIcon and shell. The Default string value of the DefaultIcon key must be the file name to use as an icon for this new URI scheme. The string takes the form «path, iconindex» with a maximum length of MAX_PATH. The name of the first key under the shell key should be an action verb, such as open. Under this key, a command key or a DDEEXEC key indicate how the handler should be invoked. The values under the command and DDEEXEC keys describe how to launch the application handling the new protocol.
Finally, the Default string value should contain the display name of the new URI scheme. The
following example shows how to register an application, alert.exe in
this case, to handle the alert scheme.
HKEY_CLASSES_ROOT
   alert
      (Default) = "URL:Alert Protocol"
      URL Protocol = ""
      DefaultIcon
         (Default) = "alert.exe,1"
      shell
         open
            command
               (Default) = "C:\Program Files\Alert\alert.exe" "%1"
When a user clicks a link containing your custom URI scheme, Windows Internet Explorer launches the pluggable protocol handler registered for that URI scheme. If the specified open command specified in the registry contains a %1 parameter, Internet Explorer passes the URI to the registered pluggable protocol handler application.
Launching the Handler
By adding the above settings to the registry, navigating to URIs such as alert:Hello%20World would cause an attempt to launch alert.exe with the complete URI on the command line. Internet Explorer percent-decodes the URI, but the Windows Run… command does not. If a URI contains percent-encoded spaces, it may be split across more than one argument on the command line.
For example, if the link above is followed through Internet Explorer, the command line would be:
"C:\Program Files\Alert\alert.exe" "alert:Hello World"
If this link is followed through Windows Explorer, the Windows Run command, or some other application, the command line would be:
"C:\Program Files\Alert\alert.exe" "alert:Hello%20World"
Because Internet Explorer will decode all percent-encoded octets in the URI before passing the resulting string to ShellExecute, URIs such as alert:%3F? will be given to the alert application pluggable protocol handler as alert:??. The handler won’t know that the first question mark was percent-encoded. To avoid this issue, pluggable protocol handlers and their associated URI scheme must not rely on encoding. If encoding is necessary, protocol handlers should use another type of encoding that is compatible with URI syntax, such as Base64 encoding. Double percent-encoding is not a good solution either; if the application protocol URI isn’t processed by Internet Explorer, it will not be decoded.
When ShellExecute executes the pluggable protocol handler with a stringon the command line, any non-encoded spaces, quotes, and backslashes in the URI will be interpreted as part of the command line. This means that if you use C/C++’s argc and argv to determine the arguments passed to your application, the string may be broken across multiple parameters. To mitigate this issue:
- Avoid spaces, quotes, or backslashes in your URI
- Quote the %1 in the registration («%1» as written in the ‘alert’ example registration)
However, avoidance doesn’t completely solve the problem of quotes in the URI or a backslash at the end of the URI.
Security Issues
As noted above, the string that is passed to a pluggable protocol handler might be broken across multiple parameters. Malicious parties could use additional quote or backslash characters to pass additional command line parameters. For this reason, pluggable protocol handlers should assume that any parameters on the command line could come from malicious parties, and carefully validate them. Applications that could initiate dangerous actions based on external data must first confirm those actions with the user. In addition, handling applications should be tested with URIs that are overly long or contain unexpected (or undesirable) character sequences.
For more information, please see Writing Secure Code.
Example Pluggable Protocol Handler
The following sample code contains a simple C# console application demonstrating one way to implement a pluggable protocol handler for the alert URI scheme.
using System;
using System.Collections.Generic;
using System.Text;

namespace Alert
{
  class Program
  {
    static string ProcessInput(string s)
    {
       // TODO Verify and validate the input
       // string as appropriate for your application.
       return s;
    }

    static void Main(string[] args)
    {
      Console.WriteLine("Alert.exe invoked with the following parameters.\r\n");
      Console.WriteLine("Raw command-line: \n\t" + Environment.CommandLine);

      Console.WriteLine("\n\nArguments:\n");
      foreach (string s in args)
      {
        Console.WriteLine("\t" + ProcessInput(s));
      }
      Console.WriteLine("\nPress any key to continue...");
      Console.ReadKey();
    }
  }
}
When invoked with the URI alert:"Hello%20World" (note extra quotes) from Internet Explorer, the program responds with:
Alert.exe invoked with the following parameters.

Raw command-line:
        "C:\Program Files\Alert\alert.exe" "alert:"Hello World""


Arguments:

        alert:Hello
        World

Press any key to continue...
Related topics
Conceptual
About Asynchronous Pluggable Protocols
Debugging Tips
Have you ever wondered how entering mailto:blah@spam.com into the URL field in your web browser automatically brings up your mail app (i.e. Outlook for most Windows users)? Well you’re in luck because this article explains it all. Enjoy!
Ok, now that you’ve read that article let’s take a closer look at how you, as a Xojo developer, can handle this. Well, as you’ve diligently read in the above article, the first step is to register your application to handle a particular URI scheme by modifying the registry. The preferred approach is to do this as part of your Application’s installation process because at that point the user has given access rights to install your app and access rights therefore to modify the registry. This is the general structure as discussed in the MSDN article:
HKEY_CLASSES_ROOT
    alert
        (Default) = "URL:Alert Protocol"
        URL Protocol = ""
        DefaultIcon
            (Default) = "alert.exe,1"
        shell
            open
                command
                    (Default) = "C:\Program Files\Alert\alert.exe" "%1"
Where “alert” is your URI scheme, so if you navigate to a URI like alert:Hello, your web browser will launch your application with an extra command line argument: “alert:Hello”
The MSDN article goes into detail about how spaces, quotes, or backslashes affect your command line arguments depending on how the URI is invoke (i.e. Web Browser vs. ShellExecute/Run command). The take home message is just to avoid spaces, quotes, or backslashes in your URI if possible.
If you simply want to create a quick test to see how this works, you could execute the following Xojo code to add this URI scheme to the registry:
Dim reg As New RegistryItem("HKEY_CLASSES_ROOT")
reg = reg.AddFolder("alert")
reg.DefaultValue = "URL:Alert Protocol"
reg.Value("URL Protocol") = ""

Dim defaultIcon As RegistryItem = reg.AddFolder("DefaultIcon")
defaultIcon.DefaultValue = """" + App.ExecutableFile.NativePath + """,1"

Dim commandItem As RegistryItem = reg.AddFolder("shell").AddFolder("open").AddFolder("command")
commandItem.DefaultValue = """" + App.ExecutableFile.NativePath + """ ""%1"""
Because you’re modifying the registry, you will need to run your application as administrator (i.e. contextual/right click your app and select “Run as administrator” in the menu). This will add the necessary registry entries.

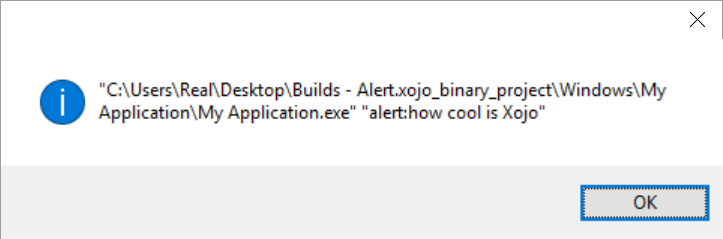
After this is done, your URI scheme is ready to be tested. Launch Internet Explorer and enter “alert:hello” in the URL field. After pressing Enter, your Application that added those registry entries will be launched. Now all you need to do is check the System.CommandLine property to see what alert message was passed. For example, if I added a MsgBox System.CommandLine to my App.Open event, I’d get something like this after entering “alert:how cool isXojo” in the URL field in Internet Explorer.
As you can see it’s very easy to set this up and handle the custom URI schemes in your application. Just be aware of the potential security issues that malicious people could be passing to your command line and handle those appropriately.
To use custom URIs on Mac OS X visit this post: Let Your OS X Desktop App React to Custom URIs

Creating your own URL protocol in Windows allows you to define custom behavior when a specific protocol is used in a URL. Here’s how to create one:
Steps to Create a Custom URL Protocol
1. Open the Windows Registry Editor:
* Press Win + R, type `regedit`, and hit Enter.
Enter fullscreen mode
Exit fullscreen mode

2. Navigate to the Protocols Section:
- Go to HKEY_CLASSES_ROOT in the registry.
- Right-click on HKEY_CLASSES_ROOT and select New > Key.

- Name this key after your custom protocol (e.g., myapp).

3. Define the Default Value:
- Double clickon (Defualt).
- Write any thing about you protocol (e.g,. my app protocol)
- press ok.

- Create New string value.

- add value URL Protocol it’s required.

- Now Your app is ready you can check on google chrome but we have add .exe file corresponding to our URL.
4. Create a Shell Subkey:
- Inside your protocol key (e.g., myapp), right-click and create a new key named shell.

- name of the key is shell:

5. Create an open Key Inside the shell Key:
- Right-click the shell key, select New > Key, and name it open.

6. Create a command Key Inside the open Key:
- Right-click the open key, select New > Key, and name it command.

7. Define the Command to Execute:
- Click on the command key, and in the right-hand pane, double-click the (Default) entry. Set the value to the path of the executable you want to run, followed by «\»%1\»» (including the quotes). For example:

- press ok, you protocol created successfully.
8. Creating Test Program
- Creating a program using c to get arguments. you can use any langualge.
«`c
include
include
int main(int argc, char *argv[])
{
printf(«Argument: \n%s», argv[1]);
getch();
return 0;
Enter fullscreen mode
Exit fullscreen mode
}
* Convert Into Exe using `c++ myapp.c -o myapp.exe`;
* now you add this exe into command defualt value.
## 9: Test Your Protocol
* goto chrome and write you *myapp://hello*

* it's open a modal to open url.
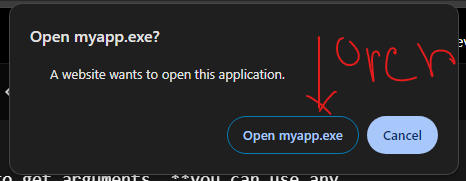
* OUTPUT:-
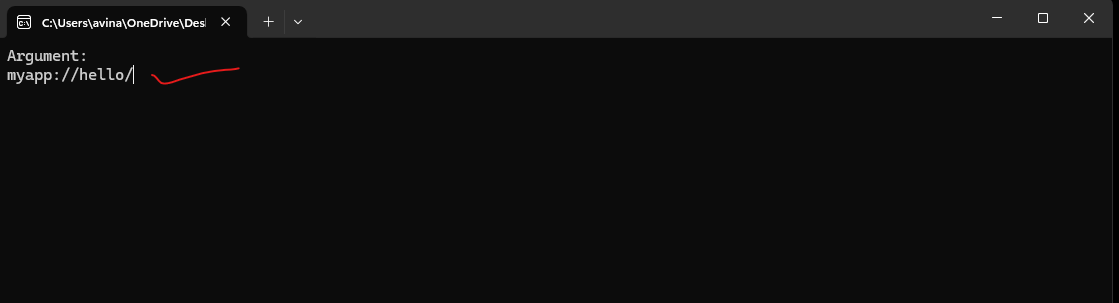
* Now you can parse this url and do anyting what you want.
Follow Me on GitHub [Avinash Tare](http://github.com/avinashtare/)
Enter fullscreen mode
Exit fullscreen mode
Guide to Creating Your Own URL Protocol (🔗)
Have you ever wondered how websites have their own unique URLs with the «http» or «ftp» prefix? Well, you’re not alone! Many tech enthusiasts are curious about creating their own URL protocols. Imagine having a custom URL like «so://yourwebsite.com» or «myapp://action» — it’s not only cool but also can enhance the user experience of your applications. In this blog post, we will dive into the world of URL protocols, explore common issues, provide easy solutions, and ultimately empower you to create your very own URL protocol. Let’s get started! 😎
Understanding URL Protocols
Before we jump into the technical aspects, let’s start with the basics. The section you see at the beginning of a URL, such as «http://www…» or «ftp://blah.blah…», is called the URL protocol. It defines the communication protocol that the browser or application should use to retrieve the requested resource. Examples you might be familiar with include:
-
http://for Hypertext Transfer Protocol (used for websites) -
ftp://for File Transfer Protocol (used for file transfers) -
file://for accessing local files -
unreal://for gaming purposes -
mailto://for launching email applications
Each of these protocols serves a specific purpose and is associated with its own set of rules. But what if you want to register your own custom protocol? Let’s find out!
Registering Your Own URL Protocol
Yes, you can indeed register your own URL protocol! The process may vary depending on the operating system, so we’ll cover the two most widely used ones: Windows and macOS.
Windows
-
Add Registry Entry: Open the Registry Editor (
regedit) and navigate toHKEY_CLASSES_ROOT. Create a new key with your desired protocol name (e.g.,myprotocol). Inside this key, create a subkey calledshelland another subkey inside it calledopen. Finally, create a subkey namedcommand. The final key path should look like this:HKEY_CLASSES_ROOT\myprotocol\shell\open\command. -
Set the Command: In the
commandsubkey, set the(Default)value to the command or path you want to associate with your protocol. For example, if you want to open a specific webpage, the command could be"C:\Program Files\MyApp\MyApp.exe" "%1".
macOS
-
Create Info.plist: Start by creating an
Info.plistfile for your application. This file contains metadata about your application, including the URL scheme. Add a newCFBundleURLTypeskey, and under it, add a new dictionary item calledCFBundleURLSchemes. WithinCFBundleURLSchemes, add a string item with your desired URL scheme (e.g.myapp). -
Handle Incoming Requests: To handle incoming requests to your URL scheme, you need to implement the appropriate code in your application. This will vary depending on the programming language or framework you’re using. For example, in Swift, you can handle incoming requests by implementing the
application(_:open:options:)method in yourAppDelegate.
Addressing Common Issues
Creating your own URL protocol can sometimes come with its own set of challenges. Let’s address a common issue you might encounter.
Issue: Protocol Not Recognized
Sometimes, when you try to open a URL with your custom protocol, such as myapp://action, the browser or application might not recognize it. This could be due to the lack of proper registration or the application not being installed.
Solution: Check Registration and Application
To resolve this issue, double-check the registration process outlined earlier for your respective operating system. Ensure that the registry entries (Windows) or the Info.plist file (macOS) are properly created. Additionally, make sure that the associated application (if any) is installed and set up correctly. Restart your computer or device to apply any changes if necessary.
Start Creating Your Own URL Protocols Today!
Now that you have a good understanding of URL protocols and how to create your own, it’s time to unleash your creativity! 🚀 Whether you want to create custom links for your website, deep-link into your mobile app, or add a unique touch to your desktop application, the possibilities are endless.
Have fun experimenting with different URL schemes, and don’t forget to share your creations with us. We’d love to see what you come up with! If you have any questions or need further assistance, feel free to leave a comment below. Happy URL protocol crafting! ✨
Introduction
With the Windows Custom URL scheme you can implement a simple integration of your application with Sygic navigation.
Example using HTML
This HTML web page example shows 4 hyperlinks to start Sygic navigation for showing the predefined locations and driving to the locations.
  <body>
    SLOVAKIA 48.159673,17.111206
    <a href="com.sygic.aura://coordinate|17.12812|48.15594|show">Sygic show</a>
    <a href="com.sygic.aura://coordinate|17.12812|48.15594|drive">Sygic navigate to</a>
    USA (Illinois) 41.87985,-87.636395
    <a href="com.sygic.aura://coordinate|-87.636395|41.87985|show">Sygic show</a>
    <a href="com.sygic.aura://coordinate|-87.636395|41.87985|drive">Sygic navigate to</a>
  </body>
List of Sygic Custom URL schemes
Please note that for majority of uses the parameter string needs to be URL-encoded (so called percent encoding).
It normally relates to the following characters: «#%<>[]^`{|} and the SPACE. For exact rules check the documentation on Encoding
Example: Instead of com.sygic.aura://route_download|http://dat.my.com/my route.sif
use com.sygic.aura://route_download%7Chttp%3A%2F%2Fdata.my.com%2Fmy%20route.sif
| name | URL scheme | Example |
|---|---|---|
| search an address or place | com.sygic.aura://search | searched address | com.sygic.aura://search|Bratislava%20Einsteinova%2021 |
| search an address or place and drive | com.sygic.aura://search | searched address | drive | com.sygic.aura://search|Bratislava%20Einsteinova%2021|drive |
| show map on an address | com.sygic.aura/address | country | city | postal | street | house number | type | com.sygic.aura://address|Slovakia|Bratislava|85101|Einsteinova|21|show |
| drive to an address | com.sygic.aura/address | country | city | postal | street | house number | type | com.sygic.aura://address|Slovakia|Bratislava|85101|Einsteinova|21|drive |
| drive to an address using the first route | com.sygic.aura/address | country | city | postal | street | house number | type | com.sygic.aura://address|Slovakia|Bratislava|85101|Einsteinova|21|driveNow |
| show map on coordinates | com.sygic.aura://coordinate | lon | lat | type | com.sygic.aura://coordinate|17.12812|48.15594|show |
| drive to coordinates | com.sygic.aura://coordinate | lon | lat | type | com.sygic.aura://coordinate|17.12812|48.15594|drive |
| drive to coordinates using the first route | com.sygic.aura://coordinate | lon | lat | type | com.sygic.aura://coordinate|17.12812|48.15594|driveNow |
| drive to coordinates with defining address description | com.sygic.aura://coordinateaddr | lon | lat | address_description | type | com.sygic.aura://coordinateaddr|17.12812|48.15594|Customer John Smith|drive |
| drive to coordinates with defining address description using the first route | com.sygic.aura://coordinateaddr | lon | lat | address_description | type | com.sygic.aura://coordinateaddr|17.12812|48.15594|Customer John Smith|driveNow |
| loads json itinerary | com.sygic.aura://route | file (sif or json) | com.sygic.aura://route|myitinerary.sif |
| downloads json itinerary and loads it to navigation | com.sygic.aura://route_download | url | type
where type can have values: |
com.sygic.aura://route_download|http://test.com/routes/myroute.sif|sif check encoding rules |
| opens web page directly in navigation | com.sygic.aura://url | webpage | com.sygic.aura://url|www.shmu.sk |
| activate license with product code | com.sygic.aura://activate|productCode | com.sygic.aura://activate|2637-A356-563C-F156 |
| start navigation and login with username | com.sygic.aura://login | username | password | com.sygic.aura://login|jsmith@company.com|$js!PsW |
| update specific map or all maps | com.sygic.aura://update | map
Note: the call starts downloading maps immediately |
com.sygic.aura://update|fra com.sygic.aura://update|all |
| show sygic products’ shop | com.sygic.aura://mysygic | com.sygic.aura://mysygic |
| show product detail from shop | com.sygic.aura://mysygicproduct | productId | com.sygic.aura://mysygicproduct|22945 |
| buy a license for a product | com.sygic.aura://mysygicbuy | productId | com.sygic.aura://mysygicbuy|22945 |
| play gps nmea log from Res/gpslogs | com.sygic.aura://gpslog | nmeafile | com.sygic.aura://gpslog|mytraveltest.nmea |
| control truck settings (available since 13.6.0) |
com.sygic.aura://truckSettings | parameterstring
where parameterstring is of the form |
com.sygic.aura://truckSettings|rou=car com.sygic.aura://truckSettings|rou=cmp com.sygic.aura://truckSettings|mxs=90&rou=tru com.sygic.aura://truckSettings|mxs=110&len=8000&wid=2450&hei=3450&axw=1200&wei=15000&rou=tru com.sygic.aura://truckSettings|mxs=100&len=10000&wid=2450&hei=3200&axw=2200&wei=15550&rou=tru |
| define back button behavior | com.sygic.aura://back_button | application identifier | com.sygic.aura://back_button|com.android.chrome |
| overwrite app settings | com.sygic.aura://settingsOverwrite | filepath |
com.sygic.aura://settingsOverwrite|%2Fsdcard%2Fsettings_overload.ini com.sygic.aura://settingsOverwrite|%2Fsdcard%2Fmenu_overload.ini |
| get device code | com.sygic.aura://deviceCode | com.sygic.aura://deviceCode |
| control head-up display | com.sygic.aura://hud | command
where the command can be of the values: |
com.sygic.aura://hud|none com.sygic.aura://hud|normal com.sygic.aura://hud|inverted |
| remote activation | com.sygic.aura://activate | SDpassword | ProductID | Period | Description
where password, product id and period should be consulted with Sygic support |
com.sygic.aura://activate|43tgs36f|1506|12|my activation batch 17 |
| set language | com.sygic.aura://setLanguage | ISO | Type | VoicePack
where |
com.sygic.aura://setLanguage|en-GB|LangVoice|TTS |
Truck settings parameter string
| key | description | Example |
|---|---|---|
| mxs | defines maximum speed in km/h | mxs=90 |
| wei | defines total weight in kilograms | wei=15000 |
| axl | defines maximum axle weight in kilograms | axw=1200 |
| len | defines length in milimeters | len=7800 |
| wid | defines width in milimeters | wid=2450 |
| hei | defines height in milimeters | hei=3450 |
| rou | defines routing type, where the possible values are: car, tru (truck), cmp (camper), van |
rou=tru |
| general | 1 defines turning the general hazmats on, 0 clears the setting | general=1 |
| water | 1 defines turning the water hazmats on, 0 clears the setting | water=1 |
| hClass | defines the setting of US hazmat classes. The possible values are 1,2,3,4,5,6,7,8,9,I. The values can be combined. The value 0 clears the setting to none. |
hClass=148 |
| adr | defines the setting of ADR tunnel class. The possible values are B,C,D,E. The values cannot be combined. The value 0 clears the setting to none. |
adr=B |
| profile | defines the profile id the new truck settings to be applied to, while the particular profile is also set active. The default is the profile 1. |
profile=2 |
| emiss | defines the vehicle’s emission category. The possible values are: 1,2,3,4,5,6 | emiss=5 |
| year | defines the vehicle’s production year. The values are in the form of 2016, 2017, etc | year=2017 |
Supported standard Android Geo URI schemes
Except for the Sygic URL schemes we also support standard Android custom URI schemes for geo functionality.
| key | description | Example |
|---|---|---|
| geo lat/lon | geo:latitude,longitude | geo:48.12345,17.12345 |
| geo lat/lon with zoom | geo:latitude,longitude?z=zoom | geo:48.12345,17.12345?z=11 |
| geo with marker | geo:0,0?q=lat,lng(label) | geo:0,0?q=48.12345,17.12345(Treasure) |
| geo with address | geo:0,0?q=my+street+address | geo:0,0?q=slovakia,+bratislava,+karadzicova,+14 |
| navigation to lat/lon | google.navigation:q= | google.navigation:q=Haanova+1%2C+851+04+Bratislava&mode=b&ll=48.12345,17.12345
google.navigation:q=Haanova+1%2C+851+04+Bratislava&mode=w&ll=48.12345,17.12345 google.navigation:q=Haanova+1%2C+851+04+Bratislava&mode=d&ll=48.12345,17.12345 |
Multiple actions in one call
It is possible to chain several actions within a single URL call using the &&& sign.
Example: com.sygic.aura://login|username|password&&&back_button|package
License terms
Integrating with the Custom URL scheme is restricted to Personal usage.
For Commercial usage of the URL scheme please contact our sales representatives.