on October 28, 2010
In Windows OS, we can find the current logged in username from windows command line. The logged in user information is stored in environment variables. So just by printing the value in these environment variables we can get to know the login name.
To know the login name of the currently logged in user we can run the below command.
echo %username%
This works on all releases of Windows OS(Windows XP, Server 2003, Windows Vista and Windows 7).
There is another command whoami which tells us the domain name also.
whoami
Example:
c:\>whoami
cmdline\administrator
Both of these options to find user name can be useful in batch files to write code in such a way that it works for every user. For example, if your batch file need to access a user specific folder, say Application data, then you can refer the directory as ‘C:\users\%username%\appdata‘.
Download Article
See which user is currently logged into the computer
Download Article
- Using the Start Menu
- Using Command Prompt
|
This wikiHow teaches you how to see your current account’s username on a Windows computer.
- Open your computer’s Start menu.
- Type %USERNAME% into the search box.
- Press Enter.
- Find the current logged-in user in your User Accounts settings.
-

The Start menu button looks like four squares in the lower-left corner of your screen.
-
Click the search box on the Start menu, and enter this line into it. This will search and find the User Accounts application from your Control Panel.
- If %USERNAME% doesn’t bring User Accounts in the search, try searching %ACCOUNT%.
Advertisement
-
This will open your User Accounts window.
-
Your current username is displayed in your User Accounts settings.


Advertisement
-
The Run window allows you to directly open any application or document on your computer.
- You can find and open Run from the Start menu, or press the ⊞ Win+R shortcut on your keyboard.
-
-
This will open Command Prompt in a new window.
-
This command will reply with your username.
-
Your current username will be displayed in a new line.


Advertisement
Ask a Question
200 characters left
Include your email address to get a message when this question is answered.
Submit
Advertisement
Thanks for submitting a tip for review!
About This Article
Thanks to all authors for creating a page that has been read 28,148 times.
Is this article up to date?
When you work with Windows, at some point, you’ll probably need to find out which user accounts are currently logged on to a computer. Luckily, you can use PowerShell to get current users on local or remote computers.
Not a reader? Watch this related video tutorial!
Not seeing the video? Make sure your ad blocker is disabled.
Do you have compromised passwords in your Active Directory? Find out with Specops Password Auditor Free.
In this tutorial, you’ll learn several ways to use PowerShell to get current users on a computer. The methods you learn will include native commands, .NET classes, and Windows Management Instrumentation (WMI) specific cmdlets.
Are you ready to find out who’s lurking on your computer? Let’s begin!
Prerequisites
In this tutorial, you’ll best learn by following the examples. And to do so, you’ll need a computer that runs on any modern version of Windows, such as Windows 10, Windows Server 2012, or later.
This tutorial will use a computer running Windows Server 2019 named DC1.
Why Use PowerShell to Get Current Users Logged On to a Computer?
Admittedly, there are ways to get current users logged on to a computer without PowerShell. After all, system admins have to have had a way to do so even before PowerShell, right? If so, why use PowerShell?
Doing the same task in PowerShell benefits from treating the results as objects that you can manipulate. For example, if you run a script that prompts for the user credential, PowerShell can programmatically populate the username, and you only need to type in the password manually.
Another real-world example is exporting the list of users currently logged on to a server to a file. It is by using PowerShell to get the current users then export the result to CSV, HTML, or XML files. Afterward, various automation workflows can use this output.
There could be thousands of reasons to use PowerShell to get current users, but the end game all boils down to your requirements. And this tutorial will teach you the different ways to achieve that goal.
Querying the Win32_ComputerSystem Class
Let’s start with the PowerShell native cmdlets called Get-WMIObject and Get-CimInstance. These cmdlets allow you to query information, including the currently logged-on user, using the Windows Management Instrumentation (WMI) classes on a local or remote computer.
Get-WMIObjectis the older (deprecated) cmdlet and is only available up to Windows PowerShell 5.1. Conversely,Get-CIMInstanceis the newer, more secure cmdlet and is available up to the latest PowerShell versions.
To learn more, visit Get-CIMInstance Vs. Get-WMIObject: What’s The Difference?
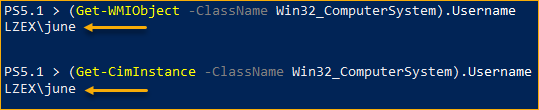
To use PowerShell to get the current user, invoke either cmdlet targeting the Win32_ComputerSystem class. The Win32_ComputerSystem class includes various properties, including the Username property. To do so, open a PowerShell window and run the commands below.
# Using the Get-WMIObject cmdlet and return only the Username property
(Get-WMIObject -ClassName Win32_ComputerSystem).Username

# Using the Get-CimInstance cmdlet and return only the Username property
(Get-CimInstance -ClassName Win32_ComputerSystem).Username
Note: Querying the Win32_ComputerSystem class will only return the username of who is logged on to the computer directly (console session). If the user logged on remotely (e.g., Remote Desktop), the username will be blank.
Both commands return the same result, as shown below. If the current user is a domain user account, the command will return the domain and username (domain\username). But for a local user account, the output would be computer\username.
Get-WMIObjectandGet-CimInstancehave a parameter called-computerName, which accepts the computer’s name to query. Using this parameter means that you can query the same information from a remote machine in the network.
But if you need to get only the username without the domain, a solution is to split the output using the split() method . To do so, run the command below in PowerShell.
# The command below will split the username property into two using the backslash '\' character as the delimiter.
# The [1] part at the end tells the command to return only the result at index 1.
# Indexes start with 0, which means specifying index 1 will show the result at the second position.
((Get-WMIObject -ClassName Win32_ComputerSystem).Username).Split('\')[1]
As a result, PowerShell returns the user part only, like the screenshot below.
Reading the Windows Environment Variables
Another way to use PowerShell to get the current user on a computer is by retrieving values from the environment variables. The environment variables represent the operating system data, including the current user’s username, among others.
There are three ways to interact with the environment variables. Whichever way you choose would return the same result.
The Env PowerShell Drive
PowerShell caches environment variables and makes them available through a PowerShell Drive (PSDrive) called the Env: drive. PSDrives are data locations that you can access like a drive on the computer (e.g., C:), but are only accessible inside PowerShell.
PowerShell automatically creates the Env: drive as soon as you open a PowerShell session. And because Env: is a drive, you can get its contents by invoking the Get-ChildItem cmdlet, similar to how you would list the contents of a file system drive or folder.
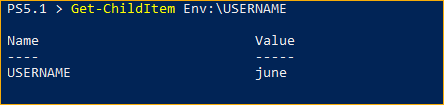
Using the Env: drive In PowerShell, get the current user by running the command below.
Get-ChildItem Env:\USERNAMEThe screenshot below shows the expected result. As you can see, the command returns the USERNAME item and its corresponding value, which is the currently logged-on user.
To return the username value only, modify the command as you see below and rerun it in PowerShell.
(Get-ChildItem Env:\USERNAME).ValueAnd as you can see below, the command only returns the username value as a string.

The $env Variable
Aside from accessing the environment variables as a PSDrive treating them as files in a drive, another way is accessing the Env drive as a variable. Meaning, you can reference the environment variables using the syntax below.
# The $ sign indicates a variable
# env is the Env drive
# <variable> is the variable name you want to get
$env:<variable>
Based on the said syntax, run the command below in PowerShell to get the current user.
As the screenshot below shows, the command returns the username value.
The .NET Environment Class
PowerShell is an object-oriented language and shell. Essentially everything that you work on within PowerShell is an object. When you run a command, the output is an object. If you declared a variable, that variable is an object itself. You get the idea.
These objects have a structure that defines the data type they represent, similar to blueprints. And these blueprints are called .NET classes or simply classes.
As for the environment variables, the class associated with it is the Environment class. So how do you use the Environment class in PowerShell to get the current user?
Like the $env variable, the Environment class has a Username property, whose value is the current user’s username. To get the username property value, run the command below in PowerShell.
[System.Environment]::UserName

Apart from the Username property, the Environment class also has a method to get the value of an environment variable. The method’s name is GetEnvironmentVariable.
To get the current user using this method, run the command below.
[System.Environment]::GetEnvironmentVariable('username')

Using the .NET WindowsIdentity Class
The WindowsIdentity class is another .NET class you can invoke in PowerShell to get the current user. This class has a method called GetCurrentName, which returns an object that represents the current Windows user.
To get the current user details, run the command below.
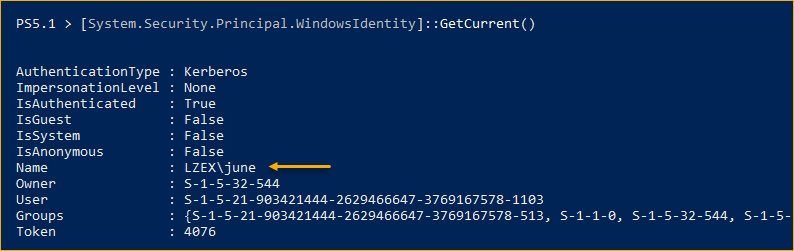
[System.Security.Principal.WindowsIdentity]::GetCurrent()
As you can see below, the command returns the current user object properties, including the Name property. The Name property value’s format follows the domain\user convention.
To return the username part only, modify the previous command to select only the Name property, and apply the string splitting technique. To do so, copy the command below and run it in PowerShell.
([System.Security.Principal.WindowsIdentity]::GetCurrent().Name).Split('\')[1]
Using the whoami Command
Another handy command that quickly lets you get the current user is the whoami command. This command is an executable file that you can find in the %WINDIR%\System32 folder with the file name whoami.exe.
To get the current user’s username, run the command below.
The command then returns the result in the domain username format, such as the screenshot below.
To get the username without the domain, apply the string split technique you learned earlier in this tutorial by running the command below.
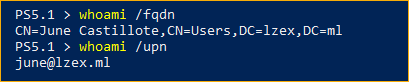
The whoami command can also return the current user’s fully qualified distinguished name (FQDN) and the user principal name (UPN). This command output could be helpful if you intend to run a script that retrieves the current user’s identity beyond the username.
Run the command below in PowerShell to get the current user’s FQDN and UPN.
# Get the current user's FQDN
whoami /fqdn

# Get the current user's UPN
whoami /upn
Note: The FQDN and UPN values are only available if the currently logged-on user is a domain user. If you attempt to get these values for a local user, the command will return an error, as shown below.

Using the query Command
If you’re a system admin or a domain user, chances are you’ve logged on to a remote machine via the Remote Desktop Protocol (RDP) at least once, perhaps to manage resources or use applications. Whatever the reason, you would want to know who is currently logged on and using system resources.
Luckily, Windows has a built-in command-line tool called query that can list all the currently logged-on users on a computer. The command also shows you if the user logged on via a remote desktop session or locally to the computer.
The query command has two parameters pertinent to getting the logged-on users; session and user. The session parameter lists the computer sessions, while the user parameter lists the users and their sessions.
The
query sessioncommand has an alias calledqwinsta, while the command alias forquery userisquser.
For example, run the command below to list the sessions on DC1.
# query sessions on DC1
qwinsta /server:dc1
The screenshot below shows the command’s output. In this example, two users logged on to the DC1 computer—one in the console session and another via RDP. As you can see, qwinsta returns all the sessions, even the non-user ones.

If you run
qwinstaorquserby itself without the/server:<computer>argument, either command will query the local computer by default.
Next, to list all users with existing log-on sessions, run the user command below.
# query users on DC1
quser /server:dc1
After running the command, you’ll notice right away that quser returns the sessions and users like the qwinsta command. But this time, there are no blank sessions.
There are also two additional columns: IDLE TIME, which shows the users’ idle time, and LOGON TIME showing the users’ logon timestamp.

In the end, comparing the qwinsta and quser results, quser is the more appropriate command in PowerShell to get current users.
Do you have compromised passwords in your Active Directory? Find out with Specops Password Auditor Free.
Conclusion
While there are many ways in PowerShell to get the current users logged on, which method is best depends on the result you intend to get and how you will use it.
The native WMI-related cmdlets and the query command allow you to get the logged-on users on a local or remote computer. Using .NET classes and environment variables offers quick ways to retrieve the same results but only on the local computer.
Whether you plan to run a script or manually display results on the screen, there’s a method that would fit your requirements to use PowerShell to get the current user. What’s next? Perhaps learn how to parse the query command results and convert them to PowerShell objects by writing functions with RegEx?
In Windows 11, there are several ways to check who is currently logged into the Windows or who you are logged in as locally. If you are on a shared network and want to check who is logged in to another Windows 11 computer remotely, there are several command lines you can use to query who is currently logged into that particular computer.
The remote method is especially useful when there are several people who often remotely login to a shared computer. If you try to login to a shared computer while someone else is already logged on, you will be given the option to continue or force the other user to logout or disconnect. Thus, it would be nice to remotely check who is currently logged into the shared computer first, before trying to login.
Also see: How to Restrict User Access to a Folder or Drive in Windows 11
Check who is logged in on Windows 11 using Command Prompt
Locally
- Search for Command Prompt via Start and open it.
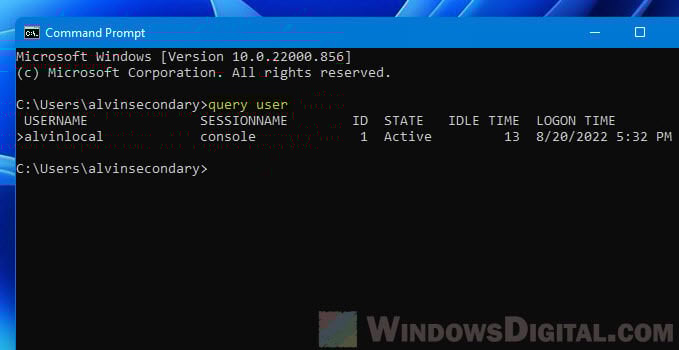
- In the Command Prompt window, enter the following command to query who is currently logged in.
query user
- The user who is logged in will be shown under USERNAME along with other information such as logon time.

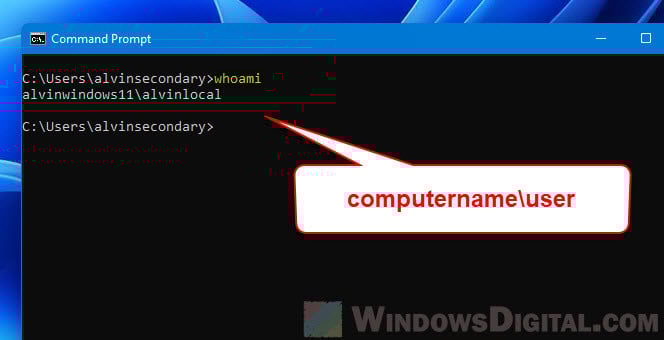
Alternatively, you can use the “whoami” command instead to check who you are logged in as in Windows 11. In Command Prompt, enter the following command to check “who am I logged in as” in the local computer (or the computer you remotely logged on to).
whoami
Remotely
- Search for and open Command Prompt via Start menu.
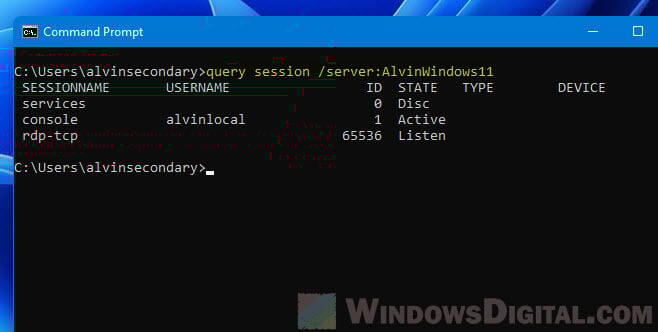
- In Command Prompt, enter the following command to query who is logged in on a Windows 11 remote computer. Replace the ComputerName with the actual computer name of the PC you want to check.
query session /server:ComputerName
You can also use query user instead of query session.
query user /server:ComputerName
- Command prompt will then shows details about the user who is currently logged into the remote computer.

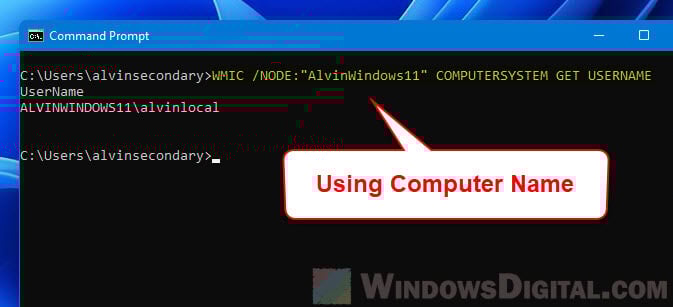
In addition, you can also use the WMIC command line to check who is logged in on Windows 11 remotely. In the command prompt window, enter the following command. Replace the ComputerName with the actual computer name of the remote computer you are querying.
WMIC /NODE:"ComputerName" COMPUTERSYSTEM GET USERNAME
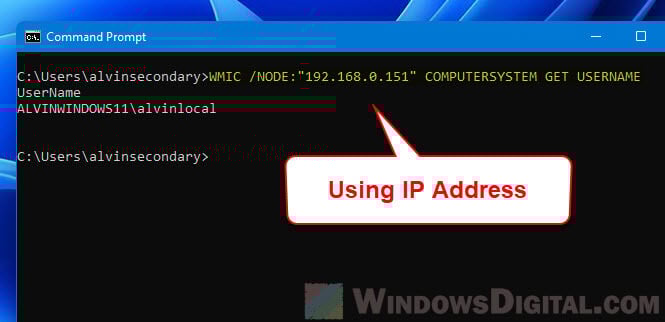
Alternatively, you can use the IP address of the remote computer instead of the computer name for this command to query who is logged in.
WMIC /NODE:"IPaddress" COMPUTERSYSTEM GET USERNAME
What to do if you encounter RPC or other error
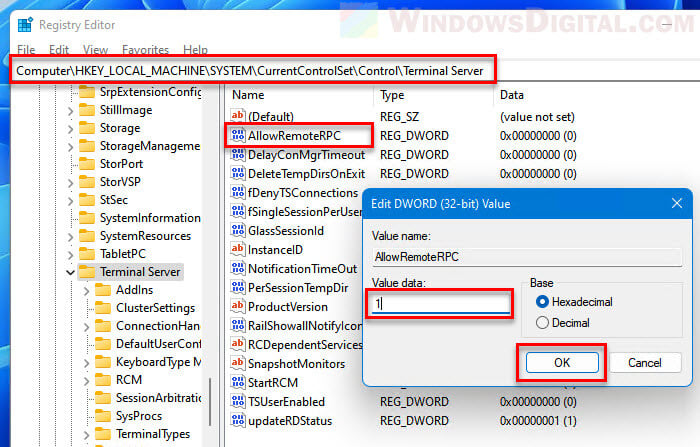
If you encounter RPC error such as “The RPC service is unavailable” error while querying who is logged in on Windows 11, try to set the following registry value on the remote computer.
- Search for Registry Editor via Start and open it.
- Navigate to the following registry key.
HKEY_LOCAL_MACHINE\SYSTEM\CurrentControlSet\Control\Terminal Server
- Next, double-click AllowRemoteRPC.
- In the Value data field, enter “1” and then click OK to save the changes.
- Close Registry Editor and restart the remote computer for the changes to take effect.
Check who am I logged in as via Task Manager or Start menu
If you only want to find out who you are logged in as on a Windows 11 local computer or a computer you remotely logged in to, you can quickly do so via the Task Manager or the Start menu.
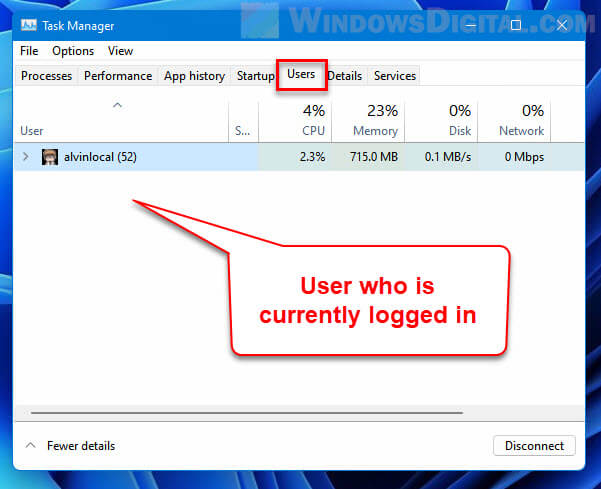
To open Task Manager in Windows 11, right-click the Start icon on the taskbar and then select Task Manager. Alternatively, you can press Ctrl + Alt + Del to open the lock screen and then select Task Manager to open it.
Next, in the Task Manager window, select the Users tab. From there, you can see which user is currently logged into the Windows 11 computer.
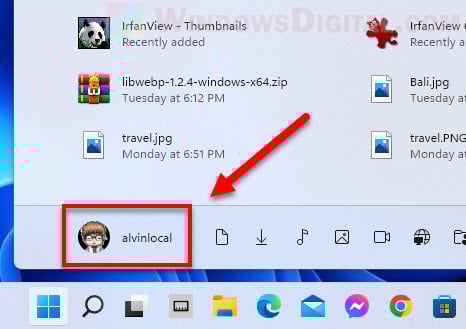
Another method to find out who is logged into Windows 11 is by simply opening the Start menu. Click the Start icon to open the Start menu. The currently logged in user will be shown at the bottom left corner of the Start menu.