
You can create you own desktop shortcut for the Ctrl + Alt + Del screen. It is pretty useful when you work over Remote Desktop apps, as it explicitly opens on the needed machine. Clicking such a shortcut will open for you the familiar full screen page with the Lock, Sign out, Task Manager, Change password commands, etc.
What is the Ctrl + Alt + Del screen in Windows
The Ctrl+Alt+Del screen, sometimes referred as the Windows Security screen, is a special page in Windows that opens when the user hits the Ctrl + Alt + Del keyboard shortcut. Typically, it includes several PC management options, the set of which may vary depending on the device, user account, and connection type. Let’s review them.
Lock
An option to lock the computer: The locked PC will require to enter your password to access your desktop. It is great when you have to leave your work place for some short time.
Sign out
Another option is «Sign out», which will sign you out of your current session. It will close all your apps and documents, so the PC is ready to start you work from scratch.
Change Password
The «Change Password» option allows changing your current password. It will open the appropriate dialog box if you select it.
Task Manager
The «Task Manager» option is probably most frequently used option of the Ctrl+Alt+Del screen. The Task Manager is the inbox app that displays all the processes running on your computer, along with the system performance details like CPU, memory, and disk usage. It allows you to manage Startup apps, and services.
Switch User
This option allows you switch from one user account to another without logging out from the OS. Thanks to it, multiple users can have work sessions simultaneously on a single PC.
Power Icon
In addition to those, there is a power icon that includes an extra menu to shut down or restart the device. It is usually located at the bottom-right corner of the Ctrl+Alt+Del screen.
If the keyboard sequence is not enough for you, and you need some alternative way to open the security screen, you can create a desktop shortcut for opening it. There are several methods to get that done.
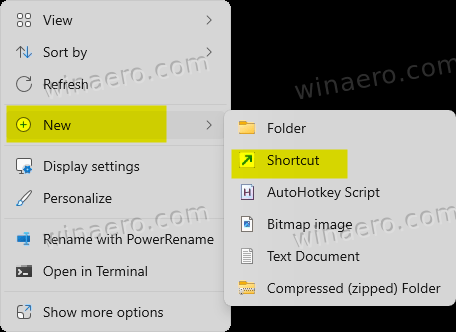
- Right-click an empty space on your desktop and select New > Shortcut from the menu.

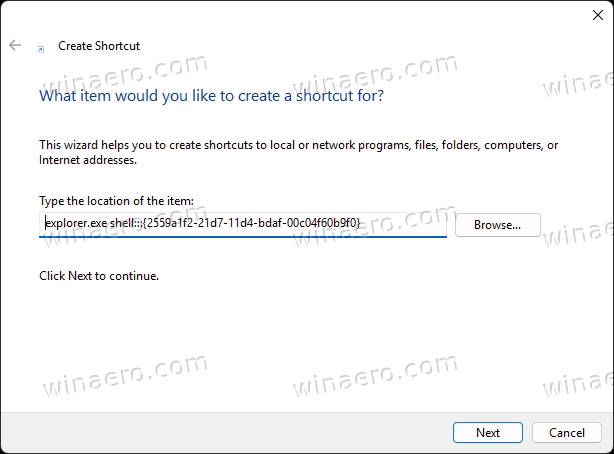
- In the «Type the location of the item:» box paste the following command:
explorer.exe shell:::{2559a1f2-21d7-11d4-bdaf-00c04f60b9f0}, and click Next.
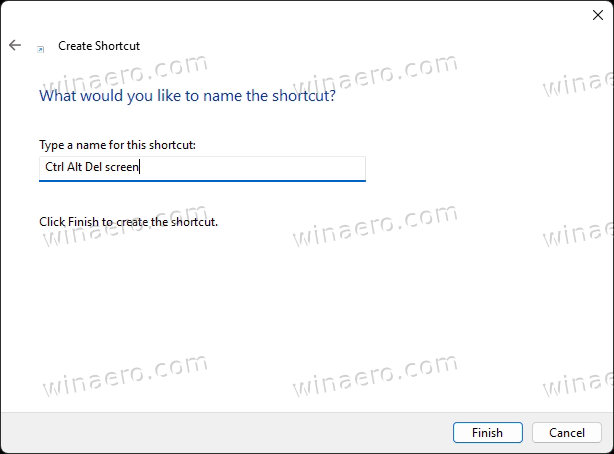
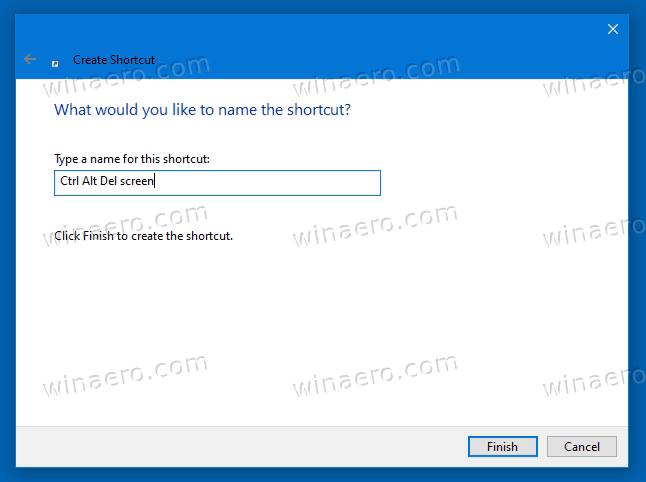
- On the next page, give your shortcut some name like Ctrl Alt Del screen.
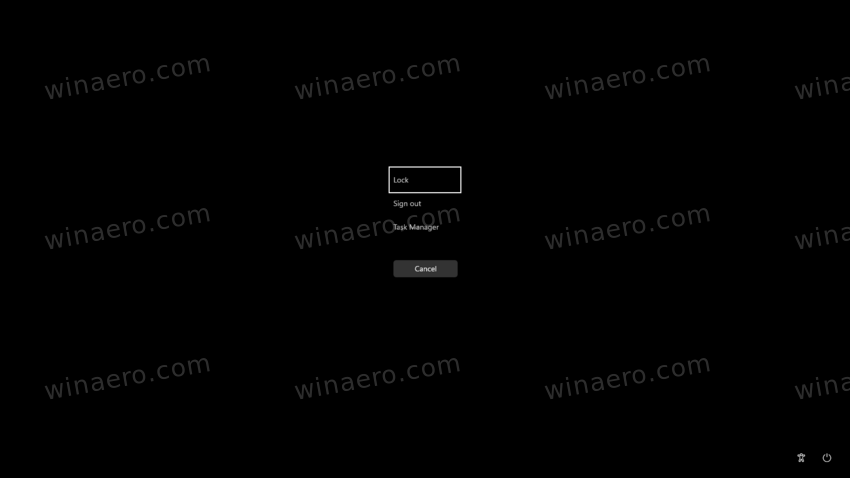
- Now, double-click the shortcut you just created. You will be presented with the familiar Ctrl + Alt + Del page.

That’s it!
You may have already noticed that some of the options are missing in my screenshot above. That’s because I am connecting via RDP. Otherwise the options to switch the user and change my password would be visible.
If the shell::: command doesn’t suit you needs or doesn’t work for some reason, a good alternative to it is VBScript. By creating a small file of 4 lines of text you can invoke the CAD screen. By creating a shortcut to that file you will have a desktop shortcut for the Ctrl+Alt+Del screen. Here’s how.
VBScript method
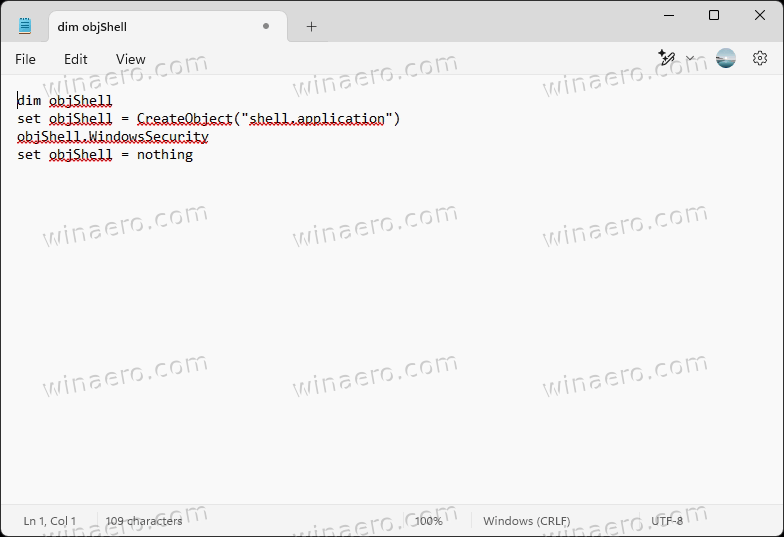
Step 1. Open you favorite text editor (Notepad will do), and paste the following text into the new document.
dim objShell
set objShell = CreateObject("shell.application")
objShell.WindowsSecurity
set objShell = nothing
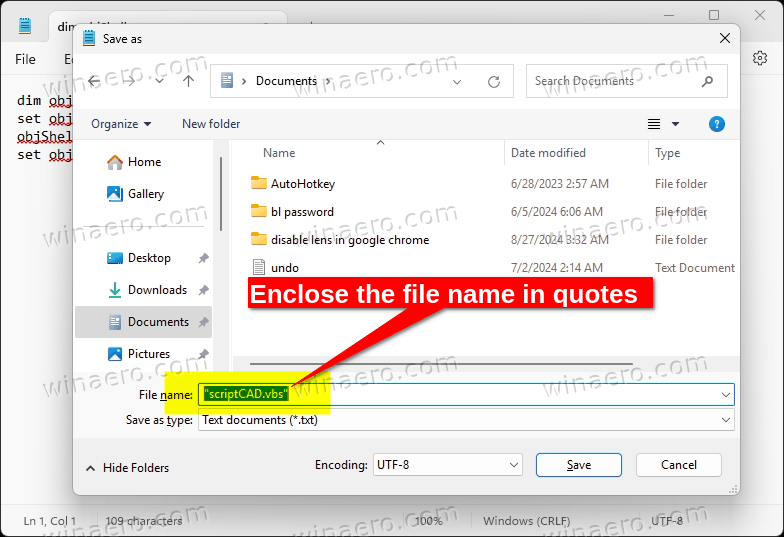
Step 2. Save the document to a file with the vbs extension. For that, press Ctrl + S and then enclose the file name in quotes in the file name box, e.g. "scriptCAD.vbs".
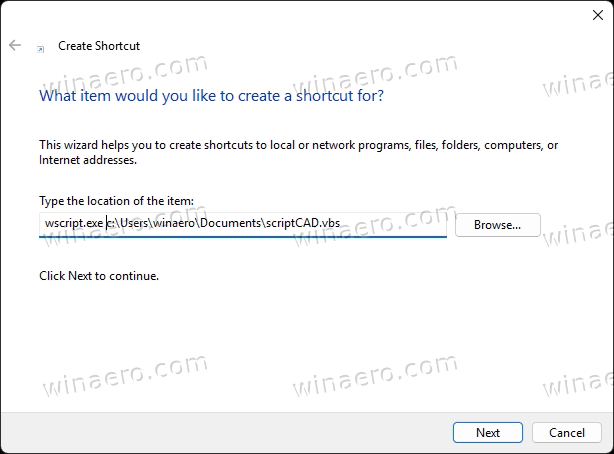
Step 3. Create a new desktop shortcut, and provide the following as the item location: wscript.exe path\to\your\vbs file. In case it will be wscript.exe c:\Users\winaero\Documents\scriptCAD.vbs.
Step 4. Name you shortcut as Ctrl Alt Del screen and double-click it. Voila, the CAD page will open instantly.
The VBScript solution is nice: It is lightweight and fast. However, there is a catch. Microsoft claims that the whole Windows Scripting Host platform is now deprecated. One day we can end up with VBScript missing after a Windows update. In this very case, you can use PowerShell instead. Let’s review this method too.
Create the Ctrl Alt Delete desktop shortcut with PowerShell
- Right-click your desktop, and select New > Shortcut from the context menu.
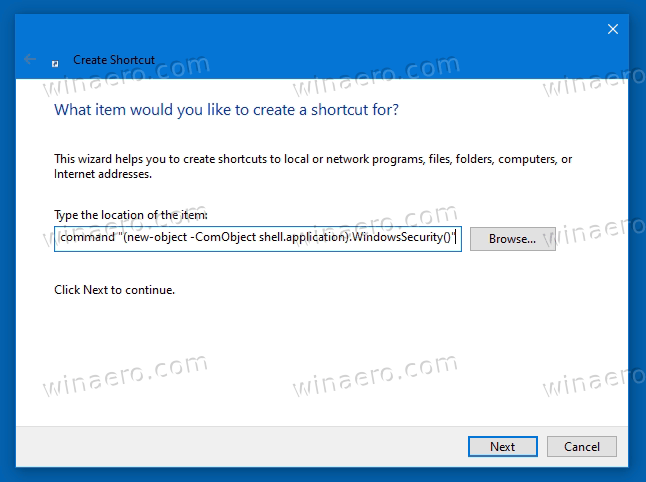
- In the Location of the item text area paste the following command:
Powershell.exe -noprofile -nologo -noninteractive -command "(new-object -ComObject shell.application).WindowsSecurity()".
- Click on the Next button, and specify a meaningful name for your shortcut.
- Now, click Finish in the New Shortcut dialog, and double-click your new Desktop shortcut. The PowerShell window will briefly appear on the screen, after which you will see the CAD page.
That’s it! The only downside of this method is the flashing PowerShell window that remains visible for a second. Everything else is pretty fine.
All the above reviewed solutions are native to Windows and don’t require you to use any third party tool. But this doesn’t mean that you shouldn’t or can’t. For example, you can create your own executable, say in Lazarus/Pascal. It will be a nice small native app that opens the Ctrl + Alt + Del page on demand.
Create Your Own App to Open the Ctrl + Alt + Del Screen
To create such an app, you must create a Shell object in Pascal to call the WindowsSecurity method. This method opens the CAD screen. The task involves using COM (Component Object Model) to interact with the Windows Shell. This will allow you to use the WindowsSecurity method to call the Security Options dialog box.
Step 1. Add required units
Ensure that your project includes the necessary units for working with COM objects. Typically, you’ll need ActiveX, ComObj, Variants, and ShellAPI. I recommend adding these: Windows, SysUtils, ActiveX, ComObj, ShellAPI, Variants.
Step 2. Initialize COM Library
Before using any COM objects, you need to initialize the COM library. The CoInitialize(nil); statement does the trick.
Step 3. Create and Use Shell Object
You will create an instance of the IShellDispatch interface and call its WindowsSecurity method.
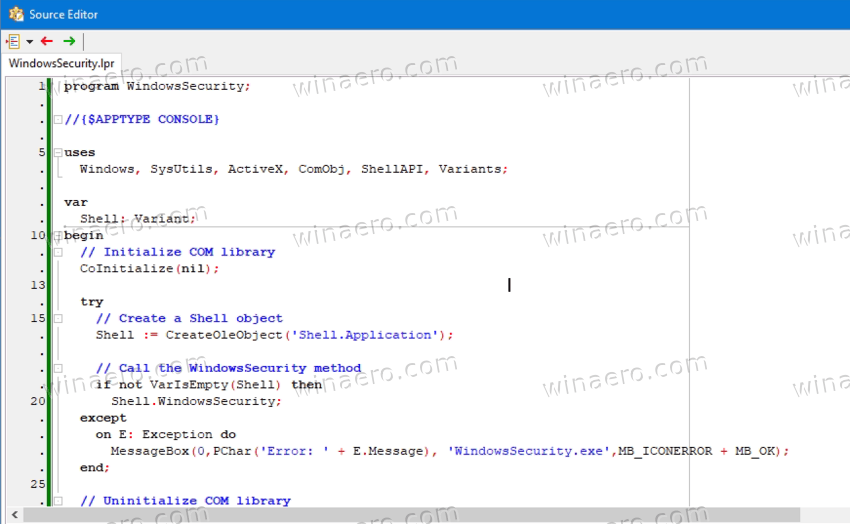
Here’s a complete example in Pascal that you can compile with Lazarus:
program WindowsSecurity;

uses
Windows, SysUtils, ActiveX, ComObj, ShellAPI, Variants;

var
Shell: Variant;
begin
// Initialize COM library
CoInitialize(nil);

try
// Create a Shell object
Shell := CreateOleObject('Shell.Application');

// Call the WindowsSecurity method
if not VarIsEmpty(Shell) then
Shell.WindowsSecurity;
except
on E: Exception do
MessageBox(0,PChar('Error: ' + E.Message), 'WindowsSecurity.exe',MB_ICONERROR + MB_OK);
end;

// Uninitialize COM library
CoUninitialize;

end.
Download the Executable file
I have compiled the above code for you into an executable binary. If you don’t want to deal with Lazarus/Delphi/anything else, you can simply download it.
Download the file
Simply run it, and it will open the Ctrl Alt Del dialog for you. Obviously, you can create a shortcut for it and use to open it in addition to hotkeys.
Why not use AutoIt?
You may wonder why I am using a Pascal code, and not AutoIt. AutoIt is a freeware scripting language designed for automating the Windows GUI and general scripting. It allows users to automate almost anything in the Windows operating system by simulating keystrokes, mouse movements, and window commands. Sounds great, but it is not suitable for our task. Here’s why.
Sending the Ctrl + Alt + Del key combination programmatically is a bit tricky because it’s a secure attention sequence (SAS) that is handled at a low level by the operating system. This means that most applications, including AutoIt, cannot simulate this key combination directly due to security reasons. So, If you absolutely need to send Ctrl + Alt + Del, you would typically need to use a lower-level system call or hook into the Windows API.
Why Windows includes the Ctrl+Alt+Del option?
There are a number of reasons for Microsoft to add the CAD requirement. Here are some of them.
Security
The Ctrl+Alt+Del combination was designed as a security measure. In older versions of Windows, like Windows 2000, this combination was used to prevent malware or unauthorized programs from mimicking the login screen and capturing your password. By requiring the physical pressing of those keys, it made it harder for malicious software to intercept or fake the login prompt.
By requiring this key combination before accessing sensitive system tools like Task Manager or user account settings, it adds a layer of protection to prevent unauthorized access.
So, the Ctrl+Alt+Del screen is an important feature in Windows that helps manage user accounts, security, system performance, and access to critical system tools like the Task Manager. It’s an important part of maintaining both security and usability, especially in multi-user environments or when an app has stopped responding and blocks your computer.
Closing Words
Invoking the Windows Security options may not be your daily task. But if you really need it, you may find that Windows doesn’t offer you an obvious way. Anyway, it is not a big deal. With help of PowerShell, VBScript, of just with a shell::: command you can create a shortcut to open the Ctrl Alt Del page. If that’s not enough, you can quickly build an executable file that opens it for you, and then create a shortcut for that exe.
Support us
Winaero greatly relies on your support. You can help the site keep bringing you interesting and useful content and software by using these options:
If you like this article, please share it using the buttons below. It won’t take a lot from you, but it will help us grow. Thanks for your support!
Author: Sergey Tkachenko
Sergey Tkachenko is a software developer who started Winaero back in 2011. On this blog, Sergey is writing about everything connected to Microsoft, Windows and popular software. Follow him on Telegram, Twitter, and YouTube. View all posts by Sergey Tkachenko
When you press the Ctrl + Alt + Del keys, you’d usually see options such as Lock, Switch User, Sign Out, and Task Manager. But did you know you can add or remove some of these options?
In this article, we’ll show you the various ways to add or remove items from the “Ctrl + Alt + Del” screen. But first, let’s briefly explore this screen.
What Is the «Ctrl + Alt + Del» Screen, and How Is It Useful?
The “Ctrl + Alt + Del” screen refers to the Security Options window that appears when you press Ctrl + Alt + Del. You can use this screen to lock or restart your device, sign out, switch between users, and quickly access the Task Manager.
In some Windows devices, the “Ctrl + Alt + Del” screen also allows you to change your password. Additionally, the screen has four options in the bottom-right corner. The first three options are for configuring language settings, Wi-Fi settings, and the Ease of Access Settings.
The last icon in the bottom-right corner helps you easily access the power options. When clicking on it, you should see the «Sleep,» «Shutdown,» and «Restart» options.
Now, let’s discover how to add or remove options from the Security Options screen.
How to Add or Remove Options From the «Ctrl + Alt + Del» Screen Using the LGPE
The Local Group Policy Editor (LGPE) makes it easy for you to add or remove options from the «Ctrl + Alt + Del» screen. If you’re using Windows Home and can’t access this tool, check out tips on how to access the LGPE on Windows Home.
Now, let’s explore how this tool can help.
How to Add or Remove the Lock, Change Password, Sign Out, and Task Manager Options
Here’s how you can use the LGPE to add or remove the Lock option from the Security Options screen:
- Press Win + R to open the Run command dialog box.
- Type gpedit.msc and press Enter to open the Local Group Policy Editor.
- Navigate to User Configuration > Administrative Templates > System > Ctrl+Alt+Del Options.
- To add the Lock option, double-click on Remove Lock Computer.

Next, select either Not Configured or Disabled to add the Lock option. Alternatively, select Enabled to remove this option. From there, press Apply and then press OK to save the changes.
Apply the same steps to add or remove the “Change password,” “Task Manager,” and the “Logoff” options from the «Ctrl + Alt + Del» screen.
How to Add or Remove the Power Button Using the LGPE
Here are the steps for adding or removing the power button from the «Ctrl + Alt + Del» screen:
- Press Win + R to open the Run command dialog box.
- Type gpedit.msc and press Enter to open the Local Group Policy Editor.
- Navigate to User Configuration > Administrative Templates > Start Menu and Taskbar.
- Double-click on the Remove and prevent access to the Shut Down, Restart, Sleep, and Hibernate commands option.
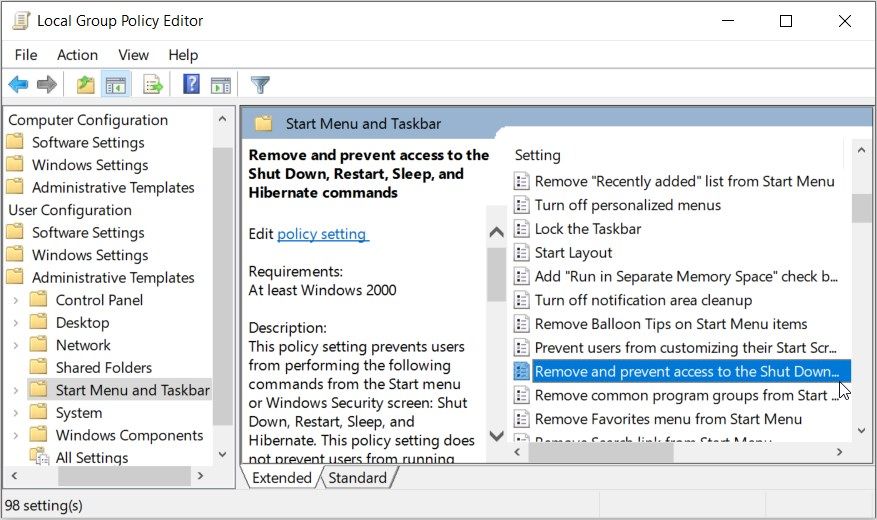
Next, select either the Disabled or Not Configured option to add the power button. Alternatively, select Enabled to remove this option. Finally, press Apply and then press the OK button.
How to Add or Remove the Wi-Fi Icon Using the LGPE
Here are the steps for adding or removing the Wi-Fi icon from the Security Options screen:
- Press Win + R to open the Run command dialog box.
- Type gpedit.msc and press Enter to open the Local Group Policy Editor.
- Navigate to Computer Configuration > Administrative Templates > System > Logon. Next, double-click on the Do not display network selection UI option on the right-hand side pane.
Select either the Disabled or Not Configured option to add the power button. Alternatively, select Enabled to remove this option. Finally, press Apply and then press the OK button.
How to Add or Remove Options From the «Ctrl + Alt + Del» Screen Using the Registry Editor
You can also add or remove options from the «Ctrl + Alt + Del» screen using the Registry Editor. However, this is a sensitive tool, so you need to back up the Registry first before continuing.
Once you’re ready, here are the steps for adding or removing the Lock option:
- Press Win + R to open the Run command dialog box.
- Type Regedit and then press Enter to open the Registry Editor.
-
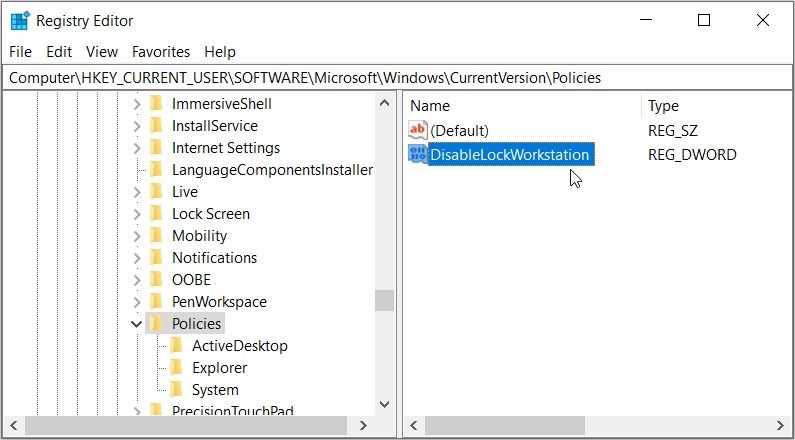
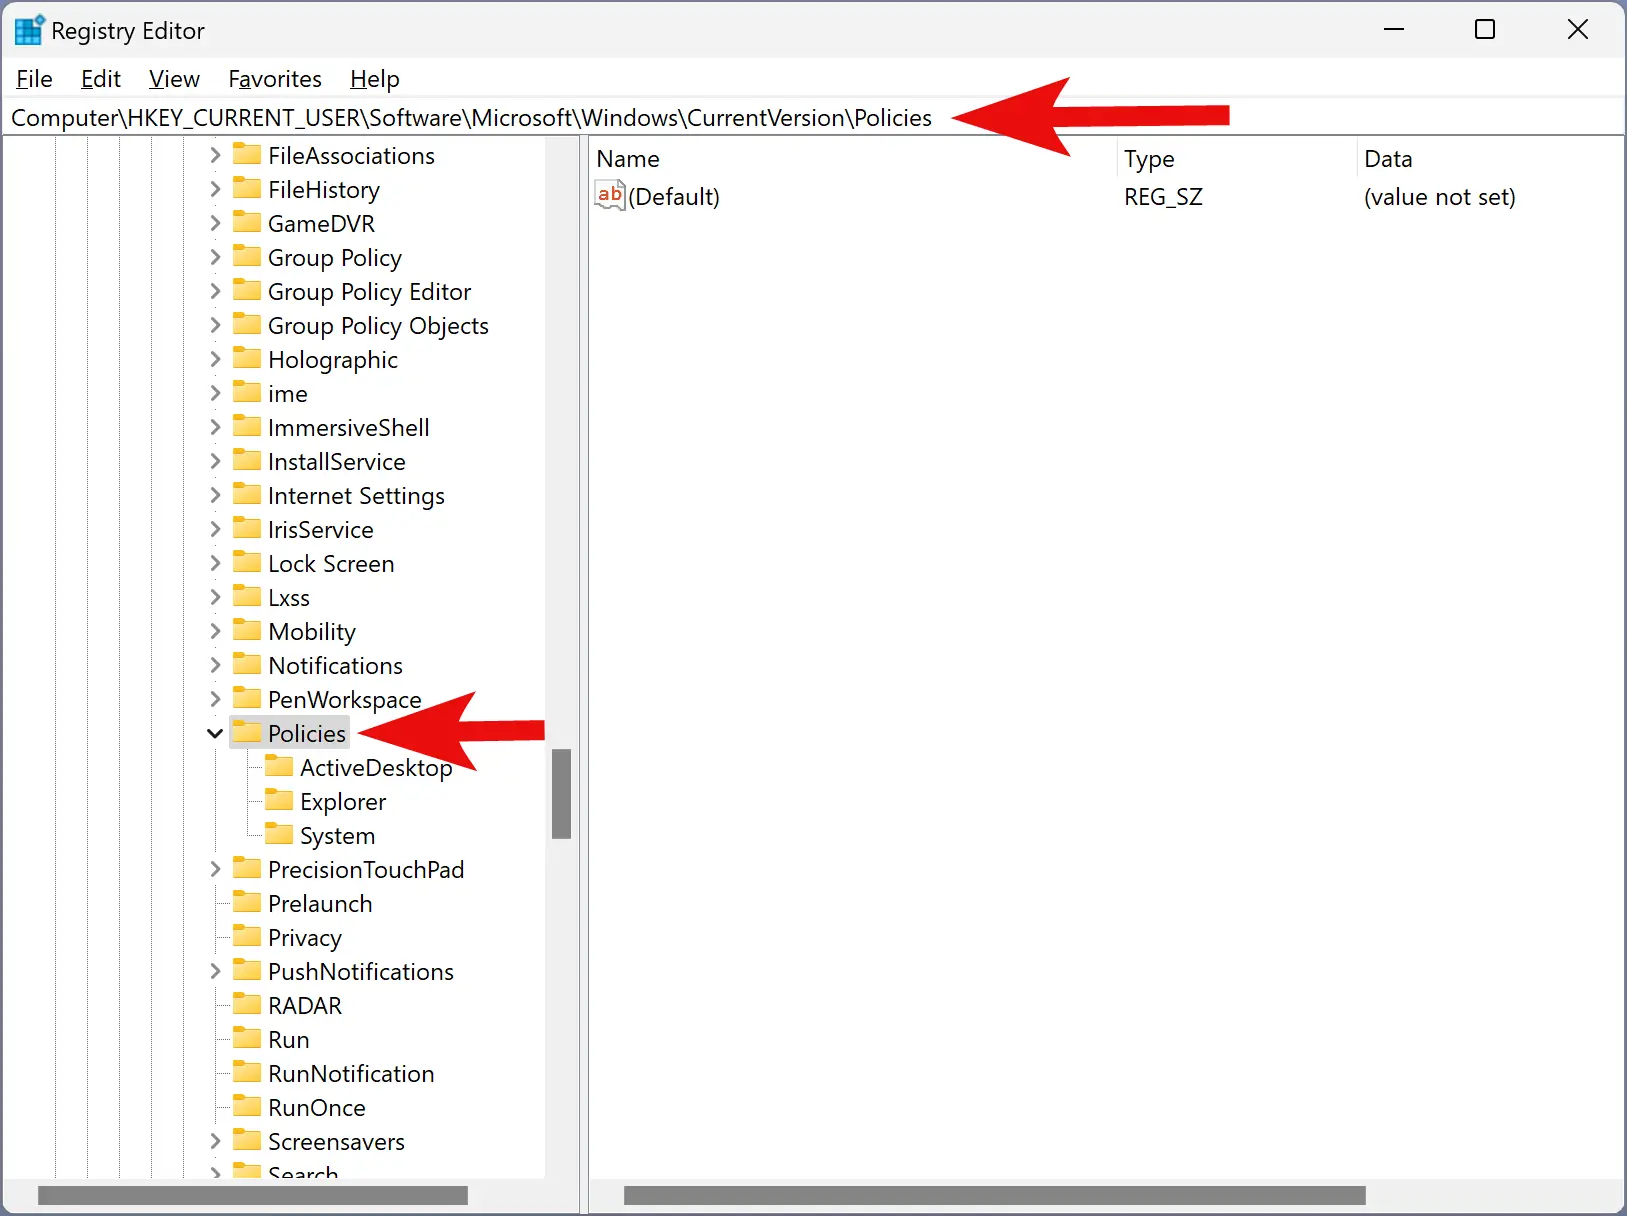
Copy-paste the following command into the address bar and then press Enter:
HKEY_CURRENT_USER\Software\Microsoft\Windows\CurrentVersion\Policies - Next, expand the Policies key and then click System.
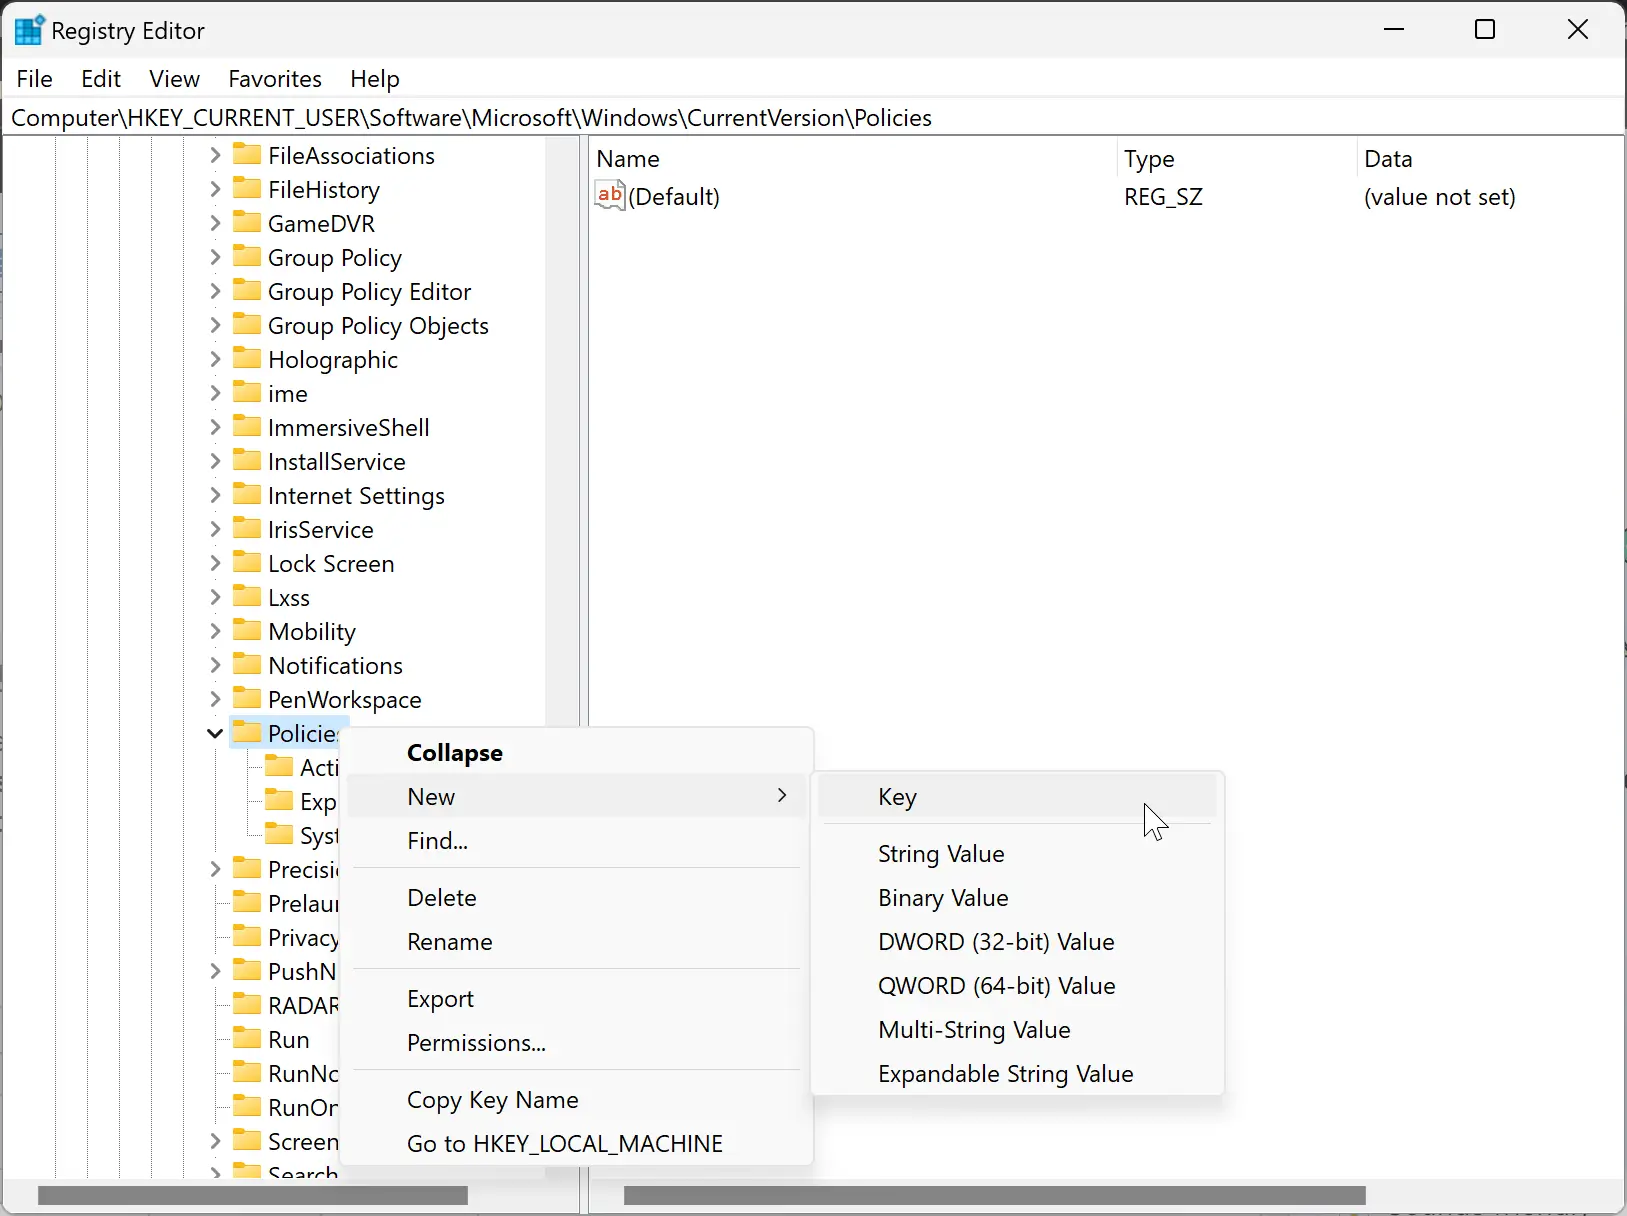
If the System key is missing, create it by right-clicking on the Policies key and selecting New > Key. Name the key as «System.»
How to Add or Remove the Lock Option
To add or remove the Lock option, follow these steps:
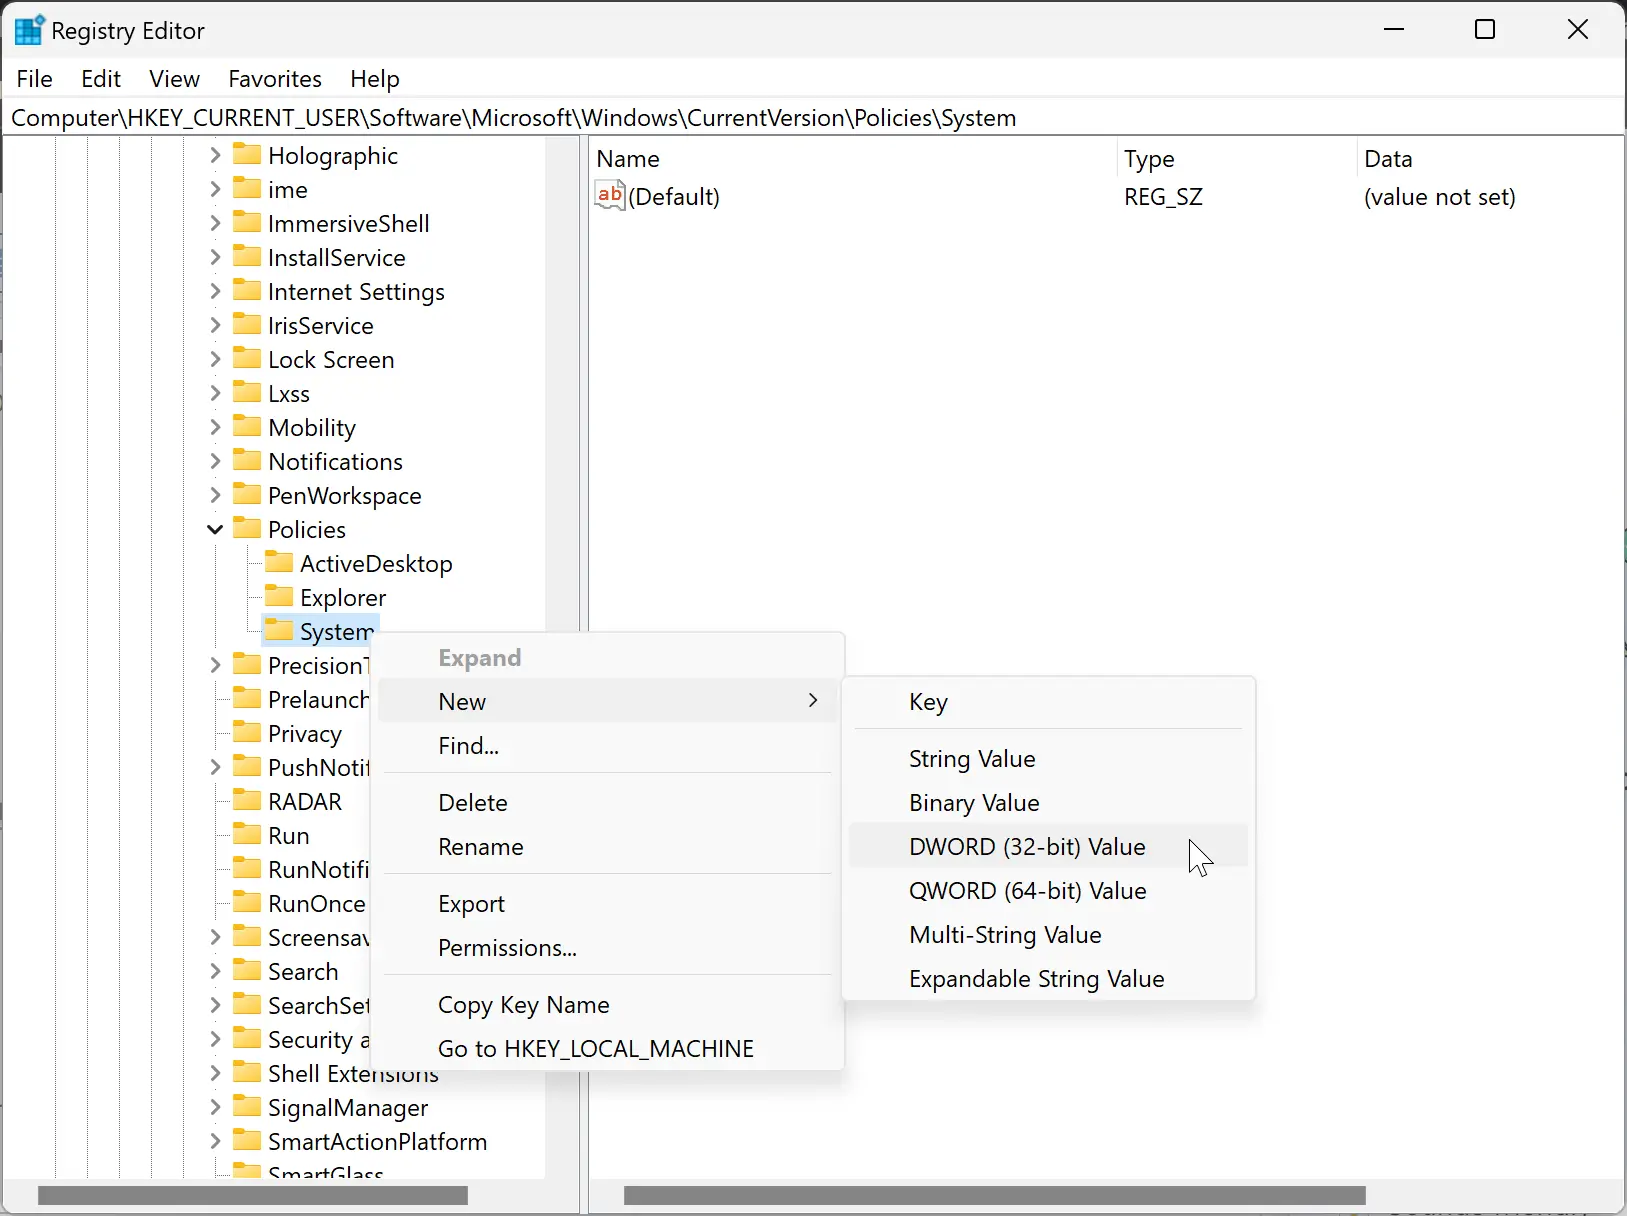
- Click the System key and right-click on a blank space on the right-hand side pane.
- Select New > DWORD (32-bit) Value.
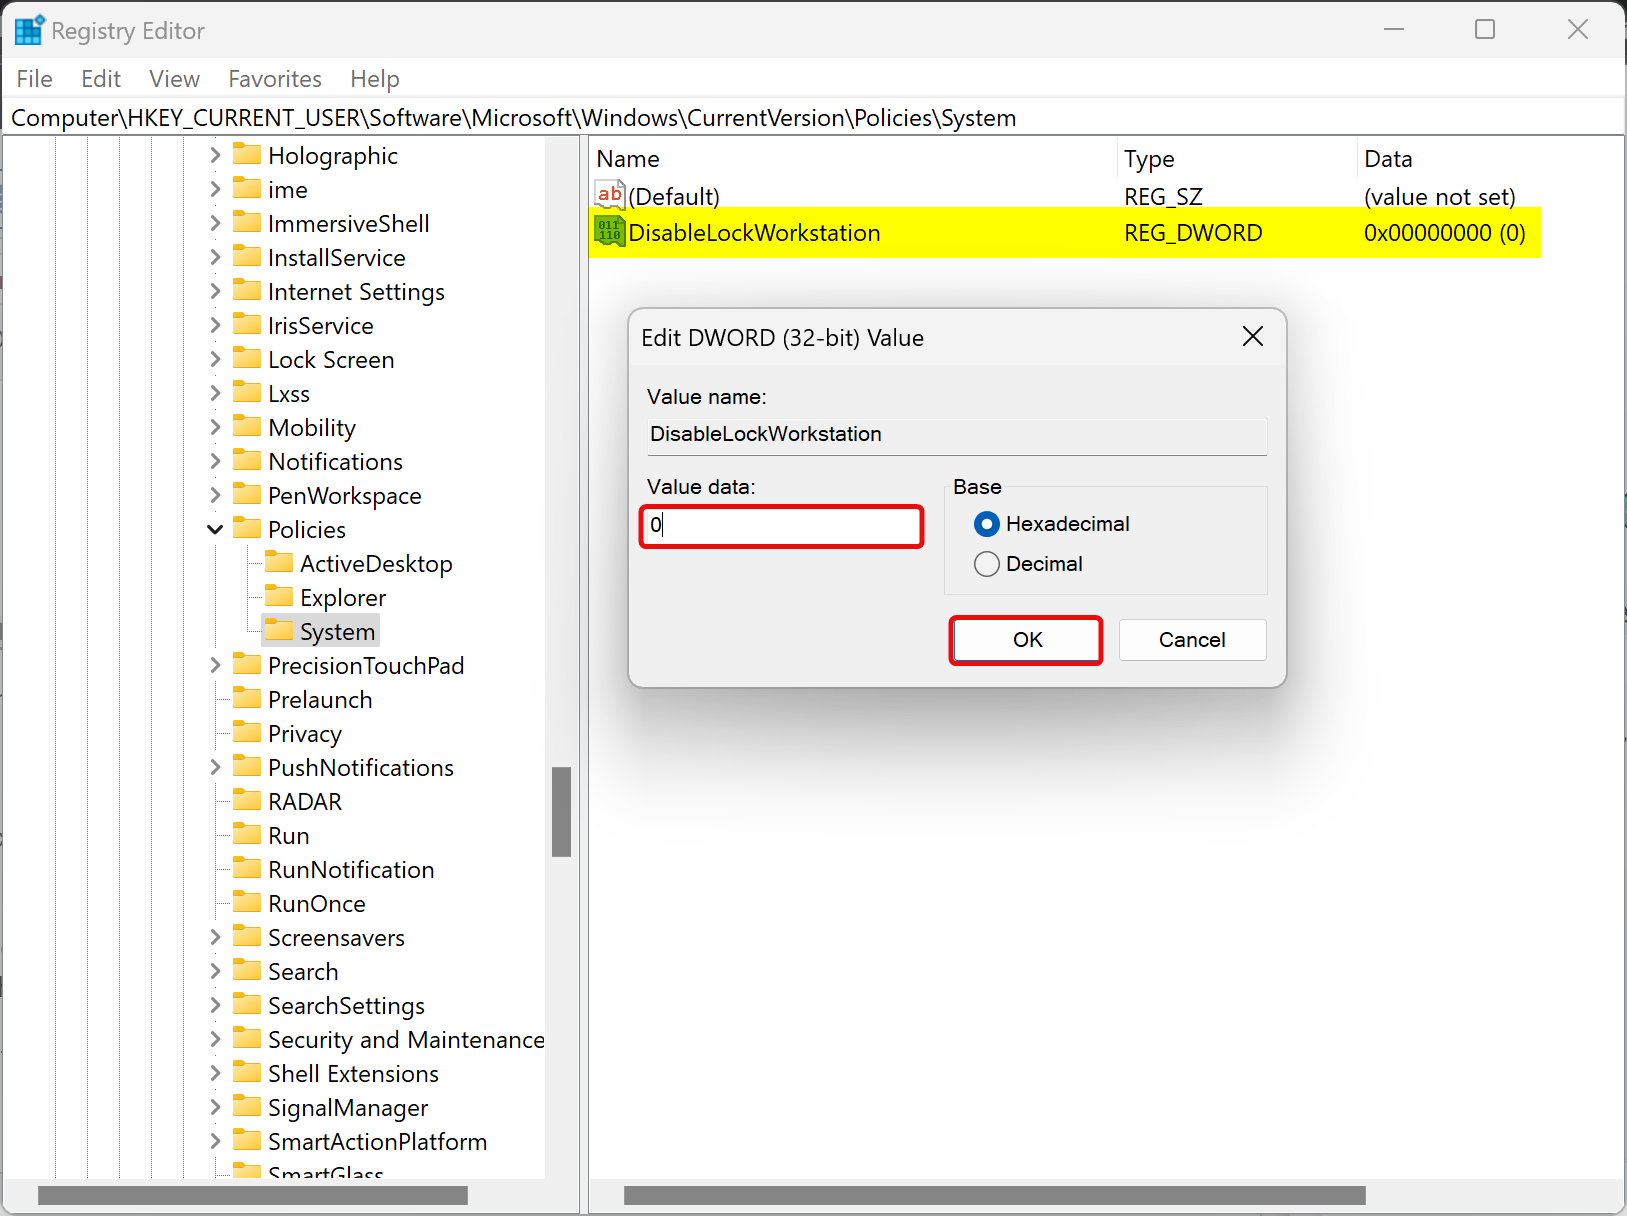
- Name the new value as “DisableLockWorkstation.”
To add the Lock option, double-click on the DisableLockWorkstation value and set the Value data to 0. Alternatively, set the Value data to 1 to remove the Lock option.
How to Add or Remove the Task Manager Option
To add or remove the Task Manager option, follow these steps:
- Open the Registry Editor and navigate to the System key as per the previous steps.
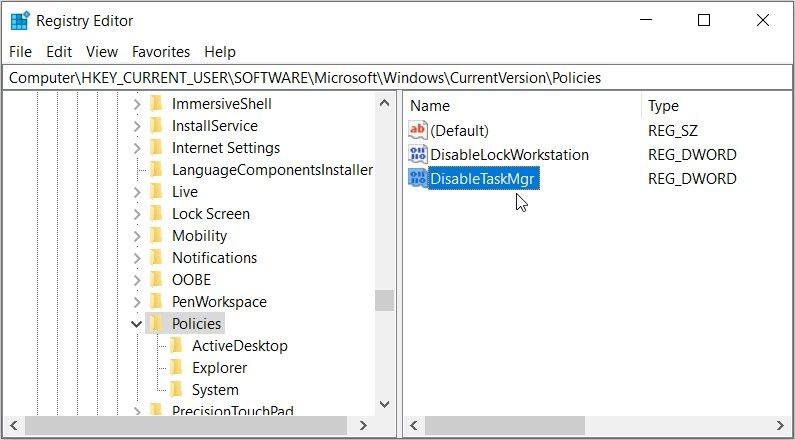
- Right-click on a blank space on the right-hand side pane and select New > DWORD (32-bit) Value. Next, name the new value as «DisableTaskMgr.»
- To add the Task Manager option, double-click on the DisableTaskMgr value and set the Value data to 0. Alternatively, set the Value data to 1 to remove the Task Manager option.
How to Add or Remove the Change Password Option
To add or remove the Change password option, follow these steps:
- Open the Registry Editor and navigate to the System key as per the previous steps.
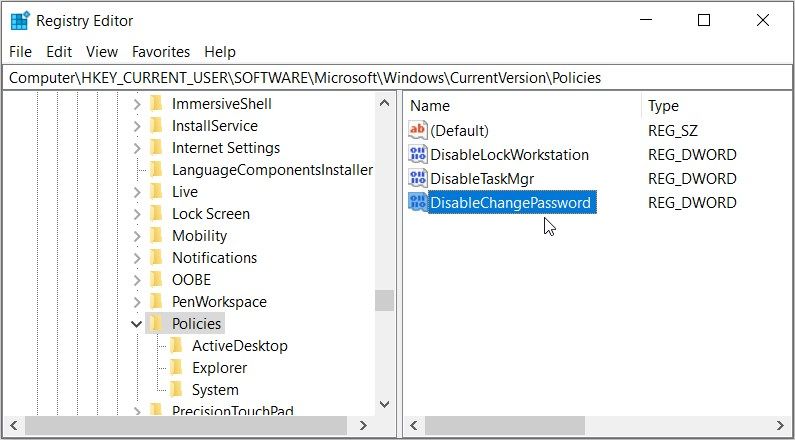
- Right-click on a blank space on the right and select New > DWORD (32-bit) Value. Next, name the new value as “DisableChangePassword.”
- To add the Change password option, double-click on the DisableChangePassword value and set the Value data to 0. Alternatively, set the Value data to 1 to remove this option.
How to Add or Remove the Sign Out Option
To add or remove the Sign out option, follow these steps:
- Open the Registry Editor and navigate to the System key as per the previous steps.
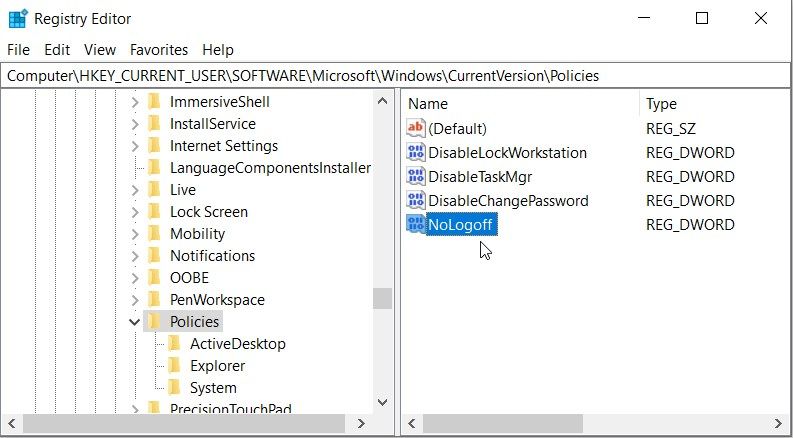
- Right-click on a blank space on the right and select New > DWORD (32-bit) Value. Next, name the new value as “NoLogoff.”
- To add the Sign out option, double-click on the NoLogoff value and set the Value data to 0. Alternatively, set the Value data to 1 to remove the option.
How to Add or Remove the Switch User Option
To add or remove the Switch User option, follow these steps:
- Open the Registry Editor and navigate to the System key as per the previous steps.
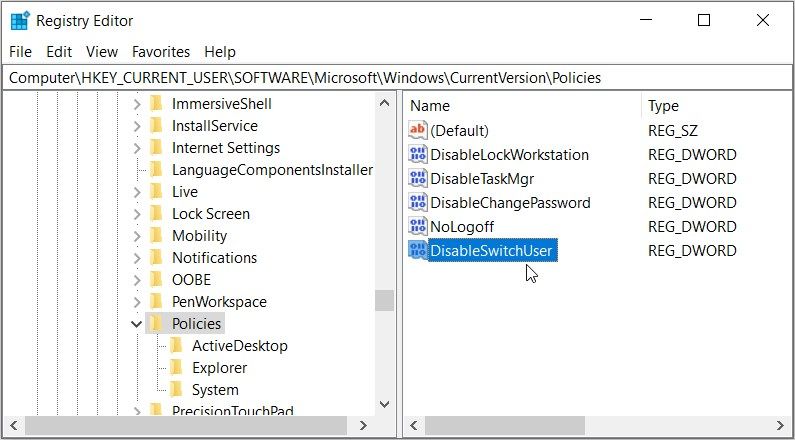
- Right-click on a blank space on the right and select New > DWORD (32-bit) Value. Next, name the new value as “DisableSwitchUser.”
- To add the Switch User option, double-click on the DisableSwitchUser value and set the Value data to 0. Alternatively, set the Value data to 1 to remove the option.
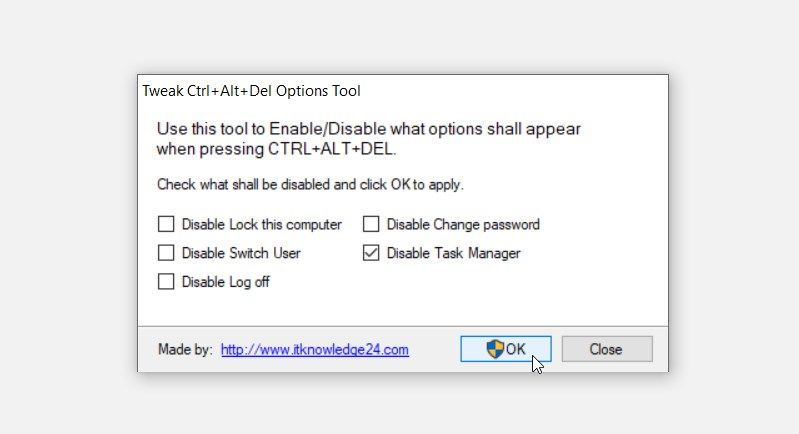
If you don’t want to use the LGPE or the Registry, then check out a third-party app called “Tweak Ctrl + Alt + Del Options Tool.”
It’s a lightweight app that requires no installation—you only need to download it and then extract its contents. From there, you just need to double-click on the app to run it.
To disable an option from the «Ctrl + Alt + Del» screen, check the relevant box and then click OK. And if you want to re-enable the option, uncheck the box and then press OK.
Download: Tweak Ctrl + Alt + Del Options Tool for Windows (Free)
Customize the «Ctrl + Alt + Del» Screen to Your Liking
Windows makes it easy for you to customize almost anything on your device. If you’d like to customize the “Ctrl + Alt + Del” screen, apply any of the tips we’ve covered.
And if you want to customize various other features, you can also explore some brilliant third-party customization tools.
When you press the Ctrl + Alt + Del keys on the keyboard on Windows 11 or 10, you usually see options such as Lock, Switch User, Sign Out, and Task Manager. Using this “Ctrl + Alt + Del” screen, you can lock or restart your PC, sign out from your user account, switch between users, and even quickly access the Task Manager.
Depending upon the configuration, the “Ctrl + Alt + Del” screen in some Windows machines also allows you to change your password. At the bottom-right corner of this screen, you will find four additional options for configuring language settings, Wi-Fi settings, Ease of Access Settings, and Power. Clicking on the Power button, you will see the “Sleep,” “Shutdown,” and “Restart” options.
If some of the above options are missing from your Windows, you can restore them by referring to this gearupwindows post. Besides that, you will also learn to remove a specific item from the “Ctrl + Alt + Del” screen.
How to Add or Remove the “Change Password” Option from the “Ctrl + Alt + Del” Screen using Local Group Policy Editor?
To show or hide the “Change Password” option from the “Ctrl + Alt + Del” screen using Local Group Policy Editor, use these steps:-
Step 1. Open Local Group Policy Editor.
Step 2. Browse or navigate to the following path in the left sidebar of Local Group Policy Editor:-
User Configuration > Administrative Templates > System > Ctrl+Alt+Del Options
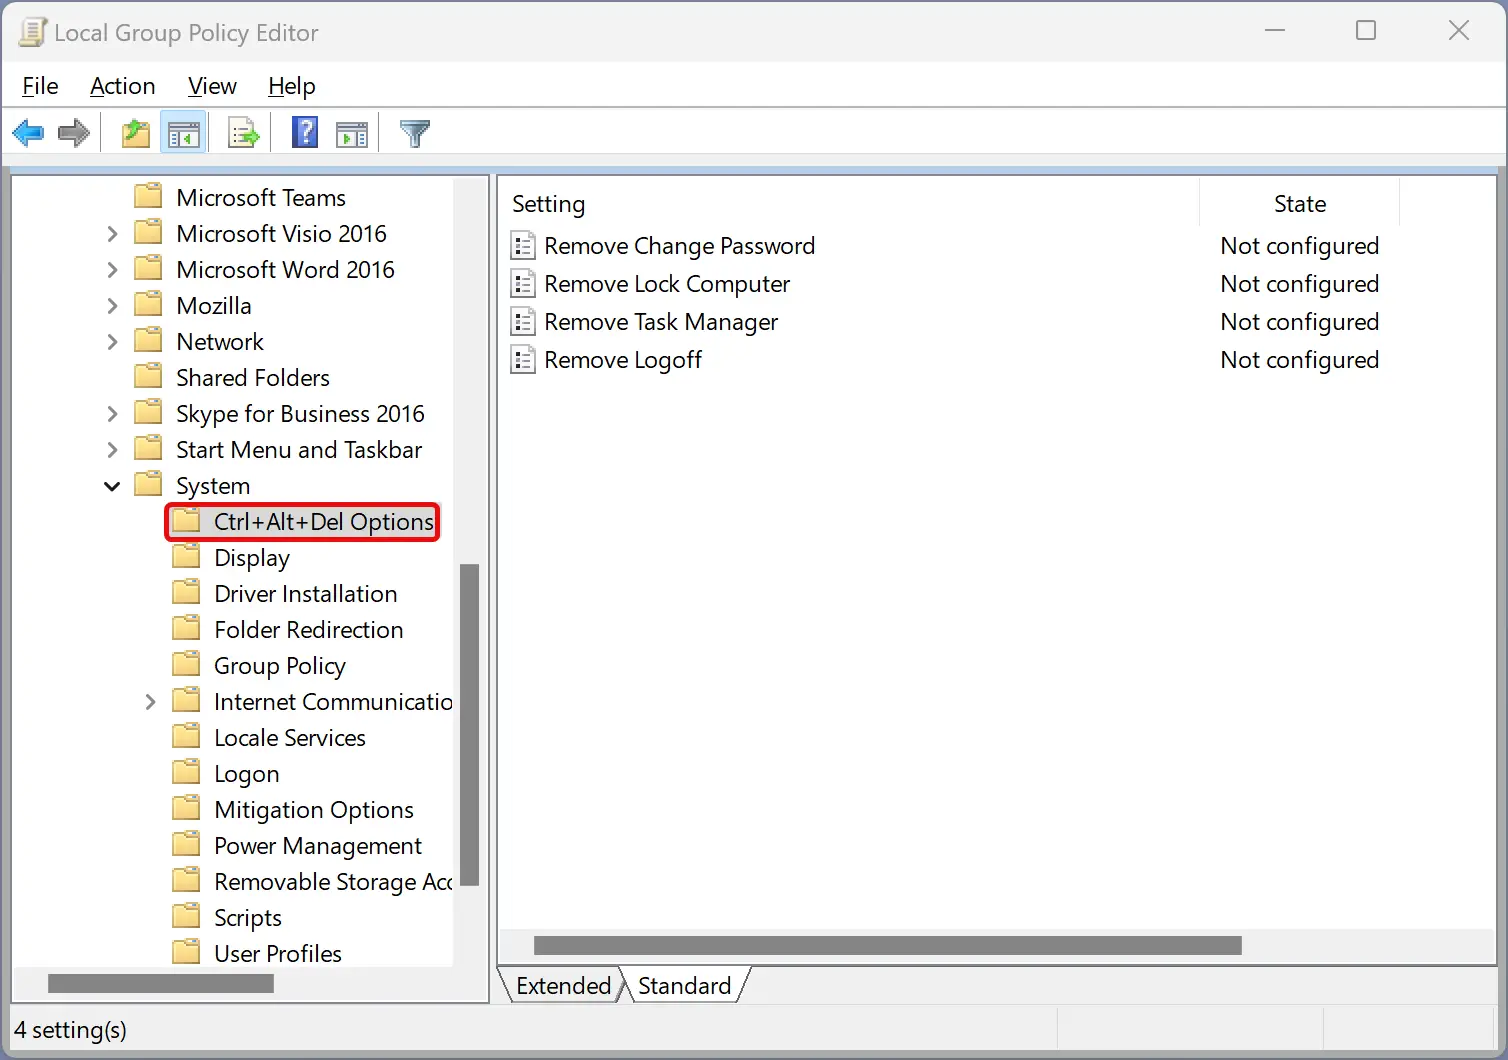
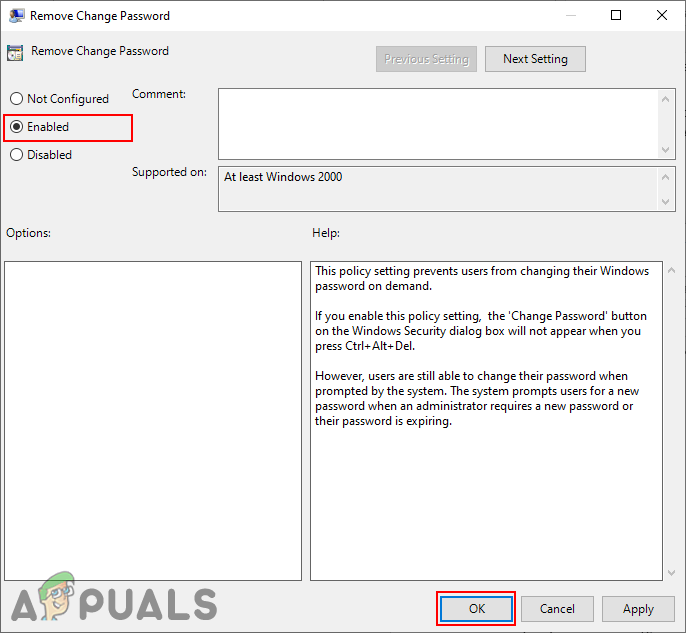
Step 3. To add the “Change Password” option, double-click on the Remove Change Password policy.
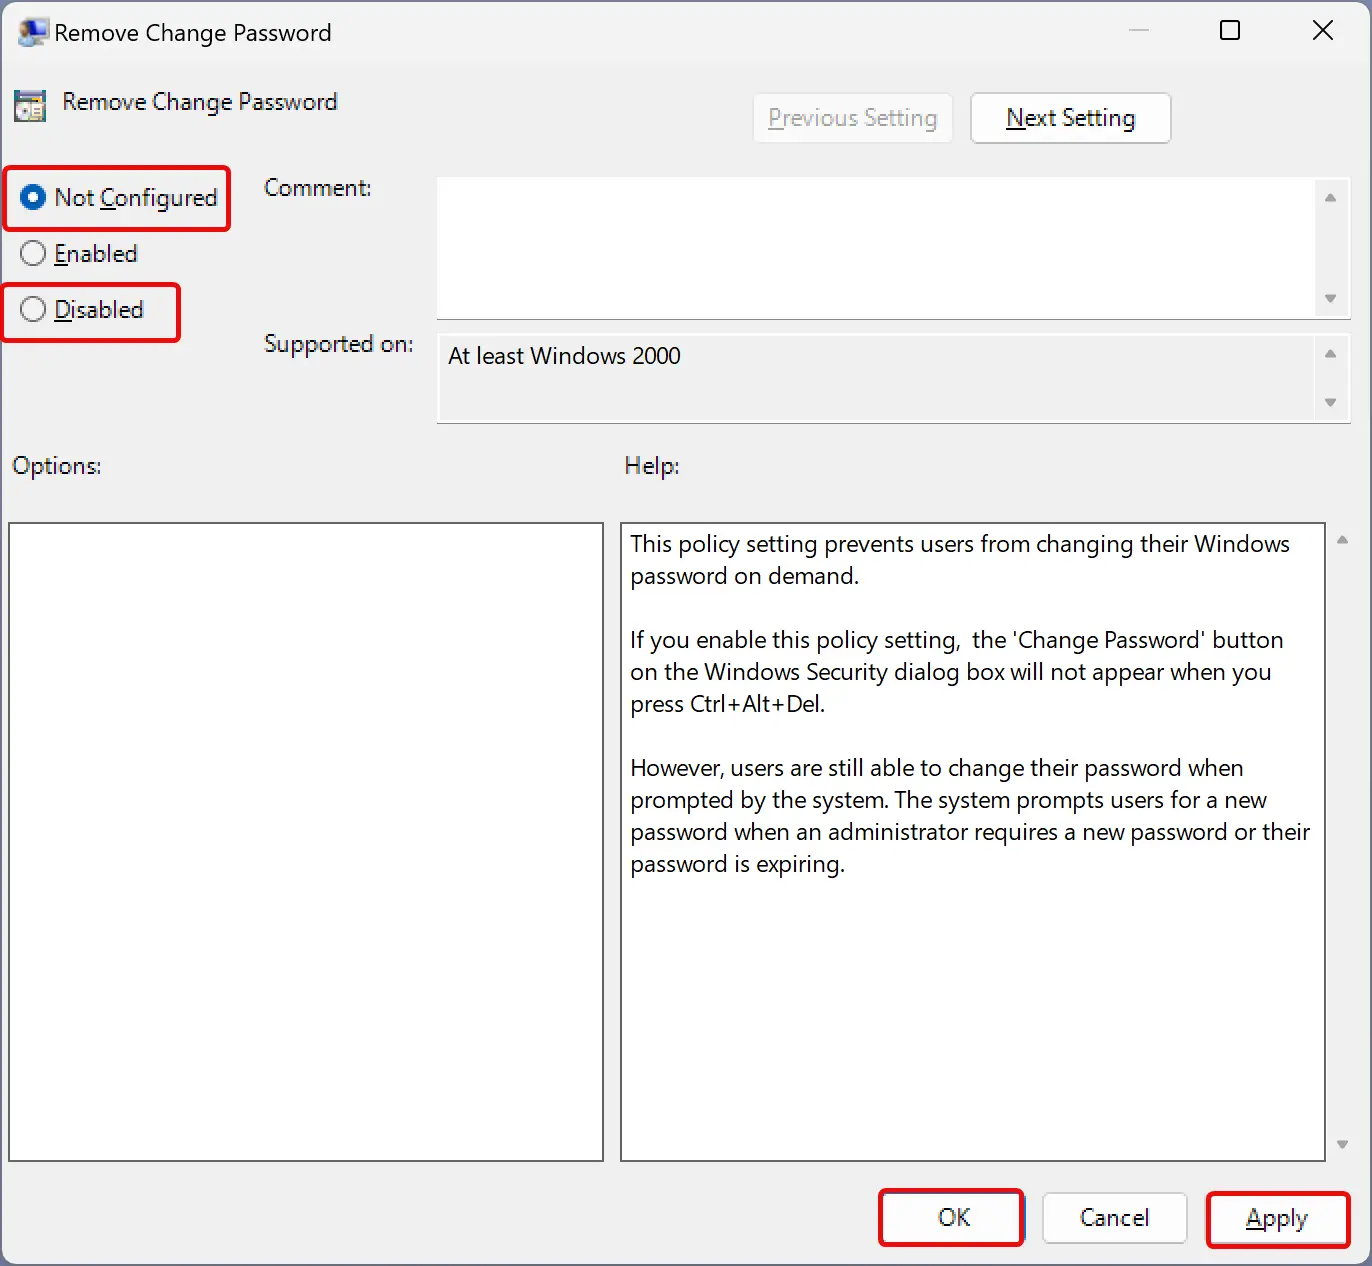
Step 4. Select the Not Configured or Disabled option to add the “Change Password” option.
Quick Note: To remove the “Change Password” option, select the Enabled option.
Step 5. Click Apply.
Step 6. Click OK.
Step 7. Reboot your PC to apply the changes.
How to Show or Hide the “Lock” Option from the “Ctrl + Alt + Del” Screen using Local Group Policy Editor?
To add or remove the “Lock” option from the “Ctrl + Alt + Del” screen using Local Group Policy Editor, use these steps:-
Step 1. Open Local Group Policy Editor.
Step 2. Browse or navigate to the following path in the left sidebar of Local Group Policy Editor:-
User Configuration > Administrative Templates > System > Ctrl+Alt+Del Options
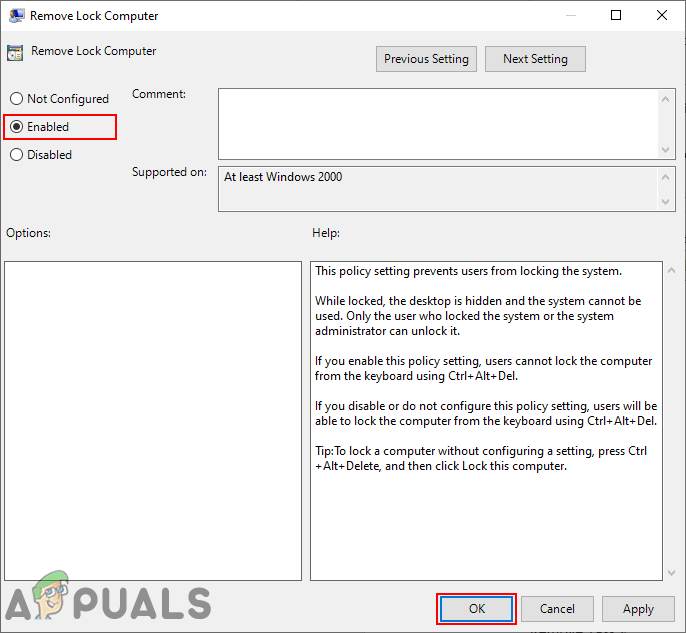
Step 3. Double-click on the Remove Lock Computer policy.
Step 4. Select the Not Configured or Disabled option to add the “Lock” option.
Quick Note: To remove the “Lock” option, select the Enabled option.
Step 5. Click Apply.
Step 6. Click OK.
Step 7. Reboot your PC to apply the changes.
How to Add or Remove the “Task Manager” Option from the “Ctrl + Alt + Del” Screen using Local Group Policy Editor?
To show or hide the “Task Manager” option from the “Ctrl + Alt + Del” screen using Local Group Policy Editor, use these steps:-
Step 1. Open Local Group Policy Editor.
Step 2. Browse or navigate to the following path in the left sidebar of Local Group Policy Editor:-
User Configuration > Administrative Templates > System > Ctrl+Alt+Del Options
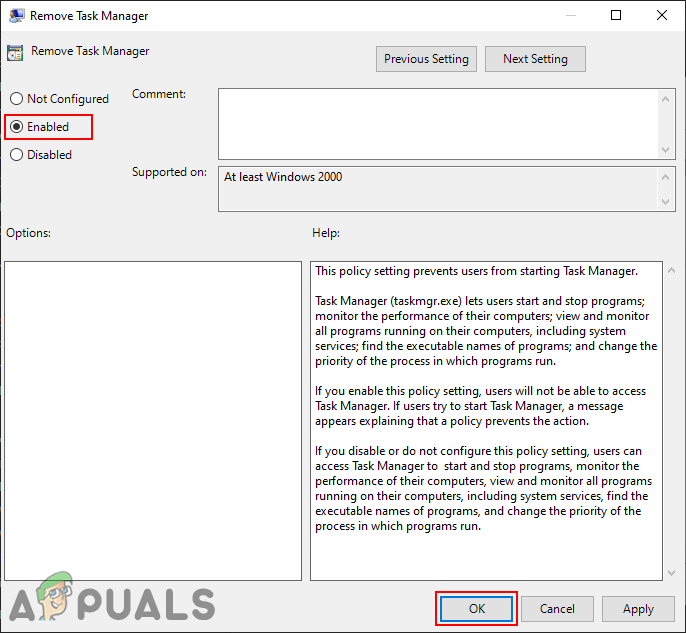
Step 3. Double-click on the Remove Task Manager policy.
Step 4. Select the Not Configured or Disabled option to add the “Task Manager” option.
Quick Note: To remove the “Task Manager” option, select the Enabled option.
Step 5. Click Apply.
Step 6. Click OK.
Step 7. Reboot your PC to apply the changes.
How to Show or Hide the “Sign out” Option from the “Ctrl + Alt + Del” Screen using Local Group Policy Editor?
To add or remove the “Sign out” option from the “Ctrl + Alt + Del” screen using Local Group Policy Editor, use these steps:-
Step 1. Open Local Group Policy Editor.
Step 2. Browse or navigate to the following path in the left sidebar of Local Group Policy Editor:-
User Configuration > Administrative Templates > System > Ctrl+Alt+Del Options
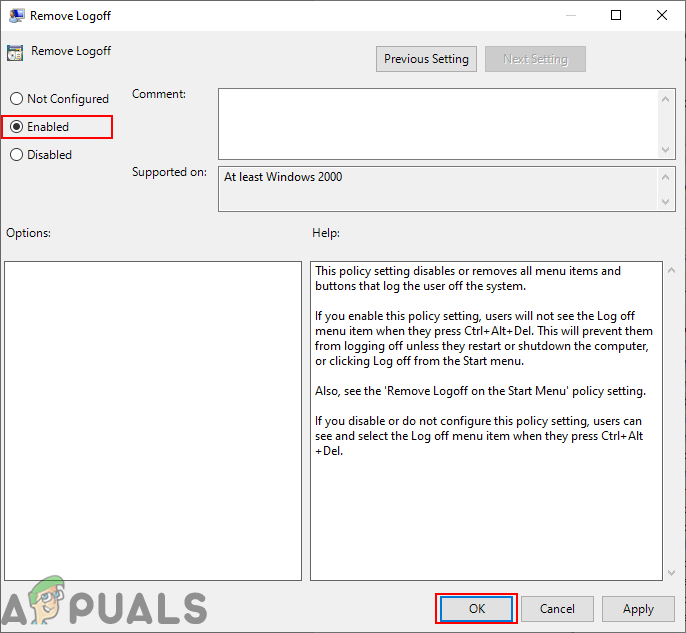
Step 3. Double-click on the Remove Logoff policy.
Step 4. Select the Not Configured or Disabled option to add the “Lock” option.
Quick Note: To remove the “Sign out” option, select the Enabled option.
Step 5. Click Apply.
Step 6. Click OK.
Step 7. Reboot your PC to apply the changes.
How to Add or Remove the Power Button from the “Ctrl + Alt + Del” Screen using Local Group Policy Editor?
To show or hide the Power button from the “Ctrl + Alt + Del” screen using Local Group Policy Editor, do these steps:-
Step 1. Open Local Group Policy Editor.
Step 2. Browse or navigate to the following path in the left sidebar of Local Group Policy Editor:-
User Configuration > Administrative Templates > Start Menu and Taskbar

Step 3. Double-click on the policy “Remove and prevent access to the Shut Down, Restart, Sleep, and Hibernate commands.”
Step 4. Select the Not Configured or Disabled option to add the Power button.
Quick Note: Choose the Enabled option to remove the Power button.
Step 5. Click Apply.
Step 6. Click OK.
Step 7. Reboot your PC to apply the changes.
How to Show or Hide the Wi-Fi Icon from the “Ctrl + Alt + Del” Screen using Local Group Policy Editor?
To add or remove the Wi-Fi icon from the “Ctrl + Alt + Del” screen using Local Group Policy Editor, do these steps:-
Step 1. Open Local Group Policy Editor.
Step 2. Navigate to the following path in the left sidebar of Local Group Policy Editor:-
Computer Configuration > Administrative Templates > System > Logon
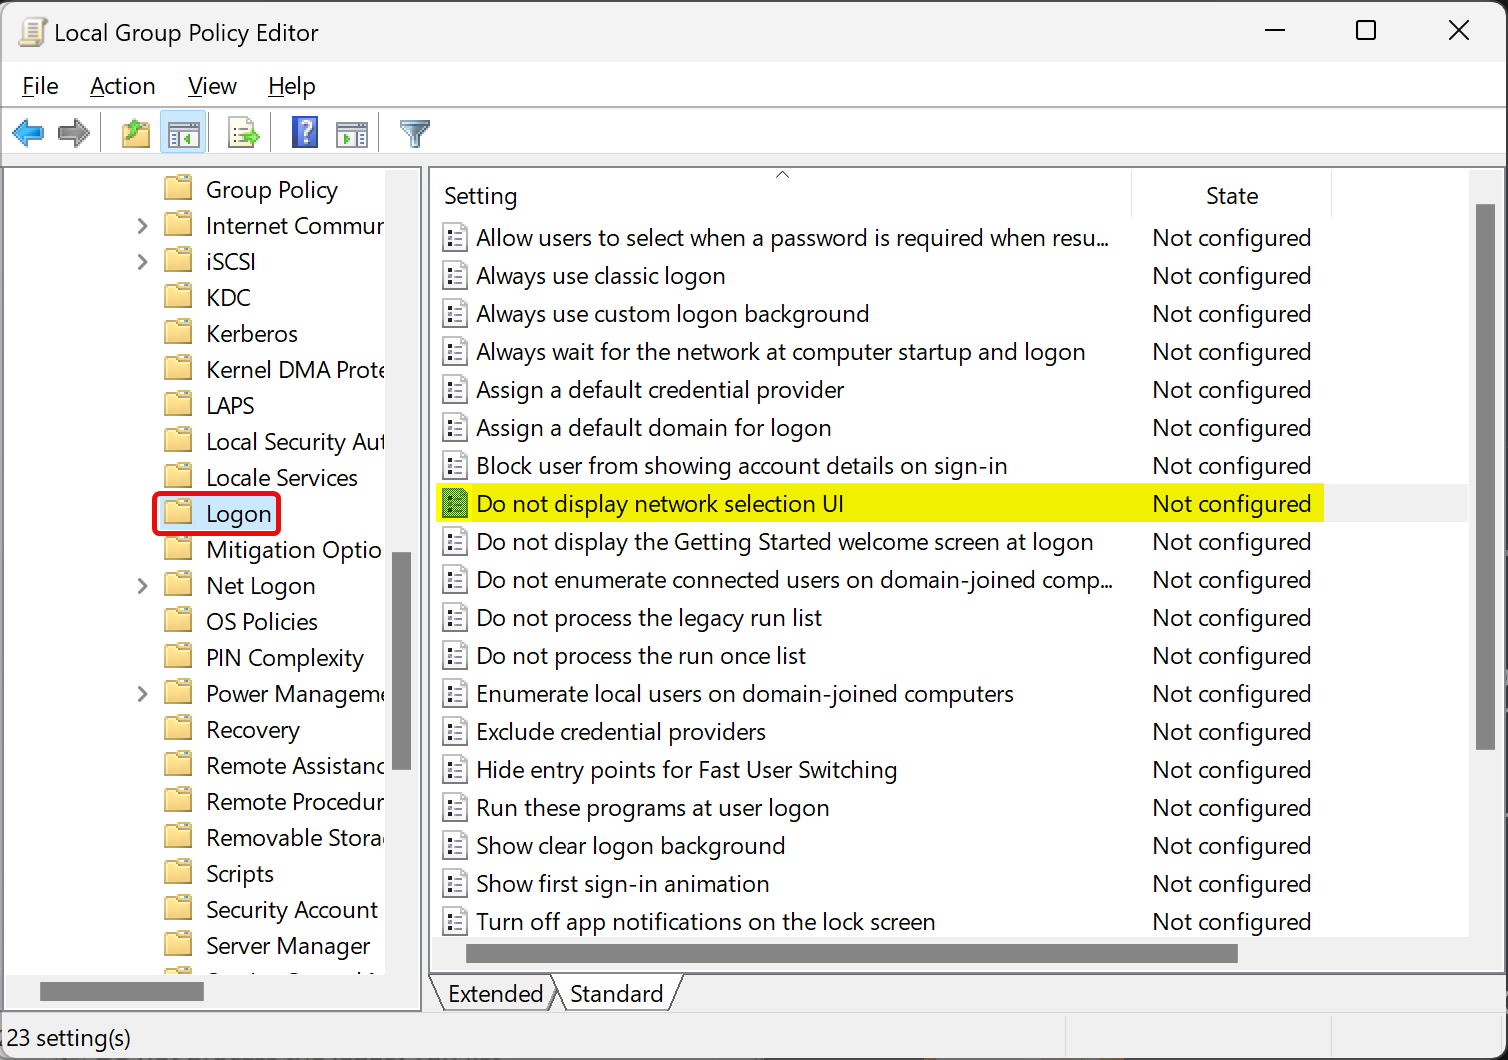
Step 3. Double-click on the Do not display network selection UI policy on the right-hand side pane.
Step 4. Select either the Not Configured or Disabled option to add the Wi-Fi icon to the “Ctrl + Alt + Del” screen.
Quick Note: If you want to remove the Wi-Fi icon, select the Enabled option.
Step 5. Click Apply.
Step 6. Click OK.
Step 7. Reboot your PC to apply the changes.
How to Add or Remove Lock Option from the “Ctrl + Alt + Del” Screen using the Registry Editor?
To enable or disable the Lock option in the “Ctrl + Alt + Del” screen using the Registry Editor, use these steps:-
Step 1. Open Registry Editor.
Step 2. Browse the following key in the left sidebar of Registry Editor:-
HKEY_CURRENT_USER\Software\Microsoft\Windows\CurrentVersion\Policies
Step 3. Expand the Policies key and click System. If the “System” key is not available under the “Policies” key, right-click on the Policies key and select New > Key. Set the name to System.
Step 4. Right-click on the System key and select New > DWORD (32-bit) Value.
Step 5. Name the newly created REG_DWORD to DisableLockWorkstation.
Step 6. Double-click on the DisableLockWorkstation REG_DWORD and set its “Value data” to the following:-
- 0: Add Lock option.
- 1: Remove the Lock option.
Step 7. Click OK.
Step 8. Restart your computer or notebook to apply the changes.
How to Show or Hide Task Manager Option from the “Ctrl + Alt + Del” Screen using the Registry Editor?
To add or remove the Task Manager option in the “Ctrl + Alt + Del” screen using the Registry Editor, use these steps:-
Step 1. Open Registry Editor.
Step 2. Browse the following key in the left sidebar of Registry Editor:-
HKEY_CURRENT_USER\Software\Microsoft\Windows\CurrentVersion\Policies
Step 3. Expand the Policies key and click System. If the “System” key is not available under the “Policies” key, right-click on the Policies key and select New > Key. Set the name to System.
Step 4. Right-click on the System key and select New > DWORD (32-bit) Value.
Step 5. Name the newly created REG_DWORD to DisableTaskMgr.
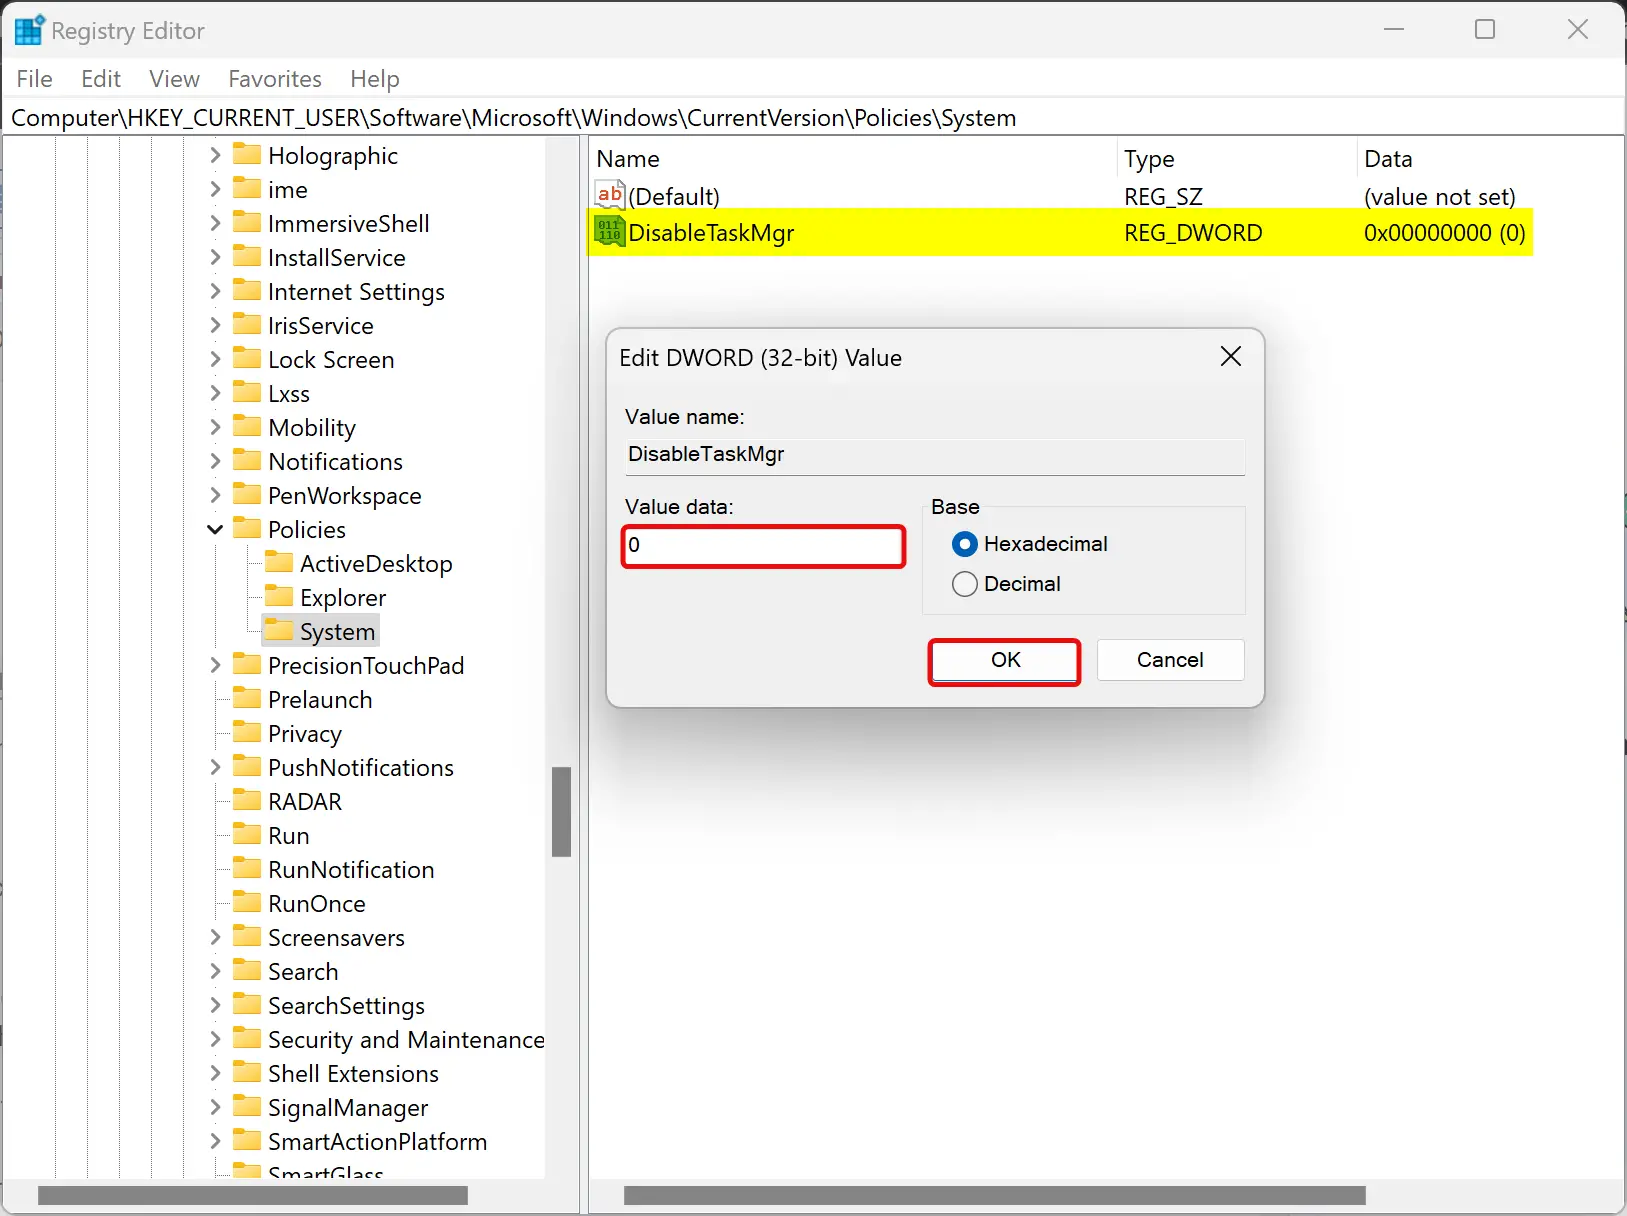
Step 6. Double-click on the DisableTaskMgr REG_DWORD and set its “Value data” to the following:-
- 0: Add the Task Manager option.
- 1: Remove the Task Manager option.
Step 7. Click OK.
Step 8. Restart your computer or notebook to apply the changes.
How to Enable or Disable Change Password Option from the “Ctrl + Alt + Del” Screen using the Registry Editor?
To add or remove the Change Password option in the “Ctrl + Alt + Del” screen using the Registry Editor, use these steps:-
Step 1. Open Registry Editor.
Step 2. Browse the following key in the left sidebar of Registry Editor:-
HKEY_CURRENT_USER\Software\Microsoft\Windows\CurrentVersion\Policies
Step 3. Expand the Policies key and click System. If the “System” key is not available under the “Policies” key, right-click on the Policies key and select New > Key. Set the name to System.
Step 4. Right-click on the System key and select New > DWORD (32-bit) Value.
Step 5. Name the newly created REG_DWORD to DisableChangePassword.

Step 6. Double-click on the DisableChangePassword REG_DWORD and set its “Value data” to the following:-
- 0: Add the Change Password option.
- 1: Remove the Change Password option.
Step 7. Click OK.
Step 8. Restart your computer or notebook to apply the changes.
How to Add or Remove Sign Out Option from the “Ctrl + Alt + Del” Screen using the Registry Editor?
To add or remove the Sign Out option in the “Ctrl + Alt + Del” screen using the Registry Editor, use these steps:-
Step 1. Open Registry Editor.
Step 2. Browse the following key in the left sidebar of Registry Editor:-
HKEY_CURRENT_USER\Software\Microsoft\Windows\CurrentVersion\Policies
Step 3. Expand the Policies key and click System. If the “System” key is not available under the “Policies” key, right-click on the Policies key and select New > Key. Set the name to System.
Step 4. Right-click on the System key and select New > DWORD (32-bit) Value.
Step 5. Name the newly created REG_DWORD to NoLogoff.
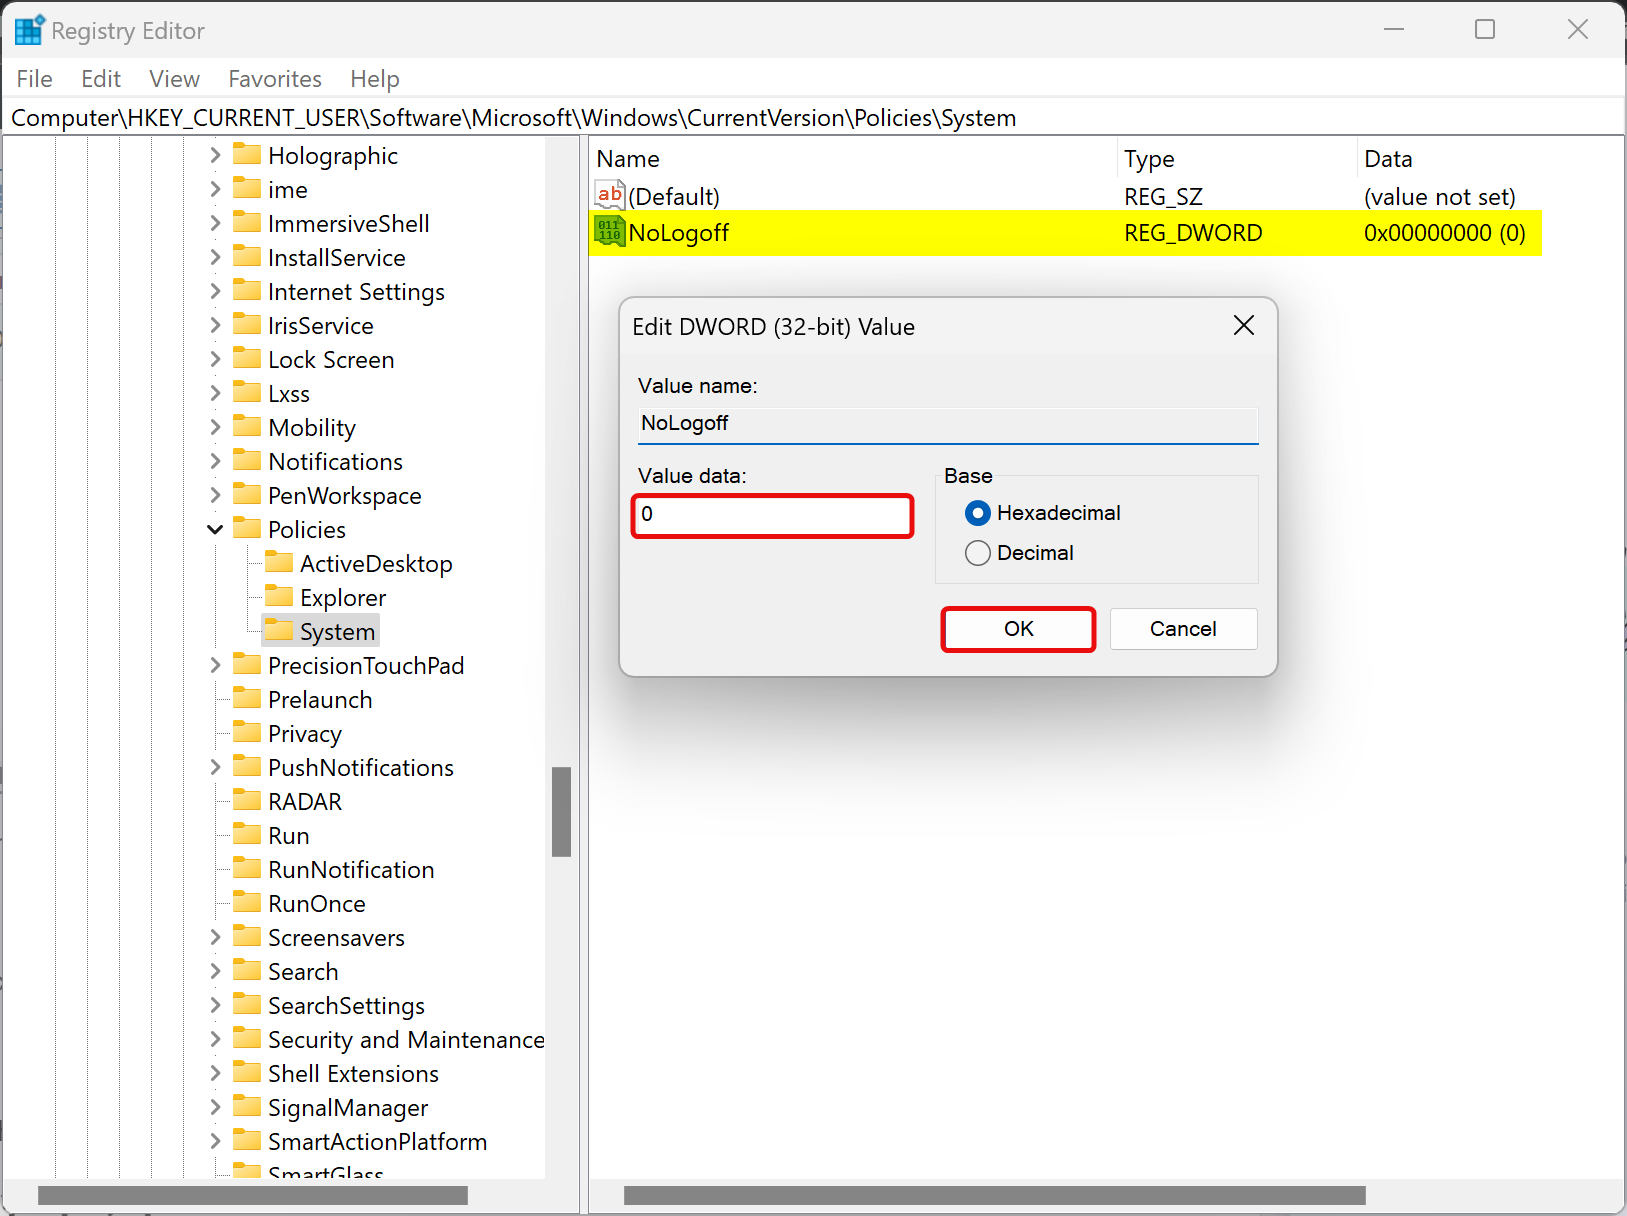
Step 6. Double-click on the NoLogoff REG_DWORD and set its “Value data” to the following:-
- 0: Add the Sign Out option.
- 1: Remove the Sign Out option.
Step 7. Click OK.
Step 8. Restart your computer or notebook to apply the changes.
How to Enable or Disable Switch User Option from the “Ctrl + Alt + Del” Screen using the Registry Editor?
To show or hide the Switch User option in the “Ctrl + Alt + Del” screen using the Registry Editor, use these steps:-
Step 1. Open Registry Editor.
Step 2. Browse the following key in the left sidebar of Registry Editor:-
HKEY_CURRENT_USER\Software\Microsoft\Windows\CurrentVersion\Policies
Step 3. Expand the Policies key and click System. If the “System” key is not available under the “Policies” key, right-click on the Policies key and select New > Key. Set the name to System.
Step 4. Right-click on the System key and select New > DWORD (32-bit) Value.
Step 5. Name the newly created REG_DWORD to DisableSwitchUser.
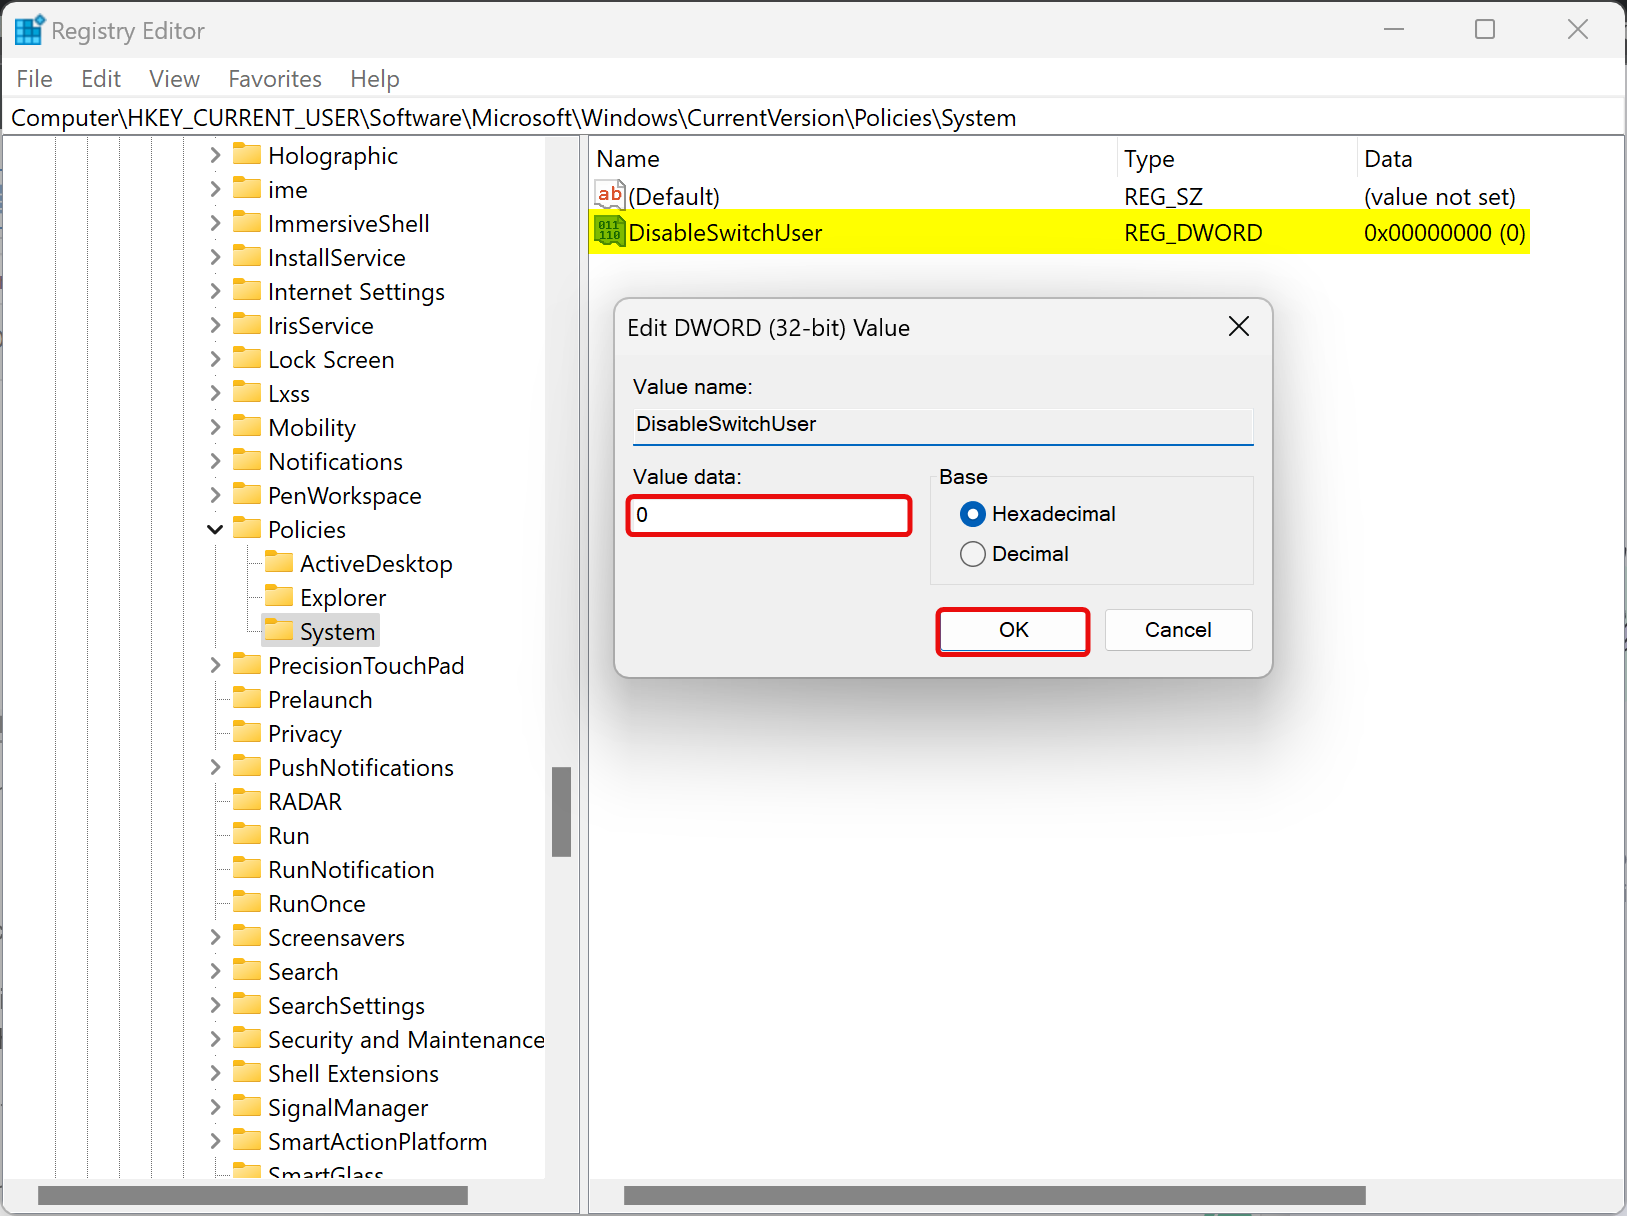
Step 6. Double-click on the DisableSwitchUser REG_DWORD and set its “Value data” to the following:-
- 0: Add the Switch User option.
- 1: Remove the Switch User option.
Step 7. Click OK.
Step 8. Restart your computer or notebook to apply the changes.
How to Add or Remove Options from the “Ctrl + Alt + Del” Screen through Tweak Ctrl + Alt + Del Options Tool?
The “Tweak Ctrl + Alt + Del Options Tool” is a lightweight and portable tool that helps tweak the “Ctrl + Alt + Del” screen in Windows 11 and 10. To use this freeware app, download and extract its contents and double-click on the app executable file to launch it.
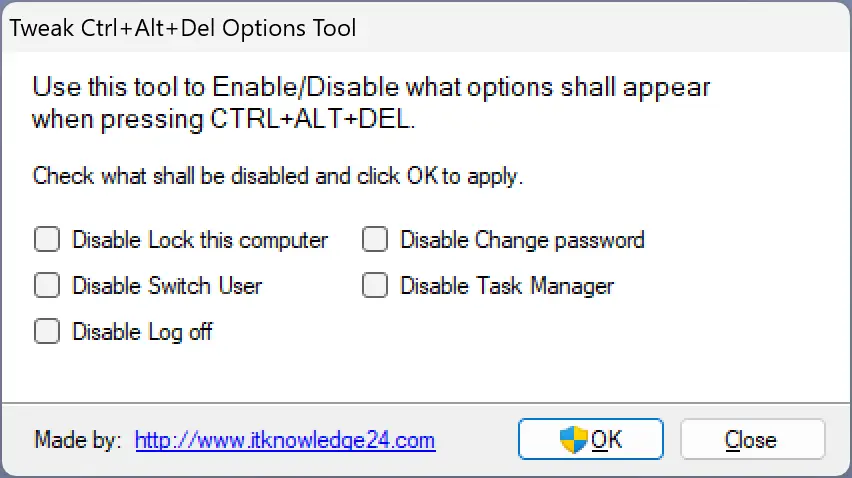
Using this free tool, you can add or remove the following from the “Ctrl + Alt + Del” screen:-
- Lock
- Change Password
- Switch User
- Task Manager
- Log off
To disable an option from the “Ctrl + Alt + Del” screen, check the relevant box and click the OK button. And re-enable the option, uncheck the box, and click the OK button.
Download “Tweak Ctrl + Alt + Del Options Tool”
You can grab the “Tweak Ctrl + Alt + Del Options Tool” from here.
Note: This app needs .Net Framework 3.5 to work correctly.
Conclusion
In conclusion, the “Ctrl + Alt + Del” screen in Windows 10 or 11 provides various options such as lock, switch user, sign out, and task manager, among others. The screen’s configuration may vary from one computer to another, but it usually allows you to change your password, and configure language settings, Wi-Fi settings, ease of access settings, and power options. If some of these options are missing, you can add or remove them using the Local Group Policy Editor. This tool allows you to configure the “Ctrl + Alt + Del” screen to suit your preferences. By following the steps outlined in this article, you can add or remove the “Change Password,” “Lock,” “Task Manager,” “Sign Out,” Power button, and Wi-Fi Icon from the “Ctrl + Alt + Del” screen.
In the decades I have been using computers, one combination of keys on the keyboard has been the ‘holy grail‘, the genuinely fool-proof way of regaining control of an unresponsive program or computer, Ctrl+Alt+Del.
As most of you know, I am a big fan of keyboard shortcuts, especially Windows Logo key shortcuts. But when it comes to personal computers, the single, most powerful combination of keys has to be Ctrl+Alt+Del (Control-Alt-Delete).
The history of Ctrl+Alt+Del, or the «three-finger salute» as it is more commonly known, was created by an engineer at IBM working on the original IBM PC project in the ’80s as a way to execute a soft reboot. The keys were selected for their location on the keyboard so that it required both hands to press all three keys at the same time. That way, you could not accidentally reboot your computer.
The Ctrl+Alt+Del key combination is built into every IBM PC clone computer’s BIOS (Basic Input/Output System). Even today, the Ctrl+Alt+Del key combination will still reboot an IBM PC when it is started into the BIOS. And in Windows, Ctrl+Alt+Del has a couple of different uses.
The first use of Ctrl+Alt+Del inside Windows 10 and Windows 11 is to bring up the login screen. Typically, only users whose computers are connected to a domain will be required to use the «three-finger salute» to log on. Every day Windows users are only required to press any key to bring up the login screen.
The second use of Ctrl+Alt+Del inside Windows 10 and Windows 11 is the best and probably the most unknown use. When you are logged into Windows and press Ctrl+Alt+Del, it brings up Windows Security in full screen.
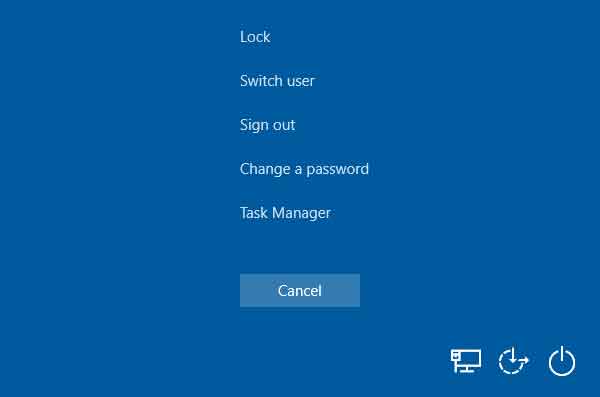
The Windows Security screen inside of Windows 10
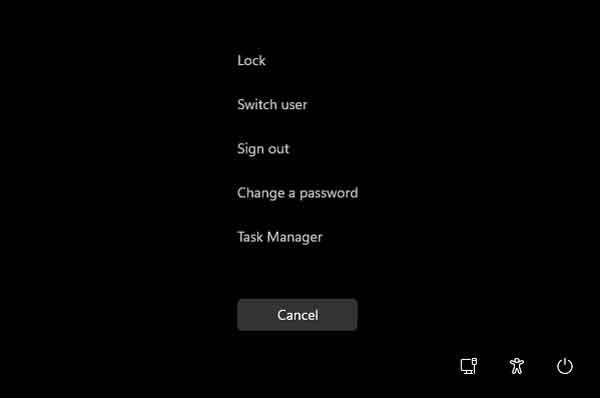
The Windows Security screen inside of Windows 11
The Windows Security screen gives you five (5) options, including Lock, Switch user, Sign out, Change a password, and Task Manager. There are three (3) more options in the lower right-hand corner: Internet, Ease of access, and Power. Here is a list of all the functions.
Lock: This button will lock the computer and require the user who is currently signed in to log on again to unlock the computer.
Switch user: This button will allow another user to log on to the computer.
Sign out: This button will sign out the currently logged-in user. Note: If you have an unresponsive program or a program that you cannot close (like junkware), signing out will close all open programs and then log the current user off.
Change a password: As the name implies, it will change the user’s password that is currently logged in.
Task Manager: This button will open the Task Manager. Task Manager has several functions, including managing the running tasks and monitoring system resources. Note: You can also forcibly terminate processes or programs that have become unresponsive.
Internet: With this button, you can select the network connection to use for the Internet.
Ease of access (Windows 10) / Accessibility (Windows 11) — This button allows you to turn on and off Narrator, Magnifier, On-Screen Keyboard, High Contrast, Sticky Keys, and Filter Keys.
Power: This button has two (2) options, Shut down or Restart.
5598edfc-9a84-4f33-9199-42cc0ba6cb62|2|5.0|96d5b379-7e1d-4dac-a6ba-1e50db561b04
Most users are aware of the Ctrl + Alt + Del keyboard command that is usually used to interrupt a function. This keyboard combination depends on the context in which it is used. In Windows 10, by pressing this keyboard combination, it will show a screen with different options listed. Users can lock, switch user, sign out, change a password, and open task manager from the options by pressing Ctrl + Alt + Del. In this article, we will show methods through which you can remove any of the options from Ctrl + Alt + Del screen.

Changing some of the settings are not possible by going through the Control Panel or Settings app on Windows. However, the Local Group Policy Editor and Registry Editor can be used to configure it. There are four options that can be removed from the Ctrl + Alt + Del screen. You can get the idea about removing each option by the names of the settings in the below method.
However, removing any of the options from the Ctrl + Alt + Del screen will also disable them from most of the places. Users will be unable to access the removed option by shortcut keys or other methods. Make sure to remove only the option that you will not be using.
Method 1: Removing Options through the Local Group Policy Editor
The Local Group Policy Editor is used to control the working environment of computer accounts and user accounts. An administrator can use the Local Group Policy Editor to modify different policy settings for multiple users. Each policy setting provides information about the function and purpose of that policy setting.
If you are using Windows Home Edition, then skip this method and try the Registry Editor method.
However, if you have the Local Group Policy Editor on your system, then follow the below guide:
- Hold the Windows key and press R to open a Run dialog. Then type “gpedit.msc” and press the Enter key to open the Local Group Policy Editor.
Note: If the UAC (User Account Control) prompt appears, choose the Yes option.Opening Local Group Policy Editor - In the Local Group Policy Editor window, navigate to the following path:
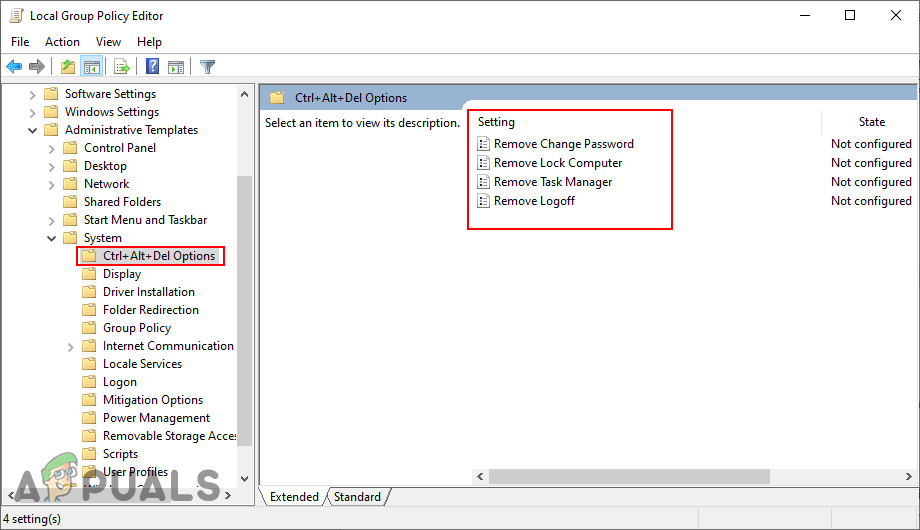
User Configuration\Administrative Templates\System\Ctrl+Alt+Del Options

Navigating to settings Note: There are four different options that you can disable it.
- For removing the change password option double-click on the “Remove Change Password” setting. It will open another window, change the toggle from Not Configured to Enabled. Finally, click on Apply/Ok to save the changes.

Removing change password option - If you want to remove the lock computer option by double-click on the “Remove Lock Computer” policy setting. A new window will open up, change the toggle from Not Configured to Enabled. Then click on the Apply and Ok button to save the changes.
Removing lock computer option - For removing the Task Manager option from the list of Ctrl + Alt + Del, double-click on the “Remove Task Manager” setting. It will open a new window where you can change the toggle from Not Configured to Enabled. To save the changes, click on Apply/Ok buttons.
Removing Task Manager option - To remove the Sign Out option, double-click on the “Remove Logoff” policy setting. Now change the toggle option from Not Configured to Enabled. Click on the Apply/Ok button to save changes.
Removing Sign Out option - Enabling any of the settings will remove that option. To enable it back, simply change the toggle for the setting back to Not Configured or Disabled.
Method 2: Removing Options through the Registry Editor
Another method to remove the options from the Ctrl + Alt + Del screen is by using the Registry Editor. This is also the only method for the users of Windows Home Edition operating system. However, for the users who used the Local Group Policy Editor method, their Registry Editor value will automatically update for that specific setting. Unlike the Group Policy Editor, users are required to create the missing key and value.
In the below steps, we have included values for all four options. However, you can choose only the ones that you want to remove and not all of them.
Note: Value data 1 will enable the value and value data 0 will disable the value.
- Press the Windows + R keys together to open a Run dialog. Then type “regedit” in the dialog and press the Enter key to open the Registry Editor. Choose the Yes option for UAC (User Account Control) prompt.
Opening the Registry Editor - In the Registry Editor window, navigate to the following key:
HKEY_CURRENT_USER\Software\Microsoft\Windows\CurrentVersion\Policies\System
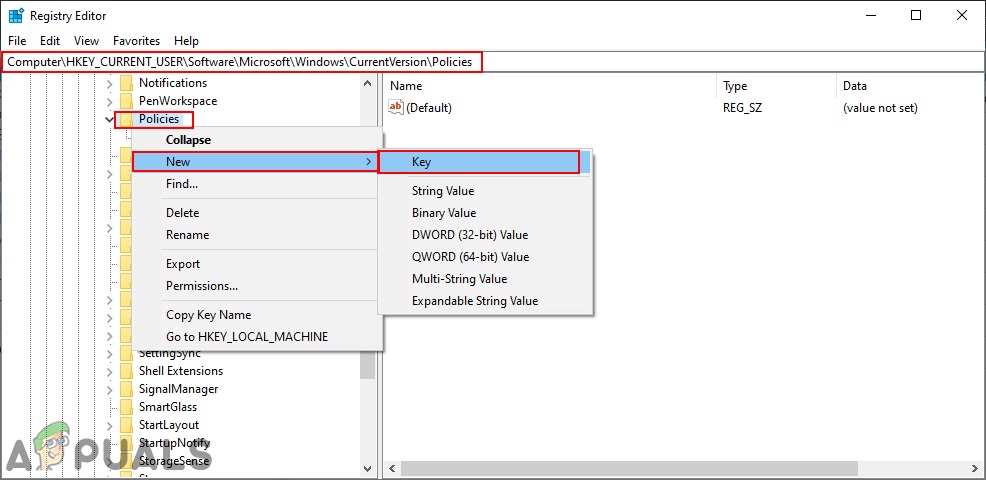
- If the System key is missing, simply create it by right-clicking on the Policies key and choosing New > Key. Name the key as “System“.

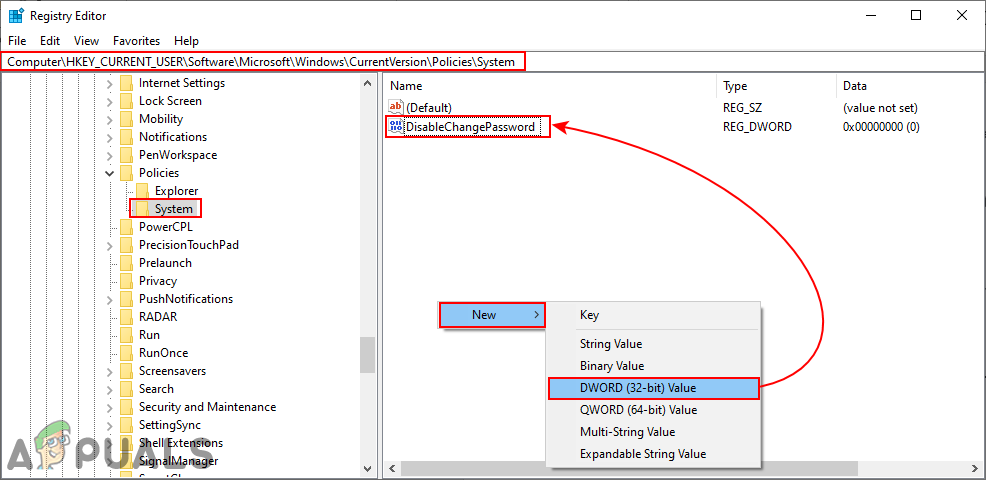
Creating the missing key - To remove the change password option, select the System key, right-click on the right pane, and choose New > DWORD (32-bit) Value. Name the new value as “DisableChangePassword“.
Creating value for removing change password - Double-click on the DisableChangePassword value and change the value data to 1 to remove the change password option.
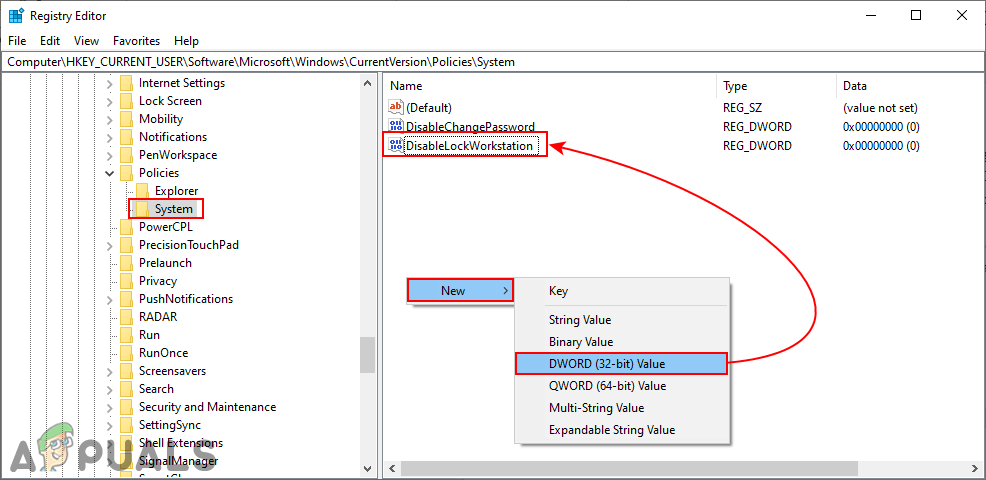
Changing value data - If you want to remove the lock option, then right-click on the empty area of the right pane and choose New > DWORD (32-bit) Value. Name this value as “DisableLockWorkstation“.
Creating value for removing lock option - Double-click on the DisableLockWorkstation value to open it up and then change the value data to 1. This will remove the lock option from the screen.
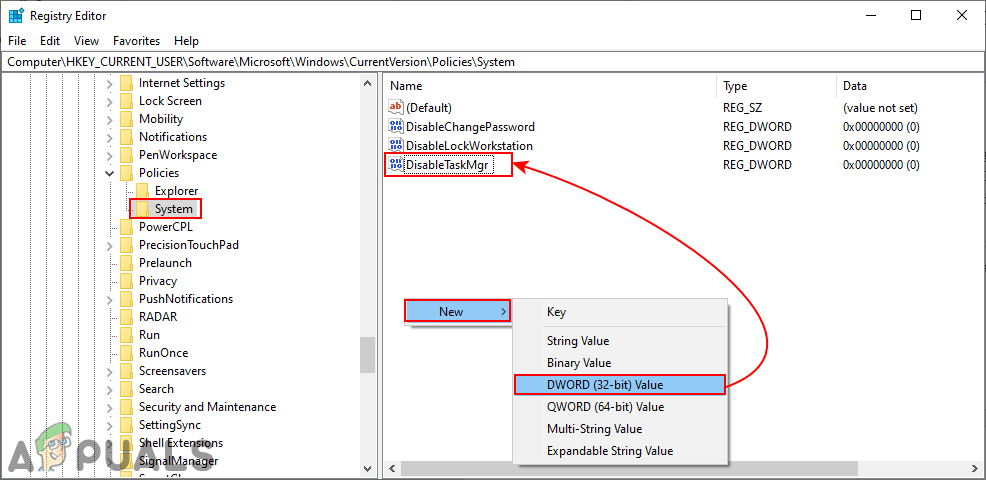
Enabling the value - To remove the Task Manager option from the system, right-click on the right pane and choose New > DWORD (32-bit Value). Name the newly created value as “DisableTaskMgr“.
Creating value for removing Task Manager - Double-click on the DisableTaskMgr value to open it. Now change the value data to 1. This will remove the Task Manager.
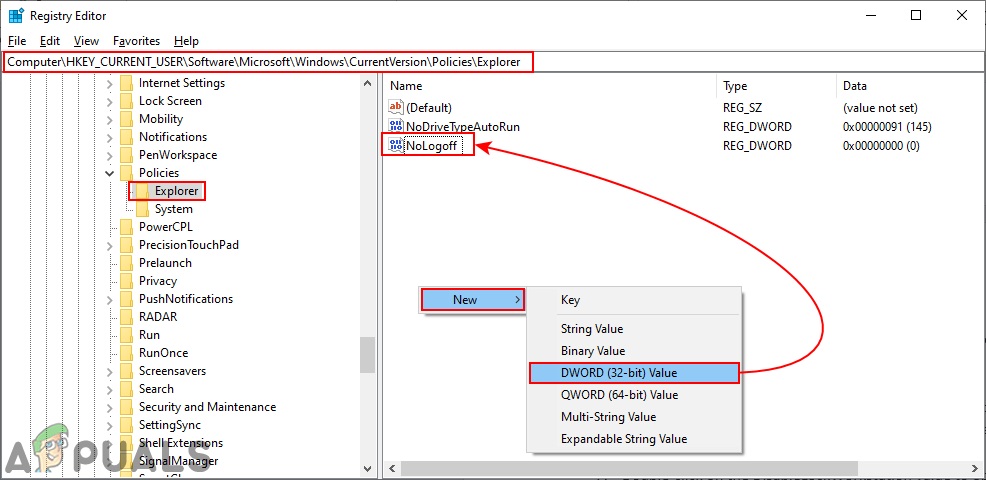
Enabling the value by change value data - For the Sign Out option, navigate to the Explorer key under Policies:
HKEY_CURRENT_USER\Software\Microsoft\Windows\CurrentVersion\Policies\Explorer
- If the Explorer key is missing, simply create it by right-clicking on the Policies key and choosing New > Key. In the Explorer key, create a new value by right-clicking and choosing New > DWORD (32-bit) Value. Name the value as “NoLogoff“.
Creating value for removing the Log off option - Double-click on the NoLogoff value and set the value data to 1. It will remove the Sign Out option.
Changing the value data - After setting any one of the above settings, make sure to restart the computer to apply the changes. To disable any value back, simple change value data to 0 or remove the value.
Kevin Arrows
Kevin Arrows is a highly experienced and knowledgeable technology specialist with over a decade of industry experience. He holds a Microsoft Certified Technology Specialist (MCTS) certification and has a deep passion for staying up-to-date on the latest tech developments. Kevin has written extensively on a wide range of tech-related topics, showcasing his expertise and knowledge in areas such as software development, cybersecurity, and cloud computing. His contributions to the tech field have been widely recognized and respected by his peers, and he is highly regarded for his ability to explain complex technical concepts in a clear and concise manner.