Overview of required tools to cross compile/build/remote debug C/C++ projects on a Windows host ( 10 ) for a Raspberry PI 3B
Introduction
The one line description explains most of it: I have a Raspberry PI 3B for which I have wanted to build some C/C++ projects. Oddly enough, how to do that from a Windows (10) host to do the cross compilation/ build and also do remote debugging from the host computer is very hard to find. There is lots of info out there but no summary of how to set up things to make an example «Hello world» from a Windows host on a remote Raspberry target. I think the main reason for that is that «C/C++» is not very popular on the Raspberry PI, Python appears to be much more popular.
As I have been able to assemble all the necessary stuff to pull it off, I decided to make the summary myself. My Raspberry PI is running the Raspbian Linux distro so it is probably not a bad example on how to set things up on other development boards running various Linux distros as well
Background
The last couple of years, I have done quite a lot of software cross development using a combination of Eclipse and various gcc/g++ development toolchains on multiple platforms (Bare metal/FreeRTOS/Linux on all sorts of processors: ARMcortex M0+…dual core ARM9, ESP32, Power5,…) so I do have a basic knowledge on how these things work.
Then, I recently went from an Eclipse/ESP32 toolchain combination to a Visual Studio Code/ESP32 toolchain which turned out to be much easier to set up than the Eclipse/ESP32 toolchain one. At the time, I had some ESP32 hardware available so I could test that setup on a Windows(10), Linux and an OSX host machine and it worked on all platforms.
As I now have only a Window 10 host and a RaspBerry PI3B running Raspbian as target, I have tried and managed to get it working from my Windows 10 host but all in all, it should be pretty much platform independent as a lot of the scripting relies on Environment variables which need a slightly different setup on the various platforms but they are common to all the possible platforms, particularly because I use the Mingw32 shell on my Windows machine.
Using the Code
The ZIP file contains the entire project and consists of very few files. Just put it anywhere you like. Note; once you unzip it, you will find that there is a subdirectory under subdirectory main with the name test and a file test.c in it, the latter two can be ignored as they are only there to test if files in subdirectories would build as well; they do.
To build the project, various tools need to be installed first so here is what needs to installed:
MSYS2
This provides Linux like terminal shell operation. Typically, it installs in directory C:\msys32.
Run Mingw32.exe in that directory to start a shell. The install can be found at https://www.msys2.org/.
arm-linux-gnueabihf toolchain
This is the required toolchain to build C/C++ projects for the raspberry PI. If you want to build for the latest, at the time of writing, «full stretch» edition of Raspbian, you need version 6.0.3 of it. Prebuilt versions of it can be found for Linux, OSX and Windows. The one I used can be found here: http://gnutoolchains.com/raspberry/. I installed it here: C:\msys32\home\RPI\SysGCC.
Once installed, add a script file called RPI-gcc_toolchain.sh in directory C:\msys32\etc\profile.d. The content should look something like this:
export PATH="$PATH:/c/msys32/home/RPI/SysGCC/bin"
export RPI_IP="192.168.0.144"
export RPI_USER="pi"
export RPI_PASSWORD="my_Pi_password"
Of course, the IP address depends on what your local router provides, setting it up to always provide the same IP address for your RPI’s MAC address is definitely a good idea. Once done, the extended PATH data and the extra environment variables will be defined each time you run a mingw32 shell.
Extra Environment Variable
To enable some features used by VSCODE and the makefile in the example project, add environment variable RPIDEV_LOC to your Windows setup and set it to c:/msys32/home/RPI/SysGCC (Using Control Panel-> System->Advanced settings->Environment variables).
Command Line Build Test
Once the above is done, you should be able to test building the project:
- Start a
mingw32shell and navigate to the root directory of the example project. - Type make to start the cross compile/build and you should see it building files hello_world_main.c and test.c.
- If all is well, the final action is that it will produce the Hello_world_c file which is an ELF file that can run on the Raspberry PI. If that works, we can get going with Visual Studio code.
Installing Visual Studio Code and Extensions
For those who have not got Visual Studio Code yet, you need to install various items:
- Visual Studio code itself, to be found at https://code.visualstudio.com/
- Extension C/C++ by Microsoft to get C/C++ support intellisense, etc.
- Extension Native-Debug to get Cross platform GDB debug support
Using Visual Studio Code to Build and Debug the Example Code
Once Visual Studio Code and the extensions are installed, you can start by opening the project’s folder. Within that folder, there is .vscode folder, in it are all the necessary JSON configuration files which provide all of the necessary build tools, etc. the build tool list pops up by pressing Ctrl+Shift+B.
The number of build commands is not long, apart from the usual clean, build and fast build tools the most important one is the Transfer… tool which transfers the file to execute to the RPI and starts the GDBSERVER on that unit with it
Actual debugging is started by pressing F5 which will attempt to connect to the RPI’s Recently started GDBSERVER. From that point on, you can do complete debugging; setting breakpoints, investigating variables, etc. just as if the application was running on your host system itself.
So, that’s it. I have done quite a bit of CLI development work in the pre GUI days. Some embedded Linux applications work, some windows development work and tons of other embedded work, with or without some form of OS. I really liked doing this as it ties a lot of stuff neatly together. I just hope this can be of use to someone who needs a solution without having to do all the digging personally.
History
- 22nd March, 2019: Initial version
Updated Feb 26, 2014 because I’m dumb.
Cross-Compiling shouldn’t be so Hard
I’m creating this post in the off-chance that someone else with a Raspberry Pi who can’t figure out how to cross-compile from Windows will find this useful (or find it at all).
I have been working on and off on a project that will run on Windows, x86 Linux, and ARM Linux. Problem is, my Linux machines are a little slow. My x86 Linux is running on an Everex Cloudbook sporting a 1500MHz VIA C7-M processor with 512MB of memory. My ARM Linux is running on a Rapsberry Pi with an ARM11 CPU clocked at 700MHz with 512MB of RAM. Compiling on my Windows PC is much faster (even if MinGW make won’t run multiple threads at once). Cross-compiling for x86 Linux isn’t really fruitful, as it’s not my main target. However, cross-compiling for my Raspberry Pi would be tremendously beneficial (a 30-second compile on my PC takes 5-10 minutes on the RPi).
Find a Working Cross Compiler
Now, most websites online talk about cross-compiling from x86 Linux to ARM Linux. The RPi creators even have their own cross-compiler available. There are, however, 2 problems with this. First, I don’t want to install Linux on my PC, virtual or otherwise. Second, their GCC cross-compiler is only at version 4.6, and I need C++11 features only available in GCC 4.7+. My solution was to start with a pre-built GCC 4.7 ARM-Linux cross-compiler and modify things until I got something working on my RPi. Below are the steps I had to take to finally get it working.
1) Find a x86 Windows to ARM Linux cross-compiler. This was fairly simple. A quick google search led me to http://linaro.org. They have GCC 4.7 and GCC 4.8 ARM Linux cross-compiler binaries for Windows.
2) Find the compiler options I would need to tell Linaro GCC to compile specifically for the Raspberry Pi. This wasn’t too difficult. Linaro is pre-built to target ARMv7 instructions and a Cortex-9 CPU, but the following compiler flags take care that issue. These commands (some of which may not actually be necessary) tell the compiler to target the RPi hardware.
|
-mcpu=arm1176jzf-s -mthumb -mtune=arm1176jzf-s -mfpu=vfp -marm -march=armv6k -mfloat-abi=hard |
3) Make the compiler link against the RPi static libraries. This was the hardest part. Using steps 1 and 2 I was able to get a file to compile for the RPi, but the problem is that Linaro is built against version 2.6.32 of the Linux Kernel, while the Raspbian image I am using is based on 2.6.26. This meant the generated executable was incompatible. The solution was to copy the static libraries from my RPi to my Windows PC and make the linker use them. This was a two-step process. Note that it took much trial and error, so some of this might be unneeded, but this is the process I got working on my machine.
3a) Copy the libraries: This involved tar-ing the following directories and using SCP to get them off the RPi (I tar-ed instead of “zipping” because data transfer was faster than trying to get the RPi to compress the data). Also note that you must tell tar to follow both symlinks and hardlinks, as both methods are in use. This doubles/triples the size, but you cannot preserve Linux links on a Windows file system.
- /usr/lib/arm-linux-gneuabihf
- /usr/lib/gcc/arm-linux-gneaubihf/4.7/*
- /opt/vc/lib
- /lib/arm-linux-gneaubihf
3b) Remove all libraries that came with Linaro and replace them with the RPi libraries. This is necessary because Linaro was built against a different version of the Linux Kernel than my version of Raspbian. This was not apparent at first, and the seg-faults I was getting on RPi were of no help. What was a help was doing “
file <executable> ” from the RPi, which showed that my executable was linked against 2.6.32, while the RPi is only 2.6.26. I then had to delete the following files from my Linaro Installation:
- <install>\lib\gcc\arm-linux-gnueabihf\4.7.3\*.o|*.a
- <install>\lib\gcc\arm-linux-gnueabihf\4.7.3\arm-linux-gnueabihf
- <install>\arm-linux-gnueabihf\lib
- <install>\arm-linux-gnueabihf\libc\lib
- <install>\arm-linux-gnueabihf\libc\usr\lib
(don’t get me started on how idiotic this layout is. There is actually a “arm-linux-gneaubihf\libc\usr\lib\arm-linux-gneaubihf\usr\lib” directory!?!)
UPDATE: I did NOT need to copy the files in this step (see step 3c) I then placed the RPi libraries as follows:
- /lib/arm-linux-gneaubihf became <install>\arm-linux-gneaubihf\libc\lib\arm-linux-gneaubihf
- /usr/lib/gcc/arm-linux-gneaubihf/4.7/* were copied to the new <install>\arm-linux-gneaubihf\libc\lib directory
- /usr/lib/arm-linux-gneaubihf became <install>\arm-linux-gneaubihf\libc\usr\lib\arm-linux-gneaubihf
- /opt/vc/lib wasn’t copied, I guess I didn’t need it after all. It might be needed later.
3c) UPDATE: Turns out that in my repeated trial and error, I skipped a step that had been working previously. Instead of copying the RPi libraries to Linaro, I actually just needed to specify the locations by passing the following lines to G++ (D:\rpi-libs is my Windows-local copy of the RPi static libraris):
|
-LD:/rpi-libs/lib/arm-linux-gnueabihf \ -LD:/rpi-libs/usr/lib/arm-linux-gnueabihf \ -LD:/rpi-libs/usr/lib/gcc/arm-linux-gnueabihf/4.7 \ -LD:/rpi-libs/opt/vc/lib/ |
3d) UPDATE: One final problem is that every .o file must be passed to the linker IF that file does not exist in a location that was specified in the configuration when the linker was built. As such, I found I needed to copy the following files to my SOURCE directory because they were HARD CODED into the linker. I could NOT pass these in as object to the compiler, because then they would be listed twice (again, they were HARD CODED), and then the compiler still wouldn’t be able to find the file (I would pass it a /path/to/crt1.o, but it would still look for crt1.o):
|
D:\rpi-libs\usr\lib\arm-linux-gnueabihf\crt*.o D:\rpi-libs\usr\lib\gcc\arm-linux-gnueabihf\4.7\crt*.o |
Of course, via my make file, I can copy these files before compilation, then delete them afterwards and I’m none the wiser. Still, it’s a terrible hack that I can only work around by a) copying my files to the predefined paths built into the Linaro GNU linker or b) building my own linker. I’m lazy, and this solution works.
Finally, Success
Once I had performed the above steps, I was able to build my executable and SCP it to my RPi. A quick “file <executable>” showed that it had been linked against the proper libraries. A quicker “chmod +x” and my executable was chugging away (or actually, waiting for a connection, but still, success!!). Now when I make changes from my Windows PC, I can quickly compile them for my Raspberry Pi. No more waiting for the little ARM processor to chug-away.
What I Learned
First of all, I learned no one seems to cross-compile FROM Windows. In fact, searching “windows linux cross compiler”, “linux cross compiler windows binaries”, etc.. all turn up links for people wanting to “Build Windows applications from Linux”. I still don’t have an x86 cross-compiler, and I refuse to install Cygwin. How is there not a native Windows executable for an x86 Linux cross-compiler? Maybe there is and it’s buried under the Linux to Windows links?
Second, GNU Linker is hard-coded to search library paths, and there is no command-line option to fix this. If I was on Linux, supposedly setting the LIBARY_PATH environment variable would have worked, but that’s a hack. You should be able to directly tell the linker what you want to do.
Finally, it seems no one is bothered by the fact that the default solution seems to be “make your own cross-compiler”. Why would thousands of individual developers each need to create their own cross-compiler. It is nice that the Raspberry Pi creators have a cross-compiler, but it’s stuck at GCC 4.6 and only works under Linux. It would be nice if they at least had GCC 4.7 and GCC 4.8, then maybe I could have been motivated to install a Linux VM.
My Linaro GCC 4.7 Raspbian Linux 2.6.26 Cross-Compiler Windows Binaries (whew)
UPDATE: These files still work, but I think I updated my steps above with a more portable solution. I have uploaded my files here: http://svn.hellwig.us/binaries/Linaro/linaro-14.01-gcc-4.7-arm-RPi-raspbian-2.6.26.zip. Simply unzip this directory somewhere to your computer. Point your makefile or environment to the “<install>\bin” directory, and you should be good to go building RPi executables from your Windows PC. I did not modify any of the Linaro executables or header files (header files might cause some problems down the line,but hopefully not many). I did not modify any of the Raspbian static library files. I simply merged the Linaro toolchain with the Raspbian libraies and viola, a cross-compiler was born. Don’t forget, if you use this, that you’ll need to specify certain compiler options to target the RPi hardware specifically.
Вычислительных возможностей платы Raspberry Pi 3(далее по тексту Rpi3) более чем достаточно для разработки программ сразу в целевой системе. Однако процесс разработки можно ускорить и сделать более комфортным, если разрабатывать программное обеспечение для Rpi3 на своем персональном компьютере.
В данной статье я собираюсь описать процесс настройки кросс-компиляции в Eclipse под Windows. Также будет описана настройка Eclipse для работы с удаленной системой Raspbian на Rpi3.
Если вы впервые сталкиваетесь с Eclipse, то установить последнюю версию можно по ссылке Eclipse CDT.
Виртуальную машину Java, необходимую для работы Eclipse, можно загрузить по ссылке JRE.
После установки указанных выше компонентов интегрированная среда разработки Eclipse CDT сможет быть запущена на вашем компьютере. В качестве вспомогательных утилит будем использовать msys из пакета MinGW, поэтому необходимо также загрузить MinGW.
Осталось установить инструментальные средства для кросс-компиляции программ.
Для этого необходимо их загрузить по следующей ссылке toolchain .
На указанном сайте также имеется инструкция на английском языке по установке инструментария tutorial.
После установки инструментария в указанном вами каталоге будут находится также дополнительные утилиты в подкаталоге TOOLS :
- WinFlashTool – утилита для записи образа операционной системы Rpi3 на карту памяти.
- SmarTTY – консольный SSH – клиент , позволяющий установить соединение с платой по протоколу SSH. Помимо стандартных функций имеет возможность загрузки файлов на плату из меню утилиты.
- UpdateSysroot – командный файл Windows , запускающий процесс синхронизации файловой системы sysroot платы и инструментария.
Если вы только что приобрели плату Rpi3 и еще не успели установить операционную систему на карту памяти, то утилита WinFlashTool поможет вам это сделать.
Необходимо загрузить с официального источника образ операционной системы Raspbian.
Дальше распакуйте загруженный образ, установите карту памяти в кард-ридер и запишите на нее с помощью WinFlashTool образ операционной системы.
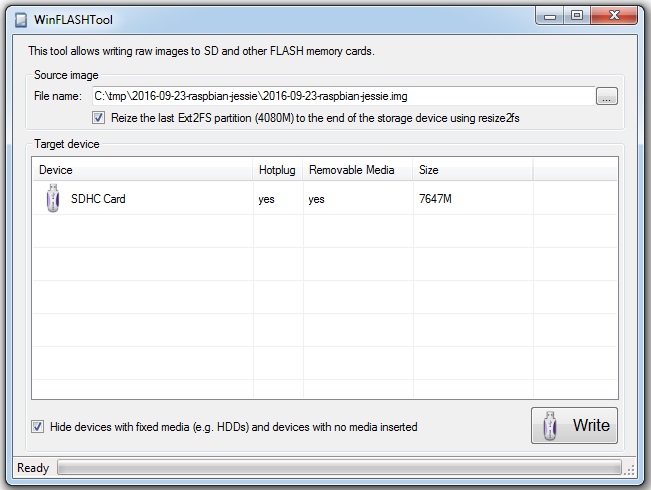
Настройка беспроводной сети WLAN на плате RPi3 описана в моей предыдущей статье.
С помощью утилиты SmarTTY установите соединение с платой. Это необходимо для исключения проблем во время настройки удаленного соединения в Eclipse.
Создайте новое соединение, указав IP -адрес платы, логин и пароль для входа (значения по-умолчанию для логина и пароля pi и raspberry соответственно).

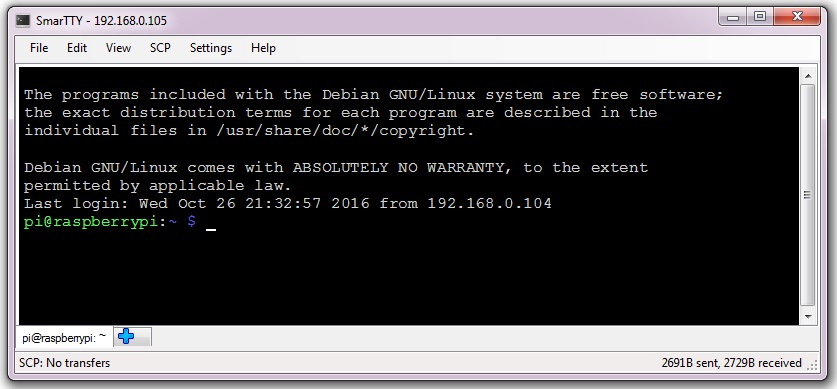
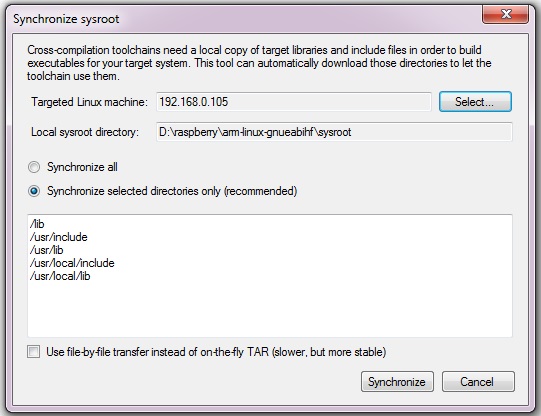
Теперь нужно провести синхронизацию файловой системы sysroot. Для чего это нужно?
Представьте ситуацию, когда вы установили самую последнюю версию образа Raspbian и не выполнили синхронизацию.
В новой версии были добавлены или изменены заголовочные файлы и файлы библиотек. Работая с кросс-компилятором вы используете старые, не идентичные с последней версией системы, заголовочные и библиотечные файлы из каталога sysroot. Поэтому нет никакой гарантии, что успешно собранная на компьютере программа будет работать внутри платы RPi3.
Запускаем скрипт UpdateSysroot на выполнение и наблюдаем за обновлением файлов на компьютере (это может занять несколько десятков минут).
Настало время настроить удаленное соединение с платой Rpi3 в Eclipse . Запускаем Eclipse CDT , выбираем в главном меню пункт Window->Show View->Other… В открывшемся окне выбираем «remote systems».
После этого в нижней части экрана появиться новая вкладка «Remote Systems». В этой вкладке необходимо определить новое соединение, нажав на первую кнопку справа.

В открывшемся окне выбираем тип соединения «Linux».
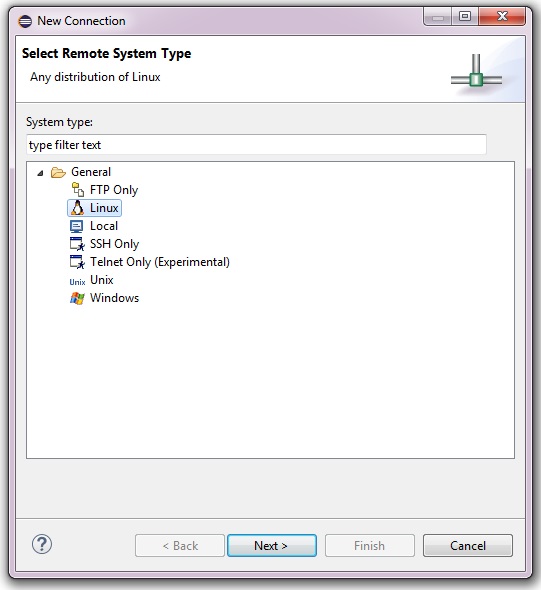
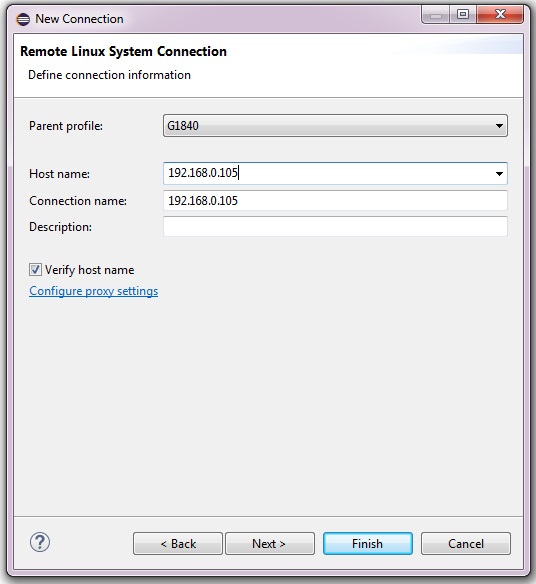

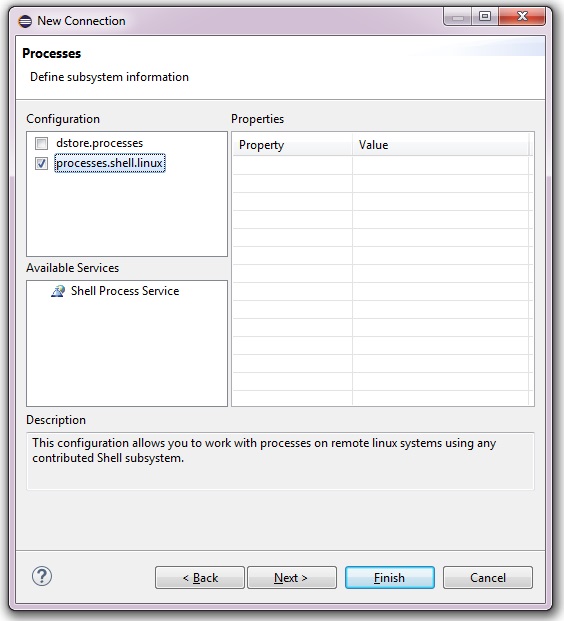

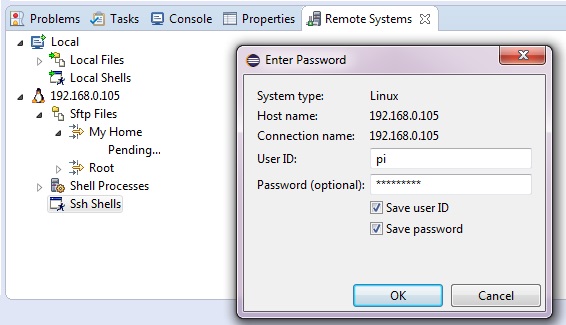
После проделанных манипуляций в закладке «Remote Systems» появится новое соединение, которое имеет подразделы:
- Sftp Files – в этом разделе можно просматривать содержимое удаленной файловой системы. Также возможно выполнять копирование файлов с помощью перетаскивания (Drag and Drop) из локального проекта на удаленную машину и обратно.
- Shell Processes – раздел позволяет просмотреть запущенные на удаленной машине процессы.
- Ssh Shells – в этом разделе можно открыть новый SSH -терминал и вводить команды прямо из Eclipse. Надобность в отдельной утилите при этом отпадает.

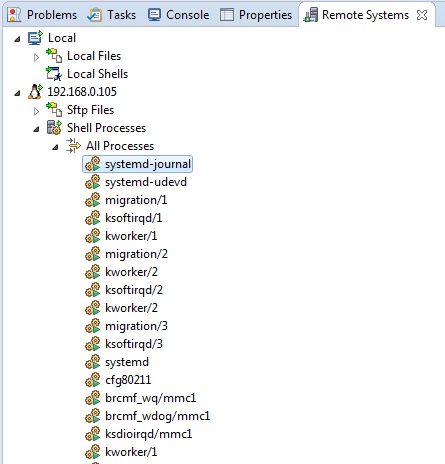

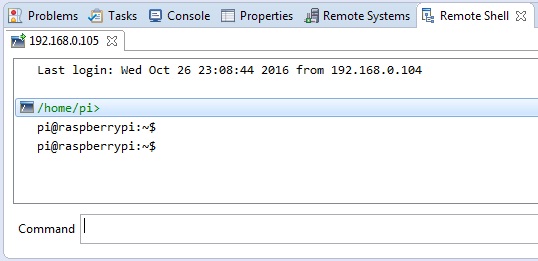
Таким образом с помощью закладки «Remote Systems» мы сможем копировать собранные на компьютере программы в файловую систему Rpi3 , запускать их на выполнение через Ssh Shells и удалять ненужный процесс в разделе Shell Processes .
Настало время создать новый проект в Eclipse и написать простую демонстрационную программу.
Создаем новый проект из главного меню File->New->C Project.

Для сборки я использую собственный Makefile, поэтому тип проекта нужно выбрать Makefile project->Empty Project

Далее вы можете просто скопировать мой Makefile в буфер клавиатуры (Ctrl+C) и вставить его в пустой проект Rpi3_Project (Ctrl+V).
Открыв Makefile в первой его строке после комментария вы увидите список используемых целей :
.PHONY: test project all clean
- test – проверяет установлен ли в системе кросс-компилятор arm-linux-gnueabi-gcc и утилита make.
- project — создает структуру каталогов внутри проекта.
- all — производит сборку проекта.
- clean — производит очистку проекта от временных файлов(в том числе исполняемого).
Теперь нужно убедиться в наличии инструментальных средств. Для этого необходимо выполнить команду make test.
Но сначала нужно добавить все четыре цели в закладку Make Target в правой части экрана.
Двойным щелчком мыши по цели test запускаем ее на исполнение и видим в окне Console примерно следующее :
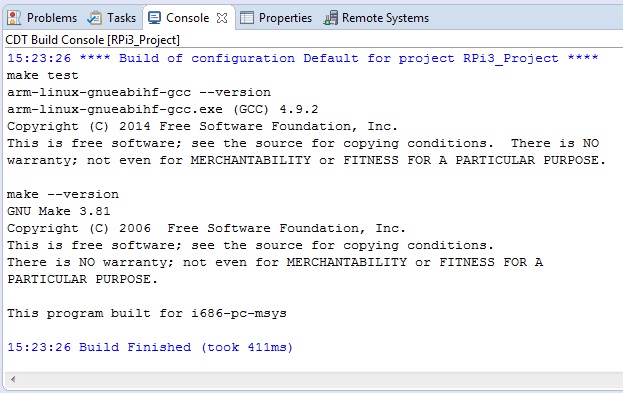
Если сообщение не было выведено в консоль не смотря на то, что инструментарии arm-linux-gnueabihf и MinGW были ранее установлены, то это может означать только то, что не прописаны пути к инструментам в системной переменной Path . Необходимо добавить в Path путь к каталогу MinGW/msys/1.0/bin и каталогу bin пакета arm-linux-gnueabihf.
Теперь создадим структуру каталогов внутри проекта двойным щелчком на цели project (make project).
Makefile организован таким образом, что для компиляции исходных файлов их названия должны быть добавлены в переменную SRC, все остальные исходники не будут компилироваться даже если они расположены внутри каталога /src.
Структура каталогов проекта такова :
- bin – каталог , содержащий исполняемый файл после сборки.
- Debug – каталог с отладочной версией программы, которая не содержит оптимизации кода и содержит отладочную информацию.
- Release – каталог с финальной версией программы, которая содержит оптимизированный код и не содержит отладочной информации.
- inc – каталог для заголовочных файлов.
- obj – содержит временные файлы сборки проекта, имеет подкаталоги Debug и Release.
- src – исходные файлы проекта.
С помощью данного Makefile можно компилировать исходные файлы, написанные на таких языках программирования как C , C++, Assembler. При этом можно использовать все доступные языки программирования для создания одной программы.
В каталоге /src создадим новый исходный файл main.c, добавим в него следующие строки :
|
#include int main(int argc, char **argv); int main(int argc, char **argv) { printf(«Welcome to the Raspberry Pi 3 programming\n»); return 0; }/* main */ |
Проверим, чтобы переменная SRC содержала название исходного файла main.c .
Дальше выполним сборку проекта, запустив цель all .
Теперь можно скопировать полученный исполняемый файл в домашний каталог на целевой плате используя перетаскивание файла мышью.

Сделаем правый клик мышью на разделе Ssh Shells для открытия контекстного меню, в котором необходимо выбрать Launch Shell . Откроется новая вкладка Remote Shell , в поле Command которой можно вводить команды оболочки.


Установим права доступа для скопированного файла Rpi3_Project с помощью команды :
|
sudo chmod 777 Rpi3_Project |
Далее запустим созданную нами программу на выполнение :

Эту же простейшую программу можно написать на языке C++ , текст программы сохранить в файле prog.cpp.
|
#include using namespace std; int main(int argc, char **argv); int main(int argc, char **argv) { cout << “Welcome to the Raspberry Pi 3 programming in C++\n”; return 0; }//main |
В Makefile не забудьте закомментировать запись SRC := main.c и добавить вместо нее SRC := prog.cpp .

Такая простая программа, как у нас, не нуждается в отладке. Для нахождения проблем в реальных программах можно воспользоваться удаленной отладкой.
Работает отладка просто : на целевой плате запускается GDB -сервер , а на стороне среды разработки в работу вступает GDB -клиент.
Настроим отладку в Eclipse, для этого в настройках отладчика выбираем пункт «Debug Configuration».

Далее создаем новую конфигурацию отладки в разделе «C/C++ Remote Application» окна «Debug Configuration» и настраиваем все так, как показано на следующем рисунке.

В графе “Connection” установите IP -адрес своей платы Rpi3 .
Во вкладке “Debugger” установите все согласно следующим рисункам :
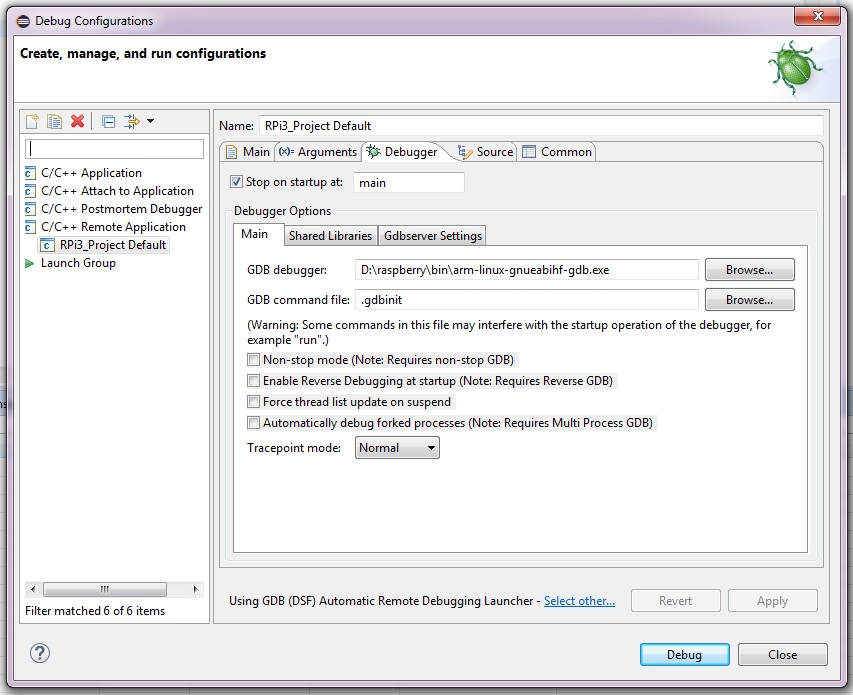

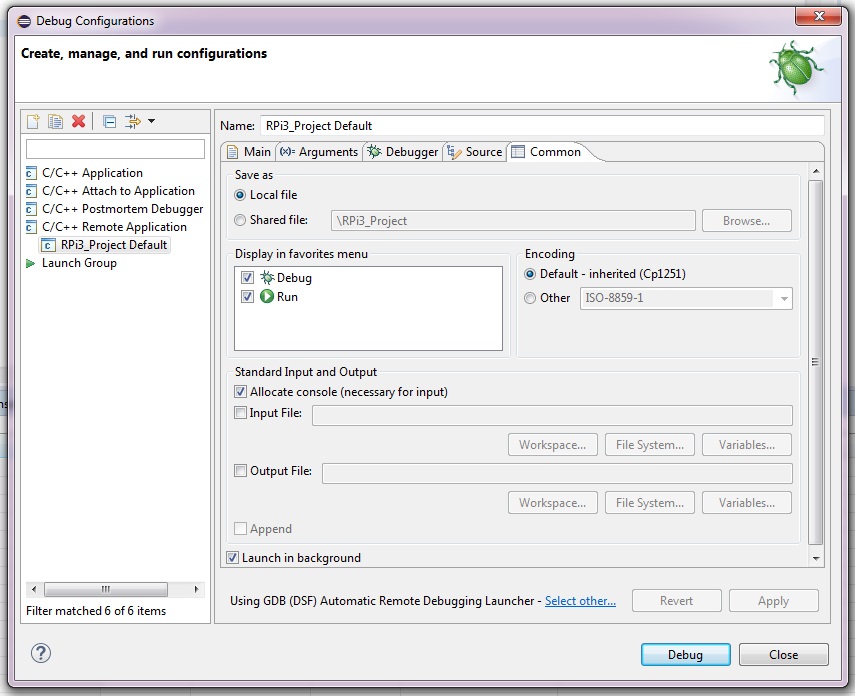
Нажимаем на кнопку “Debug” и запускаем процесс отладки :

На этом пока все, всем спасибо за внимание !
Viewed 153154 times by 21779 viewers
In this post I will go through how to install and configure a Rust cross-compilation environment from Windows to the Raspberry Pi 4 running Raspbian. I am assuming that Rust is installed in the Windows system following these instructions and that a Raspberry Pi 4 machine is running with the name raspberrypi and accessible by ssh.
The first step is to install a C/C++ toolchain for the Raspberry Pi. I typically use the one provided by SysGCC but I am sure there are others available. To test that the cross-compiler is working you can write a simple main.c file such as
#include <stdio.h>

int main()
{
    printf("Hello World\n");
    return 0;
}
Then run the following commands on a PowerShell to compile and run the executable on the remote Raspberry Pi.
    arm-linux-gnueabihf-gcc-8.exe .\main.c -o mytest
    scp .\mytest pi@raspberrypi:/home/pi
    ssh pi@raspberrypi chmod +x /home/pi/mytest
    ssh pi@raspberrypi /home/pi/mytest
If you see the Hello World output on your PowerShell terminal then the cross-compilation went well and everything is working.
Prepare the Rust environment
Now it is time to get the Rust environment ready for cross-compilation. First start by installing the target using the PowerShell.
rustup target add armv7-unknown-linux-gnueabihf
Then edit (or create) the file *C:\Users\\\.cargo\\config* by adding the line
[target.armv7-unknown-linux-gnueabihf]
linker = "arm-linux-gnueabihf-gcc-8.exe"
This line configures the linker to be used for creating the executable. If this is not done, a error: linker cc not found message shows up when trying to compile an executable for that target.
Cross-compiling Rust hello world
To create a Rust “Hello World” program, simply make a new folder (in this case I call it rs-hello) and let cargo do the rest of the work for you.
cargo init
cargo build --target=armv7-unknown-linux-gnueabihf
Now there is an executable that can be copied and executed on the remote Raspberry Pi.
scp .\target\armv7-unknown-linux-gnueabihf\debug\rs-hello pi@raspberrypi:/home/pi
ssh pi@raspberrypi chmod +x /home/pi/rs-hello
ssh pi@raspberrypi /home/pi/rs-hello
If you see the Hello, world! output on your PowerShell terminal then the cross-compilation went well and you can now create Rust programs to run on your Raspberry Pi.
Cross-Compiling for the Raspberry Pi
This repository shows how to cross-compile a simple Hello World program and run it on
a Raspberry Pi. It also shows how to install and setup a TCF agent on the Raspberry Pi
for remote debugging with Eclipse.
Prerequisites for cross-compiling
cmakeinstalled- ARM Linux cross compiler installed
- Raspberry Pi sysroot folder mirrored on the host machine, using
rsyncandscp.
See the related chapter for more information. - Optional:
tcf-agentrunning on the Raspberry Pi for remote debugging with Eclipse. See the
related chapter for more information.
Linux
Instructions for an Ubuntu host. The scripts rpi3-env-set.sh and rpi4-env-set.sh provide
most of the steps specified here and are provided for convenience.
-
You can download cross-compile toolchains built with
crosstool-ngfrom
here.You can test the toolchain with
armv8-rpi4-linux-gnueabihf-gcc --version. Copy the path
containing the toolchain binaries. It is going to be required later.Alternatively, install a pre-built ARM cross-compile with the following command
wget https://github.com/Pro/raspi-toolchain/releases/latest/download/raspi-toolchain.tar.gz
Then extract to the opt folder:
sudo tar xfz raspi-toolchain.tar.gz --strip-components=1 -C /opt
Please note that this version of the toolchain might become obsolete in the future.
If another toolchain installation is used, it is still recommended to unpack the toolchain in the
/opt/cross-pi-gccfolder so that the Eclipse configuration and helper
scripts work without adaptions. Add the folder to the system path. On Linux,
this can generally be done with the following commandexport PATH=$PATH:"/opt/cross-pi-gcc/bin"
You can add this line to the
.bashrcor.profilefile in the$HOMEdirectory
to add environmental variables permanently. More experienced users can
perform this step is a shell script which issourced to keep the environment clean.Test the toolchain with the following command
arm-linux-gnueabihf-gcc --version
-
Navigate into the toolchain folder.
cd <toolchainPath>/bin
pwd
Copy the path and run the following command to add the tool binary path to the MinGW64 path
export PATH=$PATH:"<copied path>"
-
It is assumed the root filesystem is located somewhere on the host machine (see rootfs
chapter for more information how to do this). Set in in an environmental variable which
cmakecan useexport LINUX_ROOTFS="<pathToRootfs>"
Note that you can add the commands in step 2 and step 3 to the
~/.bashrcto set the path
and the environment variable up permanently. -
Set the Raspberry Pi version by setting the
RASPBERRY_VERSIONenvironmental variable, for
example like this for the Raspberry Pi 4export RASPBERRY_VERSION=4 -
Build the application using CMake. Run the following commands inside the repository
mkdir build && cd build
cmake ..
cmake --build . -j
chmod +x hello
-
Transfer to application to the Raspberry Pi and run it to test it
scp hello <username>@raspberrypi.local:/tmp
ssh <username>@raspberrypi.local
cd /tmp
./hello
Windows
There are two options to cross-compile on Windows: Use the native tools and the Unix environment
provided by MinGW64 or perform the Linux steps in WSL2. If you want to use WLS2, follow the Linux
instructions (not tested yet, but should work). The following instructions show
how to cross-compile using MinGW64. Install MSYS2 first.
Prepare MSYS2 by running the following commands in MinGW64
pacman -S mingw-w64-x86_64-cmake mingw-w64-x86_64-make rsync
You can also run pacman -S mingw-w64-x86_64-toolchain to install the full build chain with
gcc and g++
-
Install the correct ARM Linux cross-compile
toolchain provided by SysProgs.
You can find out the distribution release of your Raspberry Pi by runningcat /etc/rpi-issue.Test the toolchain by running:
arm-linux-gnueabihf-gcc --version
-
Navigate into the toolchain folder inside MinGW64.
cd <toolchainPath>/bin
pwd
Copy the path and run the following command to add the tool binary path to the MinGW64 path
export PATH=$PATH:"<copied path>"
-
It is assumed the root filesystem is located somewhere on the host machine (see rootfs
chapter for more information how to do this). Set in in an environmental variable which
cmakecan useexport LINUX_ROOTFS="<pathToRootfs>"
Note that you can add the commands in step 2 and step 3 to the
~/.bashrcto set the path
and the environment variable up permanently -
Set the Raspberry Pi version by setting the
RASPBERRY_VERSIONenvironmental variable, for
example like this for the Raspberry Pi 4export RASPBERRY_VERSION=4 -
Build the application using CMake. Run the following commands inside the repository
mkdir build && cd build
cmake -G "MinGW Makefiles" ..
cmake --build . -j
chmod +x hello
-
Transfer to application to the Raspberry Pi and run it to test it
scp hello <username>@raspberrypi.local:/tmp
ssh <username>@raspberrypi.local
cd /tmp
./hello
Cloning the root filesystem
You can also download a basic root filesystem for the Raspberry Pi 4 with libgpiod installed
from here.
Linux Host
Set up a sysroot folder on the local host machine. Make sure the SSH connection to
the Raspberry Pi is working without issues. Then perform the following steps
cd $HOME
mkdir raspberrypi
cd raspberrypi
mkdir rootfs
cd rootfs
pwd
Store the result of pwd, it is going to be used by rsync later.
Now use rsync to clone the Raspberry Pi sysroot to the local host machine.
You can replace <ip-address> with raspberrypi.local to use DNS.
Use the rootfs location stored from the previous steps as <rootfs-path>.
rsync -avHAXR --delete-after --info=progress2 --numeric-ids <user_name>@<ip_address>:/{lib,usr,opt/vc/lib} <rootfs_path>
On Linux, it is recommended to repair some symlinks which can be problematic:
Navigate to the folder containing the symlinks first:
cd <rootfs_path>/usr/lib/arm-linux-gnueabihf
You can now use
which will show an absolute location of a shared library the symlinks points to. This location
needs to be converted into a relative path.
Run the following command to create a relative symlinks instead of an absolute ones. The pointed
to location might change to check it with readlink first before removing the symlinks:
rm libpthread.so
rm librt.so
ln -s ../../../lib/arm-linux-gnueabihf/libpthread.so.0 libpthread.so
ln -s ../../../lib/arm-linux-gnueabihf/librt.so.1 librt.so
For more information on issues which can occur when cloning the root filesystem,
see the troubleshooting section.
Windows Host
This requires MSYS2 installed. All command line steps shown here
were performed in the MSYS2 MinGW64 shell (not the default MSYS2, use MinGW64!).
Replace <UserName> with respectively. It is recommended to set up
aliases in the .bashrc file to allow quick navigation to the fsfw_example
repository and to run git config --global core.autocrlf true for git in
MinGW64.
Set up a sysroot folder on the local host machine. Make sure the SSH connection to
the Raspberry Pi is working without issues. Then perform the following steps
cd /c/Users/<UserName>
mkdir raspberrypi
cd raspberrypi
mkdir rootfs
cd rootfs
pwd
Store the result of pwd, it is going to be used by rsync later.
Now use rsync to clone the RPi sysroot to the local host machine.
You can replace <ip-address> with raspberrypi.local to use DNS.
Use the rootfs location stored from the previous steps as <rootfs-path>.
rsync -avHAXR --numeric-ids --info=progress2 <username>@<ip-address>:/{lib,usr,opt/vc/lib} <rootfs-path>
Please note that rsync sometimes does not copy shared libraries or symlinks properly,
which might result in errors when cross-compiling and cross-linking. It is recommended to run
the following commands in addition to the rsync command on Windows:
scp <user_name>@<ip-address>:/lib/arm-linux-gnueabihf/{libc.so.6,ld-linux-armhf.so.3,libm.so.6} \
   <rootfs_path>/lib/arm-linux-gnueabihf
scp <user_name>@<ip-address>:/usr/lib/arm-linux-gnueabihf/{libpthread.so,libc.so,librt.so} \
   <rootfs_path>/usr/lib/arm-linux-gnueabihf
For more information on issues which can occur when cloning the root filesystem,
see the troubleshooting section.
Installing the TCF agent on the Raspberry Pi
The TCF agent allows comfortable
Eclipse remote debugging and other features like a remote file explorer in Eclipse.
The following steps show how to setup the TCF agent on the Raspberry Pi and add it to the
auto-startup applications. The steps are based
on this guide
-
Install required packages on the Raspberry Pi
sudo apt-get install git uuid uuid-dev libssl-dev
-
Clone the repository and perform some preparation steps
git clone git://git.eclipse.org/gitroot/tcf/org.eclipse.tcf.agent.git cd org.eclipse.tcf.agent.git/agent -
Build the TCF agent
and then test it by running
obj/GNU/Linux/arm/Debug/agent –S
-
Finally install the agent for auto-start with the following steps. And set it up for
auto-start.cd org.eclipse.tcf.agent/agent make install sudo make install INSTALLROOT= sudo update-rc.d tcf-agent defaults -
Restart the Raspberry Pi and verify the tcf-agent is running with the following command
systemctl status tcf-agent
Using Eclipse
- Install Eclipse for C/C++ with the
installer - Install the TCF agent plugin in Eclipse from the
releases. Go to
Help → Install New Software and use the download page, for
example https://download.eclipse.org/tools/tcf/releases/1.6/1.6.2/ to search
for the plugin and install it. - Eclipse project files were supplied to get started. You can copy the
.cprojectand.project
files to the system root and then add the repository as an Eclipse project to get started.
Only select the root folder check box here. The build system still needs to be generated from
command line, but you can build and debug the project conveniently in Eclipse after that. - Set the
RASPBIAN_ROOTFSEclipse variable and the toolchain binary path correctly in the project
settings to make full use of the Eclipse indexer. - If the
tcf-agentis running on the Raspberry Pi, you should be able to connect to it using
the TCF plugin. - If you are connected, right click on the generated image in the build tree and select
Debug As→Remote Applicationto perform remote debugging
