
Download Windows Speedup Tool to fix errors and make PC run faster
You may have noticed a message that implies that your computer created a temporary paging file because of a problem. This might raise some eyebrows as the paging file is a file on your hard drive that Windows uses as virtual memory when your system’s physical RAM runs low on memory. In this post, we are going to see what to do if Windows created a temporary paging file on your computer.

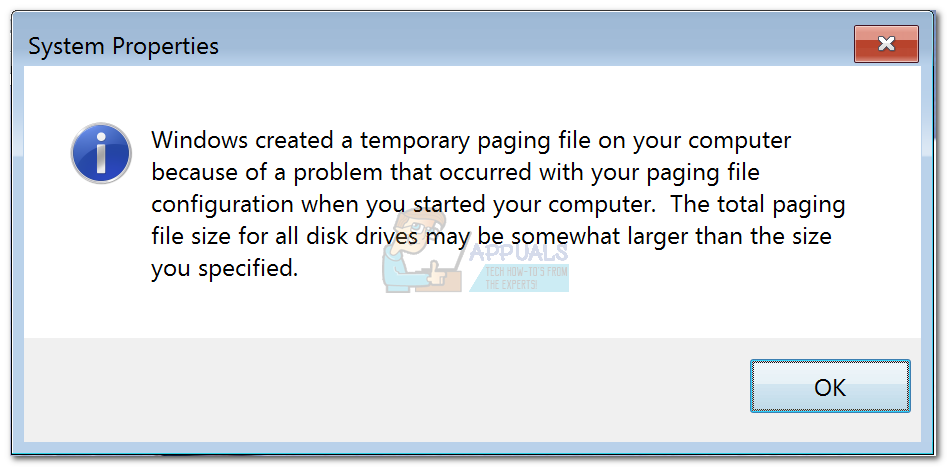
Windows created a temporary paging file on your computer because of a problem that occurred with your paging file configuration when you started your computer. The total paging file size for all disk drives may be somewhat larger than the size you specified.
If Windows has created a temporary paging file on your computer, execute the solutions mentioned below to address the issue:
- Set Virtual memory manually
- Change Registry value
- Disable AFS
- Reset the paging file
Let us get started with the troubleshooting guide.
1] Set Virtual memory manually
If the system does not have a properly allocated paging file, this can lead to performance errors and an error message. Setting the Virtual memory can ensure stability by preventing temporary paging file creation.
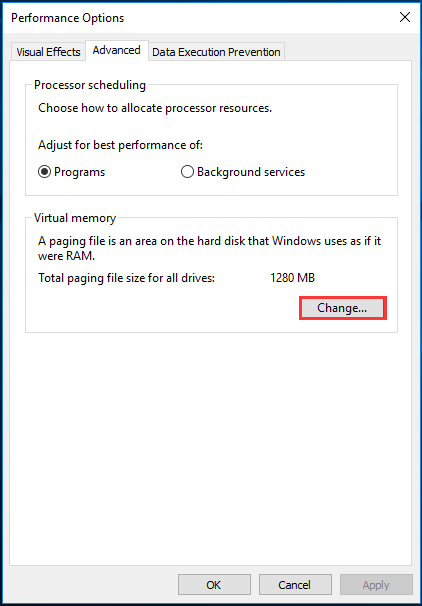
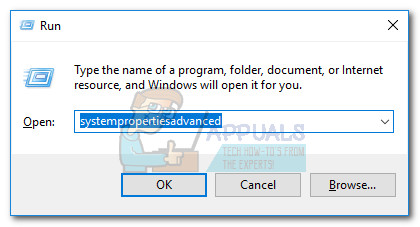
- Click Win + R to open the Run dialog box, type systempropertiesadvanced to open System Properties, and hit OK.
- In the Advanced tab, navigate to the Performance section, and click the Settings button.
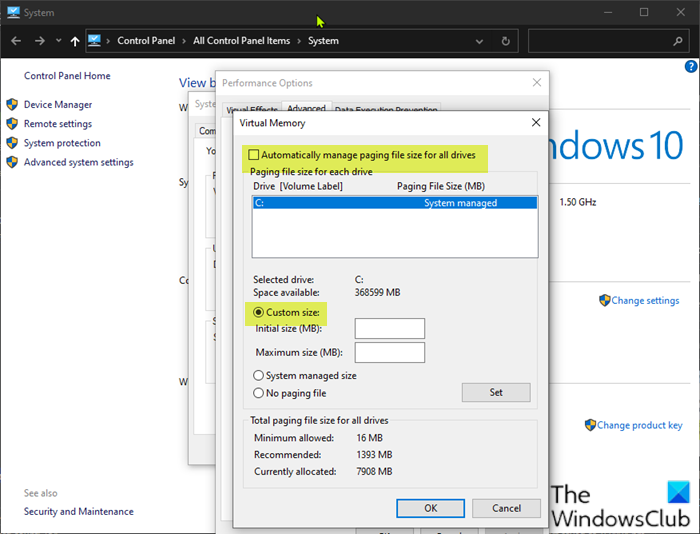
- Once again, navigate to the Advanced tab, and click the Change button under the Virtual Memory section. Here, ensure that the Automatically manage paging file size for all drives box is unticked, and select System managed size.
- Lastly, Click on the Set button and hit Ok to save the changes.
Check if the issue persists. Move to the next solution if it does.
2] Change Registry value
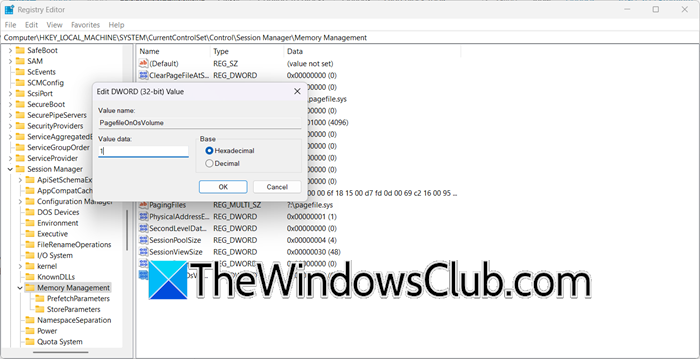
The registry key HKEY_LOCAL_MACHINE\System\CurrentControlSet\Control\Session Manager\Memory Management\PagefileOnOsVolume controls whether the Page file (a file used by Windows for virtual memory) is located on the same volume as the operating system.
- Value 1: The page file is on the same volume as the OS.
- Value 0: The page file is on a different volume.
By changing this value from 1 to 0, you instructed Windows to move the page file to a different volume. So, first, create a backup of your registry. Then, go to the following registry key:
HKEY_LOCAL_MACHINE\System\CurrentControlSet\Control\Session Manager\Memory Management\PagefileOnOsVolume
If the value is set to 1, switch it to 0; however, if it is 0, set it to 1.
In case, PagefileOnOsVolume is missing, navigate to Memory Management, right-click on an empty space, select New > DWORD (32-bit) Value, and set it to 1.
Finally, reboot your computer and check if the issue is resolved.
3] Disable Active File Scavenging
AFS (Active File Scavenging) may interfere with the virtual memory management by preventing Windows from properly accessing or modifying pagefile.sys. It is recommended to disable AFS, and here’s how to do it.
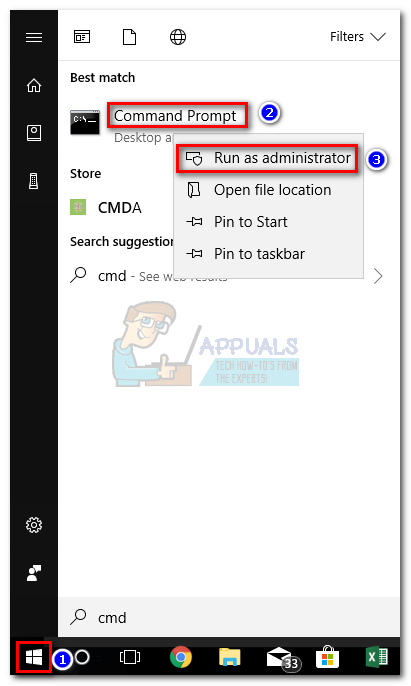
- Click Win + X, press A to open the Command Prompt, and click the Yes button.
- Type the following command to disable AFS, and hit the Enter button:
sc config afs start= disabled
- Once done, close the command prompt and reboot the device.
Ensure that the error is resolved. Otherwise, see the next solution if it continues to persist.
Read: How to increase Page File size or Virtual Memory
4] Reset the Paging file
A fresh paging file can eliminate conflicts, allow Windows to recreate the file with optimal settings, and ensure proper virtual memory allocation. Follow the steps mentioned below to reset the Paging file.
- Click Win + R to open the Run dialog box, type systempropertiesadvanced to open System Properties, and hit the OK button.
- In the Advanced tab, go to the Performance section, and click the Settings button.
- A new window will appear. Navigate to the Advanced tab and select the Change button from the Virtual Memory section.
- Untick the Automatically manage paging file size for all drivers, tick the Custom Size box, and set both the values of Initial Size and Maximum Size to 0 to disable it.
- Click on the Set option, and hit the Yes button when prompted.
- Once done, reboot the PC, and open the Run dialog box.
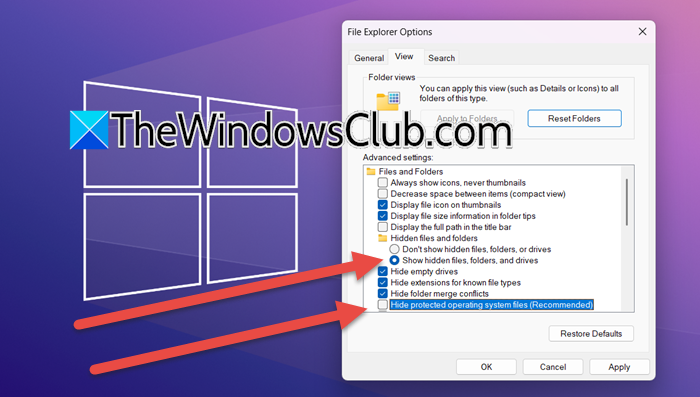
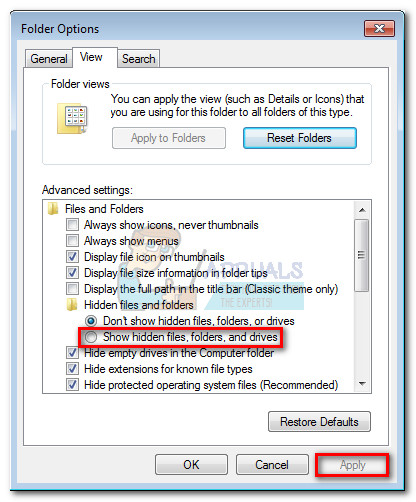
- Type control.exe folders to open the Folders option, and navigate to the View tab. In the Advanced settings section, tick the Show hidden files, folders, and drives box, and uncheck the Hide Protected operating system files box.
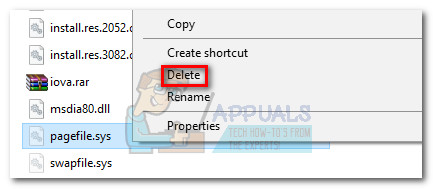
- Click Yes when warned and hit the Apply button to unhide the pagefile.sys file. Once done, navigate to the C: drive, search Pagefile.sys file, right-click on it, and select the Delete option.
- Once again, open System Properties, navigate to the Virtual Memory section, enable the Automatically manage paging file size for all drivers, and hit the OK button.
Reboot the PC, and verify whether the issue is resolved.
Read: How to create Virtual Memory on a secondary SSD
Is it okay to disable Paging file?
Disabling the paging file is generally not recommended since it helps manage memory efficiently and provides a buffer in case RAM is fully utilized. It’s in users’ best interest to let Windows manage virtual memory.
Read: Enable Virtual Memory Paging File Encryption in Windows
Should Paging file be on C: drive?
Generally, the paging file is on the C: drive because it is the system drive to ensure optimal performance. However, users can move it to another drive, especially, in the case of systems with multiple drives.
Also Read: Your system is running low on virtual memory on Windows.
Anand Khanse is the Admin of TheWindowsClub.com, a 10-year Microsoft MVP (2006-16) & a Windows Insider MVP (2016-2022). Please read the entire post & the comments first, create a System Restore Point before making any changes to your system & be careful about any 3rd-party offers while installing freeware.
What if you receive the Windows created a temporary paging file error when starting your PC or changing some settings? Don’t worry and it is easy to fix this issue as long as you follow these solutions offered by MiniTool in this post.
Windows Create a Temporary Paging File Windows 10
When booting up your computer or trying to change some settings every time, you may get a paging file error that is very annoying. The detailed error message is:
“Windows created a temporary paging file on your computer because of a problem that occurred with your paging file configuration when you started your computer. The total paging file size for all disk drivers may be somewhat larger than the size you specified”.
The error is related to pagefile.sys. In most cases, the system file is corrupted. As a result, Windows thinks it has to create a new pagefile.sys file every time you start the machine.
According to users, this error often happens on Windows 7 but it may occur in Windows 10. Luckily, you can fix the issue and the methods are introduced below.
How to Fix Windows Created a Temporary Paging File
Disable AFS
AFS, the Audio File System driver, allows Windows to read Audio CD’s and show the tracks as individual files. However, due to the existence of a bug, Windows may incorrectly think the audio CD is installed as a fixed hard drive since it cannot read the disk and create the pagefile.sys file. As a result, Windows has created a temporary paging file.
To fix this issue, disabling AFS is helpful. If you haven’t installed the driver, this way is not available.
Step 1: Run Command Prompt (CMD) as administrator.
Step 2: Type sc config afs start= disabled and press Enter.
Step 3: Reboot your PC and see if the Windows created a temporary paging file error doesn’t appear.
Tip: To re-enable the AFS driver, you can use the command sc config afs start= enabled.
If you receive the information “The specified service does not exist as an installed device”, this means you don’t install an AFS driver. In this case, try other methods.
Run System File Checker
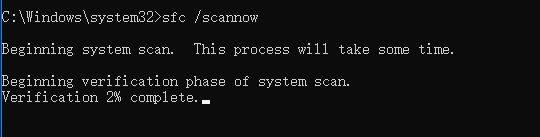
The pagefile.sys error may be caused by messed system files. To fix this issue, you can try System File Checker to detect and fix errors in system files.
Step 1: Also, run Command Prompt with admin rights.
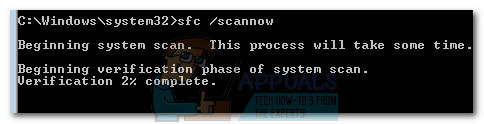
Step 2: Type sfc /scannow and press Enter. Then, wait a few minutes until the scan finishes.
Step 3: Restart the PC to see if you still receive the paging file error. If yes, continue with the steps below.
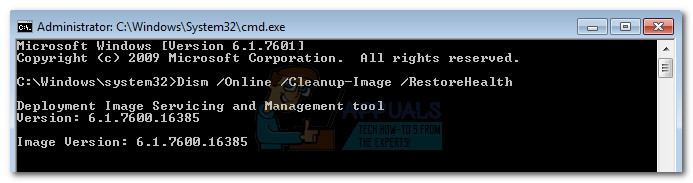
Step 4: In Command Prompt window, type Dism /Online /Cleanup-Image /RestoreHealth and press Enter. Wait until the scan is completed. Make sure the Internet connection is stable.
Step 5: Then, run another SFC scan, regardless of the DSIM scan result.
Step 6: Restart the PC after the third scan completes. If you still get the Windows created a temporary paging file error, try another way.
Force Windows to Make a Copy of Pagefile.sys
If the above 2 ways fail to fix your issue, you can choose to delete the pagefile.sys file and let Windows create a new one from scratch. This way is safe and won’t impact your system. Inversely, it can free up some free space to speed up the system.
Note: You are required to temporarily disable virtual memory, or else, you cannot delete pagefile.sys. Besides, this method requires you to own an administrator account.
Step 1: Open the Run window, type systempropertiesadvanced, and click OK.
Step 2: Under the Advanced tab, click Settings from the Performance section.
Step 3: Go to Advanced > Change.
Step 4: Uncheck Automatically manage paging file size for all drivers, click Custom size, and enter 0 for Initial size and Maximum size.
Step 5: Confirm the change and restart your computer.
Step 6: Go to C drive in Windows Explorer and locate pagefile.sys. By default, it is hidden and you need to unhide it by going to the Folders Options tab and checking Show hidden files, folders, and drivers. Then, delete the system file.
Step 7: Repeat step 1-3 to go to the Virtual Memory window again and check Automatically manage paging file size for all drivers.
Step 8: Reboot the PC and Windows will create a new pagefile.sys. Now, the issue should be removed.
Bottom Line
Windows created a temporary paging file? It is easy to fix this issue if you follow these solutions mentioned above. We hope this post is helpful to you. Just have a try.
The Windows created a temporary paging file error is displayed every time Windows boots up or the user tries to manually access the System Settings. This particular error happens because the pagefile.sys that is used by Windows for virtual memory has become corrupted or because Windows is fooled into believing that it needs to create a pagefile.sys file on an Audio CD.
Users mainly report this issue on Windows 7, but there are some scarce occurrences on Windows 10.
What is Pagefile.sys?
Pagefile.sys (also known as the swap file), is a Windows paging file that the operating system uses as Virtual Memory. Whenever it runs out of physical memory (or RAM), Windows will resort to virtual memory.
If your computer is performing a premium activity in which all of your system resources are required, some of the information stored on RAM will be written to the paging file (pagefile.sys). In the event that the information that was just transferred to the paging file is needed again, the system will write other contents in the paging file and the previously written information is read back in.
Over time, this paging file can grow so large to the point where it ends up corrupting itself. Windows has gotten more efficient at managing the pagefile.sys file, but there are still occurrences where the paging file needs to be recreated from scratch.
Fixing the pagefile.sys issue
If you’re looking to troubleshoot this issue, there are actually three potential fixes that have helped a lot of users resolve the issue. We are going to break down each method and discuss the steps and effects in detail. Please follow each potential solution in order until you encounter a fix that resolves your issue.
Method 1: Disabling AFS via elevated Command Prompt
AFS is the Audio File System driver. Its purpose is to allow Windows to read Audio CD’s and present the tracks as individual files. Under certain conditions, Windows 7 is fooled into believing that an Audio CD is mounted as a fixed disk – because it cannot read the disk and create a pagefile.sys file on it, it causes the system to fail with the Windows created a temporary paging file error.
This method is the easiest out of the bunch, and it involves disabling the audio file system driver. This might have repercussions if you ever decide to listen to an Audio CD on your computer. But since Audio CD’s are almost completely dead, the chances of this method causing underlying issues is minimal. But keep in mind that this method might not be applicable if you don’t have the AFS driver installed.
In any case, we are also going to feature the steps of re-enabling the Audio File System driver in case the method was not effective or you want to listen to an Audio CD on your computer.
Follow the steps below to disable the AFS driver:
- Acess the Windows Start bar (bottom-left corner) and search for “cmd“. Then, right-click on Command Prompt and choose Run as Administrator.

Note: You can also run Command Prompt as Administrator by selecting it and pressing Ctrl + Shift + Enter.
- In the elevated Command Prompt, type or paste the following command and press Enter:
sc config afs start= disabled

Note:
If you’re typing the command manually, make sure you get the syntax of this command right. Keep in mind that there’s no space after start, but there is one after the = sign (start= disabled). - If the service is disabled successfully, you can safely close the elevated Command Prompt and reboot your system.

If the Windows created a temporary paging file error doesn’t resurface after the restart, you have successfully resolved your issue.
Note: In case you ever need to mount or listen to an Audio CD after following this method, you can re-enable the AFS driver by opening another elevated Command Prompt (step 1) and running the sc config afs start= enabled command.
In the event that the system returned “The specified service does not exist as an installed device”, move to the method below.
Method 2: Using the System File Checker tool
The Windows created a temporary paging file error can actually originate from a system file error, in which case running a couple of diagnostics might resolve the issue automatically.
Some users have been able to eliminate the issue by running an SFC scan. The System File Checker tool will scan all protected system files and replace all corrupted files with a cached, clean copy of them. We are going to complement this scan with a DISM /Restorehealth command in order to use Windows Update to fix any remaining corrupted files. Finally, we’re going to run the sfc /scannow once again and restart the PC.
Note: The sfc /scannow command will attempt to fix any corrupted files by using the Windows Component Store – hence, it doesn’t require an internet connection. However, running the Dism /Online /Cleanup-Image /RestoreHealth command relies on WU (Windows Update) to replace corruption, so internet access is required. With this in mind, make sure you have a stable internet connection before going through the steps below.
Keep in mind that it’s a common occurrence for the System File Checker to identify and fix errors without reporting them. Regardless of the outcome of the first SFC scan, please go through all the steps provided below (SFC scan > RestoreHealth > SFC scan)
When ready, follow the steps below to run the required diagnostics:
- Acess the Windows Start bar (bottom-left corner) and search for “cmd“. Then, right-click on Command Prompt and choose Run as Administrator.
Note: You can also run Command Prompt as Administrator by selecting it and pressing Ctrl + Shift + Enter.
- In the elevated Command Prompt, type sfc /scannow and hit Enter to run the System File Checker.
Note: Keep in mind that depending on the level of corruption found on your system, this process can take anywhere from around 10 minutes to a few hours to finish.
- Once the scan is complete, restart your system and see if the issue is resolved at the next boot. If it isn’t, continue with the steps below.
Note: If the issue is not resolved, go through all the steps below even if the first SFC scan hasn’t reported any system file errors. - Open another elevated Command Prompt (step 1), paste Dism /Online /Cleanup-Image /RestoreHealth and hit Enter to initiate the RestoreHealth scan.

Note: Make sure you don’t lose the connection to the internet during this time and wait until the scan is finished. Then, check the results section to see whether it manages to fix any errors.
- Regardless of the outcome of the RestoreHealth command, run another SFC scan (sfc /scannow) in the same elevated Command prompt and let the process complete.
- Once the third scan completes, close the elevated Command prompt and reboot your device.

The next time your system boots up, check if the issue has been resolved. If you’re still experiencing the same Windows created a temporary paging file error, continue with the method below.
Method 3: Forcing Windows to make a fresh copy of pagefile.sys
If the first two methods have been unsuccessful, let’s take a more direct route and delete the paging file. The following steps will instruct you how to temporarily disable virtual memory – this will allow you the (possibly corrupted) paging file. After we delete the pagefile.sys file, Windows will be forced to build a new paging file from scratch, thus solving any corruption-related problem automatically.
Note: Although pagefile.sys is located at C:\pagefile.sys, you won’t be able to see it unless you instruct your Windows Explorer to show hidden operating system files. However, you won’t be able to delete it until you force your OS to stop using your file (by disabling virtual memory).
Keep in mind that deleting the pagefile.sys file will not have any negative impact on your system whatsoever. On the contrary, it will help free up some valuable disk space and speed up certain processes once the new paging file is created.
Follow the steps down below to force your operating system to create a new pagefile.sys file:
- Log in with a local account with administrative privileges. Keep in mind that you will be required to restart several times during this method. Remember log in with the Administrator account at every startup.
- Press Windows key + R to open a Run window and type “systempropertiesadvanced“. Hit Enter to open the Advanced tab of System Properties.

- In the Advanced tab, click the Settings button located under the Performance section.

- In the Performance Options window, select the Advanced tab and click the Change button under Virtual memory.
- Uncheck the checkbox next to Automatically manage paging file size for all drives. Then, select Custom size to an Initial size of 0 MB and a Maximum size of 0 MB and click on Set.
Note: We’re setting the custom sizes to 0 in order to prevent your OS from dumping information on it. - When prompted to confirm by System Properties, choose Yes. Then, close all dialog boxes and reboot your computer. Remember to log in with the administrator account again like we did in step 1.
- Once the startup is complete, navigate to your C: drive and locate the pagefile.sys file. If it’s not visible by default, that’s because it’s hidden by default. In this case, you’ll need to do an extra step – refer to the Note paragraph below for instructions on making the pagefile.sys file visible.
Note: If you don’t see the pagefile.sys file, open a Run window (Windows key + R), type “control.exe folders” and hit Enter to open Folder Options. In Folder Options, access the View tab and select Show hidden files, folders, or drives under Advanced settings.

- Then, scroll down through the Advanced Settings list and disable the checkbox next to Hide Protected Operating System files. You will immediately see an additional Warning window – click Yes to continue. Finally, hit Apply to save your folder modifications. The pagefile.sys file should now be visible.

- Now that pagefile.sys is visible, you should be able to delete it without problems. Do so by right-clicking on it and choosing Delete.

- Next, re-follow steps 1 to 4 to return to the Virtual Memory window. Once you’re back there again, check the box next to Automatically manage paging file size for all drives to re-enable virtual memory.
- Click Ok, close all dialog boxes and perform a final restart. You no longer need to use an account with administrator privileges. Windows should automatically recreate a new paging file at the next startup and the issue should now be resolved.


Isn’t it irritating to receive the Windows created temporary paging file error when you start your computer or modify some settings? This error message is disturbing for a PC user, Don’t be hopeless! This problem is possible to fix by following some methods mentioned in this article. When you are trying to boot up or change some settings in your computer, you may encounter a paging file error like this:
“Windows created a temporary paging file on your computer because of a problem that occurred with your paging file configuration when you started your computer. The total paging file size for all disk drivers may be somewhat larger than the size you specified”.
This error is associated with pagefile.sys. Most of the time, it occurred because of a corrupted system file. In this case, when you start your computer Windows thinks it creates a new pagefile.sys.
Mostly, Windows 7 users report this issue but Windows 10 users also face this error issue. Fortunately, you can quickly settle this issue by following our instructions.
Why Does Windows Create Temporary Page Files When RAM is Available?
If you are thinking, why does Windows create temporary paging files when RAM is available? Here is some reason:
Inadequate RAM: Windows need adequate memory to run applications. When it became insufficient, Windows created a paging file as an alternative option to run the program smoothly without crashing.
Active too many programs: When you run too many applications simultaneously, your computer memory gets overloaded. Paging files happen for lack of memory in your computer; that’s one reason to create a temporary paging file.
Unusual Shutdown: If you are working on a file and not getting enough time to save before the system crashes, Windows creates a temporary page file to store the document until you can save it.
The paging file only stores something for a short time; It’s a place where Windows stores some files temporarily. Unless something happens, there’s no reason to see your content in the paging file.
Also Read: Best 11 Ways to Fix Activation Key Not Working in Windows 11
There are many methods to fix this issue. We have discussed three effective methods to fix your temporary page file creation issue. To start this process, restart your computer to fix this problem.
Setup Paging File
Misconfigured virtual memory setting is one of the main reasons for temporary paging file creation. You may face this problem after changing virtual memory settings or trying to change the location of the paging file.
If you never change virtual memory, you should check it, as other software may have changed this setting. Look at below how you can check and set up proper virtual memory settings:
- Click Win+R to open the Run dialogue box.
- Type systempropertiesadvanced in the search bar to open System Properties.

- In the Advanced tab, click on Setting under the Performance box.

- Then go to the Advanced tab under Performance Option, and click on Change under the Virtual Memory box.

- Unmark the tick of Automatically Manage Paging Files Size for All Drives
- Make sure the paging files are in the drive that contains the Windows Operating System.
- Select the System Manage Size option in the paging file size (You can select No paging file when you have a lot of RAM).

- You can set Custom Size, but it is best to leave the default option.
- The paging file size should be set in Megabytes, not in Gigabytes
- If you don’t want to customize anything, select the Automatically Managed Paging Files Size.
Check if any problem still appears or not. If it can not fix the issue, move on to the next one.
Run System File Checker
It is possible that an error occurred from corrupted system files. The system File checker or SFC can restore errors automatically. To do this process, follow these:
- To open the Window, Click Win+R
- Type cmd and write ctrl+shift+enter to open the Command Prompt option. Now, type Yes to permit administrator access.
- In Command Prompt Windows, type sfc /scannow, then click Enter.
- After finishing the verification, restart your computer.

- If you see the error message again, then follow the steps below.
- Click Win+R to open the Window.
- Type cmd and press ctrl+shift+enter to open Command Prompt.
- In the Command Prompt, type Dism /Online /Cleanup-Image / RestoreHealth and click Enter.

- After finishing the scan, restart your computer and do another SFC scan (sfc /scannow) in the same Command Prompt and complete the verification process again. If it is not working, then move to the next method.
Disable the Audio File
Audio File System Driver or AFS allows Windows to read Audio CDs with music and shows the tracks as individual files. Due to a bug, Windows can’t read the disk and make a paging file, and it causes Windows to create a temporary paging file error.
This method only works if you have an AFS driver installed on your computer. If it is right to give up listening to music from CDs on your computer, try this one. We have also mentioned how you can turn the Audio File System back on your computer.
- Click Win+R to open the Window.
- Type cmd and press ctrl+shift+enter to open Command Prompt, and click Yes to go to Command Box.
- Then type or paste sc config afs start= disabled. If you are typing commands, then make sure to type all spaces and characters properly.
- Close the Command Prompt and restart your computer. If the error message is not seen, you have successfully resolved this issue.

- To turn back the Audio File System, follow Steps 1 and Step 2.
- Type sc config afs start= enabled on the Command box.

If it gives a notification The specified service does not exist as an installed device, it means you don’t have an AFS driver installed.
Conclusion
We have covered all the possible solutions to this Windows Created Temporary Paging File issue. By following these guidelines, you can solve your temporary paging file creation comfortably. Still, if you don’t understand, you can check this youtube video. If we miss some important information to share with you, you are welcome to share your suggestions in the comment section. That’s all for today. Have a good day.
How to Fix “Windows Created a Temporary Paging File”
When using a Windows operating system, many users encounter various issues that can disrupt their computing experience. One common message that appears in such scenarios is “Windows created a temporary paging file.” This warning indicates that Windows has encountered an issue with memory management and has resorted to creating a temporary paging file to allow the system to continue operating. While this may not seem alarming at first, understanding its implications and learning how to resolve the underlying problems is crucial for maintaining system stability and performance.
In this article, we will delve into what a paging file is, explore the reasons behind this error message, and provide a comprehensive guide on how to fix the issue effectively.
Understanding Paging Files in Windows
A paging file, also known as a swap file or pagefile, is a reserved portion of your hard drive or solid-state drive (SSD) used by Windows to manage memory. When your physical RAM is full, the operating system moves some data from the RAM to the paging file, effectively freeing up memory for active processes. This process is essential for running multiple applications smoothly, particularly when dealing with resource-intensive tasks such as video editing or gaming.
How Paging Files Work
When a user opens an application, the system loads the necessary data into RAM. If the RAM becomes insufficient to handle all active tasks, the operating system utilizes the paging file to offload some inactive data. This swap process allows Windows to continue functioning without crashing due to insufficient memory.
Causes of the “Windows Created a Temporary Paging File” Error
The message “Windows created a temporary paging file” occurs primarily due to the following reasons:
1. Insufficient Disk Space
One common cause is a lack of available space on the drive where the paging file is stored. If the system runs out of space to create this file, Windows resorts to creating a temporary version. This situation can lead to degraded performance and functionality.
2. Corrupted Paging File
If the existing paging file becomes corrupted, Windows cannot use it effectively. This corruption can stem from abrupt shutdowns, hardware failures, or issues related to system updates.
3. Improper Paging File Settings
Users might inadvertently modify the settings for the paging file. This can include disabling it entirely or setting a size too small, creating issues for the system when it needs to allocate memory.
4. Malware and Viruses
Malicious software can often interfere with system operations, including memory management. In some cases, malware may attempt to disrupt the paging file, leading to the creation of temporary files.
5. System Updates and Configuration Changes
Sometimes, after major updates or changes to system configurations, Windows may require a reconfiguration of the paging file settings, resulting in the temporary creation of paging files.
Fixing the “Windows Created a Temporary Paging File” Issue
Here is a comprehensive guide detailing various methods to resolve the issue effectively.
Method 1: Check Available Disk Space
The first step is to verify that there is sufficient disk space on the drive containing the paging file.
- Open File Explorer.
- Right-click on the drive (usually C:) and select Properties.
- Review the available space. If it’s low, try freeing up some space by deleting unnecessary files or moving large files to an external drive.
Method 2: Manage Paging File Settings
Reviewing and adjusting your paging file settings can resolve the issue quickly.
- Right-click This PC or My Computer and select Properties.
- Click on Advanced system settings.
- Under the Advanced tab, click on Settings in the Performance section.
- Navigate to the Advanced tab in the Performance Options window and click on Change… under Virtual memory.
- Uncheck Automatically manage paging file size for all drives.
- Select the drive where the paging file is stored, usually C.
- Choose Custom size and set the initial and maximum size. A good rule of thumb is to set the size to 1.5 times your physical RAM.
- Click Set and then OK to apply the changes.
Method 3: Delete the Existing Paging File
If the paging file is corrupted, deleting it may solve the problem.
- Follow the steps in Method 2 to access Virtual memory settings.
- Select the drive where the paging file is located.
- Choose No paging file and click Set.
- Restart your computer. After the restart, repeat the steps and choose System managed size or specify a new custom size.
- Click Set, and then OK.
Method 4: Run Disk Cleanup
Clearing unnecessary files can also help free up space for your paging file.
- Type Disk Cleanup in the Windows search bar and select it.
- Choose the drive you want to clean up, typically the C drive.
- Click on OK and allow the program to calculate how much space you can free up.
- Review the files listed, select those you wish to delete, and click OK.
- Confirm the action and let Disk Cleanup do its work.
Method 5: Check for Malware
It’s crucial to ensure that your system is free from malware, which can affect memory management.
- Run a full antivirus scan using your preferred security software.
- Additionally, consider running a malicious software removal tool such as Windows Defender Offline or Malwarebytes.
- Follow the program’s recommendations to remove threats found.
Method 6: Update Windows
Keeping your system updated ensures optimal performance and security.
- Navigate to Settings > Update & Security > Windows Update.
- Click Check for updates and install any available updates.
- Restart your computer once the updates are installed and check if the issue persists.
Method 7: Check System Files
Corrupted system files can also lead to issues, including problems with paging files. The System File Checker tool will help rectify this.
- Press Windows + X and select Windows Terminal (Admin) or Command Prompt (Admin).
- Type the following command and press Enter:
sfc /scannow - Wait for the scan to complete. If issues are found, follow the prompts to repair them.
Method 8: Adjust System Properties
Making adjustments to system performance settings can also be beneficial.
- Right-click This PC or My Computer and select Properties.
- Click on Advanced system settings.
- Under the Performance section, click on Settings.
- In the Performance Options window, adjust settings based on your needs.
- Click OK to save changes.
Conclusion
The error message “Windows created a temporary paging file” can be concerning, but it is essential to understand that it indicates memory management issues rather than a critical hardware problem. By following the methods outlined in this article, users can troubleshoot the problem effectively, ensuring their system runs smoothly.
Regular maintenance of disk space, settings management, file integrity checks, and keeping the system updated are vital practices. By adopting these techniques, users can prevent the reoccurrence of paging file errors, improving overall system efficiency and responsiveness. Ultimately, understanding memory management and being proactive in maintaining system health will contribute significantly to a better computing experience.