
Службы в Windows — особые процессы, выполняемые в фоновом режиме, в том числе от учетной записи «СИСТЕМА», которые могут быть запущены в том числе до входа в систему. При желании вы можете создать свою собственную службу, которая будет работать таким же образом.
В этой инструкции подробно о том, как создать службу в Windows 11 или Windows 10 средствами системы, ограничениях методов и одном дополнительном способе заставить работать ваш процесс в качестве службы.
Создание службы в командной строке
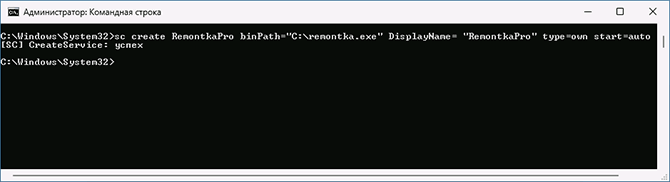
Первый способ — использование команды командной строки для создания своей службы, шаги будут следующими:
- Запустите командную строку от имени Администратора (способы запуска командной строки от Администратора).
- Используйте команду, заменив текстовые описания и пути на свои:
sc create Имя_службы binPath="C:\service-file.exe" DisplayName= "Описание_службы" type=own start=auto
- После нажатия Enter вы получите сообщение: CreateService: успех, что означает, что служба была успешно создана.

В указанной команде используются следующие параметры:
- binPath — путь к исполняемому файлу службы.
- DisplayName — отображаемое в списке служб имя службы.
- start — тип запуска, возможные значения: boot, auto, demand (значение по умолчанию), disabled, delayed-auto
- type — тип службы, по умолчанию own, возможны другие значения: share (делит исполняемый файл с другими службами), kernel (драйвер), filesys (драйвер файловой системы), interact (интерактивная служба с возможность взаимодействия с пользователем, поддержка этого типа служб прекращается).
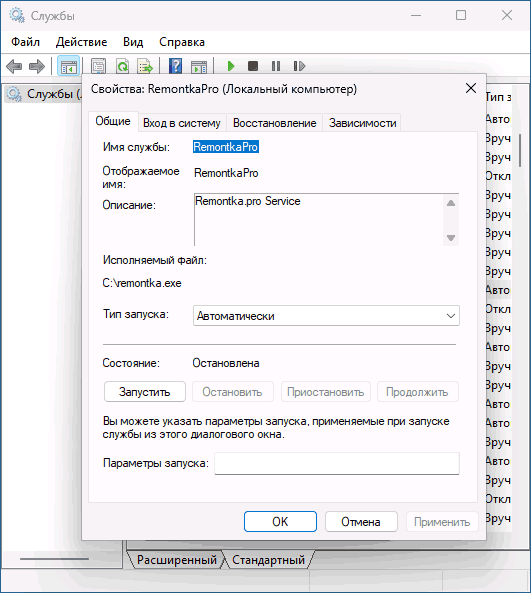
После создания службы вы сможете увидеть её в списке служб (Win+R — services.msc), а автоматический запуск произойдет при следующей перезагрузке системы.
Создание службы в Windows PowerShell
Создать службу можно и в PowerShell, запущенном от имени администратора (или в Терминале Windows). Базовый вариант команды с параметрами по умолчанию:
New-Service -Name "Имя_Службы" -BinaryPathName '"C:\путь_к_файлу параметры_запуска"'
Расширенный вариант с указанием описания и типа запуска:
New-Service -Name MyService -BinaryPathName '"C:\путь_к_файлу параметры_запуска"' -DisplayName "Имя_службы" -Description "Описание службы" -StartupType "Automatic"
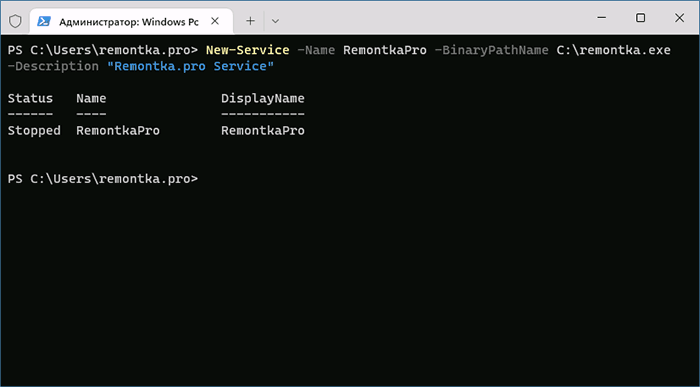
В случае, если выполняется запуск исполняемого файла без параметров, а путь не содержит пробелов, использование кавычек не обязательно, например:
-BinaryPathName C:\remontka.exe
При создании служб в PowerShell доступны и ряд дополнительных параметров, описанных в официальной справке на сайте Майкрософт.
Удаление созданной службы
Удалить созданную службы вы можете также в командной строке, запущенной от имени Администратора с помощью команды:
sc delete Имя_службы

Или в Windows PowerShell:
Remove-Service -Name MyService
После выполнения указанных команд созданная вами служба будет удалена из Windows.
Созданная служба не работает, варианты решения
Из описания можно предположить, что любой файл .exe может быть службой, однако, при попытке добавить свои фоновые утилиты и заставить их работать в виде службы рядовые пользователи обычно сталкиваются с ситуацией, когда процесс запускается, а затем закрывается сам. А при запуске службы вручную через некоторое время сообщает, что служба не ответила на запрос своевременно или о других ошибках.
Причина в том, что исполняемые файлы служб — не совсем обычные программы, они, помимо прочего, обмениваются данными с системой. Если ваш EXE не отвечает на соответствующие запросы системы, Windows «делает вывод» о том, что со службой что-то не так.
Как быть, если вы всё-таки настойчиво хотите использовать свой прикладной исполняемый файл в качестве службы?
- Использовать планировщик заданий и запуск от соответствующего пользователя — это не будет в полной мере службой, но почти то, что нужно.
- Ранее существовала программа RunAsSvc, позволяющая запускать любые процессы в качестве службы, но для современных ОC он не применима, а разработка была прекращена.

- Использовать инструменты INSTSRV.EXE и SRVANY.EXE из Windows Server 2003 Resource Kit Tools при создании службы Windows.

Создание пользовательской службы с помощью INSTSRV.EXE и SRVANY.EXE
Последний вариант из приведённого выше списка рассмотрим подробнее. Шаги будут следующими:
- Загрузите (вероятнее всего, придется найти в Интернете на сторонних сайтах) Windows Server 2003 Resource Kit полностью или только файлы INSTSRV.EXE и SRVANY.EXE, располагаем их у себя на диске, в моем примере путь — C:\Windows
- В командной строке от имени администратора используйте команду (пути меняем на свои):
C:\Windows\instsrv.exe Имя_службы C:\Windows\srvany.exe

- Если вы получили сообщение о том, что The service was successfully added, всё прошло успешно. Теперь требуется запустить редактор реестра (Win+R — regedit).
- В редакторе реестра перейдите по пути
HKEY_LOCAL_MACHINE\SYSTEM\CurrentControlSet\Services\
и найдите раздел с вашим именем службы. Нажимаем по нему правой кнопкой мыши и выбираем пункт «Создать» — «Раздел», задаем имя «Parameters» для раздела.
- Выберите созданный раздел, нажмите правой кнопкой мыши в правой панели редактора реестра и создайте новый строковый параметр с именем Application
- Дважды нажмите по параметру и в поле «Значение» укажите путь к вашему файлу exe для запуска службы.


Закройте редактор реестра — служба создана, её можно запустить из services.msc или она будет автоматически запущена после перезагрузки компьютера.
Учитывайте, что во всех приведенных примерах служба по умолчанию запускается с учетной записью «СИСТЕМА». В некоторых случаях это может приводить к неправильной работе. В этом случае может иметь смысл зайти в свойства службы в services.msc и изменить параметры на вкладке «Вход в систему».
-
Understanding Windows Services
-
Creating a Service in PowerShell
-
Running the Service
-
Stopping and Removing the Service
-
Conclusion
-
FAQ

Creating and managing services in Windows can be a daunting task, especially for those who are new to system administration. Fortunately, PowerShell makes it easier to create and run services without needing to delve deep into the graphical user interface.
In this tutorial, we will walk you through the process of creating and running a service using PowerShell. Whether you are automating tasks or managing server applications, knowing how to handle services programmatically can save you time and effort. By the end of this article, you’ll have a solid understanding of how to create and run services in PowerShell, making your administrative tasks smoother and more efficient.
Understanding Windows Services
Before we dive into the practical steps, it’s important to understand what Windows services are. Services are long-running executable applications that run in their own Windows sessions. They can start automatically when the computer boots, can run in the background without user intervention, and can be configured to restart if they fail. PowerShell provides cmdlets that allow you to create, manage, and interact with these services easily.
Creating a Service in PowerShell
To create a service in PowerShell, you typically need a program or executable that the service will run. For the sake of this example, let’s assume you have a simple executable called MyService.exe. Here’s how you can create a service using PowerShell:
New-Service -Name MyService -BinaryPathName "C:\Path\To\MyService.exe" -DisplayName "My Sample Service" -StartupType Automatic
This command creates a new service named “MyService” that points to your executable. The -StartupType Automatic parameter ensures that the service starts automatically when the system boots.
Output:
Service MyService created successfully.
In this command:
New-Serviceis the cmdlet used to create a new service.-Namespecifies the name of the service.-BinaryPathNameis the path to the executable that the service will run.-DisplayNameis the name that will appear in the Services management console.-StartupTypedefines how the service starts when the computer boots.
After running this command, your service will be created and can be found in the Services management console. If you need to verify that the service has been created successfully, you can use the Get-Service cmdlet:
Get-Service -Name MyService
Output:
Status   Name               DisplayName
------   ----               -----------
Stopped  MyService          My Sample Service
The Get-Service command retrieves the status of the newly created service, confirming that it exists and is currently stopped.
Running the Service
Once you’ve created the service, the next step is to start it. To do this, you can use the Start-Service cmdlet. Here’s how to run your newly created service:
Start-Service -Name MyService
Output:
Service MyService started successfully.
The Start-Service cmdlet initiates the service you created. If you check the status again using the Get-Service cmdlet, you should see that the service is now running.
Get-Service -Name MyService
Output:
Status   Name               DisplayName
------   ----               -----------
Running  MyService          My Sample Service
In this example:
Start-Serviceis the cmdlet that starts the specified service.- After executing this command, the service transitions from a stopped state to a running state.
Stopping and Removing the Service
When you no longer need the service, you can stop and remove it using the following commands:
To stop the service, you would use:
Stop-Service -Name MyService
Output:
Service MyService stopped successfully.
To remove the service entirely, the command is:
Remove-Service -Name MyService
Output:
Service MyService removed successfully.
The Stop-Service cmdlet halts the operation of the service, while Remove-Service deletes it from the system entirely. This is useful for cleaning up after testing or when a service is no longer needed.
Conclusion
Creating and managing services in PowerShell is a powerful way to automate and streamline administrative tasks. With just a few commands, you can create, start, stop, and remove services, allowing you to maintain better control over your system processes. This tutorial has provided you with the foundational knowledge to work with services in PowerShell, making it easier for you to manage your Windows environment effectively. Whether you are a seasoned admin or a beginner, mastering these commands will undoubtedly enhance your productivity.
FAQ
-
What is a Windows service?
A Windows service is a long-running executable application that runs in its own Windows session and can start automatically. -
Can I create a service without an executable?
No, a Windows service must be associated with an executable that it runs. -
How do I check if my service is running?
You can use theGet-Servicecmdlet in PowerShell to check the status of your service.
-
What should I do if my service fails to start?
Check the event logs for errors and ensure that the executable path is correct and accessible. -
Can I set my service to start manually instead of automatically?
Yes, you can set the-StartupTypeparameter toManualwhen creating the service.
Enjoying our tutorials? Subscribe to DelftStack on YouTube to support us in creating more high-quality video guides. Subscribe
Sure! The «PowerShell New-Service» command is used to create a new Windows service that can run applications in the background.
Here’s a quick example using a PowerShell code snippet:
New-Service -Name "MyService" -BinaryPathName "C:\Path\To\Your\Application.exe" -DisplayName "My Custom Service" -StartupType Automatic
Understanding Services in Windows
What are Windows Services?
Windows services are specialized applications that run in the background, allowing various tasks to continue without user intervention. They are primarily designed to facilitate system functions, automatically starting at boot time or on demand. Unlike traditional applications, services can operate without a direct user interface, enabling them to run even when no user is logged into the system.
Common examples of Windows services include the Windows Update Service, which manages system updates, and the Print Spooler, responsible for handling print jobs.
Why Use PowerShell for Service Management?
PowerShell provides a powerful framework for managing Windows services efficiently. The use of scripts allows for automation, reducing the manual labor involved with repetitive service management tasks. This increases consistency across operations and minimizes the risk of human error. With PowerShell’s robust command structure, IT professionals can automate complex service workflows, leading to more efficient systems management.
Mastering PowerShell Get Service: Quick Tips and Tricks
Getting Started with New-Service in PowerShell
Syntax of the New-Service Command
The `New-Service` command in PowerShell enables the creation of a new Windows service directly through the command line. Its basic syntax consists of the command followed by a series of parameters that define the service’s characteristics. Understanding how to use these parameters is critical for effective service management.
New-Service -Name "<ServiceName>" -BinaryPathName "<PathToExecutable>" [-DisplayName "<DisplayName>"] [-Description "<Description>"] [-StartupType <StartupType>]
Basic Example of Creating a New Service
Creating a new service involves providing essential parameters that define its identity and behavior. Here’s a straightforward example:
New-Service -Name "MyService" -BinaryPathName "C:\PathToYourExecutable.exe"
In this example:
- -Name specifies the identifier for the service.
- -BinaryPathName indicates where the executable that runs the service is located.
This command sets up a basic service, but adding more characteristics can enhance its utility further.
PowerShell Set Service: A Quick Guide to Service Management
Key Parameters of New-Service
Mandatory Parameters
-
-Name: This parameter is crucial as it defines the service’s unique name. It’s important to follow Windows naming conventions since choosing an existing service name will lead to errors.
-
-BinaryPathName: It specifies the exact path to the executable that the service will run. This must be accurate; otherwise, the service will fail to start.
Optional Parameters
-
-DisplayName: This is the user-friendly name displayed in service manager interfaces. It can be different from the service name for clarity.
-
-Description: A succinct summary of what the service does. This is helpful for documentation and for those who might manage the service in the future.
-
-StartupType: This parameter dictates when the service should start. Options include:
- Automatic: The service starts when the computer boots.
- Manual: The service only starts when explicitly invoked by a user or application.
- Disabled: The service cannot be started; useful for services that are not needed.
Using `-DependentServices` and Other Advanced Parameters
Setting dependencies can create structured relationships between services. For example, if one service relies on another to function correctly, configuring this can preemptively manage startup sequences:
New-Service -Name "MyDependentService" -BinaryPathName "C:\MyDependentService.exe" -DependentServices "MyService"
Here, «MyDependentService» will not start until «MyService» is up and running.
PowerShell Get Service on Remote Computer Simplified
Practical Use Cases for New-Service
Example 2: Running an Application as a Service
Here’s a slightly more advanced example, where an application is configured to run as a service:
New-Service -Name "MyAppService" -BinaryPathName "C:\MyApp\MyApp.exe" -DisplayName "My Application Service" -Description "Service to run My Application" -StartupType Automatic
In this case:
- The service is set to run automatically upon boot, enhancing operational efficiency.
Example 3: Creating a Service with Dependencies
Building on the earlier concepts, here’s how to configure a service with dependencies:
New-Service -Name "MyDependentService" -BinaryPathName "C:\MyDependentService.exe" -DependentServices "MyService"
This constructs a dependency, ensuring that your services operate in the correct order, which can be vital for applications that need to maintain data consistency or resource availability.
PowerShell Get Service Startup Type Explained Simply
Managing New Services with PowerShell
Starting and Stopping Services
Once created, managing services is straightforward with PowerShell. Use `Start-Service` to initiate a service and `Stop-Service` to halt it:
Start-Service -Name "MyService"
Stop-Service -Name "MyService"
This allows for real-time control over your service operations, crucial for troubleshooting or managing system resources effectively.
Modifying Existing Services
If adjustments are necessary after a service has been created, `Set-Service` can be employed to modify various service properties:
Set-Service -Name "MyService" -DisplayName "Updated Service Name"
This command demonstrates how to change the display name of an existing service, aiding in clarity for administrative tasks.
PowerShell Get Service Logon Account: A Quick Guide
Troubleshooting Common Issues
Common Errors When Using New-Service
Working with `New-Service` can sometimes lead to common pitfalls. For example, attempting to create a service with a name that already exists will trigger an error. Before creating a new service, it’s often wise to check for existing services with:
Get-Service -Name "MyService"
Logging and Error Handling in Scripts
When automating service management, incorporating logging can be invaluable. PowerShell allows for error handling using Try-Catch blocks, aiding in the resolution of issues during execution:
try {
    New-Service -Name "MyService" -BinaryPathName "C:\PathToYourExecutable.exe"
} catch {
    Write-Host "An error occurred: $_"
}
This ensures that potential issues are captured, allowing for smoother operations.
PowerShell New-PSDrive: Create Drives with Ease
Best Practices for Service Management with PowerShell
Variables and Script Reusability
For recurring tasks, employing variables is a smart approach. This allows for easy adjustments and enhances readability:
$ServicePath = "C:\MyApp\MyApp.exe"
$ServiceName = "MyAppService"

New-Service -Name $ServiceName -BinaryPathName $ServicePath -StartupType Automatic
Documentation and Service Management Guidelines
Thorough documentation is essential. Keeping track of services, their names, purposes, and configurations can help future administrators avoid confusion and maintain efficient service management.
PowerShell Services List: Quick Command Guide
Conclusion
The `New-Service` command is a powerful tool for automating the management of Windows services through PowerShell. With the ability to create, modify, and manage services programmatically, IT professionals can enhance their productivity and improve system reliability. As you explore more commands and techniques, remember that automation is key to elevating your workflow and maximizing efficiencies in your administrative tasks.
Mastering PowerShell NewItem: Create Files Effortlessly
Additional Resources
For further learning, consider checking out the official PowerShell documentation, diving into recommended books, and participating in community forums to connect with fellow PowerShell enthusiasts.
PowerShell может управлять службами Windows. Создать новую службу можно с помощью командлета New-Service. Создадим такой же сервис, как и в предыдущем примере, только добавим к нему описание (Description):
New-Service -Name MyService -BinaryPathName C:\MyService\MyService.exe`
-DisplayName ″My New Service″ -Description ″Very Important Service !!!″
Изменить параметры службы можно командлетом Set-Service:
Set-Service -Name MyService -Description ″Not Very Important Service″ -StartupType Manual
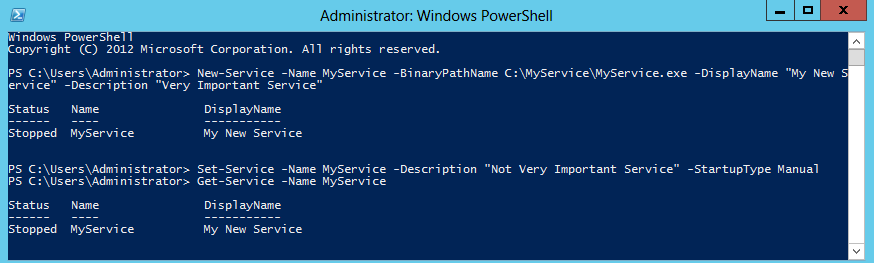
PowerShell имеет примерно такой же функционал как и Sc.exe, разве что позволяет добавить описание. А вот для удаления служб в PS простого способа нет, придется воспользоваться вот такой конструкцией:
(Get-WmiObject win32_service -Filter ″name=′MyService′″).delete()
Provide feedback
Saved searches
Use saved searches to filter your results more quickly
Sign up