
Applies ToWindows 11 Windows 10
Support for Windows 10 will end in October 2025
After October 14, 2025, Microsoft will no longer provide free software updates from Windows Update, technical assistance, or security fixes for Windows 10. Your PC will still work, but we recommend moving to Windows 11.
Learn more
System protection in Windows is a recovery feature designed to help you safeguard your system settings. It primarily involves creating and managing restore points, which are snapshots of system files, installed applications, Windows Registry, and system settings at a specific point in time.
While not enabled by default, it’s recommend enabling system protection. This feature provides an added layer of security and peace of mind, ensuring that you can quickly and easily resolve issues without losing important data.
This article describes how to configure System Protection and create restore points.
Configure System Protection
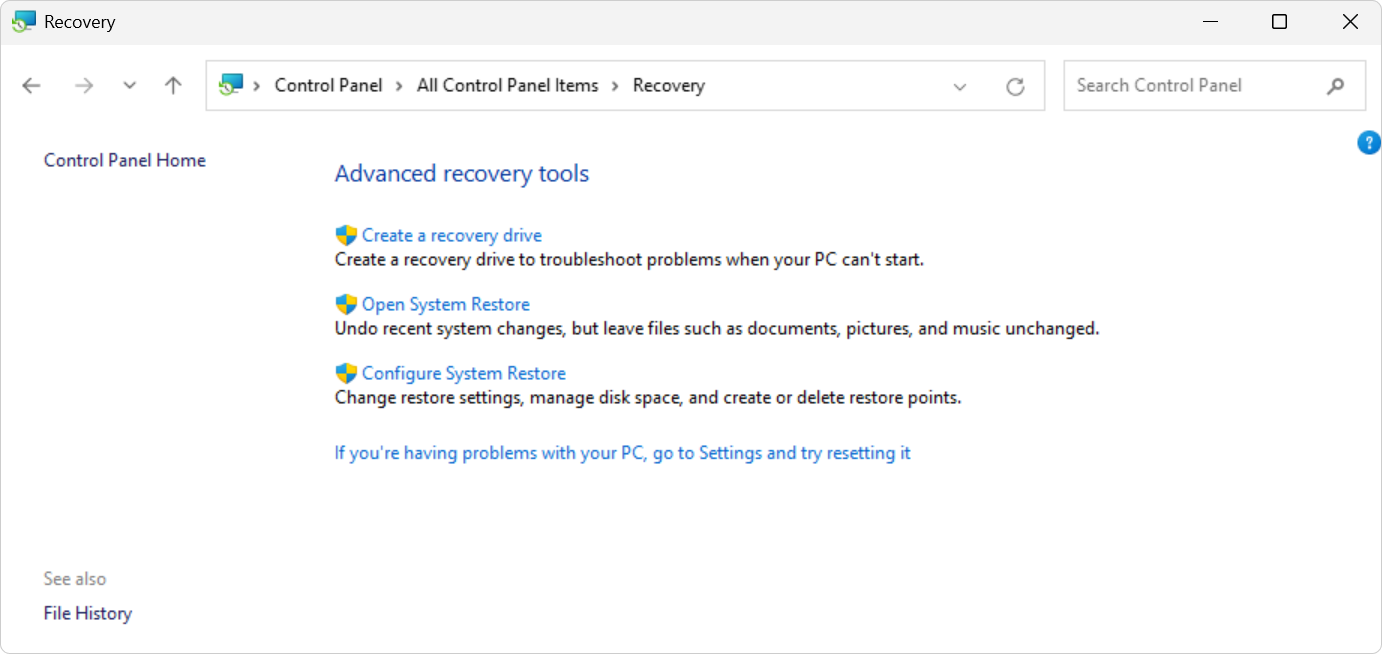
To open System Protection, you can use one of the following methods:
-
From the Control Panel, select Recovery > Open System Restore

-
Use the keyboard shortcut +R, type systempropertiesprotection.exe and press Enter
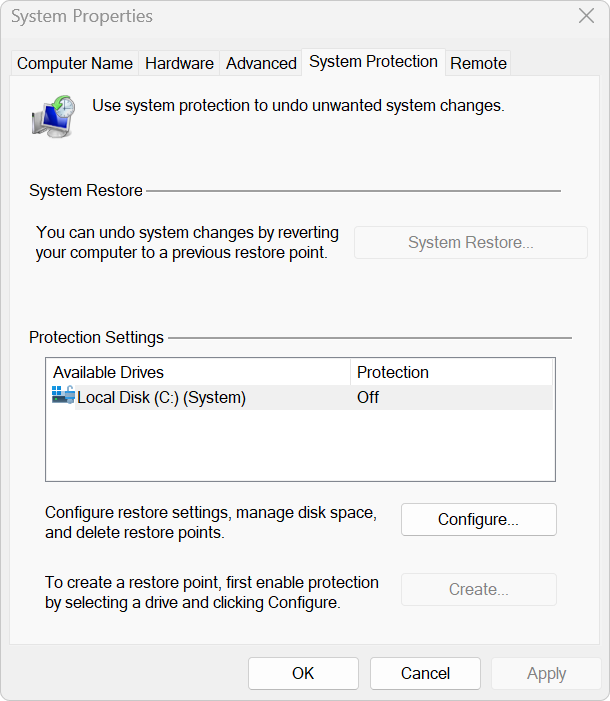
Turn on System Protection
-
To turn on System Protection, select Configure…
-
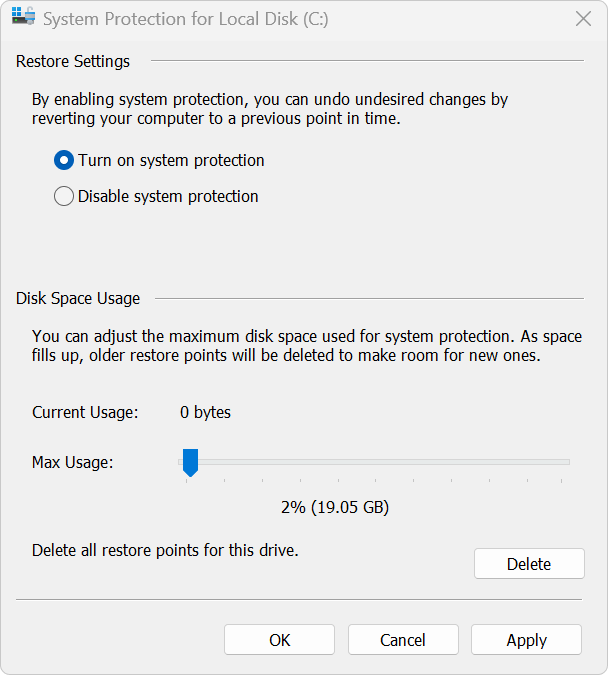
Select Turn on System Protection
-
Use the slider to specify the maximum amount of disk space that can be used by System Protection
-
Select Apply


-
System Protection will create restore points automatically, when needed
Create a restore point
To create a restore point manually:
-
Open System Protection
-
Select Create…
-
Specify a description for the restore point and select Create
Apply a restore point
To revert Windows to a restore point, use System Restore.
Need more help?
Want more options?
Explore subscription benefits, browse training courses, learn how to secure your device, and more.
Одна из возможностей восстановления Windows 10 — это использование точек восстановления системы, позволяющих отменить последние изменения в ОС, в том числе в системных файлах и реестре ОС. Точки восстановления создаются автоматически при обновлениях и изменениях системы, создать их можно и вручную, кроме этого, при соответствующих настройках параметров защиты системы.
В этой инструкции подробно описывается процесс создания точек восстановления, настройки, необходимые для того, чтобы Windows 10 делала это автоматически, а также способы использовать ранее сделанные точки восстановления для отката изменений в драйверах, реестре и параметрах системы.
Настройки восстановления системы
В зависимости от текущей конфигурации системы, автоматическое и ручное создание точек восстановление может быть как включено так и отключено, потому рекомендую проверить настройки и при необходимости изменить их:
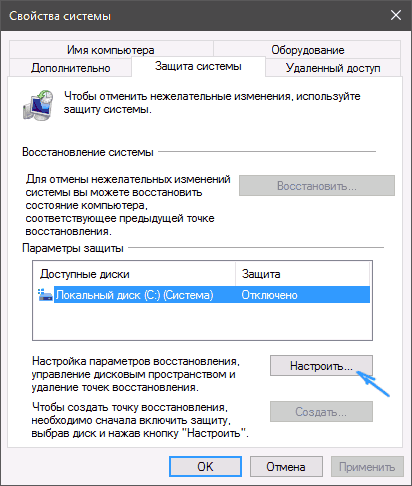
- Зайдите в Панель управления (можно использовать поиск в панели задач) и откройте пункт «Восстановление», после чего перейдите в «Настройка восстановления системы». Ещё два способа попасть в нужное окно: нажать клавиши Win+R на клавиатуре, ввести команду systempropertiesprotection и нажать Enter, либо ввести команду sysdm.cpl после чего перейти на вкладку «Защита системы».
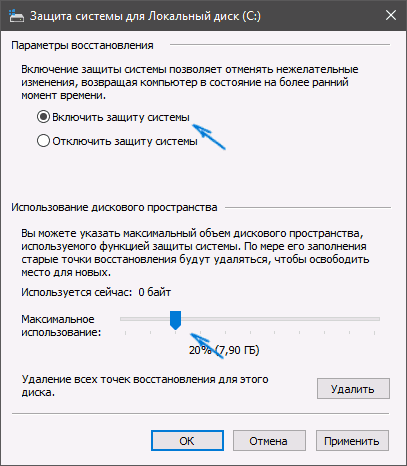
- Откроется окно настроек (вкладка «Защита системы»). Точки восстановления создаются для всех дисков, для которых защита системы включена. Например, если для системного диска C защита отключена, вы можете включить ее, выбрав этот диск и нажав кнопку «Настроить».

- После этого выберите «Включить защиту системы» и укажите количество места, которое вы хотели бы выделить для создания точек восстановления: чем больше места, тем большее количество точек сможет храниться, а по мере заполнения пространства старые точки восстановления будут удаляться автоматически.

Готово. После выполненных настроек точки восстановления системы будут создаваться автоматически при обновлениях Windows, а также при установке программ, значительно меняющих параметры системы. Также вы сможете создавать их вручную.
На данном этапе следует учитывать следующие нюансы:
- Вы можете столкнуться с сообщением о том, что восстановление системы отключено администратором. Решение описано в этой инструкции. Некоторые дополнительные сведения можно найти в статье Как включить защиту системы в Windows.
- Если вы полагаетесь на автоматически создаваемые точки восстановления, учитывайте, что они создаются только в случае, если нет точек восстановления, созданных менее 24 часов назад. Однако периодичность создания точек восстановления можно настроить.
Создание точки восстановления
Для того, чтобы создать точку восстановления системы, на той же вкладке «Защита системы», нажмите кнопку «Создать» и задайте имя новой точки, после чего еще раз нажмите «Создать». Через некоторое время операция будет выполнена.

Теперь на компьютере содержится информация, которая позволит вам отменить последние сделанные изменения в критически важных системных файлах Windows 10, если после установки программ, драйверов или других действий ОС стала работать неправильно.
Созданные точки восстановления хранятся в скрытой системной папке System Volume Information в корне соответствующих дисков или разделов, однако доступа к этой папке у вас по умолчанию нет.
Использование для отката системы
А теперь об использовании точек восстановления. Сделать это можно несколькими способами — в интерфейсе Windows 10, с помощью инструментов диагностики в особых вариантах загрузки, в среде восстановления, запущенной с флешки (если компьютер не загружается) и в командной строке.
Самый простой способ, при условии, что система запускается — зайти в панель управления, выбрать пункт «Восстановление», после чего нажать «Запуск восстановления системы». Второй способ открыть нужное окно в запущенной системе — нажать клавиши Win+R на клавиатуре, ввести rstrui и нажать Enter.
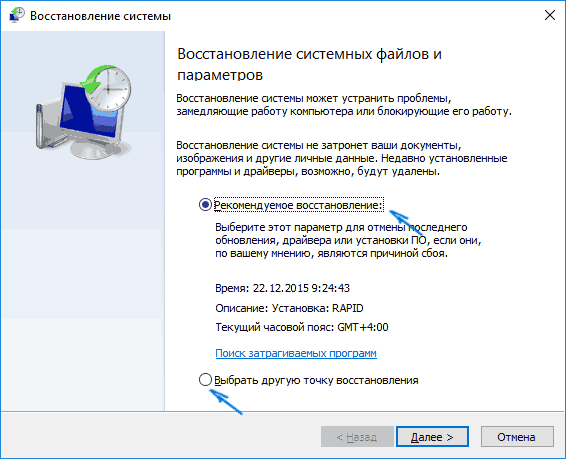
Запустится мастер восстановления, в первом окне которого вам могут предложить выбрать рекомендуемую точку восстановления (созданную автоматически), а во втором (если вы отметите «Выбрать другую точку восстановления» вы сможете сами выбрать одну из созданных вручную или автоматически точек восстановления. Нажмите «Готово» и дождитесь окончания процесса восстановления системы. После автоматической перезагрузки компьютера вам сообщат, что восстановление прошло успешно.

Второй метод использовать точку восстановления — с помощью особых вариантов загрузки (среды восстановления), попасть в которые можно через Параметры — Обновление и восстановление — Восстановление или же, еще быстрее, прямо с экрана блокировки: нажать по кнопке «питания» справа внизу, а затем, удерживая Shift, нажать «Перезагрузка». В некоторых случаях вход в среду восстановления возможен с синего экрана с ошибкой через кнопку «Дополнительные параметры».
На экране особых вариантов загрузки выберите пункт «Поиск и устранение неисправностей» — «Восстановление системы» (или «Диагностика» — «Дополнительные параметры» — «Восстановление системы» в более ранних версиях Windows 10), далее вы сможете воспользоваться имеющимися точками восстановления (в процессе потребуется ввод пароля учетной записи).

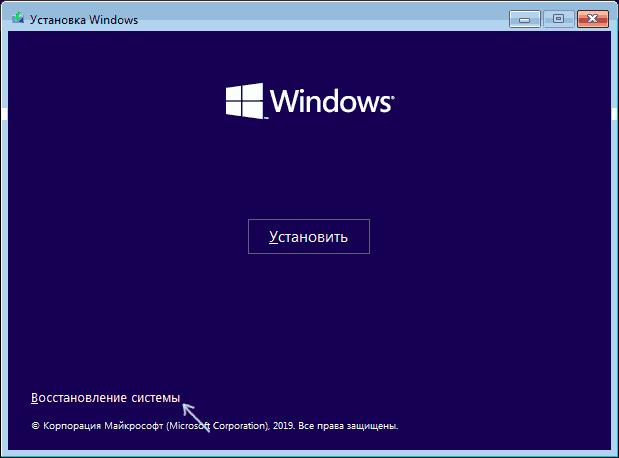
В случае, если Windows 10 не загружается, вы все равно можете использовать точки восстановления: для этого вам понадобится загрузочная флешка с Windows 10 (которую придется сделать на другом компьютере), либо диск восстановления. При использовании загрузочной флешки, достаточно будет выбрать пункт «Восстановление системы» на втором экране программы установки.
В результате вы попадете в среду восстановления, как в предыдущем способе и сможете воспользоваться точками восстановления даже на не запускающемся компьютере.
Запуск отката с использованием точки восстановления возможен и из командной строки. он вам может пригодиться в том случае, если единственный работающий вариант загрузки Windows 10 — безопасный режим с поддержкой командной строки. Просто введите в командную строку rstrui.exe и нажмите Enter для запуска мастера восстановления (он запустится в графическом интерфейсе).

И ещё одна возможность: вы можете загрузиться в WinPE и выполнить восстановление оттуда. Подробно в материале: Восстановление системных файлов Windows с WinPE.
Удаление точек восстановления
Если вам потребовалось удалить имеющиеся точки восстановления, снова зайдите в окно настройки «Защиты системы», выберите диск, нажмите «Настроить», а затем используйте кнопку «Удалить» для этого. При этом удалятся все точки восстановления для этого диска. Для удаления только выбранных точек восстановления используйте отдельную инструкцию.
То же самое можно сделать с помощью утилиты очистки диска Windows 10, для ее запуска нажмите Win+R и введите cleanmgr, а после того как утилита откроется, нажмите «Очистить системные файлы», выберите диск для очистки, а затем перейдите на вкладку «Дополнительно». Там вы сможете удалить все точки восстановления, кроме самой последней.

В завершение, некоторая дополнительная информация, которая может быть полезной в контексте рассмотренной темы:
- Точки восстановления содержат лишь информацию об изменившихся системных файлах, критичных для работы Windows 10 и записях в реестре, но не представляют собой полный образ системы. Если вас интересует именно создание такого образа, на эту тему есть отдельная инструкция — Как сделать резервную копию Windows 10 и восстановиться из нее.
- При создании новых точек восстановления, если лимит места на диске для них был исчерпан, более старые удаляются автоматически.
- Некоторые программы очистки диска компьютера могут удалять точки восстановления в автоматическом режиме. Если вы используете такие утилиты, внимательно изучите их настройки, чтобы не оказаться без точек восстановления, когда они вам потребуются.
- При необходимости вы можете восстановить отдельные файлы из точек восстановления.
- Дополнительную информацию по возможностям возврата работоспособности ОС вы можете найти в статье Восстановление Windows 10.
- При создании и использовании точек восстановления можно столкнуться с различными ошибками. Решение для самой частой описано в инструкции: Как исправить ошибку 0х80070091 при использовании точек восстановления в Windows 10, те же методы могут сработать и для других проблем с восстановлением системы.
Надеюсь, информация была полезной, а если у вас остались вопросы, вы можете задать их в комментариях ниже, я постараюсь подсказать решение.
Точки восстановления (restore points) — это достаточно простое средства для восстановления работоспособность операционной системы Windows в случае непредвиденных ошибок с системными файлами и реестром после установки некорректных драйверов, обновлений или программ. С помощью точки восстановления вы можете восстановить состояние реестра, системных файлов, драйверов и установленных программ на дату создания точки восстановления. Несмотря на то, что точки восстановления основаны на теневом копировании томов, при восстановлении из restore point личные файлы пользователя в его профиле не перезатираются. В этой статье мы рассмотрим, как системные администраторы могут использовать точки восстановления в Windows 10 и 11.
Содержание:
- Как включить создание точек восстановления в Windows?
- Создать и удалить точку восстановления в Windows
- Восстановление Windows или отдельных файлов из точки восстановления
Как включить создание точек восстановления в Windows?
В Windows 10 и 11 функционал точек восстановления обеспечивается службой System Restore, которая по умолчанию отключена.
Вы можете проверить, включена ли защита Windows с помощью точек восстановления:
- Выполните команду
systempropertiesprotection
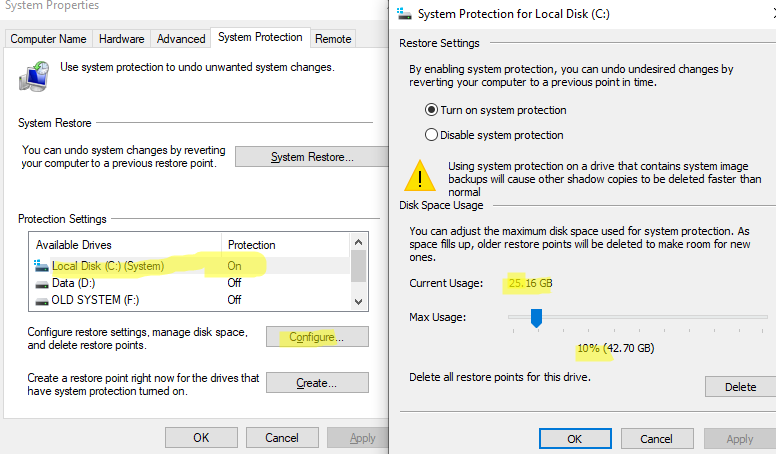
; - Откроется вкладка System Protection (Защита системы) стандартной панели System Properties;
- В нашем случае защита включена для системного диска C: и отключена для всех остальных;
- Выберите диск и нажмите кнопку Configure;
- Здесь вы можете включить/отключить защиту для диска, изменить максимальный размер диска, которые будет доступен для хранения точек восстановления и удалить все точки восстановления;

Вы можете включить защиту системы через GPO. Настройте следующие параметры политик:
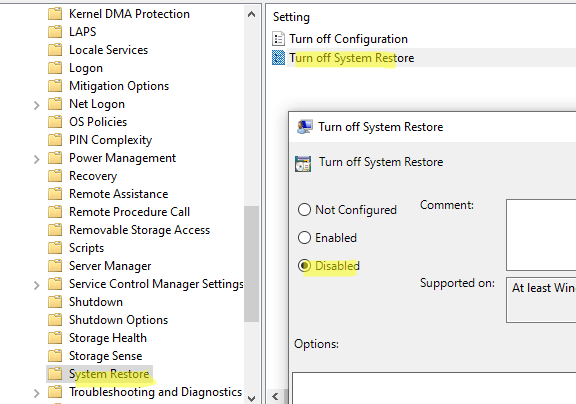
- Перейдите в Computer Configuration -> Policies -> Administrative Templates -> System -> System Restore, задайте значение Turn off System Restore = Disabled

- В Computer Configuration -> Policies -> Administrative Templates -> Windows Components -> Windows Defender -> Scan задайте Create system restore point = Enabled
Можно включить защиту определенного диска с помощью PowerShell:
Enable-ComputerRestore -drive "c:\"
Создать и удалить точку восстановления в Windows
Windows по умолчанию создает точки восстановления при установке или удалении обновлений, драйверов или приложений.
Чтобы создать точку восстановления немедленно, нажмите кнопку Create и укажите описание точки.
Можно создать точку восстановления из консоли PowerShell:
Checkpoint-Computer -description "Backup before update APP2" -RestorePointType "APPLICATION_INSTALL"

По умолчанию создается точка восстановления типа APPLICATION_INSTALL. Можно в качестве параметра RestorePointType указать:
- MODIFY_SETTINGS
- DEVICE_DRIVER_INSTALL
- APPLICATION_INSTALL
- APPLICATION_UNINSTALL
- CANCELLED_OPERATION
Вывести список доступных точек восстановления:
Get-ComputerRestorePoint|ft -AutoSize

По умолчанию служба System Restore разрешается создавать только одну точку восстановления раз в 24 часа. Если попробовать создать новую, появится ошибка:
WARNING: A new system restore point cannot be created because one has already been created within the past 1440 minutes.
Чтобы разрешить создавать точки восстановления чаще, нужно изменить DWORD параметр реестра SystemRestorePointCreationFrequency в ветке HKLM\SOFTWARE\Microsoft\Windows NT\CurrentVersion\SystemRestore. По умолчанию значение параметра 1440 (24 часа). Чтобы отключить ограничение на частоту создания точек восстановления, измените значение на 0.
Точки восстановления не являются полноценным средством резервного копирования Windows. Вы можете настроить резервное копирование образа Windows на внешний носитель с помощью встроенных средств.
Точки восстановления Windows основаны на технологии снапшотов тома диска службой VSS. Когда вы создаете новую точку восстановления, служба VSS сообщает всем приложениям о необходимости перейти в консистентное состояние и временно приостановить активность. После этого она создает снапшот консистентного состояния диска (целиком).
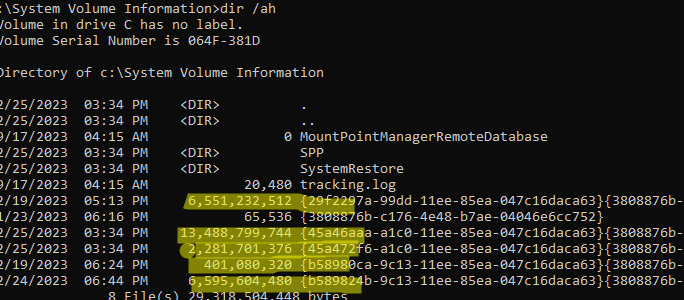
Точки восстановления хранятся в скрытой папке System Volume Information, которая находится в корне каждого диска. На скриншоте выделены файлы снапшотов для каждой из созданных точек восстановления. Как видите их размер достигает десятков гигабайт.
Вывести список дисков, для которых созданы снапшоты:
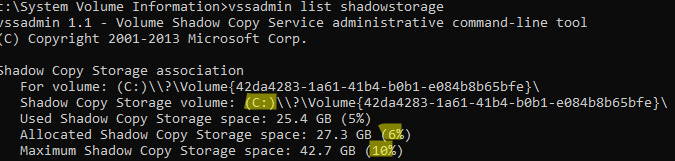
vssadmin list shadowstorage
В этом примере на диске C: есть снапшоты, которые занимают 6% места (при лимите 10% от емкости).
Можно изменить размер места для снапшотов с помощью команд:
vssadmin resize shadowstorage /on=c: /for=c: /maxsize=50GB
Или:
vssadmin resize shadowstorage /on=c: /for=c: /maxsize=15%
Вывести список созданных снапшотов диска с помощью команды:
vssadmin list shadows /for=c:
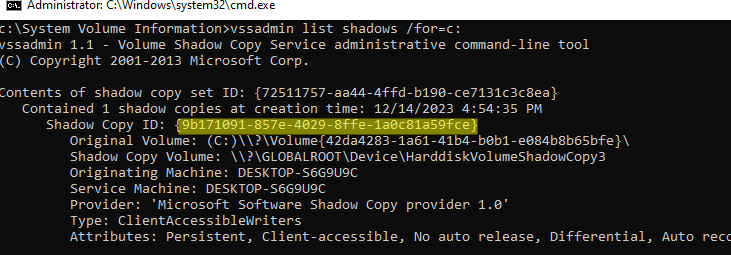
Удалить конкретный снапшот можно по shadow copy ID:
vssadmin delete shadows /Shadow={9b171091-857e-4029-8ffe-1a0c81a59fce}
Удалить самый старый снапшот:
vssadmin delete shadows /for=C: /oldest
Удалить все точки восстановления:
vssadmin delete shadows /all
Также для очистки старых точек восстановления можно использовать стандартную утилиту очистки диска Disk Cleanup (cleanmgr.exe). Перейдите на вкладку More options и нажмите Clean up в секции System Restore and Shadow copies..
Восстановление Windows или отдельных файлов из точки восстановления
Для восстановления состояния системы из созданной ранее точки восстановления используется утилита
rstrui.exe
.
- Запустите утилиту;
- Выберите предыдущую точку восстановления, на которую нужно откатить Windows;
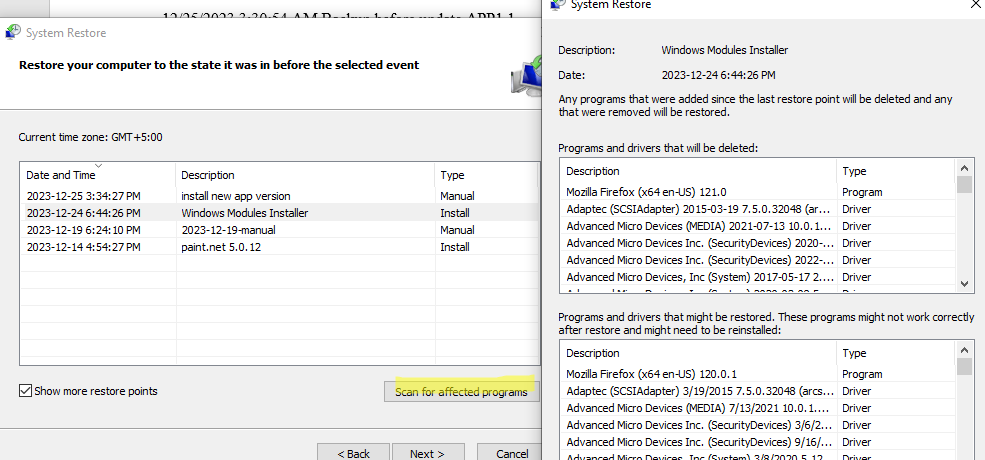
- Вы можете сравнить список приложений, служб и драйверов в текущей версии и в точке восстановления (кнопка Scan for affected programs);
- Нажмите Next -> Finish;
- Windows выполните откат к предыдущему снапшоту (понадобится перезагрузка).
При восстановлении из предыдущей точки восстановления текущие файлы пользователя в персональных папках Documents, Downloads, Desktop и т.д. в профилях пользователей не будет удалены (перезаписаны).
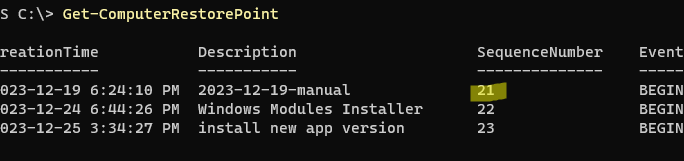
Вы можете восстановить Windows из точки восстановления с помощью PowerShell. Получить ID точек восстановления:
Get-ComputerRestorePoint
Восстановить Windows из указанной точки:
Restore-Computer -RestorePoint 21
Выполните команду, чтобы проверить что восстановление выполнено успешно:
Get-ComputerRestorePoint -LastStatus
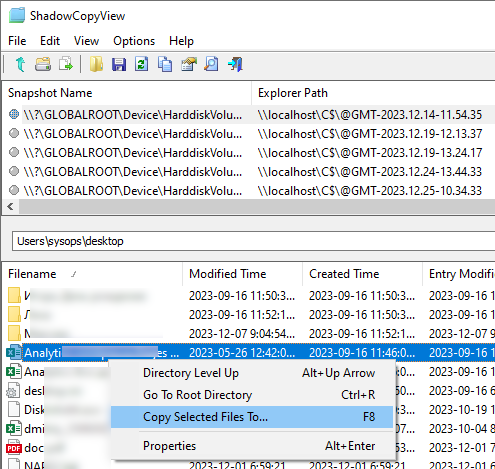
Как мы указали выше, при откате к предыдущей точке восстановления персональные файлы пользователя не перезатираются. Однако фактически они хранятся в снапшоте (ведь создается снимок всего диска). Это значит, что вы можете вручную восстановить любой файл из теневой копии вашей точкой восстановления.
Для просмотра файлов в теневой копии можно воспользоваться бесплатной утилитой ShadowCopyView (https://www.nirsoft.net/utils/shadow_copy_view.html)
Вы можете открыть нужную вам точку восстановления (по дате создания), найти в ней предыдущую версию нужного вам файла и восстановить его в произвольный каталог на диске (Copy Selected files to …).
Практически такой способо восстановления личных файлов из точки восстановления неприменим, т.к. при восстановлении файлы оказываются поврежденными (частично забиты нулями). Это баг описывал Вадим в посте Нюансы извлечения файлов из теневых копий в клиентских Windows.
В качестве обходного решения можно настроить Историю файлов или делать теневые копии заданием планировщика с командой:
wmic shadowcopy call create Volume='C:\'
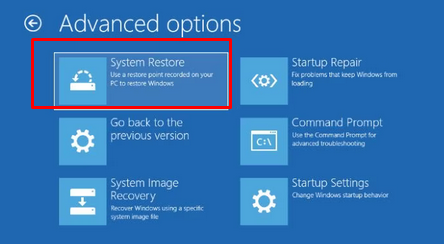
Для офлайн восстановления состояния Windows из точки восстановления, загрузите компьютер в среде восстановления Windows RE и выберите в меню пункт System Restore. Вам будет предложено выбрать одну из ранее созданных точек восстановления.
После восстановления доменного компьютера из ранее созданной точки восстановления обычно нужно также восстановить доверительные отношения с доменом с помощью команды:
Test-ComputerSecureChannel –Repair
В Windows Server служба System Protection отсутствует и для создания аналога точек восстановления нужно установить и настроить компонента Windows Server Backup (WSB).
Статья обновлена: 11 февраля 2025
ID: 15104
Точка восстановления создает копию системных файлов компьютера на момент создания этой точки восстановления. Если, например, после запуска системных утилит или установки драйверов возникнут ошибки, вы сможете вернуться к исходному состоянию компьютера.
Чтобы создать точку восстановления в операционной системе Windows 10, 11:
- Нажмите на значок поиска в панели задач Windows.
- Введите в поле поиска создание точки восстановления и выберите Создание точки восстановления.
- На вкладке Защита системы выберите диск, для которого нужно создать точку восстановления, и нажмите Настроить.

- Выберите Включить защиту системы и нажмите ОК.

- Нажмите Создать.

- Введите описание точки восстановления и нажмите Создать.

- После завершения создания точки восстановления нажмите Закрыть.
Точка восстановления для локального диска C будет создана.
Спасибо за ваш отзыв, вы помогаете нам становиться лучше!
Спасибо за ваш отзыв, вы помогаете нам становиться лучше!
Creating a recovery point in Windows 10 is a crucial step in safeguarding your data and ensuring that you can easily restore your system in case of any unexpected issues. Did you know that a study conducted by Microsoft revealed that 42% of Windows users have experienced data loss at some point? With this in mind, it becomes imperative to establish a reliable recovery point that can save you from potential headaches and loss of important files.
To create a recovery point in Windows 10, you can utilize the built-in System Restore feature. This tool allows you to take a snapshot of your system’s current state, including installed programs, system settings, and files. In the event of a system failure or software issue, you can simply restore your computer back to the saved recovery point, returning it to a functioning state. This process can help you avoid the hassle of reinstalling programs, reconfiguring settings, and potentially losing important data. By regularly creating recovery points, you can have peace of mind knowing that your system is protected against unexpected failures.
Creating a recovery point in Windows 10 is crucial for safeguarding your system against potential crashes and data loss. Follow these steps to create a recovery point:
- Click on the Start button and type «Control Panel» to open the Control Panel.
- Select «System and Security» and then click on «Backup and Restore (Windows 7)».
- On the left side, click on «Create a system image».
- Select the location to save the backup (external hard drive or network location).
- Choose the drives you want to include in the recovery point and click «Next».
- Click «Start backup» to begin creating the recovery point.
Creating a recovery point allows you to restore your computer to a previous state in case of system issues or data loss. It’s a reliable way to protect

Introduction
Creating a recovery point in Windows 10 is an essential step in ensuring the safety and integrity of your system. Whether you’re making changes to system settings, installing new software, or experiencing issues with your operating system, having a recovery point allows you to revert back to a stable state. The recovery point serves as a snapshot of your system’s current state, including installed programs, files, and settings. In this article, we will explore the steps involved in creating a recovery point in Windows 10, providing you with the knowledge and tools to safeguard your system.
Understanding Recovery Points
Before diving into the process of creating a recovery point in Windows 10, it’s important to understand what exactly a recovery point is and how it can be beneficial. A recovery point is essentially a backup of your system’s configuration and settings at a specific point in time. It includes important system files, installed programs, and user data necessary for the normal functioning of your Windows 10 operating system.
Having a recovery point can be advantageous in several scenarios. Firstly, it allows you to revert back to a stable state if you encounter problems with your system after making changes to settings or installing software. Secondly, it provides a safety net in case of data loss or corruption, allowing you to restore important files and folders. Lastly, a recovery point can save you time and effort in the event of system failure, as it provides a quick and convenient method of restoring your system without the need for a complete reinstallation.
Now that we understand the importance of creating a recovery point, let’s explore the different methods available in Windows 10.
Using the Windows 10 System Restore Feature
One of the easiest ways to create a recovery point in Windows 10 is by utilizing the built-in System Restore feature. This feature allows you to roll back your system to a previous state, effectively creating a recovery point.
Here’s how you can use the System Restore feature to create a recovery point:
- Open the Start menu and type «System Restore» in the search bar.
- Click on «Create a restore point» from the search results.
- In the System Properties window, click on the «Create» button.
- Enter a description for the restore point to help you identify it later.
- Click «Create» to create the recovery point.
Once the process is complete, you’ll have successfully created a recovery point using the System Restore feature. It’s recommended to give your restore point a descriptive name that can help you identify it easily, especially if you plan on creating multiple restore points.
Configuring System Restore Settings
Before creating a recovery point, it’s a good idea to configure the System Restore settings according to your preferences. Here’s how you can access and modify these settings:
- Open the Start menu and type «System Restore» in the search bar.
- Click on «Create a restore point» from the search results.
- In the System Properties window, click on the «Configure» button.
- In the new window, you can adjust the following settings:
- System Protection: You can enable or disable System Protection for each drive on your system. It’s recommended to have it enabled for your primary drive.
- Max Usage: Specify the maximum amount of disk space System Restore can use. Windows 10 usually allocates sufficient space by default.
- Click «Apply» and then «OK» to save your changes.
Configuring these settings allows you to manage the storage allocated for recovery points and customize the protection for your system. You can allocate more or less space depending on your storage requirements and ensure that System Restore is enabled on the drives that are critical to your system’s stability.
Using Third-Party Backup Software
While the System Restore feature in Windows 10 provides a convenient method for creating recovery points, you may also consider using third-party backup software for more advanced options and features. These software solutions often provide additional functionality, such as scheduling automatic backups, creating incremental backups to save disk space, and allowing for easy recovery from different points in time.
Here are a few popular third-party backup software options you can explore:
- Acronis True Image: Acronis True Image is a comprehensive backup software that offers both local and cloud-based backup options. It provides features like disk cloning, continuous data protection, and easy recovery options.
- Macrium Reflect: Macrium Reflect is a reliable backup and disk imaging software that allows you to create complete image backups of your system. It offers advanced features like differential and incremental backups, scheduling options, and even bootable rescue media.
- AOMEI Backupper: AOMEI Backupper is a user-friendly backup software that offers system backup, disk backup, file backup, and partition backup options. It also provides features like differential and incremental backups, and the ability to create bootable rescue media.
By using third-party backup software, you can have more control over your recovery points and tailor the backup process to your specific needs. These software solutions often offer more advanced features and flexibility compared to the built-in Windows tools.
Choosing the Right Backup Strategy
When using third-party backup software, it’s important to establish a backup strategy that suits your needs. Here are a few things to consider:
- Frequency: Determine how often you want to create backups. This will depend on factors such as the frequency of changes to your system or the importance of the data being backed up.
- Retention: Decide how many backup versions you want to retain. This will dictate how far back in time you can go to recover files or restore your system.
- Storage: Consider the storage medium for your backups. It could be an external hard drive, network-attached storage (NAS), or cloud storage.
- Validation: Periodically test the integrity of your backups by performing test restores or verifying the backup files.
By establishing a backup strategy, you can ensure that your recovery points are created and maintained regularly, maximizing the effectiveness and reliability of your backup solution.
Recovering from a Recovery Point
Creating a recovery point is only the first step; knowing how to recover from it is equally important. Whether you’re using the Windows 10 System Restore feature or third-party backup software, the recovery process typically involves selecting the desired recovery point and following the provided instructions.
Here are some general steps to recover from a recovery point:
- Start your computer and access the recovery environment. This can usually be done by pressing a specific key during startup (e.g., F8 or F11) or through the boot menu.
- Select the recovery option you want to use (e.g., System Restore, recovery from a backup image).
- Follow the on-screen instructions. This may involve selecting the recovery point or backup file you want to restore, selecting the target location, and confirming the restore process.
- Wait for the recovery process to complete. This may take some time, depending on the size of the recovery point and the speed of your system.
- Restart your computer and verify that your system has been restored to the desired state.
It’s important to note that the recovery process may differ slightly depending on the specific tool or software you’re using. Always refer to the documentation or help resources provided by the software or consult the relevant support channels for detailed instructions.
Exploring Additional Recovery Point Options
Aside from the built-in System Restore and third-party backup software options, Windows 10 offers a range of additional features that can help you create and manage recovery points. Let’s explore some of these options:
Create a Recovery Drive
A recovery drive is a USB drive that contains the necessary files to help you recover your system. It includes the Windows Recovery Environment (WinRE) and can be used to troubleshoot and repair startup issues, perform system resets, and even reinstall Windows 10.
To create a recovery drive, follow these steps:
- Connect a USB drive with sufficient space to your computer.
- Open the Start menu and type «Create a recovery drive» in the search bar.
- Click on the «Create a recovery drive» option from the search results.
- In the Recovery Drive wizard, make sure to check the box that says «Back up system files to the recovery drive.»
- Follow the on-screen instructions to create the recovery drive. This process may take some time, depending on the size of the system files being backed up.
A recovery drive can be a valuable tool in situations where your system is unbootable or experiencing critical issues. It provides a separate environment from your hard drive and can be used to perform various recovery actions.
Windows 10 Reset Options
If you’re looking to restore your Windows 10 operating system to a fresh state without losing your personal files, the Windows 10 Reset options can be useful. These options allow you to reinstall Windows 10 while keeping your personal files intact.
To access the Windows 10 Reset options, follow these steps:
- Open the Start menu and go to «Settings» (the gear icon).
- Click on «Update & Security.»
- In the left sidebar, select «Recovery.»
- Under the «Reset this PC» section, click «Get started.»
- Choose whether you want to keep your personal files or remove everything, then follow the on-screen instructions to complete the reset process.
Windows 10 Reset options provide a convenient way to restore the operating system without the need for external recovery media or backup software. However, it’s important to note that this process will remove any software installed after the reset point, so be sure to back up any essential programs or files beforehand.
Advanced Recovery Options
In addition to the basic Reset options mentioned above, Windows 10 also offers advanced recovery options for more specific scenarios, such as system repair, startup troubleshooting, and automated recovery.
To access these advanced recovery options, follow these steps:
- Open the Start menu and go to «Settings» (the gear icon).
- Click on «Update & Security.»
- In the left sidebar, select «Recovery.»
- Under the «Advanced startup» section, click «Restart now.»
- Your computer will restart, and you will be presented with a range of advanced recovery options that can help you troubleshoot and repair your system.
The advanced recovery options provide more granular control over system repair and troubleshooting. You can use these options to access command prompt tools, perform manual repairs, and recover your system from different types of issues.
Conclusion
Creating a recovery point in Windows 10 is crucial for maintaining the stability and security of your system. Whether you choose to use the built-in System Restore feature, third-party backup software, or explore additional recovery options, the process ensures that you have a backup plan in place for unforeseen circumstances. By understanding the benefits and utilizing the available tools, you can safeguard your valuable data and maintain control over your Windows 10 operating system.

Creating a Recovery Point in Windows 10
Creating a recovery point in Windows 10 is essential for safeguarding your system and data. In case of any errors, system failure, or malware attacks, a recovery point can restore your computer to a previous functioning state. Here’s how you can create a recovery point in Windows 10:
Method 1: Using the System Restore
The System Restore feature in Windows 10 allows you to create recovery points:
- Open the Start Menu and search for «System Restore.»
- Select «Create a restore point» from the results.
- In the System Protection tab, click on «Create.»
- Enter a name for the restore point and click «Create» again.
Method 2: Using Backup and Restore (Windows 7)
You can also use the Backup and Restore feature to create a recovery point:
- Open the Control Panel and go to «System and Security.»
- Click on «Backup and Restore (Windows 7).»
- Click on «Create a system image» on the left sidebar.
- Choose the location to store the recovery image, and click «Next.»
- Follow the instructions to complete the process.
- To create a recovery point in Windows 10, go to the Control Panel and open the «Backup and Restore (Windows 7)» option.
- Click on «Create a System Image» and choose the location where you want to save the recovery point.
- Make sure to select the drives and partitions you want to include in the recovery point.
- Click on «Start Backup» and wait for the process to complete. It may take some time depending on the size of your data.
- Once the recovery point is created, you can use it to restore your system to a previous state if something goes wrong.
Key Takeaways
Frequently Asked Questions
Here are some commonly asked questions about creating recovery points in Windows 10:
1. Why should I create a recovery point in Windows 10?
Creating a recovery point is crucial as it allows you to restore your system to a previous state in case of a critical error or malfunction. It serves as a safety net, protecting your files, settings, and applications from irreversible damage or loss.
2. How can I create a recovery point in Windows 10?
There are two ways to create a recovery point in Windows 10. One way is to use the built-in System Restore feature. To do this, go to the Control Panel, select «System and Security,» and click on «System.» Then, click on «System Protection» and choose the drive you want to create a recovery point for. Finally, click on «Create» and follow the prompts to complete the process.
Alternatively, you can also use third-party backup and recovery software, such as Acronis True Image or Macrium Reflect, to create recovery points in Windows 10.
3. Is it possible to schedule automatic recovery point creation in Windows 10?
Yes, Windows 10 allows you to schedule automatic recovery point creation. To do this, open the Control Panel, go to «System and Security,» click on «Backup and Restore (Windows 7),» and then select «Set up backup.» Choose the location where you want to save the backup, select the files and folders you want to include, and click on «Next.» On the next screen, click on «Change schedule» and set the frequency and time for automatic backups.
Make sure the backup drive is connected and turned on during the scheduled backup time for automatic recovery point creation to work.
4. Can I restore my computer using a recovery point created in Windows 10?
Yes, you can restore your computer using a recovery point created in Windows 10. To do this, go to the Control Panel, select «System and Security,» click on «System,» and then choose «System Protection.» Click on «System Restore» and follow the prompts to select the recovery point you want to use for the restoration process. Keep in mind that restoring your computer using a recovery point will revert your system settings and installed applications to the state they were in when the recovery point was created.
5. How often should I create a recovery point in Windows 10?
It is recommended to create a recovery point in Windows 10 before making any significant changes to your system, such as installing new software, updating drivers, or modifying system settings. Additionally, it is good practice to create regular recovery points on a weekly or monthly basis to ensure you have recent backups in case of emergencies or unexpected issues.
Creating a recovery point in Windows 10 is a simple and valuable way to protect your computer and data. By following these easy steps, you can ensure that you have a backup in case of any system issues or data loss. First, open the Control Panel and navigate to the «Backup and Restore» option. Then, click on «Create a system image» and select the location where you want to save the backup. It is recommended to choose an external hard drive or network location. Finally, click «Start backup» and wait for the process to complete. Now, you have successfully created a recovery point that you can use to restore your Windows 10 system to a previous state if needed.
Remember, regularly creating recovery points is essential to protect your computer and ensure you can easily recover from any issues that may arise. Set a reminder to create new recovery points periodically or automate the process using third-party software. By taking these steps, you can have peace of mind knowing that your Windows 10 system is safe and secure.