
Creating a custom Windows ISO with pre-installed programs can save you significant time when setting up multiple computers. This guide will walk you through the process of creating a Windows 11 ISO with your chosen programs already installed. While we’ll be using Windows 11 in this tutorial, the same steps can be applied to Windows 10.
Key Takeaways
- Creating a custom Windows ISO allows you to pre-install your preferred programs
- This method works for both Windows 10 and Windows 11
- You’ll need virtualization software like VMware or VirtualBox to create the custom ISO
Requirements
Before we begin, make sure you have:
- A Windows 11 (or 10) ISO file
- Virtualization software (VMware Player or VirtualBox)
- At least 50GB of free disk space
- A stable internet connection
Step 1: Download the Windows ISO
- Open your web browser and search for “download Windows 11“.
- Click on the official Microsoft Windows 11 download page.
- Scroll down to find the “Download Windows 11 Disk Image (ISO)” section.
- Select “Windows 11 (multi-edition ISO)” and click “Download“.
- Choose your language and click “Confirm“.
- Click “64-bit Download” to start the download.

If you want to download the Windows 10 ISO File instead, check out these guides:
- How to Download the Windows 10 ISO Without Media Creation Tool
- How to Download Windows 10 ISO File from Microsoft
Step 2: Prepare for Virtualization
- Create a new folder on your desktop named “VMShare“.
- Move the downloaded Windows 11 ISO into this folder.
- Install VMware Player or VirtualBox if you haven’t already.

If you need assistance with Virtualization and Hypervisors, you can check out these guides:
- How to Enable Virtualization on Your PC
- How to Install VMware on Windows 11 and 10
- How to Download & Install VirtualBox
Step 3: Create a New Virtual Machine
- Open VMware Player and click “Create a New Virtual Machine“.
- Choose “I will install the operating system later” and click “Next“.
- Select “Windows” as the guest operating system and “Windows 11” as the version.
- Name your virtual machine and choose a location to store it.
- Create a Password to encrypt the VM files (Windows 11 only).
- Specify disk capacity (at least 64GB recommended) and select “Store virtual disk as a single file“.
- Click “Customize Hardware” and make the following adjustments:
- Increase memory to at least 8GB (8192MB)
- Increase processors to at least 2 cores
- Under “New CD/DVD”, choose “Use ISO image file” and browse to select your Windows 11 ISO.
- At the bottom of the Settings window, click on Add to add new hardware.
- Choose Hard Disk and click Next.
- Select the recommended Virtual Disk Type based on your system’s capabilities. For example, if your system supports NVMe, select that option.
- Create a new virtual disk, leaving the default settings, and click Next, then Finish.
- Note: You now have two hard disks within your virtual machine—one for the Windows installation and the other for saving the custom Windows image file.
- Click “Close” and then “Finish” to create the virtual machine.
Note: These instructions are tailored to the hardware in my computer. If your system has lower specifications, be sure to adjust the virtual machine settings accordingly.

Step 4: Install Windows 11 in the Virtual Machine
- Start the virtual machine and press any key to boot from the ISO when prompted.
- Select your language preferences and click “Next“.
- Click “Install now“.
- If asked for a product key, select “I don’t have a product key“.
- Choose “Windows 11 Home” (or your preferred edition) and click “Next“.
- Accept the license terms and click “Next“.
- Choose “Custom: Install Windows only (advanced)“.
- Select the unallocated space and click “Next” to start the installation.
- Wait for the installation to complete and the virtual machine to restart.

Step 5: Complete Initial Windows Setup
- Select your region and keyboard layout.
- Create a local account named “User” with no password.
- Follow this guide to bypass the forced Microsoft Account creation on Windows 11
- Answer the privacy questions according to your preference.
- Wait for the setup to complete and reach the desktop.

Step 6: Install Desired Programs
Note: This part is based on personal choices. You can add any software you want to your custom Windows ISO. The software I mention here is just what I prefer and recommend, but it’s chosen based on what I need.
- Make sure you have an active internet connection then open Microsoft Edge and navigate to Ninite.com.
- Select the programs you want to pre-install. For this guide, I’ll choose:
- Google Chrome
- Malwarebytes
- 7-Zip
- iTunes
- K-Lite Codec Pack
- Open Shell (for a classic Start menu experience)
- Click “Get Your Ninite” at the bottom of the page to download the installer.
- Run the Ninite installer and wait for it to complete.

- Next, download and install these additional programs:
- Adobe Reader (uncheck the McAfee option during installation)
- AnyDesk
- Nilesoft Shell (for an enhanced right-click menu)
- OnlyOffice (for document, spreadsheet, and presentation editing)
- For each program, download the installer, run it, and follow the on-screen instructions.

Step 7: Prepare System for Imaging
Note: If you’re only going to use this custom Windows ISO on your own computer and not on anyone else’s, you can skip Step 7 and Step 9. These steps are for setting up a new computer name and starting the Out of Box Experience, where you create a new user account during installation. If you want to go straight to your user account after installing Windows from the custom ISO, just skip these steps.
- Open Command Prompt as administrator.
- Type the following command and press Enter:
%windir%\system32\sysprep\sysprep.exe /audit /reboot - It will restart the computer and boot into the default local admin account.

- After restarting, do a search for “Control Panel” and open it.
- Navigate to User Accounts > User Accounts > Manage another account.
- Select the “User” account you created earlier.
- Click “Delete the account” and then “Delete Files“.
- Confirm by clicking “Delete Account“.

Step 8: Create a Data Partition
- Press Windows key + X and select “Disk Management“.
- When prompted to initialize the new disk, ensure GPT is selected and click “OK“.
- Right-click on the unallocated space of Disk 1 and select “New Simple Volume“.
- Follow the wizard, accepting default settings, but set the volume label as “DATA“.
- Click “Finish” to create and format the new partition.

Step 9: Run Sysprep
Reminder: You can skip this step, read the Note in Step 7 for more info.
- Open the Run dialog (Windows key + R).
- Type “sysprep” and press Enter.
- In the System Preparation Tool:
- Set “System Cleanup Action” to “Enter System Out-of-Box Experience (OOBE)“
- Check “Generalize”
- Set “Shutdown Options” to “Shutdown“
- Click “OK” and wait for the process to complete and shut down the VM.

Step 10: Capture the Custom Windows Image
- Start the VM and boot from the Windows 11 ISO (you may need to press a key to boot from DVD).
- In the Windows Setup screen, click “Next” and then “Repair your computer“.
- Choose Troubleshoot > Command Prompt.
- In the Command Prompt, determine your drive letters:
- Type
C:and press Enter, then typedirto check contents - Repeat for
D:,E:, etc., until you find your Windows installation and Data drives
- Type
- Assuming C: is your Windows drive and D: is your Data drive, run this command:
dism /Capture-Image /ImageFile:D:\install.wim /CaptureDir:C:\ /Name:windows11
Wait for the image capture to complete, type exit to close Command Prompt, then click “Continue” to exit to Windows 11.

Step 11: Install VMware Tools
- In VMware Player, click on “Player” in the top menu.
- Select “Manage” > “Install VMware Tools“.
- If an AutoPlay window appears, click “Run setup64.exe“.
- Follow the installation wizard, accepting default settings.
- When prompted to restart, click “No“.

Step 12: Set Up Shared Folders
- In VMware Player, go to “Player” > “Manage” > “Virtual Machine Settings“.
- Click on “Options” tab, then “Shared Folders“.
- Select “Always enabled” and click “Add“.
- Click “Next“, then “Browse“.
- Navigate to and select the “VMShare” folder on your desktop.
- Click “OK“, then “Next“.
- Ensure “Enable this share” is checked and click “Finish“.
- Click “OK” to close the settings window.
- Restart the virtual machine.

Step 13: Access Shared Folders
- After restarting, open File Explorer in the VM.
- Click on “Network” in the left pane.
- If prompted, turn on network discovery.
- Double-click on “VMware-host” > “Shared Folders” > “VM share“.
- Verify that you can see the original Windows 11 ISO file.

Step 14: Download and Install AnyBurn
- Open a web browser in the VM and go to Anyburn.com.
- Download the free version of AnyBurn.
- Install AnyBurn, following the default installation options.

Step 15: Create the Custom Bootable ISO
- Open AnyBurn and select “Edit image file“.
- Click the folder icon to browse, navigate to the shared VM folder, and select the original Windows 11 ISO.
- Click “Next” to load the ISO contents.
- In the file structure, navigate to the “sources” folder.
- Find and select “install.wim” or “install.esd“.
- Click “Remove” and confirm the deletion.
- Click “Add” and navigate to your Data drive.
- Select your custom “install.wim” file and click “Add“.
- Verify that the new “install.wim” is in the “sources” folder.
- Click “Next“.
- Name your custom ISO (e.g., “Windows11-Custom”).
- Click “Create Now” to generate your custom bootable ISO.

Step 16: Verify the Custom ISO
- Minimize the VMware Player window.
- Open the “VMShare” folder on your desktop.
- Confirm that your new custom Windows 11 ISO is present.

Your custom Windows ISO is now bootable and ready to be used. If you don’t want to test it in a VM first as explained in Step 17 below, you can go ahead and create a bootable USB drive with this ISO and use it to install Windows your computer.
Step 17: Test the Custom ISO (Optional)
- Create a new virtual machine in VMware Player.
- Use the same settings as before, but select your custom ISO as the installation media.
- Start the VM and go through the Windows installation process.
- Verify that all your pre-installed programs are present on the new installation.

Additional Tips
- For older or unsupported hardware, you can use Rufus to create a bootable USB drive from your custom ISO, which can bypass Windows 11 system requirements.
- Keep your original custom “install.wim” file. You can use it to quickly update your custom ISO in the future without going through the entire process again.
- Always ensure you have appropriate licenses for Windows and any software included in your custom ISO.

Conclusion
Congratulations! You’ve successfully created a custom Windows 11 ISO with pre-installed programs. This ISO can now be used to quickly set up new computers with your preferred software and settings. Remember to periodically update your custom ISO to include the latest software versions and Windows updates.
Frequently Asked Questions (FAQ)
Can I use this method for both Windows 10 and Windows 11?
Yes, this method works for both Windows 10 and Windows 11. Just use the appropriate base ISO for your desired Windows version. I have a similar guide where I show you how to create a custom Windows 10 Gaming ISO.
Do I need a separate license for each installation of my custom Windows ISO?
Yes, you still need a valid Windows license for each installation. Creating a custom ISO doesn’t change the licensing requirements.
How often should I update my custom ISO?
It’s a good practice to update your custom ISO every few months to include the latest Windows updates and software versions.
Can I add or remove programs from my custom ISO later?
To modify the included programs, you’ll need to create a new custom ISO. However, you can streamline the process by starting with your existing custom “install.wim” file.
Will this custom ISO work on computers with different hardware configurations?
Generally, yes. Windows includes drivers for most common hardware. For specific or unusual hardware, you may need to install additional drivers after the initial setup.
Are you tired of using the standard Windows 11 installation media and wanting to create a custom ISO file that includes all your favorite utilities, drivers, and applications? Look no further! In this article, we’ll walk you through the process of creating a custom ISO file in Windows 11. Whether you’re an IT professional, a power user, or just someone who wants to streamline their installation process, this guide is for you.
Why Create a Custom ISO File?
Before we dive into the nitty-gritty of creating a custom ISO file, let’s talk about why you’d want to do this in the first place. A custom ISO file allows you to include all the necessary drivers, applications, and utilities that you need for a specific installation. This can save you a lot of time and effort in the long run, as you won’t have to manually install each component separately.
For example, if you’re an IT professional, you may want to create a custom ISO file that includes all the necessary drivers and applications for a specific company or department. This way, when new employees join, you can simply use the custom ISO file to set up their computers with all the necessary software and settings.
Preparing Your System for Custom ISO Creation
Before you start creating your custom ISO file, there are a few things you need to prepare:
Step 1: Download the Windows 11 Assessment and Deployment Kit (ADK)
To create a custom ISO file, you’ll need to download the Windows 11 Assessment and Deployment Kit (ADK). You can download the ADK from the official Microsoft website. Make sure to select the correct version of the ADK that matches your Windows 11 installation.
Step 2: Install the ADK
Once you’ve downloaded the ADK, install it on your Windows 11 machine. Follow the prompts to complete the installation process.
Step 3: Create a New Folder for Your Custom ISO File
Create a new folder on your machine where you’ll store all the files and folders related to your custom ISO file. This folder will serve as the working directory for your custom ISO creation process.
Gathering the Necessary Files and Folders
To create a custom ISO file, you’ll need to gather the necessary files and folders. These include:
- The Windows 11 installation files (located in the
C:\Windows\WinSxSfolder) - Any drivers or applications you want to include in your custom ISO file
- Any custom settings or configurations you want to apply to the installation
Step 1: Copy the Windows 11 Installation Files
Copy the Windows 11 installation files from the C:\Windows\WinSxS folder to your working directory. This will create a copy of the installation files that you can modify and customize.
Step 2: Add Drivers and Applications
Add any drivers or applications you want to include in your custom ISO file to the drivers and applications folders in your working directory. Make sure to follow the correct format and naming conventions for each type of file.
Step 3: Create Custom Settings and Configurations
Create any custom settings or configurations you want to apply to the installation. This can include things like registry keys, group policy settings, or other customizations.
Using the Deployment Tools to Create the Custom ISO File
Now that you have all the necessary files and folders, it’s time to use the deployment tools to create your custom ISO file.
Step 1: Create a New Deployment Share
Create a new deployment share using the Deployment Tools. A deployment share is a folder that contains all the files and settings needed to create a custom ISO file.
Step 2: Configure the Deployment Share
Configure the deployment share by adding the necessary files and settings. This includes the Windows 11 installation files, drivers, applications, and custom settings and configurations.
Step 3: Create the Custom ISO File
Use the Deployment Tools to create the custom ISO file. This will build the ISO file from the deployment share and include all the necessary files and settings.
Optional: Adding Custom Boot Options
If you want to add custom boot options to your ISO file, you can do so by modifying the boot.wim file. This file is used to configure the boot process for the installation.
Step 1: Mount the `boot.wim` File
Mount the boot.wim file using the Deployment Tools. This will allow you to modify the file.
Step 2: Add Custom Boot Options
Add custom boot options to the boot.wim file by modifying the BCD (Boot Configuration Data) file. This file is used to configure the boot process for the installation.
Step 3: Unmount the `boot.wim` File
Unmount the boot.wim file to save the changes.
Conclusion
Creating a custom ISO file in Windows 11 is a straightforward process that requires some preparation and knowledge of the deployment tools. By following the steps outlined in this article, you can create a custom ISO file that includes all the necessary files and settings for a specific installation. Whether you’re an IT professional, a power user, or just someone who wants to streamline their installation process, a custom ISO file can save you a lot of time and effort in the long run.
| Windows 11 ADK | Deployment Kit Version | Windows 11 Version |
|---|---|---|
| ADK for Windows 11 (64-bit) | 10.1.22000.1 | 11 (21H2) |
| ADK for Windows 11 (32-bit) | 10.1.22000.1 | 11 (21H2) |
Note: The table above provides information on the Windows 11 ADK and its compatibility with different Windows 11 versions.
What is a custom ISO file and why would I need to create one?
A custom ISO file is a personalized version of the original Windows 11 installation media that includes specific drivers, updates, and settings tailored to your needs. By creating a custom ISO file, you can simplify the installation process and ensure that your Windows 11 installation is fully up-to-date and configured to your liking. This can be particularly useful if you need to install Windows 11 on multiple devices with the same hardware configuration.
Creating a custom ISO file also allows you to include specific drivers for hardware components that may not be included in the original installation media. This can save you time and effort during the installation process, as you won’t need to search for and install drivers separately. Additionally, a custom ISO file can be used to create a bootable USB drive, which can be useful for troubleshooting or installing Windows 11 on devices without a CD/DVD drive.
What are the system requirements for creating a custom ISO file?
To create a custom ISO file, you’ll need a device running Windows 11 with the 64-bit version of the operating system. You’ll also need at least 4 GB of free disk space and a 64-bit processor with a minimum clock speed of 1 GHz. Additionally, your device must have at least 2 GB of RAM (4 GB or more is recommended).
It’s also important to note that you’ll need a valid Windows 11 license key to activate your installation after creating a custom ISO file. You can use a retail license key or a volume license key, depending on your specific needs. Make sure to keep your license key safe, as you’ll need it to activate your installation after the installation process is complete.
What tools do I need to create a custom ISO file?
To create a custom ISO file, you’ll need a few tools, including the Windows 11 Assessment and Deployment Kit (ADK) and the Windows Preinstallation Environment (WinPE). You can download the ADK from the official Microsoft website, and WinPE is included in the ADK. You’ll also need a copy of the original Windows 11 installation media (ISO file) to use as a starting point for your custom ISO file.
In addition to these tools, you may also need to download specific drivers for your hardware components, depending on your needs. You can usually find these drivers on the manufacturer’s website or through Windows Update. Make sure to download the correct drivers for your specific hardware configuration to avoid any compatibility issues during the installation process.
How do I create a custom ISO file using the Windows ADK?
To create a custom ISO file using the Windows ADK, you’ll need to follow a series of steps. First, download and install the Windows ADK on your device, then launch the Deployment Tools Command Prompt as an administrator. Next, use the copype.cmd command to create a folder structure for your custom ISO file, and then use the oscdimg.exe command to create the ISO file itself.
During this process, you’ll need to specify the location of the original Windows 11 installation media (ISO file) and the location of your custom files (drivers, updates, etc.). Make sure to provide the correct paths and file names to avoid any errors during the creation process. Once you’ve completed these steps, you can use the resulting ISO file to create a bootable USB drive or DVD for installing Windows 11.
Can I add custom settings to my ISO file, such as a default wallpaper or network settings?
Yes, you can add custom settings to your ISO file using the Windows ADK. To do this, you’ll need to modify the unattended.xml file, which is used to configure the Windows installation process. You can add settings such as a default wallpaper, network settings, and user account settings to this file.
To add custom settings, you’ll need to use a text editor or the Windows SIM tool (part of the Windows ADK) to modify the unattended.xml file. This can be a complex process, so make sure to carefully review the documentation and examples provided with the Windows ADK to ensure that you’re using the correct syntax and options. Once you’ve modified the unattended.xml file, you can include it in your custom ISO file and use it to install Windows 11 with your custom settings.
How do I verify that my custom ISO file is correct and functional?
To verify that your custom ISO file is correct and functional, you should test it on a virtual machine or a spare device before using it for a production installation. This will help you identify any errors or issues with your custom ISO file, such as missing drivers or incorrect settings.
During the testing process, make sure to carefully review the installation process and verify that all of your custom settings are applied correctly. You should also test the functionality of your hardware components to ensure that they’re working correctly with your custom drivers. If you encounter any issues during the testing process, you can modify your custom ISO file and retest it until you’re satisfied with the results.
Can I use my custom ISO file to upgrade an existing Windows installation?
No, a custom ISO file is designed for a clean installation of Windows 11, and it’s not intended for upgrading an existing Windows installation. If you want to upgrade an existing Windows installation, you should use the built-in upgrade process or the Microsoft Deployment Toolkit (MDT) to create a customized upgrade package.
However, you can use your custom ISO file to perform a “refresh” installation of Windows 11, which replaces the existing operating system files with the new ones while preserving your user data and settings. To do this, you’ll need to boot from the custom ISO file and select the “Upgrade” option during the installation process. Keep in mind that this process may still require you to reinstall some applications and drivers, depending on the specifics of your installation.
Installing Windows 10 is easy; as a Windows administrator or expert user, all you have to do is download an ISO from Microsoft, burn it to an external device and use it to boot the PC or laptop.
In 15 to 30 minutes, you’ll have a clean, fresh Windows 10 installation, but it still will require some work before it’s ready for production use. You’ll need to install software and the desktop and personalize the Start menu to meet your requirements. Then, you’ll need to repeat this process for each of your PCs and repeat that procedure whenever a reinstall is necessary. However, there is a different approach that can save time when setting up multiple PCs or if you have to reinstall often.
Create a custom ISO
First, you should install Windows 10, customize it to your needs, install all the software you need, capture that installation and use it to create an ISO. Using this customized ISO for your installation media, you need half an hour to clean install Windows 10 with all your software and personalization. When you want to change something in your ISO, add or remove software, change personalization, or update or upgrade Windows 10, you simply update the image and create a new ISO. It’s fast and easy to do, and it can work for any Windows administrators.
To create a custom ISO, you need install media for your preferred Windows 10 edition and software, a technician machine — a Microsoft term that means a PC on which you can build OS images — and about 20 minutes longer than it would take to clean install Windows 10 and all your software one time.
The process of creating a custom ISO breaks down into five distinct parts:
- Install Windows and prepare assets while installing
- Update and customize Windows, install software
- Generalize Windows image with Windows System Preparation Tool (Sysprep)
- Capture Windows image, create the ISO
- Update/Change the ISO
Apart from whatever software you pre-installed in your Windows image, you don’t need any third-party tools, apps or other software; everything is done using native Windows 10 and Microsoft tools.
You should follow these steps to create a custom ISO for a Windows 10 desktop.
1. Install Windows and prepare assets
Install Windows normally until it stops at the Region Selection screen after the last reboot. When the desktop requests a product key, select the «I don’t have a product key» option. Windows does not need to be activated for this process.
This example uses a Hyper-V Generation 1 virtual machine (VM) as the technician machine, with a 64 GB virtual hard disk. Before starting the VM, you should change its settings to use Standard Checkpoints instead of default Production Checkpoints.
Installation takes 15 minutes or so to complete. While it’s running, you have time to prepare some assets on your host machine. First, download and install the Windows 10 Assessment and Deployment Kit (ADK). Next, create an unattended answer file using the Windows System Image Manager (SIM), which is part of the Windows ADK. Don’t panic even if you are a Windows SIM newbie. It’s easy to use.
If you are feeling unsure about this, or if Windows SIM looks too intimidating, input the following answer file into a blank file using Notepad (Figure 1).
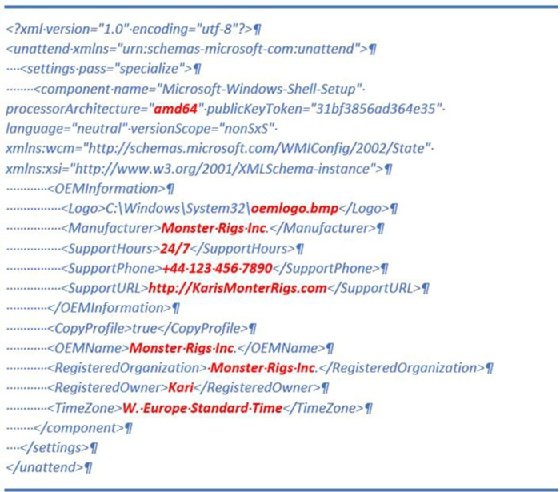
The values shown in bold red above are explained below.
ProcessorArchitecture = adm64 for 64 bit Windows, x86 for 32 bit
Logo = OEM logo (120*120 pixel bitmap (.bmp)) file
Manufacturer = Whatever you like
SupportHours = text string (9 AM to 5 PM, 10:00 – 18:00, 24/7 etc.)
SupportPhone = any phone number
SupportURL = any URL
OEMName = Whatever you like
RegisteredOwner = Whatever you like
TimeZone = As per Microsoft time zone names
All the preceding answer file components are optional, except ProcessorArchitecture — this component is mandatory. If you do not need or want to set a time zone, for example, you should remove this line:
<TimeZone>W. Europe Standard Time</TimeZone>
When you’re done customizing the answer file, save it as unattend.xml. You should create a new folder on Microsoft OneDrive and name it «Deployment Assets.» Save your answer file in this folder.
Next, prepare an OEM logo image if one is needed. Any bitmap image (.bmp) will do, but its size must be exactly 120 x 120 pixels. Save the image as oemlogo.bmp in the Deployment Assets folder.
Modify background images, colors, sounds and screensavers on your host machine, then save your settings as a theme file. Save all the themes you’d like to include in the custom ISO into your Deployment Assets folder as well. This folder is where you’ll find the items you need to customize your ISO again and again.
2. Update and customize Windows, install software
When Windows installation is done, the final setup out of box experience (OOBE) begins. The process stops to let you to select the region but instead of doing that, press Ctrl + Shift +F3.
Windows interrupts its normal setup and restarts in audit mode, a special customization mode for Windows. Because no user accounts exist on the desktop yet, it signs you into audit mode using the built-in administrator account. Click on «Cancel» to close it, and then change the display resolution if the default 1024 x 768 is too small for you to work in.
You can now install your software and update Windows. Do not run any programs yet. If, for example, the installer shows «Run this application now» selected in a final prompt, unselect it and close that installer. Do not install any hardware drivers — even those that Windows Update installs automatically will be removed later. If any installer or update requires a restart, do it. Windows returns to audit mode after restart. If you want to download software, you must use Microsoft Edge.
Import the Deployment Assets you prepared while Windows was installing on your technician machine. If you saved assets on OneDrive, sign into your OneDrive account. Download the oemlogo.bmp file and save it to the C:\Windows\System32 folder. Do the same for the answer file unattend.xml and save it to the C:\Windows\System32\Sysprep folder. It is important for you use these file names exactly as shown, and to save them to the folders specified.
Customizing the installed image
You do not need to save the Windows themes that you prepared. Select a desktop theme on OneDrive and instead of saving it, select Open to apply it to the technician machine. Because Windows is not activated in audit mode, you cannot use personalization options (e.g., themes, colors etc.). Applying an imported theme is your only means to customize theme and desktop appearance.
Open File Explorer and customize it as you like. You can adjust icon size, hide or show the Ribbon, show item selection boxes, show Details or Preview pane, show Libraries in Navigation pane and so on.
The following PowerShell command exports your current Start layout to the file named C:\Windows\System32\MyStart.xml:
Export-StartLayout C:\Windows\System32\MyStart.xml
When you’ve exported the file, open the Group Policy Editor with the command Win + R, type gpedit.msc. The Group Policy Editor is not available in Home and Single Language Windows 10 editions. Browse to Local Computer Policy > Administrative Templates > Start Menu and Taskbar in the left-hand pane, then double click Start Layout on the right-hand pane.
Enable policy by entering C:\Windows\System32\MyStart.xml as the Start Layout File, then click on OK to save that policy.
This policy forces each user account to use your customized Start layout.
Two batch files are still missing from this customization. They run once each time a new user signs in for the first time. The first file resets File Explorer’s Recent Files and Quick Access. To build this file, type or copy and paste the following two lines into a new Notepad text file:
echo Y | del
%appdata%\microsoft\windows\recent\automaticdestinations\*
del %0
This batch file resets Quick Access and then deletes itself because it only exists and runs when a new user signs in for the first time. In Notepad, select File > Save As, type %appdata% in the address bar in the Save As prompt, then press Enter to open AppData\Roaming folder.
Browse to the folder named Microsoft\Windows\Start Menu\Programs\Startup. Save the file as RunOnce.bat and select «Save As type: All files» in Notepad’s Save As prompt.
The second batch file is a Visual Basic Script (.vbs) file. Its purpose is to greet new users the first time they sign in, after which it deletes itself. This file is optional, but it is something you should probably include in your customized images. Type or copy and paste the following text into a new Notepad text file:
Dim WshShell, Welcome
Set WshShell = WScript.CreateObject("WScript.Shell")

Welcome = WshShell.Popup("Welcome to customised Windows 10 with pre-installed software.", 60, "Windows 10", vbOKOnly)

Select Case Welcome
case 1
MsgBox "Following software has been installed: Office 365 (2016), Adobe reader, VLC Player, Chrome, Firefox and Opera. You will also find some pre-installed themes in Settings > Personalize > Themes.", vbOKOnly, "Windows 10"
End Select

MsgBox "Have Fun with Windows 10!", vbOKOnly, "Windows 10"

DeleteScript()
Function DeleteScript()
Set objFSO = CreateObject("Scripting.FileSystemObject")
strScript = Wscript.ScriptFullName
objFSO.DeleteFile(strScript)
End Function
Save this file as Welcome.vbs to the same folder where you saved RunOnce.bat. Again, select the «Save As type: All files» option in Notepad’s Save As prompt.
If you like, you can also prepare both the unattend.xml and Welcome.vbs files on the host while Windows is installing.
3. Generalize Windows image with Sysprep
One small — but important — step you must take before running Sysprep is creating a partition on the Hyper-V VM to store a captured Windows image. If you are using a physical PC as the technician machine, this is unnecessary. Instead, you can simply use an external HDD or flash drive to store that image.
Create free space in Disk Management
Open Disk Management and shrink the original C: partition to create free space for a new partition in which to capture a Windows image. It needs to be big enough for the install.wim file you’ll capture later. For example, a custom Windows 10 Pro x64 ISO could include the following software pre-installed: Office 365 Business, Macrium Reflect, Opera, Chrome, Firefox, VLC player, Adobe Reader, Malwarebytes, TeamViewer, 7-Zip, Notepad++, and other software that varies from build to build.
As described, this results in an install.wim file that’s between 5 to 6 GB in size. To compensate, you usually subtract 10 GB (10,240 MB) from C:. That’s plenty for most users. Then, exit Disk Management.
To help identify key partitions later, rename the system drive C: to Windows and the new partition to Image or any other distinctive name. Create a new folder on the new capture drive (E:) named Scratch. You will need it when capturing the image as a temporary working folder using the DISM command.
Prep and run Sysprep
If you are running a Hyper-V VM, create a checkpoint now. If you are using another virtualization program, create a snapshot. If using a physical PC, you should create a system image now. Checkpoints and snapshots take just a minute, while imaging a physical PC takes a bit longer.
Check that the built-in admin’s or current user’s Downloads folder is empty and that no software installers or assets are left there. Run Disk Cleanup to remove all temp files, Recycle Bin content and other bloat.
To run Sysprep, open the command prompt. The desktop will automatically elevate it because you are signed in using the built-in administrator account. Run the following command:
%windir%\system32\sysprep\sysprep.exe /generalize /oobe
This command runs Sysprep with Generalize and OOBE switches and then shuts down. The Generalize switch removes all hardware-related information such as drivers and registry entries, resets Event Viewer, removes all shadow copies — restore points — and disables the built-in administrator account.
The OOBE switch forces Windows to run its setup phase the next time Windows boots from this image as if it were a normal Windows setup. Because Windows was generalized, it generates a new unique SID for each such installation.
Sysprep reads the answer file unattend.xml from C:\Windows\System32\Sysprep folder. In this case its most important line reads <CopyProfile>true</CopyProfile>. When true, CopyProfile copies all our customizations to the default user profile in the hidden Default folder in the Users folder. That profile is used as the base profile whenever a new user account gets created.
4. Capture Windows image, create the ISO
Once Sysprep finishes working its magic, the Windows 10 installer shuts down. Boot the technician machine using the Windows 10 install media — the same you used in the beginning to install Windows. Do not let it boot from hard disk, an HDD or SSD if using a physical machine or VHD if you’re using Hyper-V.
At the first prompt when Windows setup asks for region and language settings, instead of selecting anything and starting installation, press Shift + F10 to open the Recovery Console Command Prompt. Type diskpart and press Enter to start the disk partitioning utility, then type list vol to list all available volumes, or partitions. For this example, the Hyper-V VM list vol shows this information:
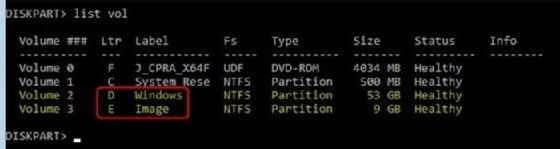
You can see why it’s important to name the disk partitions so you can identify them easily.
Note that the Recovery Console does not use the same drive ID policy as Windows 10. You need to be sure which drive has Windows installed and which drive will store the captured image for customization and re-use.
Type exit and press Enter to exit the disk partitioning utility.
Enter the following command:
dism /capture-image /imagefile:E:\install.wim
/capturedir:D:\ /ScratchDir:E:\Scratch
/name:»W10PROx64» /compress:maximum
/checkintegrity /verify /bootable
Check and note the following important details:
- /imagefile:E:\ = drive where install.wim will be saved
- /capturedir:D:\ = drive where Windows is installed
- /ScratchDir:E:\ = drive where temporary working folder Scratch is located
- /name: = any name you like in quotes, not important but obligatory, here you can see the version of Windows: 64-bit Win10 Pro
Press Enter to start.
This will take some time to complete. On slow physical machines, it can take up to 20 to 25 minutes. During the first half of that period, you won’t see a progress indicator.
When this command has finished, eject the install media — in Hyper-V select Media menu > DVD Drive > Eject. Next, close the command prompt and restart the technician machine. This time, boot normally from HDD or VHD and let it work through normal OOBE setup.
While the technician machine is preparing and setting up Windows, right-click the original Windows 10 ISO image you used to mount it on the host computer as a virtual DVD. Then, open it in File Explorer and copy its entire contents to a new folder on the host HDD.
When the technician machine is ready and your initial user is logged into the desktop, copy your newly created install.wim file from the image drive (E:) to the Sources subfolder in the folder where you copied the original Windows installation files. In this example, that’s D:\ISO_Files\Sources folder. It will replace the original Windows 10 install.wim file.
Hyper-V users should also create a checkpoint now on their technician VM to capture a pristine system image.
Windows imaging tools
Run Deployment and Imaging Tools Environment elevated as an admin. It is installed as part of the Windows ADK and you can find it in Start > W > Windows Kits. Type CD\ and press Enter to set the working folder to the root of the C: drive. Enter this command:
oscdimg.exe -m -o -u2 -udfver102 -bootdata:2#p0,e,
bd:\iso_files\boot\etfsboot.com#pEF,e,
bd:\iso_files\efi\microsoft\boot\efisys.bin
d:\iso_files d:\Win10PROx64.iso
The preceding command is one long continuous command line though it breaks across multiple lines in this article.
Check and the note following details:
- d:\iso_files = path to folder where you copied original install files
- d:\Win10PROx64.iso = path and your preferred name for new ISO
With all this work completed, making the ISO takes just a minute or two. When that’s done, you can burn the ISO to a DVD or flash drive; it will work on both BIOS/MBR and UEFI/GPT systems to install your customized Windows with its pre-installed software.
5. Update or change the ISO
The beauty of using Hyper-V VM as technician machine lies in how easy it makes the job of maintaining and updating a customized install image. For example, Windows Insider: Fast Ring receives new pre-release builds frequently and participants may want to upgrade their ISOs at the same pace.
When you feel like changing the ISO, you can simply apply the Hyper-V technician VM’s standard checkpoint you should have created just before running Sysprep Windows. You can add and remove software, update software, run Windows updates, apply a new theme or do whatever else you might need to do.
When that’s done, you should run Disk Cleanup, create a new checkpoint so you can restore to this point, repeat Sysprep, capture a new install.wim and make a new ISO. This process will be much faster now. The whole process takes just minutes because both Windows and basic software are already installed.
Upgrading the custom ISO
As a Windows Insider, you might also be interested in upgrading the ISO. When a new build arrives, you should restore the checkpoint you created when the technician machine was fully set up after capturing the install.wim file. You can’t use the checkpoint made in audit mode before Sysprep, because upgrading Windows in audit mode is not possible.
Once you’ve booted to normal mode, you can upgrade to the latest Insider build or the next feature update build using Windows Update or a standard ISO image. When that upgrade completes, enter the following command in an elevated command prompt to restart Windows in audit mode:
%windir%\system32\sysprep\sysprep.exe /audit /reboot
Windows restarts, then signs into audit mode using the built-in administrator account. Your initial user account already exists, so you should open Settings app > Accounts > Other users and delete all existing user accounts and their profile folders.
You should also delete the custom install.wim file from last time if it’s still located on the image drive — E: in this example — and check to ensure that the Scratch folder still exists. If not, you must recreate it manually.
Editor’s note: This article was revised in 2024 by TechTarget editors to improve the reader experience.
Are you tired of spending hours setting up your Windows 10 system every time you reinstall it? We’ve all been there, frustrated with the endless cycle of downloading and installing software.
Don’t worry – we’re here to guide you through the process of creating a custom Windows 10 ISO with pre-installed software, saving you time and effort.
Think the relief of having all your important programs already included in your Windows 10 installation, ready to go as soon as you boot up your system. No more searching for each application individually or dealing with compatibility issues. Our skill in customizing Windows ISOs will boost you to streamline your setup process and improve your user experience.
Join us on this voyage to simplify your Windows 10 installation and optimize your workflow. We understand the struggles you face when setting up a new system, and we’re here to provide you with a solution that meets your needs. Let’s plunge into this customization voyage hand-in-hand and unpack the full potential of your Windows 10 operating system.
Key Takeaways
- Research and preparation are critical when creating a custom Windows 10 ISO with pre-installed software.
- Identify important software, ensure compatibility, and verify licenses before proceeding with customization.
- Choose core software carefully, use customization tools, and seek expert advice for a successful ISO customization.
- Follow a structured process of selecting software, using customization tools, consolving settings, and testing the custom ISO thoroughly.
- Thoroughly test the custom Windows 10 ISO for smooth installation, proper functionality, compatibility, and performance.
- Documentation of issues and solutions during testing is important for refining and improving the custom Windows 10 ISO further.
Research and Preparation
When considering creating a custom Windows 10 ISO with pre-installed software, research and preparation are key to a successful outcome. To begin, we must identify the important programs that will streamline our workflow and improve productivity.
Here are the key steps to take during the research and preparation phase:
- Identify the software: Determine the tools and applications that are critical for your daily tasks and work requirements.
- Compatibility check: Ensure that the software you choose is compatible with Windows 10 to avoid any issues during installation.
- License verification: Confirm that you have the necessary licenses for the software you plan to include in your custom ISO.
By conducting thorough research and meticulous preparation, we can adjust our Windows 10 experience to suit our specific needs and optimize our workflow efficiently. External resources can also be useful in guiding us through this process. It’s beneficial to refer to trusted technology websites for ideas and recommendations on important software and customization tips.
Choosing Software and Tools
When Choosing Software and Tools for your custom Windows 10 ISO, it’s super important to select programs that align with your needs and preferences.
Here are some tips to help you make smart decisionss:
- Identify Core Software: Determine the important software required for your workflow, such as productivity tools, utility programs, or creative applications.
- Check Compatibility: Ensure that the software you choose is compatible with Windows 10 to avoid any issues post-installation.
- Verify Licenses: Ensure that you have the proper licenses for the software you plan to include in your custom ISO to avoid any legal implications.
- Consider Customization Tools: Investigate customization tools that can help streamline the process of creating a personalized Windows 10 ISO with pre-installed software.
- Seek Expert Advice: Visit trusted technology websites for ideas on the best software options and tools to improve your Windows 10 experience.
After all, the key to a successful custom Windows 10 ISO lies in selecting the right mix of software and tools adjusted to your specific requirements.
For more information on software selection and customization tools, check out this helpful guide on Windows Central.
Customizing Windows 10 ISO
When customizing a Windows 10 ISO with pre-installed software, it’s super important to have a clear plan in place.
Here are some key steps we can follow to create a adjusted Windows 10 ISO:
- Choose Core Software: Select important software that meets your specific needs, ensuring compatibility with Windows 10.
- Verify Licenses: Make sure all software included in the custom ISO has valid licenses to avoid any legal issues.
- Investigate Customization Tools: Use tools like NTLite, WinReducer, or PowerShell scripts to customize and streamline the installation process.
- Seek Expert Advice: Consult reputable technology websites like Windows Central for guidance and best practices on customizing Windows 10 ISO.
For detailed guidance on software selection, customization tools, and expert tips on creating a custom Windows 10 ISO, check out this informative guide on Windows Central.
Creating the Custom ISO
When creating a custom Windows 10 ISO with pre-installed software, it’s super important to follow a exact process.
Here’s how we can go about it:
- Select the desired software: Choose the core software that you want pre-installed on the Windows 10 ISO. Ensure that you have the necessary licenses to include this software.
- Use customization tools: Investigate tools like NTLite or WinReducer to help you customize the Windows 10 ISO. These tools offer a range of options to adjust the ISO to your specific needs.
- Consolve settings: Adjust settings such as user preferences, system configurations, and personalization options to create a customized experience for users.
- Integrate drivers: Make sure to integrate the required drivers into the ISO to ensure compatibility with a wide range of hardware.
For more in-depth guidance on creating a custom Windows 10 ISO, you can refer to the detailed resources available on Windows Central.
Their expert advice and tutorials can provide useful ideas into the customization process.
Testing the Custom Windows 10 ISO
When it comes to testing the custom Windows 10 ISO, it is critical to ensure that everything works seamlessly.
Here are some steps we recommend taking:
- Installation: Install the custom Windows 10 ISO on a test machine to verify if the installation process is smooth and error-free.
- Functionality: Test each pre-installed software to check if they function as intended and are properly integrated into the system.
- Compatibility: Verify the compatibility of the custom Windows 10 ISO with various hardware configurations to ensure a broad range of devices can support it.
- Performance: Assess the total performance of the system after installing the custom ISO to identify any potential issues or improvements needed.
Throughout the testing phase, it’s super important to keep detailed records of any issues encountered and the solutions put in place.
This documentation will be useful for refining the custom Windows 10 ISO further.
For more in-depth guidance on testing custom Windows 10 ISOs, you can refer to resources from Windows Central for expert ideas on quality assurance processes.
After all, thorough testing is critical to giving a reliable and optimized custom Windows 10 ISO for your needs.
- Author
- Recent Posts
Stewart Kaplan has years of experience as a Senior Data Scientist. He enjoys coding and teaching and has created this website to make Machine Learning accessible to everyone.
Creating a custom Windows 11 ISO can be particularly advantageous for users who want to tailor their system installation for specific needs. This guide aims to provide you with detailed instructions and insights into the process, enabling you to create a customized installation medium that suits your preferences.
Why Create a Custom Windows 11 ISO?
Customizing a Windows 11 ISO can offer several benefits:
-
Pre-installed Software: Include software applications you use frequently, saving you time during installation.
-
Windows Updates: Ensure that your Windows installation has the latest updates, making it more secure and efficient right from the start.
-
Customization Options: Pre-configure settings, wallpapers, themes, and other personalizations that you prefer.
-
Removals: Exclude unnecessary software and components, thereby streamlining your installation for performance.
-
Efficiency: Creates a single installation file that you can use across multiple machines, saving time in setting up systems.
Prerequisites
Before diving into the creation of a custom Windows 11 ISO, make sure to gather the following tools and materials:
-
Windows 11 ISO File: Download the official Windows 11 ISO from Microsoft’s website.
-
Rufus or UNetbootin: These applications can help you create bootable USB drives.
-
Ntlite: A tool designed for the modification of Windows installation files.
-
PowerISO or UltraISO: Useful for managing ISO files.
-
A computer running Windows: This is where you will perform the customization processes.
Step-by-Step Guide to Create a Custom Windows 11 ISO
Step 1: Download the Official Windows 11 ISO
- Navigate to the official Microsoft download page.
- Select Download Windows 11.
- Choose the option to download the ISO image file directly.
Step 2: Install Required Software
-
NTLite: This tool will allow you to customize the ISO image by adding, removing, and modifying components.
- Download it from the official website and install it.
-
PowerISO/UltraISO: These are optional but beneficial if you want to edit ISO files directly.
- Download and install your preferred ISO editing software.
-
Rufus: If you plan on creating a bootable USB drive from your custom ISO.
- Download and install Rufus.
Step 3: Extract the Windows 11 ISO
Using PowerISO or any similar tool, extract the contents of the Windows 11 ISO to a folder on your computer. To do this:
- Open PowerISO.
- Click on «Open» and select your ISO file.
- Click on «Extract» and select a new folder where the contents of the ISO will be extracted.
Step 4: Customize Your Windows Installation with NTLite
- Launch NTLite.
- Select the option to add an Image and navigate to the folder where the Windows 11 files are extracted.
- Choose the appropriate image version (e.g., Home, Pro) and click «Load.»
Now, you can start customizing:
a. Integrating Drivers
- If you have specific hardware that requires custom drivers, navigate to the Drivers section in NTLite.
- Add the necessary drivers by clicking on «Add» and selecting the drivers from your computer.
b. Adding Updates and Hotfixes
- You can also integrate updates to avoid downloading them later.
- Navigate to Updates in NTLite, select «Add,» and browse for any downloaded updates in .msu or .cab format.
c. Pre-installing Software
- Use the Post-Setup Commands feature to execute installation files (like .exe) silently.
- Add the path to the installer in this section.
d. Customizing User Settings
- You can modify system settings in the Settings section.
- Customize user account settings, privacy settings, and more as per your preferences.
Step 5: Remove Unnecessary Windows Features
Reduce the installation footprint by removing features you don’t need:
- Navigate to the Components section in NTLite.
- Review the list of features and applications.
- Select items you wish to remove (e.g., optional features, language packs).
- Apply the changes.
Step 6: Applying Changes
Once you finish all customizations:
- Click on “Create ISO” in NTLite.
- Choose the destination folder for the new ISO file, and name it (for example, “Custom_Windows11.iso”).
- Click “Start” and wait for the process to complete.
Step 7: Create a Bootable USB Drive
Now that you have the custom ISO, you can set it up on a USB drive:
- Open Rufus.
- Insert a USB drive (ensure you back up any existing data, as this process will erase it).
- In Rufus, select your USB device from the «Device» menu.
- Under «Boot selection», select «Disk or ISO image (please select)» and then choose the custom ISO you created.
- Select the partition scheme (GPT for UEFI systems).
- Click «Start» and wait for the burning process to finish.
Step 8: Testing the Custom Windows 11 ISO
To ensure that everything is working as intended:
- Boot from the USB drive by selecting it in your BIOS/UEFI menu.
- Proceed through the installation to verify that all customizations have been applied correctly.
- Make sure that all drivers, updates, and pre-installed software are functioning.
Troubleshooting Common Issues
-
Boot Issues: Ensure that your BIOS boot order is correct and that the USB is formatted as FAT32.
-
Driver Issues: If you encounter hardware not recognized, revisit the drivers’ section in NTLite and ensure all necessary drivers were included.
-
Performance Problems: Too many features removed can lead to system instability. A middle-ground approach is recommended.
-
Faulty ISO: Sometimes, an error occurs during the creation of the ISO. If the installation fails, review your settings in NTLite for any issues.
Conclusion
Creating a custom Windows 11 ISO can vastly improve your installation experience by aligning it more closely with your specific needs. While it may take some time to go through the various customization options, the benefits gained from having a personalized installation will be well worth the effort.
Ensure that you keep your custom ISO files stored safely, as you can reuse and modify them whenever necessary. With patience and practice, you can master the art of Windows ISO customization, turning it into a valuable skill for your computing needs. Now, equipped with this guide, you can confidently create a personalized Windows 11 installation tailored just for you.
Happy customizing!