
-
Home
-
Partition Magic
- How to View Windows 10 Crash Logs and Error Logs
By Irene |
Last Updated
When you computer crashes, a crash log will be generated, which can help you analyze the causes of the crash. But, do you know how to view Windows 10 crash logs and error logs? If you don’t know, don’t worry. This article from MiniTool will show you how to view Windows 10 crash log with two methods.
Method 1. View Windows 10 Crash Logs with Event Viewer
To view Windows 10 crash logs, you can make use of the built-in tool Event Viewer, which keeps a log of application and system messages, errors, warnings, etc. You can follow the steps below to check Windows crash logs Windows 10 with Event Viewer.
Step 1. Type Event Viewer in the Windows 10 Cortana search box. Then right click the best match Event Viewer and choose Run as Administrator.
Step 2. Here is the main interface of Event Viewer. On the left side of the window, you can view all the Logs according to the category. To view Windows 10 crash logs such as the logs of blue screen error, just click on Windows Logs.
Step 3. Then choose System under Windows Logs.
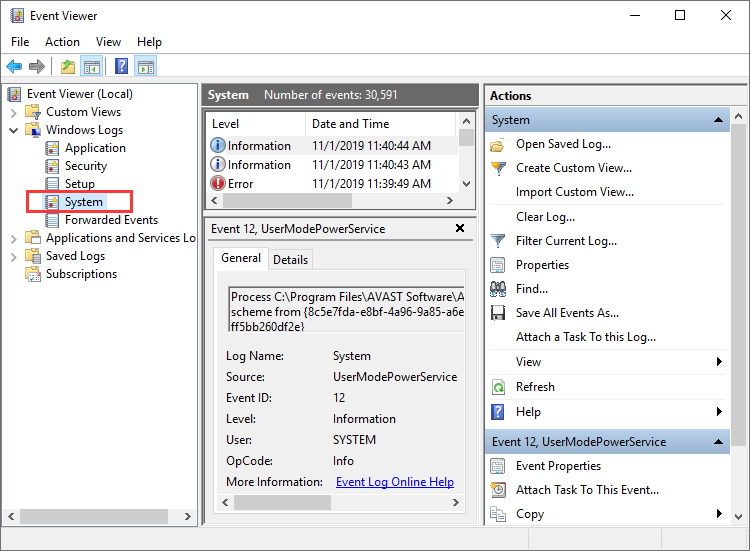
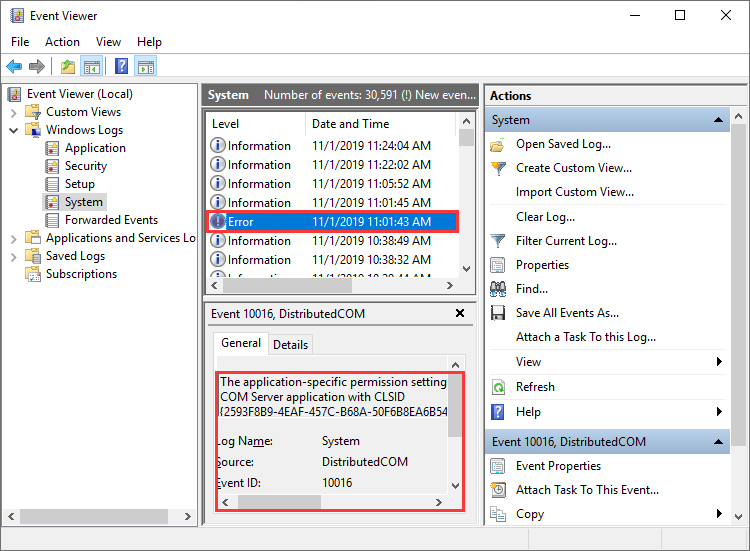
Step 4. Find and click Error on the event list. Then you can view the detailed crash log information shown up in the bottom of the window.
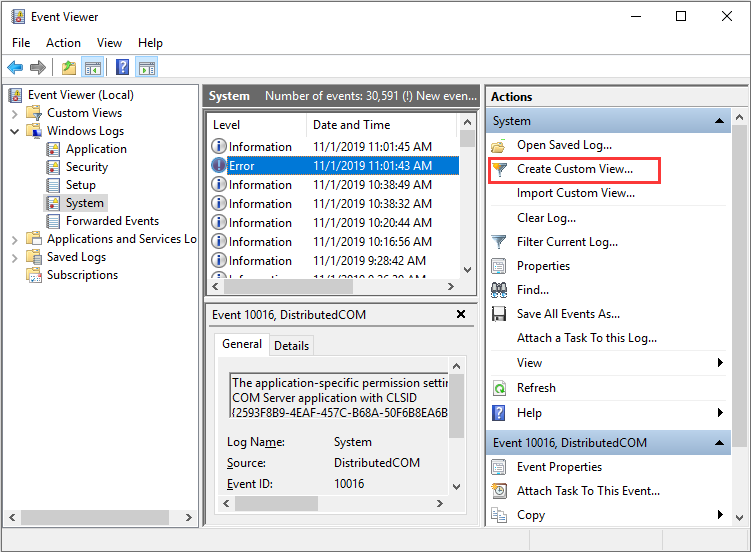
You can also create a custom view so you can view the crash logs more quickly. Here are steps on how to create a custom view.
Step 1. Click on Create a Custom View on the right window. As you click on Create Custom View, a new window will pop up.
Step 2. Choose a time period you want to view. Then check the boxes next Critical, Warning and Error in the Event levels section.
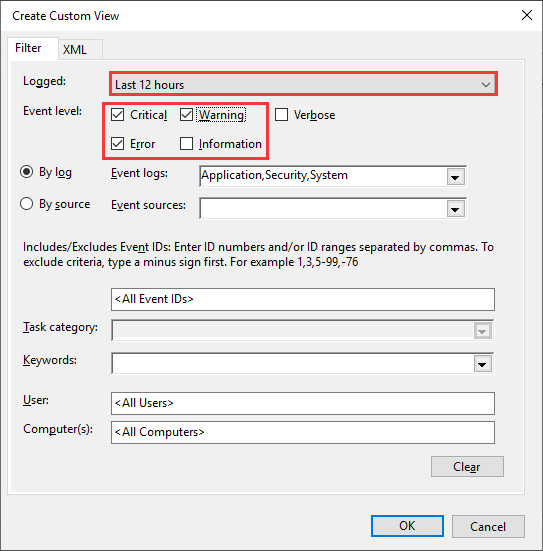
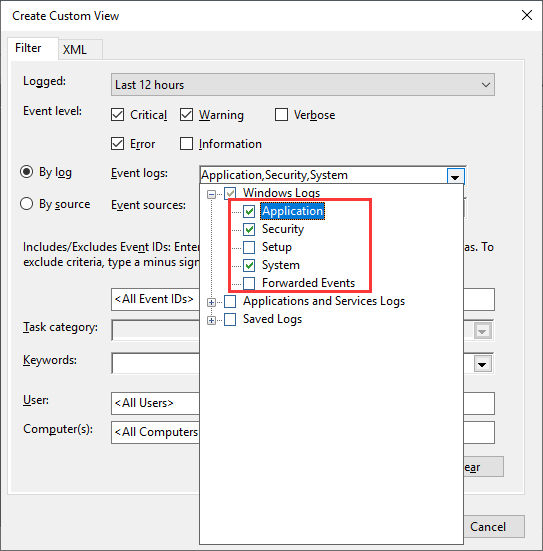
Step 3. Select the By log option. Then click the drop-down menu next to Event logs, and then select Application, Security and System.
Step 4. Then click OK to save the settings.
Step 5. Name this custom view and then click OK to start to view the Windows 10 crash log.
Step 6. Then you can view all the Windows 10 crash logs during the tome period you select.

Windows Reliability Monitor also enables you to view recent system and application crashes. Here’s how to check Windows 10 crash logs with Reliability Monitor.
Method 2. View Windows 10 Crash Log with Reliability Monitor
Step 1. Type reliability in the Windows 10 Cortana search box. Then click the best match View reliability history.
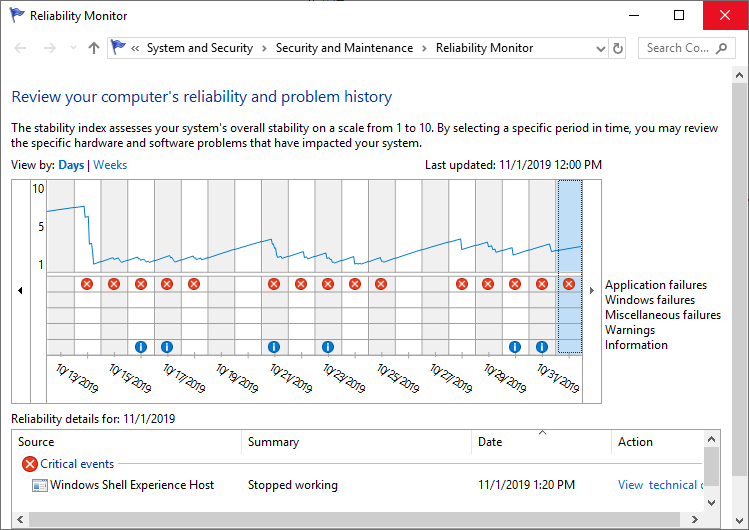
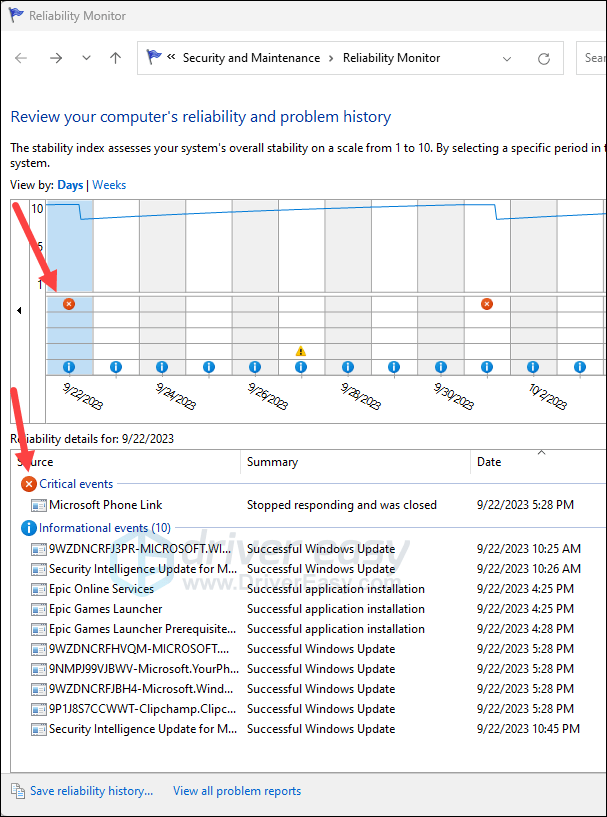
Step 2. From the main interface, you can see that the Reliability Monitor window is arranged by dates. If Windows crashes or freezes, you will see a red circle with an “X” representing the failure, as shown below.
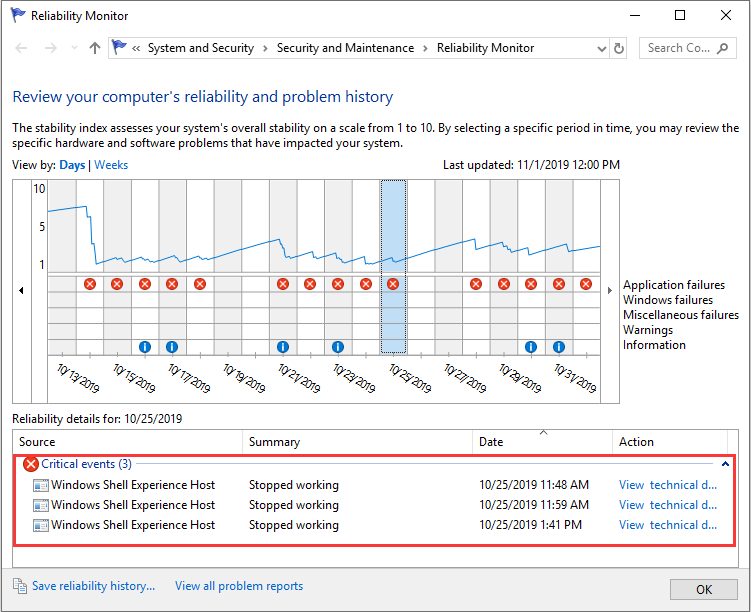
Step 3. If you want to view a certain day’s crash log, just click that day’s column and more detailed information will be displayed at the bottom. You can also double click one of the listed events to open a new window with more information.
Tips:
Discover and eliminate deceptive antivirus with MiniTool System Booster, your safeguard against digital threats.
MiniTool System Booster TrialClick to Download100%Clean & Safe
Conclusion
Event viewer and Reliability Monitor are all good for you to check Windows 10 crash logs. Choose a tool you like and you can get all the Windows crash log information.
About The Author
Position: Columnist
Irene joined MiniTool in 2018 and has since become a professional in the areas of disk management and Windows tricks. Irene’s expertise allows her to assist clients with managing their hard drives, optimizing their Windows operating system, and troubleshooting any technical issues that arise.
- Windows event logs store the information for hardware and software malfunction, including other successful operations.
- You can view the event logs with different severity across various categories in the Event Viewer (eventvwr.msc), or using the Reliability Monitor (Control Panel > System and Security > Security and Maintenance > Maintenance > View reliability history).
The Windows operating system logs and stores information about the actions performed on it, especially if any errors have occurred. This information is collected from the different Windows applications as well as the Windows components itself.
These errors are recorded in the location “C:\WINDOWS\system32\config\“. However, if you go on to this directory, you will find files that cannot be opened in any apps, and therefore, you won’t be able to view the error logs. For those purposes, the Windows OS includes two useful tools:
- The Windows Event Viewer, and
- The Reliability Monitor
These tools can be used to view and understand the different errors and warnings that occur on your computer. So if your apps keep crashing, or you keep experiencing Blue Screen of Death (BSoD) and you cannot understand why, you can resort to these tools to understand why the error has occurred and how you can mitigate it.
This guide discusses how to access the Event Viewer and the Reliability Monitor on a Windows computer, and how you can use them to understand the different error types and their causes.
Table of Contents
What are Windows Event Logs?
Event logs are files that contain structured information about the happenings of an event. These events can be errors, warnings, or simple operations. These files provide information about the different hardware and software-based operations on the system.
On a Windows computer, event logs are used to determine the cause of an error or a warning. These contain error codes and often an explanation for why something happened. For example, if the system crashes all of a sudden, Windows will generate a log explaining why it crashed.
Sometimes, the explanation is simple enough to resolve the issue. At other times, you may only be able to get a certain error code (eg. 0xC000021A) which doesn’t explain much on its own. However, you can search for this code on the internet and obtain detailed answers for the causes of the error and its possible fixes.
Event logs can contain the following information on a Windows computer:
- Log name: This is the category of the event log for which the log was generated. The different categories have been discussed below.
- Source: Name of the component or app that caused the event.
- Event ID: This is the identification number that helps administrators identify a specific logged event. This is usually the code that is used to further research the error that caused the logged event.
- Level (Type): This indicates the severity of the event log. These can be information, error, verbose, warning, or critical.
- User: Name of the user account who logged onto the computer when the event occurred.
- OpCode: When a program raises the event, it executes an activity or a certain point within an activity, and the OpCode defines a numeric value that identifies the particular activity.
- Event date/time (Logged): Indicates the date and time when the event occurred and when the log was generated.
- Task Category: This indicates what kind of recorded event log it is. To provide more details about the event, developers can include task categories in their apps if needed.
- Keywords: Event logs categorize events using keywords. These keywords help classify the type of event and provide additional context. One such common keyword is “classic”.
- Computer: Name of the computer logging the event.
Types and Categories of Windows Event Logs
If you are new to the event logs on a Windows computer, then it will be important for you to understand its types and categories. With this knowledge, you will be able to look for the right error log and understand it better.
Types/Level of event logs
Regardless of the category of an event log, there are 5 types of error logs, which are as follows:
- Information: Indicates that a service or application is running smoothly. For instance, the event will be recorded as an information event when a Windows Service is started successfully.
- Warning: These are insignificant incidents that raise the possibility of future problems. A warning event may be logged when your device is running on low disk space.
- Error: An error log, identified with a red exclamation mark, describes a serious problem that arises when a system is unable to operate as intended, such as when the operating system or an app crashes.
- Success Audit: Such type of event logs document a legitimate effort to obtain the security log through auditing. An effective login attempt, for instance, will be classified as a successful audit event.
- Failure Audit: These event logs show the security log’s audited security access failures, like not being able to access the network disc.
When reading the different event logs, we normally look for warnings or error logs, as those usually cause major issues with the system, such as the operating system crashing or resulting in BSoDs.
Categories of event logs
Other than the information about the different types of event logs, you must also understand the different categories of them. This information will let you know where to look for the event log (under which category).
- Application: Event logs regarding apps and software hosted on the computer get logged under this category. For example, an event log will be created if the Paint application or a game fails to launch.
- Security: Any events about the security of the system are stored under this category. Such events are recorded via the Windows auditing process. For example, if an unauthorized access attempt is made to the system, or a secure file deletion attempt is made, an event would be automatically registered.
- Setup: Events that occur during the Windows OS installation are recorded in the setup log. Setup events will also be registered on domain controllers relating to the Active Directory.
- System: Events about the system and its components are recorded in this category. For example, an error with the kernel will be recorded here.
- Forwarded Events: These are the event logs that have been forwarded from other devices on the network.
With this information, when an error occurs on your computer, you should be able to look under the right category and understand why it happened.
Now that you fully understand the use and benefits of event logs, let me show you how to access the event logs and make them useful.
How to view event logs on Windows
As mentioned earlier, you can access the event logs on a Windows computer using the Event Viewer, and the Reliability Monitor.
The Event Viewer can be used to access the different event categories discussed above and view all sorts of events. Whereas the Reliability Monitor provides a timeline of events that can be arranged in days and weeks. The latter focuses on system errors that may affect the reliability and performance of the system and is not as detailed as the Event Viewer.
View event logs with Event Viewer
To access the logged events in the Event Viewer, follow these steps:
-
Press the Windows key + R to launch the Run Command box.
-
Type in “eventvwr.msc” and press Enter to open the Event Viewer.
-
Expand “Windows Logs” from the left navigation pane.
-
Click on the event category that you want to access.

Open log event category -
Now, scroll through the logs in the middle pane and click on the one you need the information for.
Since there are too many logs to go through, you can apply a filter by performing these additional steps. To start, click “Filter Current Log” in the right pane.
Filter the logs -
In the Filter Current Log window, select the following elements to help you find a specific error log file:
- Logged: The duration to show the event logs for.
- Event level: The severity of the log event.
- [Optional] Event ID: If you are looking for a specific error log for which you already have the event ID.
Apply the event filters -
When done, click OK.


When the filters are applied, you can scroll through the event logs in the Event Manager, and double-click the one you want more information on.
I would also like to add that in Step 6 above, you can further narrow your search result by applying additional filters, such as a keyword, a user account name, etc.
Moreover, you can also use the “Custom View” option and filter certain types of event logs from different categories into one frame. To create a custom view, use these steps:
-
In the Event Viewer, click “Create Custom View” in the right pane.
Create a custom filter in Event Viewer -
In the “Create Custom View” window, select “By log” and then expand the drop-down menu in front of it.
-
In the drop-down menu, select the log categories that you want to view.

Select the event log categories to view -
Now select the event levels and click OK.
Create a custom view for event logs -
Now set a name for the custom view and click OK.
Assign a name to custom event view


After performing these steps, you should be able to view the shortlisted even logs directly under one category in the left pane.

In case you want to delete or edit the custom event category, simply right-click on it and select the respective option from the context menu.
View event logs with the Reliability Monitor
You can also use the Reliability Monitor to view the important error logs on your computer. Here is how to access and read the tool:
-
Press the Windows key + R to open the Run Command box.
-
Type in “control” and press Enter to launch the Control Panel.
-
Click “System and Security“.
-
Click “Security and Maintenance“.
-
Expand Maintenance.

Expand Maintenance -
Click “View Reliability History“.
Open Reliability Monitor -
Click on the day’s column for which you want to view the crash log.
Select the day to view the event logs for -
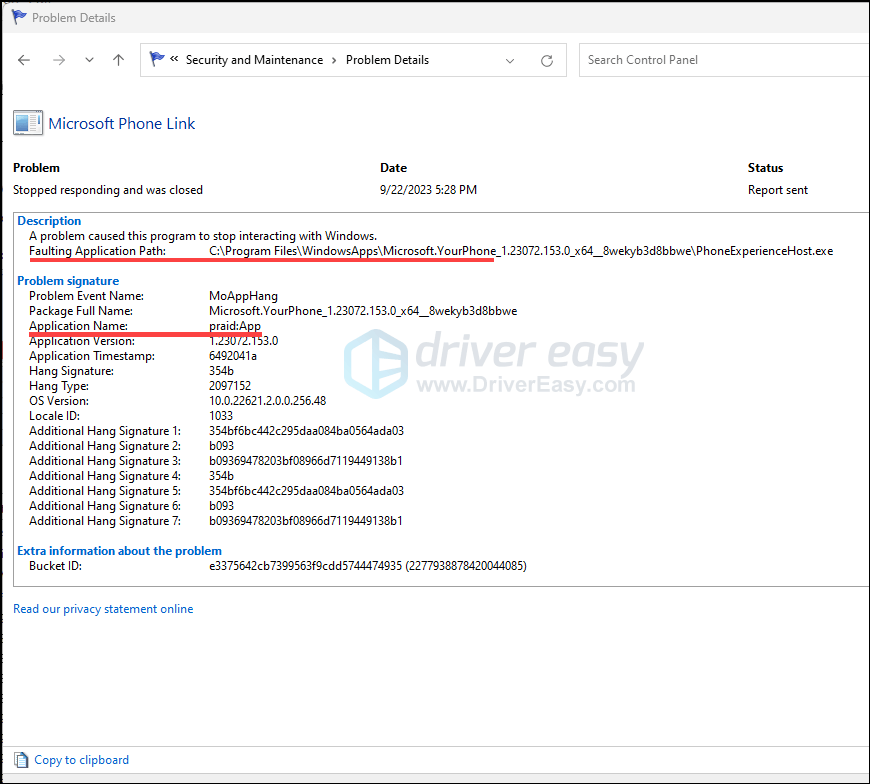
Double-click on the event in the bottom section of the Reliability Monitor to view more details.

Open the event log using the Reliability Monitor


After performing these steps, you should be able to see the complete details for the selected event log.

As you may find in the image above, the details here for the event log are somewhat different than the ones available inside the Event Viewer. However, you can use the error code to find more information about the event online.
Closing words
Understanding the crash and event logs is just as important as accessing them. There is no use in viewing the event logs if you cannot determine what they mean.
This detailed guide shows you exactly how to view and understand the system event logs and look for errors with different severity, inside different categories. You can also view them for specific days if you are not sure exactly when an error occurred.
If your computer crashes or freezes a lot, or it turns itself off all of a sudden, or your games won’t launch out of nowhere, and you have no idea what’s going on, don’t worry, there are usually crash logs and reports saved in your computer that can help you identify the culprit, or at least get closer to the root cause. Here in this post, we’ll introduce 4 kinds of crash logs on Windows and how you can use them to identify the culprit to your computer software problems.
4 Kinds of Crash Logs on Windows
The following are 4 types of crash logs that you can find on Windows. You can check them all if necessary, and cross-check the information in these 4 tools to dig out the culprit, and eventually, solve the computer performance and reliability issues by yourself.
- View Crash Logs with PowerShell
- View Crash Logs with Event Viewer
- View Crash Logs with Reliability Monitor
- View Crash Logs with Minidump Files
1. View Crash Logs with PowerShell
To view Windows crash logs with PowerShell, here’s what you can do:
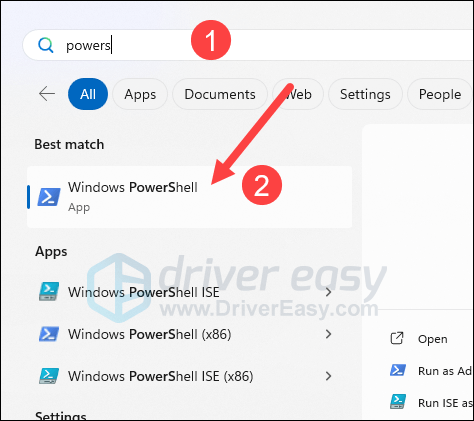
- On your keyboard, press the Windows key and type PowerShell, then select Windows PowerShell.

- Copy and paste this command
Get-EventLog -LogName System -Newest 15 -EntryType Errorto the PowerShell window and hit Enter.
- The latest 15 error entries will be listed for you to see. If you want to see more latest entries, just change the number 15 to whatever number you desire.
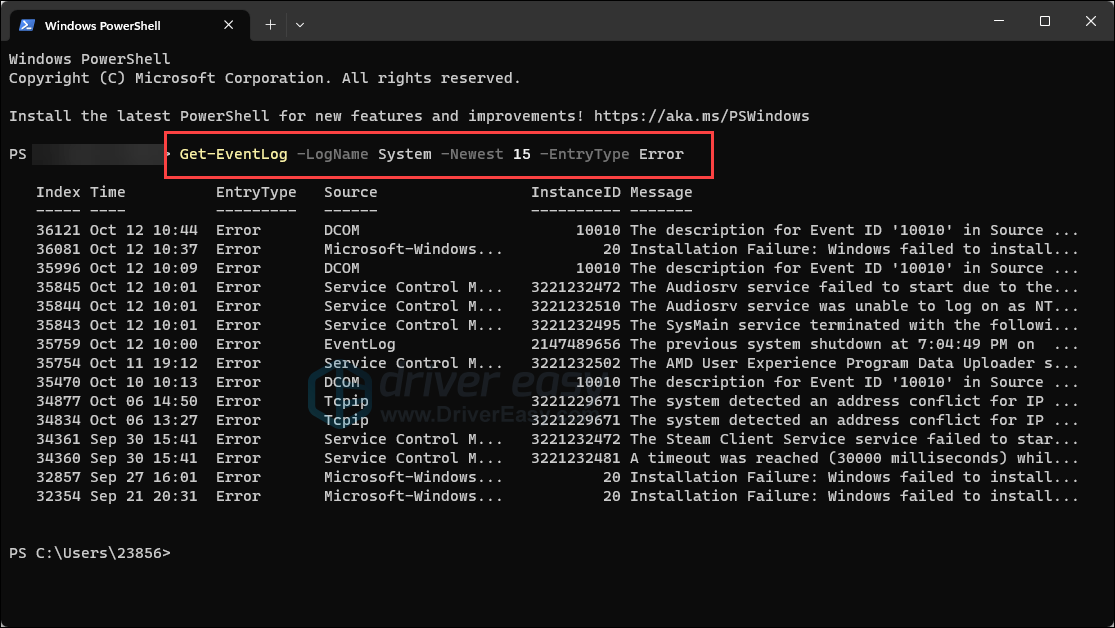
Note that this command only displays very basic information about the computer system issues, so if this is not detailed enough for you, please move on.
2. View Crash Logs with Event Viewer
Event Viewer keeps a detailed and chronological record of system, security, and application notifications, so it’s a good tool to narrow down any system problems and failures. To use Event Viewer:
2.1 Check Windows System Logs in Event Viewer
- On your keyboard, press the Windows key and the R key at the same time. Type eventvwr and hit Enter.

- Click Windows Logs, then System, and scroll down on the right panel to click the red exclamation entry you see, and you’ll find detailed information about this error underneath.


Most of the entries you see in Event Viewer are tagged with:
- Information (a white i mark),
- Warning (a yellow exclamation mark),
- Error (a red exclamation mark), or
- Critical (a red cross)
We suggest that you focus on the entries with a red cross only, i.e. the critical events, since Event Viewer can be a bit too sensitive when it comes to crash logs: most of the time, Warning and Error entries (yellow and red exclamations) merely mean something unexpected happened or didn’t happen. While the Information entries are just there to record events in Windows, purely informational.
So you can also choose to view the crash logs with only the Critical entries shown in the way follows.
2.2 Check Critical events only in Event Viewer
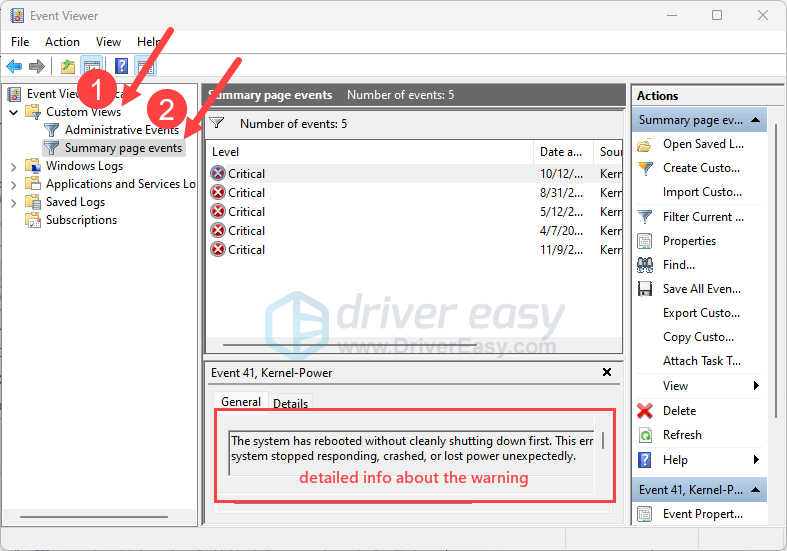
- On your keyboard, press the Windows key and the R key at the same time. Type eventvwr and hit Enter.
- On the left panel, click Custom Views, then Summary page events, then you should see only the critical errors listed, with the detailed information listed underneath.

2.3 How to use the information in Event Viewer
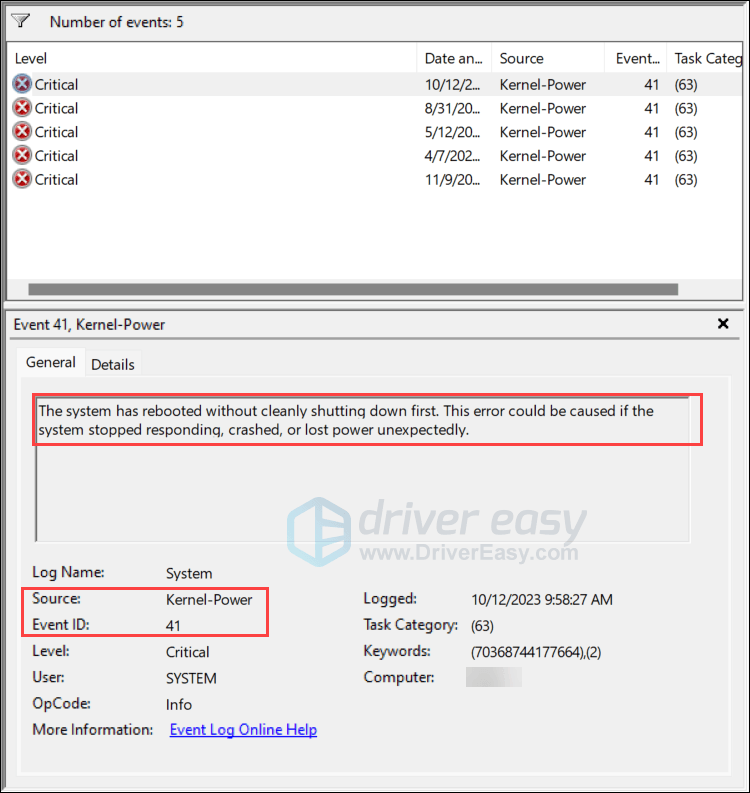
In the detailed information section, you can refer to the information mentioned in the General section, which may be helpful sometimes. You can also check the Source and Event ID fields. For instance, mine is showing “Kernel-Power 41”, and if I do a Google search with this keyword combination, I’ll get a lot of results, with many of them mentioning power-related problems. Then I’ll know what to look at to fix this computer problem.
If there’s not much useful information that can be seen on your Event Viewer, you can move on to use the next tool.
3. View Crash Logs with Reliability Monitor
Reliability Monitor shows your Windows 10 system stability history at a glance. It also tracks critical events, warnings, and informational events on your computer. To use Reliability Monitor:
- On your keyboard, press the Windows key and the R key at the same time. Type perfmon /rel and hit Enter.
- Then you should see a window like this. Click the section where there’s a red cross (meaning critical events), and you should see the detailed information about this event.

- Double-clicking each event to see more detailed information in a new window.

3.1 How to use Reliability Monitor
If you see a faulting application name and a faulting module path in the detailed information window, you can do a Google search with their combination and find the results that you need.
For instance, I see a LinkCollector.exe as the faulting application and KERNELBASE.dll as the faulting module. To “translate” the crash log, it’s saying KERNELBASE.DLL has trouble launching LinkCollector, the bookmark manager.
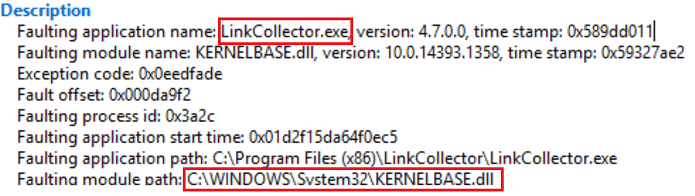
Then I did a Google search on LinkCollector and KERNELBASE.dll individually, and almost all results told me that the latter is a legitimate Windows file that can’t be removed from my computer. I then looked at the bookmark manager, and it turned out that this software is rather old, and probably has a problem keeping up with Windows 11 or Windows 10. For older software to work smoothly on newer operating systems, running it in compatibility mode should be the go-to option. So the problem was fixed.
4. View Crash Logs with Minidump Files
Minidump files are very useful if you’re experiencing blue screen of death errors. When a fatal system error or system crash occurs, a minidump file will be saved on your computer. With the information stored in these minidump files, it’s much easier and faster to locate the culprit to your blue screen of death errors.
The minidump files are usually saved in C:\Windows\Minidump, but if you don’t see it there, please make sure that you have the minidump file feature enabled.
4.1 To enable the Minidump File
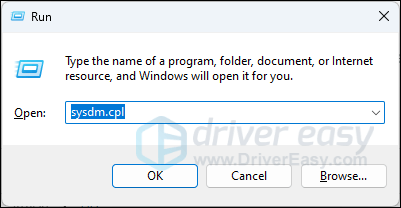
- On your keyboard, press the Windows key and the R key at the same time. Type sysdm.cpl and hit Enter.
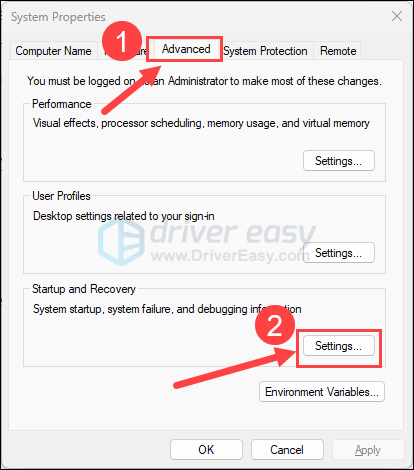
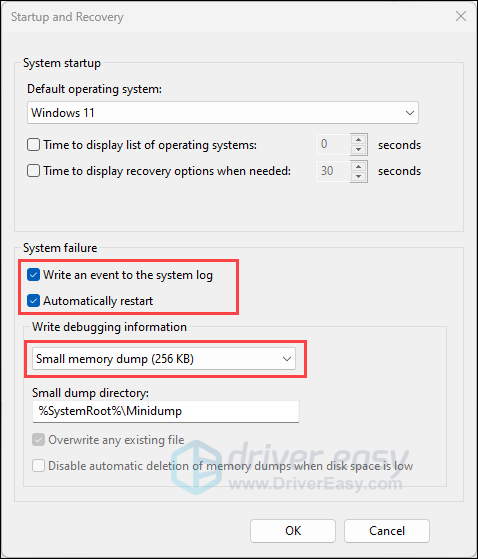
- Click Advanced, then click the Settings button under Startup and Recovery.

- Make sure the boxes for Write an event to the system log and Automatically restart are checked, and the Write debugging information has Small memory dump (256 KB) selected.

- Click OK to save the changes.
4.2 How to use Minidump Files to Fix Blue Screen of Death Errors
- Firstly, you need to download and install WinDbg from here: https://apps.microsoft.com/detail/9PGJGD53TN86?hl=en-us&gl=US
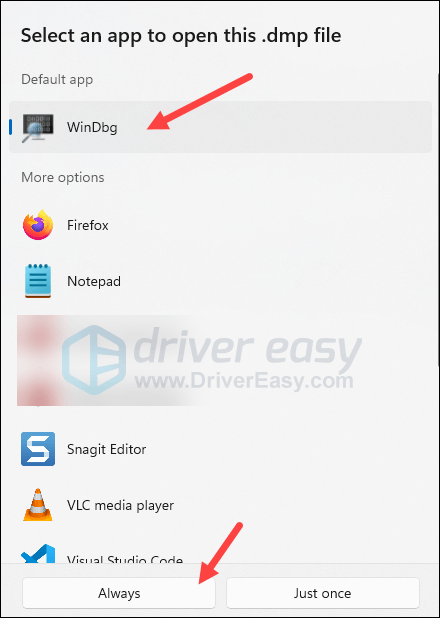
- Go to C:\Windows\Minidump (where your minidump files are saved), then right-click one of the minidump files and select Open with…

- Select WinDbg, and select Always, so WinDbg will be the default app to open all the rest of your minidump files.

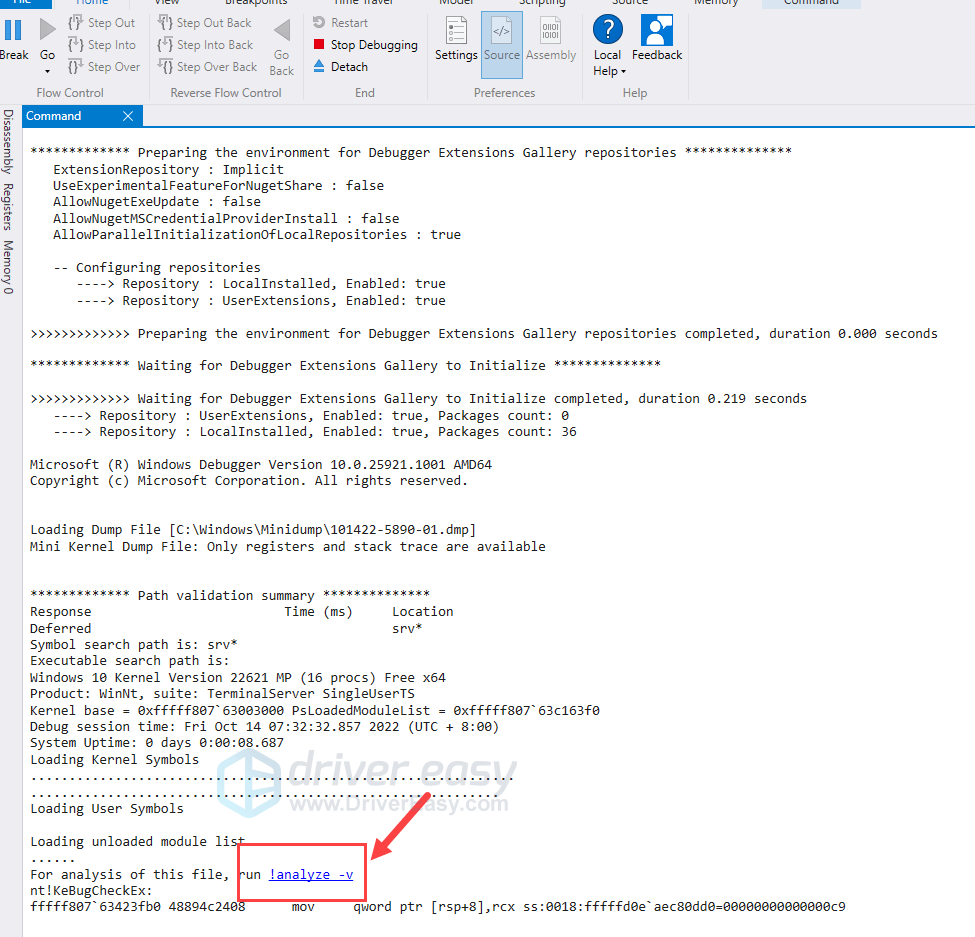
- Then the minidump file will open.
- When it finishes loading, you’ll see a window like this. Click the !analyze -v section to continue.

- When you see a window like this, and with no *BUSY* wording in the kd> field, the debugging is done.

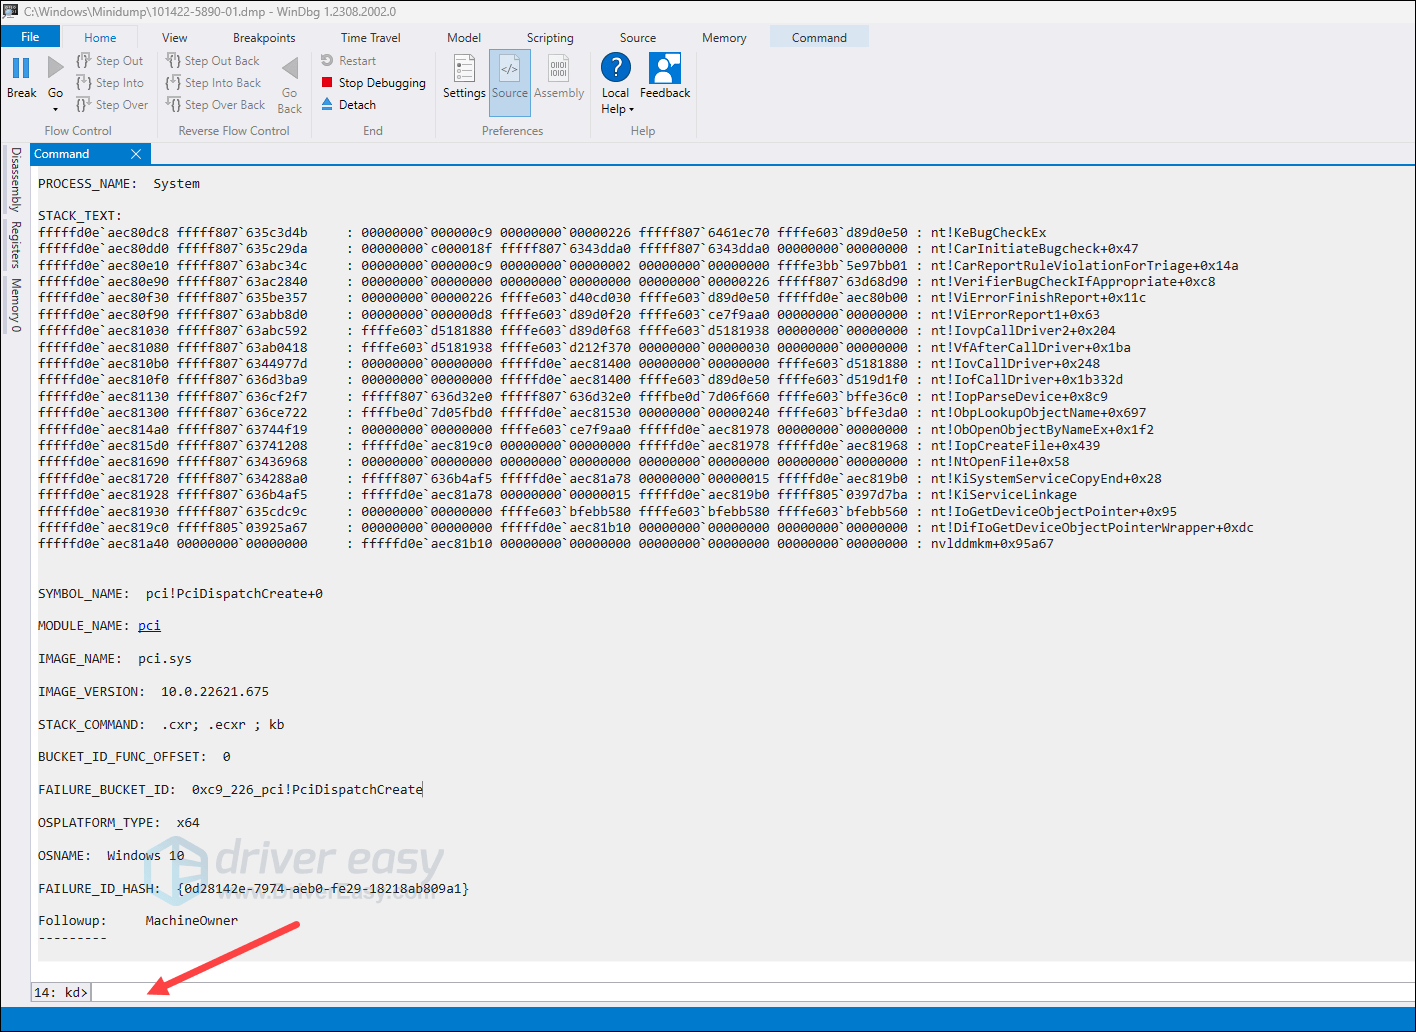
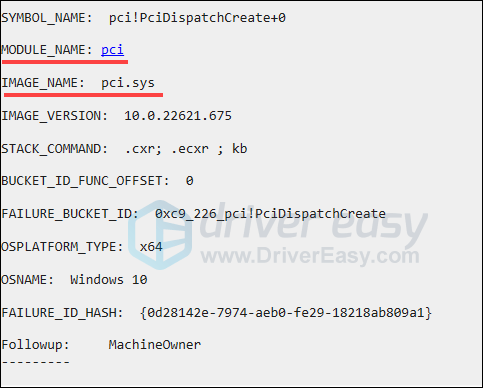
- Keep an eye on the MODULE_NAME and the IMAGE_NAME entries, as these are closely related to the faulting services or programs that cause the blue screen problems.

- On your keyboard, press the Ctrl key and the Home key at the same time to go to the top of the WinDbg window, and you’ll see more information there. Copy the first line of the crash log and run a Google search, and you’ll find more helpful results online.

- Or you can search the crash log you see here in our knowledgebase: https://www.drivereasy.com/kbc/blue-screen-error/ and see if there are targeted results.
- Another helpful source is Microsoft’s Bug Check Code Reference, but it’s a bit challenging if you’re not very experienced with computer crashes and fixes.

2
2 people found this helpful
It’s an unfortunate and inevitable fact that while developing software, sometimes your software will crash. This also happens, sometimes, hopefully very infrequently, in production code. Each time this happens, Windows stores information about each crash in the Windows Event Log, along with many other events in the Windows crash log.
You can inspect these using the Windows Event Viewer, but to find them you’ll be wading through lots of other data about the behaviour of the operating system. It’s needle in a haystack time.
There is a better way.
In this article, I will explain two event log entry types which encode crashes and how to read them. Then, I’ll also introduce some tools that take the drudgery out of converting this information into a symbol, filename and line number to enable you to identify the location of the crash and possibly its root cause.
The Event Log Services
The Windows error reporting service and Windows event collector work together to collect and store detailed information about successful events, operation failures, critical errors, faulty drivers and application crashes in the Windows event log.
Three services work together to provide the Windows Event Log. These are the event log service names:
- Windows Error Reporting Service
- Windows Event Collector
- Windows Event Log
The Windows Event Log
The Windows event log can be viewed using Microsoft’s Event Viewer. Just type “Event Viewer” in the start menu search box and press return. That should start it.
Crash information is stored in the sub category “Application” under “Windows Logs”. The two event sources that describe crashes are Windows Error Reporting and Application Error. These are event id 1000 and 1001.
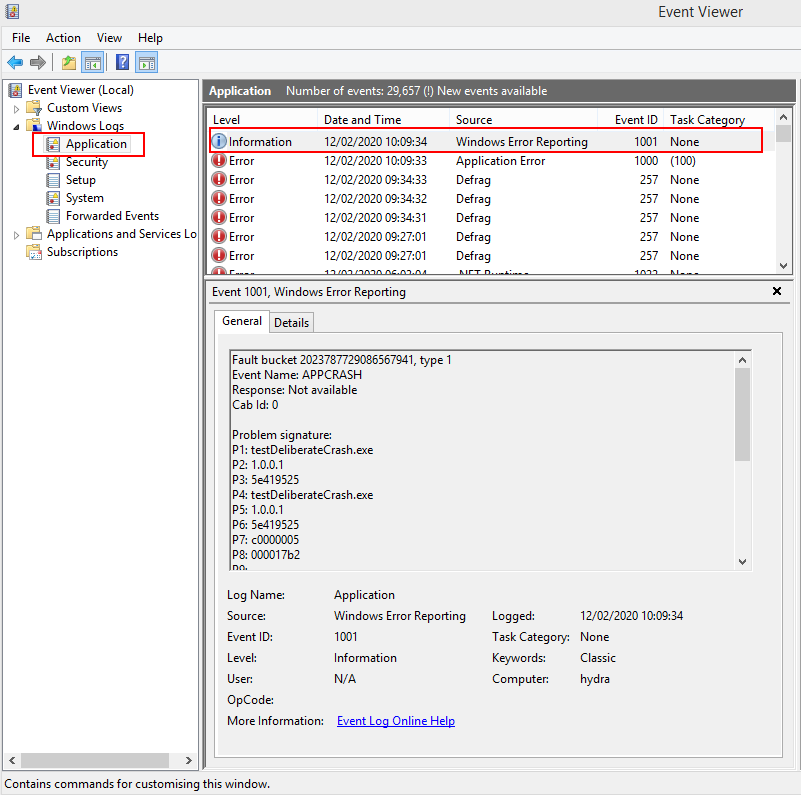
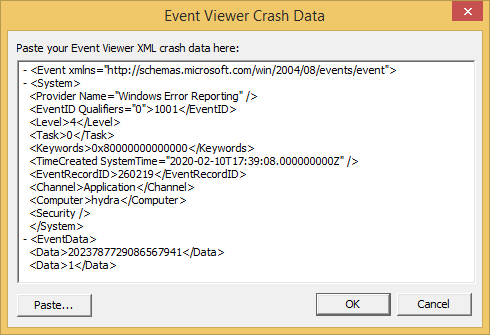
The image above shows a Windows Error Reporting event has been selected. The human readable form is shown below in the General tab. Although I say human readable, it really is unintelligible gibberish. None of the fields are identified and you have nothing to work with. The details tab isn’t any better – the raw data is present in text or XML form. Here’s the XML for the crash shown above.
<Event xmlns="http://schemas.microsoft.com/win/2004/08/events/event">
  <System>
    <Provider Name="Windows Error Reporting" />
    <EventID Qualifiers="0">1001</EventID>
    <Level>4</Level>
    <Task>0</Task>
    <Keywords>0x80000000000000</Keywords>
    <TimeCreated SystemTime="2020-02-12T10:09:34.000000000Z" />
    <EventRecordID>260507</EventRecordID>
    <Channel>Application</Channel>
    <Computer>hydra</Computer>
    <Security />
  </System>
  <EventData>
    <Data>2023787729086567941</Data>
    <Data>1</Data>
    <Data>APPCRASH</Data>
    <Data>Not available</Data>
    <Data>0</Data>
    <Data>testDeliberateCrash.exe</Data>
    <Data>1.0.0.1</Data>
    <Data>5e419525</Data>
    <Data>testDeliberateCrash.exe</Data>
    <Data>1.0.0.1</Data>
    <Data>5e419525</Data>
    <Data>c0000005</Data>
    <Data>000017b2</Data>
    <Data />
    <Data />
    <Data>C:\Users\stephen\AppData\Local\Temp\WERC24C.tmp.WERInternalMetadata.xml</Data>
  <Data>C:\Users\stephen\AppData\Local\Microsoft\Windows\WER\ReportArchive\AppCrash_testDeliberateCr_c31b903842d94a84d4621dceaac377462674f7a_eb589596_139ec4bd</Data>
    <Data />
    <Data>0</Data>
    <Data>c3d360b2-4d7f-11ea-83d3-001e4fdb3956</Data>
    <Data>0</Data>
    <Data>54756af49aec84f97c15f03794ffd605</Data>
  </EventData>
</Event>
There’s quite a bit of data in here, the purpose of each field implied, not stated. Towards the end is some information related to a crash dump, but if you go searching for it, the minidump will no longer be present.
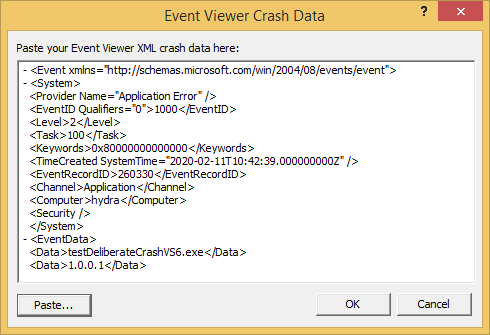
The format for Application Error crashes is different.
Windows Error Reporting
The event log data for a Windows Error Reporting event contains many fields that we don’t need if we’re just investigating a crash address. Each event starts with an <Event> tag and ends with an </Event> tag.
We need to correctly identify the event. Inside the event is a <System> tag which contains a tag with an attribute “Provider Name” set to “Windows Error Reporting” and “Event ID” set to 1001.
Once the event is identified we need to find the <EventData> tag inside the event. The <EventData> contains 14 <Data> tags.
The first four tags are always the same:
- 1. Timestamp.
- 2. Number of data items.
- 3. Information Type.
- 4. Information Status.
We can use the Information Type to determine how to process all the data. There are two Information Types that interest us.
APPCRASH
APPCRASH data is for a most application crashes.
If Information Type is “APPCRASH”, the data is:
- 1. Timestamp.
- 2. Number of data items.
- 3. Information Type.
- 4. Information Status.
- 5. Unknown.
- 6. Crashing executable.
- 7. Executable version.
- 8. Executable timestamp.
- 9. Crashing DLL. This will be the same as 6 if the crash is in the .exe.
- 10. DLL version. This will be the same as 7 if the crash is in the .exe.
- 11. DLL timestamp. This will be the same as 8 if the crash is in the .exe.
- 12. Exception code.
- 13. Fault offset.
- 14. Class. This may or may not be present
We’re interested in tags 9, 12 and 13.
If we want to version the crashing DLL we also need tags 10 and 11.
BEX
BEX data is for a buffer overflow exception or Data Execution Prevention exception.
If Information Type is “BEX” or “BEX64”, the data is different:
- 1. Timestamp.
- 2. Number of data items.
- 3. Information Type.
- 4. Information Status.
- 5. Unknown.
- 6. Crashing executable.
- 7. Executable version.
- 8. Executable timestamp.
- 9. Crashing DLL. This will be the same as 6 if the crash is in the .exe.
- 10. DLL version. This will be the same as 7 if the crash is in the .exe.
- 11. DLL timestamp. This will be the same as 8 if the crash is in the .exe.
- 12. Fault offset.
- 13. Exception code.
- 14. Class. This may or may not be present
Note that the order of the fault offset and exception code has been reversed compared to APPCRASH.
We’re interested in tags 9, 12 and 13.
If we want to version the crashing DLL we also need tags 10 and 11.
Application Error
The event log data for an Application Error event contains many fields that we don’t need if we’re just investigating a crash address. Each event starts with an <Event> tag and ends with an </Event> tag.
We need to correctly identify the event. Inside the event is a <System> tag which contains a tag with an attribute “Provider Name” set to “Application Error” and and “Event ID” set to 1000.
Once the event is identified we need to find the <EventData> tag inside the event. The <EventData> contains at least 12 <Data> tags, some of which may not be present, or which may be empty. These tags are present:
- 1. Crashing executable.
- 2. Executable version.
- 3. Executable timestamp.
- 4. Crashing DLL. This will be the same as 1 if the crash is in the .exe.
- 5. DLL version. This will be the same as 2 if the crash is in the .exe.
- 6. DLL timestamp. This will be the same as 3 if the crash is in the .exe.
- 7. Exception code.
- 8. Fault offset.
- 9. Process id.
- 10. Application start timestamp.
- 11. Application path.
- 12. Module path.
Of these tags we’re interested in tags 7, 8 and 12.
If we want to version the crashing DLL we also need tags 5 and 6. If 12 isn’t available, use 4.
Removing the drudgery
The previous two sections have described which fields to extract data from. If you’re doing this manually this is tedious and error prone:
- You have to search for the event id or event name. In most Windows event logs there will be multiple items to examine.
- For each item that matches your event id search you need to select the correct values from the correct fields and then use another application to turn them into a symbol, filename and line number.
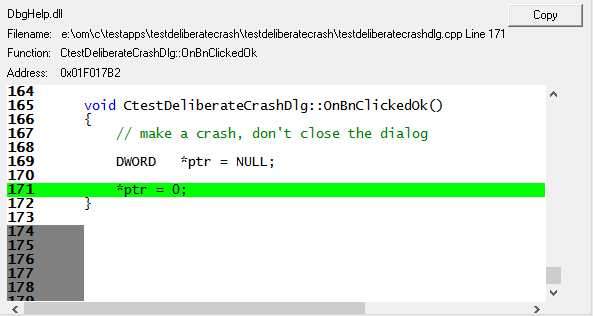
- Our tools DbgHelpBrowser, DWARF Browser, TDS Browser and MapFileBrowser are designed to take a crash offset inside a DLL and turn it into a human readable symbol, filename and line number. But that still requires you to do the hard work of fishing the correct data out of the XML dump.
Now there is a better way, we’ve added an extra option to these tools that allows you to paste the entire XML data from a crash event and the tool then extracts the data it needs to show you the symbol, filename and line number.
DbgHelpBrowser
Load the crashing exe (or DLL) into DbgHelpBrowser. This will cause the symbols to be loaded for the DLL (assuming symbols have been created and can be found). We’re not covering versioning the DLL as most likely you will have your own methods for this.
Choose the option Find Symbol from Event Viewer XML crash log… on the Query menu. The Event Viewer Crash Data dialog is displayed.
Paste the XML data into the dialog and click OK.
The main display will select the appropriate symbol in the main grid and display the relevant symbol, filename, line number and source code in the source code viewer below.
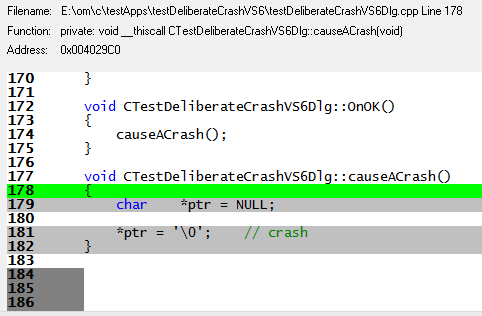
The process for DWARF Browser and TDS Browser is the same as for DbgHelp Browser, but these tools operate on different types of debug information.
MapFileBrowser
Load the MAP file for the crashing exe (or DLL) into MapFileBrowser. We’re not covering versioning the DLL as most likely you will have your own methods for this.
Choose the option Find Symbol from Event Viewer XML crash log… on the Query menu. The Event Viewer Crash Data dialog is displayed.
Paste the XML data into the dialog and click OK.
The main display will select the appropriate symbol in the main grid and display the relevant symbol, filename, line number and source code in the source code viewer below.
Conclusion
Windows Event Logs can be hard to read and error prone to use.
However when paired with suitable tools you can quickly and easily turn event log crashes into useful symbol, filename and line number information to inform your debugging efforts.
Use Event Log Crash Browser to discover crash information in your event log today.
Additional Reading
Has your computer with Windows 10 operating system just crashed suddenly and you are right now searching for a way to view crash logs in Windows 10 then you have come to the right place. This is where we can guide you on how you can check crash logs in Windows 10.

Table of Contents
Windows crash may be because of a lot of reasons like overheating of the system or some fault in the driver installed. This is where the crash logs option comes in use for you can see what has caused the crash and other info like the name of the log and the EventID.
What Causes Windows 10 to Crash?
The users that face this kind of crash the first time may think that the reason behind this might be confusing and it will not be worth it to know. But the point to focus on here is the fault might not be with the components of Windows 10 and there must be an external reason that you can check in Windows crash report.
- Issue in RAM: There is a high possibility that your computer RAM is not working at the optimum level and that is what causes your PC trouble in retrieving data from memory whensoever you are trying to do so.
- Overheated System: With low RAM size or any other compatibility issue in the motherboard you may face an overheating of the system that is causing your PC to crash or freeze.
- Incompatible Driver: It is a common habit to install new drivers for our system when our pre-installed drivers get outdated and start to make any function of the PC lag. But these drivers may in all possibility contain some viruses or bugs that can potentially harm and cause our system to crash.
- Issue with Hard Drive: Hard drives contain most of the data in your PC and any fault can create a situation that most probably will lead to a crash where a Windows 10 blue screen log is.
Microsoft’s investigation identifies the following as the primary reasons why Windows crashes:
- 70% of accidents are the result of rogue driver code.
- 10% of the total is accounted for by hardware issues.
- 15% of the cases include unknown causes.
- 5% of the issues are the result of Microsoft code.
You can check our guide to Fix Windows 10 Crashing Randomly.
Here, we have listed the ways to check crash logs in Windows 10.
Method 1: Through Event Viewer
Event viewer is an inbuilt app to view crash logs in Windows 10. You may view the event logs on your computer using the Event Viewer component of the Windows operating system. Application and system messages, such as informative messages, errors, warnings, etc., are logged by Event Viewer. You may identify the specific reasons why your computer crashes using Event Viewer and it is one of the easiest ways to get Windows crash reports.
1. Go to the Windows Cortana Search box and type Event Viewer. Click on Open.

2. Click on Windows log. This is where you will get all logs including Windows 10 blue screen log.

3. Then, choose System from the drop-down menu.

4. On the event list, click Error. Then you can view all the information about Windows crash reports.

Also Read: How to Clear All Event Logs in Event Viewer in Windows 10
Method 2: Through Reliability Monitor
There is another tool to get reliable information and view crash logs in Windows 10. It is called a Reliability Monitor and as the name suggests, it is a great choice to depend on in case your Windows 10 PC crashes. Below are the steps that will help you guide on how to use this to check crash logs in Windows 10.
1. Again, go to Windows 10 Cortana search box and type Reliability Monitor, and click on Open.

2. You will see on the interface Reliability Monitor is generating the report Please wait.

3. You will see Stability Index.

It assesses your overall system stability on a scale from 1 to 10. You can select any week or any day to review specific hardware or software problems that troubled your system. The horizontal line in blue will show you the score.
Note: stability index does not take into account warning and informational events when it calculates the stability score from 1 to 10.
The report records 3 failures which are application failure, Windows failure, and miscellaneous failure. Moreover, it records informational events and warnings. The table below shows how these failures, informational events, and warnings.
| Icon | Information it shows |
| Blue info icon | Informational events |
| Red cross icon | 3 failures |
| Yellow exclamation icon | Warning |
4. Then out of all these crash dates if you want any information about a particular date what you got to do is just, click on that date’s column. This will open a new window displaying all the information.

5. Click on View all problem reports.

Now, you will see all crash log details.

Also Read: Fix The Procedure Entry Point Error on Windows
Method 3: Through Windows PowerShell
Third and the final method to check cash logs in Windows 10 is using the Power Shell tool. Power Shell is a great application that is used in automating the management system with the use of a scripting language. Read below to understand how you can use this application to view crash logs in Windows 10.
1. Go to the Windows 10 Cortana search box and type PowerShell. Click on Open after finding the top search result.

2. Type the following command into the command box. The crash logs will be retrieved together with their Index, Time, EntryType, Source, InstanceID, and Description using this command.
Get-EventLog -Log system | where {$_.entryType -match "Error"}

3. Get the most recent crash logs up to the specified number by using the Newest argument. Run the following command to collect the 20 most recent crash logs:
Get-EventLog -LogName System -Newest 20 -EntryType Error

Frequently Asked Questions (FAQs)
Q1. Where do I find information about my computer crashing?
Ans. You can use Event viewer which is an in-built app in Windows 10, you can also use reliability monitor which is a user-friendly application and you can also use PowerShell application which is an open-source CLI tool.
Q2. What are the most frequent crashes in Windows 10?
Ans. The three most frequent crashes in Windows OS are fault at the application level, the software hangs unexpected restart and shutdown. There are other reasons also but these are common reasons as per Microsoft investigation.
Q3. Where can I find crash log in Windows 11?
Ans. You can use Event Viewer to see the crash logs in Windows 11. In the event viewer app, move to the Windows log. Then search error and tap on the error. Detailed information will be shown for the error.
Q4. Why does my PC keep crashing and freezing?
Ans. There are a number of reasons for crashes and freezing. Some common reasons are overheating, issues with memory, faulty hardware and software, malicious files, corrupted system registry files, and too little available memory.
Recommended:
- Fix Windows Does Not Have Enough Information to Verify This Certificate Solutions
- Why is my Computer Making Funny Noises?
- Fix Hard Disk Problems in Windows 10
- Fix Event 1000 Application Error in Windows 10
The Windows PCs are designed in a way that they can store all the crash log information in your crash log so you can at any time view crash log information in Windows 10. We hope that these methods might have helped you to view crash logs in Windows 10.