
When you’re deploying Windows 10 in a customized environment, you specify the selective settings in an answer file. For those, who are not familiar with an answer file, here is what it is. An answer file is an XML file, usually contains the customized settings that would be used by Windows Setup during the installation. Most of the IT professionals like to deploy custom settings in their workplace/organization and it raises the need of answer file. It is located as unattend.xml in Panther folder under windows directory (%windir% or C:\Windows). Extended information on answer file is available in this documentation.
So if there are some incorrect entries in the answer file, Windows Setup won’t be able to process the file. In such a condition, following error will come into play:
Page Contents
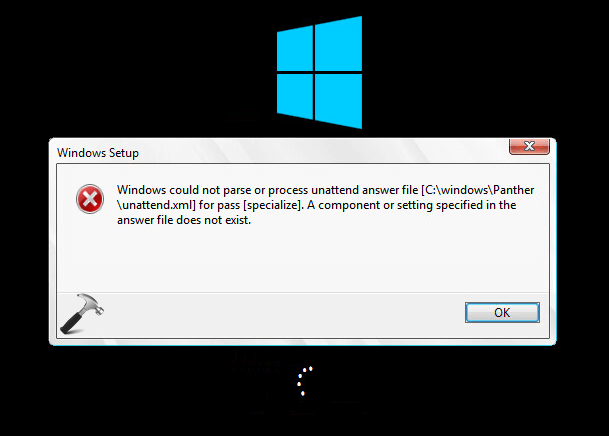
Windows could not parse or process the unattend answer file for pass [specialize]. A component or setting specified in the answer file does not exist.
So if you’re facing this issue while deploying Windows 10, and if you know how to correct answer file errors, simply recheck the unattended.xml file and remove the extra code that is not applicable to your environment or causing the issue. Here, note the in some cases, Windows displays the components which is causing error so it would be easy for you to rectify the code. But if you’re an end user with not enough knowledge about modifying answer file and you incidentally started facing this problem, here is how to correct it.
FIX : Windows Could Not Parse Or Process The Unattend Answer File For Windows 10
Windows usually checks for unattend.xml file in %windir%/Panther. By following the steps mentioned below, you’ll be able to allow Windows to skip looking for unattend answer file. Once it skipped answer file verification, it would be able to boot without the above mentioned error. Here’s how to make this possible:
1. When this error appears, simply press Shift + F10 to bring Command Prompt.
2. Now in the Command Prompt window, type regedit.exe command to open Registry Editor. In the Registry Editor window, navigate to following key:
HKEY_LOCAL_MACHINE\SYSTEM\Setup\Status\ChildCompletion
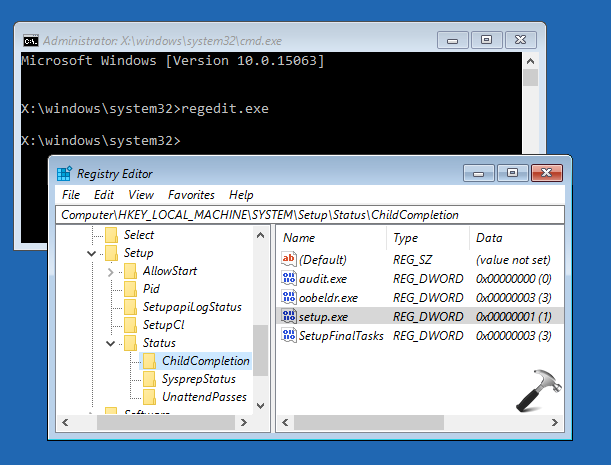
3. In the right pane of ChildCompletion folder, look for setup.exe named registry DWORD (REG_DWORD), the value for which might be corresponding to 1. Double click on that same DWORD and change its Value data to 3 (refer below screenshot). Click OK. Close Registry Editor and Continue to your existing operating system and reboot then.
After restarting your system, Windows will be able to skip checking for unattend answer file and you’ll be able to boot fine, without the error.
That’s it!
RELATED ARTICLES
After successfully creating Windows Image for OpenStack, uploaded the Windows 10 QCOW2 image on my OpenStack setup and created an Instance to load Windows 10 image. However, after waiting for a long time (nearly hours) still, the windows loading screen didn’t complete and suspected about the image. Cameback to KVM virt-manager and booted Windows VM and to my surprise, I encountered the error: Windows could not parse or process the unattend answer file for pass [specialize]. Then realized the long waiting time on OpenStack. Below is the snapshot of the complete error message:
![Windows could not parse or process the unattend answer file for pass [specialize]](https://techglimpse.com/wp-content/uploads/2022/03/Pasted-into-How-to-fix-Windows-could-not-parse-or-process-the-unattend-answer-file.png "Windows could not parse or process the unattend answer file for pass [specialize]")
How to solve Windows could not parse or process the unattend answer file
Solution: The error indicates a problem with the information in the unattend.xml file, and tells you to check the specialize pass, in the Microsoft-Windows-shell-Setup container. If you know how to correct the answer files, simply recheck the unattend.xml file and fix it appropriately that is causing the issue. But, if you’re an end-user with not enough knowledge about modifying the answer file here is how to rectify it.
Step 1: When this error appears, simple press Shift + F10 to open the command prompt.

Step 2: Type regedit.exe in the command prompt to open Registry Editor. Navigate to HKEY_LOCAL_MACHINE\SYSTEM\Setup\Status\ChildCompletion

Step 3: Double click on Setup.exe from the right pane and change the Value data to 3. Click OK. Close Registry Editor, exit the command prompt and click Ok on the error screen to reboot the Windows OS.

After the restart, Windows will skip checking for unattend answer file and boot without any error.

Ramya Santhosh
is a Web Designer and content creator. A freelance writer on latest trends in technology, gadget reviews, How to’s and many more.

We’ve all see this classic error message when performing a Windows build ‘Windows could not parse or process the unattend answer file for pass specialize’

The issue here always applies to a problem with the unattend.xml file being processed at the time and it’s recommended to check the setupact.log and setuperr.log in the c:\windows\panther\unattendGC folder to discover what’s going on.
If you can’t access the CMD prompt via a Shift + F10 at this stage then reboot into WinPE and copy the files over to a network share.
I had the problem recently and although the setuperr.log file reported an issue with the Windows product key the actual issue was caused by the Post Install ‘Configure’ step in a MDT integrated Task Sequence being disabled. This step is used configure the unattend.xml file so if disabled caused this catastrophic effect.

Once re-enabled the problem went away.
Today I got this interesting error when deploying new VMs from a pre-defined template with customizations. Its basically failing on Setup is applying system settings part and to be precise on specialize pass of Microsoft-Windows-Shell-Setup of unattend.xml file.
Here is the screenshot:

At this point the only option is to press OK which will cause the VM to reboot, needless to say it will be constantly rebooting never taking you back to the actual login screen. Trick to get us out of this one is dating back to old XP days and SCCM troubleshooting during task sequence issues – press F8! You should now have nice cmd window, navigate to C:\Windows\Panther\UnattendGC and look for file called setuperr.log, use notepad to open it up.


As you can see the god damn product key is not valid. A common issue when cloning customizations – you can end up cloning Server 2008 customizations and try to apply them to Server 2008 R2 which will obviously fail. Only the product key seems to matter, everything else will be exactly the same between the two operating systems from vCenter customizations perspective.
Problem Explanation
You’ve created a new image, captured it and attempted deployment and received the error:
«Windows could not parse or process unattend answer file [C:\windows\Panther\unattend.xml] for pass [specialize]. A component or setting specified in the answer file does not exist.»
Alternatively, you’ve just made a new MDT Task Sequence and slipstreamed updates into it and received the same error.
Symptoms
- Infinitely looping on first boot
- Windows has encountered a problem, press ok to restart.
- C:\Windows\Panther\Unattend.xml Error (described above)
Reasons
The cause of this is simple, it’s internet explorer 10.0 which you have installed either within the image or slipstreamed into the image.
Fix [SOLVED]
Actually simple, but only if you know where to look and since you’ve probably scrolled down and ignored everything I said above, I’ll get to the point, follow these instructions:
- In your MDT Deployment Workbench, go to your list of task sequences.
- Right click the task sequence you are using to deploy out your new image with IE 10.
- Go to the properties of this task sequence.
- Choose the OSInfo tab and click «Edit Unattend.xml»
- Wait about a year for it to load up the catalogue…. (depending on your machine speed, this can take quite a while, this opens the Windows System Image Manager (WSIM)
- Go to Unattend -> Components -> Specialize
- Choose the Microsoft-Windows-IE-InternetExplorer-Neutral from the list
- Find IE-WelcomeMessage
- The Status should say false, if it doesn’t make sure it does.
- Right click this value and in the context menu (the right click menu) UNTICK «write image value» (See Image for a visual aid)

11. Save the Unattend.xml and to be on the safe side update your deployment share (though I don’t believe this is needed but it makes you feel better inside)
Reinstall your image onto your client and it should work fine for you now 
EDIT [17-11-2013 — MDT 2013]
Having spoken with some of my colleagues I have ascertained that by using MDT 2013 they have not encountered this issue, however if you need to maintain support to deploy Windows XP images then you will not be able to upgrade.