
|
Гость 0 — 03.06.2017 — 00:59 |
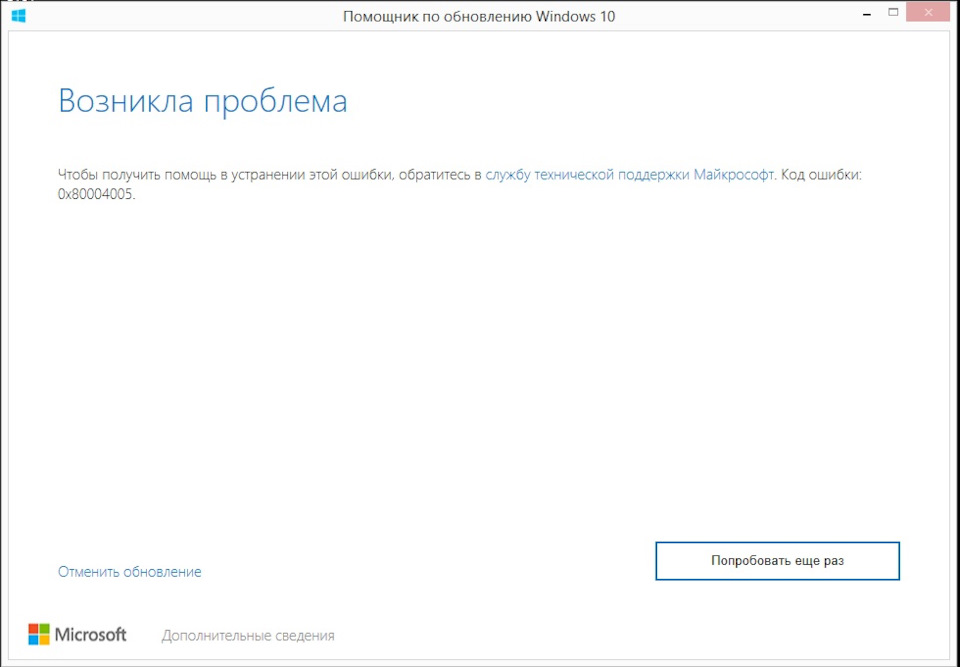
Доброго времени суток! При запуске установки Windows появляется окно со следующим содержанием: Windows could not determine the language to use for Setup. Error code 0x80004005 подскажите, где искать причину и что сделать? |
|
|
Гость 1 — 03.06.2017 — 17:53 |
А что у Вас за дистрибутив?
|
|
|
Гость 2 — 03.06.2017 — 17:59 |
Непосредственно из операционной системы можно запустить только установку операционной системы в режиме обновления. А, как Вы сами понимаете, невозможно обновить более новую операционную систему предыдущим выпуском Windows.
|
|
|
Гость 3 — 03.06.2017 — 20:08 |
из БИОС запустил, сделал восстановление системы, вроде работает.
|
|
|
Гость 4 — 03.06.2017 — 20:25 |
Такое впечатление, как буд-то из запущенной «восьмерки» попытка запуска setup 7-ки. Вообще при непонятных ситуациях, нужно загружаться в «безопасном режиме» и выполнять восстановление контрольной точки
|
|
|
Гость 5 — 07.06.2017 — 21:57 |
Лесник спасибо за консультацию, все настроил.
|
|
|
Гость 6 — 11.06.2017 — 21:56 |
если выбивает кодовую ошибку лучше перебить винду .у меня тоже так было я поставил ХР
|
По работе столкнулся с ошибкой в процессе обновления со старых версий виндовс до вин 10.
В сети информации почти нет. Вот решил записать для себя и остальных кто вдруг наткнется.
При использовании программы MediaCreationTools, Может возникнуть данная ошибка.
Для этого надо отменить процесс обновления.
Далее зайти на диск C.
Найти там папку ESD
Зайти в нее, далее в папку Windows, и запустить опять установку.

После того как установщик подумает он предложит вам следующее
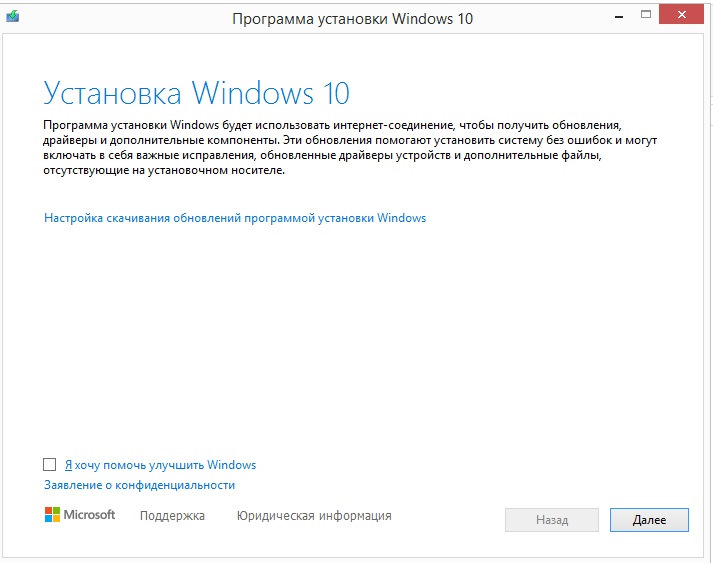
Нажимаем на надпись «Настройка скачивания обновлений программой установки Windows»
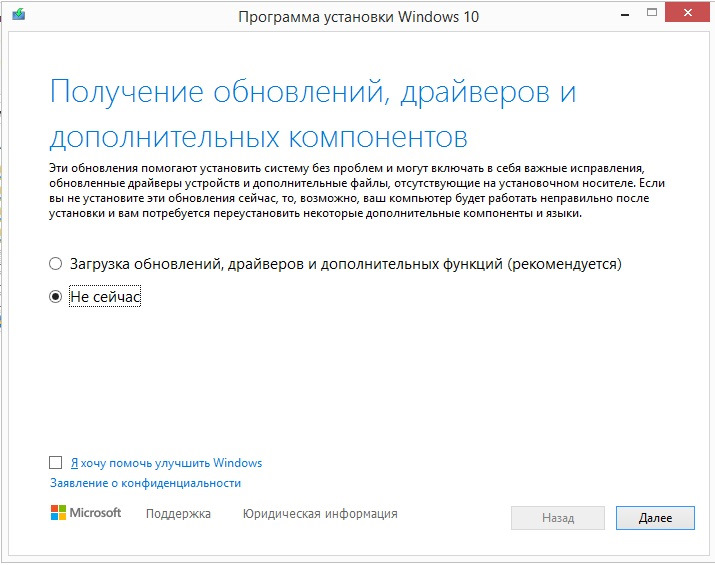
И выбираем «Не сейчас»
Теперь все обновиться нормально.
ПС
Возможно установка не пройдет с первого раза. Так как программа может произвести удаление не корректно скачанных обновлений а потом закрыться. Ничего страшного. Просто заново потом запускаем Setup и так же отказываемся от загрузки обновлений.
ПСС
Можно перейти на версию выше. С домашней на ПРО например. Просто перед запуском обновления необходимо сбросить активацию системы. И ввести при установке ключ от нужной вам версии.
!ключ установки определенной версии а не ключ активации этой версии!
Ключи спокойно ищутся в интернете.
Resolving Error Code 0x80004005 on Windows 10 and 11
Published
6 min read
How to Fix Error Code 0x80004005 on Windows 10 and 11
Error Code 0x80004005, commonly referred to as an «unspecified error,» can be a frustrating hurdle for Windows 10 and 11 users. Whether this error appears during file transfers, software installations, or while attempting to access a virtual machine, it signifies some underlying problem that requires attention. This guide will provide a detailed look into the causes of Error Code 0x80004005 and step-by-step solutions designed to resolve the issue efficiently.
Understanding Error Code 0x80004005
Before diving into the solutions, it’s essential to understand what the 0x80004005 error is. The error is categorized as an «unspecified error,» meaning it doesn’t provide a clear indication of what went wrong. It’s often associated with operations such as:
- File extraction and compression
- Windows updates
- Virtual machine issues
- Network-related tasks
- Problems with certain Windows services or settings
The error can arise from various issues, including software conflicts, corrupted files, outdated operating systems, or incorrect permissions.
Common Causes of Error Code 0x80004005
Identifying the root cause of the error can streamline your troubleshooting efforts. Here are some common culprits behind the 0x80004005 error:
-
Corrupted Files: Damage to system files, application files, or Windows components can trigger the error.
-
Permission Issues: Insufficient permissions for accessing files or folders can lead to this error.
-
Windows Update Problems: Incomplete or failed Windows updates often produce this error message.
-
File System Errors: Problems within the NTFS file system can cause instability and errors in file operations.
-
Virtual Machine Configuration: Issues pertaining to configurations in VirtualBox, Hyper-V, or other virtual machine software.
General Troubleshooting Steps
Before diving into more specific solutions, it’s essential to perform some preliminary troubleshooting steps:
-
Restart Your PC: This simple action can resolve many transient issues. If the error persists after restarting, proceed to the next steps.
-
Check for Updates: Ensure that your Windows operating system is up to date. Sometimes, simply applying the latest updates can resolve compatibility issues.
-
Scan for Malware: Use a reputable antivirus program to perform a full system scan. Malware can disrupt system operations and generate various errors, including 0x80004005.
-
Free Up Disk Space: Low disk space can cause issues with file transfers or installations. Ensure your drive has enough space for the operations you’re trying to conduct.
Specific Solutions for Windows 10 and 11
Now that you understand the error and have tried some preliminary troubleshooting, let’s delve into specific solutions that can help you resolve Error Code 0x80004005.
Solution 1: Check and Repair Corrupted Files
Using the built-in System File Checker (SFC) tool can help repair corrupted system files that may cause the 0x80004005 error. Here’s how to perform an SFC scan:
-
Open Command Prompt as Administrator:
- Type «cmd» in the Windows search bar.
- Right-click on «Command Prompt» and select «Run as administrator.»
-
Run the SFC Scan:
- In the Command Prompt, type the following command and press Enter:
sfc /scannow - The scan will take some time, and it will attempt to repair any corrupted system files it finds.
- In the Command Prompt, type the following command and press Enter:
-
Reboot Your Computer: After the scan is complete, restart your PC to apply the changes.
Solution 2: Modify Security Permissions
Insufficient permissions may lead to the 0x80004005 error. Modifying the security permissions of the affected file or folder may resolve the issue:
-
Locate the Folder or File that you’re having issues with in File Explorer.
-
Right-click on the File/Folder and select Properties.
-
Go to the Security tab and click on Edit.
-
Select Your User Account and check the permissions. Ensure that «Full Control» is checked.
-
Click Apply and then OK to save your changes.
-
Attempt the action that caused the error again.
Solution 3: Disable Third-Party Antivirus or Firewall
Sometimes, third-party security software may interfere with file operations and cause the 0x80004005 error. If you have antivirus software or a firewall installed, try disabling it momentarily to see if it resolves the issue:
-
Locate the antivirus program icon in the taskbar.
-
Right-click on the Icon and look for an option to disable the protection temporarily.
-
Proceed with the Action that was causing the error and see if it works now.
-
Remember to re-enable your antivirus after testing to keep your system safe.
Solution 4: Perform a Clean Boot
A clean boot can help determine if background programs are causing the error. Here’s how to perform it:
-
Press Win + R to open the Run dialog.
-
Type
msconfigand press Enter to open the System Configuration window. -
In the Services tab, check the box for Hide all Microsoft services, then click on Disable all.
-
Switch to the Startup tab and click on Open Task Manager.
-
Disable all startup items listed in the Task Manager.
-
Close Task Manager, return to the System Configuration window, and click OK.
-
Restart your PC.
If the error no longer occurs, you can re-enable services and startup items one at a time to identify which one caused the issue.
Solution 5: Use the Windows Update Troubleshooter
If the 0x80004005 error appears during a Windows update, using the onboard troubleshooter can help pinpoint and fix issues:
-
Open Settings: Press Win + I to open the Settings app.
-
Navigate to Update & Security.
-
Click on Troubleshoot on the left sidebar.
-
Under «Additional troubleshooters,» find and click on Windows Update.
-
Click Run the troubleshooter and follow the prompts.
The troubleshooter will detect problems and attempt to resolve them automatically.
Solution 6: Check Disk for Errors
A corrupted disk can lead to the 0x80004005 error. Checking your disk for errors using the CHKDSK utility can help:
-
Open Command Prompt as Administrator.
-
Type the following command and press Enter:
chkdsk C: /f /r(Replace «C:» with the drive letter you want to check.)
-
You’ll be informed that CHKDSK cannot run while the volume is in use and asked if you want to schedule it at the next restart. Type «Y» and press Enter.
-
Restart your computer to let CHKDSK scan and fix any errors.
Solution 7: Reinstall Windows Update
If you suspect a Windows Update might be the cause of the error, you can uninstall the recent updates:
-
Open Settings and go to Update & Security.
-
Under Windows Update, click on View update history.
-
Click on Uninstall updates.
-
Find the most recent updates, right-click on them, and choose Uninstall.
-
Restart your PC and check if the error persists. You can try reinstalling the updates afterward.
Solution 8: Check Windows Services
Some Windows services that aren’t running can lead to this error. Ensuring the correct services are active may resolve the issue:
-
Press Win + R to open the Run dialog.
-
Type
services.mscand hit Enter to open the Services manager. -
Locate the following services and ensure they are running and set to Automatic:
- Windows Update
- Background Intelligent Transfer Service
- Cryptographic Services
- Windows Installer
- Remote Procedure Call (RPC).
-
If any services are stopped, right-click on them and select Start.
-
After checking all the relevant services, restart your computer.
Solution 9: Adjust Virtual Machine Settings
If the 0x80004005 error pertains to a virtual machine issue, adjusting the settings can help:
-
Ensure you have the necessary permissions to access the virtual machine’s files.
-
Check the Virtual Machine Software: If using Hyper-V or VirtualBox, confirm that the virtualization is enabled in your BIOS/UEFI settings.
-
Check configuration settings within the virtual machine software. Ensure:
- The path to virtual hard disks is accessible.
- The configuration matches the specifications required.
-
If necessary, recreate the virtual machine after backing up essential data.
Conclusion
Error Code 0x80004005 can be a persistent issue for users of Windows 10 and 11, impacting various system operations. However, with systematic troubleshooting and targeted solutions, you can often resolve the error efficiently. By following the detailed steps outlined in this guide, you should be well-equipped to tackle the 0x80004005 error, restore your Windows experience, and ensure that your system operates smoothly. Remember always to follow best practices with regular backups and updates to minimize the potential for errors in the future.
Для поддержания стабильности, безопасности и оптимальной производительности операционной системы Windows, а также для поспеванием за неуклонным течением времени, Microsoft приходится регулярно выпускать различные обновления для всех версий Windows. Компьютеры, работающие на Windows, постоянно получают обновления и они не перестанут делать этого скорее всего никогда. Обновления прекращаются в момент окончания поддержки устарелой ОС, например, такой как Windows XP. В данный момент обновления получают операционные системы Windows 7, Windows 8, Windows 8.1 и Windows 10. Как правило, как только любая из перечисленных систем входит в сеть, то она сразу же начинает получать пакеты с обновлениями.
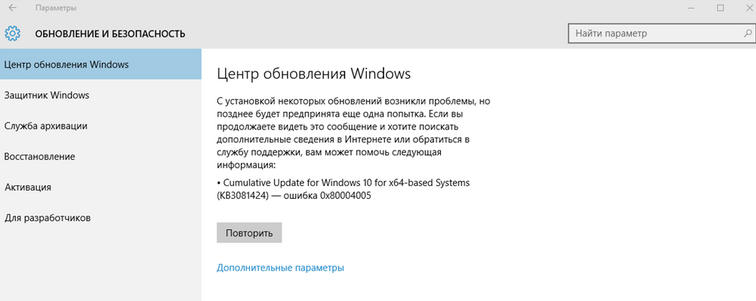
Тем не менее, иногда, некоторые обновления не могут благополучно загрузиться или же установиться на компьютере пользователя. Когда это происходит, пользователь обычно сталкивается с ошибкой. 0x80004005 как раз является одной из таких ошибок. Когда Центр обновления Windows не удается загрузить определенное обновление или установить его, перед пользователем появляется следующие сообщение:
С установкой некоторых обновлений возникли проблемы, но позднее будет предпринята еще одна попытка. Если вы продолжаете видеть это сообщение и хотите поискать дополнительные сведения в Интернете или обратиться в службу поддержки, вам поможет следующая информация:
- Cumulative Update for Windows 10 for x64-based Systems(KB3081424) — ошибка 0x80004005
Когда обновление не может быть загружено или установлено, просто попробуйте перезагрузить ваш компьютер(не аварийной перезагрузкой). Это действие скорее всего поможет вам решить сложившуюся проблему с ошибкой 0x80004005 в большинстве случаев. Тем не менее это может и не сработать.
Данная ошибка может возникать на различных конфигурациях операционных систем и действительно опасной данная проблема становится тогда, когда вам нужно установить какое-либо важное обновление.
К счастью, существуют несколько методов, благодаря которым вы сможете успешно избавиться от ошибки 0x80004005. Давайте их рассмотрим.
Исправления для ошибки 0x80004005 при обновлении Windows
Метод №1 Запустить утилиту SFC
Данная проблема довольно часто может возникать по вине системных файлов, которые необходимы Центру обновлений Windows для того, чтобы загрузить и установить нужные обновления. Однако эти обновления уже могут быть повреждены из-за них. В таких случаях, сканирование с помощью SFC(программа для проверки файлов) всегда должно помочь в сложившейся ситуации. Утилита сможет обнаружить поврежденные или модифицированные системные файлы Windows и починить их, если сможет. После этого вы сможете спокойно продолжить выполнять обновление, но без проблем. Для выполнения сканирования файловой системы выполните следующие шаги:
- Нажмите комбинацию клавиш Win+X(либо просто нажмите правой кнопкой мыши по Пуску) и выберите из контекстного меню пункт «Командная строка(администратор)».
- После запуска Командной строки, впишите в нее команду sfc /scannow и нажмите Enter. Начнется процесс проверки вашей файловой системы. Данный процесс может занять некоторое время, так что можете отвлечься на что-то иное. По окончанию процесса проверки, вам предоставят список всех поврежденных и исправленных файлов.
Ваша система таким образом должна была избавиться от поврежденных файлов, которые мешали процессу обновления и вызывали ошибку 0x80004005.
Метод №2 Удаление всего из папки %systemroot%\SoftwareDistribution\Download
Очень распространенной проблемой, вызывающую данную ошибку, могут является поврежденные обновления, которые смогли все-таки загрузиться. Ваша система будет пытаться установить их, но все что будет появляться, так это ошибка 0x80004005. Все что вам нужно сделать, так это удалить эти поврежденные обновления из папки %systemroot%\SoftwareDistribution\Download , а затем заново загрузить их. Для удаления файлов из выше указанной папки сделайте следующие шаги:
- Нажмите комбинацию клавиш Win+R.
- Затем впишите в пустую поисковую строку %systemroot%\SoftwareDistribution\Download
- Выберите все файлы, которые будут находиться в открывшейся папке. Можно это быстро выполнить посредством комбинации клавиш Ctlr+A, а затем нажмите клавишу Delete(или же Shift+Delete для удаления, которое будет игнорировать Корзину).
- После этого просто закройте данное окно и перезагрузите ваш компьютер.
Подождите пока ваш ПК запуститься, а затем зайдите в Центр обновления Windows, чтобы проверить наличие ошибки 0x80004005.
Метод №3 Загрузка обновления вручную
Для того, чтобы получить доступ ко всем критическим обновлениям, особенно пользователям с проблемами в Центре обновления Windows, Microsoft выпускает практически каждое обновление отдельным пакетом. Если вы один из тех, кто натыкается на ошибку 0x80004005 каждый раз при загрузке и установке обновлений Windows, то вы можете просто обойти эту проблему просто скачав нужное вам обновление самостоятельно и установить его вручную. Делается это довольно просто:
- Зайдите в любой поисковик на ваше усмотрение.
- Введите запрос что-то вроде «Microsoft обновление KBХХХХХХХ скачать». Заметка: KBХХХХХХХ — это номер обновления, которое вам необходимо скачать.
- Не заходите ни на какие сторонние сайты. Сразу же кликайте на официальный сайт Microsoft.
- Скачайте данное обновление, запустите его и следуйте указаниям мастера-установщика(или визарда).
Для того, чтобы существенно поднять шанс срабатывания данного способа, скиньте скачанное обновление в папку %systemroot%\SoftwareDistribution\Download. Затем следуйте указаниям из второго метода.
-
i dont get it
there pid.txt or i enter the keydoesnt wanna continue the installation
i deploy it and then capture it mb the flagging was not right ?
might be the NTlite
Edit
«Windows could not determine the language to use for setup error code 0x80004005»now this error :S
-
-
please mask that key and please don’t ask why, Thank you
-
yea i used this its same in pid.txt
mb the liting ?
edit
false alarm its was the liting -
s1ave77
Has left at his own requestHow about deleting pid.txt and use ei.cfgIt should ask, what to install and allow to skip the key prompt.
FYI: You must use either or, not both, pid.txt will always out-rule ei.cfg.
Stop hovering to collapse…
Click to collapse…
Hover to expand…
Click to expand…
-
software license is missing
i will start from the start its better that way
NTLite is not ready for this i guess
-
new error
«Windows could not determine the language to use for setup error code 0x80004005»
ofc cos the liting
i agree but install the hotfix online system will check if everything is ok before starting
its take much longer but its make it stabler -
s1ave77
Has left at his own requestCheck the WIM if all info is still included:
dism /Get-WimInfo /WimFile:"path\to\install.wim" /index:1
Index : 1
Name : Windows 8.1 Pro
Description : Windows 8.1 Pro
Size : 12.856.771.229 bytes
WIM Bootable : No
Architecture : x64
Hal : acpiapic
Version : 6.3.9600
ServicePack Build : 17031
ServicePack Level : 0
Edition : Professional
Installation : Client
ProductType : WinNT
ProductSuite : Terminal Server
System Root : WINDOWS
Directories : 19502
Files : 92137
Created : 18.03.2014 - 12:08:48
Modified : 18.03.2014 - 12:09:23
Languages :
de-DE (Default)
Check if language info is present and correct.
BTW: Never had the slightest stability issues as i don’t cut functionality off .
Stop hovering to collapse…
Click to collapse…
Hover to expand…
Click to expand…
-
C:\Sources>dism /Get-WimInfo /WimFile:install.wim /index:1 Deployment Image Servicing and Management tool Version: 6.1.7600.16385 Details for image : install.wim Index : 1 Name : Windows Technical Preview Description : Windows Technical Preview Size : 8,010,096,108 bytes Architecture : x64 Hal : acpiapic Version : 10.0.9888 ServicePack Build : 0 ServicePack Level : <undefined> Edition : <undefined> Installation : <undefined> ProductType : WinNT ProductSuite : Terminal Server System Root : WINDOWS Directories : 17235 Files : 70109 Created : 14/11/2014 - 23:07:03 Modified : 04/12/2014 - 23:28:53 Languages : en-US (Default) The operation completed successfully. -
i just used manual removing in this :\
gonna try another time with another way
thank for the help we know the cause
-
s1ave77
Has left at his own requestAlthough i love Dism/ImageX/Wimlib-ImageX it’s a PITA to handle that manually via Deployment Tools CMD. So i developed my own CWUI (Command Window User Interface) . It’s part of JATD and by far the biggest sub-script there. Covers nearly all needed option for those nice tools.
DISM MODULE MENU:█████████████████████████████████████████████████████████████████████████████████ ■■■■■■■■■■■■■■■■■■■■■■■■■■■■ WINDOWS IMAGING TOOLS ■■■■■■■■■■■■■■■■■■■■■■■■■■■■ █▀█▀█▀█▀█▀█▀█▀█▀█▀█▀█▀█▀█▀█▀█▀█▀█▀█▀█▀█▀█▀█▀█▀█▀█▀█▀█▀█▀█▀█▀█▀█▀█▀█▀█▀█▀█▀█▀█▀█▀█ █▄█▄█▄█▄█▄█▄█▄█▄█▄█▄█▄█▄█▄█▄█▄█▄█▄█▄█▄█▄█▄█▄█▄█▄█▄█▄█▄█▄█▄█▄█▄█▄█▄█▄█▄█▄█▄█▄█▄█▄█ ░░░░░░░░░░░░░░░░░░░░░░░░░░░░░░░░░░░░░░░░░░░░░░░░░░░░░░░░░░░░░░░░░░░░░░░░░░░░░░░░░ ░ ░ == (9) MOUNTED IMAGE INFO =============== (0) GET CURRENT VERSION =============== ░ ░ ░░░░░░░░░░░░░░░░░░░░░░░░░░░░░░░░░░░░░░░░░░░░░░░░░░░░░░░░░░░░░░░░░░░░░░░░░░░░░░░░░ ░ ░ == (A) APPLY ESD/SWM/WIM [D] ============ (C) CHECK ESD/SWM/WIM [A/S] [D] ======= ░ ░ == (D) CAPTURE [IX] [D] [W-IX] ========== (E) EXPORT [A/S] [IX] [D] [W-IX] ====== ░ ░ == (F) MOUNT MENU [A/S] [D] ============= (G) CLEANUP MENU [A/S] [D] ============ ░ ░ == (H) SET FLAGS [IX] [W-IX] ============ (I) DELETE [IX] [D] [W-IX] ============ ░ ░ == (J) REGISTRY HIVE MENU [D] =========== (K) SPLIT [A/S] [IX] [D] [W-IX] ======= ░ ░ == (L) WINDOWS UPDATES [A/S] [D] ======== (M) MODERN UI APPS [A/S] [D] ========== ░ ░ == (N) WINDOWS FEATURES [A/S] [D] ======= (O) DRIVERS MENU [A/S] [D] ============ ░ ░ ░░░░░░░░░░░░░░░░░░░░░░░░░░░░░░░░░░░░░░░░░░░░░░░░░░░░░░░░░░░░░░░░░░░░░░░░░░░░░░░░░ ░ ░ == (P) Upgrade to Target Edition ======== (Q) Net 3.5 Integration [A/S] [D] ===== ░ ░ == (R) Change System Locale [D] ========= (S) Set Product Key [D] =============== ░ ░ == (1) Decrypt Store ESD ================ (2) Convert Store ESD ================= ░ ░ == (3) List Image Content [W-IX] ======== (4) Update Files directly [W-IX] ====== ░ ░ == (5) Optimize [W-IX] ================== (6) Extract directly [W-IX] =========== ░ ░ ░░░░░░░░░░░░░░░░░░░░░░░░░░░░░░░░░░░░░░░░░░░░░░░░░░░░░░░░░░░░░░░░░░░░░░░░░░░░░░░░░ ░ ░ == (Y) Show Name/Edition-Flags ========== (Z) Create ISO (GPT+MBR) ============== ░ ░ ░ ░ ▓▓▓▓▓▓▓▓▓▓▓▓▓▓▓▓▓▓▓▓▓▓▓▓▓▓▓▓▓▓▓▓▓▓▓▓▓▓▓▓▓ (B) Back ▓▓▓▓▓▓▓▓▓▓▓▓▓▓▓▓▓▓▓▓▓▓▓▓▓▓▓▓▓▓ ■■■■■■■■■■■■■■■■■■■■■■■■■■■■■■■■■■▄/ YOUR CHOICE \▄■■■■■■■■■■■■■■■■■■■■■■■■■■■■■■■■■■ ■>MOUNT/COMMIT SUB MENU:
███████████████████████████████████████████████████████████████████████████████████████

MOUNT MENU [DISM]
▀▀▀▀▀▀▀▀▀▀▀▀▀▀▀▀▀▀▀▀▀▀▀▀▀▀▀▀▀▀▀▀▀▀▀▀▀▀▀▀▀▀▀▀▀▀▀▀▀▀▀▀▀▀▀▀▀▀▀▀▀▀▀▀▀▀▀▀▀▀▀▀▀▀▀▀▀▀▀▀▀▀▀▀▀▀
File...: f:\win\install.wim
Folder.: f:\win\mount
Scratch: C:\Users\s1ave77\AppData\Local\Temp
▀▀▀▀▀▀▀▀▀▀▀▀▀▀▀▀▀▀▀▀▀▀▀▀▀▀▀▀▀▀▀▀▀▀▀▀▀▀▀▀▀▀▀▀▀▀▀▀▀▀▀▀▀▀▀▀▀▀▀▀▀▀▀▀▀▀▀▀▀▀▀▀▀▀▀▀▀▀▀▀▀▀▀▀▀▀▀


   [F] Get Mounted WIM Info
   [V] Get Mounted WIM Version
   [C] Cleanup-WIM and Mountpoints

   [M] Mount Single Index
    Mount Multiple Indices

    Commit Single Index
   [X] Commit Multiple Indices
   [P] Commit All Indices

   [R] Re-Mount Image
   [Y] Re-Mount Multiple Images
   [O] Re-Mount All Images

    Unmount/Commit Single Index
   [Z] Unmount/Commit Multiple Indices
   [T] Unmount/Commit All Indices

   [D] Discard Single Index
   [E] Discard Multiple Indices
   [A] Discard All Indices

   [N] ENTER NEW DATA
    BACK


▀▀▀▀▀▀▀▀▀▀▀▀▀▀▀▀▀▀▀▀▀▀▀▀▀▀▀▀▀▀▀▀▀▀▀▀▀▀▀▀▀▀▀▀▀▀▀▀▀▀▀▀▀▀▀▀▀▀▀▀▀▀▀▀▀▀▀▀▀▀▀▀▀▀▀▀▀▀▀▀▀▀▀▀▀▀▀


YOUR CHOICE:
Stop hovering to collapse…
Click to collapse…
Hover to expand…
Click to expand…
-
Looks good
but
I think the best is combination between GUI and Console/Cmd/Powershell ISEwith abiltly to change profile of Waik 4.1 / 4 vista waik….
have current / default Dirs
like Mount Dir / wim2export…