
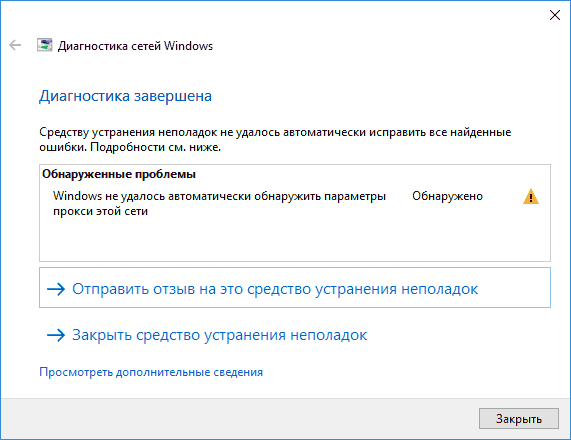
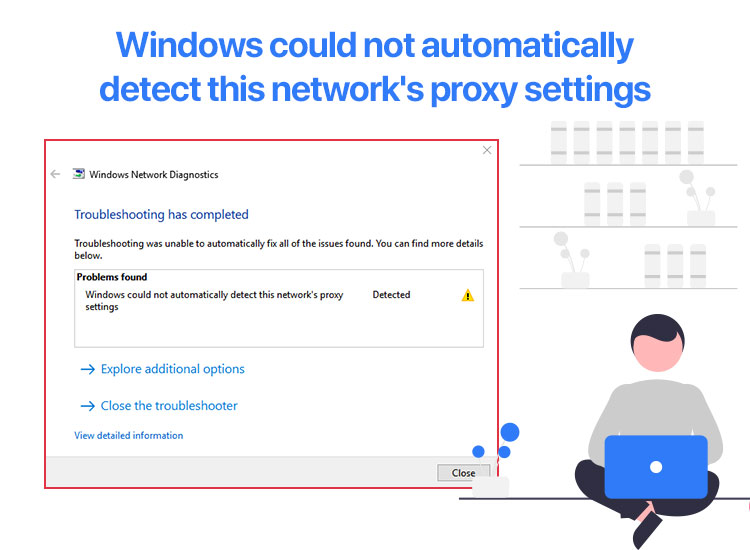
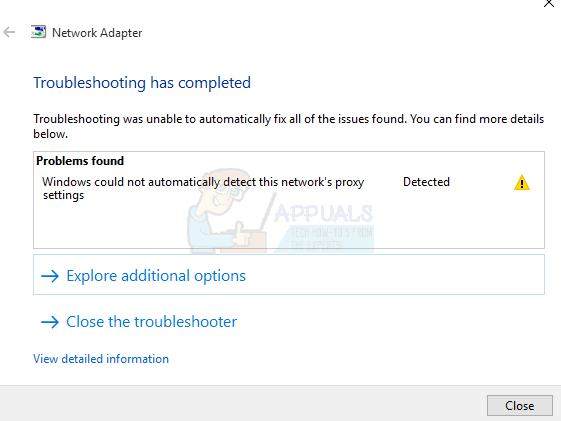
Если у вас не работает Интернет, а при диагностике сетей вы получаете сообщение «Windows не удалось автоматически обнаружить параметры прокси этой сети», в этой инструкции простые способы исправить эту проблему (средство устранения неполадок её не устраняет, а лишь пишет «Обнаружено»).
Эта ошибка в Windows 10, 8 и Windows 7 обычно вызвана неверными настройками прокси-сервера (даже если они кажутся правильными), иногда — сбоями со стороны провайдера или наличием вредоносных программ на компьютере. Все варианты решения рассмотрены далее.
Исправление ошибки не удалось обнаружить параметры прокси этой сети
Первый и чаще всего работающий способ исправить ошибку — вручную изменить параметры прокси сервера для Windows и браузеров. Сделать это можно, используя следующие шаги:
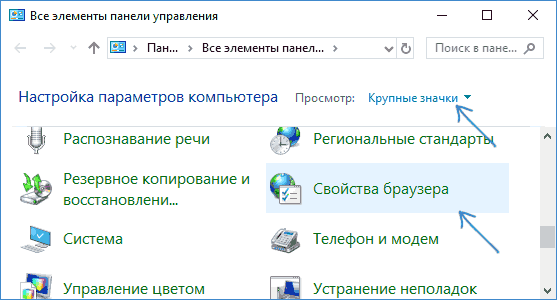
- Зайдите в панель управления (в Windows 10 для этого можно использовать поиск на панели задач).
- В панели управления (в поле «Просмотр» вверху справа установите «Значки») выберите «Свойства браузера» (или «Параметры браузера» в Windows 7).

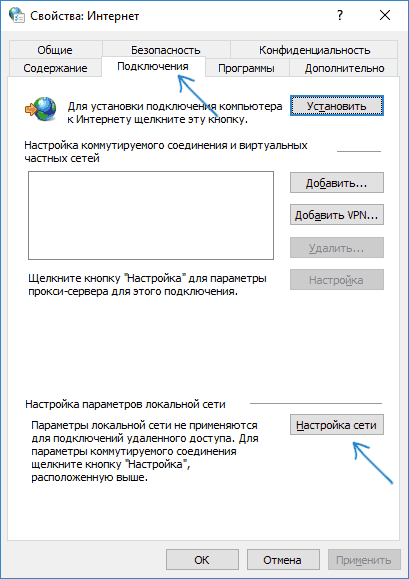
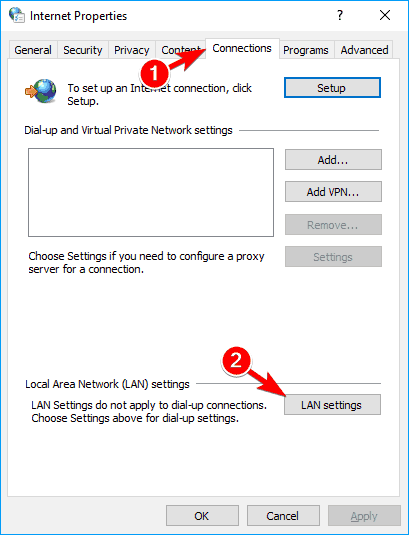
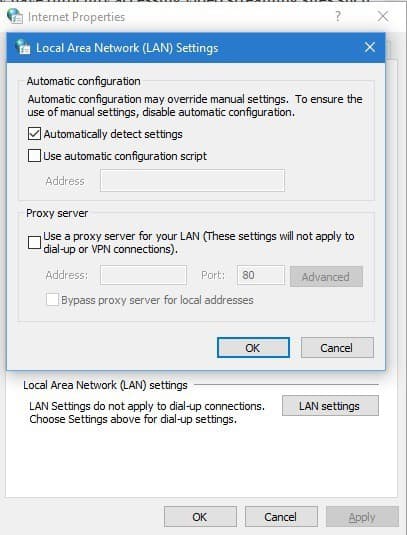
- Откройте вкладку «Подключения» и нажмите кнопку «Настройка сети».

- Снимите все отметки в окне настройки прокси-серверов. В том числе уберите отметку «Автоматическое определение параметров».
- Нажмите «Ок» и проверьте, была ли решена проблема (может потребоваться разорвать подключение и снова подключиться к сети).
Примечание: есть дополнительные способы для Windows 10, см. Как отключить прокси-сервер в Windows и браузере.
В большинстве случаев этого простого метода оказывается достаточно для того, чтобы исправить «Windows не удалось автоматически обнаружить параметры прокси этой сети» и вернуть работоспособность Интернета.
Если же нет, то обязательно попробуйте использовать точки восстановления Windows — иногда, установка какого-то ПО или обновления ОС могут вызвать такую ошибку и при откате к точке восстановления ошибка исправляется.
Видео инструкция
Дополнительные методы исправления
Помимо вышеописанного метода, если он не помог, попробуйте такие варианты:
- Выполните сброс сетевых настроек Windows 10 (если у вас эта версия системы).
- Используйте AdwCleaner для проверки на наличие вредоносных программ и сброса сетевых настроек. Для того, чтобы был выполнен сброс сетевых параметров, перед сканированием установите следующие настройки (см. скриншот).


Также могут помочь следующие две команды для сброса WinSock и протокола IPv4 (следует запускать в командной строке от имени администратора):
- netsh winsock reset
- netsh int ipv4 reset
Думаю, один из вариантов должен помочь, при условии, что проблема не вызвана какими-то сбоями со стороны вашего Интернет-провайдера.
If you see a yellow exclamation mark on the Network icon in the system tray and you receive an error message, Windows could not automatically detect this network’s proxy settings, here are some solutions that might work for you. Although restarting the router can solve this issue, many times, it doesn’t work – and in such cases, you need to troubleshoot further.
What is a proxy server?
A proxy server is a machine that provides a gateway between users and the internet. It’s an intermediary server separating end-user clients from the destinations that they browse and translates traffic between networks or protocols. It is essentially a computer on the internet that has an IP address of its own.
The following suggestions will help you fix the Windows could not automatically detect this network’s proxy settings error on your system:
- Check proxy server settings
- Check Proxy settings in Windows Settings
- Obtain DNS server address automatically
- Restart Network Adapter
- Scan PC with adware removal tool
- Install/update the network driver
- Temporarily disable antivirus, firewall software or VPN
- Use Network Troubleshooter
- Use Network Reset.
Let us see these methods in detail.
1] Check proxy server settings

This is probably the best solution to this problem since this issue generally occurs due to a wrong proxy server. Press Win + R, type inetcpl.cpl and hit the Enter button. Alternatively, you can search for Internet Options in the Taskbar search box or Cortana. After opening the Internet Properties window, switch to Connections tab. You should find a button called LAN settings. Click on it. After that, make sure the Use a proxy server for your LAN option is unchecked. If it is checked, remove the check-mark and save your changes.
2] Check Proxy settings in Windows Settings
If you often use a manual proxy, this is when you need to check up. For that, press Win + I to open Windows Settings panel. After opening, go to Network & Internet > Proxy. On your right-hand side, make sure the proxy setting is correctly entered. Also, you can disable the manual proxy and enable only Automatically detect settings option.
3] Obtain DNS server address automatically
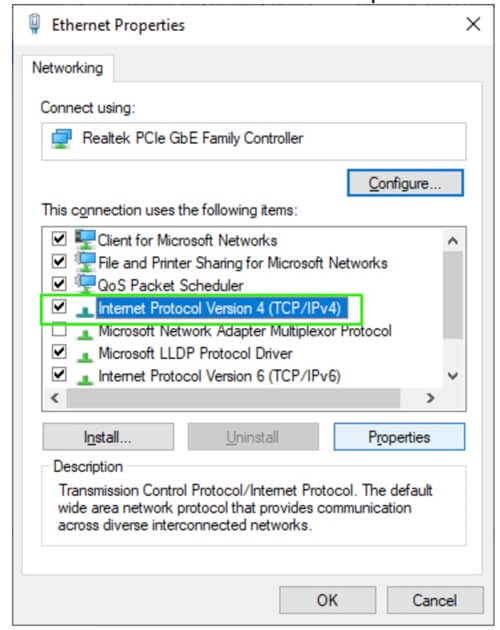
This issue often occurs when you use a direct Ethernet connection or use the Ethernet cable through a Wi-Fi router. If you haven’t enabled this Obtain DNS server address automatically option, you may get the error message.
To confirm, press Win + R, type ncpa.cpl and hit the Enter button. You can find Ethernet or any other connected network name. Right-click on it, select Properties > Internet Protocol Version 4 (TCP/IPv4). Next, click on Properties. In the next window, check whether Obtain DNS server address automatically is selected or not. If not, you need to select it along with Obtain an IP address automatically.
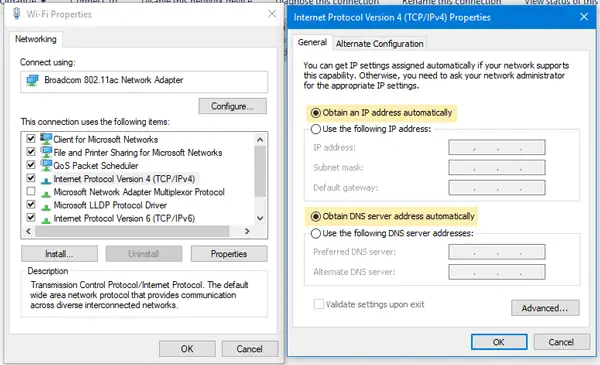
Note: This solution works only when you are using an Ethernet cable through a router. It doesn’t work when you have a direct Ethernet connection.
4] Restart Network Adapter
Every computer has a network adapter that helps users to get an internet connection. You can restart that network adapter and check if it works. To do this, press Win + R, type ncpa.cpl, and hit Enter. Now, right-click on the connected network name and select Disable. After a minute, again right-click on the same and select Enable.
5] Scan PC with adware removal tool
Sometimes, adware and malware can enable the proxy server settings automatically or make some other changes internally. Hence, you might get an error when trying to connect the PC to the internet. Therefore, this is a good idea to scan your full system with a reliable adware removal tool like AdwCleaner. You could also run your antivirus software scan to be doubly safe.
6] Install/update network driver
Although Windows 11/10 detects the network without installing new drivers, you may need to install afresh or update your network driver.
7] Temporarily disable antivirus, firewall software or VPN
If you have recently installed any antivirus, firewall software or VPN app, you should disable it for a short time to check if they are creating an issue or not. Sometimes such software can cause problems related to incoming as well as outgoing connections.
8] Reset TCP/IP
Resetting TCP/IP can fix this issue if the problem is occurring due to corruption.
9] Use Network Troubleshooter
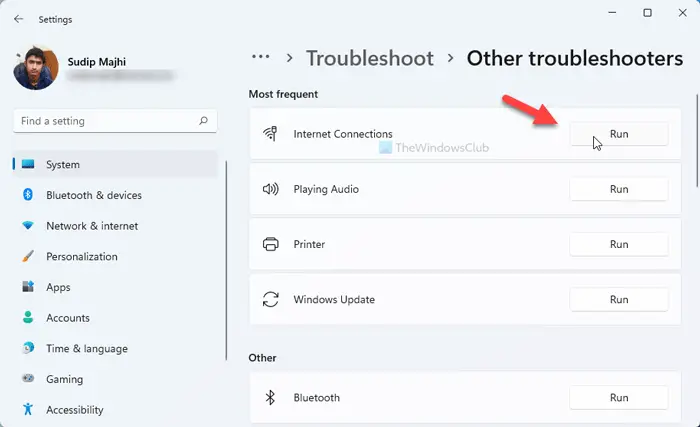
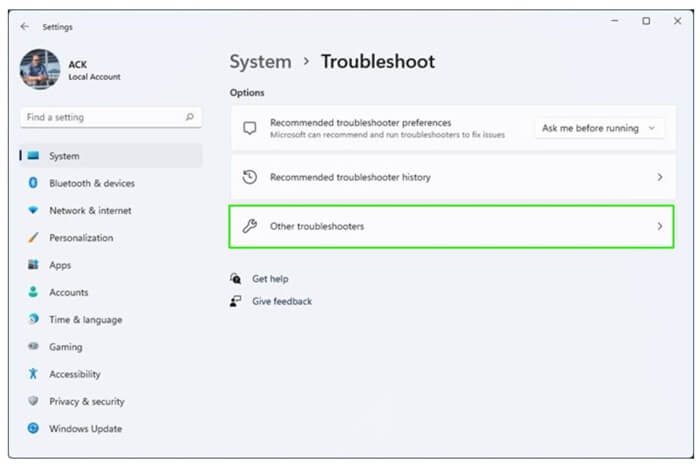
If you are using Windows 11, follow these steps:
- Press Win+I to open Windows Settings.
- Ensure that you are in the System tab.
- Click on the Troubleshoot menu on the right side.
- Click on the Other troubleshooters option.
- Select the Internet Connections Troubleshooter.
- Click the Run button.
- Follow the screen instructions.
However, if you are using Windows 10, follow these steps:
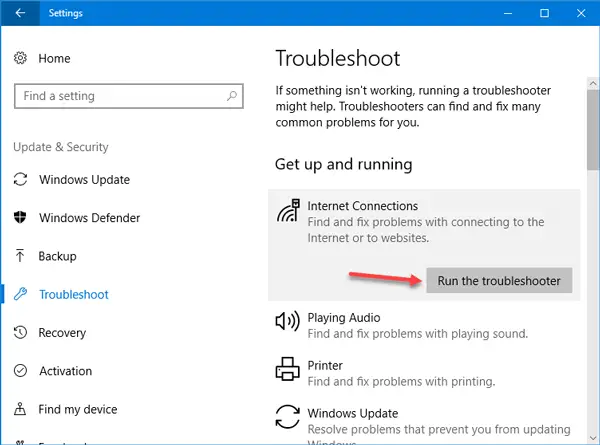
Windows Settings panel comes with a troubleshooter that can fix various internet issues. To use this, press Win + I to open Windows Settings. Then, go to Update & Security > Troubleshoot. On your right-hand side, click on Internet Connections and Run the troubleshooter button and follow the screen instructions.
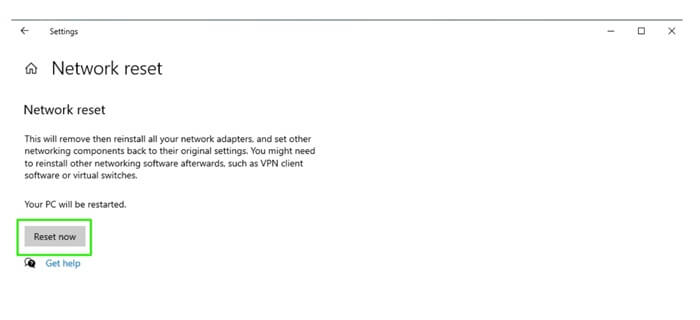
10] Use Network Reset
If nothing helps, you should consider using the Network reset option. To use the Network Reset feature to reinstall Network adapters, reset Networking Components to default, etc, follow these steps:
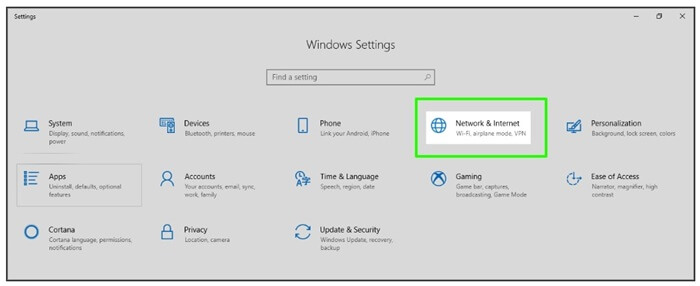
- Open Settings
- Click on Network & Internet
- Click on the Status link on the left side
- Scroll down till you see the Network reset link.
- Click on it to start the process.
The Network Reset feature will first remove and then reinstall all your network adapters and set other networking components back to their original settings and default values. To restore the network connections, adapter settings, network proxy settings to default – and to fix proxy issues, network errors, proxy server issues, etc. you may consider using this function.
How do I automatically detect proxy settings?
To automatically detect proxy settings in Windows 11/10, you need to open the Internet Options panel. To do so, you can search for it in the Taskbar search box and click on the individual search result. Once it is opened, switch to the Connections tab and click on the LAN settings button. Then, tick the Use a proxy server for your LAN checkbox and click the OK button.
How do I fix Windows could not automatically detect this network’s proxy settings?
There could be several things you can do to fix this issue on Windows 11/10 computers. For example, you can start by checking the proxy server settings, proxy settings in the Windows Settings panel, restart the Network Adapter, scan your computer with a reliable adware removal tool, etc. However, if nothing works, you can always run the Network Troubleshooter and reset network settings.
Related reads:
- Fix Network & Internet connection problems
- How to fix Unidentified Network
- Windows can’t get the Network Settings from the router
- Windows cannot connect to the Internet
- No Internet Access in Windows
- Fix Windows Connectivity issues with Hotspots and Wi-Fi adapters
- Limited Network Connectivity message.
Frustrated with the “Windows could not automatically detect this network’s proxy settings” error? You are not alone in this problem. Many users have reported this annoying problem when connecting to a proxy server, owing to misconfigured network settings, issues with the network adapter, or outdated drivers.
Hence, this article presents a quick and easy guide with the most suitable solutions for the “Windows could not detect this network’s proxy settings” error. Let us dive right into them without wasting valuable time.
Fixes for “Windows Could Not Detect Proxy Settings” Error
You can apply these fixes in order (beginning with the first solution and moving down the list of fixes) until the “Windows could not detect proxy settings” issue disappears.
Fix 1: Restart your computer
Before moving to complex solutions, restarting your computer is the easiest thing to do to fix the “Windows could not detect proxy settings” error. Hence, you can follow these steps to restart your computer.
- First, click the Start button on the taskbar.
- Next, click the power icon (a circle with a vertical line).
- Lastly, click Restart and let your computer reboot.
Also know: What is an ISO File in Windows and How to Download It for Windows 7/10/11?
Fix 2: Restart your router
If restarting your computer did not work, restarting your router may help fix the “Windows could not detect this network’s proxy settings” error. Hence, here are the steps to reboot the router.
- First, locate your router’s power button and turn off the device.
- Wait for at least 5 minutes before powering on your router.
Fix 3: Restart your network adapter
Since network adapter problems may have contributed to the “Windows could not detect proxy settings” error, restarting the network adapter is a quick workaround you can try. Here is how to do it.
- First, use the Win+I keyboard shortcut to navigate to your computer’s settings.
- Next, go to the Network & Internet settings.
- In this step, click Change adapter options.
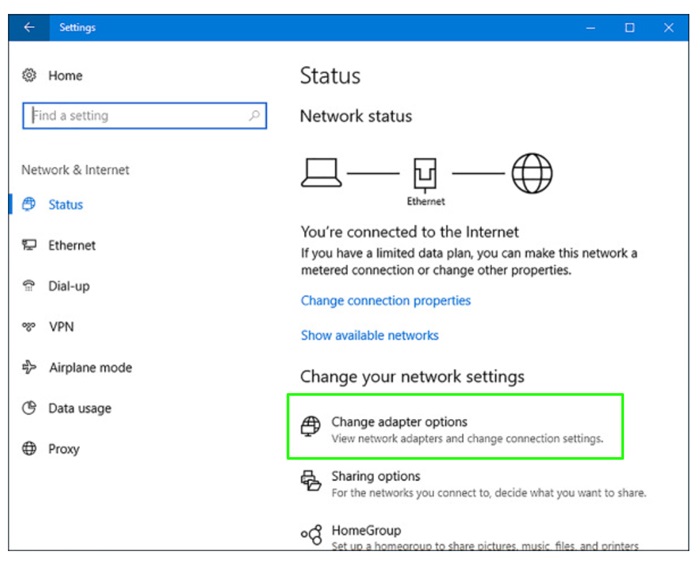
- Next, select your network connection.
- Click the Disable this network device option.
- After waiting for 15 to 30 seconds, click the Enable this network device button to re-enable your network adapter.
Also know: How to Fix DISM Error 0x800f081f on Windows 10 and 11
Fix 4: Check your proxy network settings
Since the “Windows could not automatically detect this network’s proxy settings” error relates to the proxy settings, verifying the proxy settings is a logical solution. You can follow these steps to check the proxy settings.
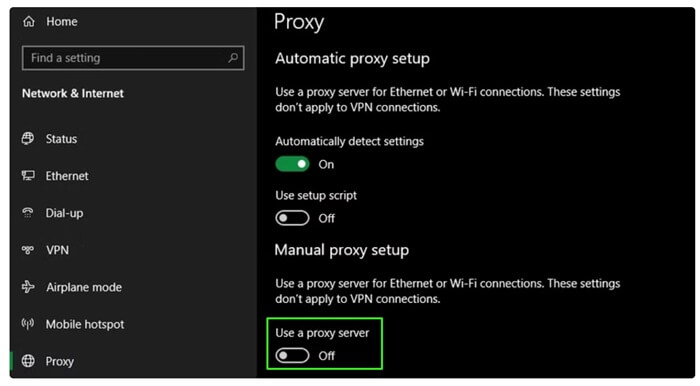
- First, launch Windows settings using the Win+I keyboard shortcut.
- Next, navigate to the Network & Internet settings.
- In this step, click Proxy.
- If you do not use a proxy, ensure the Use a proxy server option is off. Moreover, if the Automatically detect settings option is already enabled, leave it on.
Fix 5: Update network adapter drivers
Outdated drivers are among the top reasons for connectivity problems and may also be responsible for the “Windows could not detect proxy settings” problem. Hence, you can follow these directions to update the network drivers on your computer.
- First, right-click the Start button on your taskbar and choose Device Manager.
- Once the Device Manager appears, locate and expand the Network adapters category by double-clicking on it.
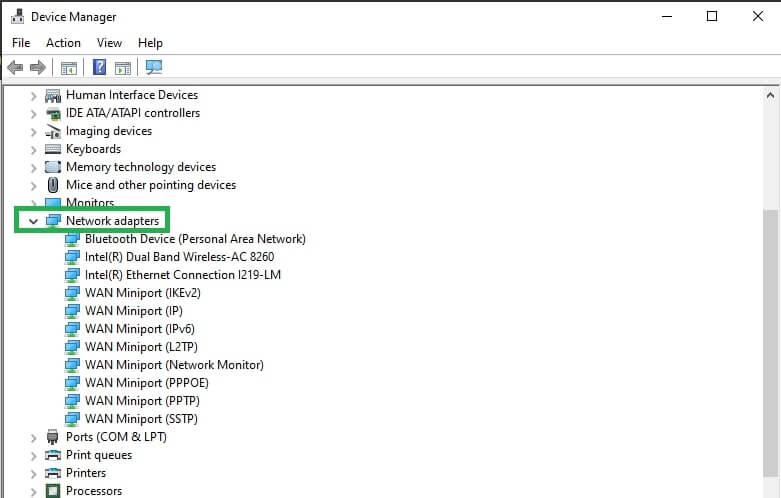
- Right-click your WiFi or Ethernet network adapter and select Update driver from the context menu.
- Choose the option allowing Windows to search automatically for drivers.
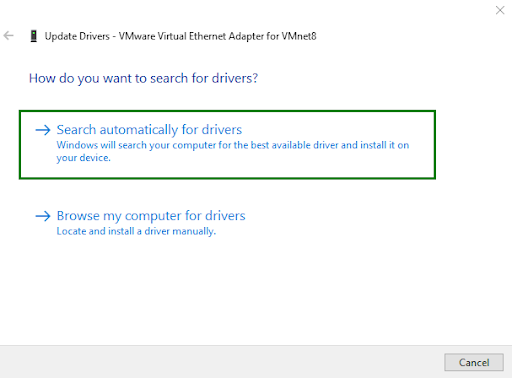
- Wait for the driver update process to complete.
- Lastly, restart your computer after completing the above steps.
Fix 6: Check your DNS and IP server addresses
Manually obtaining the IP and DNS server addresses may be a reason your computer runs into the “Windows could not detect this network’s proxy settings” error. This is so because when a pre-configured address is entered, the computer only uses that address to access the internet, and if the address does not work, it leads to problems.
Hence, below is how you can check and allow your computer to get the IP and DNS address automatically.
- First, use the Win+R keyboard shortcut to launch the Run utility.
- Next, input Control in the Run box and press Enter to open the Control Panel application.
- Once the Control Panel opens, set the view mode to Category.
- Next, click Network and Internet.
- In this step, navigate to the Network and Sharing Center.
- Next, choose the Change adapter settings option.
- If using a wireless network, right-click WiFi. If using a wired or LAN connection, right-click Ethernet.
- Choose Properties from the on-screen context menu.
- Next, click Internet Protocol Version 4 (TCP/IPv4).
- In this step, click Properties.
- Choose to obtain an IP address automatically, and obtain a DNS server address automatically.
- Lastly, click OK to exit the window.
Also know: Fixed: Something Went Wrong 1001 Error on Windows 11 and 10
Fix 7: Perform network troubleshooting
Windows boasts a built-in internet connection troubleshooting utility that might help you troubleshoot issues like “Windows could not automatically detect this network’s proxy settings.” You can follow these steps to utilize this network troubleshooter to solve the problem.
- First, use the Win+I keyboard shortcut to open Windows settings.
- Next, navigate to System settings.
- Choose Troubleshoot from the system settings menu.
- Next, navigate to the other troubleshooters.
- In this step, scroll down to and click on Network Adapter.
- Click Run to begin the troubleshooting.
- Lastly, follow the on-screen instructions after completing the above steps.
Fix 8: Reset network settings
If none of the above solutions did the trick for you, you may try resetting your network settings. Network settings reset restores the proxy servers to the default settings and roll back network configurations to their initial settings. Hence, after closing all the background applications, you can follow these steps to reset the network settings.
- First, press the Windows and I keys simultaneously to launch Settings.
- Next, choose the Network & Internet settings.
- In this step, click Advanced network settings.
- Scroll down to More settings and click Network reset.
- Lastly, click Reset now, wait for the process to complete, and restart your computer.
Fix 9: Clean boot your computer
Third-party applications may interfere with your network connection and cause issues like “Windows could not detect this network’s proxy settings.” Hence, performing a clean boot can help fix the problem. Here is how to do it.
- First, use the Win+R hotkey to launch the Run utility.
- Next, type msconfig in the on-screen Run box and press Enter.
- Once the System Configuration window opens, navigate to the Services tab.
- In this step, select the Hide all Microsoft services option.

- Next, click Disable all.
- In this step, navigate to the Startup tab and click Open Task Manager.
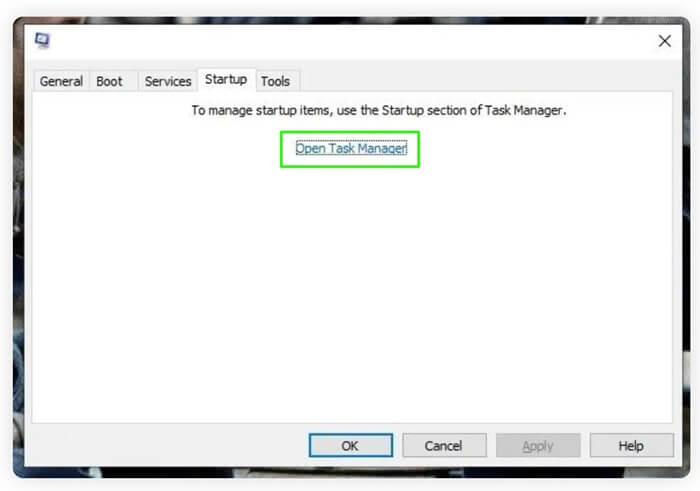
- Once Task Manager opens, right-click each startup item and choose Disable.
- Exit the Task Manager.
- Return to the System Configuration window and click OK.
- Lastly, restart your computer to complete the task.
Also know: How to Fix bootrec /fixboot Access is denied Error in Windows 11
“Windows Could Not Automatically Detect This Network’s Proxy Settings” Error Fixed
That is all for fixing the “Windows could not detect proxy settings” error. We hope one of these solutions will solve the problem for you. However, if you have any questions or feedback about this guide, do not hesitate to let us know through the comments section. Also, if you liked this article, please give us a thumbs up by subscribing to our posts so we can continue to work hard to make tech easy.
Sometimes you might see a yellow warning sign on your Wi-Fi name in the system tray. If you right-click the Wi-Fi name and select Troubleshoot then you will most likely see the error with the message “Windows could not automatically detect this network’s proxy settings”. Although the yellow warning sign doesn’t always mean that you will get this error but it’s highly likely especially if you can’t use your internet or if your internet is really slow. This error can appear at any time without any prior signs and will most likely prevent you from using the internet.
The error can be caused by a change in proxy settings of your Windows. The change in settings can be caused by an infection or change in system files and network settings or file corruptions that will lead to a change in network settings. All of these can be caused by malware or because of some system file issues on your computer which can also prevent an internet connection from being established in Windows.
You should go through the general troubleshooting first to eliminate any possibility. If the general troubleshooting doesn’t solve the problem then move towards the solution methods because those are in detail.
1. Reset your Network Configurations
The very first thing you should do is reset the Winsock with the commands given below. Basically what you will do by following the commands given below is reset the Winsock settings back to the default or clean state. So if any changes were made that were causing the issue the problem should solve with this method.
- Press the Windows key once
- Type cmd in the Start Search box
- Right-click on the Command Prompt and click Run as administrator…
- Type in the following command and press “Enter”.
netsh winsock reset catalog

Resetting your Winsock Catalog - Now restart your computer and check whether the problem is solved or not. If it’s still there then continue.
- Type in the following command and press enter.
netsh int ipv4 reset reset.log
- Then type the following commands.
netsh int ipv6 reset reset.log
ipconfig /flushdns
ipconfig /release
ipconfig /renew
- Type exit and press Enter

Now check if the problem is solved or not. If the problem isn’t solved then restart your computer and then check.
2. Disable Automatic Proxy Settings Check
Going to the internet options given in your Windows and unchecking the proxy server option solves the problem as well. Basically, you are turning off the option that tells your computer to use certain proxy settings. Whether you turned it on yourself or not, it’s a good thing to turn it off so that Windows can automatically detect proxy settings.
- Hold Windows key and press R
- Type inetcpl.cpl and press Enter
Run/inetcpl.cpl - Click Connections tab
- Click the LAN Settings button
- Uncheck the option that says Use proxy servers for your LAN (these settings will not apply to dial-up or VPN connections) under the proxy server section
- Click ok and then click ok again.
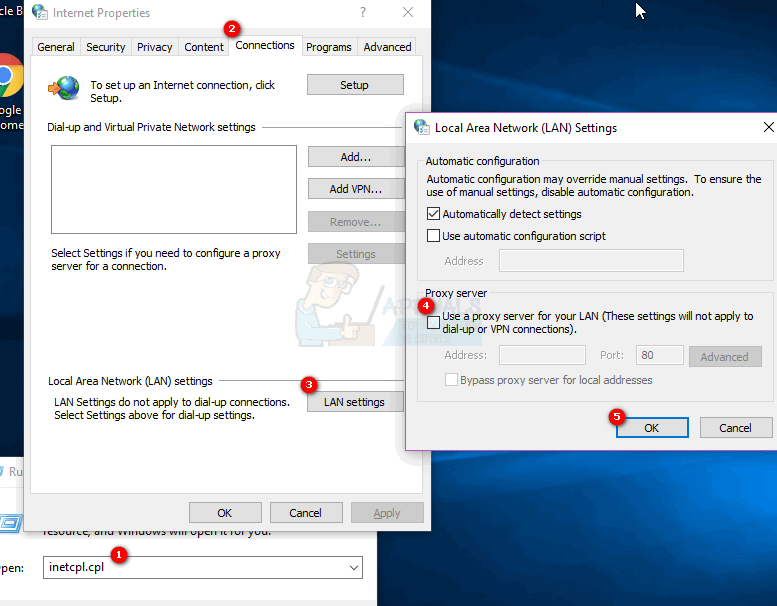
Now check your internet connection and it should work fine now.
3. Check for Virus
Sometimes malware or infection might be causing this issue. There is a lot of malware that changes the settings of your internet to either stop your access to the internet or make all your traffic go towards their preferred settings so that it can be watched.
This is an extreme case but not an impossible one. This can be an issue for you especially if you don’t have any Antivirus or the issue started after installing new software.
Follow the steps given below to check whether the issue is because of an infection or not
- Use an Antivirus to scan your computer thoroughly. You can use any Antivirus but we recommend Malware Bytes. Go here and download the Malware Bytes for your computer and install it.
- Scan your computer and see if it gets any infections. If Malware Bytes catches some bad files then delete those and then check if the issue is still there or not.
4. Restore your Windows from System Restore
If the issue is caused by a change in settings because of file corruption or infection then performing a System Restore is also a good option. Performing a System Restore is the best option especially if the problem is new or started after downloading a certain software.
Go here for a complete step-by-step guide to restoring your system from a System Restore Point. Try to go back to a point when you are sure you didn’t have this problem. Once you are done, check to see if the problem is still there or not.
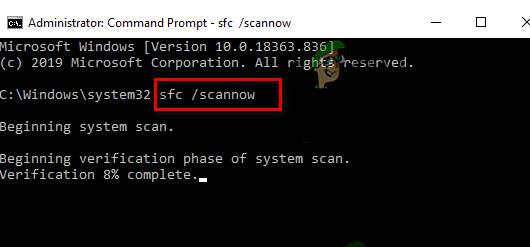
5. Do an SFC Scan
Since your problem can be because of corrupted system files that changed the internet settings, perform the SFC scan is a good option and solves the problem for many users. Basically, an SFC scan scans your system files and replaces any corrupted ones with the correct ones that are stored in your system.
So if the problem was because of corrupted files, the SFC scan should solve it.
- Press the Windows key once
- Type cmd in the Start Search box
- Right-click on the Command Prompt and click Run as administrator…
- Type SFC /scannow and press Enter

Perform an SFC Scan - Wait for it to finish. You will see the results
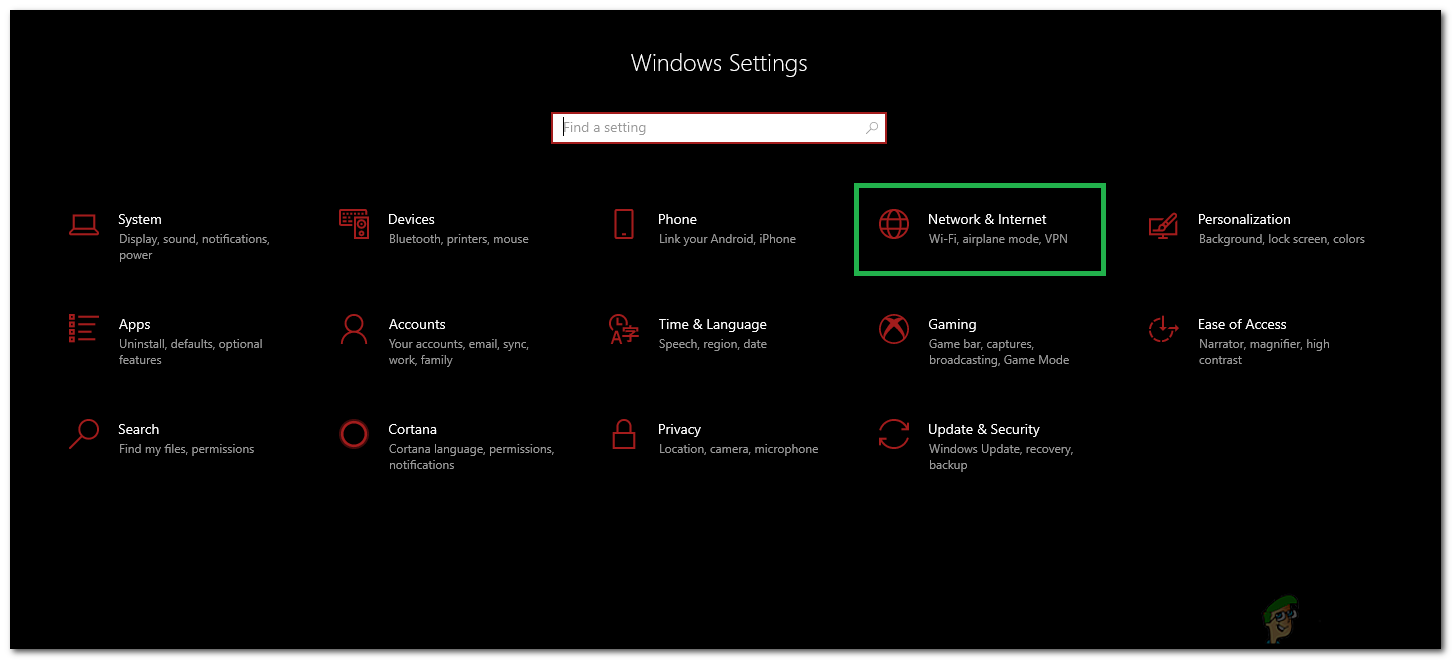
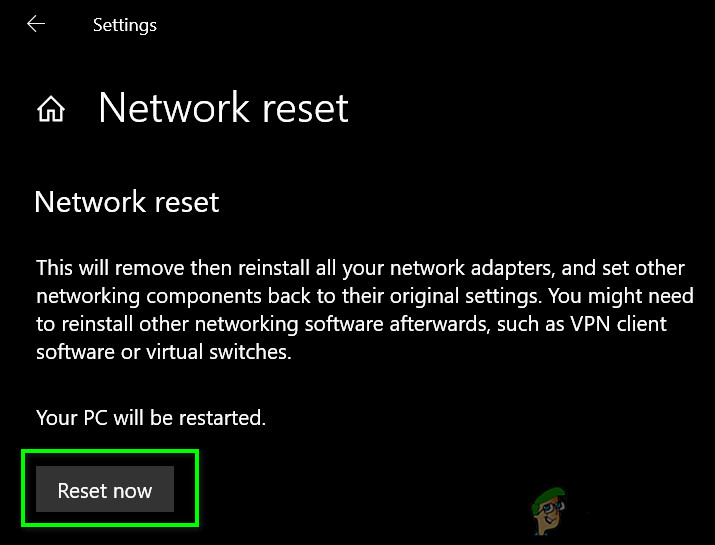
6. Reset your Network through Settings
In certain cases, some network restrictions or Firewall configurations can prevent the computer from being able to connect to the internet. It is also possible that certain network configurations have been outdated on your computer. Therefore, in this step, we will be performing a network reset. For that:
- Press “Windows” + “I” to open the settings.
- In the settings, click on the “Network and Internet” option and then select “Status” from the left pane.

Selecting “Network and Internet” Options - In here, click on the “Network Reset” option at the end of the list and select the “Reset Now” button.

Press Reset Network Button - Check to see if the issue persists after the network has been reset.
7. Reset your Network Adaptor
The network adapter may have acquired some incorrect configurations which are preventing it from being able to function properly. Therefore, in this step, we will be resetting the network adapter. To do so, follow the guide below.
- Press “Windows” + “R” to open the Run prompt.
- Type in “ncpa.cpl” and press “Enter” to open the Network Connections settings.
Running Network settings - In the Network Connections, right-click on the Network Adapter that you are using and select “Disable”.

Disable Network Connection - After some time, right-click on it again and click on “Enable”.
- Wait some time and check to see if the issue persists.

Once the scan is finished and successful, try to check the internet again and see if the problem is there or not.
8. Enable the Required Services
Some services are responsible for setting up new connections and make sure that all the configurations are working as they should. However, these services can be stopped by a third-party bad tweaking program. To fix this issue, follow these steps:-
- Search for Command Prompt in the search bar.
- Right-click on the Command Prompt and run it as an administrator.
- Type the following commands one by one to enable the essential configuration services:-
sc config Wlansvc start= demand
sc config dot3svc start= demand
sc config Dhcp start= auto
- Now restart your computer and check to see if the issue persists.
9. Reset and Setup a Static IP address
Setting up your Static IP can potentially fix this issue as you will manually configure the essential settings that are required to run the network smoothly. Fortunately, we have an article on this topic with a detailed explanation and methods to set up a Static IP address. You can check to follow the steps to reset and change your IP address here.
10. Reset all Network and Adaptor Configurations
We are going to reset our network configurations and remove the drivers of network adaptors completely from our Windows. We can do that by using Command Prompt, resetting these configurations will also reset and install your network drivers so you don’t have to worry about anything. To reset all your network settings, follow these steps:-
- Search for Command Prompt in the search bar and click “Run as Administrator”.
- Once the Command Prompt is opened type the following command and press enter:-
netcfg -d
- Wait for the Command to execute properly and once that’s completed, you can simply restart your computer.
- Check to see if the issue persists.
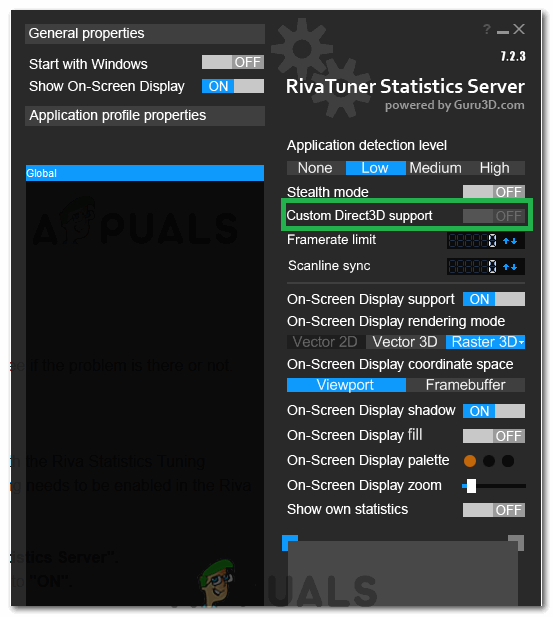
11. Enable Custom 3D Support (MSI Afterburner)
This solution primarily focuses on users who use the MSI Afterburner along with the Riva Statistics Tuning Server to monitor the performance of their hardware. In some cases, this setting needs to be enabled in the Riva Server to get everything working in line with the overlay. For that:
- Click on the “System Tray” icons and double click on the “Riva Tuner Statistics Server”.
- It should open up its settings, make sure to turn the “Custom 3D support” to “ON”.

Turning Custom 3D Support ON - Check to see if the issue persists while opening the steam overlay.
If none of the steps above helped you then there is something wrong with your router or internet connection. We really suggest you give your ISP a call and let them know about the situation you are having. So that they can assist you with the problem as in some cases users reported changing their router fixed the issue for them.
Kevin Arrows
Kevin Arrows is a highly experienced and knowledgeable technology specialist with over a decade of industry experience. He holds a Microsoft Certified Technology Specialist (MCTS) certification and has a deep passion for staying up-to-date on the latest tech developments. Kevin has written extensively on a wide range of tech-related topics, showcasing his expertise and knowledge in areas such as software development, cybersecurity, and cloud computing. His contributions to the tech field have been widely recognized and respected by his peers, and he is highly regarded for his ability to explain complex technical concepts in a clear and concise manner.
Every operating system has some sort of problem and the same goes for Windows 10. Speaking of which, few Windows 10 users have been experiencing proxy issues.
According to users, they are getting Windows could not automatically detect this network’s proxy settings error message.
If you’re having similar problems, do have a look at our solutions below. There are many proxy-related issues that can occur, and in this article, we’re going to cover the following problems:
- Windows 10 can’t detect proxy settings
- This is a common variation of this error and it can be easily fixed by using one of our solutions.
- Windows could not automatically detect proxy server
- Sometimes you might get a message saying that Windows can’t detect the proxy server.
- This issue is usually related to your network configuration.
- Windows won’t save proxy settings
- According to users, they are unable to save their proxy settings.
- This is a common error but you should be able to fix it with solutions from this article.
- Windows proxy settings keep changing
- This is another common problem with proxy.
- According to users, their proxy settings keep changing and they are unable to configure the proxy.
- Windows 10 proxy settings not saving, changing
- This is probably one of the most annoying proxy errors that can occur.
- According to users, they are unable to save or change their proxy settings.
NOTE
This issue affects all versions of Windows from old school Windows 7 to the latest, Windows 11.
Windows could not automatically detect this network’s proxy settings in Windows 7
If you’re still running on Windows 7 and you happen to come across this error message, follow these quick steps before trying anything else:
- Open Internet Explorer and go to Tools, then Internet Options.
- Switch to the Connections tab and set the Automatically detect settings option and all its sub-sections to off.
- Restart your PC and see if the error persists.
Users report that the Internet on their computers is running very slow and they have difficulty accessing video streaming sites such as Youtube, Vimeo, and Netflix.
As you can see, this can be quite a problem and cause many inconveniences, but luckily for you, we have the solutions.
How to deal with proxy issues on Windows 10?
1. Check your proxy server settings
- Press Windows Key + R on the keyboard.
- When Run dialog appears type inetcpl.cpl and hit Enter.
- Click the Connections tab, and then click the LAN settings button.

- Check if your proxy settings are okay.

2. Reset TCP/IP
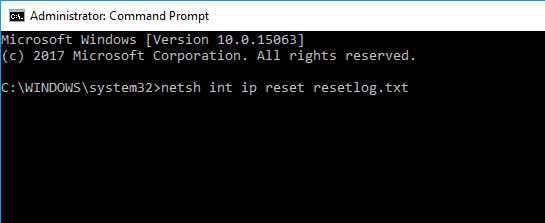
- Press Windows Key + X and select Command Prompt (Admin) from the menu.
- When Command Prompt starts, type:
netsh int ip reset resetlog.txt
- Restart your computer and see if the issue is resolved.
If you’re unable to access the Command prompt as an administrator, make sure you have the latest updates installed. Alternatively, you can try to create a new user account.
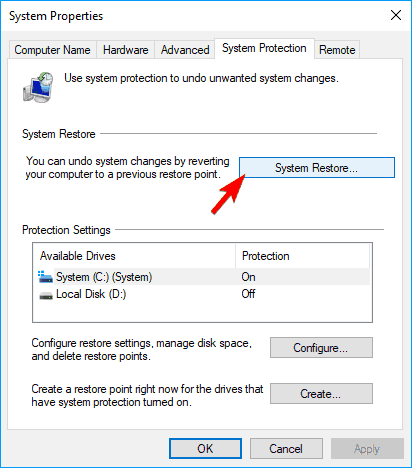
3. Use System Restore
- Press Windows Key + S and enter system restore.
- Select Create a restore point from the list of results.
- System Properties window will now appear.
- Click on System Restore button.

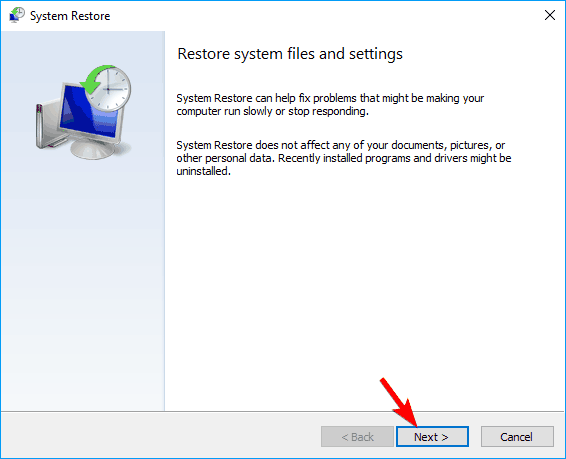
- When System Restore window appears, click on Next.

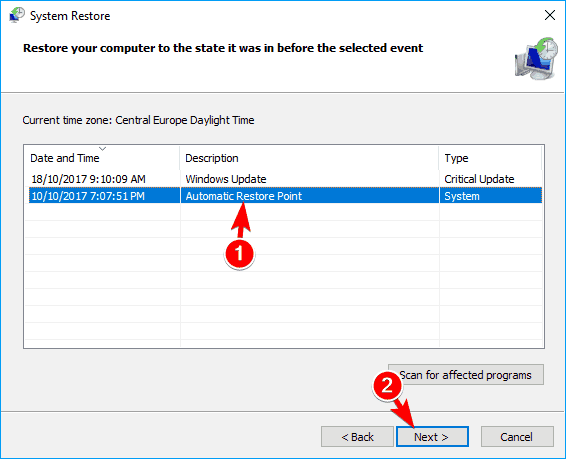
- Now you should see a list of recent restore points.
- If available, check Show additional restore points option.
- Select the desired restore point and click on Next.
- Follow the instructions on the screen to complete the restoration process.
After completing the restoration, the error message should be resolved and everything will start working again.
Many users reported that this solution fixed the problem for them, so be sure to try it out.
If you have not yet created a system restore point, we recommend you to do that regularly, because it can help with many problems PC users experience.
Also, if the System Restore doesn’t complete and you encounter some kind of error, try doing the same procedure in Safe Mode.
3.1. Use a dedicated third-party program
One other solution would be to use specialized software that can repair your computer files and bring your settings back to default. Sometimes your settings can get screwed up by corrupted system files.
4. Perform an SFC scan
- Open Command Prompt as an administrator.
- To see how to do that, check Solution 2.
- Now enter the following command:
sfc/scannow
- The SFC scan will now start.
- The scanning process can take about 10-15 minutes, so don’t interrupt it.

If you can’t perform the scannow operation because of an error, this article will help you get past it.
According to users, you can fix Windows could not automatically detect proxy simply by using Command Prompt.
Once the scan is finished, check if the problem still appears. If so, you might have to use DISM scan.
- To do that, open Command Prompt as administrator.
- Enter the command:
DISM /Online /Cleanup-Image /RestoreHealth
DISM scan can take about 20 minutes or more, so don’t interrupt it. Once the DISM scan is finished, check if the issue is resolved. If you were unable to run the SFC scan before, try running it after the DISM scan.
After running both scans, your issue should be resolved. Several users reported that SFC scan fixed the problem for them, so we advise you to try it out.
Want to know more about corrupted files on Windows 10 and what can you do? Take a look at this amazing guide about it.
5. Uninstall your antivirus software
Using your computer without an antivirus is not the best idea, but fortunately for you, Windows 10 comes with Windows Defender which will protect you when you remove your antivirus software.
According to some users, your antivirus software such as AVG can cause some issues with proxy on Windows 10, so it’s advisable to remove your current antivirus software.
There are specific ways to remove your particular antivirus. For example, you can uninstall Norton Antivirus from Programs and Features, with its own uninstaller tool, or you can remove it in Safe Mode.
McAfee has its own removal tool and if that won’t work you can try uninstalling it from the Windows Control Panel.
In case you want to be secure while surfing the internet, you will need to get a full-dedicated tool to secure your network. A VPN protects your PC from online attacks, masks your IP address, and blocks all unwanted access.
To properly remove an antivirus program, we recommend using a third-party uninstaller application that will thoroughly clean your PC of any tough entries that may resist a simple removal.
In other circumstances, it appears to be even preferable. For example, CCleaner allows you to not only delete your antivirus software but also thoroughly wipe the internal drive of all traces of it.
⇒ Get CCleaner
After removing your antivirus software check if the issue is resolved. If the issue is resolved be sure to download and install different antivirus software.
- Fix: ERROR_EVENT_PENDING (The TDI indication has entered the pending state)
- Error Dolphin-028: How to Fix the Login Error in Ubisoft Connect
- Windows 11 Mobile Hotspot Stuck on Disconnecting [Solved]
6. Reset your Internet settings
- Press Windows Key + S and enter internet options.
- Select Internet Options from the menu.
- Navigate to the Advanced tab and click on Reset.
- Click the Reset button.
- If you want, you can clear your personal data by checking Delete personal settings.

- Optional: Click on Restore advanced settings.
- Now click on Apply and OK to save changes.

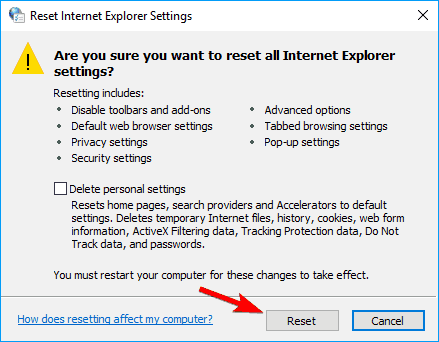
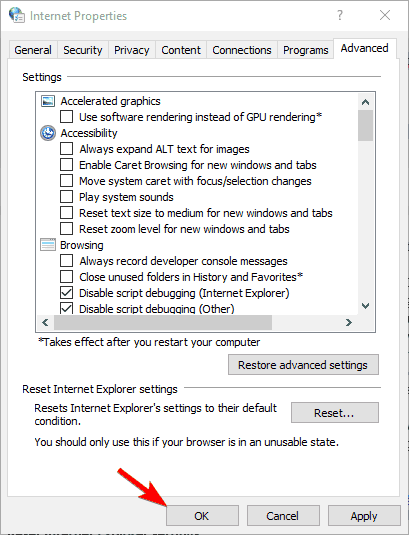
Windows Could not automatically detect network’s proxy settings error can sometimes occur due to your Internet settings. However, you should be able to fix the issue simply by resetting your settings to default.
After resetting your Internet settings the issue should be resolved.
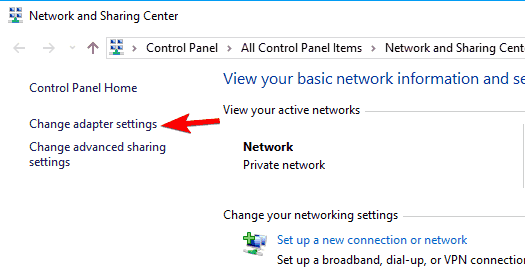
7. Restart your network adapter
- Right click the network icon in the bottom right corner and choose Open Network and Sharing Center.

- Click on Change adapter settings from the menu on the left.

- Locate your network connection, right click it and choose Disable.
- Now right click your network connection again and choose Enable from the menu.
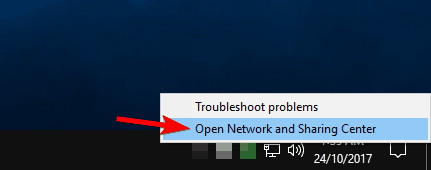
One of the simplest ways to fix Windows could not automatically detect network’s proxy settings error is to restart your network adapter.
After restarting your network adapter, the issue should be resolved and your network connection will start working again.
Keep in mind that this might not be a permanent solution, so you’ll have to repeat it if the problem reappears.
8. Enable Obtain DNS server address automatically
- Open Network and Sharing Center and go to Change adapter settings.
- Locate your network connection, right click it and choose Properties from the menu.
- Select Internet Protocol Version 4 (TCP/IPv4) and click on Properties button.
- Select Obtain DNS server address automatically and click on OK to save changes.

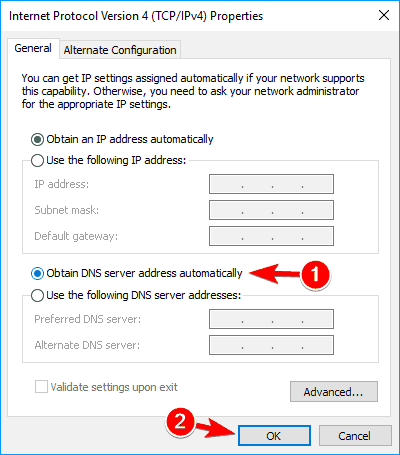
According to users, you might be able to fix Windows could not automatically detect network’s proxy settings error simply by obtaining your DNS automatically.
Many users prefer setting their DNS manually, but sometimes it’s better to use automatic settings.
After doing that, the issue should be resolved and you’ll be able to access the Internet without any problems. If the DNS server is not responding, make sure all your drivers are up to date.
9. Change proxy settings
- Press Windows Key + I to open the Settings app.
- When Settings app opens, navigate to Network & Internet section.

- In the left pane, go to Proxy and in the right pane disable Automatically detect settings.


Users reported that disabling this feature fixed the problem for them, so make sure you try it.
Users also report experiencing an error that won’t let the proxy turn off at all on Windows 10. If this is the case for you, you will have to fix this issue first and then move on to change your settings.
- Automatically detect settings keeps getting checked
- Unable to Connect to proxy server in Windows 10/11
- No internet, There is something wrong with proxy server
- How to configure global proxy settings on a Windows 10 PC
10. Run network troubleshooter
- Open the Settings app and navigate to the Update & security section.

- In the left pane select Troubleshoot.
- Select Network Adapter in the right pane and click on Run the troubleshooter.

- When Troubleshooter opens, follow the instructions on the screen to complete it.
- Optional: Some users are recommending to run Internet Connections troubleshooter, so you might want to try that as well.
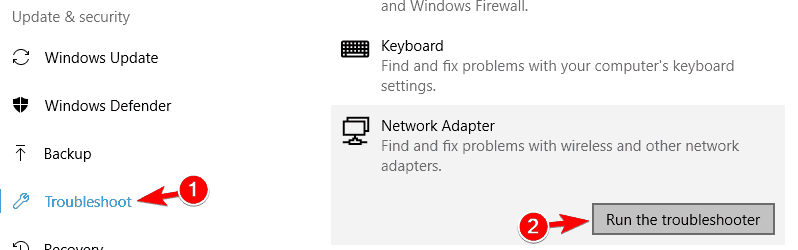
After completing the troubleshooting, the issue should be resolved completely.
Windows 10 proxy issues can cause many problems. If you’re getting Windows could not automatically detect network’s proxy settings error, we hope that some of our solutions will be helpful for you.
We recommend you look into the best antivirus software on the market to make sure you get an up-to-date tool that will truly protect your PC without interfering with your connection.
If you’re aware of another method to solve this problem, share your troubleshooting steps in the comments section below. You can also leave there any other questions that you have.