
Hi
sometimes you want to copy files which are exclusively locked by other processes.
This can be done s by using volume shadow copies. Out of the box it is not possible to do this at command line.
The Tool you need is vshadow.exe which is part of the Microsoft Windows SDK. Install the SDK. The executable can then be found in the folder “Microsoft SDKs\Windows\v7.1\Bin\vsstools”.
Note: You can copy all files by using volume shadow copies, but keep in mind you can only make consistent backups of files which are covered my a vss writer. Means if a snapshot is taken the vss writer ensures that the file(s) on the disk(s) is/are in a consistent state. For example an SQL Server. The vss writer of the SQL Server brings the whole database, and all files which belongs to, in an state where you can backup it by simply copying the files from the snapshot.
A list of files and folders which are affected by which writer can be get by
c:\> vshadow.exe -wm
Lets start backup. Create a snapshot of the drive on which the files resist you want to copy. In this example i will copy the HKEY_LOCAL_MACHINE\Software Registry hive. The correspondent file is %SystemRoot%\System32\config\SOFTWARE.
If you try to copy it you’ll get an error.
C:\>copy  %SystemRoot%\System32\config\SOFTWARE D:\Temp

The process cannot access the file because it is being used by another process.

        0 file(s) copied.
This file is part of the VSS “Registry Writer”
* WRITER "Registry Writer"
    - WriterId   = {afbab4a2-367d-4d15-a586-71dbb18f8485}
    - InstanceId = {6471eea9-f4ad-4ef4-88b7-b6b49dd29def}
    - Supports restore events = FALSE
    - Writer restore conditions = VSS_WRE_NEVER
    - Restore method = VSS_RME_RESTORE_AT_REBOOT_IF_CANNOT_REPLACE
    - Requires reboot after restore = TRUE
    ....
       - Affected paths by this component:
         - C:\WINDOWS\System32\SMI\Store\Machine
         - C:\WINDOWS\system32\config
    ....
Take a persitent (to expose it later) snapshot of the C: Drive. The script parameter creates a file which contains environment variables with information of the snapshot just created. If your file is not affected my any writer append the no writer switch -nw. This speeds up the creation of the snapshot.
C:\> vshadow.exe -p -script=env.cmd C:
Note: If you got an error “ERROR: COM call “m_pVssObject->InitializeForBackup()” failed. Then you use vshadow with the wrong CPU architecture. Only x64 binaries work on x64 system.
To use those variables simply execute the cmd file
C:\> env.cmd

[This script is generated by VSHADOW.EXE for the shadow set {bc471dd4-fdb6-4fd7-a3db-997639f59dae}]

SET SHADOW_SET_ID={bc471dd4-fdb6-4fd7-a3db-997639f59dae}

SET SHADOW_ID_1={a167f0ca-aa23-466b-839c-0f1a68e3866c}

SET SHADOW_DEVICE_1=\\?\GLOBALROOT\Device\HarddiskVolumeShadowCopy1
Create an directory to expose the snapshot.
c:\> mkdir D:\mnt
And expose the snapshot in an (empty) folder. You can also expose the snapshot as a drive letter.
c:\ >vshadow.exe -el=%SHADOW_ID_1%,D:\mnt
Copy the file
c:\> copy D:\mnt\Windows\System32\config\SOFTWARE D:\Temp
Deleting snapshot will also remove the snapshot “mount”.
d:\> vshadow.exe -ds=%SHADOW_ID_1%
It’s also possible to “mount” a snapshot into the filesystem. Here D:\mnt. The folder mustn’t exists, it is created by mklink. Note the trailing “\” backslash at the end of the snapshot path. Otherwise the folder D:\mnt is empty.
d:\> mklink /d D:\mnt %SHADOW_DEVICE_1%\
Deleting the mount point and remove the link
d:\> rmdir D:\mnt
Michael
My Knowledgebase for things about Linux, Windows, VMware, Electronic and so on…
This website uses cookies to improve your experience and to serv personalized advertising by google adsense. By using this website, you consent to the use of cookies for personalized content and advertising. For more information about cookies, please see our Privacy Policy, but you can opt-out if you wish. Accept Reject Read More
Locked or open files are not only problematic when trying to delete them on the computer system. They can also be problematic when a user tries to move a folder with files or single files to a different location. One extreme example would be moving the Windows folder to another hard drive to replace the old one. Windows would not allow some files to be copied to the new destination.
Shadow Copy has to be installed on the computer system but can be run afterwards from the command prompt or by opening the graphical user interface. Running the tool from the command line will still open the interface after sending the command but it will require no user interaction unless errors occur.
Shadow Copy makes use of the Microsoft’s Volume Shadow service which means that this service has to be running to work with Shadow Copy. Microsoft renamed the feature in Windows Vista to Previous Versions. The service provides the means to copy any accessible file without having to worry about if the file is locked or open.
It is possible to copy the Windows folder to another location using the Shadow Copy software. Shadow Copy is compatible with Windows XP, Windows Server 2003 and Windows Vista. The software is portable as the installed files can be executed independently from the installation. (Tested after uninstalling the software)
Advertisement
There are many, many reasons why you might want to copy files in Windows, especially if you’re trying to fix a problem.
A file copy might be necessary during a troubleshooting process if, for example, you suspect a corrupt or missing system file. On the other hand, sometimes you’ll copy a file to provide a backup while you make changes to an important file that might have a negative impact on your system.
No matter the reason, the file copy process is a standard function of any operating system, including all versions of Windows.
What Does It Mean to Copy a File?
A file copy is just that—an exact copy, or a duplicate. The original file isn’t removed or altered in any way. Copying a file is simply putting the exact same file in some other location, again, without making any changes to the original.
It can be easy to confuse a file copy with a file cut, which is copying the original just like a regular copy, but then deleting the original once the copy has been made. Cutting a file is different because it actually moves the file from one location to another.
How to Copy a File in Windows
A file copy is most easily accomplished from within File Explorer, but there are some other ways you can make file copies (see the section at the very bottom of this page).
It’s really, really easy to copy files from within File Explorer, no matter which Windows operating system you’re using. You might know File Explorer as My PC, Computer, Windows Explorer, or My Computer, but it’s all the same file management interface.
Windows 11, Windows 10, Windows 8, Windows 7, Windows Vista, and Windows XP all have slightly different processes for copying files:
Windows 11
-
Open File Explorer by selecting the Start button, and then searching for and selecting File Explorer.
-
Use the navigation bar at the top, or the folders on the left, to find the folder where the file you want to copy is stored. Double-clicking a folder or subfolder moves you through the file system.
-
Select the file (don’t double-click it).
-
Choose the copy button from the top of the window. It looks like two pieces of paper on top of each other.
The same copy button is accessible in the context menu if you right-click the file you want to copy.
-
Using the same method described earlier to find the file, now locate the folder where you want this file to be copied.
-
Once you’re inside the destination folder, use the paste button at the top of the window. This is the one to the right of the copy button.
You can repeat this step as many times as you want, in other folders, to copy the same file to other destinations.
Windows 10 & Windows 8
-
If you’re using Windows 10, select the Start button and then choose Documents from the left-hand side. It’s the one that looks like a file.
Windows 8 users can search for This PC from the Start screen.
Both versions of Windows also support opening File Explorer or This PC with the WIN+E keyboard shortcut.
-
Find the folder where that the file is located by double-clicking any folders or subfolders necessary until you reach the file.
If your file is located on a different hard drive than your primary one, choose This PC from the left-hand side of the open window and then select the correct hard drive. If you don’t see that option, open the View menu at the top of the window, and then go to Navigation pane > Navigation pane.
If you’re given a permissions prompt that says you need to confirm access to the folder, just continue through.
It’s likely that your file is located deep inside several folders. For example, you might have to first open an external hard drive or disc, and then two or more subfolders before you reach the file that you want to copy.
-
Select the file by clicking or tapping it once. This will highlight it.
To copy more than one file at once from that folder, hold down the Ctrl key and select each additional file that should be copied. The exact same process works for copying folders, too.
-
With the file(s) still highlighted, access the Home menu at the top of the window and select the Copy option.
Anything you just copied is now stored in the clipboard, ready to be duplicated elsewhere.
-
Navigate to the folder where the file should be copied to. Once there, open the folder so that you can see any files or folders that already exist inside (it might even be empty).
The destination folder can be anywhere; on a different internal or external hard drive, DVD, in your Pictures folder or on your Desktop, etc. You can even close out of the window where you copied the file, and the file will remain in your clipboard until you copy something else.
-
From the Home menu at the top of the destination folder, choose Paste.
If you chose the same folder that has the original file, Windows will either automatically make a copy but will append the word «copy» to the end of the file name (just before the file extension) or ask you to either replace/overwrite the files or skip copying them.
If you’re asked to confirm the paste because the folder requires administrator permissions to paste files, go ahead and provide that. This just means the folder is considered important by Windows, and that you should be careful when adding files there.
The file selected from Step 3 is now copied to the location you chose in Step 5. Remember that the original file is still located where it was when you copied it; saving a new duplicate didn’t affect the original in any way.
Windows 7 & Windows Vista
-
Select the Start button and then Computer.
-
Locate the hard drive, network location, or storage device that the original file you want to copy is located on, and double-click to open the contents of the drive.
If you’re planning on copying files from a recent download from the internet, check your Downloads folder, Documents library, and Desktop folders for the downloaded file. Those can be found in the Users folder.
Many downloaded files come in a compressed format like ZIP, so you may need to uncompress the file to locate the individual file or files you’re after.
-
Continue to navigate down through whatever drives and folders are necessary until you find the file you want to copy.
If you’re prompted with a message that says «You don’t currently have permission to access this folder», select Continue to continue to the folder.
-
Highlight the file you want to copy by selecting it once. Do not open the file.
Want to copy more than one file (or folder)? Hold down the Ctrl key on your keyboard and select any files and folders you want to copy. Release the key when you’ve highlighted all the files and folders you want to copy. All of those highlighted files and folders will be copied.
-
Choose Organize and then Copy from the menu at the top of the folder’s window.
-
Navigate to the location where you want to copy the file to. Once you’ve found the folder, click on it once to highlight it.
Just to reiterate, you’re selecting the destination folder that you want the copied file to be contained in. You shouldn’t click any files. The file you’re copying is already in your PC’s clipboard.
-
Choose Organize and then Paste from the folder window’s menu.
If you paste the file in the exact same folder where the original exists, Windows will rename the duplicate to have the word «copy» at the end of the file name. This is because no two files can exist in the same folder with the exact same name.
If you’re prompted to provide administrator permissions to copy to the folder, choose Continue. This means that the folder you’re copying to is considered a system or other important folder by Windows 7.
The file you selected in Step 4 will now be copied to the folder that you chose in Step 6. The original file will be left unchanged and an exact copy will be created in the location you specified.
Windows XP
-
Select Start and then My Computer.
-
Locate the hard drive, network drive, or another storage device that the original file you want to copy is located on, and double-click to open the contents of the drive.
If you’re planning on copying files from a recent download from the internet, check your My Documents and Desktop folders for the downloaded file. These folders are stored within each user’s folder inside the Documents and Settings directory.
Many downloaded files come in a compressed format, so you may need to uncompress the file to locate the individual file or files you’re after.
-
Continue to navigate down through whatever drives and folders are necessary until you find the file you want to copy.
If you’re prompted with a message that says «This folder contains files that keep your system working properly. You should not modify its contents.», choose Show the contents of this folder to continue.
-
Highlight the file you want to copy by selecting it once (don’t double-click or it will open the file).
Want to copy more than one file (or folder)? Hold down the Ctrl key on your keyboard and select any files and folders you want to copy. Release the key when you’re done. All highlighted files and folders will be copied.
-
Choose Edit and then Copy To Folder from the menu at the top of the folder’s window.
-
In the Copy Items window, use the (+) icons to locate the folder you want to copy the file that you selected in Step 4 to.
If the folder doesn’t yet exist that you want to copy the file to, select Make New Folder.
-
Choose the folder you want to copy the file to, and then select Copy.
If you copy the file to the same folder that has the original, Windows will rename the duplicate file to have the words Copy of before the original file name.
The file you selected in Step 4 will be copied to the folder that you chose in Step 7. The original file will be left unchanged and an exact copy will be created in the location you specified.
Tips and Other Ways to Copy Files in Windows
One of the most well-known shortcuts for copying and pasting without a mouse is Ctrl+C and Ctrl+V. It works with not only text, but also files and folders. Just highlight what needs to be copied, execute Ctrl+C to store it in the clipboard, and then use Ctrl+V to paste the contents somewhere else.
Ctrl+A can highlight everything in a folder, but if you don’t want to copy everything you’ve highlighted, and instead want to exclude a few items, you can then use the Ctrl key to deselect any highlighted item. Whatever remains highlighted is what will be copied.
Files can also be copied from the Command Prompt in any version of Windows, with the copy or xcopy command.
You can also open File Explorer by right-clicking the Start button. The option is called File Explorer or Explore, depending on the version of Windows that you’re using.
If you don’t know where the file is located on your computer, or you’d rather not search through lots of folders to find it, you can do a quick system-wide file search with the free Everything tool. You can even copy files directly from that program and avoid using File Explorer. Other file search tools have similar features.
Thanks for letting us know!
Get the Latest Tech News Delivered Every Day
Subscribe
Windows 11 offers a modern interface and a host of new features that enhance user experience, including improved file management tools. Copying files is one of the most fundamental tasks you can perform on any operating system, and Windows 11 simplifies this process while providing multiple methods to achieve it. In this article, we will explore various methods to copy files in Windows 11, delve into the specifics of the operating system, and provide tips and tricks to maximize your efficiency.
Understanding File Copying in Windows 11
Copying a file essentially means creating an identical duplicate of it at a specified location. This action is crucial when organizing data, backing up important files, or transferring data between different storage devices. Windows 11, like its predecessors, supports both graphical user interface (GUI) methods and command-line operations for copying files.
Methods of Copying Files
1. Using File Explorer
One of the simplest and most commonly used ways to copy files in Windows 11 is through File Explorer. Follow these steps:
Step 1: Open File Explorer
- Click the ‘File Explorer’ icon on the taskbar or press
Windows + Eon your keyboard.
Step 2: Navigate to the File
- Browse to the location where the file you want to copy is stored. This can be in libraries, like Documents and Pictures, or in custom folders.
Step 3: Select the File
- Click on the file you want to copy. You can select multiple files by holding the
Ctrlkey and clicking each file.
Step 4: Copy the File
- Right-click on the selected file(s) and choose ‘Copy’ from the context menu. Alternatively, you can press
Ctrl + C.
Step 5: Navigate to the Destination
- Move to the folder or directory where you want to paste the copied file.
Step 6: Paste the File
- Right-click in the destination folder and select ‘Paste’ from the context menu. Alternatively, press
Ctrl + V.
2. Using Keyboard Shortcuts
For users who prefer using keyboard shortcuts, copying files in Windows 11 can be done quickly without using the mouse. The process is nearly identical to the GUI method:
- Open File Explorer (Ctrl + E).
- Navigate to the file location.
- Select the file(s) using arrow keys and Spacebar.
- Press
Ctrl + Cto copy. - Move to the destination folder using arrow keys.
- Press
Ctrl + Vto paste the file(s).
3. Drag and Drop Method
Another intuitive way to copy files is to use the drag-and-drop functionality incorporated into Windows:
Step 1: Open Two File Explorer Windows
- Open two separate File Explorer windows, one for the source folder and one for the destination folder.
Step 2: Select the File
- Click and hold the left mouse button on the file you want to copy in the source window.
Step 3: Drag to Destination
- While holding the mouse button, drag the file to the other window.
Step 4: Copy File
- To ensure that a copy is made rather than moving the file, hold down the
Ctrlkey while releasing the mouse button. This will create a copy of the file in the destination folder.
4. Using the Command Prompt
For users who are comfortable with command-line interfaces, the Command Prompt in Windows 11 provides a powerful way to copy files.
Step 1: Open Command Prompt
- Press
Windows + Xand select ‘Windows Terminal’ or ‘Command Prompt’.
Step 2: Use the Copy Command
- Use the
copycommand followed by the source path and destination path. The general syntax is:copy "C:pathtosourcefile.txt" "C:pathtodestination"For example:
copy "C:UsersYourNameDocumentsexample.txt" "D:Backup"
Step 3: Execute the Command
- Press
Enter, and the file will be copied to the specified location.
5. Using PowerShell
PowerShell offers another alternative to copy files, featuring more advanced options than the Command Prompt. Here’s how to do it:
Step 1: Open PowerShell
- Press
Windows + Xand select ‘Windows Terminal’ (make sure you are in PowerShell mode).
Step 2: Use the Copy-Item Command
- The syntax of the
Copy-Itemcommand is:Copy-Item -Path "C:pathtosourcefile.txt" -Destination "D:Backup"
Step 3: Execute the Command
- Press
Enter, and the file will be copied to the specified location.
6. Using the Right-Click Context Menu
Windows 11 has an enhanced context menu that makes copying files straightforward:
Step 1: Right-Click on the File
- Navigate to the file in File Explorer and right-click on it.
Step 2: Select Copy
- Choose ‘Copy’ from the context menu.
Step 3: Navigate to Your Desired Folder
- Right-click within the target folder where the copied file will reside.
Step 4: Select Paste
- Click on ‘Paste’ from the context menu to place your copied file.
7. Copying Files with Windows Search
Windows Search is a powerful tool that helps you find files quickly. You can use it to copy files as follows:
Step 1: Use the Search Bar
- Click on the search bar next to the Start menu or press
Windows + S.
Step 2: Search for the File
- Type the name of the file you want to copy and hit
Enter.
Step 3: Right-Click and Copy
- Once found, right-click the file and choose ‘Copy’.
Step 4: Navigate to Your Desired Folder
- Go to the destination folder and right-click again to select ‘Paste’.
Additional Tips for Copying Files in Windows 11
1. Using the Clipboard History
Windows 11 introduces an enhanced clipboard feature that lets you store multiple copied items. Here’s how to use it:
- Enable clipboard history by pressing
Windows + V. - After copying a file, access the clipboard history with
Windows + Vand select the desired item to paste.
2. Copying Files to External Drives
Copying files to external drives follows the same procedures as internal drives. Simply ensure that the external drive is connected.
3. Soft Links and Hard Links
For advanced users, linking files can save space and provide easy access. If you need to keep the original file unchanged but want to access it from another location, consider using shortcuts or links.
4. Copying with Subdirectories
When copying directories, you can include subdirectories by using the following command in Command Prompt:
xcopy "C:pathtosource*" "D:pathtodestination" /S /EThis command ensures that all files and subdirectories are copied.
5. Copying Over the Network
Windows 11 provides users the ability to copy files over a network. Simply share the source folder with network permissions set and access it from another PC.
Conclusion
Understanding how to efficiently copy files in Windows 11 is an essential skill that enhances productivity and makes managing data easier. This operating system offers multiple methods—each with its unique advantages—from the intuitive drag-and-drop functionality in File Explorer to more advanced command-line techniques. Regardless of your preference, mastering these techniques will undoubtedly streamline your workflow.
Remember that with each method chosen, the core process remains the same: select the file, copy it, and navigate to your desired location for pasting. Experiment with these methods to find the one that best fits your workflow. As technology continues to evolve and as Windows 11 further develops, stay informed about new features and updates that could enhance your file management experience even more.
On Windows, you have probably already encountered the message « This action cannot be performed because the file is open in another program». In some cases, the system does not specify the program in question. And even if it is indicated, the file sometimes remains locked by the application, even after closing. Here’s how to unblock a file used by another process.
This problem is encountered quite frequently on Windows, and it is quite annoying. While you are in a rush and want to recover a copy of a file on your USB key, you see a failure message indicating that it is used by another program. You then decide to close it. But sometimes the problem persists.
The first thing that comes to mind is to “end process” in task manager. This solution works, but the program must have been launched by the system, in which case you may not be able to close this process.
How to copy, modify or delete a file used by another program?
When Windows gives no details, it is always possible to recover control over a file locked by a unknown process. To do this, you can use a small utility named Process Explorer. We recently talked about it in another article: how to know if your webcam is hacked.
Process Explorer is an application offering more options than the traditional Windows task manager. Thanks to it, you will be able to identify any process using a file, a program or even a device.
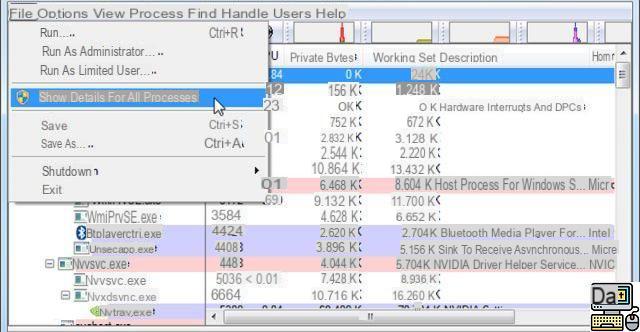
- Start by downloading Process Explorer from the Microsoft site, then open it.
- In the File menu, click on Show Details for All Processes
- Then click on the menu Find > Find Handle or DLL.
- In the search bar, enter the name of the locked file or the beginning of the name then click on « Search ».
- The process should appear in the search results.
- Click on the result and it will appear highlighted in the detail area below.
- Right-click, then « Close Handdle » and voila.
The whole process only takes a few seconds when you have already gone through it once and Process Explorer is already installed on your computer. That’s it, no more reason to get carried away when a file opened in another program becomes inaccessible or impossible to copy. You have the solution.
Windows 10 won’t start? Several reasons can cause problems when starting Windows 10 for the first time or after an update: Bad BIOS settings,… The battery is one of the essential parts of our laptops. Like smartphones, battery life is a crucial factor for a good experience. Some applications act…Creating a WiFi access point on Windows 10 in order to share your Internet connection is done in two steps, three steps. We explain the procedure to you in this… On Windows, there are several ways to update the drivers. Generally, these update automatically. But it is sometimes necessary to force the maneuver,…