
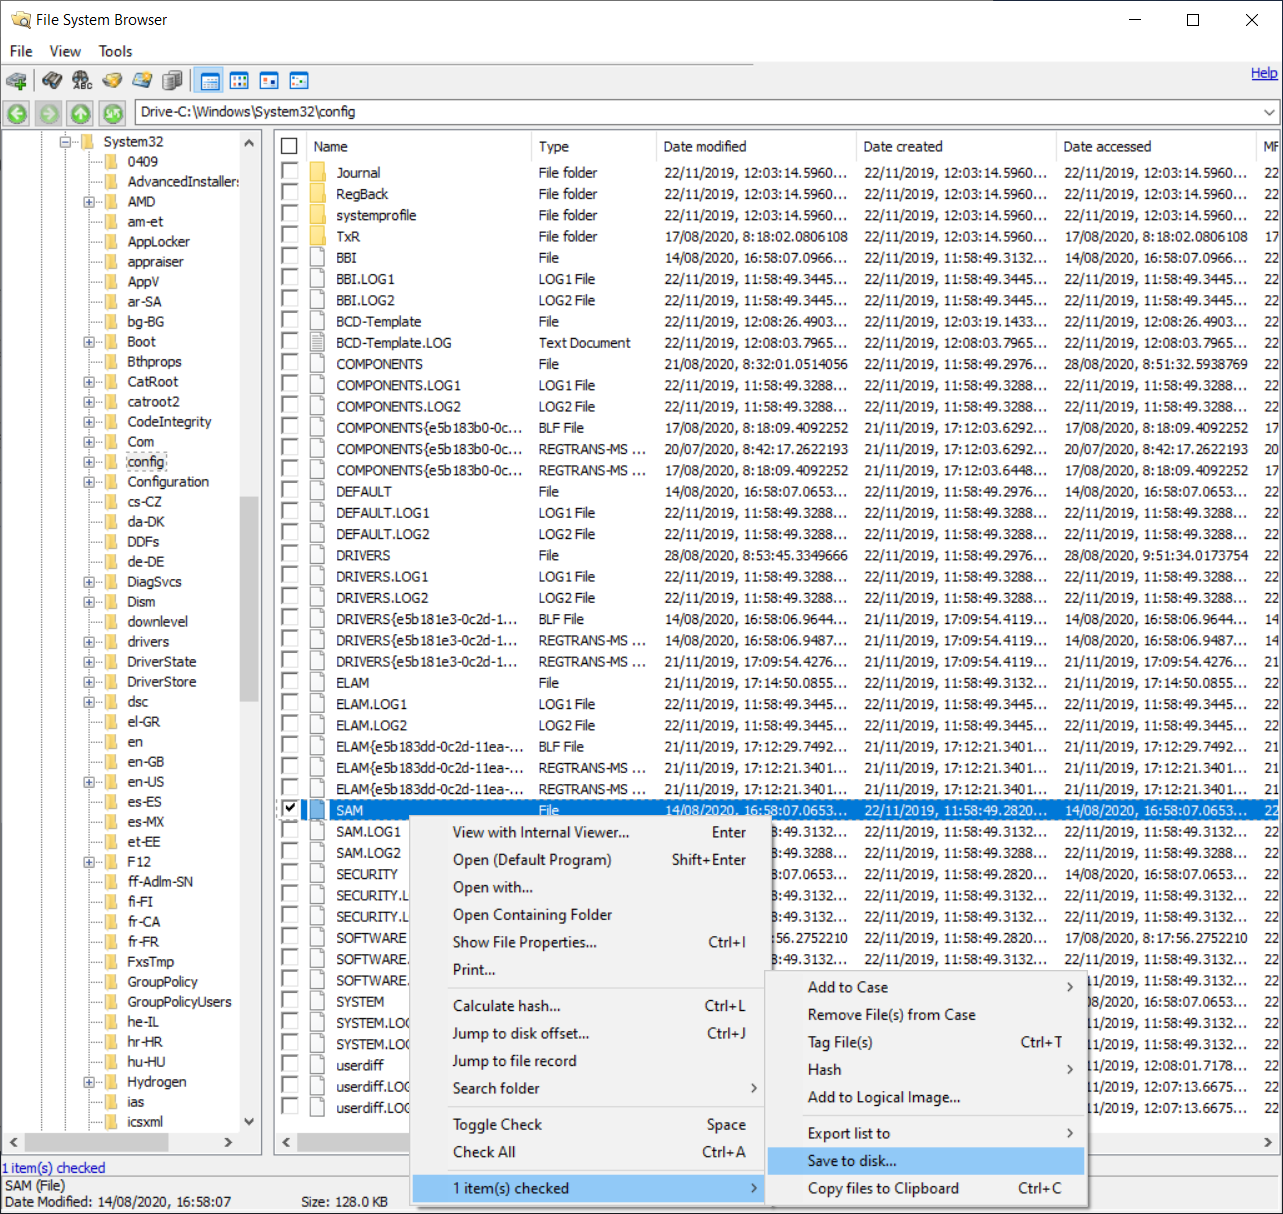
You can copy a locked file from a disk image or hard drive by using the file system browser in OSForensics. In the file system browser choose «Add device to case» from the File menu and select the drive letter or image file you wish to copy from. Check the item you wish to copy, right click and scroll to 1 item(s) checked then click ‘Save to disk…’
The example below shows the live system drive (C) mounted and the SAM registry
file being saved to another location, this file is normally locked as it is in
use by Windows and can not be copied, deleted or opened. Files permissions that
would normally prevent files being accessed are also bypassed when using this
method.
Note: OSForensics version 1.1 or higher required
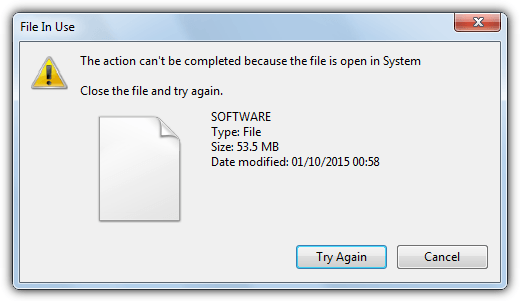
Today, we’ll show you how to copy locked files in Windows, like those in C:\Windows\System32\Config or the System Volume Information folder.
Files such as SOFTWARE or SAM can trigger errors like “The action can’t be completed because the file is open in System.”
With the right tools, you can bypass these restrictions. Be sure to also learn how to back up and restore registry hives.
Let’s get started.
What are the best Windows tools to copy locked or in-use files?
1. Robocopy (Built-in Windows Alternative)
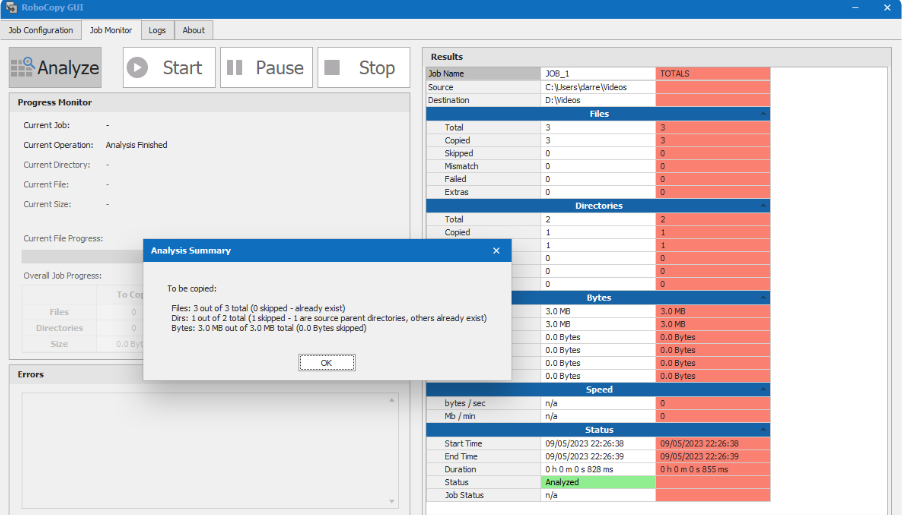
Best for advanced users who prefer command line tools, Robocopy is a pre-built option that you can use to quickly copy locked files.
Using it may be intimading if you’re not used to command line tools, but Microsoft also offers the possibility to download a GUI for it, which makes things run smoother.
Robocopy (Robust File Copy) is included in Windows and supports copying locked files using the COPY mode.
Example Command:
robocopy C:\Windows\System32\config C:\Backup /B /E /COPY:DAT/B– Uses backup mode to bypass restrictions./E– Copies all subdirectories./COPY:DAT– Copies data, attributes, and timestamps.
Robocopy is reliable and can be automated with Task Scheduler, making it a solid alternative to third-party tools.
Download Robocopy GUI
2. Shadow Copy
Shadow Copy uses the Volume Shadow Service allowing you to copy locked and in use files from one location to another with the aid of a simple user interface. It does need installing but you can easily copy the Shadow Copy folder from Program Files and then uninstall again to run the program portably in future.
Usage is pretty easy, browse for a copy from folder (note it will copy what’s in the folder and not the folder itself), browse for a copy to folder and click the Copy button. By default all files will be copied with the all files mask (*.*) which you can change to copy files with a specific extension.
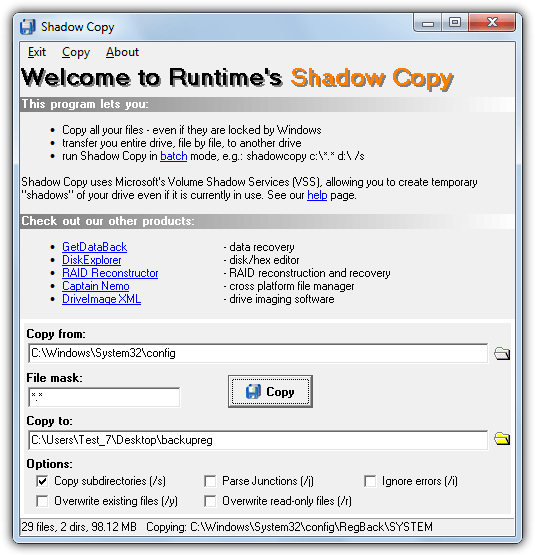
There are a few tick box options below to copy subdirectories, overwrite existing files, ignore errors and parse junction points. Running from the command line is supported but all that really does is open the user interface with predefined from and to locations set and automatically starts the copy.
Download Shadow Copy
3. Shadowspawn (formerly HoboCopy)
Shadowspawn is a command-line utility designed to create a read-only shadow copy of a disk, allowing you to access and copy files that are normally in use or locked by the system. Inspired by Microsoft’s Robocopy, it provides a straightforward way to interact with shadow copies, enabling the backup or transfer of files that cannot be accessed during normal operations. The tool mounts the shadow copy as a new drive letter, and you can then run arbitrary commands on it, such as copying files or directories.
To copy locked files, the command syntax is simple:
Shadowspawn /r C:\Windows\System32\config\ C:\Backup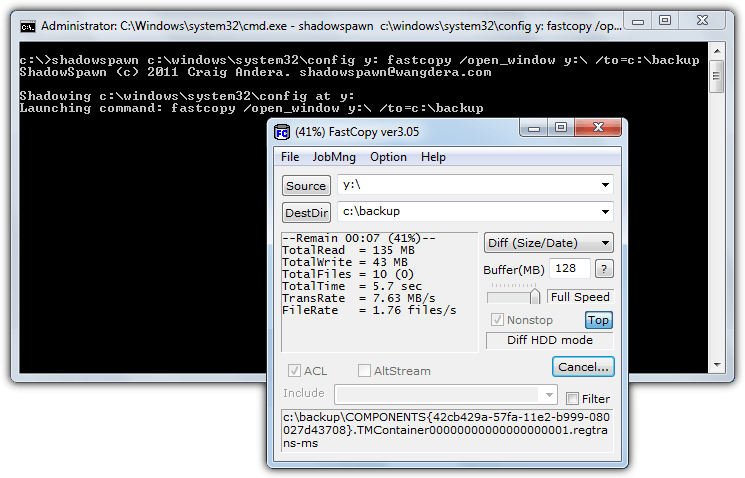
This command will copy the entire contents of the Config folder to the Backup directory. To skip subfolders, remove the /r option. You can also copy individual files from the Config folder by appending their names:
Shadowspawn C:\Windows\System32\config\ C:\Backup SOFTWARE SYSTEMThis will copy only the SOFTWARE and SYSTEM registry hive files to the Backup folder.
If you prefer a GUI, Shadowspawn can be paired with front-end tools to simplify the task. The utility itself remains lightweight and portable, making it easy to run without installation, as long as the Visual C++ runtimes (appropriate for your system’s architecture) are installed.
Shadowspawn is the successor to the now-discontinued HoboCopy, offering similar functionality with enhanced flexibility. It’s a great choice for anyone needing to access and copy files that are otherwise inaccessible while in use.
Download Shadowspawn | Learn more on GitHub
4. Passmark OSForensics
OSForensics may seem a bit overkill because it’s a 50MB+ installer and a full suite of information gathering tools, but the copying of locked and in use files is completely transparent and done from a Windows Explorer style interface. This makes it very easy to use and allows you to copy whole folders full of locked files with minimal fuss.
After install choose to “Continue using the free version”, click the Create Case button and give it a name which places all operations into a profile. Then click File System Browser on the left, choose the drive you want to copy from and click OK.
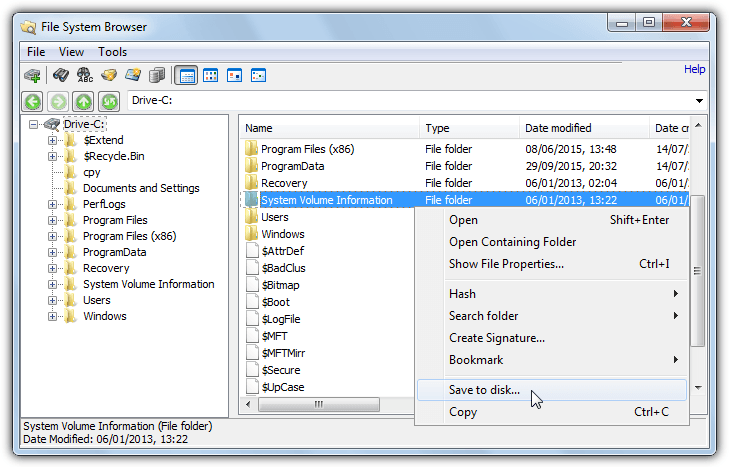
The file browser will be familiar as it’s like Explorer and you simply use it to locate the in use files or folders you want to copy. Right click on the entry, select Save to disk and choose the folder you want to save to. This makes OSForensics ideal for quickly copying several different folders containing in use files, you can also multi select with Shift+click and Ctrl+click.
Download PassMark OSForensics
5. PC Hunter
If OSForensics is a bit too much for you, PC Hunter is worth a try because it provides a similar Explorer like file and folder tree view so you can easily copy in use files or a whole folder. PC Hunter is actually an advanced anti rootkit tool that operates at an extremely low level on the system, as a result it may trigger an alert in your antivirus.
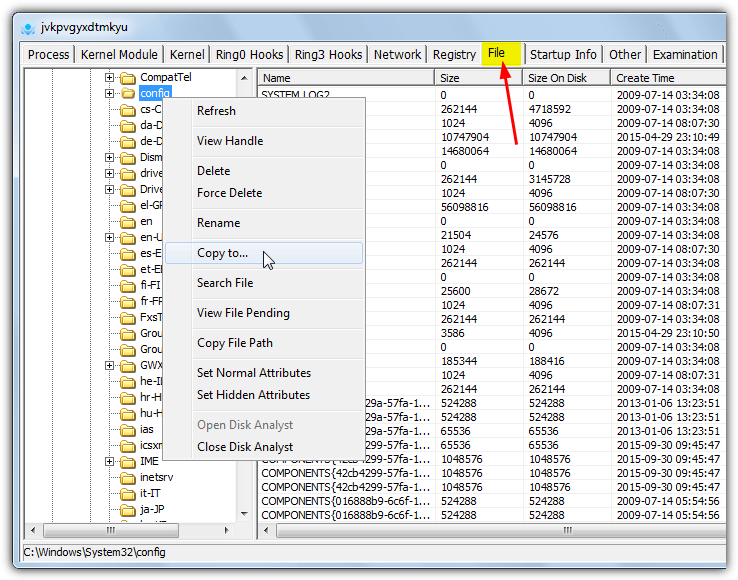
For such a powerful tool PC Hunter is remarkably simple to use, run the portable 32-bit or 64-bit executable, click on the File tab and use the folder tree to locate the file you want to copy. Right click on the file and choose Copy to. One issue is selecting more than one file will grey out the option although you can still duplicate the whole folder by right clicking on it in the folder tree and using the Copy to option. For advanced users PC Hunter is also very capable at deleting hard to remove files and registry entries although it needs to be used with care.
Download PC Hunter
6. Extents
Extents is a little bit different because it doesn’t use the Volume Shadow Service but instead reads the actual raw clusters on the disk used by the file and reconstructs them into a new file. This has the side effect of bypassing locking or in use restrictions imposed by the operating system.
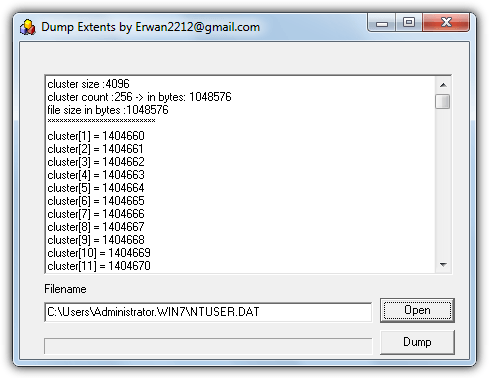
Only a single file can be handled at a time so it’s best used when you only want to copy one or two files at the most. Run the Extents executable and press Open to look for the in use file. The display will show the disk cluster details of the file. Click the Dump button and choose the save location and filename, make sure to use the same filename and include the extension. Note that Extents doesn’t work perfectly in 64-bit Windows, for instance it will not detect or load open Registry hives like SAM or SOFTWARE.
Download Extents
7. RawCopy
While it’s not exactly the same as Extents in operation, RawCopy is quite similar by using low level disk reading to copy a file from an NTFS formatted disk, whether it’s locked or not. The biggest obvious difference is the fact RawCopy is used from the command line only and has no user interface.
Usage is quite straightforward, simply supply a source path and name of a single file and a destination folder argument to the command, make sure to include quotes if spaces are involved:
rawcopy C:\WINDOWS\system32\config\SYSTEM C:\outputfolder
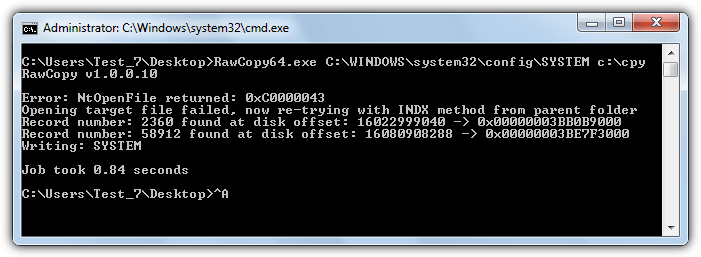
By default the tool will try to copy using the file’s name, if it cannot because for instance the parent folder has locks on it, RawCopy will then try by using the file index number from the Master File Table. There are 32-bit and 64-bit versions available so make sure you use the correct one.
Download RawCopy
When dealing with locked files in Windows, choosing the right tool depends on your needs—whether you prefer a command-line approach like Robocopy or Shadowspawn, or a more user-friendly interface like Shadow Copy or OSForensics. These tools help bypass system restrictions, making it easier to copy essential files such as registry hives or system configuration data.
Alternatively, if you also want a lightweight yet effective solution, consider FFCopy, which streamlines file transfers with advanced features. You can download FFCopy here and enhance your workflow for handling locked or in-use files efficiently.
Locked or open files are not only problematic when trying to delete them on the computer system. They can also be problematic when a user tries to move a folder with files or single files to a different location. One extreme example would be moving the Windows folder to another hard drive to replace the old one. Windows would not allow some files to be copied to the new destination.
Shadow Copy has to be installed on the computer system but can be run afterwards from the command prompt or by opening the graphical user interface. Running the tool from the command line will still open the interface after sending the command but it will require no user interaction unless errors occur.
Shadow Copy makes use of the Microsoft’s Volume Shadow service which means that this service has to be running to work with Shadow Copy. Microsoft renamed the feature in Windows Vista to Previous Versions. The service provides the means to copy any accessible file without having to worry about if the file is locked or open.
It is possible to copy the Windows folder to another location using the Shadow Copy software. Shadow Copy is compatible with Windows XP, Windows Server 2003 and Windows Vista. The software is portable as the installed files can be executed independently from the installation. (Tested after uninstalling the software)
Advertisement
Sign in to your How-To Geek account
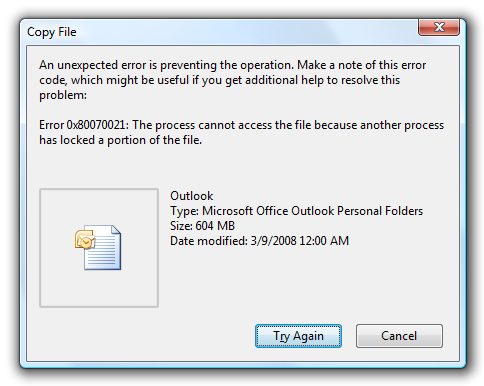
If you’ve ever tried to copy a file that is locked by another application, you’ve probably seen an error message similar to «The process cannot access the file because another process has locked a portion of the file». So how do you copy it anyway? Since XP, Windows has supported a technology called Volume Shadow Copy, which is used to power the previous versions feature in Vista as well as System Restore and backups. What it does is take a temporary snapshot of the file or drive, and then allow an application to read from the snapshot even while other applications are accessing or modifying the file. What we can do is use a command line utility called HoboCopy that utilizes this service to copy the file. Understanding the Prerequisites HoboCopy and most other backup utilities make use of two services in Windows, and you’ll need to verify that these services are not disabled:
They can be left as Manual startup, so they don’t need to be running all the time. Hobocopy will start the two services automatically when needed, and the Volume Shadow Copy service will be turned back off after it’s done. Using HoboCopy to Backup/Copy a Single File The syntax is a little weird, because HoboCopy is really meant to be used for backing up an entire set of folders. We can use it to backup a single file by passing in the filename argument at the end. Note: on Windows Vista you will need to launch an Administrator mode command prompt by right-clicking on the Command prompt in the start menu and choosing Run as Administrator. Syntax:
hobocopy c:\directoryname\ d:\backupdirectory\ <filename>
For example, I want to backup my c:\users\geek\mail\outlook.pst file to d:\backups\outlook.pst. Here’s the syntax that I’d use:
C:\> hobocopy c:\users\geek\mail\ d:\backups\ Outlook.pst
HoboCopy (c) 2006 Wangdera Corporation. hobocopy@wangdera.com Starting a full copy from c:\users\geek\mail to d:\backups\
Copied directory
Backup successfully completed.
Backup started at 2008-03-09 01:57:28, completed at 2008-03-09 01:58:39.
1 files (606.45 MB, 1 directories) copied, 7 files skipped
Using HoboCopy to Backup an Entire Directory A much more useful task would be to backup my entire User folder, probably to an external hard drive for safekeeping. For this, we’ll want to add a couple of command-line arguments.
|
/full |
Copy all files |
|
/skipdenied |
Ignore any access denied messages because of permission errors. |
|
/r |
Copy recursively |
|
/y |
Don’t prompt, just copy everything |
Syntax:
hobocopy /full /skipdenied /y /r c:\directoryname\ d:\backupdirectory\
Let’s go with the same example, I want to backup my entire user directory to d:\backups\, so I’d use this command:
hobocopy /full /skipdenied /y /r c:\users\geek\ d:\backups\
This command will likely take a very long time to complete, so you might want to take a nap or something. At the end you should have a nearly perfect copy of the directory… if there are any permission errors you’ll be alerted to files that didn’t copy. Realistically any files in your user directory shouldn’t have this problem. Using HoboCopy to Incrementally Backup a Drive Hobocopy also supports backing up files incrementally, so it will only copy the files that have changed since the last backup. This works similarly to utilities like rsync, except hobocopy stores the last backup date in a file that you need to specify on the command line.
|
/statefile=filename |
This flag specifies the file that contains the last backup information. |
|
/incremental |
Only copy files that have changed since the last full copy. |
Syntax:
hobocopy /incremental /statefile=filename /y /r c:\directoryname\ d:\backupdirectory\
Example:
hobocopy /incremental /statefile=d:\lastbackup.dat /y /r c:\users\geek\ d:\backups\
The first time that you run this command you will need to use /full instead of /incremental, or else you will get an error because the state file hasn’t been created yet. After that you can run the incremental backup with the /incremental switch. This would be an excellent way to automatically backup a set of folders as part of a scheduled task. Download HoboCopy from sourceforge.net
So you’ve got a file you need to copy (or in my case, back up) but the file is in use all the time, and the backup system you are using is not able to get a clean copy, and throws some sort of error about the file being in use (dang you Backup Exec). What to do, what to do.
Well, there is a neat utility out there, that is free, and works with the existing windows services (Volume Shadow Copy, and Microsoft Software Shadow Copy Provider), to copy an open file or directory while it is still in use. The utility is HoboCopy, and it’s free (my favorite price). You can download it from Source Forge or by following this link –> http://sourceforge.net/project/showfiles.php?group_id=117783&package_id=204974
Just extract the file (I dumped it into C:WindowsSystem32 so I wouldn’t have to mess with paths), and use the very simple to follow syntax to copy your “in use” files. The syntax is simply: hobocopy c:directoryname d:backupdirectory
Here’s a few of the switches you can throw in:
/full – Copy all files
/incremental – Used after full to only copy changed files
/statefile=filename – Used with the above command to indicate where the state file is used. more later (where filename is the name of the file)
/skipdenied – Ignore “access denied” messages
/r – Copy recursively
/y – Don’t prompt (and copy everything)
One note, if your running this from Vista, you’ll want to make sure you run it as Administrator, as the program will start the two services listed above, and if you’re not an admin, that part will fail. You’ll also want to ensure those two services (see above) are set to be at least manual start. Don;t worry, Hobocopy will start and stop the services as it needs to, so no worries about extra services killing your machine.
So let’s say you want to run a “Pre” command in Backup Exec to replicate a “live” directory , and then backup up the replica during the backup so you have a good copy of data (that is consistent). You could run a command like the following:
hobocopy /full /statefile=d:backuplastbackup.dat /y /r d:mainfolder d:backup
This command would replicate all files in the “D:mainfolder” folder to the “D:backup” folder, and subsequently, create a file called lastbackup.dat, that going forward, will know the dates of all the files last backup, so going forward, an incremental backup could be used using the /incremental switch. The command you’d actually put into Backup Exec, in the “Pre-Command” section would be:
hobocopy /incremental /statefile=d:backuplastbackup.dat /y /r d:mainfolder d:backup
My test run of a 5 GB directory took less than 10 minutes using the /full switch, and that was copying to and from the same drive, and there were LOTS of folders involved, so your speed may be much better.
Hobocopy can also be used to copy single files, and would be great for a low cost backup or archive of files (there is a switch that allows removal of the source files, but I’m not even going to list that here, as I don’t want anyone blaming me for schwacking their files. 🙂 )
Good luck