

0
Conversion of Crt Certificate to Pfx format
Recently we faced an issue where a client renewed his certificate from Godaddy, after renewal client found that the private key was missing from the certificate. Godaddy support suggested importing the certificate on the same server, from where the CSR was generated for this certificate, however, that server was removed from the network.
Conversion from one certificate format to another, such as from .crt to .pfx, is necessary to accommodate different systems or applications that require specific formats for certificate usage. For instance, .pfx files are commonly used for storing private keys with associated public key certificates. This conversion ensures compatibility and proper functionality across various platforms or tools that may have format-specific requirements.
Similarly, converting from .crt to .cer format may be necessary due to different naming conventions or requirements of systems. Both formats essentially contain certificate information, but their extensions might signify their usage or compatibility with particular software or environments. The conversion between these formats helps ensure seamless integration and usage across diverse systems that might necessitate a specific file format.
Objective: Conversion of Crt certificate to Pfx format.
Solution:
Convert Certificate File From CRT to PFX using OpenSSL
January 22, 2013
Linux
This guide will show you how to convert a .crt certificate file and associated private key, and convert it to a .pfx file using OpenSSL. This can be useful if you need to take a certificate file, and load it onto a Windows server for example.
A PFX file is a way of storing private keys, and certificates in a single encrypted file. It is commonly used to import and export certificates and keys on a Windows PC.
In the example below, the following files will be used:
domain.name.crt – this is the public certificate file.
domain.name.key – This is the private encryption key for the above certificate.
domain.name.pfx – This will be the PFX file outputted from OpenSSL.
Converting the crt certificate and private key to a PFX file
$ openssl pkcs12 -export -out domain.name.pfx -inkey domain.name.key -in domain.name.crt
This will create a pfx output file called “domain.name.pfx”.
You will be asked for the pass-phrase for the private key if needed, and also to set a pass-phrase for the newly created .pfx file too.
You can now load this .pfx file onto a Windows machine, or wherever needed.
You Might Also Like
In many cases where you need an SSL certificate for your web servers (or other secure services like Lync, Exchange etc) you need to get a digital certificate from a third party certificate authority.
Now many third party CA’s will issue you with the CRT file and a CRT for the Certificate authority (Most Windows clients have most third party CA’s already in store (You can view them by opening mmc.exe and choosing certificates), and they also provide you with the RSA private key of the certificate in a separate file.
Now some CA’s also have the ability to let you download finished PFX files depending on what kind of service you need to deploy.
So check with the CA you are buying you’re certificates from that in most cases they have own certificates for web server and Lync, Exchange etc.
In Windows cases you need to merge these files into a PFX file.
Now before I tell you the secret I wish to explain what the difference is between the different files so you know how the certificate works.
- A
.csrfile is a certificate signing request which initiates your certificate request with a certificate provider and contains administrative information about your organization. - A
.keyfile is the private key used to encrypt your site’s SSL-enabled requests. .pemand.crtextensions are often used interchangeably and are both base64 ASCII encoded files. The technical difference is that.pemfiles contain both the certificate and key whereas a.crtfile only contains the certificate. In reality this distinction is often ignored.- The PFX extension is used on Windows servers for files containing both the public key files (your SSL certificate files, provided by for instance DigiCert) and the associated private key (generated by your server at the time the CSR was generated).
So in my case I had a crt file for the certificate itself and I had a crt file for the CA and I had the private key within a .key file.
Now I had to “merge” these into a PFX file so I could import it for use for Lync.
Now this is where openssl comes in.
Openssl comes often default with most linux distroes (ubuntu,fedora etc) in my case I had the Netscaler VPX available.
Before you can use openssl on Netscaler you have to type the command shell to enter the regular freebsd shell.
So type the command openssl pkcs12 –export –out certificate.pfx –inkey rsaprivate.key –in certificate.crt –certfile fileca.crt
After that you need to type a password to encrypt the pfx file.

Now after that is done you can copy the file from the share on either your unix share or Netscaler as in my case.
And you can try importing it in the certificate store.
Now when you import it you need to enter the password you used earlier in order to import it, and after you finished importing it open it and see that you have the private key available
#ca, #crt, #imagenya, #key, #openssl, #pfx
Note:
Certificatetool.com offers online and free SSL certificate format conversion tool without needing any software installation or running the OpenSSL commands. If you would like to convert your CER file to other formats, check CRT Converter page.
Converting CRT to PFX online is easy using Certificatetool.com tool
Just follow these steps:
- Upload Certificate File and Private Key (Optional)
- Select the initial file format and the format you want to convert to.
- Click the «Convert» button to begin the file conversion process. Please wait until output file is ready for download.
What is CRT format?
The extension CRT is employed for certificates, with CER and CRT being almost interchangeable. This is especially prevalent in *nix systems. A file with a .crt extension encompasses an end-entity certificate, its public key, and identity details such as domain names verified to be linked with the certificate.
CRT certificates play a crucial role in enabling secure TLS handshakes, substantiating website identity ownership to browsers, and establishing encrypted sessions that are shielded against eavesdropping and content tampering.
What is PFX format?
A Personal Information Exchange file, commonly referred to as a PFX file, is a password-protected archive containing a digital certificate, a private key, and the intermediate authority’s certificate. Primarily utilized to bolster the security of applications and websites, PFX files often play a central role in the installation of SSL certificates.
SSL, or Secure Sockets Layer, is a protocol designed to facilitate secure communication across computer networks. SSL certificates, integral to this protocol, serve the dual purpose of verifying a website’s identity and encrypting data transmitted between the website and the user’s browser.
Typically crafted by web hosting companies or certificate authorities, PFX files find their way to a website’s server after creation. Once installed, the website gains the ability to use HTTPS, the secure version of HTTP.
To install an SSL certificate, a web browser supporting HTTPS is required. Following a successful installation, a lock icon in the address bar signifies the website’s use of HTTPS and assures users that their communication with the site is secure.
Beyond securing websites, PFX files also play a role in code signing—a process that verifies the software developer’s identity and ensures the integrity of the software. Validating the signature of downloaded software from a trusted source using PFX files enhances confidence in the authenticity of the software.
In essence, PFX files emerge as a vital security tool safeguarding applications, websites, and software. Users engaging with SSL certificate-reliant websites or software should verify the validity of the associated PFX file and confirm its correct installation for optimal security assurance.
Why Choose Certificatetool.com to Convert Your Certificates?
Certificatetool.com offers the following advantages:
- Effortless online conversion: Our website seamlessly runs code in the backend to convert your certificate files directly online. No need to grapple with OpenSSL commands yourself!
- Expertise at your fingertips: We handle all the complexities of SSL certificate file conversions, saving you time and effort.
- Fast, free, and simple: Upload your file, private key, and press the «Convert» button. It’s that easy!
- Unmatched privacy: We never store any files you upload, ensuring complete confidentiality and peace of mind.
Don’t hesitate to experience the convenience of Certificatetool.com for your certificate conversion needs.
Собрать SSL-сертификат в PFX-файл (также известный как PKCS#12) можно с помощью OpenSSL в linux и windows системах:
1. Убедитесь, что у вас есть все необходимые файлы:
— сертификат (.crt, .cer, .pem)
— приватный (закрытый) ключ (.key)
— опционально: цепочка промежуточных сертификатов ((.crt, .cer, .pem))
2. Используйте OpenSSL для создания PFX:
openssl pkcs12 -export -out certificate.pfx -inkey private.key -in certificate.crt -certfile fullchain.crt
где:
-out certificate.pfx — выходной PFX-файл;
-inkey private.key — Ваш приватный ключ;
-in certificate.crt — Ваш сертификат;
-certfile ca-bundle.crt — файл с промежуточными сертификатами (опционально, но рекомендуется для корректной работы цепочки доверия).
3. Введите пароль (если требуется):
OpenSSL запросит пароль для защиты PFX-файла. Этот пароль понадобится при импорте сертификата.
Примечание: старые версии Windows могут не поддерживать современные алгоритмы шифрования PFX (например, AES-256). Попробуйте создать PFX с -legacy:
openssl pkcs12 -legacy -export -out certificate.pfx -inkey private.key -in certificate.crt -certfile fullchain.crt
В windows SSL-сертификат в PFX-файл можно собрать с помощью CertUtil –MergePFX:
1. Установка промежуточного сертификата
Промежуточный сертификат импортируем в «Computer\Intermediate Certificate Authorities»
2. Сборка сертификата pfx
Для сборки понадобится ключ и сам сертификат. Файлы должны находиться в одной директории и имена файлов должны совпадать. Используем встроенную утилиту Windows «CertUtil.exe».
Выполняем команду: CertUtil –MergePFX <имя>.crt <имя>.pfx.
Вводим пароль два раза.
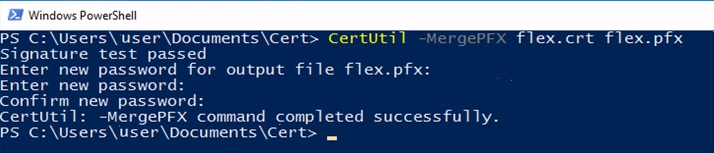
На выходе получим .pfx файл.
Для включения в .pfx файл промежуточных сертификатов и сертификата центра сертификации(CA) необходимо экспортировать сертификат с опциями «Yes, export private key» и «Include all certificates in the certification path if possible» в certlm.msc.
Вы уже работаете с сервисами Cloud4Y?
Перейти на вебсайт
Попробовать бесплатно