
Connecting to an SMB share on Windows 10 is easier than you might think. Just a few clicks and you’ll have access to shared files or printers on other devices in your network. This guide will walk you through each step so you can quickly get connected and start sharing.
In this section, we’ll go through the steps to connect to an SMB share on your Windows 10 device. Each step is designed to make the process straightforward, so even if you’re not a tech guru, you’ll be able to follow along easily.
Step 1: Open File Explorer
Open the File Explorer by clicking the folder icon on your taskbar.
This is the primary tool you’ll use to navigate your files and network locations. If you can’t find it, press the «Windows» key and «E» at the same time.
Step 2: Click on ‘This PC’
On the left-hand sidebar, find and click ‘This PC’.
This action will give you a broader view of the storage and network locations available on your computer.
Step 3: Click the ‘Computer’ Tab
Once you’re in ‘This PC’, find and click the ‘Computer’ tab at the top.
The ‘Computer’ tab is where you’ll find options and tools to manage your network connections.
Step 4: Click ‘Map Network Drive’
In the ‘Computer’ tab, click on ‘Map network drive’.
This opens a new window where you can enter details for the SMB share you want to connect to.
Step 5: Choose a Drive Letter
Select a drive letter from the dropdown menu.
The drive letter you choose will be the identifier for the SMB share, like how ‘C:’ is for your main drive.
Step 6: Enter the Folder Path
In the ‘Folder’ field, type the path to the SMB share, starting with ‘’.
For example, if the computer name is ‘Desktop’ and the folder is ‘Shared’, type ‘DesktopShared’.
Step 7: Click ‘Finish’
Finally, click ‘Finish’ to complete the setup.
If prompted, enter the username and password required to access the SMB share.
After completing these steps, you should be able to see and access the shared folder or printer in File Explorer.
- Make sure both devices are on the same network.
- Ensure the SMB feature is enabled on Windows 10 through ‘Windows Features’.
- Confirm the computer name and shared folder name are correct.
- Always check for typos in the folder path.
- Use the correct login credentials if prompted for username and password.
Frequently Asked Questions
Why can’t I see the network share?
Make sure both devices are on the same network and the SMB feature is enabled in Windows Features.
What if I get an «Access Denied» error?
Verify your username and password and ensure you have permissions to access the shared folder.
Can I connect to an SMB share on a different operating system?
Yes, SMB is a cross-platform protocol, so you can connect to shares on Linux, macOS, etc.
How do I disconnect from an SMB share?
In ‘File Explorer’, right-click the network drive and select ‘Disconnect’.
Is it safe to connect to an SMB share?
As long as you trust the network and the shared content, it’s generally safe. Always ensure your firewall and security settings are up-to-date.
Summary of Steps
- Open File Explorer.
- Click on ‘This PC’.
- Click the ‘Computer’ Tab.
- Click ‘Map Network Drive’.
- Choose a Drive Letter.
- Enter the Folder Path.
- Click ‘Finish’.
Conclusion
Connecting to an SMB share on Windows 10 is a handy way to access files and printers across your network. Whether you’re collaborating on projects or just need to print from another room, knowing how to set up an SMB share can make your life a lot easier. Always double-check your network settings and ensure you’re entering the correct path and credentials to avoid any hiccups.
For those who want to dive deeper, Microsoft’s official documentation offers more detailed configurations and troubleshooting tips. Connecting to an SMB share is a skill worth mastering as it enhances your productivity and makes file sharing a breeze. So go ahead, try it out, and see how seamless your network sharing experience can be!
Matt Jacobs has been working as an IT consultant for small businesses since receiving his Master’s degree in 2003. While he still does some consulting work, his primary focus now is on creating technology support content for SupportYourTech.com.
His work can be found on many websites and focuses on topics such as Microsoft Office, Apple devices, Android devices, Photoshop, and more.
Scope/Description
- This article will show how to connect to our SMB shares on Windows and MacOS clients.
Prerequisites
- SMB share configured on our server.
Steps
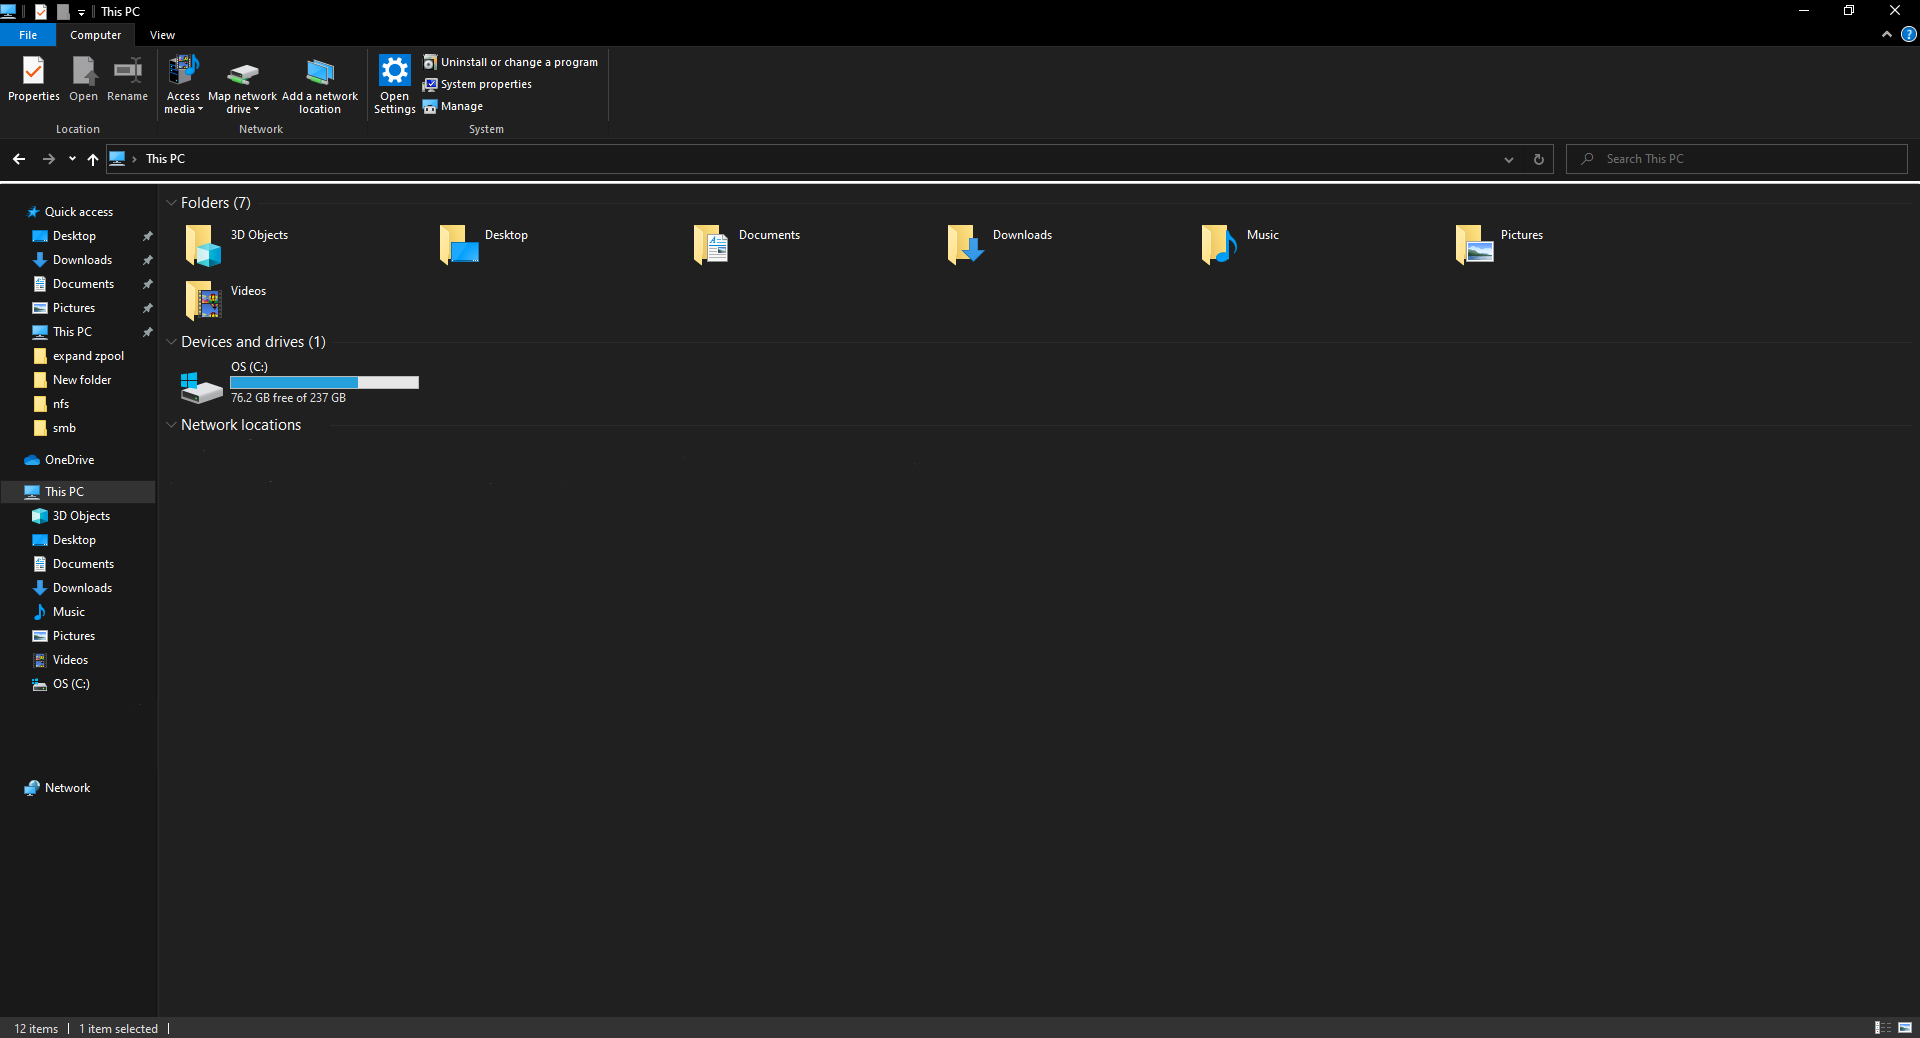
- On a Windows client, go to This PC in File Explorer.
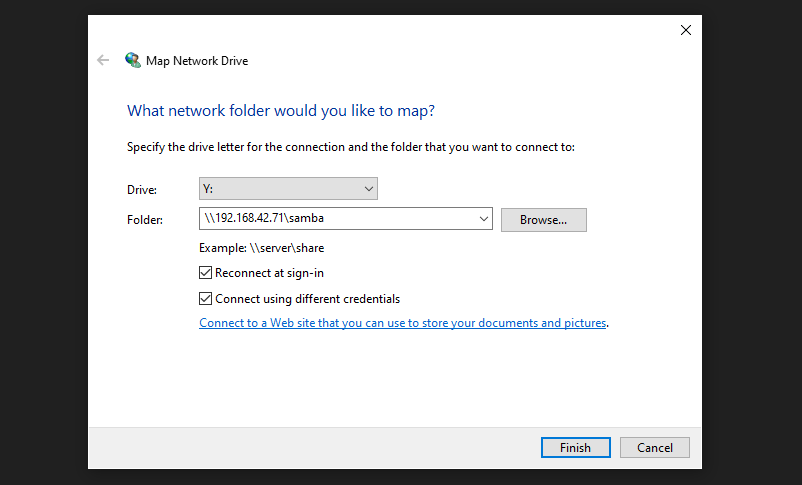
- Select Map network drive.
- In this menu, enter the server IP address in the following format \\SERVER-IP\SHARE-NAME and select Connect using different credentials.
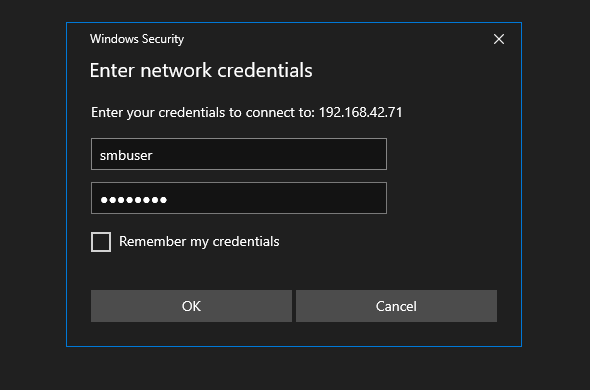
- Enter the login to connect to the SMB share.
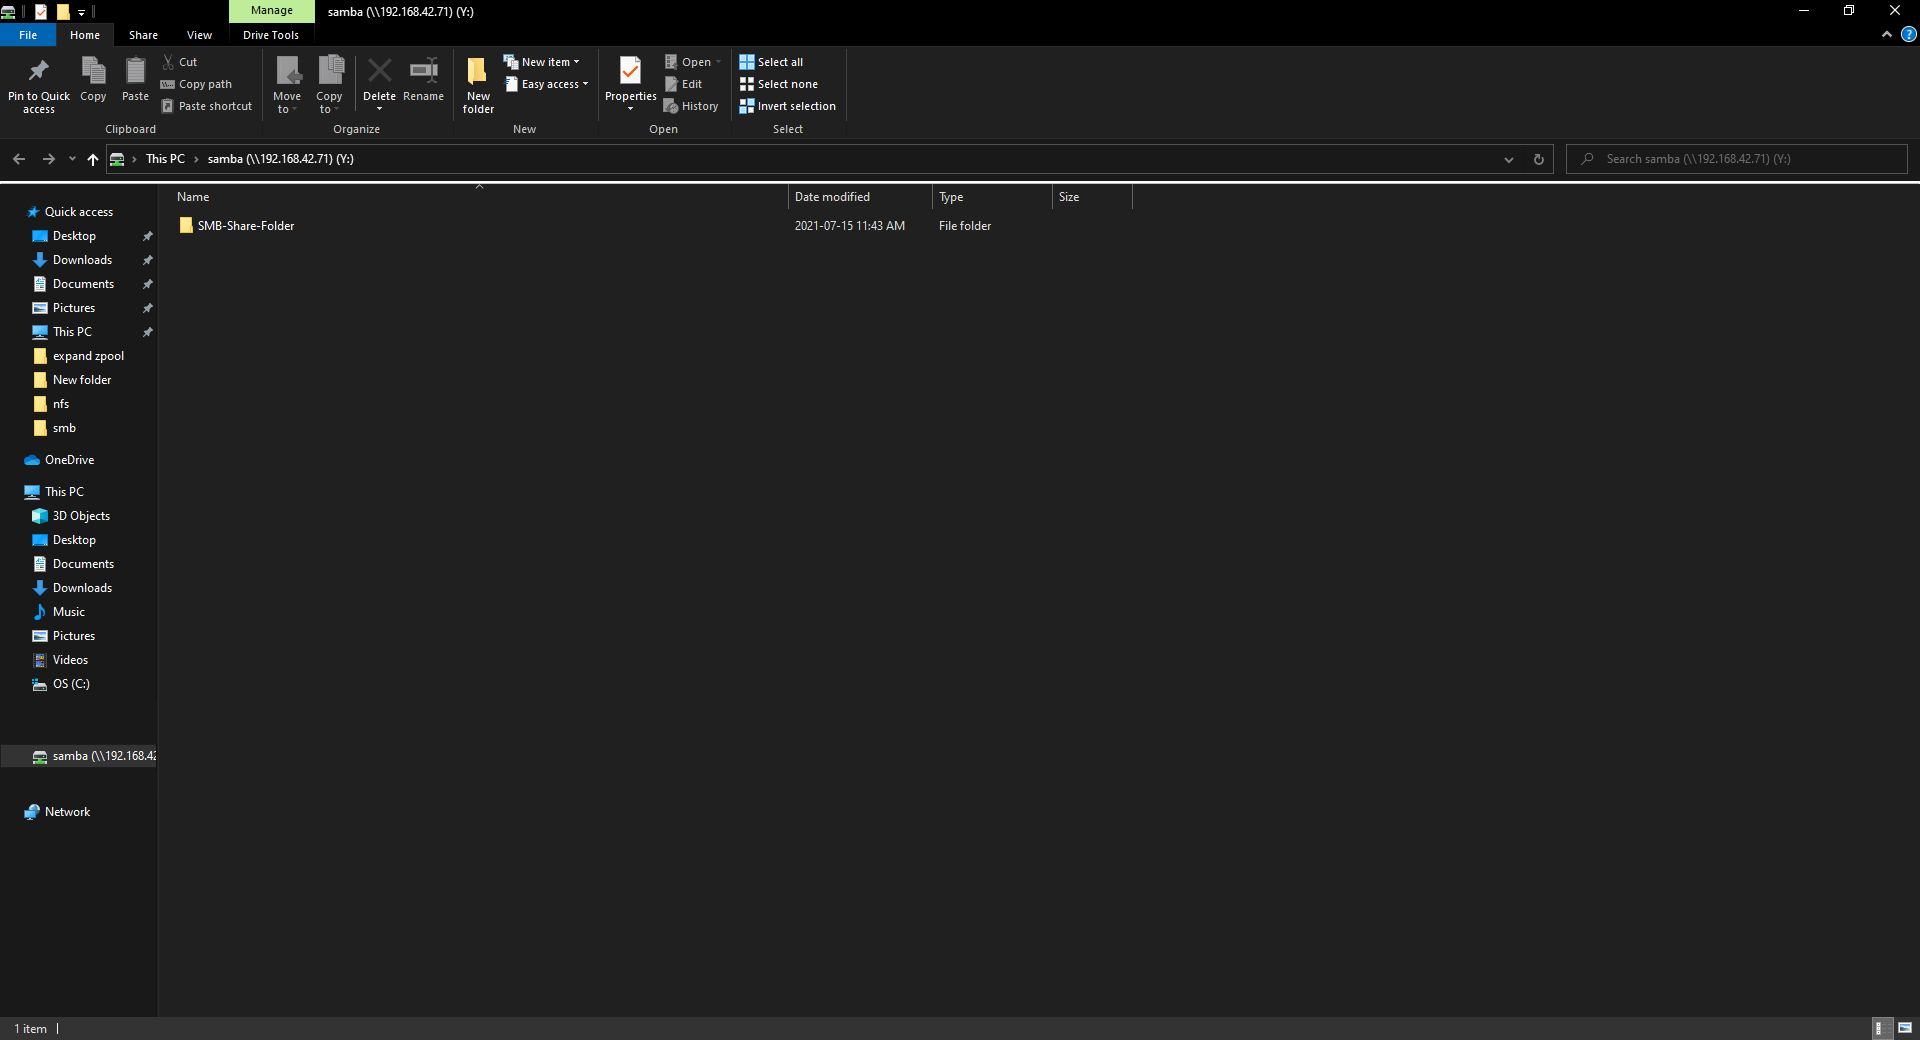
- Here we can see our SMB share is connected, and we can create a folder.
Connecting to SMB Share on MacOS
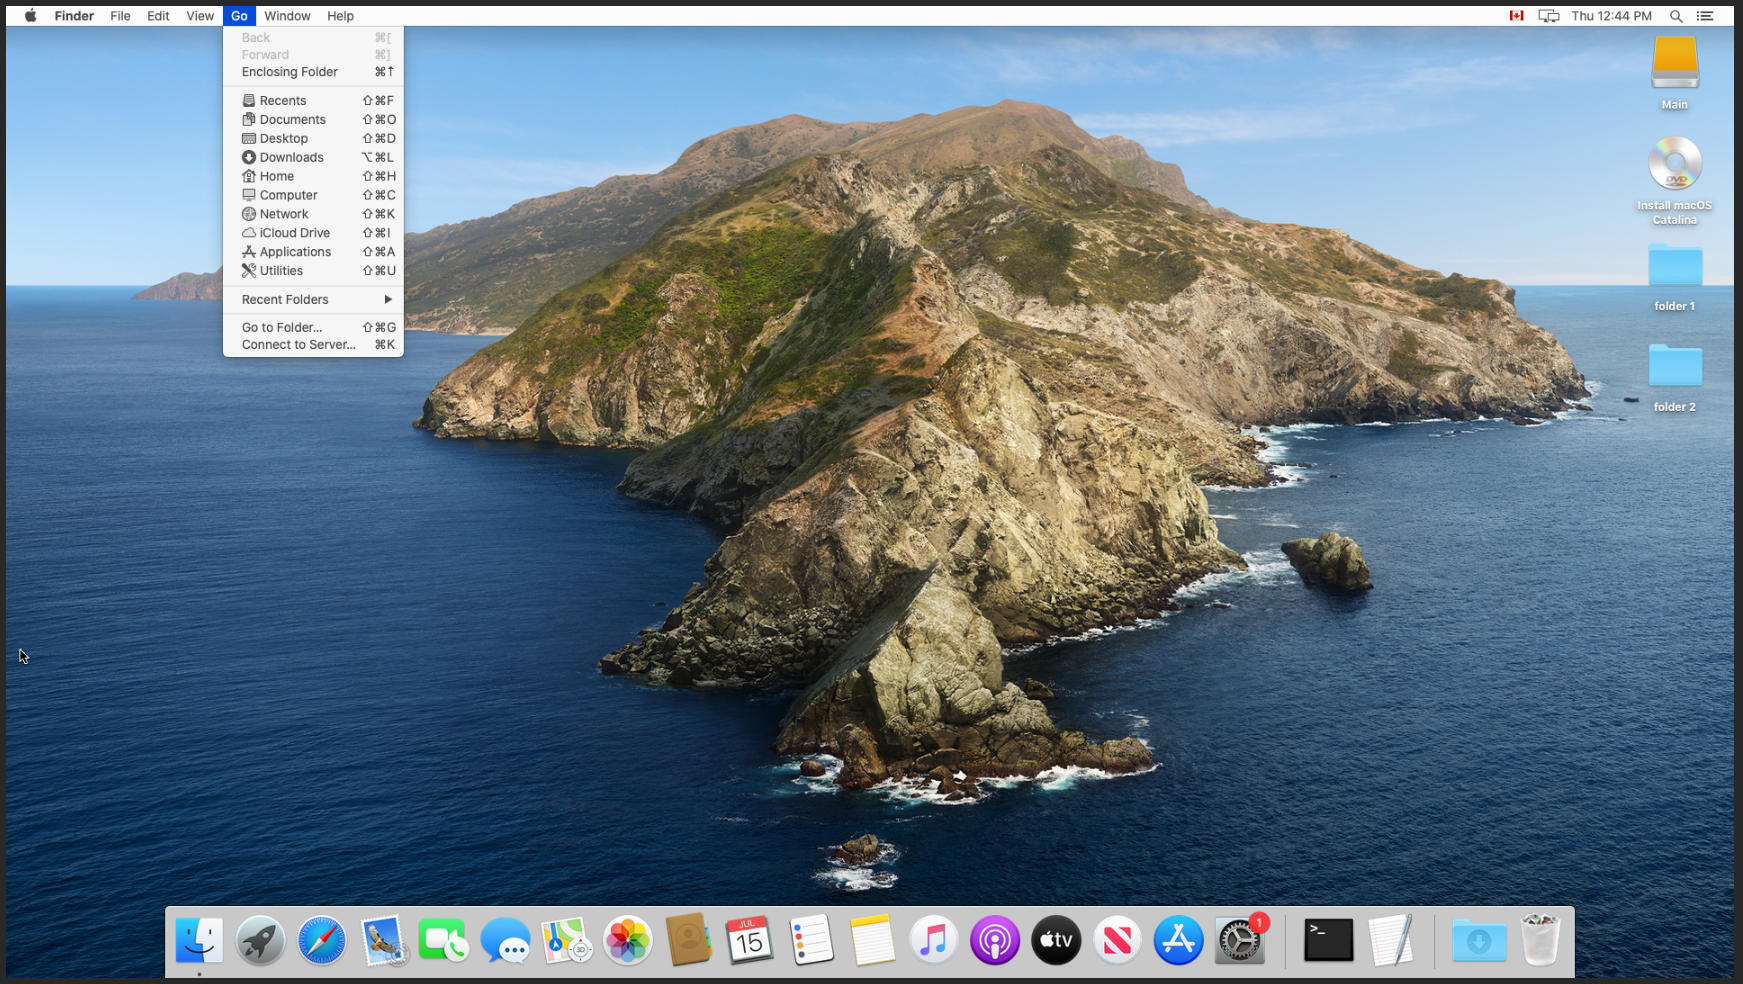
- At the toolbar on the top of the screen, press Go and then “Connect to Server…“.
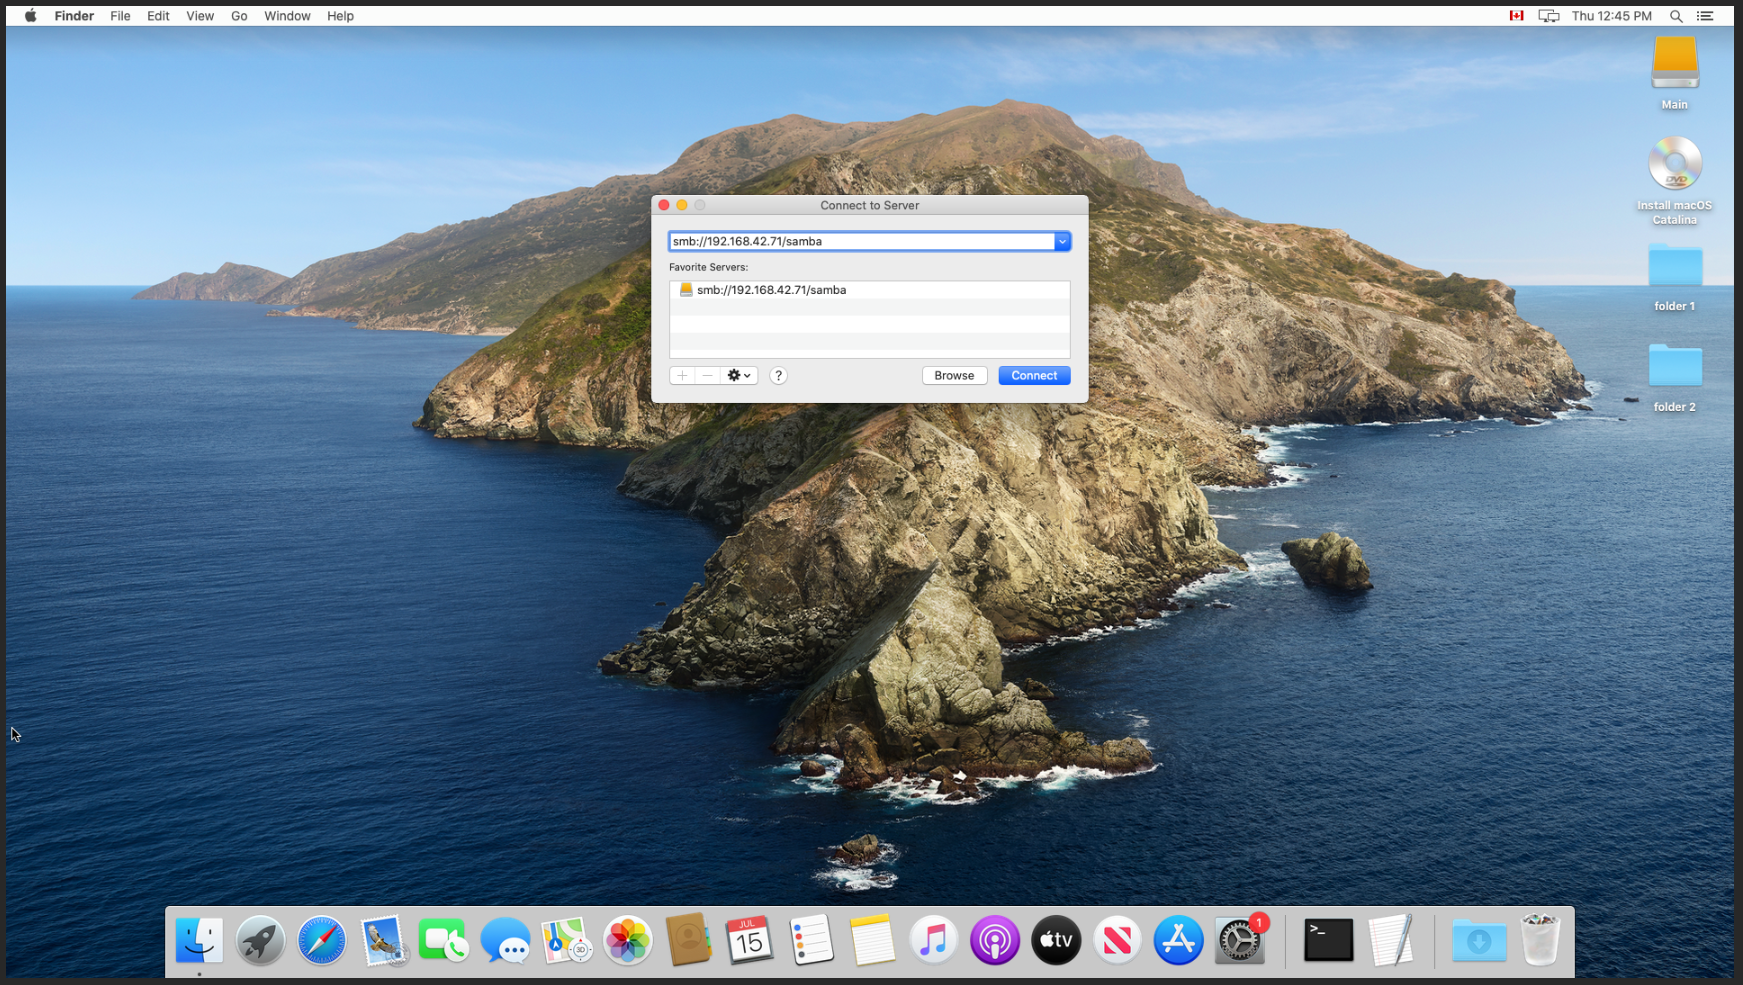
- In the address bar, enter smb://SERVER-IP/SHARE and click Connect. We can also select the plus at the bottom to save this information if we need to reconnect.
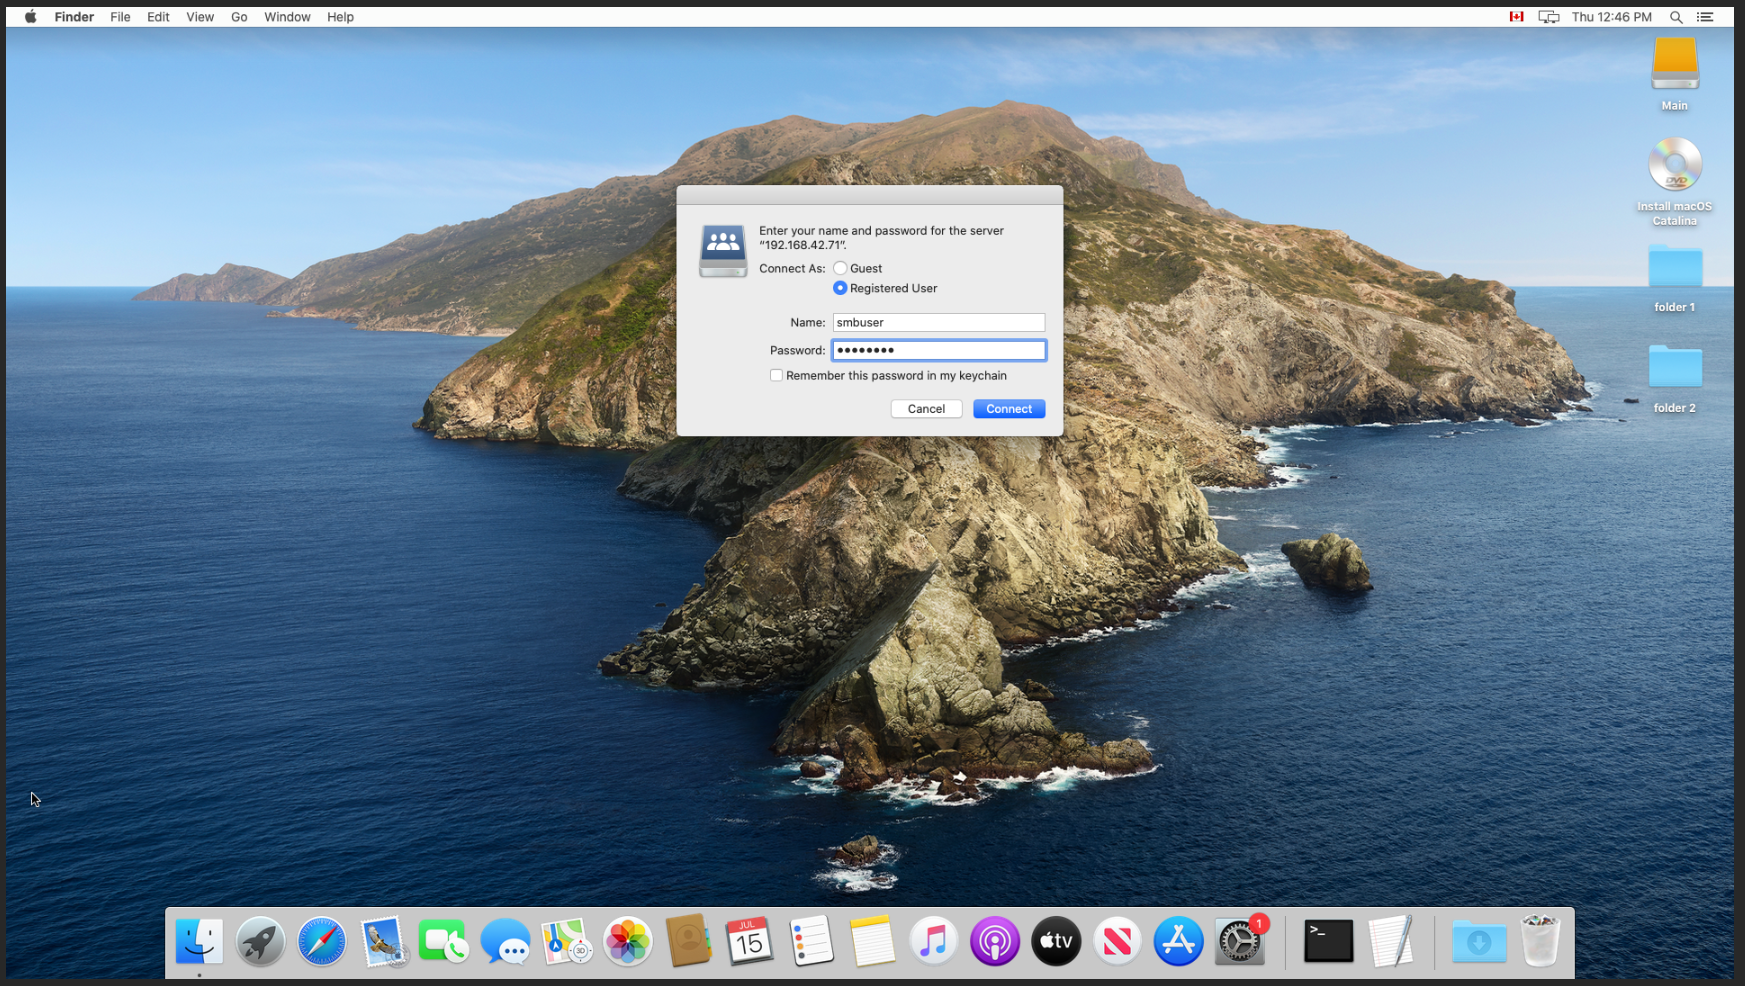
- Enter the login to connect to the SMB share.
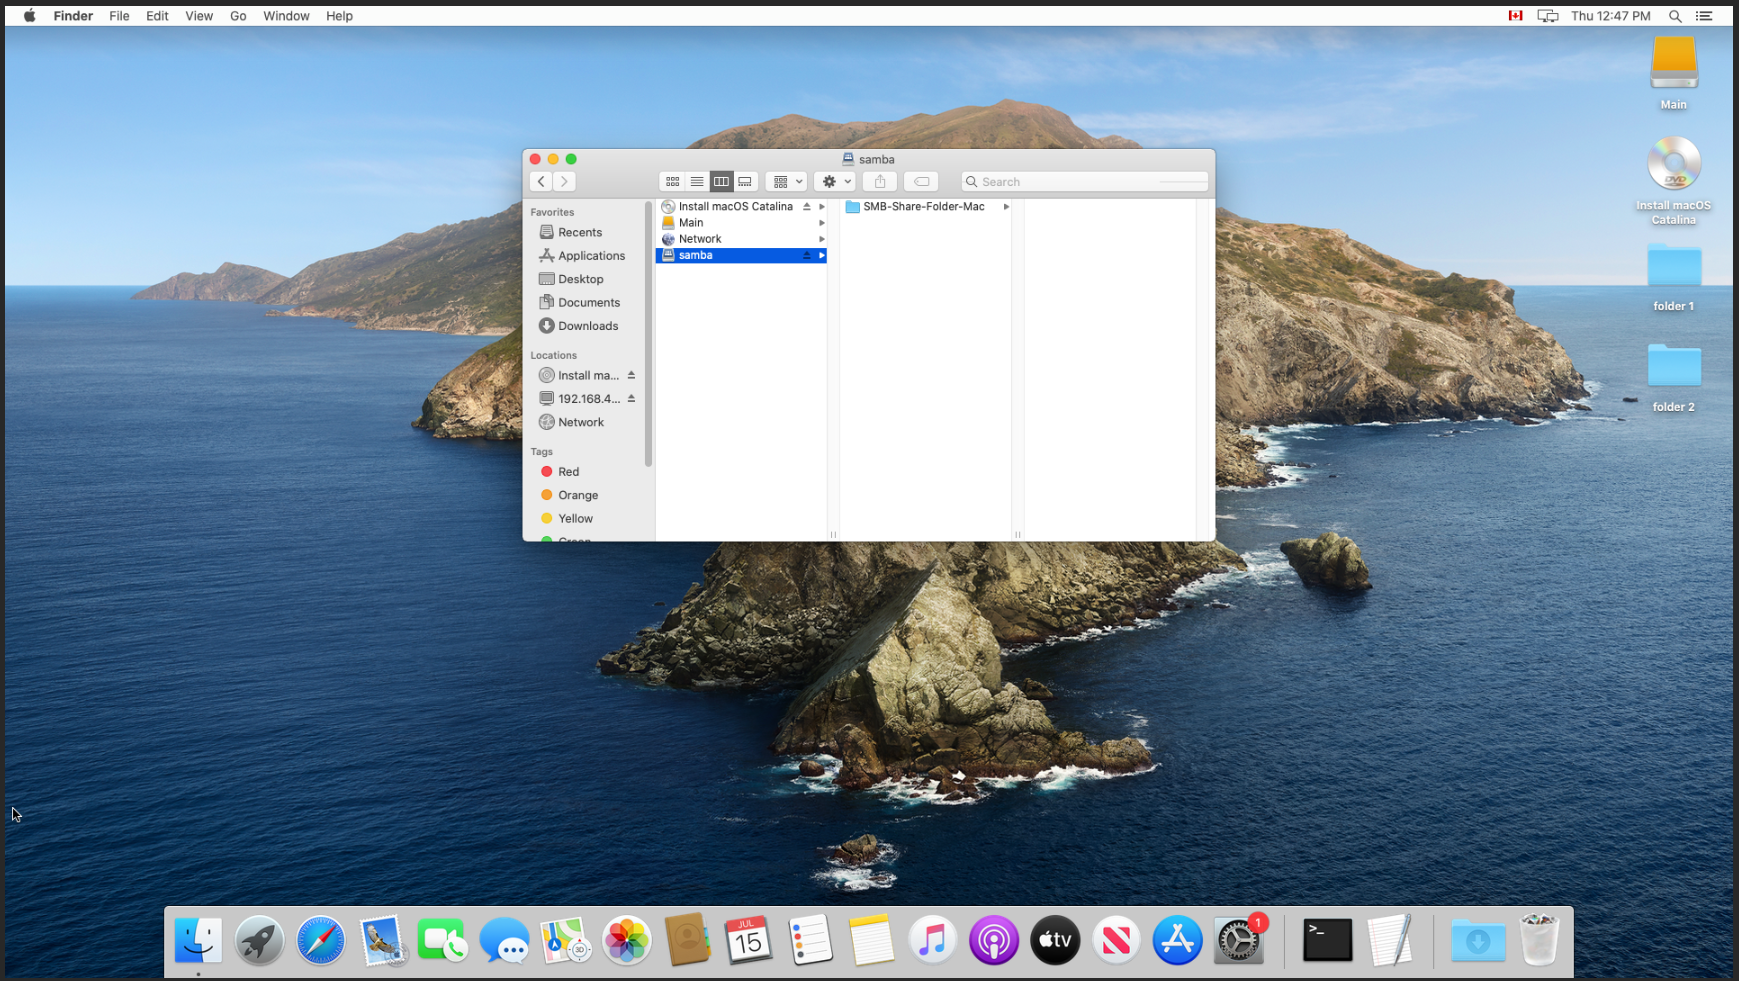
- Here we can see our SMB share is connected, and we can create a folder.
Verification
- We are able to map our SMB share, and have the correct access given our share configuration.
Troubleshooting
- Ensure the SMB share is configured correctly on the server.
- Ensure the client machine can communicate to the server.
Further Reading
- Setting Up Local User Access SMB Shares
- Setting up Windows Active Directory Authentication SMB Shares
- MacOS SMB Optimization
Was this article helpful?
Like
6
Dislike
3
Connecting to SMB (Server Message Block) shares in Windows 11 is an essential task for anyone looking to utilize network resources effectively. Whether you’re accessing files stored on a network server or sharing documents between computers, understanding how to establish a connection can streamline your workflow and enhance collaboration. This comprehensive guide will walk you through the steps necessary to connect to SMB shares in Windows 11, troubleshoot common issues, and optimize your file-sharing experience.
Understanding SMB
Before diving into the connection process, it’s important to understand what SMB is. SMB stands for Server Message Block, and it is a network file sharing protocol that enables applications to read and write to files on a remote server. It also allows users to communicate with network devices like printers. SMB works on the application layer of the OSI model and operates primarily over TCP/IP.
Windows 11 supports SMB in various versions, with SMB 3.x being the most current. This version provides improved performance and security features, such as encryption and better fault tolerance. Connecting to SMB shares will become increasingly relevant as businesses move toward remote work, necessitating easy access to shared resources.
Preparing Your Windows 11 Environment
Step 1: Check Windows Features
Before connecting to an SMB share, ensure that the necessary SMB features are enabled in your Windows 11 system. Here’s how to do it:
-
Open Windows Features:
- Type «Turn Windows features on or off» into the Start menu and select it.
- Alternatively, you can right-click on the Start button and select «Apps and Features.» Click on «Optional features» and then «More Windows features».
-
Enable SMB 1.0/CIFS File Sharing Support (if necessary):
- In the Windows Features dialog, scroll down to find «SMB 1.0/CIFS File Sharing Support.»
- Note that SMB 1.0 is deprecated due to security vulnerabilities, so whenever possible, rely on newer versions (SMB 2.x and SMB 3.x).
- Check the box (if it’s unchecked) and click “OK.”
-
Restart Your Computer:
- Restart your system to apply the changes.
Step 2: Connect to Your Network
Ensure that your computer is connected to the same network as the SMB share you wish to access. This is usually a local area network (LAN) or a Wi-Fi network. For troubleshooting connection issues later, you can check your network connection by:
- Clicking on the network icon in the taskbar.
- Ensuring you are connected to the correct Wi-Fi network or LAN.
Connecting to SMB Shares in Windows 11
With the preparation complete, you’re now ready to connect to SMB shares.
Step 1: Accessing File Explorer
- Open File Explorer:
- Use the keyboard shortcut
Windows + Eto launch File Explorer. - Alternatively, you can click on the File Explorer icon in the taskbar.
- Use the keyboard shortcut
Step 2: Using the Address Bar
-
Enter the SMB Share Path:
- In the File Explorer window, locate the address bar at the top.
- Enter the path to the SMB share using the format
\servernamesharename(replaceservernamewith the name or IP address of the server andsharenamewith the name of the shared folder). - For example,
\192.168.1.100SharedFolder.
-
Press Enter:
- After entering the path, press
Enter. Windows will attempt to connect to the SMB share.
- After entering the path, press
Step 3: Authentication
-
Enter Credentials:
- If prompted, input your username and password for the network share.
- You may also check the box that says «Remember my credentials» if you wish for Windows to save your login details for future access.
-
Access the Share:
- Once authenticated, the contents of the SMB share should be displayed in the File Explorer window.
Mapping SMB Shares as Drive Letters
If you frequently access a particular SMB share, it can be convenient to map it to a drive letter. This allows for quicker access and easier management. Here’s how to do this:
Step 1: Map Network Drive
-
Open File Explorer:
- Launch File Explorer through the
Windows + Eshortcut.
- Launch File Explorer through the
-
Navigate to This PC:
- On the left pane, click on «This PC.»
-
Select Computer Tab:
- Click on the “Computer” tab at the top of the File Explorer window.
-
Select Map Network Drive:
- Click on «Map network drive.» You’ll see a drop-down menu.
Step 2: Choose Drive Letter and Folder
-
Select a Drive Letter:
- In the Map Network Drive window, select a drive letter from the “Drive” dropdown.
-
Enter Folder Path:
- In the «Folder» text box, enter the path to the SMB share similarly as before (e.g.,
\servernamesharename).
- In the «Folder» text box, enter the path to the SMB share similarly as before (e.g.,
-
Reconnect at Sign-in:
- If you want Windows to automatically reconnect to this share every time you log in, check the option «Reconnect at sign-in.»
-
Click Finish:
- You might be prompted for your username and password if it’s required. Enter your credentials and click “Finish.” The mapped drive should now appear under “This PC.”
Accessing SMB Shares Using Run Command
For a quick connection to an SMB share, you can also use the Run command:
-
Open the Run Dialog:
- Press
Windows + Rto open the Run dialog box.
- Press
-
Enter SMB Path:
- Type
\servernamesharenamein the box and click “OK.”
- Type
-
Authenticate:
- If prompted, enter your credentials, and the SMB share should open.
Troubleshooting Connection Issues
While connecting to SMB shares in Windows 11 is usually straightforward, you may occasionally encounter issues. Below are common problems and their solutions:
Error Messages
-
Cannot Access the Share:
- Ensure that your computer is connected to the network.
- Verify that the SMB share path is correctly entered.
- Check if you have the correct permissions for access.
-
Network Path Not Found:
- Confirm that the server hosting the SMB share is powered on and connected to the network.
- Try using the IP address of the server instead of the name, as there could be a DNS issue.
-
Access Denied:
- Ensure that you have been granted appropriate permissions to the shared folder.
- Check with your network administrator to ensure your account has access rights.
Additional Settings
-
Check Windows Defender Firewall:
- Sometimes, the firewall settings may block SMB protocol access.
- To allow SMB connections, navigate to the Control Panel > System and Security > Windows Defender Firewall > Allow an app or feature through Windows Defender Firewall, and ensure that «File and Printer Sharing» is enabled.
-
SMB Protocol Version Compatibility:
- Ensure compatibility between different SMB versions; some servers may only support SMB 2.0 or earlier.
- Check on the server side whether SMB 1.0 is disabled, as it’s outdated and vulnerable.
Utilizing Advanced SMB Features
Once connected to an SMB share, you can take advantage of its various features.
File Permissions Management
Understanding file permissions is crucial for network management. Here’s a brief overview of how they work:
-
Read Permissions:
- Allows users to view files and folders, but not modify them.
-
Write Permissions:
- Enables users to create, modify, and delete content within the folder.
-
Execute Permissions:
- Provides the ability to run executable files.
Managing permission levels can be done by right-clicking on the shared folder, selecting «Properties,» and navigating to the «Security» tab. From here, you can manage user access levels.
Tracking and Monitoring Usage
For organizations, monitoring file usage can be essential. Although Windows does not provide an in-depth analysis feature for SMB shares, you can utilize third-party monitoring tools that integrate with Windows networks, allowing you to oversee user activity and access logs.
Conclusion
Connecting to SMB shares in Windows 11 may seem daunting initially, but by breaking it down into manageable steps, anyone can navigate this task with confidence. After preparing your system and ensuring your network connectivity, you can easily connect to SMB shares through File Explorer, the Run command, or by mapping drives for convenience. If issues arise, knowing how to troubleshoot these problems will ensure you maintain your connection to essential files.
As businesses and individuals alike continue to rely on network resources, mastering file sharing protocols like SMB will undoubtedly remain vital. Remember to stay updated on the latest protocols and security practices to maximize your efficiency and minimize risks associated with your SMB connections. Enjoy your seamless file-sharing experience!
When it comes to file sharing in a networked environment, the Server Message Block (SMB) protocol stands as a key pillar in Windows 10 and other operating systems. Connecting to SMB shares allows you to easily access files, printers, and other resources on a network. In this guide, we’ll walk you through the intricacies of connecting to SMB on Windows 10, ensuring you can tap into shared network resources effortlessly.
Understanding SMB and Its Importance
Before diving into the connection process, it’s crucial to grasp what SMB is and why it’s important. The Server Message Block (SMB) is a network protocol primarily used for providing shared access to files, directories, and printers over a network. It allows applications to read and write to files and request services from server programs on a computer network.
With its primary utility in both corporate and home networks, SMB enhances data sharing and collaboration, making it essential for users who frequently work with network resources. Windows 10 supports multiple versions of SMB, including the widely used SMB 1.0, SMB 2.0, and the more secure SMB 3.0.
Why Use SMB?
There are several compelling reasons to employ SMB for file sharing:
- Ease of Use: Connecting to SMB shares is intuitive and user-friendly, particularly within a Windows ecosystem.
- Interoperability: SMB allows cross-platform file sharing among different operating systems, such as Windows, macOS, and Linux.
- Security: SMB 2.0 and above enhance file access security, supporting encryption and improved authentication measures.
Preparing to Connect to SMB on Windows 10
Before you initiate a connection to an SMB share on Windows 10, ensure that you have set up the necessary parameters. Here’s what you need to do:
1. Ensure Network Discovery is Enabled
For SMB connections to work efficiently, your PC should be configured to discover other devices on the network. Follow these steps to enable Network Discovery:
- Open the Control Panel.
- Navigate to Network and Sharing Center.
- Click on Change advanced sharing settings.
- Under the Private section, ensure Turn on network discovery is selected.
2. Set File and Printer Sharing Settings
To allow files and printers to be shared on the network:
- Within the Advanced sharing settings, scroll to the Private section.
- Select Turn on file and printer sharing.
3. Ensure SMB Protocol is Enabled
Starting with Windows 10 version 1709, SMB 1.0 is no longer enabled by default due to security issues. To check or enable it:
- Search for Control Panel in the Start menu and open it.
- Click on Programs, then select Turn Windows features on or off.
- Scroll down and find SMB 1.0/CIFS File Sharing Support. If it’s unchecked, check it and click OK.
- Restart your PC for the changes to take effect.
How to Connect to SMB Shares in Windows 10
Once you have completed the preparation steps, you’re ready to connect to an SMB share. There are several ways to do this:
Method 1: Connecting via File Explorer
One of the most straightforward methods of connecting to SMB shares is through File Explorer:
- Open File Explorer: Click the folder icon on your taskbar or press Windows + E.
- Access the Address Bar: At the top of File Explorer, click on the address bar.
- Enter the SMB Path: Type the following format into the address bar:
\\SERVERNAME\SHARENAME
Replace SERVERNAME with the name or IP address of the server hosting the SMB share and SHARENAME with the specific folder name you want to access.
4. Press Enter: Hit Enter to establish the connection.
Example:
If you know your server’s IP address is 192.168.1.10 and the share name is Documents, type:
\\192.168.1.10\Documents
This will prompt you to enter your credentials if required.
Method 2: Mapping a Network Drive
Mapping a network drive allows you to create a shortcut for quicker access to the SMB share:
- Open File Explorer: Launch File Explorer.
- Select “This PC”: On the left navigation pane, locate and click on “This PC.”
- Click “Map Network Drive”: In the ribbon at the top, click on the “Computer” tab and select Map network drive.
- Choose a Drive Letter: From the drop-down menu, choose a letter that you want to associate with the network drive.
- Enter the Folder Path: Input the SMB address in the Folder field in the same format as mentioned before:
\\SERVERNAME\SHARENAME
6. Reconnect at Sign-in: Check the box if you want the drive to reconnect automatically when signing in.
7. Click Finish: Hit Finish to complete the mapping.
Troubleshooting Connection Issues
Despite following the correct steps, you may encounter issues while trying to connect to SMB shares. Common problems include network connectivity issues or misconfigured SMB settings. Here’s how to troubleshoot them:
1. Check Network Connection
Ensure that your device is connected to the network correctly. If you’re connected via Wi-Fi, verify that your internet connection is stable. If necessary, restart your router and computer.
2. Verify SMB Settings
Confirm that the SMB protocol is enabled as previously detailed. Additionally, check if the SMB share has permissions set for your user account.
3. Test the Connection
You can ping the server from your Windows 10 PC to see if it’s reachable:
- Open the Command Prompt (search for
cmdin the Start menu). - Type:
ping SERVERNAME
Replace SERVERNAME with the IP or hostname of the server.
4. Firewall Settings
Ensure that your firewall settings on both the server and your PC allow SMB traffic. If a firewall is blocking the connection, it can prevent you from accessing shared drives.
Enable File and Printer Sharing on the Firewall
- Open the Windows Security app.
- Go to Firewall & network protection.
- Click on Allow an app through firewall.
- Ensure File and Printer Sharing is allowed on the network type you are connected to.
Advanced Techniques and Tips
To enhance your SMB sharing experience, consider these advanced techniques:
1. Use PowerShell for Connecting to SMB
PowerShell provides powerful command-line tools for managing SMB connections. You can use the New-PSDrive cmdlet to map SMB shares more dynamically. Here’s how:
Open PowerShell and type:
New-PSDrive -Name "S" -PSProvider FileSystem -Root "\\SERVERNAME\SHARENAME" -Persist
Replace "S" with the desired drive letter and fill in the server and share name accordingly.
2. Optimize SMB Performance
If you’re working with large files or require fast transfers, explore optimizing your SMB settings:
- Use SMB 3.0: Ensure that both the client and server support SMB 3.0 for enhanced performance and security features.
- Consider network settings: Adjust the settings of your network adapter for performance, ensuring maximum throughput.
Conclusion
Connecting to SMB shares in Windows 10 is a valuable skill for those seeking efficient file sharing and network collaboration. By understanding the SMB protocol, preparing your environment, and following straightforward connection methods, you can easily access shared resources on your network.
If you encounter any difficulties, use the troubleshooting tips provided in this guide to resolve issues. With practice, you’ll become adept at managing SMB connections, ultimately enhancing your productivity at home or in the workplace. Whether you’re sharing documents across a small team or accessing files from a server miles away, mastering SMB in Windows 10 is an essential ability in today’s interconnected world.
What is SMB and why is it important for Windows 10?
SMB, or Server Message Block, is a network file sharing protocol that allows applications to read and write to files and request services from server programs in a computer network. In Windows 10, SMB enables users to share files, printers, and serial ports across the network seamlessly. This makes it vital for both personal and professional environments where collaboration and resource sharing are crucial.
Moreover, SMB plays a significant role in accessing files on remote computers. By allowing different systems to communicate, it enhances the workflow and productivity of users. Understanding how to manage SMB connections can significantly improve your experience in file sharing, accessing network resources, and overall connectivity within Windows 10.
How do I enable SMB in Windows 10?
To enable SMB in Windows 10, you need to access the Control Panel. Start by typing “Control Panel” in the Start menu and select it. Next, navigate to “Programs” and then “Turn Windows features on or off.” In the new window, locate the option for “SMB 1.0/CIFS File Sharing Support” and enable it if it’s unchecked. After making your selections, click OK, and restart your computer to apply the changes.
Please note that while enabling SMB 1.0 may be necessary for compatibility with older devices, it is generally recommended to use SMB 2.0 or higher due to enhanced security features. Configuring SMB versions appropriately can prevent vulnerabilities and ensure secure connections across your network.
How can I troubleshoot SMB connection issues in Windows 10?
Troubleshooting SMB connection issues can begin with checking your network settings. Ensure that your network discovery is turned on and your network is set to “Private” rather than “Public,” as SMB connections can be restricted on public networks. Additionally, verify that your firewall settings allow SMB traffic, typically by ensuring that exceptions for file and printer sharing are enabled.
If problems persist, you may want to clear your cached network credentials. Open the Credential Manager in the Control Panel and remove any outdated credentials related to network share paths. Sometimes, a simple restart of the affected devices can also resolve connection issues, as it refreshes the network settings and connections.
What security measures should I take when using SMB?
When using SMB, it’s essential to implement several security measures to protect your network and data. First, ensure that you disable SMB 1.0 if it is not necessary, as it is an outdated protocol with known security vulnerabilities. Always aim to use SMB 2.0 or higher, which includes improved security features like better encryption methods and increased performance.
Additionally, ensure that your operating system and any network devices like routers and firewalls are up to date with the latest security patches. Use strong passwords for shared resources, and consider restricting access to sensitive files or folders based on user permissions to minimize risks from unauthorized access.
Can I share files with non-Windows devices using SMB?
Yes, you can share files with non-Windows devices using SMB, as many operating systems, including macOS and various Linux distributions, support the SMB protocol. To share files with these devices, you generally need to configure the sharing settings correctly on your Windows 10 machine, specifying which folders you want to share and ensuring that the appropriate permissions are set.
On the receiving device, users will typically need to connect to the shared folder using the device’s file explorer or a specific command within the terminal, depending on the operating system used. Ensure that all devices are on the same network and that any necessary SMB services are enabled to facilitate cross-platform sharing effectively.
What are the differences between SMB versions?
SMB has evolved through different versions, with each new iteration introducing enhancements in performance and security. SMB 1.0, designed in the 1980s, is largely outdated, lacking adequate security measures. This version is less efficient in handling modern networking and is susceptible to various vulnerabilities.
SMB 2.0 introduced in Windows Vista brought significant improvements, including reduced chattiness between clients and servers, additional encryption options, and support for large file sizes. SMB 3.0 and later versions introduced even more features, such as better encryption standards and support for multiple channels, enhancing both security and performance when sharing files across networks.
How do I access shared folders on a network in Windows 10?
To access shared folders on a network in Windows 10, you can open File Explorer and navigate to the “Network” section. If network discovery is enabled, you should see the list of devices connected to your network. Double-click on the desired device to view its shared folders. If you do not see the device, ensure that network discovery is turned on and that your computer is connected to the same network.
Alternatively, you can directly access a shared folder by typing the network path in the File Explorer address bar. The format for this is \\ComputerName\SharedFolderName. If you encounter prompts for a username and password, enter the credentials of an account that has permission to access the shared folder. This method provides a straightforward way to connect to and utilize shared resources within your network.
Connecting to an SMB share on Windows 11 is a useful way to access files and folders on a network. It’s a straightforward process that involves a few simple steps. In this guide, we’ll walk you through the process of connecting to an SMB share, ensuring you can access shared resources on your network without a hitch.
How to Connect to an SMB Share on Windows 11
To connect to an SMB share on Windows 11, we’ll map the network drive so you can access shared files just like any other folder on your computer. Follow these steps to get connected.
Step 1: Open File Explorer
First, open File Explorer by clicking on the folder icon in your taskbar or by pressing Windows + E on your keyboard.
Opening File Explorer is the gateway to accessing all your files and network locations. It’s the starting point for mapping your network drive.
Step 2: Click on ‘This PC’
Once File Explorer is open, navigate to ‘This PC’ on the left-hand side.
‘This PC’ gives you an overview of your computer’s storage devices and is where you’ll add your network drive.
Step 3: Select ‘Map Network Drive’
In the ‘This PC’ window, click on the ‘Map network drive’ button located in the toolbar at the top.
This action will open a new dialog box where you’ll enter the details for your network drive.
Step 4: Choose a Drive Letter
In the dialog box, select a drive letter from the dropdown menu. This will be the letter assigned to your network drive.
Choosing a drive letter is like giving your network drive an identity, making it easily accessible from File Explorer.
Step 5: Enter the Network Path
In the ‘Folder’ field, type the network path to the SMB share, starting with \ followed by the server name and the shared folder name (e.g., \servernamesharename).
The network path is the address of your SMB share. This tells your computer exactly where to find the shared resources on the network.
Step 6: Click ‘Finish’
Finally, click ‘Finish’ to complete the process.
After clicking ‘Finish,’ your computer will attempt to connect to the SMB share. If prompted, enter your network credentials to access the shared folder.
After you complete these steps, your SMB share will appear as a new drive under ‘This PC’ in File Explorer. You can now access shared files and folders just like you would with any other drive on your computer.
Tips for Connecting to an SMB Share on Windows 11
- Ensure your network is configured correctly and that you have the necessary permissions to access the SMB share.
- If you experience connectivity issues, check your firewall settings to ensure they aren’t blocking the connection.
- Keep your Windows 11 system updated to avoid compatibility issues with SMB shares.
- Use a strong, unique password for your network credentials to maintain security.
- If the network path contains spaces, enclose it in double quotes (e.g.,
"\servernameshared folder").
Frequently Asked Questions
What is an SMB share?
An SMB share is a shared folder or file system that can be accessed over a network using the Server Message Block (SMB) protocol.
What if I don’t see the ‘Map Network Drive’ option?
If you don’t see the ‘Map Network Drive’ option, ensure you are in ‘This PC’ view and not a different File Explorer window.
Can I connect to an SMB share without network credentials?
No, you typically need network credentials (username and password) to access an SMB share unless it’s configured for public access.
What should I do if I can’t connect to the SMB share?
Check your network settings, ensure the SMB share path is correct, and verify your firewall is not blocking the connection.
Can I connect to multiple SMB shares?
Yes, you can connect to multiple SMB shares by repeating the mapping process and assigning different drive letters to each share.
Summary
- Open File Explorer.
- Click on ‘This PC’.
- Select ‘Map Network Drive’.
- Choose a drive letter.
- Enter the network path.
- Click ‘Finish’.
Conclusion
Connecting to an SMB share on Windows 11 is a powerful way to access network resources effortlessly. By following the straightforward steps outlined in this guide, you can map network drives and streamline your workflow, making shared files and folders readily available at your fingertips.
Remember to keep your network credentials secure and your system updated to avoid any hiccups. If you’re looking to optimize your network setup further, consider exploring additional network configuration options or consulting with an IT professional for advanced networking needs. Happy sharing!