
This tutorial is going to show you 3 ways to log into Linux server on Windows via SSH.
What’s SSH?
SSH stands for Secure Shell, which was invented in 1995 to replace the insecure Telnet (Telecommunication Network). It’s now the primary way for system administrators to securely log into remote Linux servers over the public Internet. Although it looks and acts the same as Telnet, all communications over the SSH protocol is encrypted to prevent packet sniffing.
If you are running a Linux or Mac computer, SSH client is installed by default. You can open up a terminal window and run the ssh command like below to connect to a remote Linux server.
ssh [email protected]
Now let’s discuss how to use SSH on Windows.
Method 1: Windows 10’s Built-in SSH Client
The Microsoft PowerShell team decided to port OpenSSH (both the client and the server) to Windows in 2015. It finally arrived in Windows 10’s Fall Creator Update in 2017 and is enabled by default in the April 2018 Update.
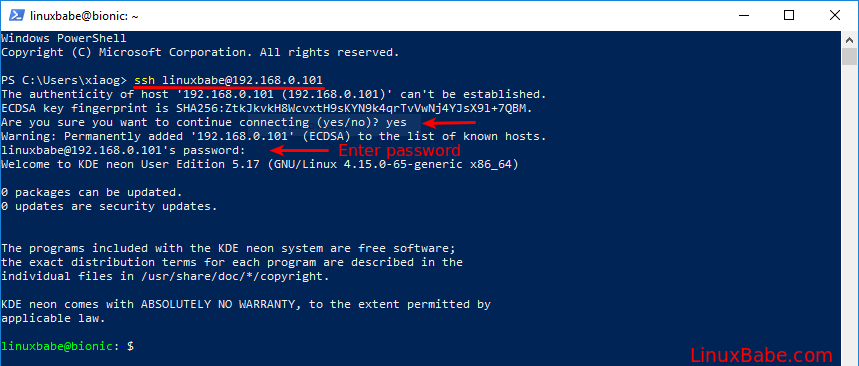
To use the OpenSSH client on Windows 10, simply open a PowerShell window or a command prompt window and run the ssh command. For example, if I want to connect to my Ubuntu desktop in the LAN, I would run
ssh [email protected]
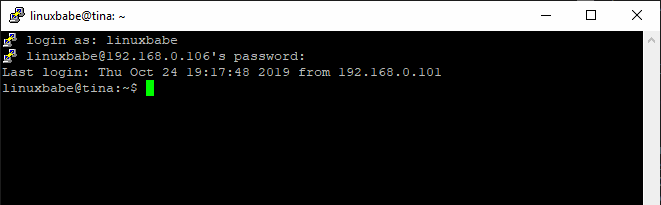
linuxbabe is the username on my Ubuntu desktop and 192.168.0.101 is the private IP address for my Ubuntu desktop. The first time you connect to a Linux computer, you will be prompted to accept the host key. Then enter your password to login. After login, you can run Linux commands to do administrative tasks.
Note that if you want to paste a password into the PowerShell window, you need to right-click the mouse and press Enter.
To log out from the Linux box, run the exit command or press Ctrl+D.
The default font size in PowerShell Window is very small. To change it, right-click the titlebar and select properties, then you can change the font size, and the background color.

Method 2: Use SSH in Windows Subsystem for Linux
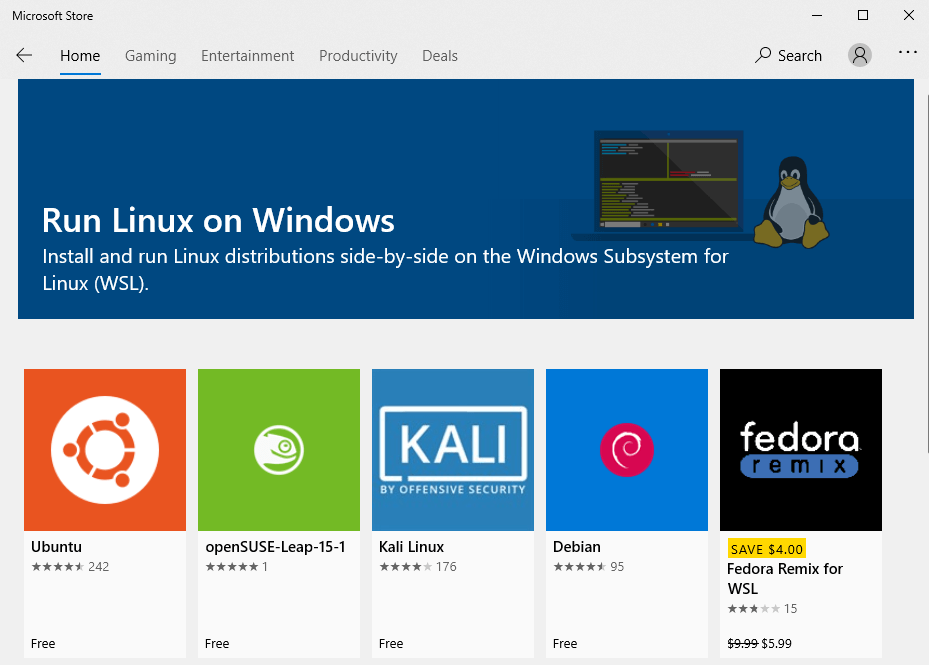
Windows Subsystem for Linux (WSL) enables you to run native Linux command-line tools directly on Windows 10. If you are a system administrator, WSL is probably an overkill for just using SSH because it would install and run a Linux distro (without graphical user interface) on your Windows 10 desktop. WSL is created for web developers or those who need to work on open-source projects. You can use not only SSH but also other Linux command line tools (Bash, sed, awk, etc).
Open the Microsoft Store and enter WSL in the search box. Select Run Linux on Windows and install a Linux distro of your choice.
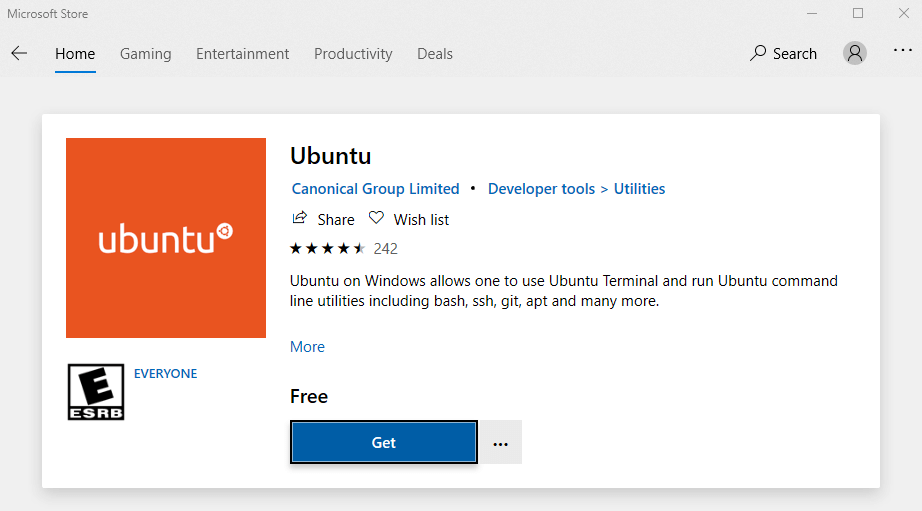
For example, I choose Ubuntu and click the Get button to install it.
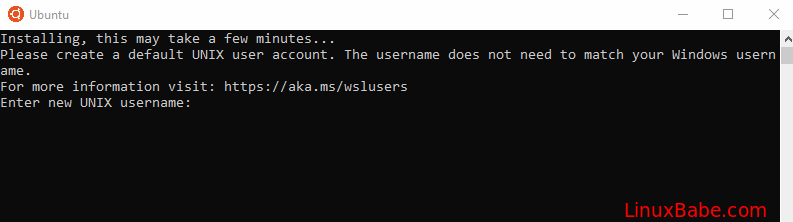
Once your Linux distro is installed, open the Control Panel and select Programs -> Turn Windows features on or off. Tick on the checkbox of Windows Subsystem for Linux to enable this feature. (You may need to reboot your Windows PC for this change to take effect.)
Next, you can launch the Linux distro from the start menu by search the distro’s name. The first time you launch it, you need to create a user and set a password.
After that, you can use the ssh command like below to connect to a Linux server or PC that runs a SSH server.
ssh [email protected]
Method 3: Use Putty
Putty is a well-known and the most popular SSH client on Windows before the arrival of Windows OpenSSH client and Windows Subsystem for Linux. To use SSH with Putty, you need to download the Putty program from the official website and install it.
Launch Putty from the Start menu. Then enter the IP address or hostname of the Linux box and click the Open button to connect to it.
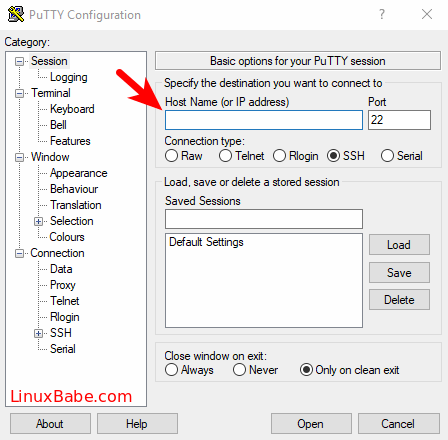
Accept the host key and you will be prompted to enter the username and password.
Please note that when you type in your password, the cursor doesn’t move, but it’s actually accepting your password. To paste text into Putty, first press Ctrl+C to copy the text, then go to Putty window and press the right button of your mouse.
How to Set Up SSH Key on Windows 10 (Optional)
There’re mainly two ways of authenticating user login with OpenSSH server:
- password authentication
- public-key authentication: also known as passwordless SSH login because you don’t need to enter your password.
To set up public-key authentication on Windows 10, follow the instructions below.
Open Windows Powershell, and run the following command to generate SSH keypair.
ssh-keygen -t rsa -b 4096
Where:
-tstands fortype. The above command generates an RSA type keypair. RSA is the default type.-bstands forbits. By default, the key is 3072 bits long. We use a 4096 bits key for stronger security.
When asked which file to save the key, you can simply press Enter to use the default file. Next, you can enter a passphrase to encrypt the private key, but you will need to enter this passphrase every time when you log into the Linux server. If you don’t want it, you can press Enter, so it will have no passphrase.

- The private key (your identification) will be saved in the .ssh/id_rsa file under your user directory.
- The public key will be saved in the .ssh/id_rsa.pub file.
Now we need to upload the public key to remote Linux server. You can display the public key in the Powershell with the following command.
cat .ssh/id_rsa.pub
Then log in to your server via password authentication, and run the following command to create a .ssh directory under your home directory.
sudo mkdir ~/.ssh
Create the authorized_hosts file
sudo nano ~/.ssh/authorized_keys
Copy your SSH public key and paste it to this file. Save and close the file. To save a file in Nano text editor, press Ctrl+O, then press Enter to confirm. To close a file, press Ctrl+X.
Next, change the permission of this file.
sudo chmod 600 ~/.ssh/authorized_keys
Log out of your Linux server.
exit
Now you can SSH into your server without entering a password.
Next Step
I hope this article helped you use SSH on Windows. You might also want to protect SSH service from hacking, I recommend setting up public-key authentication or two-factor authentication.
- 2 Simple Steps to Set up Passwordless SSH Login on Ubuntu
- Set Up SSH Two-Factor Authentication (2FA) on Ubuntu Server
Also, you can enable automatic security updates on your Linux server to patch vulnerabilities.
- Set Up Automatic Security Update (Unattended Upgrades) on Ubuntu
If you want FTP access to the Ubuntu server, you can set up pure-FTPd server.
- How to Set Up a Secure FTP Server with Pure-FTPd on Ubuntu
As always, if you found this post useful, then subscribe to our free newsletter to get more tips and tricks. Take care 🙂
В этом уроке мы научимся подключаться к терминалу Ubuntu через протокол SSH с помощью программы PuTTY на Windows. Для начала давайте разберемся, что такое SSH и зачем нам нужен PuTTY для подключения по SSH к серверам.
⇓ Запись видеоурока во ВКонтакте ⇓
⇓ Запись видеоурока на RuTuBe ⇓
⇓ Запись видеоурока на YouTuBe ⇓
SSH (Secure Shell – Безопасная оболочка) – протокол позволяющий производить удаленное управление операционной системой и осуществлять передачу данных, таких как файлы, аудио и видео потоки. Преимущества данного протокола в том, что он шифрует весь передаваемый трафик, включая пароли.
PuTTY – программа, позволяющая подключаться к системам через протоколы удаленного доступа, такие как SSH, Telnet и другие. Однако, судя из нашей задачи мы будем её использовать для работы именно с через протокол SSH.
Установка и настройка сервера SSH
В процессе установки операционной системы мы указывали, что нам необходимо установить SSH сервер. Если вы этого не сделали, то запустите авторизуйтесь в консоли и запустите команду:
sudo apt install openssh-server
Как вы видите, система выдает нам сообщение, что сервер openssh уже установлен в системе.

Вообще, что это за команда и каков синтаксис построения команд в Linux я расскажу более подробно в следующем видео.
Установка и работа в программе PuTTY
Скачиваем программу PuTTY с официального сайта https://putty.org.ru \ Скачать \ Обычная версия: putty-0.73-ru-17.zip \ Разархивируем и устанавливаем.
У меня она уже установлена, поэтому я её запускаю и попадаю в основной раздел, с которым мы будем работать, это раздел Session (сессии), т.е. подключения к удаленным системам.
У вас здесь будет только пункт Default Settings (Настройки по умолчанию) \ Вводим ip адрес нашего сервера, 192.168.88.50 \ Port: 22 \ Connect type: SSH \ Сразу сохраним параметры подключения к данному серверу, чтобы не вводить их каждый раз \ Save sessions \ Ubunbu-srv \ Save. Теперь подключение с данным именем появилось у нас в списке сохраненных сеансов.

Если мы выберем профиль сеанса и нажмем на кнопку Load, то загрузим его настройки. Это очень удобно, если вы администрируете несколько серверов, все их настройки можно добавить в разные профили сессий.
Если вы забыли адрес сервера, то в консоли вводим команду:
ip ad
и видим настройки сетевых подключений присутствующих в системе

Нажимаем Open, чтобы попытаться подключиться к нашему серверу через протокол защищенной оболочки SSH \ Вводим логин: it-skills \ Вводим пароль: ***** \
После успешного подключения мы получаем сообщение добро пожаловать в Ubuntu 22.04.2, ссылки на полезные ресурсы, дата и время на сервере, сводную информацию о загруженности сервера.
Строка it-skills@ubuntu-srv: говорит нам о том, что мы подключены к серверу ubuntu-srv под пользователем it-skills
Давайте перейдем в корневой каталог и отобразим его содержимое:
cd /
ls -la

Опять же, все эти команды мы будем изучать в следующих уроках, но если вкратце, то команда cd сменяет каталог, / — это корневой каталог, т.е. самый верхний, как например диск С в системах Windows, вот только в Linux корневой каталог один, независимо от количества жестких дисков в системе, а в Windows корневой каталог есть в каждом диске, т.е. папка верхнего уровня.
Команда ls -la выводит содержимое каталога, в котором мы сейчас находимся, т.е. содержимое корневого каталога.
Достоинства использования PuTTY
Давайте разберемся, а в чем еще, помимо удаленного подключения к консоли сервера, удобство работы через программу PuTTY? Ведь в нашем случае, у нас сервер установлен в качестве виртуального сервера, и мы можем им управлять через VMWare!
А удобство в следующем:
— удаленное подключение – как минимум мы поняли, как подключаться к серверу через SSH, хотя, сам по себе именно данный способ не доработан, так как с точки зрения безопасности тут нужно еще запретить прямое подключение из-под пользователя root, разрешить подключение только по сертификату и сменить порт по умолчанию. Мы этого делать не будем, так как в рамках нашего домашнего полигона в этом необходимости нет, однако, если вы выпускаете сервер в мир, т.е. он становится доступен через сеть интернет, то данные настройки должны быть выполнены обязательно.
— наличие скрула — если мы перейдем в каталог etc и просмотрим его содержимое то увидим большое количество файлов и папок
cd /etc/
ll
Через терминал на сервере мы не можем увидеть все содержимое, так как нам доступен только конец вывода на экран, а вверх мы не модем пролистать.
Если мы сделаем тоже самое через программу PuTTY, то мышкой можем пролистать весь вывод, так как здесь есть скрулл.
— копирование и вставка – через программу PuTTY очень удобно копировать и вставлять нужное содержимое. К примеру, мы можем легко выделить весь вывод, скопировать его Ctrl+C и вставить в какой-нибудь документ (Выполнить \ notepad \ Вставить). Как правило, это полезно, когда вам необходимо отправить какую-нибудь информацию техническому специалисту, если у вас появляются какие-то ошибки на сервере. Ну или вы пишите скрипт в одну строку и добавляете в него какие-то правки, довели его до правильной работы, потом просто выделили, скопировали и вставили себе в документ или отправили кому-нибудь. Т.е. не нужно заново его вводить вручную.
Так же, если вы столкнулись с каким-нибудь текстом написанном на английском языке, вы можете легко его скопировать, вставить в переводчик и понять, что от вас требуется.
Так же полезен и обратный процесс, это вставка, т.е. допустим вы подключились к какому-то серверу и у вас есть уже наработанный список команд, позволяющий легко и быстро настроить сервер. Чтобы их не вводить вручную, мы просто копируем из нужного документа, и нажатием на правую кнопку мыши ПКМ содержимое вставляется в терминал
К примеру, эта же команда sudo apt install openssh-server по установке сервера ssh.
Вообще это очень полезно при изучении различных инструкций, так как вы можете просто через Copy Paste быстро настроить нужную службу.
— размер шрифта – допустим мне так же удобно менять размер шрифта.
К примеру в виртуальной машине он такой, однако когда я подключался к своему рабочему компьютеру с ноутбука, а у меня тут расширение намного больше чем на ноутбуке, то этот шрифт становится еще меньше и приходится вглядываться в то, что написано в терминале.
Однако, через PuTTY мы можем изменить размер шрифта, цвет и фон шрифта на тот, который вам удобнее (ПКМ по окну программы \ Change Settings «Изменить настройки» \ Windows \ Appearance \ Font settings \ Change \ 16 \ ОК \ Apply )
Еще видел, что некоторые любят менять фон на белый, а текст делать черным. Это дело конечно каждого, но лично я бы не привыкал к такому формату, так как лучше все же работать в стандартном режиме.
The secure shell protocol (SSH) is the most common method for controlling remote machines over the command line in the Linux world. SSH is a true Linux original, and it is also gaining popularity in the Windows world. There is even official Windows documentation for SSH, which covers controlling Windows machines using OpenSSH.
This article describes how to establish an SSH connection from a Windows machine to a Fedora 33 Linux system using the popular open source tool PuTTY.
Ways to use SSH
SSH uses a client-server architecture, where an SSH client establishes a connection to an SSH server. The SSH server is usually running as a system daemon, so it is often called SSHD. You can hardly find a Linux distribution that does not come with the SSH daemon. In Fedora 33, the SSH daemon is installed but not activated.
You can use SSH to control almost any Linux machine, whether it’s running as a virtual machine or as a physical device on your network. A common use case is the headless configuration of embedded devices, including the Raspberry Pi. SSH can also be used to tunnel other network services. Because SSH traffic is encrypted, you can use SSH as a transport layer for any protocol that does not provide encryption by default.
In this article, I’ll explain four ways to use SSH: 1. how to configure the SSH daemon on the Linux side, 2. how to set up a remote console connection, 3. how to copy files over the network, and 4. how to tunnel a certain protocol over SSH.
1. Configure SSHD
The Linux system (Fedora 33 in my case) acts as the SSH server that allows the PuTTY SSH client to connect. First, check the daemon’s SSH configuration. The configuration file is located at /etc/ssh/sshd_config and contains a lot of switches that can be activated by commenting out related lines:
#	$OpenBSD: sshd_config,v 1.100 2016/08/15 12:32:04 naddy Exp $

# This is the sshd server system-wide configuration file.  See
# sshd_config(5) for more information.

# This sshd was compiled with PATH=/usr/local/sbin:/usr/sbin:/sbin:/usr/local/bin:/usr/bin:/bin

# The strategy used for options in the default sshd_config shipped with
# OpenSSH is to specify options with their default value where
# possible, but leave them commented.  Uncommented options override the
# default value.

Include /etc/ssh/sshd_config.d/*.conf

#Port 22
#AddressFamily any
#ListenAddress 0.0.0.0
#ListenAddress ::
The default configuration, where no line is uncommented, should work for this example. Check whether the SSH daemon is already running by typing systemctl status sshd:
$ systemctl status sshd
● sshd.service - OpenSSH server daemon
   Loaded: loaded (/usr/lib/systemd/system/sshd.service; enabled; vendor preset: enabled)
   Active: active (running) since Fri 2018-06-22 11:12:05 UTC; 2 years 11 months ago
     Docs: man:sshd(8)
           man:sshd_config(5)
 Main PID: 577 (sshd)
    Tasks: 1 (limit: 26213)
   CGroup: /system.slice/sshd.service
           └─577 /usr/sbin/sshd -D -oCiphers=aes256-gcm@openssh.com,chacha20-[...]
If it’s inactive, start it with the systemctl start sshd command.
2. Set up a remote console
On Windows, download the PuTTY installer, then install and open it. You should see a window like this:

In the Host Name (or IP address) input field, enter the connection information for your Linux system. In this example, I set up a Fedora 33 virtual machine with a bridged network adapter that I can use to contact the system at the IP address 192.168.1.60. Click Open, and a window like this should open:
This is an SSH security mechanism to prevent a man-in-the-middle attack. The fingerprint in the message should match the key on the Linux system at /etc/ssh/ssh_host_ed25519_key.pub.. PuTTY prints the key as an MD5 hash. To check its authenticity, switch to the Linux system, open a command shell, and enter:
ssh-keygen -l -E md5 -f /etc/ssh/ssh_host_ed25519_key.pubThe output should match the fingerprint shown by PuTTY:
$ ssh-keygen -l -E md5 -f /etc/ssh/ssh_host_ed25519_key.pub
256 MD5:E4:5F:01:05:D0:F7:DC:A6:32 no comment (ED25519)
Confirm the PuTTY Security Alert by clicking Yes. The host system’s fingerprint is now in PuTTYs trust list, which is located in the Windows registry under:
HKEY_CURRENT_USER\SOFTWARE\SimonTatham\PuTTY\SshHostKeysEnter your correct login credentials, and you should be on the console in your home directory:

3. Copy files over the network
In addition to the remote console, you can use PuTTY to transfer files via SSH. Look in the installation folder under C:\\Program Files (x86)\\PuTTY and find pscp.exe. You can use this to copy files to and from a Linux system.
Open a command prompt with Windows + R and enter cmd. Copy the file MyFile.txt from your Linux user home directory to your Windows home directory by entering:
C:\"Program Files (x86)"\PuTTY\pscp.exe stephan@192.168.1.60:/home/stephan/MyFile.txt .To copy a file from the Windows home directory to the Linux user home directory, enter:
C:\"Program Files (x86)"\PuTTY\pscp.exe MyFile.txt stephan@192.168.1.60:/home/stephan/As you may have already figured out, the copy command’s general structure is:
pscp.exe <source> <target>4. Tunnel a protocol
Imagine you have a Linux machine that is running an HTTP-based service for some arbitrary application. You want to access this HTTP service from your Windows machine over the internet. Of course, you cannot expose the related TCP port to the public because:
- The server is running HTTP, not HTTPS
- There is no user management nor login at all
At first glance, it looks like an impossible task to set up this architecture without producing a horrible security flaw. But SSH makes it relatively easy to set up a safe solution for this scenario.
I will demonstrate this procedure with my software project Pythonic. Running as a container, Pythonic exposes two TCP ports: TCP port 7000 (main editor) and TCP port 8000 (the code-server source-code editor).
To install Pythonic on a Linux machine, run:
podman pull pythonicautomation/pythonic
podman run -d -p 7000:7000 -p 8000:8000 pythonic
Switch to your Windows machine, open PuTTY, and navigate to Connection -> SSH -> Tunnels. Add the two TCP ports you want to forward:
- Source:
7000/ Destination:localhost:7000 - Source:
8000/ Destination:localhost:8000

Then go back to the Session section, and establish an SSH connection as you did before. Open a browser and navigate to https://localhost:7000; you should see a screen like this:

You have successfully configured port forwarding!
Warning: If you expose TCP Port 22 to the public, don’t use easy-to-guess login credentials. You will receive login attempts from all over the world trying to access your Linux machine with common, standard credentials. Instead, permit only known clients to log in. This login restriction can be achieved using public-key cryptography, which uses a key pair in which the public key is stored on the SSH host machine, and the private key remains at the client.
Debugging
If you are struggling to connect to your Linux machine, you can follow the processes in your SSH daemon with:
journalctl -f -u sshdThis is how an ordinary log-in process looks like with LogLevel DEBUG :

Learn more
This article barely scratched the surface about ways to use SSH. If you are looking for information about a specific use case, you can probably find it among the tons of SSH tutorials on the internet. I use PuTTY heavily at work because its easy configuration and good interoperability between operating systems make it a Swiss Army knife tool for connectivity solutions.
This work is licensed under a Creative Commons Attribution-Share Alike 4.0 International License.
Время на прочтение6 мин
Количество просмотров29K

В прошлой статье я обещал рассмотреть механизм удаленного подключения с Windows на серверы под управлением *nix, и наоборот при помощи PowerShell. Обещанного обычно ждут три года, но я успел чуть раньше. Что ж, если хочется с верного макбука управлять гетерогенной инфраструктурой, или наоборот ― с Surface Pro рулить Linux-серверами без всяких putty, ― прошу под кат.
Microsoft Loves Linux
Еще в 2015 году Microsoft торжественно объявила о запуске программы «Microsoft Linux». Сюда вошла как банальная поддержка гостевых *nix-like OS на Hyper-V, так и встроенная в Windows 10 Ubuntu и возможность запуска в Docker продуктов Microsoft, таких как SQL Server.
Компания также опубликовала исходный код PowerShell, что позволило запускать «Ракушку Мощи» не только на Windows. Из-под одноименного аккаунта на Github, помимо исходного кода, выложены и бинарники под большинство современных систем (лицензия MIT).
Это позволяет настроить удаленное управление с помощью единого инструмента ― PowerShell. Помимо подключения к консоли компьютера, можно запускать отдельные команды, в том числе и на нескольких серверах одновременно. Довольно удобно для автоматизации задач администрирования, таких как массовое изменение настроек, инвентаризация, сбор логов.
Порой удобно совмещать традиционные консольные команды со вставками PowerShell:
cat /etc/passwd | ConvertFrom-Csv -Delimiter ':' -Header Name,Passwd,UID,GID,Description,Home,Shell | Sort-Object Name | Format-TableДля подключения к Windows-машинам при помощи PowerShell используется протокол WS-Man. Для GNU\Linux привычен SSH. Так как сегодня становятся универсальными оба протокола, разберем их подробнее.
PowerShell 6.0 под Windows и *nix, пока еще находится в бете. Поэтому не рекомендую без хорошего тестирования применять на боевых серверах описанное ниже.
Магомед не идет к горе
Когда технология удаленного доступа при помощи PowerShell только набирала обороты, единственным универсальным способом подключения к разным системам был протокол WS-Man. Для тестового стенда я взял Windows Server 2016 и Centos 7, для которых и буду настраивать возможность удаленного подключения и выполнения команд при помощи этого протокола.
Для начала установим на Centos свежий PowerShell:
curl https://packages.microsoft.com/config/rhel/7/prod.repo > /etc/yum.repos.d/microsoft.repo

yum install -y powershell

pwsh
После установки появилась возможность запускать привычные Windows-администратору командлеты. Например, посмотрим версию PS и получим список запущенных процессов командлетами $PSVersionTable и Get-Process:

Работаем в консоли PowerShell на CentOS.
Чтобы подключаться к Linux-машине с консоли Windows, нам понадобится установить и настроить:
- OMI (Open Management Infrastructure) ― адаптация WMI, которую также можно использовать для управления компьютерами с ОС, отличными от Windows;
- PSRP (PowerShell Remoting Protocol) ― библиотека, необходимая для удаленного подключения PowerShell.
Подробно с работой и эволюцией OMI и PSRP можно ознакомиться в отличном материале от Matt Wrock, я же просто установлю OMI командой:
yum install omiДалее нужно настроить порты и аутентификацию в конфигурационном файле /etc/opt/omi/conf/omiserver.conf, после чего перезапустить сервер командой:
/opt/omi/bin/service_control restartДля упрощения эксперимента я не буду настраивать ни NTLM-аутентификацию, ни Kerberos. Еще и шифрование отключу ― разумеется, в боевой среде делать этого не стоит. Для включения текстовой аутентификации и шифрования на стороне Windows в работе winrm достаточно выполнить следующие команды:
winrm set winrm/config/client/auth @{Basic="true"}
winrm set winrm/config/client @{AllowUnencrypted="true"}
winrm set winrm/config/service/auth @{Basic="true"}
winrm set winrm/config/service @{AllowUnencrypted="true"}
После настройки можно проверить работу OMI из консоли Windows:
winrm enumerate http://schemas.microsoft.com/wbem/wscim/1/cim-schema/2/OMI_Identify?__cimnamespace=root/omi -r:http://server:5985 -auth:Basic -u:root -p:"password" -skipcncheck -skipcacheck -encoding:utf-8 -unencrypted
Подключаемся к CentOS из cmd.
Теперь проверим работу обратным подключением ― из Linux к Windows:
/opt/omi/bin/omicli ei root/cimv2 Win32_Environment --auth Basic --hostname server -u username -p password --port 5985 
… а затем с CentOS подключаемся к Windows.
После того, как WMI\OMI заработал, нужно установить и настроить PSRP. К сожалению и вопреки инструкции, бинарник отсутствует. Библиотеку пришлось компилировать, долго и нудно исправляя возникающие ошибки зависимостей:
yum groupinstall 'Development Tools'
yum install openssl-devel pam-devel
git clone --recursive [https://github.com/PowerShell/psl-omi-provider.git](https://github.com/PowerShell/psl-omi-provider.git)

cd psl-omi-provider/
make release
rpm -ihv target/Linux_ULINUX_1.0_x64_64_Release/psrp-1.4.1-0.universal.x64.rpm
Теперь мы сможем подключаться с Windows на Linux и наоборот при помощи PowerShell. Начнем с Windows на Linux:
$cred = Get-Credential

#пропустим проверку сертификата для нашей тестовой лаборатории
$o = New-PSSessionOption -SkipCACheck -SkipRevocationCheck -SkipCNCheck

#выполнение команды:
Invoke-Command -ComputerName server -ScriptBlock { Get-Process } -Authentication Basic -SessionOption $o -Credential $cred -UseSSL | Select-Object -First 5

#подключение к консоли
Enter-PSSession -ComputerName 'server' -Credential $cred -Authentication basic -UseSSL -SessionOption $o
С Windows на Linux.
Аналогичным образом можно провести и обратное подключение.
Invoke-Command можно «натравить» на список компьютеров, и с рабочей станции Windows создать пользователя на всех серверах Linux командой вида:
 Invoke-Command -ComputerName server1,server2,server3  -ScriptBlock { adduser admin;echo admin:password | chpasswd
 }
Надо сказать, что способ не самый удобный и эффективный. Минусов добавляет компиляция библиотек, разнообразные баги ― например, на момент написания статьи PSRP не позволял нормально подключиться из Linux в Windows.
Да и сами разработчики рекомендуют не плясать вокруг WS-Man, а обратиться к проверенному способу ― SSH. Что ж, попробуем и его.
Гора идет к Магомету
На этот раз машина с Windows получит чуть больше специфической подготовки ― нужно установить свежий PowerShell и OpenSSH.
После можно проверить синтаксис командлета New-PSSession. Если все произошло как надо, то командлет, помимо привычного параметра ComputerName, будет поддерживать и HostName.

PowerShell 6.0.0-beta.9 и обновленный синтаксис командлета.
Установка OpenSSH описана в отдельной инструкции.
Но под спойлером вы найдете все основные моменты.
Качаем последний релиз или используем пакет из репозитория Chocolatey. Все это разархивируем в \Program Files\OpenSSH.
В консоли с правами администратора переходим в папку с разархивированным содержимым и запускаем установку командой:
powershell -ExecutionPolicy Bypass -File install-sshd.ps1
Теперь генерируем ключи:
.\ssh-keygen.exe -A
.\FixHostFilePermissions.ps1 -Confirm:$false
В тестовой среде мы будем использовать парольную аутентификацию, поэтому стоит убедиться что она включена в файле sshd_config:
```bash
PasswordAuthentication yes
```
Если вы также хотите автоматически запускать PowerShell при подключении по SSH, то в параметре subsystem нужно прописать путь к желаемой версии PS:
Subsystem powershell C:/Program Files (x86)/PowerShell/6.0.0-beta.9/pwsh.exe -sshs -NoLogo -NoProfileДля работы клиента SSH нужно добавить директорию в %PATH% любым удобным способом. Например, таким:
setx path "%path%;C:\Program Files\OpenSSH"Остается только настроить и запустить службы:
Set-Service sshd -StartupType Automatic
Set-Service ssh-agent -StartupType Automatic
net start sshd
После установки уже можно наслаждаться подключением к серверу Windows по ssh.

C Windows через Putty на Linux, с Linux обратно на Windows по SSH.
На достигнутом останавливаться не будем и перейдем к настройке Linux. При настройке сервера SSH по умолчанию достаточно прописать PowerShell в Subsystem:
Subsystem powershell /usr/bin/pwsh -sshs -NoLogo -NoProfileТеперь проверим подключение через командлет New-PSSession и Invoke-Command.
Сначала Windows:

Работаем из PowerShell с Linux-сервером.
Теперь подключимся из Linux к Windows:

Работаем из PowerShell с Windows-сервером.
В отличие от WS-Man, SSH настраивается намного проще и работает стабильнее. Да и беспарольное подключение по ключам настраивать привычнее.
В хозяйстве пригодится
С однозначным «советом потребителю» все опять сложно: SSH проще в настройке и стабильнее, но WS-Man использует API и позволяет применять инструменты вроде JEA. На боевых серверах использовать WS-Man я бы не стал однозначно, а вот реализация OpenSSH в Windows как сервера, так и клиента мне понравилась. Для самопальной автоматизации вполне подойдет даже без PowerShell.
В любом случае, границы между Linux и Windows хоть и медленно, но начинают стираться, что безусловно радует.
By on 1 Oct 2024 0 Categories / Linux
To connect to the Linux server in Windows, we can use the Windows command line or PowerShell, and we can also easily connect to the Linux VPS through the Putty software.
There are also many software to connect to Linux VPS through SSH client.
Prerequisites for connecting to a Linux VPS
Before connecting to the Linux VPS server, you need to prepare the following items:
- SSH client to connect
- IP address or Host name for connect to VPS
- Username and password to enter the server
When you order a Linux VPS, you will be provided with server login details.
How to connect to Linux VPS server with Putty?
Unlike the RDP software that is installed by default on Windows, we have to download the Putty software from its official website.
Now enter server IP along with port number and connection method and select Open.
And enter your username and password that you got from your virtual private server provider.
Note: Due to the greater security of the server when entering the password, it is not possible to view the password on the screen.
If you do not want to use a password to connect to your Linux server and you are also looking for more convenience and security, you can follow the tutorial on how to create SSH key on Linux VPS.
How to connect to Linux server windows using command prompt?
If you don’t want to install Putty software, you can connect to your Linux server via SSH from the CMD section of Windows and manage your server.
Step 1- In Windows CMD or PowerShell, enter the following command
ssh [username]@[ip-address]
Instead of [username], enter the server username, and instead of [ip-address], enter the Main IP address of your server and press enter.
Step 2- Now you can enter your server password and connect to your server through SSH client with port 22.
Note: If you have changed the default port of your Linux VPS, you must use the following command:
ssh [username]@[ip-address] -p [port-number]
By default, the SSH port is 22, which is known and available for intrusion. To increase security, you need to change Linux VPS SSH port.
Best free SSH client for windows
One of the main uses of SSH is remote Linux server management. The SSH protocol is used to establish a secure connection between the client and the server, which is done using SSH client software.
Let’s go to examine some of them.
1- PuTTY
PuTTY is one of the most famous and popular free SSH clients for Windows OS, which is used among Linux server users due to its open-source and lightness.
Features of PuTTY software:
Availability for free
Support for various protocols such as SSH, Telnet, Rlogin
Light implementation without installation
Providing multiple SSH connection options
Using SSH 1 and SSH 2 protocol version
ِِDownload link: PuTTY
2- WinSCP
WinSCP is one of the most popular and powerful file management software that can be used on the Windows operating system, which uses secure SSH, SFTP, SCP protocols to transfer files between systems.
Features of WinSCP software:
Free and open source
High security
Very convenient and user-friendly
Powerful and automatic file transfer
File management on servers
Support for all web protocols
Ability to transfer files from Windows to Linux
Download link: WinSCP
3-MobaXterm
It is a powerful and versatile management tool for remote access and control. It is also possible to apply supervisory and control orders in several systems simultaneously.
Features of MobaXterm software:
It has a free version with full features and a paid version with more professional features.
Support various protocols such as: SSH, RDP, VNC, FTP, SFTP, X11, …
It has a built-in X server that enables running Linux on Windows.
Open and manage multiple connections in one environment.
Download link: MobaXterm
4- Bitvise SSH Client
It is a lightweight, simple, and efficient management tool that gives secure access to servers on Windows.
Features of Bitvise software:
Support SSH1, SSH2 protocol for secure connection.
Very simple and user-friendly.
Has SFTP for transferring files between systems.
Download link: Bitvise
5- Multi-Remote Next Generation Connection Manager
An open-source remote administrator that can be used using SSH, RDP, VNC, ICA, Telnet, HTTP/HTTPs, and RLogin protocols.
Features of mRemoteNG software:
Free and open source.
Simple and user-friendly.
Support for different protocols.
Light and fast software.
Ability to save and manage connections.
Download link: mRemoteNG
The software introduced above is one of the best software for connecting to a Linux server, each of which can have unique features, and you need to do more research to choose each of them.
Summary:
Connecting to Linux VPS through Windows is possible using various software such as PuTTY, WinSCP, MobaXterm and other SSH connection software. You can also connect to a Linux server through Windows command prompt(CMD).