
Windows позволяет подключить любую общую сетевую папку с файлового сервера или NAS хранилища в виде отдельного диска с назначенной ему буквой диска. Такие подключенные сетевые папки называются сетевыми дисками. Сетевые диски удобно использовать для удобства доступа пользователей к часто используемым общим ресурсам на файловом сервере.
Сетевой диск в Windows можно подключить несколькими способами:
- Из проводника Windows
- Из командной строки или PowerShell
- С помощью групповых политик
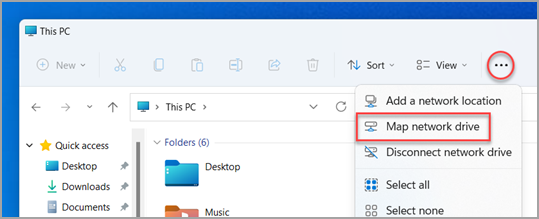
Чтобы подключить сетевой диск в Windows 11, откройте проводник, нажмите кнопку с тремя точками в верхнем меню и выберите пункт Map network drive.
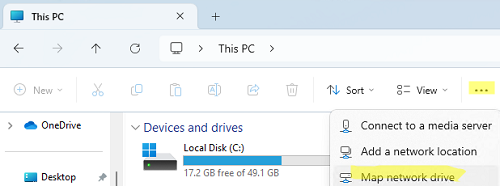
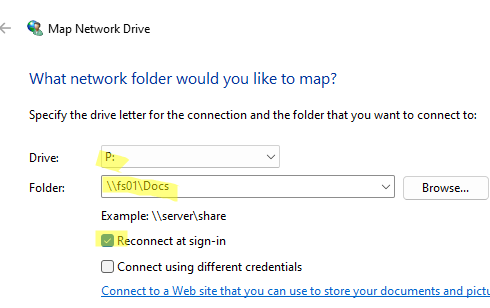
- Выберите букву диска, которую нужно назначить сетевой папке,
- Укажите путь к папке на файловом сервере (в UNC формате, например
\\fs01\Docs\IT
). Если у вас настроено отображение компьютеров в сетевом окружении, можно воспользоваться кнопкой Browse для ручного выбора компьютера и общей сетевой папки на нем. - Если нужно автоматически подключать этот диск пользователю при входе в Windows, включите опцию Reconnect at sign-in (Восстанавливать подключение при входе в систему).
- Если вы не хотите использовать учетные данные текущего пользователя, с помощью опции Connect using different credentials можно указать имя пользователя и пароль, который будут использоваться для подключения (будут сохранены в диспетчер учетных данных Windows).
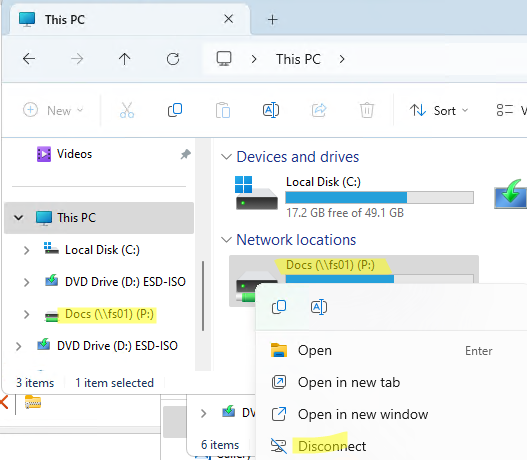
После этого в проводнике Windows появится новый сетевой диск. Пользователь теперь сможет быстро и удобно открывать общей файлы на сетевом диске.
Чтобы отключить сетевой диск, щелкните по нему и выберите Disconnect.
Для подключения/отключения сетевых дисков из командной строки можно использовать команду
net use
. Например:
net use P: \\fs01\Docs /PERSISTENT:YES
где:
-
P:
— буква диска, которую нужно назначить сетевой папке -
\\fs01\Docs
— полный UNC путь к папке -
/PERSISTENT:YES
— сделать сетевой диск постоянным. Без использования этой опции сетевой диск автоматически удаляется при перезагрузке компьютера. - Если нужно указать учетную запись пользователя для подключения к папке, добавьте:
/USER:WINITPRO\kbuldogov *
(пароль будет запрошен интерактивно). Либо вы можете указать пароль в открытом виде:
/USER:WINITPRO\kbuldogov Password1
Вывести все подключенные сетевые диски в сессии пользователя:
net use
Удалить сетевой диск:
net use P: /delete

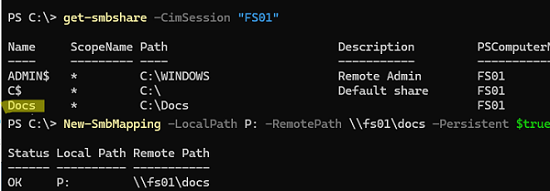
Также для подключения сетевого диска можно использовать PowerShell.
Вывести список сетевых папок на удаленном компьютере:
Get-SmbShare -CimSession "FS01"
Создать постоянное подключение к сетевой папке в виде сетевого диска:
New-SmbMapping -LocalPath P: -RemotePath \\fs01\docs –Persistent $true
Удалить сетевую папку:
Remove-SmbMapping P: -UpdateProfile
Download Article
Step-by-step guide to accessing & sharing files across computers
Download Article
- On Windows
- On Mac
- Video
- Expert Q&A
- Tips
|
|
|
|
This wikiHow teaches you how to set up a network drive on a Windows or Mac computer. A network drive is a shared folder that’s used by two or more computers on the same network.
Creating a Network Drive
- Open File Explorer, click “This PC,” and press the “Computer” tab.
- Select “Map Network Drive” and choose a drive letter in the drop-down menu.
- Press “Browse” and choose the folder you want to share.
-

Each computer on which you want to use the network drive must be on the same Internet network for the network drive to appear on any computer other than the one on which you create it.
-
If your computer isn’t set to discover other computers on the network, you’ll need to enable network discovery. To do so:[1]
- Open Start

- Type in control panel
- Click Control Panel
- Click Network and Sharing Center (you may first have to click the Network and Internet heading).
- Click Change advanced sharing settings in the upper-left side.
- Check the «Turn on network discovery» box.
- Check the «Turn on file and printer sharing» box.
- Click Save changes at the bottom of the window.
Advertisement
- Open Start
-
Open Start
. Click the Windows logo in the bottom-left corner of the screen.[2]
-
-
It’s on the left side of the File Explorer window. This will open the This PC window.
-
You’ll find this option in the upper-left side of the window. A toolbar will appear near the top of the window.
-
This option is in the «Network» section of the toolbar. Make sure that you click the icon resembling a flash drive and not the Map network drive text here.[4]
-
Click the «Drive» drop-down box, then click a letter in the drop-down menu. This will assign to your network drive a letter that you can use to identify it later.[5]
-
This option is on the right side of the window. A pop-up window will appear.
-
Click the computer on which you want to create the drive, then find the folder that you want to use and click it to select it.
-
This option is at the bottom of the window.
- If you receive an error, the folder that you chose is not shareable. This may happen because the folder is read-only.
-
It’s at the bottom of the window. Doing so will create your network drive and enable it for any networked computers.
- If your computer ever changes to a different channel on your network, you’ll need to reestablish the network drive.
-
As long as the other computers on the network have network discovery and file sharing enabled, you’ll be able to open the drive by going to This PC and double-clicking the network drive folder below the «Devices and drives» heading.


Advertisement
-
Each computer on which you want to use the network drive must be on the same Internet network for the network drive to appear on any computer other than the one on which you create it.
-
If your computer isn’t set to discover other computers on the network, you’ll need to enable network discovery. To do so:
- Open the Apple menu

- Click System Preferences…
- Click Sharing
- Check the «File Sharing» box
- Close the System Preferences window.
- Open the Apple menu
-
Click the blue, face-like icon in your Mac’s Dock.
-
Click a folder on the left side of the Finder window to open it, then click a folder that you want to use as the network drive to select the folder.
-
It’s a menu item at the top of the screen. Clicking it prompts a drop-down menu.
-
You’ll find this in the File drop-down menu. Doing so opens a window with the folder’s information.
-
Click and drag your mouse across the text to the right of «Where:» to select the folder’s location, then press ⌘ Command+C to copy the location.
- This location will usually say something like «System/FolderName» or similar.
-
This menu item should be at the top of the screen. A drop-down menu will appear.
- If you don’t see Go in the menu bar, open a new Finder window to make it appear. You can also click the desktop.
-
It’s near the bottom of the Go drop-down menu. Doing so opens a pop-up window.[6]
-
Type in the computer’s name followed by a slash. Do so in the «smb://» (or «ftp://») text field at the top of the Connect to Server window.[7]
- If your computer is named «Rhonda», for example, you’d type in Rhonda/ here.
-
Press ⌘ Command+V to do so. You should now see your computer’s name followed by the folder’s address in the text field.
-
It’s to the right of the address bar. This will add the folder’s address to your Mac.[8]
-
It’s a blue button at the bottom of the window.
-
The login and password you need to enter here will vary depending on your network, so check with your system administrator if you don’t know how to log in.[9]
- Once you’re logged in, you should see a flash drive icon with your folder’s name appear on the desktop.


![Step 10 [7]...](https://www.wikihow.com/images/thumb/b/b0/Set-up-a-Network-Drive-Step-23.jpg/v4-460px-Set-up-a-Network-Drive-Step-23.jpg)


Advertisement
Add New Question
-
Question
How do I set up a physical network drive?
Luigi Oppido is the Owner and Operator of Pleasure Point Computers in Santa Cruz, California. Luigi has over 25 years of experience in general computer repair, data recovery, virus removal, and upgrades. He is also the host of the Computer Man Show! broadcasted on KSQD covering central California for over two years.
Computer & Tech Specialist
Expert Answer
Plug your network drive into your router or modem via the network plug on the back, or plug the USB into your router. Follow the on-screen installation software that comes with the drive. If directed, type in the IP address for the network drive into your web browser. Finally, set up what you want to back up or save to the network drive.
-
Question
Can PCs in different buildings share a network?
PCs all over the world can share a network. Maybe revisit network fundamentals to gain a broader understanding.
Ask a Question
200 characters left
Include your email address to get a message when this question is answered.
Submit
Advertisement
Video
-
Since the computer that houses the network drive folder must be on and online for other computers to access the drive, make sure that you update the computer during non-working hours.
-
If you don’t want to use a folder on your computer as the network drive, you can plug an external hard drive into your router using an Ethernet adapter (or a USB connection if your router supports it) and then select ROUTER in the network drive Browse window. This will make the drive more stable, as your router is less likely to change or go offline than is your computer.
Thanks for submitting a tip for review!
Advertisement
-
If the computer that contains the network drive goes offline, you won’t be able to access the network drive on any other computer until the main computer is back online.
Advertisement
References
About This Article
Article SummaryX
1. Open the Network and Sharing Center.
2. Click Change advanced sharing settings.
3. Enable network discovery and file/printer sharing.
4. Open the File Explorer and click This PC.
5. Click the Computer tab and select Map network drive.
6. Select a drive letter.
7. Select info to share.
8. Access the network drive from another computer.
Did this summary help you?
Thanks to all authors for creating a page that has been read 643,357 times.
Reader Success Stories
-
«Not finished setting up yet but clearly answers my how to questions. Thank you for your efforts.»
Is this article up to date?
Все способы:
- Способ 1: Папка «Этот компьютер»
- Способ 2: Корень сетевого расположения
- Способ 3: Подключение Яндекс.Диска в качестве сетевого
- Вопросы и ответы: 1
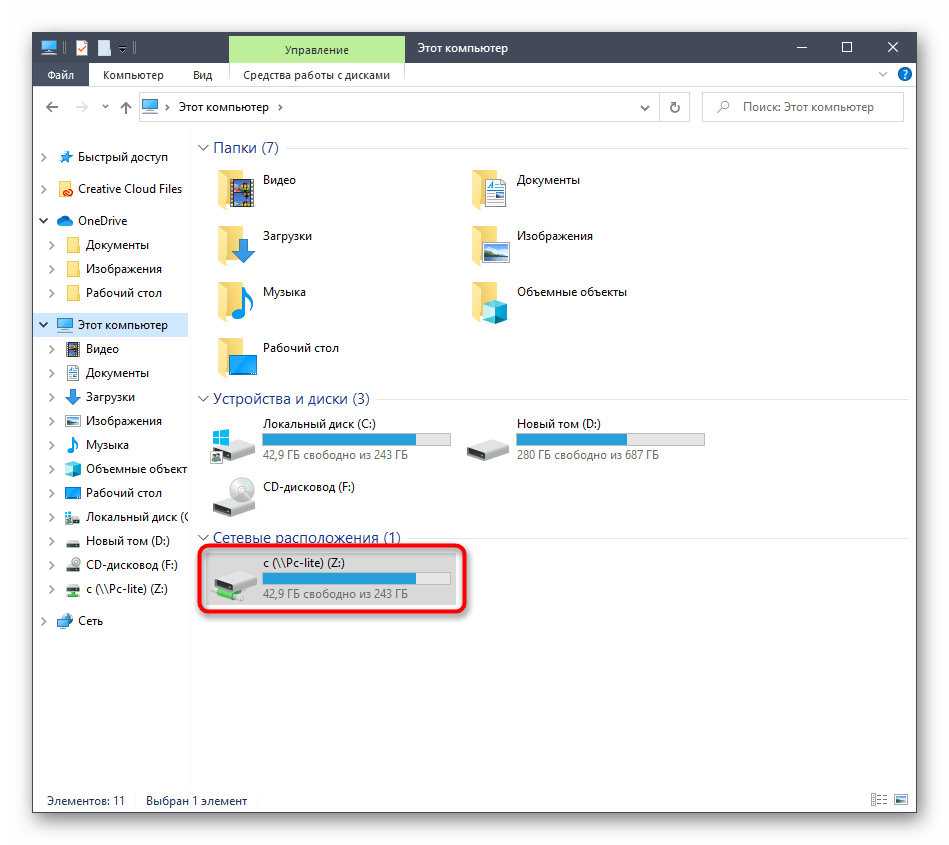
Сетевым диском называется одна или несколько директорий, находящихся в общем доступе и имеющих определенную метку тома в виде буквы. Благодаря этому становится возможным обмен файлами между всеми участниками локальной сети без каких-либо трудностей. Подключение сетевого диска в операционной системе Windows 10 доступно всем пользователям, обладающим соответствующими правами, и сегодня мы хотим рассказать о трех методах осуществления этой операции.
Перед началом рассмотрения инструкций мы советуем убедиться в том, что локальная сеть и общий доступ в Windows 10 были настроены правильно. Более детальные инструкции по данной теме вы найдете в отдельных материалах на нашем сайте, кликнув по ссылкам ниже.
Подробнее:
Настройка локальной сети в Windows 10
Создание домашней сети на Windows 10
Способ 1: Папка «Этот компьютер»
Самый простой метод создания сетевого диска — использование меню «Этот компьютер». Там пользователю нужно только нажать на несколько кнопок, чтобы справиться с поставленной задачей. Давайте более детально рассмотрим этот вариант, разобрав каждый шаг.
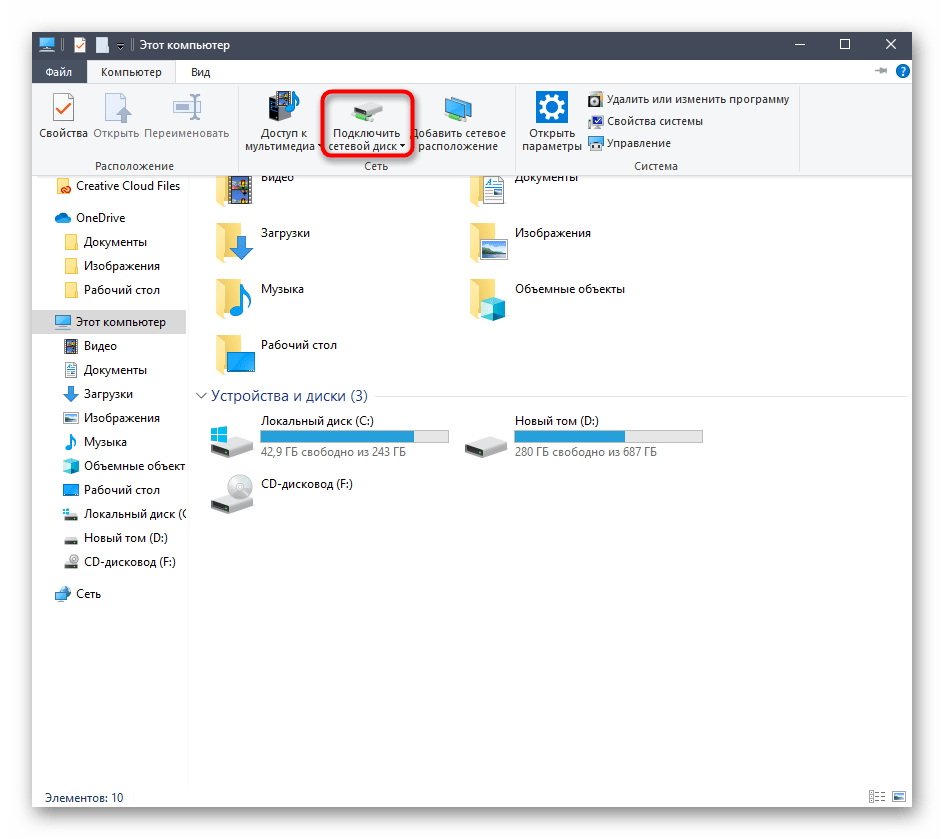
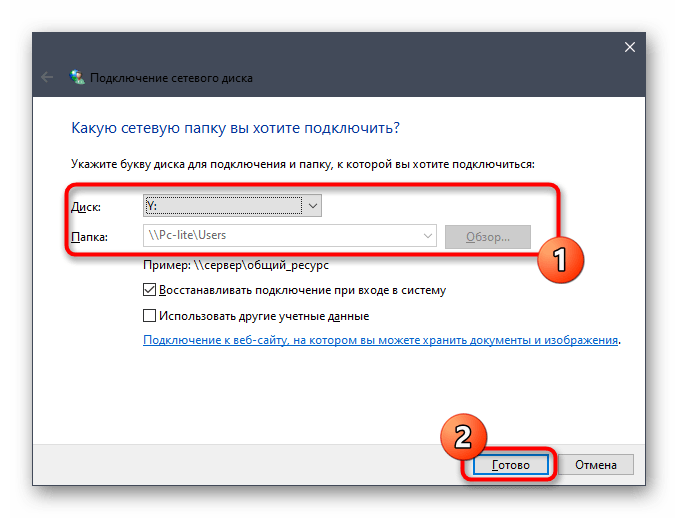
- Откройте Проводник и перейдите в раздел «Мой компьютер». Здесь нажмите по кнопке «Компьютер», чтобы раскрыть список дополнительных опций.
- Отыщите пункт «Подключить сетевой диск» и нажмите по нему левой кнопкой мыши.
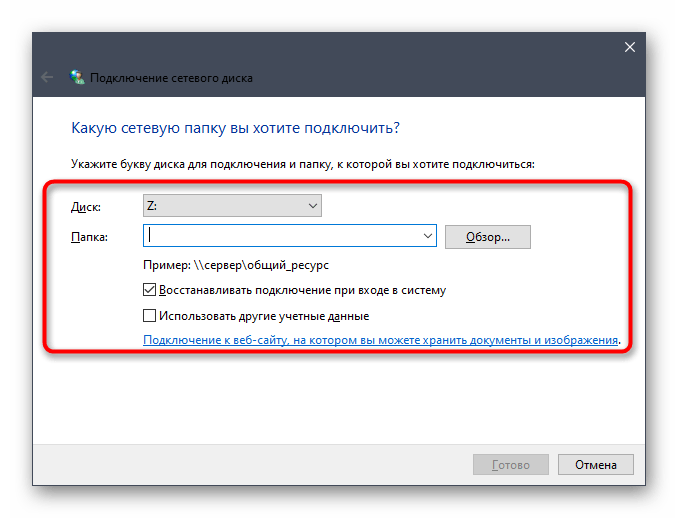
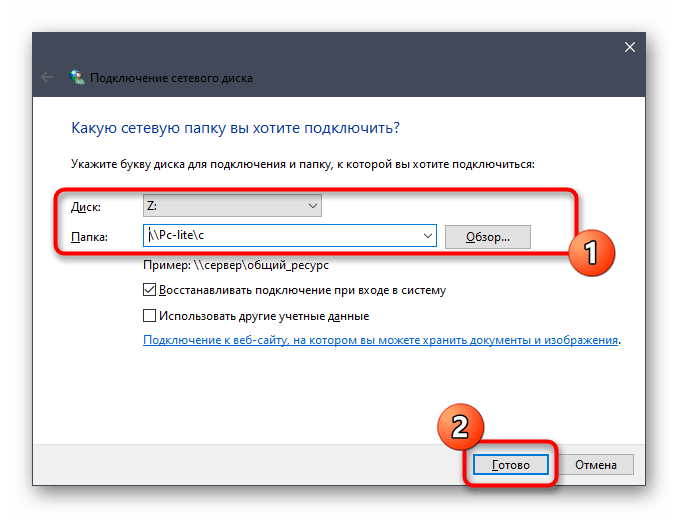
- Остается только заполнить соответствующую форму, чтобы подключить накопитель. Для этого указывается буква диска, вводится полный путь к папке и указываются дополнительные параметры.
- Если вы нажмете по кнопке «Обзор», сможете выбрать одно из стандартных общих сетевых расположений в качестве диска.
- После этого убедитесь в правильности настроек и нажмите на «Готово».
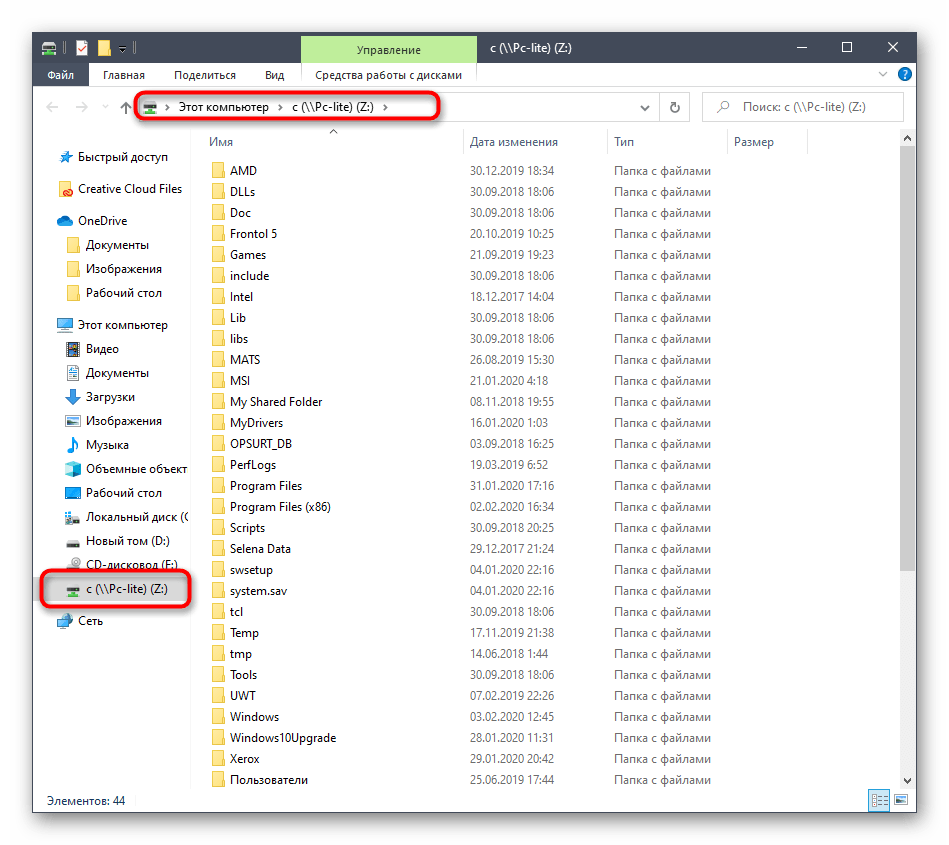
- Произойдет автоматическое перемещение в корень созданного диска. Здесь вы можете осуществлять управление им, удалять или перемещать файлы.
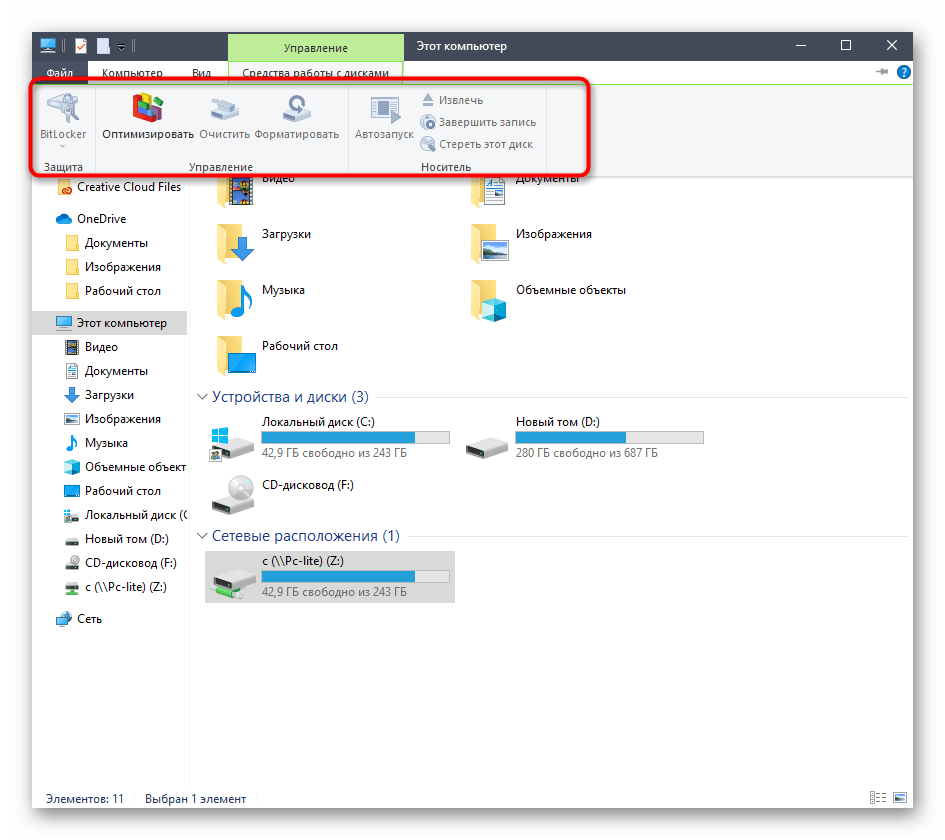
- До момента отключения сетевой диск будет располагаться в разделе «Этот компьютер» в списке «Сетевые расположения».
- Здесь же его можно будет оптимизировать и совершать другое управление в соответствии с имеющимися правами.

Точно таким же образом можно добавлять неограниченное количество дисков, обладая соответствующими правами доступа. Если же этот вариант вам не подходит, переходите к ознакомлению со следующим, а при возникновении проблем обратитесь к завершающему разделу сегодняшнего материала.
Способ 2: Корень сетевого расположения
Иногда пользователю требуется подключить в качестве сетевого диска уже имеющуюся общую папку. В таком случае тоже можно воспользоваться первым методом, однако немного быстрее будет осуществить это при помощи соответствующего контекстного меню.
- Откройте утилиту Выполнить, зажав горячую клавишу Win + R. В строке введите
\\Name, где Name — название стандартного сетевого расположения, например, имя текущего компьютера или устройства локальной сети. - Щелкните по любой из находящихся в открывшемся каталоге папке ПКМ и в контекстном меню выберите «Подключить сетевой диск».
- Задайте название диску и нажмите на «Готово». Как видите, папка будет определена автоматически.
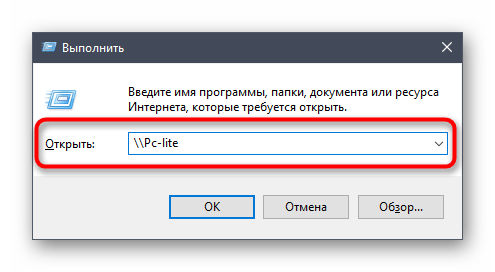
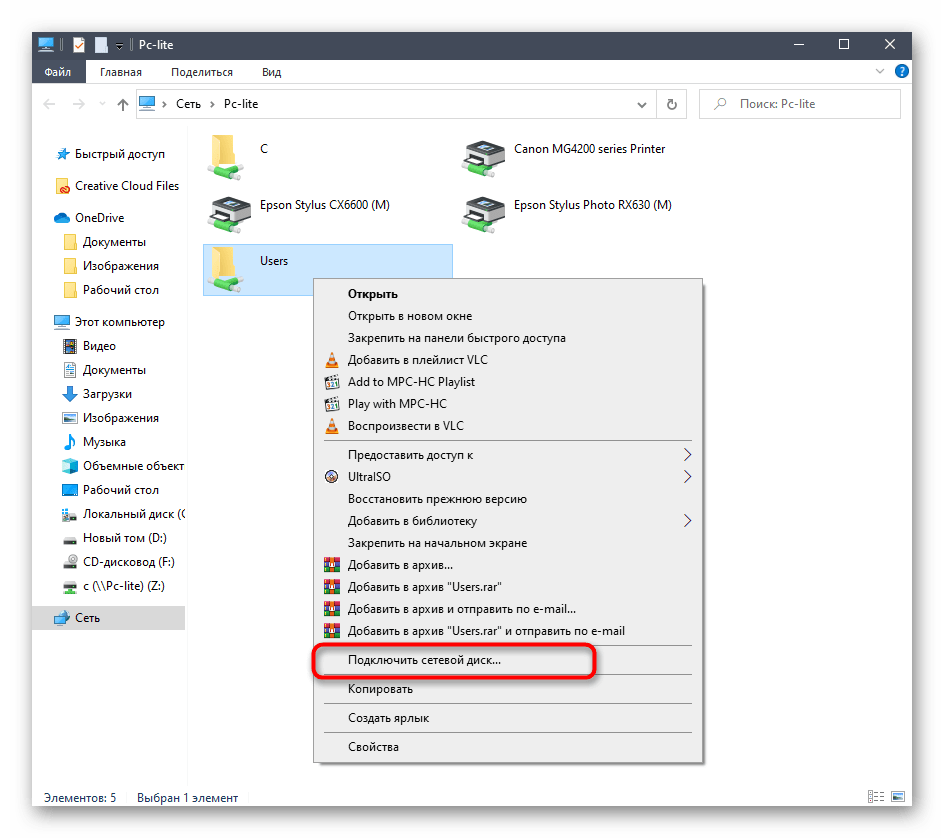
Этот метод можно применять к любому каталогу, находящемся в общем доступе. Для реализации данной задачи потребуется выполнить всего три простых действия, поэтому с этим не должно возникнуть проблем даже у начинающих юзеров.
Способ 3: Подключение Яндекс.Диска в качестве сетевого
Если вы являетесь пользователем Яндекс.Диска, скорее всего, обратились к этой статье, чтобы разобраться, как именно подключать это облачное хранилище в качестве сетевого диска. Принцип осуществления этого действия практически соответствует тем, о которых мы уже говорили в предыдущих способах. Другой наш автор в отдельной статье более детально рассказал, как именно производится подключение. Рекомендуем ознакомиться с ней, кликнув по ссылке далее.
Подробнее: Как подключить Яндекс.Диск как сетевой диск
Это были все методы, позволяющие подключить сетевой диск в Windows 10. Осталось только разобраться с возможными проблемами, которые возникают во время этого процесса. Начнем с самой распространенной, связанной с неправильно установленными параметрами реестра. Исправляется эта неполадка следующим образом:
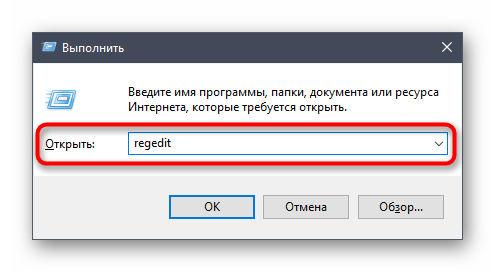
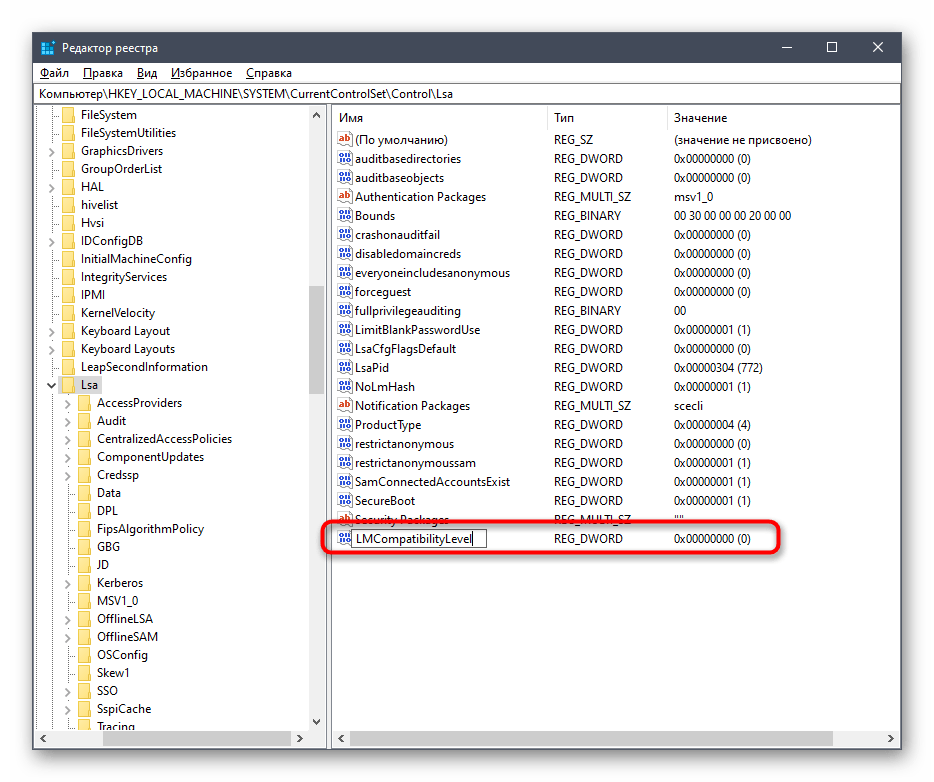
- Откройте утилиту «Выполнить» (Win + R), а затем введите в строке
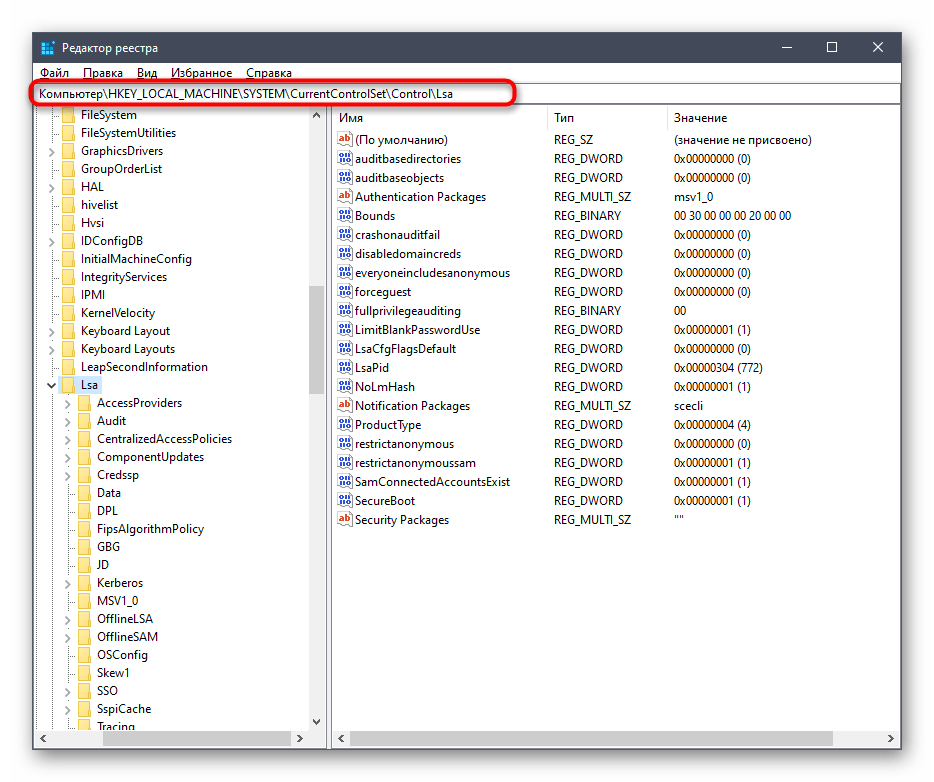
regeditи нажмите на Enter. - В открывшемся меню следует перейти по пути
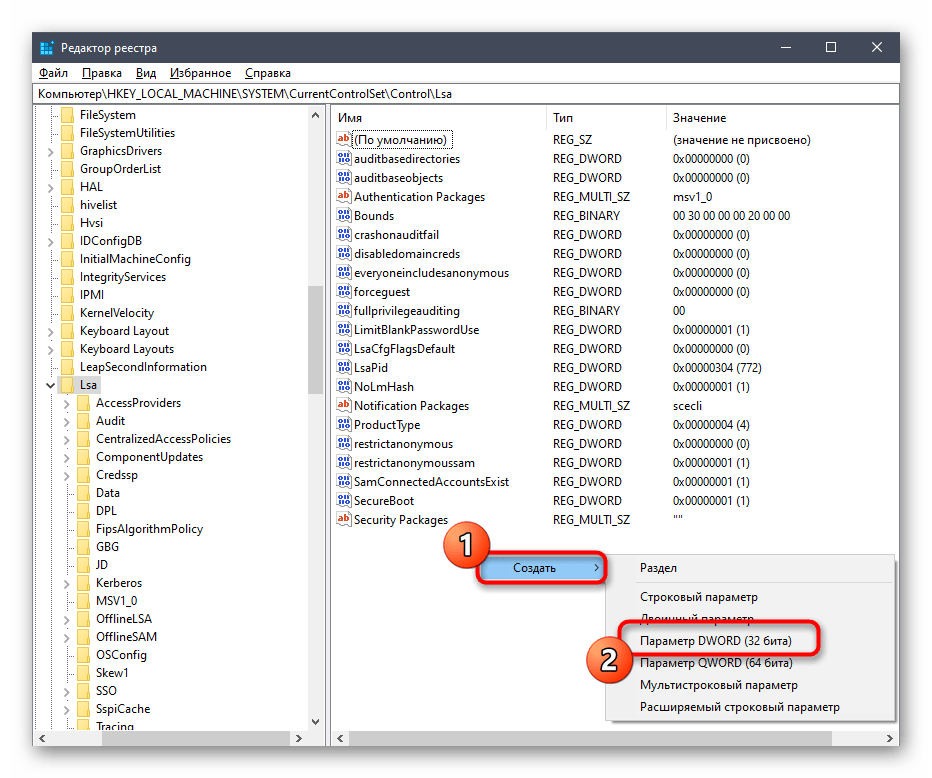
HKEY_LOCAL_MACHINE\SYSTEM\CurrentControlSet\Control\Lsa. - Здесь щелкните по пустому месту ПКМ и создайте параметр DWORD, выбрав соответствующий пункт.
- Задайте ему название «LMCompatibilityLevel» и нажмите на Enter, чтобы применить изменения.
- После этого дважды кликните по строке, чтобы открыть ее свойства. Измените значение на 1 и примените настройку.
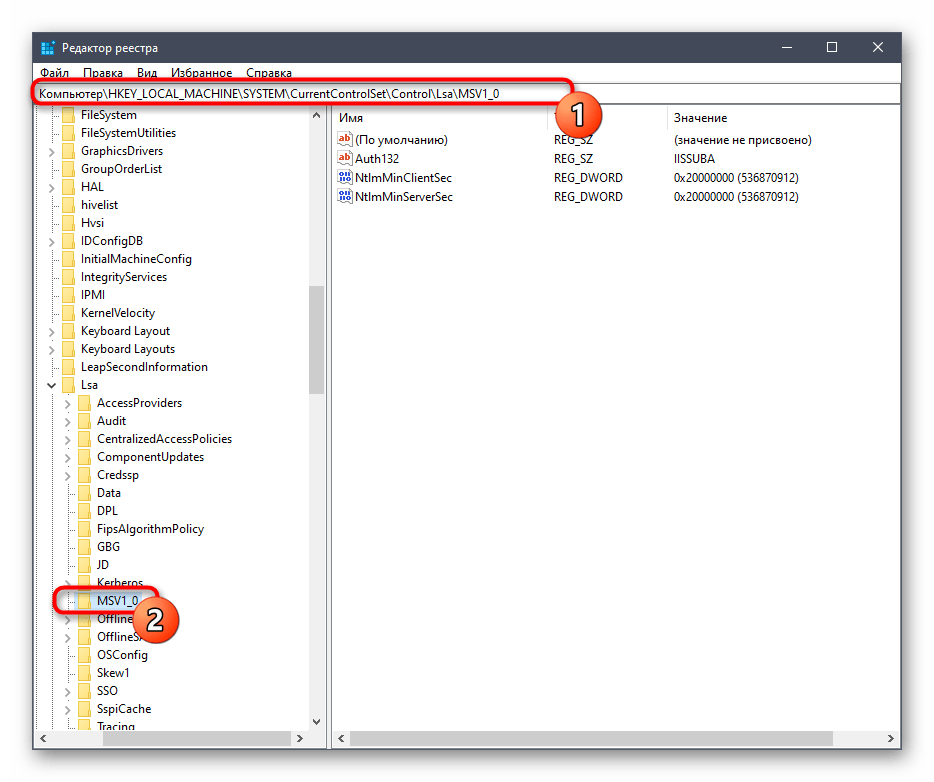
- Теперь вам следует перейти по пути
HKEY_LOCAL_MACHINE\SYSTEM\CurrentControlSet\Control\Lsa\MSV1_0. - Отыщите там параметр «NtlmMinClientSec» и «NtlmMinServerSec».
- Значение каждого из них потребуется изменить на 0.
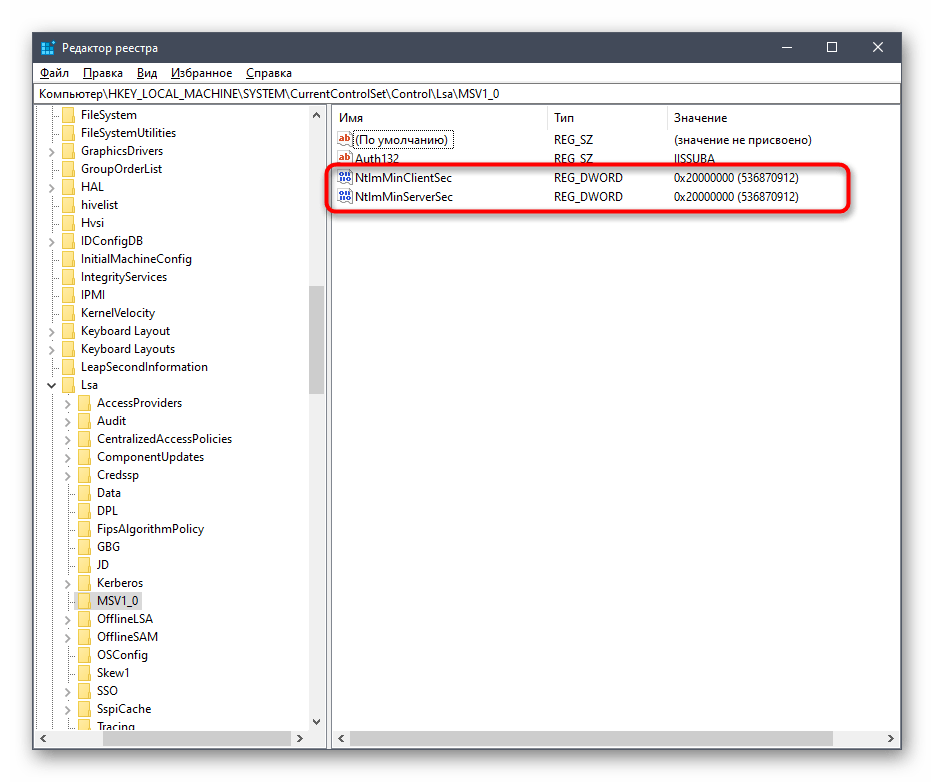
Внесенные только что изменения связаны с задержкой стороны клиента и общими параметрами сетевого окружения. После их применения при перезагрузке компьютера подключение сетевого диска должно пройти успешно. Если этого добиться не удалось, обратите внимание на приведенное далее руководство. Там описаны другие причины возникновения подобной проблемы.
Подробнее: Устранение проблем с обнаружением сетевого окружения в Windows 10
Это было все, что мы хотели рассказать о подключении сетевого диска в Виндовс 10. Как видите, ничего в этом сложного нет, а возможность выбора оптимального варианта позволит любому пользователю быстро и легко справиться с этой задачей.
Наша группа в TelegramПолезные советы и помощь
Applies ToWindows 10 Windows 11
Note: This article focuses on how to share files or folders over a Local Area Network (or LAN), such as connected computers within your home or workplace. If you are trying to find out how to share a file over the Internet, for example with a friend or family member, OneDrive provides easy ways to accomplish this. For more details, see Share OneDrive files and folders.
Here are some answers to common questions about changes to file and folder sharing in Windows 11:
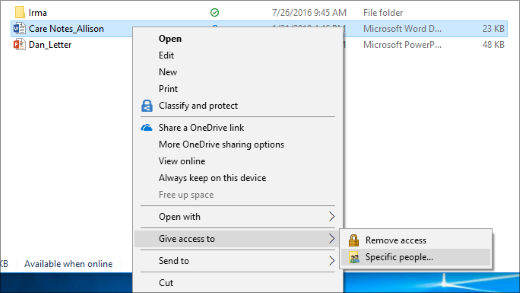
To share a folder over a network in File Explorer, do the following:
-
Right-click (or long-press) a file, and then select Show more options > Give access to > Specific people.

-
Select a user on the network to share the file with or select Everyone to give all network users access to the file.
Map a network drive to get to it from File Explorer in Windows without having to look for it or type its network address each time.
-
Open File Explorer from the taskbar or the Start menu, or press the Windows logo key + E.
-
Select This PC from the left pane. Then, on the File Explorer ribbon, select More > Map network drive.

Note: If you don’t see Map network drive on the More menu, you can right-click the This PC node in the folder pane and you’ll see the command there.
-
In the Drive list, select a drive letter. (Any available letter will do.)
-
In the Folder box, type the path of the folder or computer, or select Browse to find the folder or computer. To connect every time you sign in to your PC, select Reconnect at sign-in.
-
Select Finish.
Note: If you can’t connect to a network drive or folder, the computer you’re trying to connect to might be turned off, or you might not have the correct permissions. Try contacting your network administrator.
Right-click or press a folder, then select Show more options > Give access to > Remove access.
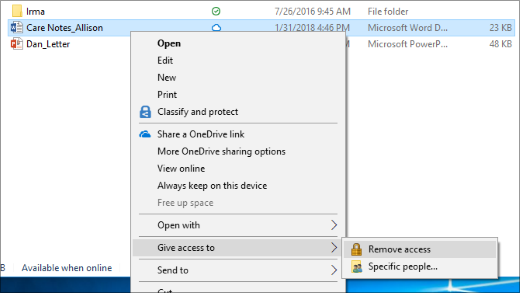
File Explorer shows the Remove access option for all folders, even those that aren’t being shared over a network.
Open File Explorer, then type \\localhost into the address bar.
Note: When you’ve shared a folder in your user profile and you go to \\localhost, you’ll see your user profile and all its files there. This doesn’t mean that all of your files are shared—just that you have access to all your own files.
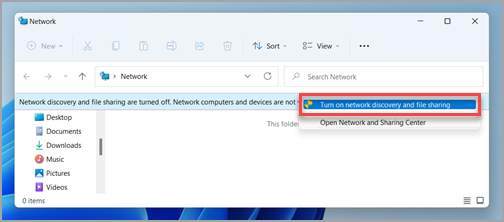
If you open File Explorer, go to Network, and see an error message («Network discovery is turned off….»), you’ll need to turn on network discovery to see devices on the network that are sharing files. To turn it on, select the Network discovery is turned off banner, then select Turn on network discovery and file sharing.
To troubleshoot problems with sharing files or folders, follow the steps below on all computers from which you’re trying to share.
-
Update Windows. Ensuring all machines are as updated as they can be is key to making sure you aren’t missing out on any driver or Windows updates. Open Windows Update
-
Make sure the computers are on the same network. For example, if your computers connect to the internet through a wireless router, make sure they all connect through the same wireless router.
-
If you’re on a Wi-Fi network, set it to Private. To find out how, see Essential network settings and tasks.
-
Turn on network discovery and file and printer sharing and turn off password protected sharing.
-
Select the Start button, then select Settings .
-
In the Find a setting search bar, type manage advanced sharing settings and select Manage advanced sharing settings from the suggested results.
-
In the Advanced sharing settings window that appears, under Private, select Turn on Network discovery and Turn on file and printer sharing.
-
Under All Networks, select Turn off password protected sharing.
-
-
Make sharing services start automatically.
-
Press the Windows logo key + R.
-
In the Run dialog box, type services.msc, and then select OK.
-
Right-click each of the following services, select Properties, if they’re not running, select Start, and next to Startup type, select Automatic:
-
Function Discovery Provider Host
-
Function Discovery Resource Publication
-
SSDP Discovery
-
UPnP Device Host
-
-
Related topics
-
Share things with nearby devices in Windows
-
Share files in File Explorer
Need more help?
Want more options?
Explore subscription benefits, browse training courses, learn how to secure your device, and more.
Mapping a network drive in Windows 10 allows you to easily access and manage files and folders stored on a remote network location. Whether you need to connect to a shared drive on your office network or access files from a network-attached storage (NAS) device, mapping a network drive provides a convenient way to establish a connection and access the files as if they were stored locally on your computer.
Understanding the process of mapping a network drive in Windows 10 is essential for streamlining your workflow and improving productivity. In this article, we will guide you step-by-step on how to map a network drive in Windows 10.
But before we dive into the steps, let’s first understand what a network drive is and why mapping it in Windows 10 is beneficial.
Key takeaway:
- Mapping a network drive in Windows 10 allows for convenient access to shared files and folders on a network.
- Follow a step-by-step guide to map a network drive, including opening File Explorer, clicking on “This PC” or “Computer,” selecting “Map network drive” in the toolbar, choosing a drive letter, entering the network drive path, and selecting whether to reconnect at sign-in.
- Common issues, such as inability to connect to the network drive, incorrect credentials or permissions, and drive mapping disappearing after restart, can be troubleshooted.
- Alternatives to mapping a network drive include accessing network drives using UNC path or using cloud storage services like OneDrive.
What is a Network Drive?
A network drive is a storage device or location on a local network that multiple users or computers can access. It allows users to store and share files and data with others on the network. Network drives can be physical devices, like network-attached storage (NAS), or virtual drives on servers or other computers.
One advantage of a network drive is that it provides a centralized location for storing and accessing files, making collaboration and information sharing easier. It also enables easy backups and data recovery. Network drives can be accessed from any computer on the network, providing flexibility and convenience.
When using a network drive, it is important to understand what a network drive is and ensure proper security measures are in place to protect sensitive data. This includes setting up user permissions and encryption protocols. Regular backups should also be performed to safeguard against data loss.
Mapping a network drive in Windows 10 can offer several benefits and improve productivity. There are several reasons why you should consider mapping a network drive.
Firstly, mapping a network drive allows for easy accessibility to files and folders on a remote server or another computer on your network. This eliminates the need to navigate through multiple folders each time you need a file, saving you time and effort.
Secondly, mapping a network drive is time-saving. By mapping a network drive, you can directly open, edit, and save files from the mapped drive. This streamlines your workflow and reduces the time spent searching for files on different devices or servers.
Mapping a network drive centralizes storage, making files accessible from any connected device. This means you always have the most up-to-date version of your files without the need to transfer them between devices.
In addition, mapping a network drive promotes seamless collaboration, especially for teams or file sharing. Multiple users can access and modify files stored on the mapped drive simultaneously, enhancing productivity and teamwork.
A true story exemplifying the benefits of mapping a network drive is that of John, an IT professional. He was able to save valuable time and boost efficiency by easily accessing all required files from one central location after mapping a network drive in Windows 10.
Step-by-Step Guide: How to Map a Network Drive in Windows 10
Looking to map a network drive in Windows 10? Look no further! This step-by-step guide will walk you through the entire process with ease. From opening File Explorer to selecting a drive letter, entering the network drive path, and choosing your preferences for automatic reconnection, we’ve got you covered. Say goodbye to endless searching and confusion, and follow this simple guide to map your network drive effortlessly on Windows 10.
Step 1: Open File Explorer
To open File Explorer in Windows 10, follow Step 1: Open File Explorer by clicking the Start button at the bottom left corner of your screen. In the search bar, type “File Explorer” and click the app that appears in the search results. Alternatively, you can press the Windows key + E on your keyboard for a direct way to open File Explorer.
Once opened, File Explorer will display your folders, files, and drives. By following Step 1, you can easily navigate through your files and folders in Windows 10.
Step 2: Click on “This PC” or “Computer”
Step 2: Click on “This PC” or “Computer” to open the list of available drives.
Step 3: Click on “Map network drive” in the toolbar.
Step 4: A small window will pop up, asking you to select a drive letter.
Step 5: Enter the network drive path in the corresponding field. This could be a shared folder on another computer or a network-attached storage (NAS) device.
Step 6: Choose whether to reconnect to the network drive every time you sign in. This ensures the drive remains accessible after restarting your computer.
Step 7: Click “Finish” to complete the process. The network drive will now be mapped and displayed under “This PC” or “Computer“.
Mapping a network drive in Windows 10 allows access to files and folders stored on another device or network location as if they were on your computer. This can greatly enhance productivity and collaboration in a shared work environment.
Step 3: Click on “Map network drive” in the toolbar
To map a network drive in Windows 10, follow these steps:
Open File Explorer.
Click on “This PC” or “Computer”.
Click on “Map network drive” in the toolbar.
Select a Drive Letter.
Enter the Network Drive Path.
Choose whether to reconnect at sign-in.
Click on “Finish”.
By clicking on “Map network drive” in the toolbar, you can connect to a network drive in Windows 10. It allows access to files and folders on another computer or server on the network. Mapping a network drive provides a convenient way to access shared resources, such as documents, spreadsheets, or media files, without navigating through folders manually.
Note: Make sure you have the correct network drive path and necessary permissions to access the shared resources. If you encounter any issues, refer to the troubleshooting section in the article for solutions.
Remember, mapping a network drive is just one option for accessing network resources. There are alternatives available, such as using the UNC path or utilizing cloud storage services like OneDrive. Choose the method that suits your needs and preferences.
Step 4: Select a Drive Letter
- Click “Map network drive” in the toolbar.
- In the new window, click the drop-down menu labeled “Drive” to see available letters.
- Choose a letter not currently in use.
- Select a letter that is easy to remember and related to the purpose of the network drive.
- For example, if the drive is for work, choose the letter W for “Work“.
- Click “Finish” to complete the mapping process.
Pro Tip: Choose a letter that is unlikely to conflict with future drive assignments to avoid issues when connecting additional drives or devices.
Step 5: Enter the Network Drive Path
To enter the Network Drive Path, follow these steps:
- Open File Explorer.
- Navigate to the Computer tab by clicking on “This PC” or “Computer“.
- Click on “Map network drive” in the toolbar.
- Choose a Drive Letter from the drop-down menu.
- Enter the Network Drive Path in the “Folder” field. This will typically be a Universal Naming Convention (UNC) path or an IP address followed by the shared folder name (e.g., \\server\sharedfolder or \\192.168.0.100\sharedfolder).
- Check the “Reconnect at sign-in” box if you want the network drive to automatically connect every time you log in.
- Click on “Finish” to complete the process.
Pro tip: Double-check the UNC path or IP address to ensure a successful connection to the network drive.
Step 6: Choose whether to reconnect at sign-in
1. After entering the network drive path, you have the option to decide if you want to reconnect to the network drive every time you sign in to your Windows 10 computer.
2. By selecting the reconnect at sign-in option, Windows will automatically establish a connection to the network drive every time you start your computer. This seamless access ensures that you can readily access your files and folders.
3. This feature is particularly useful if you frequently work with files stored on the network drive and prefer them to be easily accessible without any manual connection.
4. Conversely, if you opt not to reconnect at sign-in, Windows will only connect to the network drive when you manually access it through File Explorer.
5. This alternative may be more suitable if you desire to have more control over the network drive connection, or if you have limited storage space and want to conserve resources.
6. Keep in mind that if you choose not to reconnect at sign-in, you will need to manually connect to the network drive each time you wish to access files or folders stored on it.
7. To modify this setting in the future, simply open File Explorer, right-click on the network drive, select “Disconnect,” and then remap the drive with different settings.
Step 7: Click on “Finish”
By following these steps, you can easily connect to a network drive. Open File Explorer and select “This PC” or “Computer“. Then, click on “Map network drive” in the toolbar. Choose a Drive Letter for identification. Enter the Network Drive Path, the location of the network drive you want to connect to. Select whether to reconnect at sign-in for easy access. Click on “Finish” to complete the mapping process.
Common Issues and Troubleshooting
Struggling with mapping a network drive on Windows 10? In this section, we’ll dive into the common issues and troubleshooting steps you might encounter. From difficulties connecting to the network drive to incorrect credentials or permissions, and even the annoyance of drive mapping disappearing after a restart – we’ve got you covered. So, let’s get to the bottom of these problems and find the solutions you need to smoothly navigate your network drives on Windows 10.
Issue 1: Cannot connect to the network drive
If you are experiencing the issue of not being able to connect to the network drive in Windows 10, you can follow these troubleshooting steps:
1. Check your network connection: Ensure that your computer is properly connected to the network and has a stable internet connection.
2. Verify the network drive path: Double-check the entered network drive path for any typos or errors that might be causing the connection problem.
3. Check network permissions: Confirm that you have the necessary permissions to access the network drive. If needed, contact your system administrator to verify or update your permissions.
4. Disable firewall or antivirus software: Temporarily disable any firewall or antivirus software that could potentially be blocking the connection to the network drive.
5. Restart your computer and the network drive: Resolve connectivity issues by restarting both devices. Power off both your computer and the network drive, wait a few seconds, and then power them back on.
6. Reset network settings: If the previous steps do not work, you can try resetting your network settings. Open the Network and Sharing Center in Windows and select the option to reset your network settings.
By following these steps, you can troubleshoot and resolve the issue of being unable to connect to the network drive in Windows 10.
Issue 2: Incorrect credentials or permissions
To troubleshoot the problem of incorrect credentials or permissions while mapping a network drive in Windows 10, follow these steps:
1. Check that the username and password entered to access the network drive are correct. Double-check for typing errors.
2. Confirm that the account being used has sufficient permissions to access the network drive. Verify with the network administrator or the shared folder owner.
3. If the network drive is on a different domain, ensure the username specifies the correct domain (e.g., DOMAINusername).
4. If using a Microsoft account for authentication, make sure the account has permission to access the shared folder. Alternatively, consider creating a separate local user account on the computer for accessing the network drive.
5. If the network drive is protected by a firewall or antivirus software, temporarily disable the software and try mapping the drive again. If successful, adjust the software settings to allow access to the network drive.
If the issue persists or the above steps do not solve the problem, seek assistance from a technical support professional or the network administrator. They can provide guidance based on the specific network environment and configuration.
Always ensure the accuracy of the credentials and permissions to avoid connectivity issues when mapping a network drive in Windows 10.
Issue 3: Drive mapping disappears after restart
When encountering the issue where drive mapping disappears after a restart, it is essential to follow the provided steps to successfully resolve the problem.
To begin, open File Explorer and navigate to either “This PC” or “Computer” as instructed. Then, locate and click on “Map network drive” in the toolbar.
Next, select an appropriate Drive Letter and enter the correct Network Drive Path. It is crucial to ensure the accuracy of the entered information to avoid any issues.
You will then have the option to choose whether to reconnect the mapped drive at sign-in. This decision should be based on your preferences and requirements.
Click on “Finish” to finalize the drive mapping process. After completing these steps, you will be able to effectively map the network drive and prevent it from disappearing after restarting your computer.
Remember to double-check the network drive path and select the appropriate drive letter to ensure accuracy. If you want the mapped drive to be automatically connected every time you sign in, do not forget to check the “reconnect at sign-in” option.
By following these steps, you can successfully troubleshoot and resolve the issue of drive mapping disappearing after restart. Keep these steps in mind for future reference to ensure a seamless and uninterrupted mapping experience for network drives in Windows 10.
Alternatives to Mapping a Network Drive
Looking for alternatives to mapping a network drive in Windows 10? We’ve got you covered. In this section, we’ll explore two alternative methods that can help you access network drives more efficiently. Option 1 takes advantage of the UNC path, providing a seamless way to connect to network resources. On the other hand, Option 2 offers the option of using cloud storage services like OneDrive for easy access to your files. Say goodbye to traditional mapping and discover new ways to streamline your network drive access.
Option 1: Access Network Drives using UNC Path
Option 1: Access Network Drives using UNC Path
To access network drives using UNC path, follow these steps:
- Open File Explorer.
- Click on “This PC” or “Computer”.
- Click on “Map network drive” in the toolbar.
- Select a Drive Letter.
- Enter the Network Drive Path.
- Choose whether to reconnect at sign-in.
- Click on “Finish”.
UNC (Universal Naming Convention) is a standard way to access resources on a network. The UNC path allows direct access to network drives without mapping them as separate drive letters. This is useful for avoiding clutter in the drive list and accessing shared resources temporarily.
The UNC path consists of the server name or IP address and the shared folder, such as \servershare. Replace “server” with the actual server name or IP address, and “share” with the shared folder name you want to access.
By using the UNC path, you can easily access network drives without mapping them, providing quick and convenient access to shared files and folders.
Option 2: Use OneDrive or other Cloud Storage Services
Using OneDrive or other cloud storage services is an excellent alternative to mapping a network drive in Windows 10. Here are some reasons why:
- OneDrive and other cloud storage services allow you to access your files from any device with an internet connection. This means you can access your files on your Windows 10 computer, as well as on your smartphone, tablet, or any other device.
- When you save files to OneDrive or other cloud storage services, they are automatically synced across all your devices. This ensures that you always have the latest version of your files, no matter which device you’re using.
- OneDrive and other cloud storage services make it easy to share files with others. You can easily collaborate on documents, share photo albums, or send large files to colleagues or clients.
- OneDrive and other cloud storage services provide automatic backups of your files, giving you peace of mind knowing that your data is safe and secure.
- OneDrive and other cloud storage services offer generous amounts of storage space, allowing you to store a large number of files without worrying about running out of space on your computer’s hard drive.
- OneDrive is integrated with Windows 10, making it seamless to save and access files directly from File Explorer. Other cloud storage services also provide similar integrations or dedicated applications.
By using OneDrive or other cloud storage services, you can enjoy the benefits of accessing your files from anywhere, data syncing across devices, easy file sharing, data backup, ample storage space, and seamless integration with Windows 10. This option provides a convenient and efficient way to store and manage your files without the need for mapping a network drive.
Some Facts About How to Map a Network Drive in Windows 10:
- ✅ Network discovery needs to be enabled before mapping a network drive in Windows 10. (Source: Our Team)
- ✅ To enable network discovery, go to Control Panel, click on “View Network Status and Tasks,” and select “Change Advanced Sharing Settings.” (Source: Our Team)
- ✅ Once network discovery is enabled, open File Explorer and click on “This PC.” (Source: Our Team)
- ✅ In the Network group of the Computer tab, select “Map Network Drive.” (Source: Our Team)
- ✅ Choose a drive letter, enter the folder or computer path, and click “Finish” to complete the mapping process. (Source: Our Team)
Frequently Asked Questions
How do I map a network drive in Windows 10?
To map a network drive in Windows 10, open File Explorer, click on “This PC,” and select “Map Network Drive.” Choose a drive letter, enter the folder or computer path in the “Folder” box, and click “Finish.”
How do I enable network discovery in Windows 10?
To enable network discovery in Windows 10, go to Control Panel, click on “View Network Status and Tasks,” select “Change Advanced Sharing Settings,” choose “Turn on Network Discovery,” and click “Save Changes.”
How do I map a drive using different credentials in Windows 10?
If you are an ECU employee, choose a drive letter, type the address to the resource, check the “Connect using different credentials” box, click “Finish,” enter your PirateID and password in the “Windows Security” dialog box, and click “OK.”
How can I save changes after enabling network discovery in Windows 10?
To save changes after enabling network discovery in Windows 10, click on “Save Changes” in the “Change Advanced Sharing Settings” window.
Can I map a network drive in Windows Vista?
Yes, you can map a network drive in Windows Vista. Open File Explorer, right-click “This PC,” select “Map Network Drive,” choose a drive letter and enter the folder or computer path, and click “Finish.”
How do I access a mapped network drive in Windows 7?
To access a mapped network drive in Windows 7, open File Explorer, go to “My Computer,” and you will find the mapped network drive in the list of drives.
- About the Author
- Latest Posts
Mark is a senior content editor at Text-Center.com and has more than 20 years of experience with linux and windows operating systems. He also writes for Biteno.com