

Sometimes, you need to download a file directly from the Command Prompt (CMD). It’s simple, quick, and doesn’t require opening a browser. Here’s how to do it step-by-step. 😉
CURL Command on CMD
For Windows 10 and later, there is a built-in tool called Curl that can be used to download files using the command line. It’s pretty simple: open your command prompt by pressing the Win + R key on your keyboard, typing cmd on the search bar that appeared, and then hitting the Enter key.
Then type the below command, replacing the download URL of your file:
curl -O https://example.com/file.zipThis will download the file and save it with the same name as on the website.

Want to rename the file as you download it? Use this:
curl -o MyFile.zip https://example.com/file.zip
Invoke-WebRequest Command on PowerShell
Invoke-WebRequest functions similarly to the curl command, but in PowerShell. To download a file using this command, replace the URL with your file’s URL as shown in the command below:
Invoke-WebRequest https://example.com/file.zip -OutFile file.zipThis will save the file as file.zip in your current directory.

BITSADMIN Command for Older Versions of Windows
Windows XP, Vista, Windows 7, 8/8.1, and Windows 10 don’t support the curl and Invoke-WebRequest commands. In this case, you can use bitsadmin. To use it, open CMD and type the below command, replacing the download URL of your file:
bitsadmin /transfer myDownloadJob /download /priority normal https://example.com/file.zip C:\Users\yourusername\Downloads\file.zipThe file will be saved to the location C:\Downloads.

WGET Command for Linux Lovers on Windows
The WGET command is available on Windows but requires manual installation. It is a built-in utility in Linux, making it easier for Linux users to use the same command on Windows OS as well.
To use WGET, download wget from the internet (Google “wget for Windows”). And then add to the system path. To do this, follow the steps:
- Open your browser and search for “wget for Windows.”
- Go to a trusted source like Eternallybored.org or another reliable website.
- Download the
wget.exefile. Choose the version that matches your system (32-bit or 64-bit). - Once downloaded, locate the
wget.exefile (usually in yourDownloadsfolder). - Move it to the location:
C:\Windows\System32\

Now you’re all set to use wget on your Windows system for downloading files. You can now open CMD and type after replacing the file URL in the below sample command:
wget https://example.com/file.zip
With this guide, you’ve covered all the methods to download a file from the CMD (command line) like a pro! 😃👏
Powerful VPS Hosting, Without the Premium Price
Get the performance you need at a price you’ll love. Explore our affordable VPS plans.
See Pricing
As a Linux user, I can’t help but spend most of my time on the command line. Not that the GUI is not efficient, but there are things that are simply faster to do with the keyboard.
Think about copy and paste. Select a text you want to copy, go to the edit menu, click, precisely move down to copy, click, then go to the destination, click where you want to paste, go to edit menu, click, move down to the paste option, then paste. Every time I see someone do this, I die a little inside. Sure you can save some time by right-clicking, copy, right-click, paste. But you can save some more time by pressing, ctrl-c then ctrl-v
My hands are already on the keyboard, and I would rather do the mundane things on the keyboard and not think about them.
One thing I do frequently is download files. They can be zip file, tgz, or jpg. On linux, all I have to do is open the command line, run wget with the file I want to download and it is done.
wget http://example.org/picture.jpg
Straight to the point. But how do you do that when you are on a Windows machine? Let me introduce you to cURL, pronounced curl. (i don’t know why I wrote it the way I did)
curl is a very powerful tool with too many feature. But I just want to download the file on Windows so let’s just learn how to do that.
Open PowerShell. That’s Windows Key + R then type powershell and press enter.
Now run the curl command with the -O option to specify the file output.
curl http://example.org/picture.jpg -O picture.jpg
Easy right? Now you can download files right from the command line all by simply using your keyboard.
OK. It is time I confess. This is not the curl tool you are using. It’s only an alias. In reality, we are calling the command Invoke-WebRequest. But hey! It works, so we don’t care. You can call it in its native format if you want to.
Invoke-WebRequest http://example.org/picture.jpg -O picture.jpg
Either way, now you know how to download a file from the command line.
You can download a file using the command prompt by utilizing the `curl` command, which allows you to fetch files from the web.
curl -O https://example.com/file.txt
What is CMD?
The Command Prompt, commonly referred to as CMD, is a command-line interpreter in Windows operating systems. It allows users to execute commands directly to the system, bypassing graphical interfaces. CMD has been an integral part of computing since the earlier days of DOS, providing a powerful tool for file management, system diagnostics, and automation.
Understanding CMD is crucial for anyone looking to enhance their technical skills, as it allows for greater control over system operations.
Download Steam Cmd: A Quick Guide to Getting Started
Benefits of Downloading Files Using CMD
Downloading files using CMD can offer several advantages:
-
Speed and Efficiency: CMD commands can often execute faster than graphical alternatives, especially when dealing with bulk downloads or automated tasks.
-
Automation of Repetitive Tasks: Command scripts can automate the repeated downloading of files, saving time and effort.
-
Managing Downloads in Scripting: CMD allows users to script entire processes, making it easier to manage workflows without manual intervention.
Read File in Cmd: A Simple Guide to Easy File Access
Navigating CMD
Opening CMD
To get started with downloading files using CMD, you’ll first need to open the Command Prompt. Here’s how you can do it on different operating systems:
-
Windows: Press `Windows + R`, type `cmd`, and press `Enter`. Alternatively, search for «Command Prompt» in the Start menu.
-
Mac (through Terminal): Open Terminal from the Applications > Utilities folder, though CMD commands primarily work in Windows.
Basic Commands to Know
Before diving into downloading files, here are some basic commands you should be familiar with:
-
cd: Change Directory — This command helps you navigate between folders.
-
dir: List Directory Contents — It displays all files and folders within the current directory.
-
mkdir: Make Directory — Use this command to create a new folder.
-
exit: Close CMD — This command closes the Command Prompt window.

Find IP Using Cmd: A Quick and Easy Guide
Downloading a File Using CMD
Using PowerShell
PowerShell is a more advanced command-line interface that offers greater functionality than CMD. To download files using PowerShell, you can use the `Invoke-WebRequest` command. Here’s how:
Invoke-WebRequest -Uri "http://example.com/file.zip" -OutFile "C:\Users\YourUsername\Downloads\file.zip"
In this example, replace `http://example.com/file.zip` with the URL of the file you want to download. The `-OutFile` parameter specifies the desired download location.
Using Curl
Curl is a versatile command-line tool designed to transfer data from or to a server. It can function seamlessly through CMD for downloading files.
Here’s the syntax to download a file via Curl:
curl -O http://example.com/file.zip
The `-O` option automatically saves the file with its original name. Just like before, ensure you substitute the URL with your target file’s URL.
Using Wget
Wget is another powerful tool mainly used for downloading files from the web. It’s particularly useful for downloading multiple files at once or for resuming interrupted downloads.
To use Wget for downloading files, you first need to ensure it’s installed. Once loaded, you can execute the following command:
wget http://example.com/file.zip
This straightforward command will initiate the download. Remember, Wget also offers additional options for managing downloads, including recursive downloading and limiting download speeds.
Delete Files Cmd: A Quick Guide to File Removal
How to Handle Downloaded Files
Checking File Integrity
After downloading files, it’s essential to verify their integrity. This ensures that the files are not corrupt or incomplete. You can check the file’s size and type using CMD commands, or even compare checksums using tools available through CMD.
Changing File Extensions
In some cases, you might need to rename your downloaded files or change their extensions. This can be done using the `rename` command:
rename "file.zip" "file.zip.bak"
This example changes the name of the file `file.zip` to `file.zip.bak`.
Delete File with Cmd: A Quick Step-by-Step Guide
Common Issues and Troubleshooting
Permission Denied Errors
If you encounter permission denied errors while trying to download files, it might be due to insufficient privileges. To resolve this, you can run the Command Prompt as an administrator by right-clicking on its icon and selecting Run as administrator.
Network Connectivity Problems
When downloading files, network issues can often arise. If you experience slow downloads or failures, you might want to diagnose your connection. Use the `ping` command to test the network connectivity to a site:
ping example.com
Or use `tracert` to trace the route taken to a network destination.

Format USB Using Cmd: A Step-by-Step Guide
Conclusion
To effectively download files using CMD, it’s essential to understand the commands and tools available. By utilizing PowerShell, Curl, or Wget, users can streamline the downloading process, automate tasks, and manage files efficiently. Becoming familiar with CMD can significantly enhance your technical skills and improve your workflow.
Whether you’re an experienced user or just starting, practicing these commands will boost your confidence in using CMD for file management tasks. Stay tuned for more CMD tips and tricks to make your usage even more efficient!
Rename File in Cmd: A Quick Guide
Additional Resources
For further reading and the exploration of more CMD commands, look for communities or resources that cater to CMD enthusiasts. Websites and online platforms dedicated to coding can provide invaluable insights and practice opportunities for refining your CMD skills.
In this guide, we’ll show you how to download a file from an FTP server using the Command Prompt (CMD) on Windows 11 or 10. The File Transfer Protocol (FTP) is commonly used to move files between computers over the internet. And CMD is a tool in Windows that lets you do a bunch of command-line tasks, like moving files around, without the need for any third-party software.
Also see: How to use FTP via command line on Windows 11
What you need first
Before we start, you need a few things:
- The FTP server’s address (like
ftp.example.com) - A username and password for the FTP server, if it asks for one
- The exact path of the file you want (something like
/folder/subfolder/filename.extension)
Expert guide: How to download all files from a website directory using Wget
How to get an FTP file with Command Prompt
Follow the steps below to download a file from an FTP site using CMD in Windows 11 or 10:
- Hit Win + X on your keyboard, and pick Windows Terminal (Windows 11) or Command Prompt (Windows 10) from the menu that pops up.
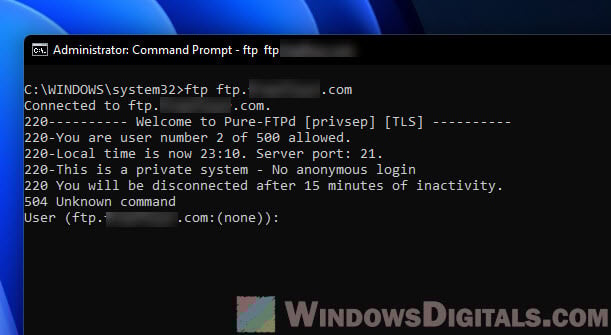
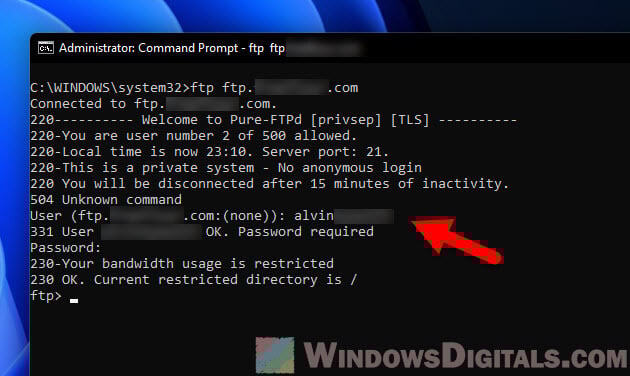
- Connect to the FTP server. Type this command in CMD, swapping ftp.example.com with the real FTP server’s address:
ftp ftp.example.com
You’ll know you’re connected when you see the FTP server’s welcome message.

- Log into the FTP server (if needed). If the server wants a username and password, it’ll ask. Put in your details to move forward.
Sometimes, you might have to type in your username and password yourself like this:user your_username your_password
Change your_username and your_password to what you actually use. After you’re in, you’ll see a message saying so.

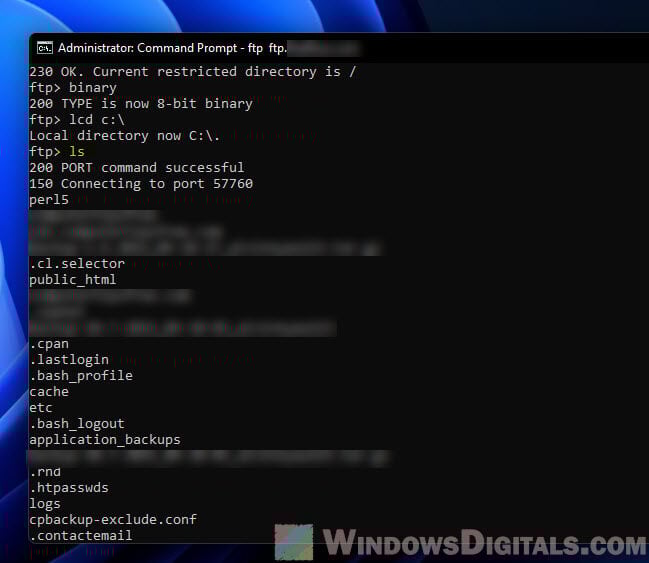
- To peek at what’s in the current directory on the FTP server, type:
ls
This shows you all the files and folders there, helping you find the one you want to download.

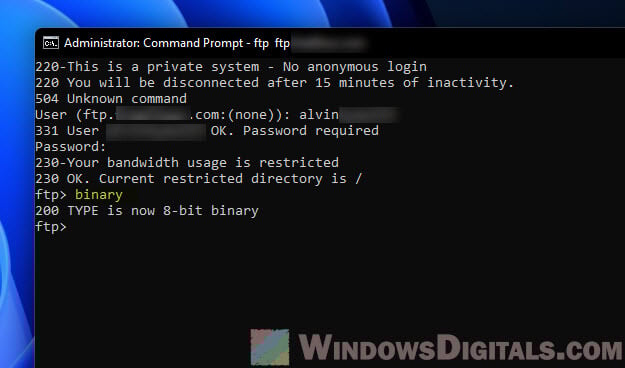
- To make sure your file comes over correctly, switch to binary mode by typing:
binary

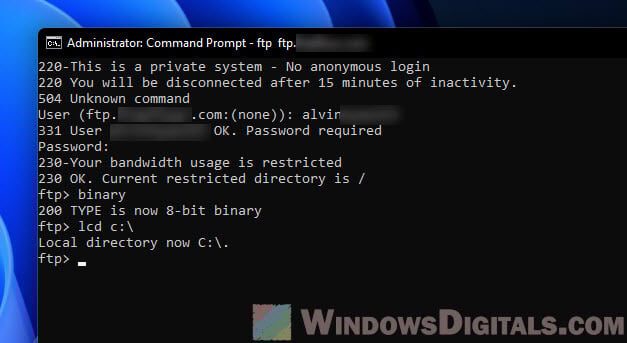
- Decide where on your computer you want to save the file you’re getting. Type this, but replace C:\destination_folder with where you want it to go:
lcd C:\destination_folder

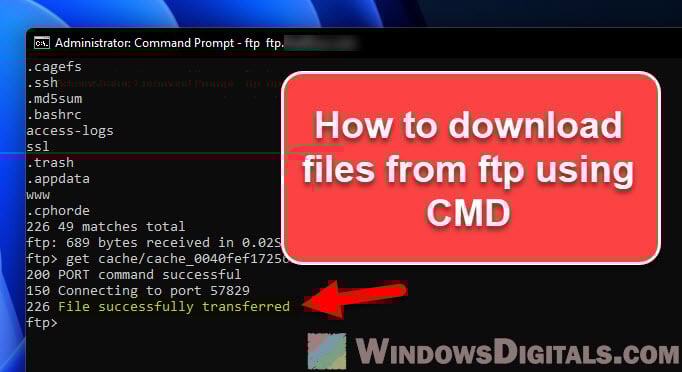
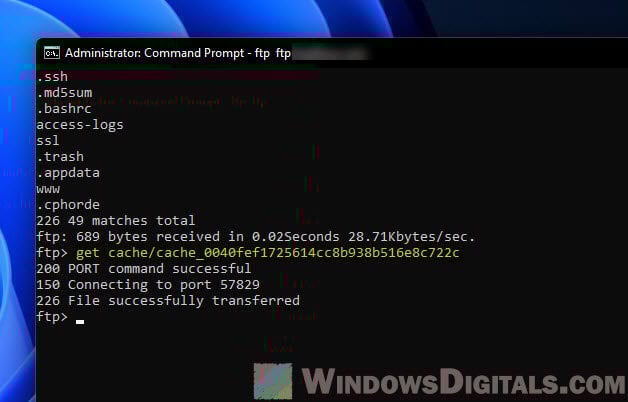
- Now, download the file with the get command. Swap out /folder/subfolder/filename.extension with the file’s actual location on the server:
get /folder/subfolder/filename.extension
You’ll see a message when the file has finished moving.

- Close the FTP connection by typing:
bye
exit
Congrats! You’ve just downloaded a file from an FTP server using only Command Prompt in Windows 11 or 10. This way, you can get files without needing any extra FTP software, which should save you time and money.
Useful tip: How to run Batch File without the CMD window
Quick single command download
Besides the step-by-step method, there’s a quick way to download an FTP file using just one line of command in CMD. This is great if you like to keep things simple and fast.
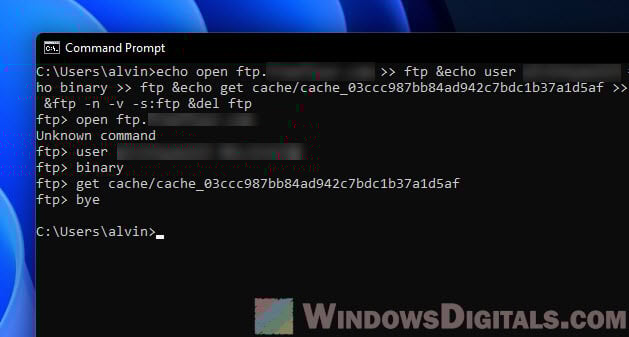
Here’s the magic one-liner:
echo open WEBSITE >> ftp &echo user USERNAME PASSWORD >> ftp &echo binary >> ftp &echo get PATHTOFILE >> ftp &echo bye >> ftp &ftp -n -v -s:ftp &del ftp
Switch out these bits with your details:
WEBSITE: Your FTP server’s address (like ftp.example.com)USERNAME: Your FTP usernamePASSWORD: Your FTP passwordPATHTOFILE: Where the file lives on the server (like /folder/subfolder/filename.extension)
This single command line does it all: connects, logs you in, gets your file, and closes the session. It even cleans up by deleting a temp file it made. Though it’s speedy, it’s better for folks who don’t mind not seeing what’s happening step by step.
Before you use this command, make sure you’re in the folder where you want the file to go. To change directories in CMD, type:
cd C:\destination_folder
Swap C:\destination_folder with your folder. Once you’re there, use the one-liner above to quickly grab your FTP file.
Related resource: Copy folder structure without files in Windows 11/10
How to download many files at once with “mget”
When you need to download a bunch of files from an FTP server all at the same time, the mget command is your friend. It’s perfect for saving time when you’ve got lots of files to download.
Before you start downloading, make sure you’re in the right folder on the FTP server where the files you want are. To download everything in the folder, use mget *.*. The *.* means “grab all files.” If you’re after just a specific type of file, like text files, change *.* to *.txt.
Here’s the command:
mget *.*
After you run this, you’ll get asked for each file if you want to download it. Answer with yes (y) or no (n). If there’s a long list of files and you know you want all of them, constantly replying can sometimes be quite annoying. To skip this step, activate automatic yes responses by entering this command before starting with mget:
prompt
This turns off the confirmation for each file, so the download starts right away without asking. Don’t forget to switch prompting back on after by typing prompt again, to avoid unwanted downloads in the future.
Most users will download files onto their PC using their web browser. There’s a problem with this method, however—it’s not particularly efficient. If you need to pause your download, or if you’ve lost your connection, you’ll probably need to start your download again from scratch. You may also be working with Python or other code at the command line and want to download directly from the command prompt.
That’s where tools like Wget come in. This command line tool has a number of useful features, with support for recursive downloads and download resumption that allows you to download single files (or entire websites) in one go.
Wget is popular on Linux and other Unix-based operating systems, but it’s also available for Windows users. Below, we’ll explain how to install and use Wget to download any content you want online from your Windows command line.
Installing GNU Wget on Windows
Wget (in name, at least) is available on Windows 10 and 11 via the PowerShell terminal. However, this version of Wget isn’t the same as the GNU Wget tool that you’d use on a Linux PC. Instead, this version is simply an alias for a PowerShell command called Invoke-WebRequest.
Invoke-WebRequest is Wget-like in what it does, but it’s a completely different tool that’s much more difficult to use and understand. Instead, you’ll be better served by installing Wget for Windows, a compiled version of the same tool available for Linux users, using the steps below.
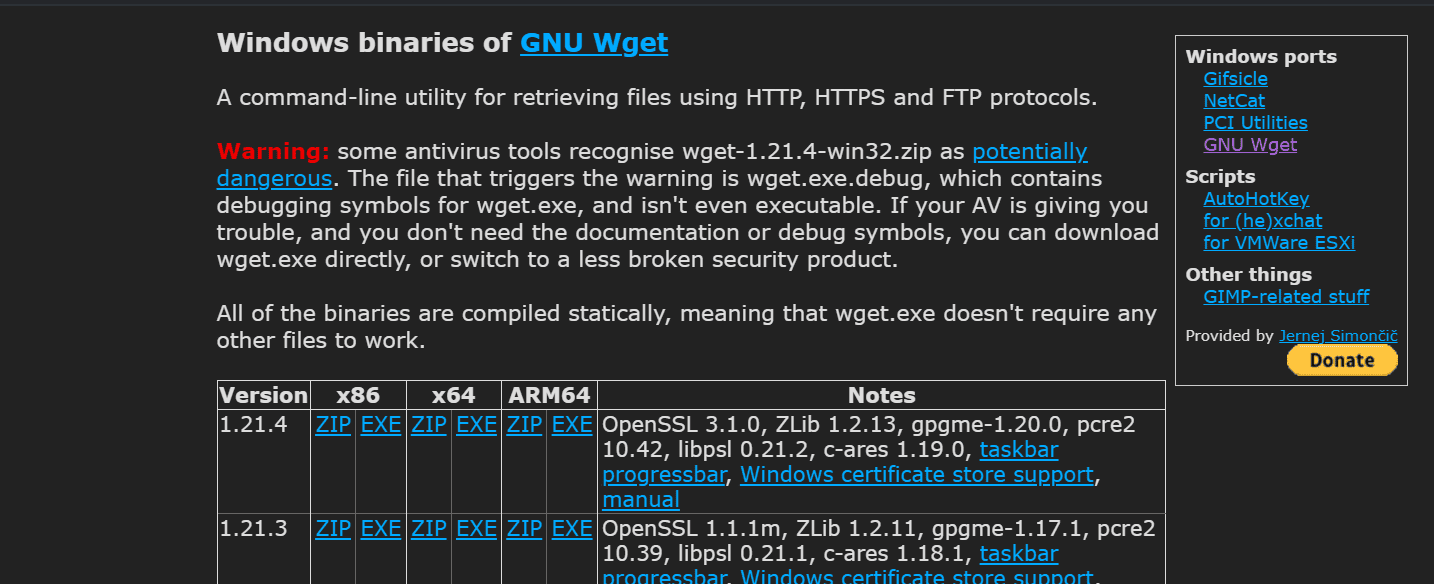
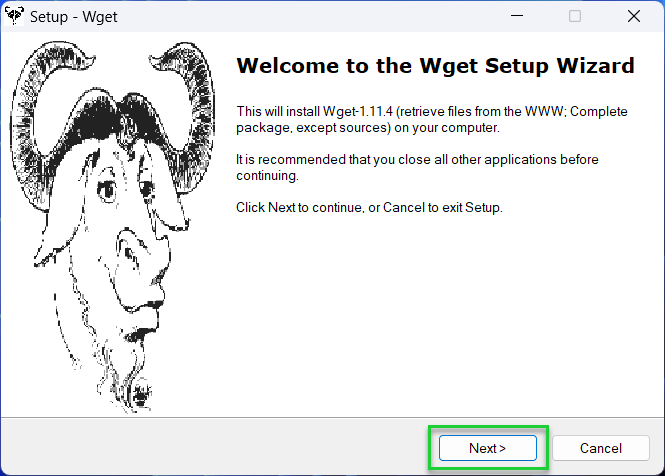
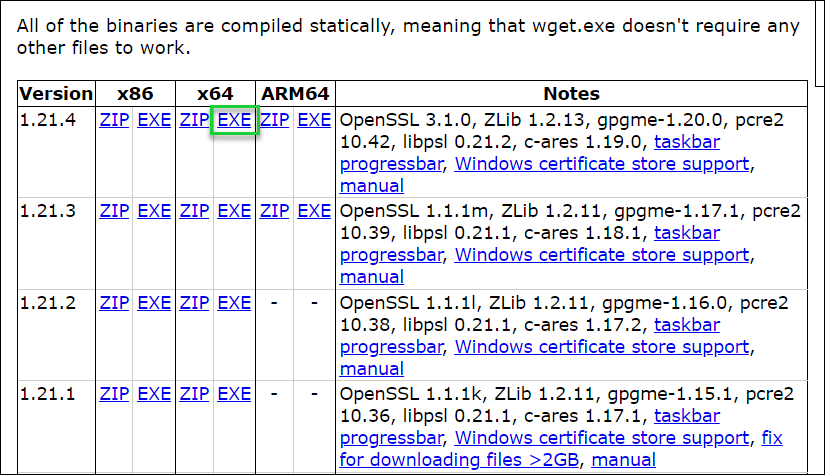
1. Download the Wget for Windows setup file from the Wget website. You’ll need to do this using your web browser.
Get Tom’s Hardware’s best news and in-depth reviews, straight to your inbox.
2. Run the Wget for Windows installer file. Once the Wget setup file has finished downloading, run the setup file and follow the on-screen instructions to complete the installation.
3. Update the Wget.exe file (optional). The Wget installer is packaged with a fairly old version of the Wget binary. If you run into difficulties downloading files because of SSL certificate errors, you should download the latest wget.exe for your architecture from this website and save it to your Wget installation directory (typically C:\Program Files (x86)\GnuWin32\bin). This step is optional, but highly recommended.
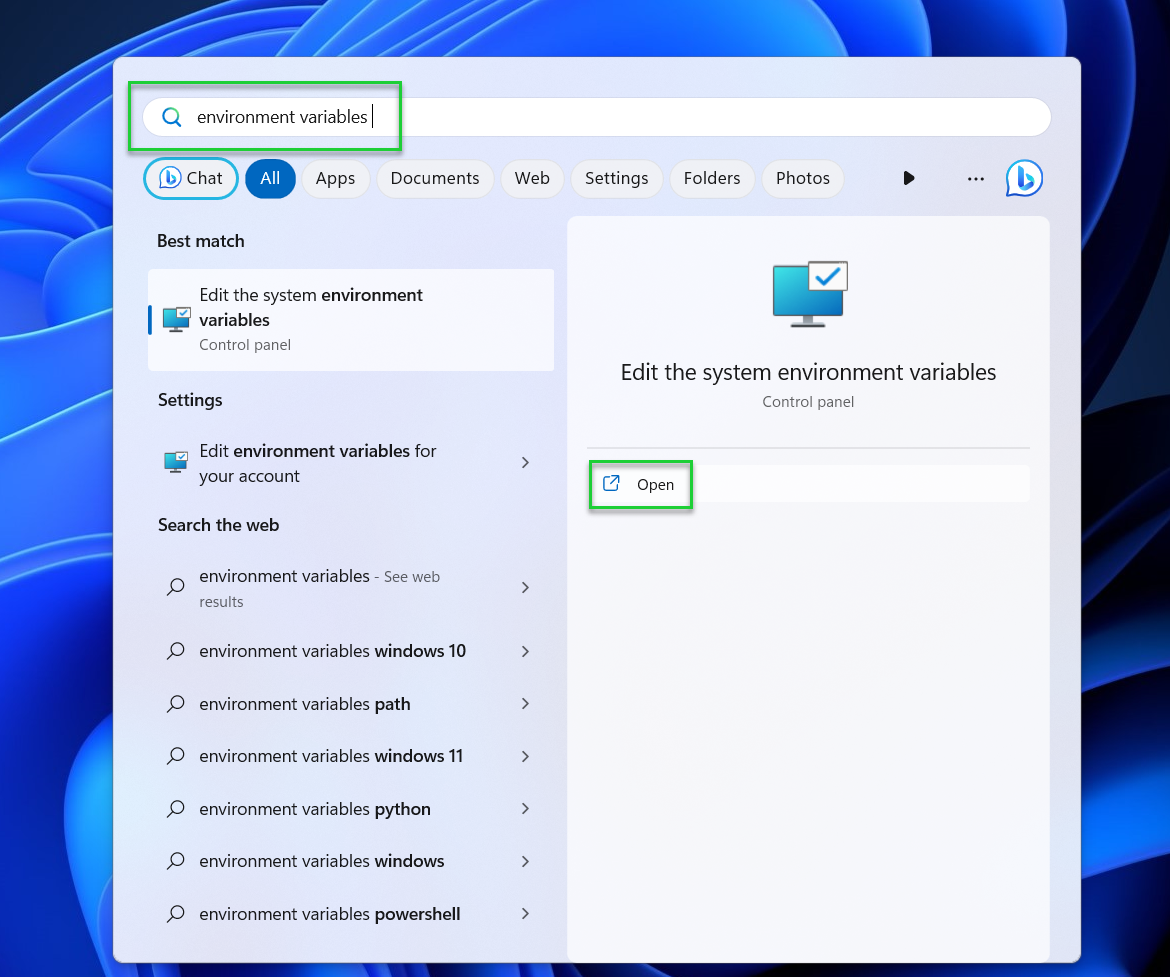
4. Open the Start menu, search for environment variables, and click Open. Once the installation is finished, use the search tool in the Start menu to search for environment variables, then click Open. You’ll need to do this to allow you to use the ‘wget’ command from the command line without referencing its location every time you wish to run it.
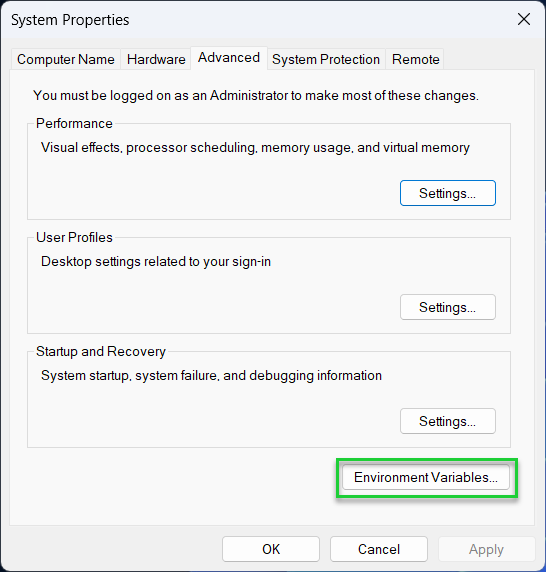
5. Click Environment Variables in the System Properties window.
6. Select Path and click Edit under System or User variables.
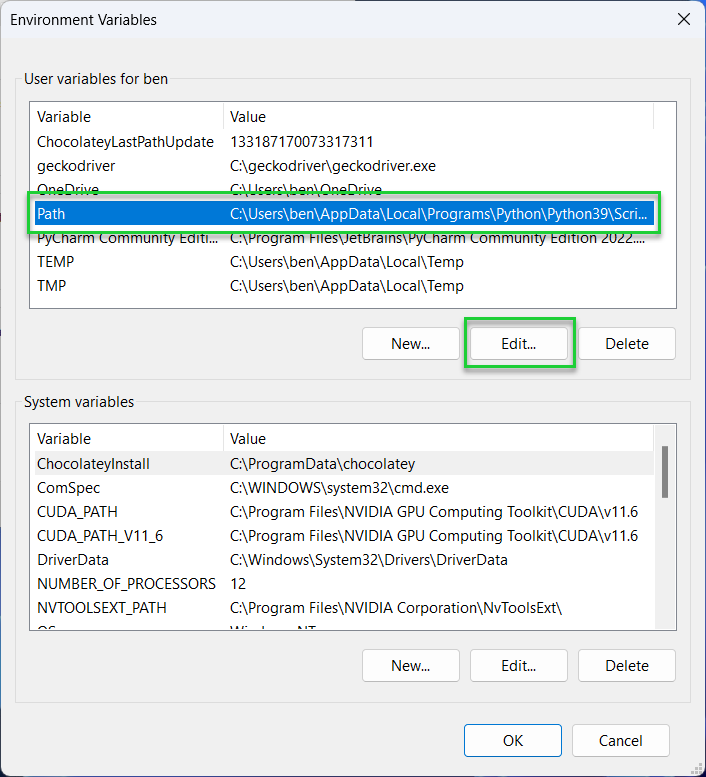
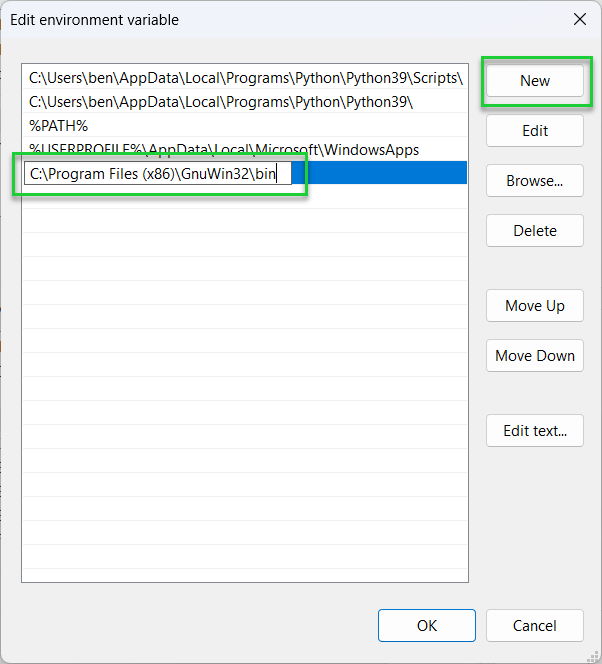
7. Click the New button and type in the directory for the Wget for Windows binary (.exe) file. By default, this should be C:\Program Files (x86)\GnuWin32\bin.
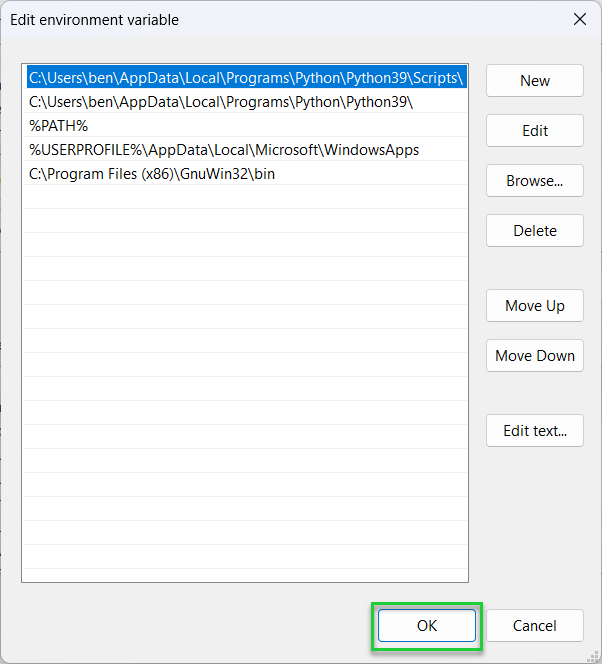
8. Save your changes. When you’re finished, click OK in each menu and exit System Properties.
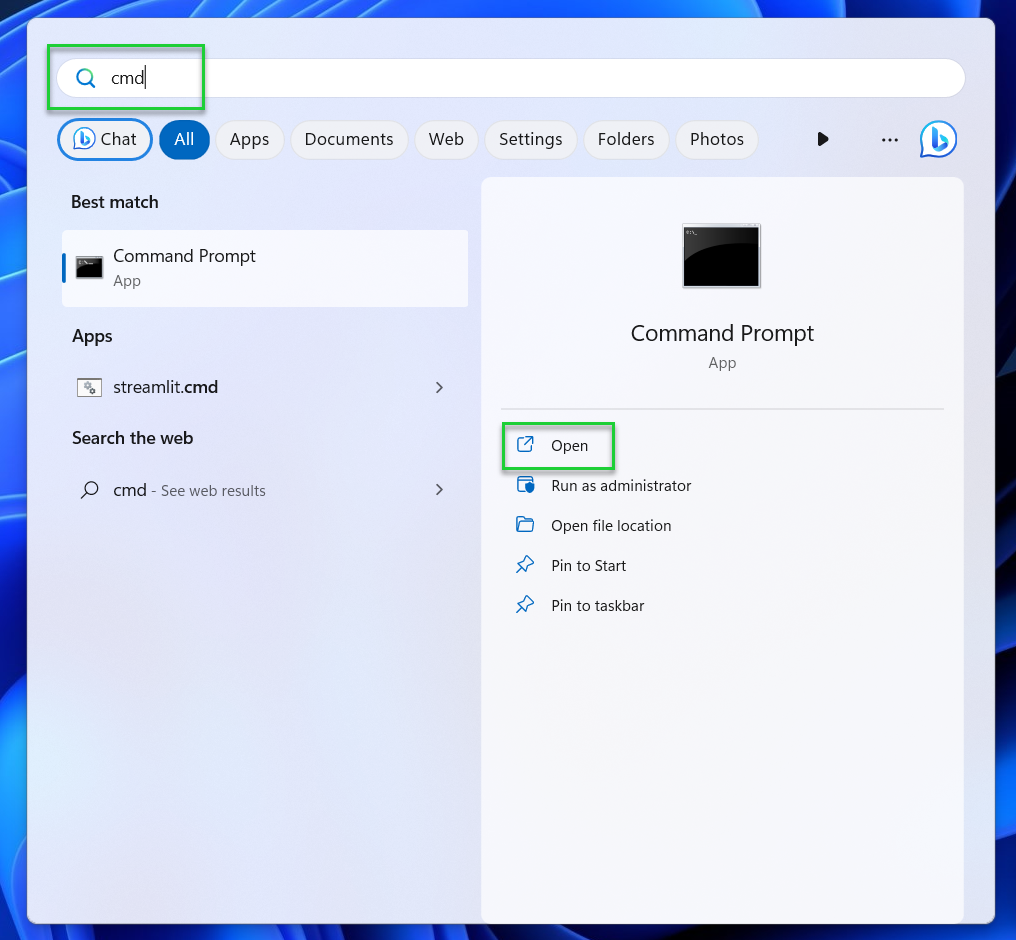
9. Open the Start menu, type cmd, and press Open. This will launch a new command prompt window. You can also use the newer Terminal app, as long as you switch to using a command prompt shell.
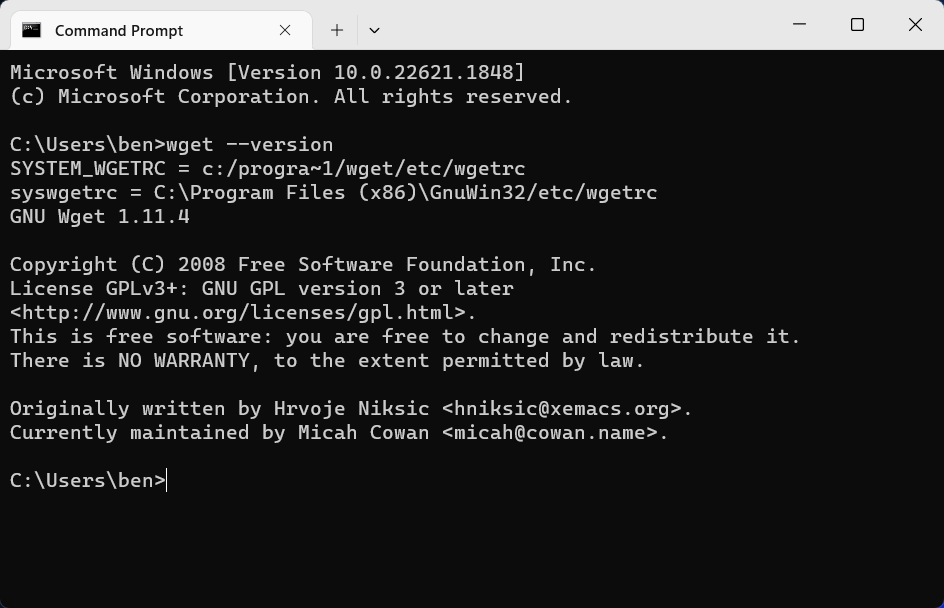
10. Type wget —version and press Enter. If Wget was installed correctly, you should see the GNU Wget version returned in the command prompt window.
If you want to run Wget from a PowerShell terminal instead, you’ll need to run the file from its installation directory directly (eg. C:\Program Files (x86)\GnuWin32\bin\wget.exe).
Downloading Files with Wget
Once you’ve installed GNU Wget and you’ve configured the environment variables to be able to launch it correctly, you’ll be able to use it to start downloading files and webpages.
We’ve used an example domain and file path in our examples below. You’ll need to replace this with the correct path to the file (or files) that you want to download.
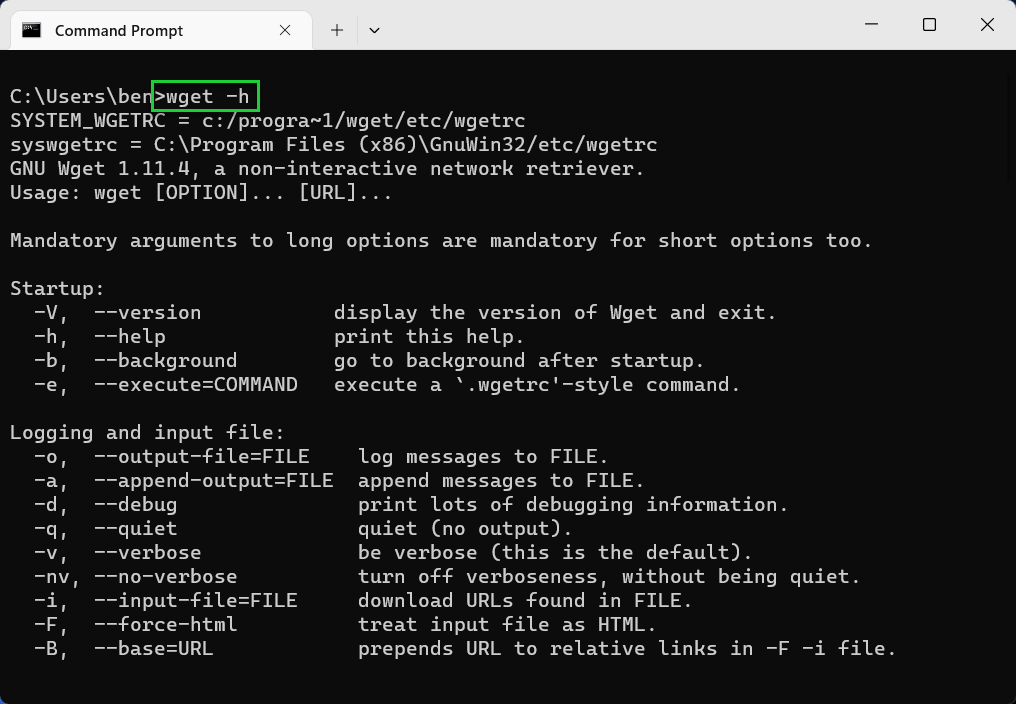
- Type wget -h to see a full list of commands. This will give you the full list of options that you can use with Wget.
wget -h
- Download a single file using wget <url>. Replace <url> with the path to a file on an HTTP, HTTPS, or FTP server. You can also refer to a website domain name or web page directly to download that specific page (without any of its other content).
wget example.com

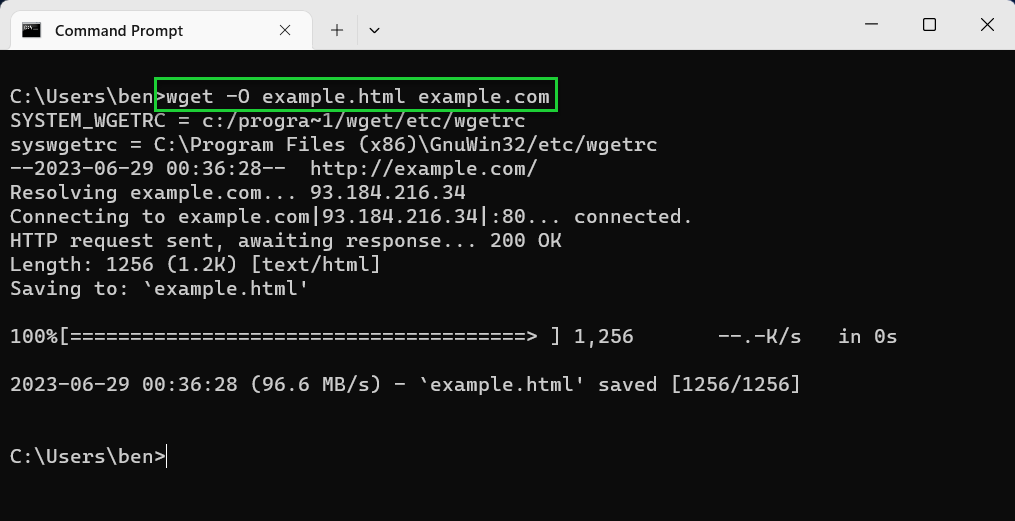
- Save with a different filename using -O. Using the -O option, you’ll be able to save the file with a different filename. For example, wget -O <filename> <url>, where <filename> is the filename you’ve chosen.
wget -O example.html example.com
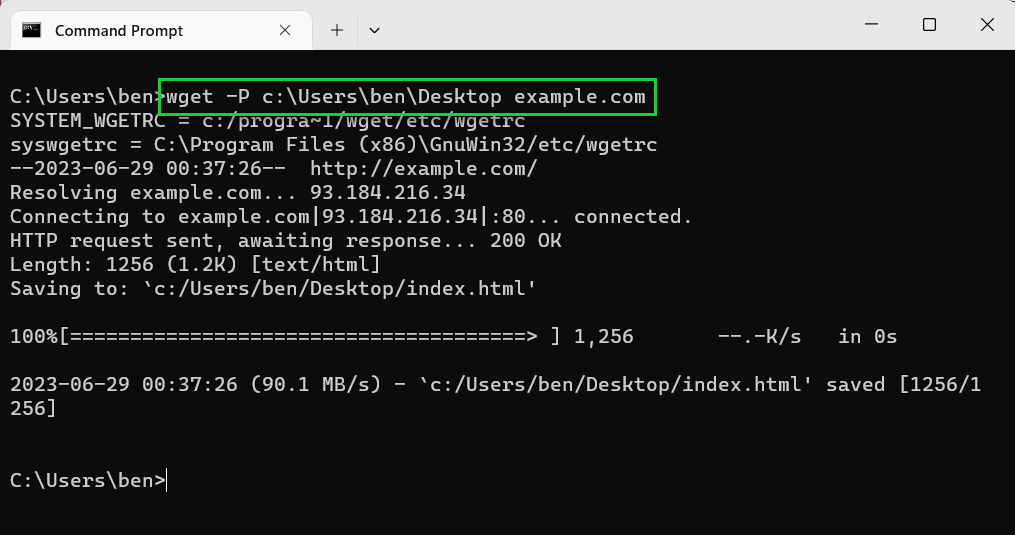
- Save to a different directory using -P. If you want to save to another directory than the one you’re currently in, use the -P option. For example, wget -P <path> <url>.
wget -P C:\folder example.com
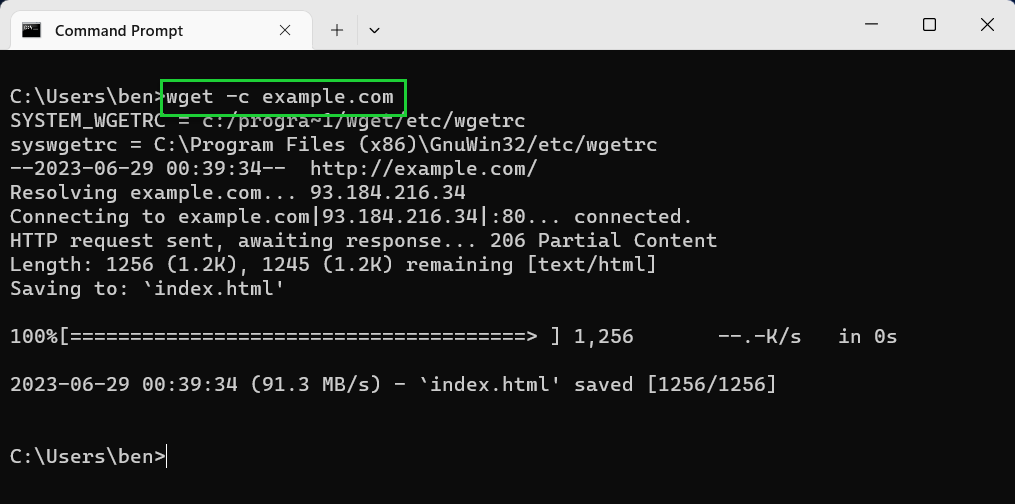
- Use —continue or -c to resume files. If you want to resume a partial download, use the -c option to resume it, as long as you’re in the same directory. For example, wget -c <url>.
wget -c example.com
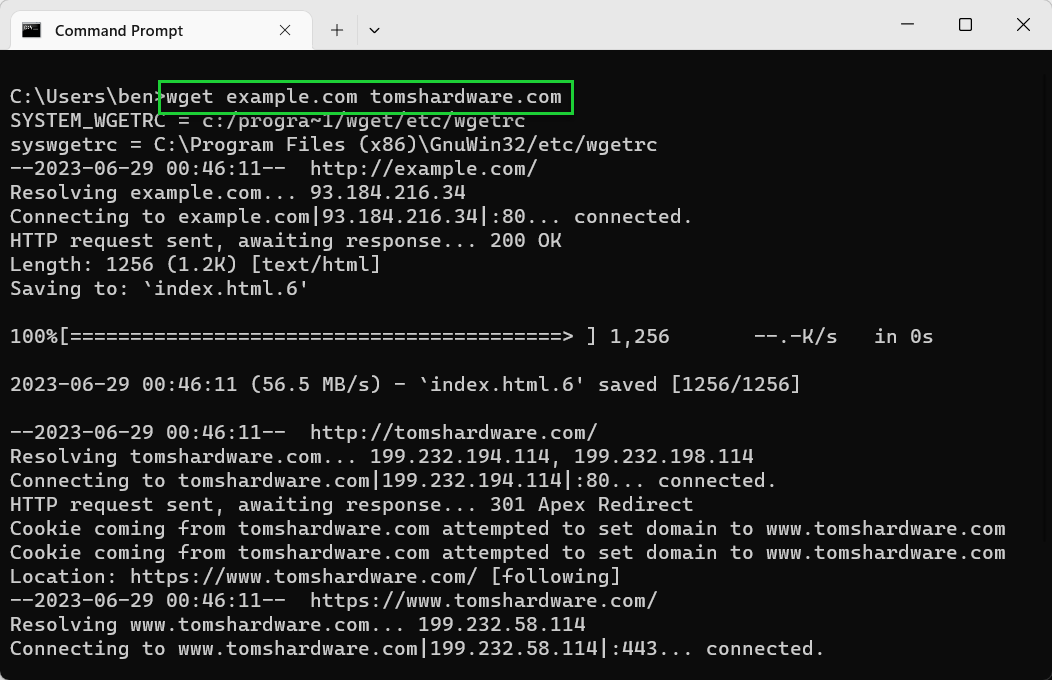
- Download multiple files in sequence. If you want to download several files, add each URL to your Wget command. For example, wget <url1> <url2> etc.
wget example.com tomshardware.com
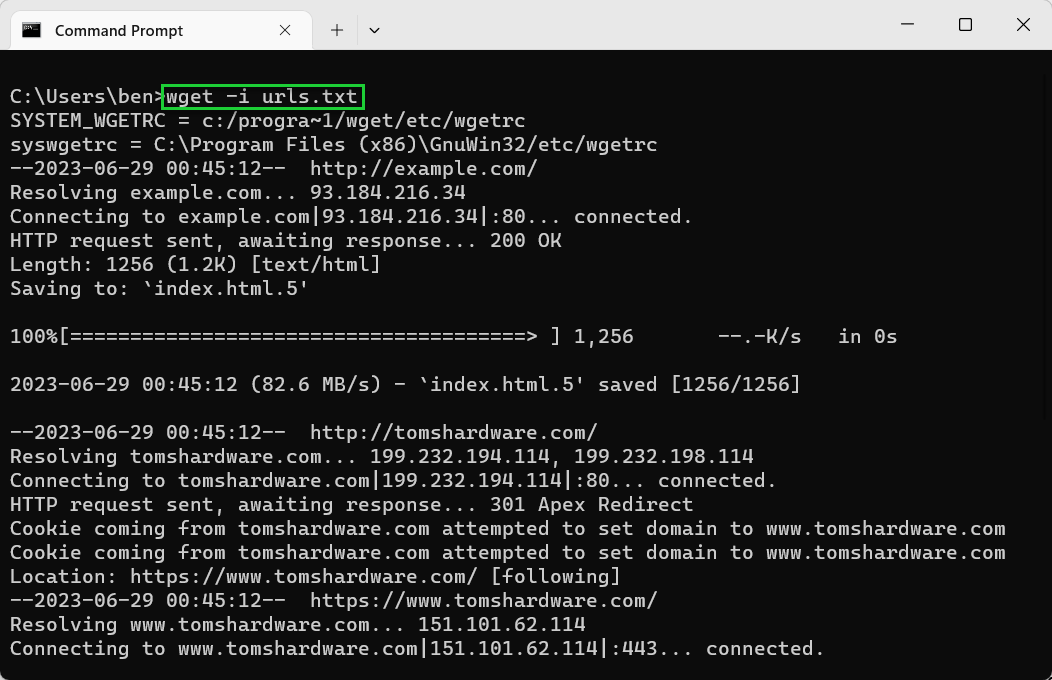
- Download multiple files using a text file with -i. Using the -i option, you can refer to a text file that contains a list of URLs to download a large number of files. Assuming that each URL is on a new line, Wget will download the content from each URL in sequence. For example, wget -i <file.txt> <url>.
wget -i urls.txt
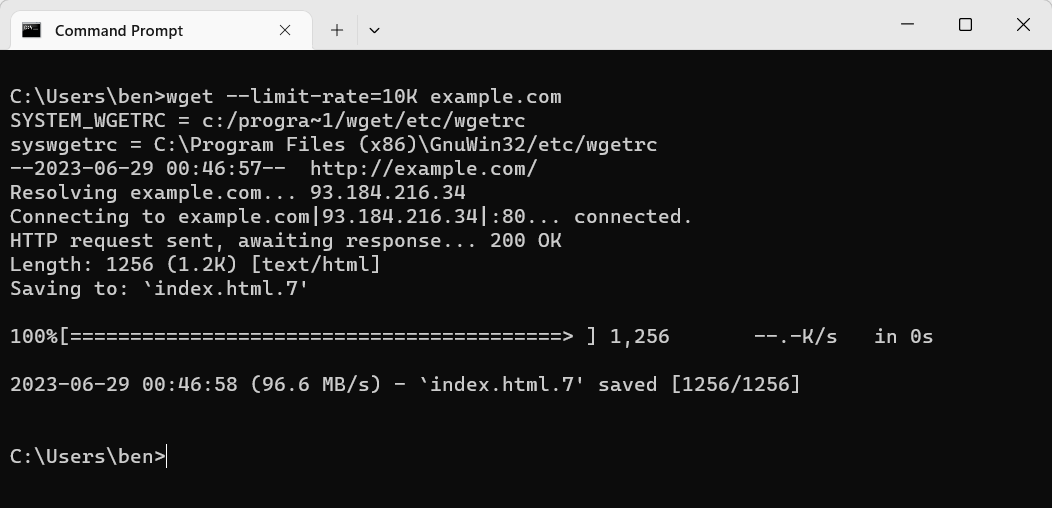
- Limit download speeds using —limit-rate. If you want to limit your bandwidth usage, you can cap the download speeds using the —limit-rate option. For example, wget —limit-rate=1M <url> would limit it to 1 megabyte per second download speeds, while wget —limit-rate=10K <url> would limit it to 10 kilobytes per second.
wget —limit-rate=10K example.com
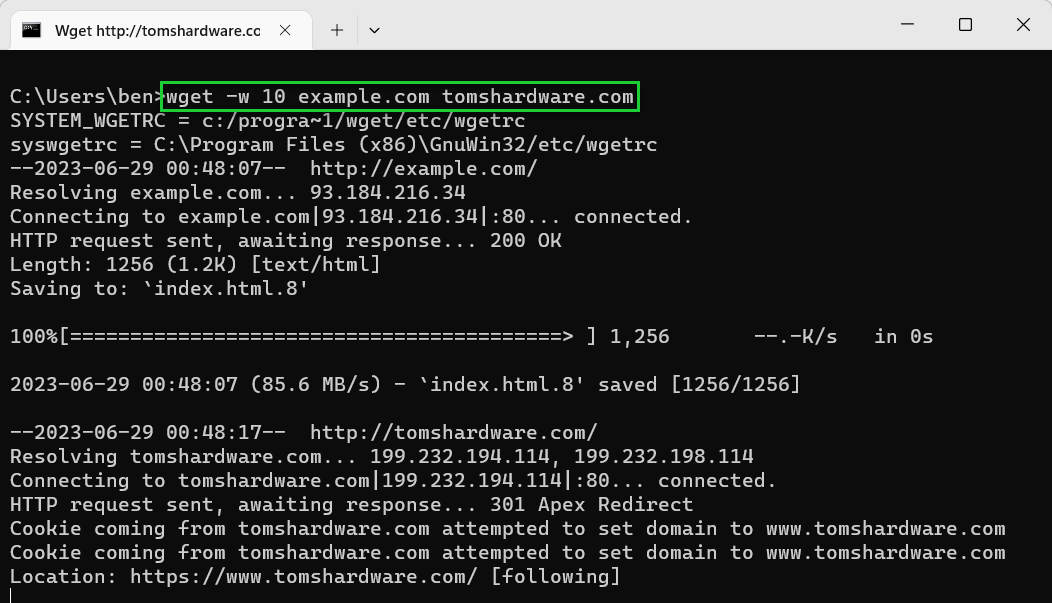
- Use -w or –wait to set a pause period after each download. If you’re downloading multiple files, using -w can help to spread the requests you make and help to limit any chance that your downloads are blocked. For example, wget -w 10 <url1> <url2> for a 10 second wait.
wget -w 10 example.com tomshardware.com
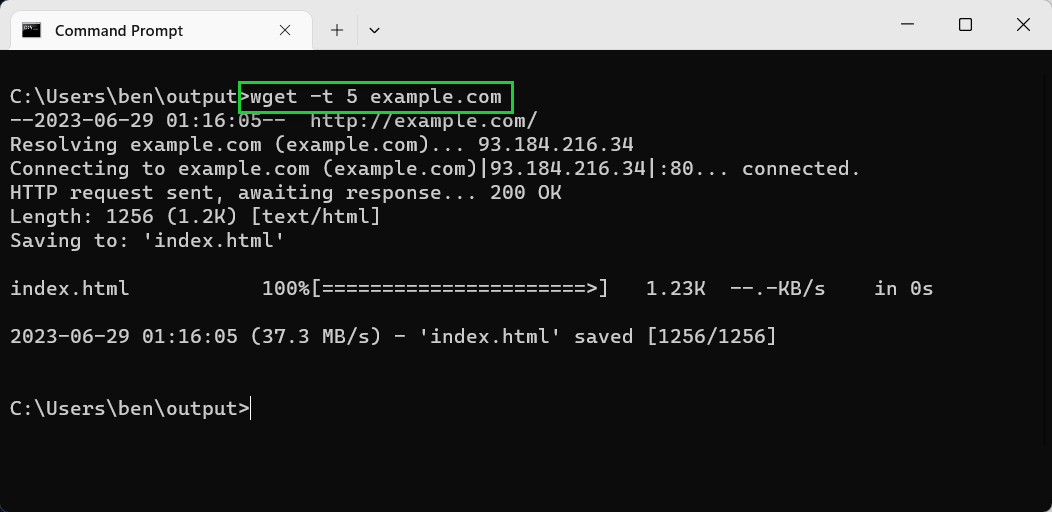
- Set a retry limit using -t or —tries. If a download fails, wget will use the -t value to determine how many times it’ll attempt it again before it stops. The default value is 20 retries. If the file is missing, or if the connection is refused, then this value is ignored and Wget will terminate immediately.
wget -t 5 example.com
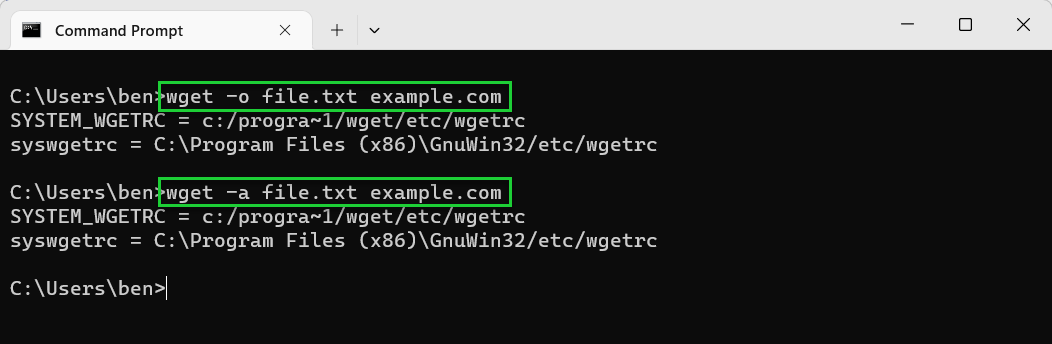
- Save a log using -o or -a. You can save your log data to a text file using -o (to always create a new log file) or -a (to append to an existing file). For example, wget -o <file.txt> <url>.
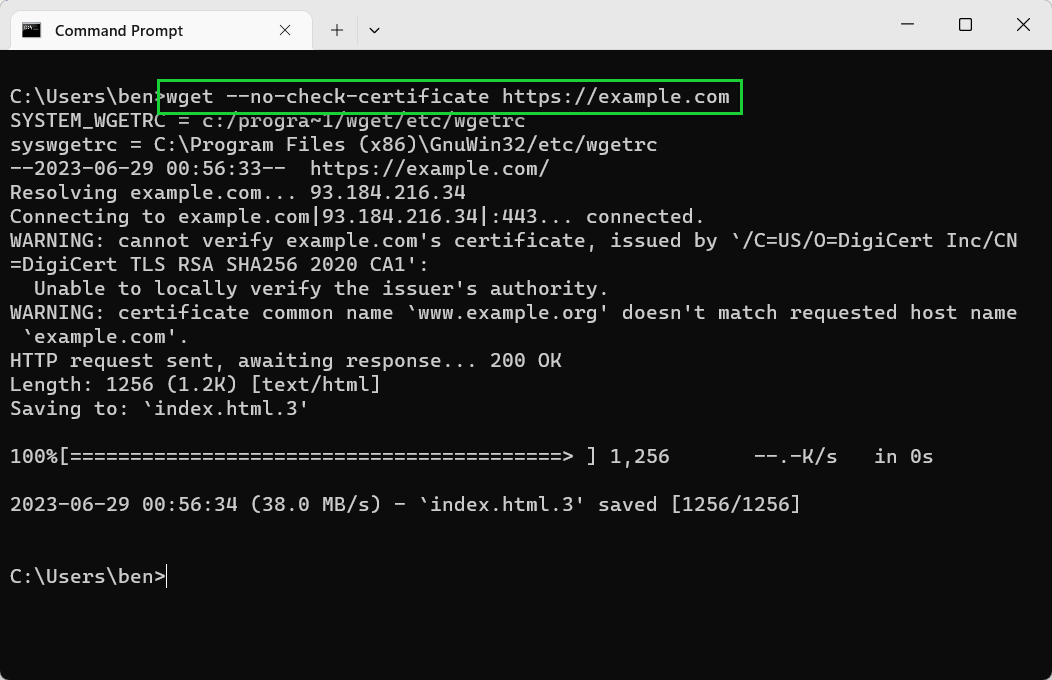
- Bypass SSL errors using —no-check-certificate. If you’re having trouble downloading from a web server with an SSL certificate and you’ve already updated your Wget installation, bypass the SSL certificate check completely using —no-check-certificate to allow the download (in most cases). You should only do this for downloads from locations that you completely trust. For example, wget —no-check-certificate example.com.
wget —no-check-certificate https://example.com
Make sure to use the wget -h or wget —help command to view the full list of options that are available to you. If you run into trouble with Wget, make sure to limit the number of retries you make and set a wait limit for each download you attempt.
Using Wget for Recursive Downloads
One of Wget’s most useful features is the ability to download recursively. Instead of only downloading a single file, it’ll instead try to download an entire directory of related files.
For instance, if you specify a web page, it’ll download the content attached to that page (such as images). Depending on the recursive depth you choose, it can also download any pages that are linked to it, as well as the content on those pages, any pages that are linked on those pages, and so on.
Theoretically, Wget can run with an infinite depth level, meaning it’ll never stop trying to go further and deeper with the content it downloads. However, from a practical point of view, you may find that most web servers will block this level of scraping, so you’ll need to tread carefully.
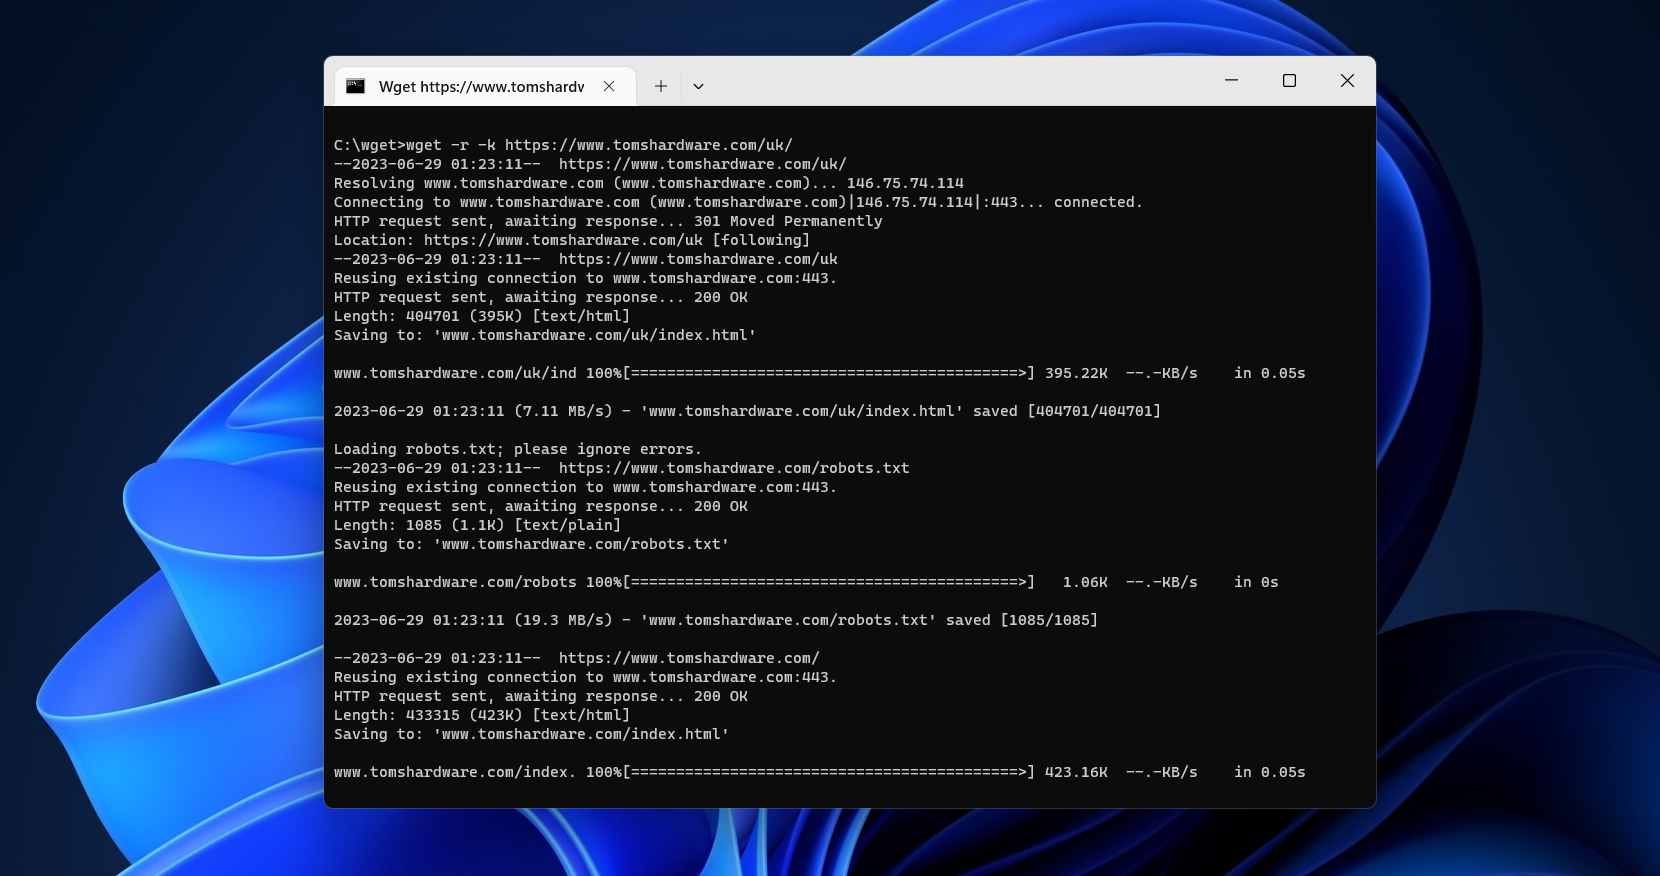
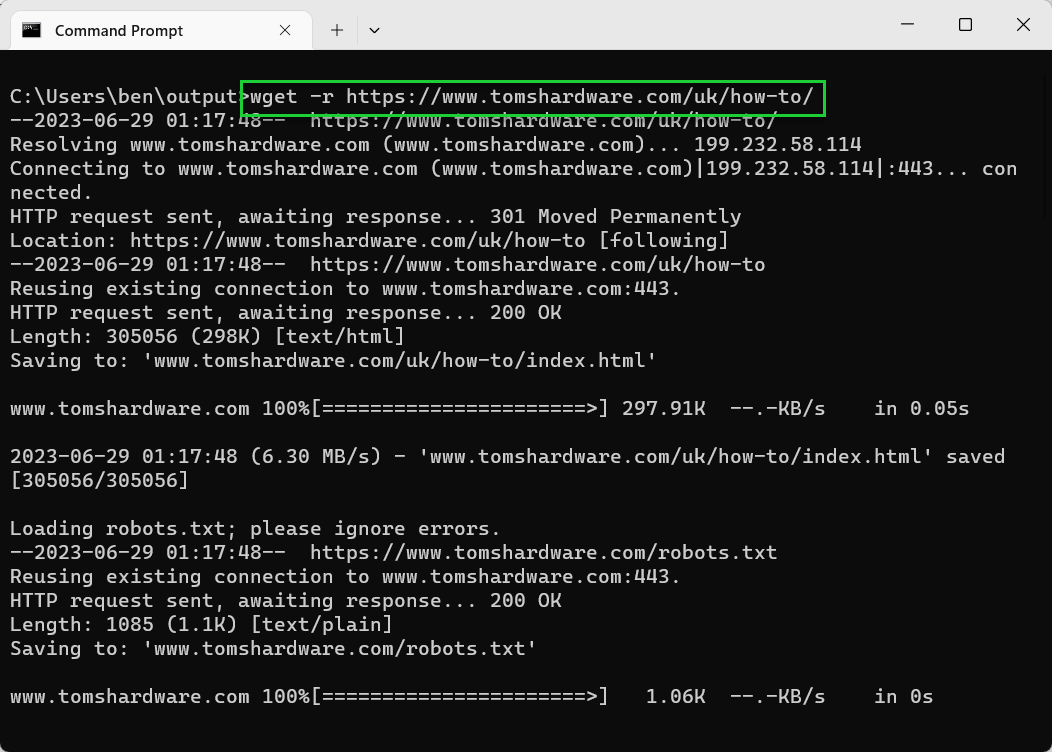
- Type wget -r or wget —recursive to download recursively. By default, the depth level is five. For example, wget -r <url>.
wget -r tomshardware.com
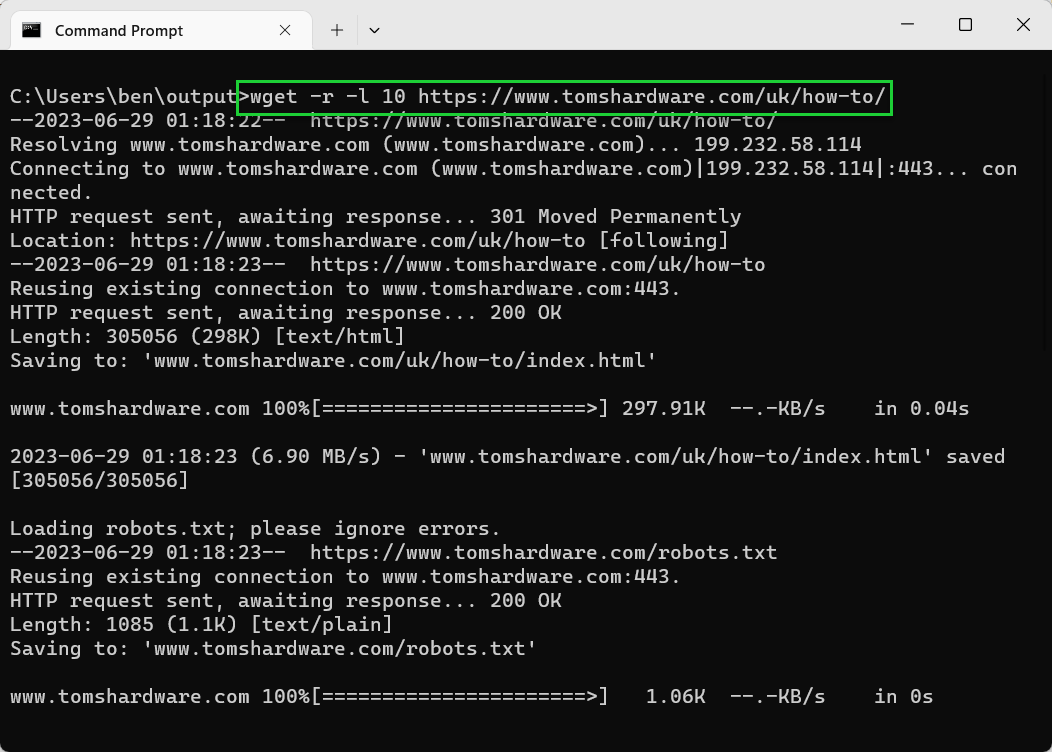
- Use -l or –level to set a custom depth level. For example, wget -r -l 10 <url>. Use wget -r -l inf <url> for an infinite depth level.
wget -r -l 10 tomshardware.com
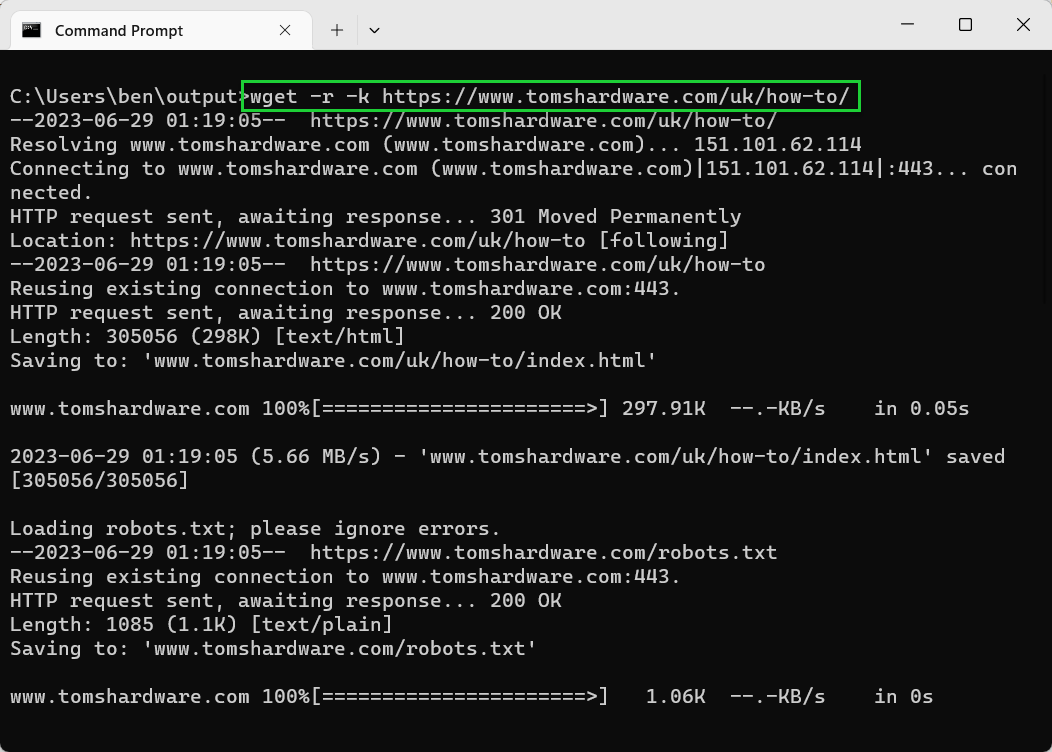
- Use -k to convert links to local file URLs. If you’re scraping a website, Wget will automatically convert any links in HTML to point instead to the offline copy that you’ve downloaded. For example, wget -r -k <url>.
wget -r -k tomshardware.com
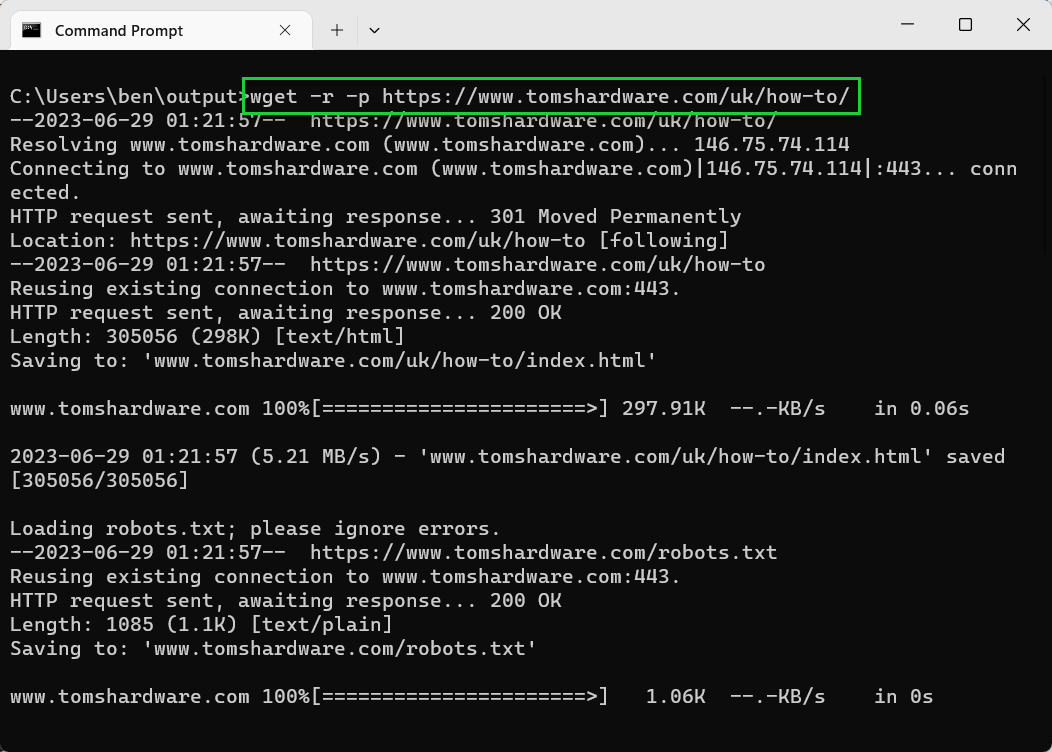
- Use -p or —page-requisites to download all page content. If you want a website to fully download so that all of the images, CSS, and other page content is available offline, use the -p or —page-requisites options. For example, wget -r -p <url>.
wget -r -p tomshardware.com
For a full list of options, make sure to use the wget —h command. You should also take care to respect any website that you’re actively downloading from and do your best to limit server loads using wait, retry, and depth limits.
If you run into difficulties with downloads because of SSL certificate errors, don’t forget to update your Wget binary file (wget.exe) with the latest version.