
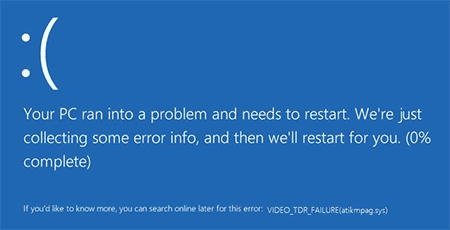
Один из частых синих экранов смерти (BSoD) на компьютере или ноутбуке с Windows 10 — ошибка VIDEO_TDR_FAILURE, после которой как правило указывается сбойный модуль, чаще всего — atikmpag.sys, nvlddmkm.sys или igdkmd64.sys, но возможны и другие варианты.
В этой инструкции подробно о том, как исправить ошибку VIDEO_TDR_FAILURE в Windows 10 и о возможных причинах появления синего экрана с этой ошибкой. Также в конце есть видео руководство, где подходы к исправлению показаны наглядно.
Как исправить ошибку VIDEO_TDR_FAILURE
В общих чертах, если не учитывать целый ряд нюансов, о которых будет подробно сказано далее в статье, исправление ошибки VIDEO_TDR_FAILURE сводится к следующим пунктам:
- Обновление драйверов видеокарты (при этом здесь стоит учитывать, что нажатие «Обновить драйвер» в диспетчере устройств — это не обновление драйвера). Иногда может потребоваться предварительное полное удаление уже установленных драйверов видеокарты.
- Откат драйвера, если ошибка, наоборот, появилась после недавнего обновления драйверов видеокарты.
- Ручная установка драйвера с официального сайта NVIDIA, Intel, AMD, если ошибка появилась после переустановки Windows 10.
- Проверка на наличие вредоносных программ (майнеры, работающие напрямую с видеокартой, могут вызывать синий экран VIDEO_TDR_FAILURE).
- Восстановление реестра Windows 10 или использование точек восстановления, если ошибка не позволяет зайти в систему.
- Отключение разгона видеокарты, если он присутствует.
А теперь подробнее по всем этим пунктам и о различных методах исправить рассматриваемую ошибку.
Почти всегда появление синего экрана VIDEO_TDR_FAILURE связано с теми или иными аспектами работы видеокарты. Чаще — проблемами с драйверами или ПО (при неверном обращении программ и игр к функциям видеокарты), реже — с какими-то нюансами работы самой видеокарты (аппаратными), её температурой или сверхмерной загрузкой. TDR = Timeout, Detection, and Recovery, а ошибка возникает если видеокарта перестаёт отвечать.
При этом уже по имени сбойного файла в сообщении об ошибке можно сделать вывод о какой именно видеокарте идет речь
- atikmpag.sys — видеокарты AMD Radeon
- nvlddmkm.sys — NVIDIA GeForce (сюда же относятся и другие .sys, начинающиеся с букв nv)
- igdkmd64.sys — Intel HD Graphics
Способы исправления ошибки стоит начать с обновления или отката драйверов видеокарты, возможно, поможет уже это (особенно если ошибка стала появляться после недавнего обновления).
Важно: некоторые пользователи ошибочно считают, что если в диспетчере устройств нажать «Обновить драйвер», выполнить автоматический поиск обновленных драйверов и получить сообщение о том, что «Наиболее подходящие драйверы для данного устройства уже установлены», это означает, что стоит последний драйвер. На самом деле это не так (сообщение говорит лишь о том, что Центр обновления Windows не может вам предложить другого драйвера).
Для обновления драйвера правильным способом будет загрузить драйверы вашей видеокарты с официального сайта (NVIDIA, AMD, Intel) и вручную установить на компьютер. Если это не сработало, попробуйте предварительно удалить старый драйвер, подробно об этом я писал в инструкции Как установить драйверы NVIDIA в Windows 10, но для других видеокарт метод тот же самый.
Если ошибка VIDEO_TDR_FAILURE возникает на ноутбуке с Windows 10, то может помочь такой путь (случается, что фирменные драйверы от производителя, особенно на ноутбуках, имеют свои особенности):
- Скачайте с официального сайта производителя ноутбука драйверы для видеокарты.
- Удалите имеющиеся драйверы видеокарты (и интегрированного и дискретного видео).
- Установите драйверы, загруженные на первом шаге.
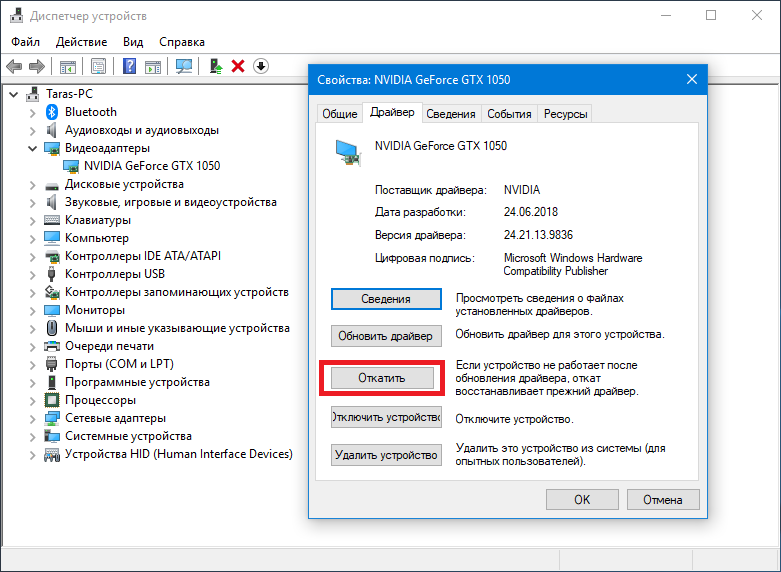
Если проблема, наоборот, появилась после обновления драйверов, попробуйте выполнить откат драйвера, для этого выполните следующие шаги:
-
- Откройте диспетчер устройств (для этого можно нажать правой кнопкой мыши по кнопке Пуск и выбрать соответствующий пункт контекстного меню).
- В диспетчере устройств откройте «Видеоадаптеры», нажмите правой кнопкой мыши по названию видеокарты и откройте «Свойства».

- В свойствах откройте вкладку «Драйвер» и проверьте, активна ли кнопка «Откат», если да — используйте её.


Если указанные выше способы с драйверами не помогли, попробуйте варианты из статьи Видеодрайвер перестал отвечать и был восстановлен — по сути это та же проблема, что и синий экран VIDEO_TDR_FAILURE (только восстановление работы драйвера не проходит успешно), и дополнительные методы решения из приведенной инструкции могут оказаться полезными. Также далее описаны еще некоторые методы исправить проблему.
Синий экран VIDEO_TDR_FAILURE — видео инструкция по исправлению
Дополнительная информация по исправлению ошибки
- В некоторых случаях ошибка может быть вызвана самой игрой или каким-то ПО, установленном на компьютере. В игре можно попробовать понизить параметры графики, в браузере — отключить аппаратное ускорение. Также, проблема может крыться в самой игре (например, не совместима с вашей видеокартой или криво сломана, если это не лицензия), особенно если ошибка возникает только в ней.
- Если у вас разогнанная видеокарта, попробуйте привести её параметры частот к штатным величинам.
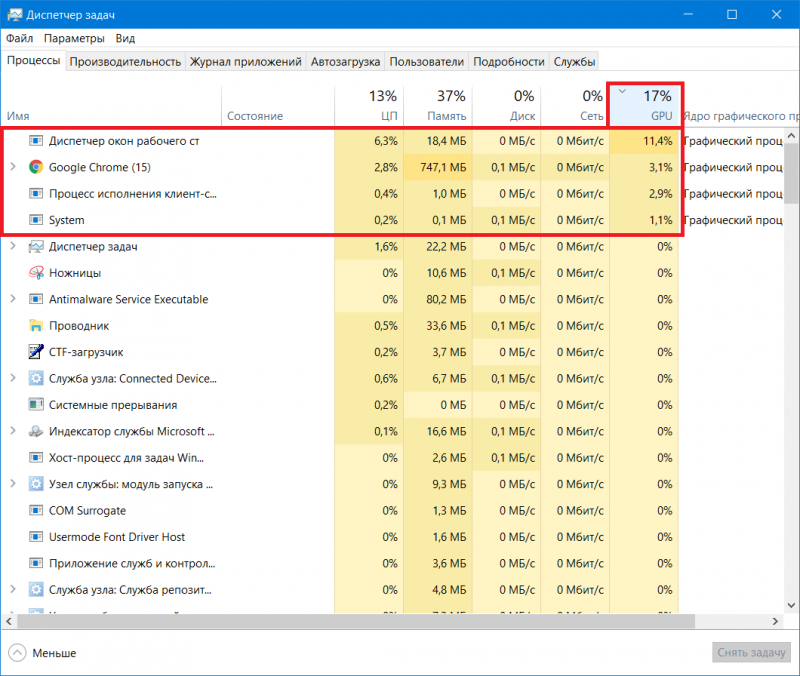
- Загляните в диспетчер задач на вкладку «Производительность» и выделите пункт «Графический процессор». Если он постоянно под нагрузкой, даже при простой работе в Windows 10, это может говорить о наличии вирусов (майнеров) на компьютере, что тоже способно вызывать синий экран VIDEO_TDR_FAILURE. Даже при отсутствии такого симптома, рекомендую выполнить проверку компьютера на наличие вредоносных программ.

- Перегрев видеокарты и разгон также нередко являются причиной ошибки, см. Как узнать температуру видеокарты.
- Если Windows 10 не загружается, а ошибка VIDEO_TDR_FAILURE появляется еще до входа в систему, вы можете попробовать загрузиться с загрузочной флешки с 10-кой, на втором экране внизу слева выбрать пункт «Восстановление системы», а затем использовать точки восстановления. При их отсутствии можно попробовать восстановить реестр вручную.

Представьте себе сценарий: вы работаете или играете за компьютером, как вдруг ваш компьютер падает в BSOD. Синий экран смерти – штука весьма неприятная, особенно, когда работа не сохранена и ее потом надо делать заново. В отдельной статье мы уже рассказывали подробнее о самом явлении синего экрана смерти на Windows 10. В этом же материале уделим внимание одной конкретной ошибке, а именно ошибке VIDEO_TDR_FAILURE.
Заметить эту ошибку можно в подробностях синего экрана смерти, описанных мелким шрифтом. Зачастую там пишет что-то в следующем духе:
При желании вы можете найти в Интернете информацию по этому коду ошибки: VIDEO_TDR_FAILURE.
Если вы задались поиском решения возникшей проблемы, вы в правильном месте. Эта статья расскажет о известных методах, которые помогут исправить ошибку VIDEO_TDR_FAILURE в Windows 10, а также о возможных причинах ее появления.
VIDEO_TDR_FAILURE — что это за ошибка
Зачастую коды ошибок синего экрана смерти содержат в себе информацию, которая без поиска информации в Интернете или обращения к специалисту не расскажет пользователю абсолютно ничего. Все же, если присмотреться внимательнее к сообщению вашего компьютера, можно найти кое-какие зацепки. Проблема в том, что пользователи зачастую не обращают внимание на содержимое синего экрана смерти и сразу спешат перезагрузить ПК. Зря.
VIDEO_TDR_FAILURE – это ошибка, которая в 99% случаев уходит своими корнями в сбой работы видеокарты. Сам префикс “VIDEO” в коде уже указывает на это. Кроме того, зачастую после надписи “VIDEO_TDR_FAILURE” идет указание загадочного файла в скобочках. Это может быть atikmpag.sys, nvlddmkm.sys или igdkmd64.sys. Конкретно указанный файл в конкретно вашем случае будет зависеть от того, какой графический чип используется в компьютере. Ошибка VIDEO_TDR_FAILURE на ПК с видеокартой AMD будет сопровождаться файлом atkmpag.sys, NVIDIA – nvlddmkm.sys, а встроенной графикой Intel – igdkmd64.sys. Все предельно просто.
Синий экран VIDEO_TDR_FAILURE означает в первую очередь сбой работы вашей видеокарты. Аббревиатура TDR расшифровывается как Timeout Detection and Recovery. Простыми словами, видеокарта перестала отвечать на запросы операционной системы. Если зависания случаются слишком много раз под ряд, Windows падает. Хорошая новость в том, что проблема зачастую имеет софтверный характер и вылечить ее можно достаточно просто. В отдельных случаях имеет место быть физическая неполадка с видеокартой. Как и во всех остальных инструкциях, мы начинаем с самых простых методов решения проблемы и постепенно перемещаемся к более сложным.
Как исправить ошибку VIDEO_TDR_FAILURE
Многие ресурсы в первую очередь рекомендуют начать с проверки драйверов видеокарты, что на самом деле является правильным подходом. Часто именно проблема в драйвере является причиной появления ошибки VIDEO_TDR_FAILURE. Все же мы рекомендуем начать поиски источника проблемы в другом месте.
Разгон
Прежде всего, проверьте настройки разгона вашей видеокарты. Если вы не разгоняли свою видеокарту (не совсем актуально для компьютеров со встроенной графикой Intel), пропустите этот шаг.
Каждая видеокарта имеет свой лимит разгона, который уникален для каждого чипа (даже две одинаковые модели могут разгоняться по-разному), поэтому эта процедура весьма щепетильна. Если вы перестараетесь с разгоном частоты ядра видеокарты или частоты памяти, почти со 100% вероятностью видеокарта зависнет, и система упадет. В таком случае вам надо просто откатить настройки разгона до стандартных или снизить добавленную частоту в программе, которую вы использовали для разгона видеокарты. Если вы неудачно разогнали карту и система падает сразу после входа в систему, загрузитесь в безопасный режим, удалите приложение и профили разгона, а затем загрузитесь в обычный режим работы Windows. Если причина была именно в неправильном разгоне, карта вернется до стоковых частот, и вы сможете нормально работать с компьютером.
Если ошибка VIDEO_TDR_FAILURE возникает только при интенсивных нагрузках (к примеру, во время игр), попытайтесь немного снизить их. Понизьте качество графики или разрешение экрана, чтобы видеокарта не работала на 100%.
Драйверы
Если проблема скрывалась не в разгоне, продолжить поиск надо в драйвере вашей видеокарты. Прежде всего попытайтесь установить новую версию драйвера, если такова доступна на сайте производители или в панели управления NVIDIA / Radeon / Intel. Имейте в виду, что обновлять драйвер надо либо с этих приложений, либо с официального сайта. Попытка обновить драйвер через Диспетчере устройств ли приведет к желанному результату.
Допустим, установлен самый свежий драйвер и обновляться уже некуда. В таком случае, попробуйте вспомнить, когда именно впервые появилась ошибка VIDEO_TDR_FAILURE. Возможно, причиной как раз стал новый драйвер, а на старом все работало хорошо. В таком случае вам надо провести откат драйвера.
- Нажмите Win + X и выберите Диспетчер устройств.

- Найдите пункт Видеоадаптеры и разверните его.

- Найдите свою видеокарту и щелкните по ней правой кнопкой мыши. Выберите Свойства.
- На вкладке Драйвер нажмите кнопку Обновить драйвер. Учтите, что эта кнопка может быть недоступна. Откат драйвера доступен только в том случае, если вы хотя бы раз обновляли драйвер оборудования. Если кнопка Обновить драйвер недоступна, вам придется узнать, как удалить драйвер в Windows 10. Удалите текущий драйвер, а затем на сайте производителя скачайте предыдущую версию драйвера. Установите его и понаблюдайте за работой системы.


Относительно драйверов хочется также добавить, что не стоит доверять центру обновлений Windows установку драйверов. Именно поэтому в статье «Как переустановить Windows» мы рекомендуем скачать драйверы еще до начала установки, а затем отключить Интернет и установить все драйверы. Центр обновлений Windows скачивает порой не самые актуальные версии драйверов, из-за чего могут возникать неполадки в работе устройств на новых версиях Windows или в принципе. Владельцам ноутбуков также можно посоветовать обратиться на сайт производителя ноутбука, а не входящей в его состав видеокарты. Возможно, на сайте доступен специальный драйвер, который лучше всего работает с этим компьютером.
Интегрированная видеокарта
Отдельного упоминания стоят также компьютеры с интегрированными в процессор видеокартами (процессоры Intel и APU от AMD). Советы с драйверами для них тоже актуальны, но, поскольку встроенная графика не имеет собственной выделенной памяти и для работы использует оперативную, есть смысл проверить оперативную память на ошибки. Убедитесь, что она работает исправно и без сбоев. Справедливости ради стоит сказать, что, если в оперативной памяти спрятались какие-то проблемы, ошибка VIDEO_TDR_FAILURE будет вашей не единственной головной болью.
Вредители в компьютере
2017-2018 год ознаменовался массовым помешательством на майнинге криптовалют. С этой задачей лучше всего справляются видеокарты. Кто-то добросовестно майнит на собственном оборудовании, а кто-то добывает «эфир» или «биткоины» при помощи вредоносного ПО, которое маскируется в недрах вашей операционной системы и нагружает видеокарту и процессор. Из-за подобных неприятностей может возникать ошибка VIDEO_TDR_FAILURE.
Если вы подозреваете, что причиной, из-за которой возник синий экран смерти VIDEO_TDR_FAILURE, является вирус-майнер, рекомендуем проверить ваш компьютер на наличие какой-нибудь заразы. С этим хорошо справится встроенный в Windows 10 антивирус. Практика показала, что он очень недурно отлавливает вирусы-майнеры, поэтому убедитесь, что антивирус работает и остается в актуальном состоянии (устанавливайте все доступные обновления). Также проведите тщательную проверку компьютера.
Обнаружить вредоносное ПО, которое нагибает вашу видеокарту, можно достаточно просто. Просто последите за нагрузкой на видеоадаптер. Откройте Диспетчер задач и на вкладке Производительность щелкните Графический процессор. Перед этим убедитесь, что в системе не открыты игры, браузер или любые другие приложения, способные нагружать видеокарту.

Если в системе все закрыто, а нагрузка постоянно высокая, значит что-то скрытое активно потребляет ресурсы вашего ПК без соглашения. Перейдите на вкладку Процессы и щелкните на столбец GPU. Диспетчер задач отфильтрует список процессов таким образом, чтобы сначала отображались те задачи, которые больше всего нагружают видеокарту. Исследуйте их и убедитесь, что они не являются вирусами-майнерами.
Если вы сделали все, что только могли, а нагрузка на видеокарту все равно остается большая и появляется ошибка VIDEO_TDR_FAILURE, мы можем порекомендовать вам переустановить систему, выполнив при этом полную очистку содержимого диска. Перед этим лишь убедитесь, что у вас созданы резервные копии нужных файлов.
Совет: чтобы запретить сайтам использовать ресурсы вашего компьютера для майнинга криптовалюты, используйте расширения, способные обнаружить скрытый майнинг. С этим замечательно справляется бесплатное расширение AdGuard, доступное для всех популярных браузеров, включая Microsoft Edge.
Физические неполадки с видеокартой
Самая неприятная часть. Все описанные выше причины возникновения ошибки VIDEO_TDR_FAILURE в теории решаются программно. Если ничего не помогло, пора провести диагностику видеокарты.
Прежде всего, проверьте температуру. Для этого воспользуйтесь любым приложением для замера температуры компонентов компьютера. MSI Afterburner, HWMonitor, AIDA64 – все эти приложения замечательно подойдут. Запустите приложение для мониторинга и следите за ростом температуры видеокарты под нагрузкой. Для замера температуры видеокарты в играх можно использовать встроенный оверлей (если видеокарта AMD Radeon) или сторонние приложения, вроде FPS Monitor / MSI Afterburner / Riva Tuner, которые выводят информацию о состоянии видеокарты (нагрузка, частоты, температура) поверх картинки с игрой. Слишком высокая температура может приводить к появлению ошибки VIDEO_TDR_FAILURE.
Если вы заметили, что карточка греется слишком сильно, пора заглянуть внутрь корпуса компьютера. Убедитесь, что система охлаждения видеокарты работает исправно, а вентилятор и радиатор не слишком забиты пылью. Если видеокарта нуждается в чистке, извлеките ее из слота, почистите (не стоит дуть ртом и плевать в систему охлаждения — воспользуйтесь балончиком со сжатым воздухом или пылесосом в крайнем случае). Также позаботьтесь достаточной вентиляцией корпуса. Если видеокарта старая и вы уже давно не проводили ей диагностику, имеет смыл попробовать заменить термопасту. После установки видеокарты обратно убедитесь, что вы надежно ее зафиксировали в нужном PCIe-слоте. С ноутбуками будет немного тяжелее, но попытка заменить термопасту и почистить систему охлаждения тоже может помочь.
Предупреждение: если у вас нет опыта замены термоинтерфейса, лучше обратитесь к специалисту. Мы не несем ответственности за поврежденные видеокарты неумелыми руками пользователя.
Имейте в виду, что физическая поломка чипа может быть причиной ошибки VIDEO_TDR_FAILURE. Если после всех ваших усилий и попыток не помогает совсем ничего, вам надо обратиться в сервисный центр для диагностики видеокарты. Перед этим можно попытать счастья еще одним способом.
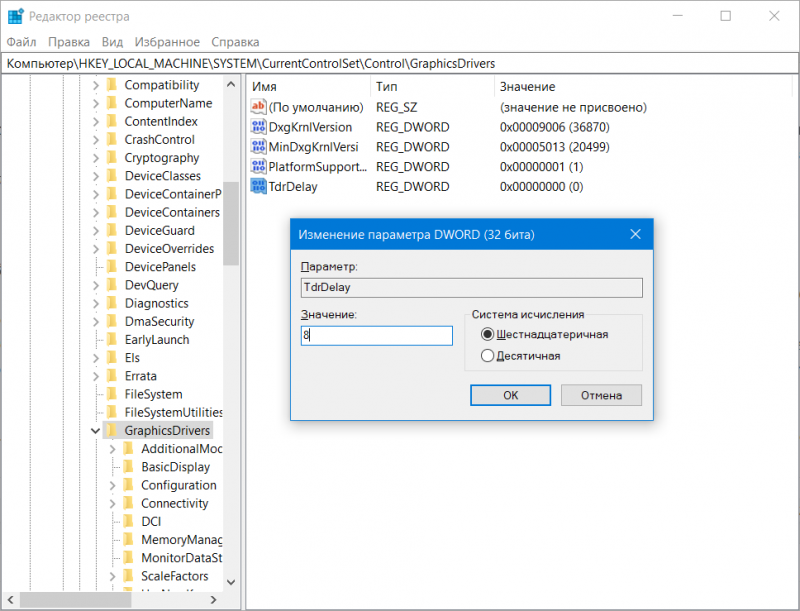
Редактор реестра
Этот способ рекомендует компания Microsoft, но шансы, что он поможет, крайне невелики (ироничн, не правда ли?). Он заключается в том, чтобы увеличить время, по истечению которого система свалится в голубой экран смерти. Ошибка VIDEO_TDR_FAILURE на синем экране смерти возникает только после того, как видеокарта некоторое время не отвечала на запросы системы. Можно увеличить этот тайм-аут. Метод поможет в том случае, если видеокарта еще дышит, но при наличии физических поломок вы все равно будете наблюдать синий экран смерти. Пробуйте этот способ в том случае, если совсем ничего не помогло.
- Нажмите Win + R и введите regedit.
- В адресную строку редактора реестра введите адрес Компьютер\HKEY_LOCAL_MACHINE\SYSTEM\CurrentControlSet\Control\GraphicsDrivers.
- В правой части редактора найдите параметр TdrDelay. Если его там нет, нажмите по пустому полю правую кнопку мыши и выберите Создать – Параметр DWORD (32 бита). Назовите его TdrDelay и установите значение 8. Если параметр уже существует, измените его значение со стандартного на 8.

- Перезапустите компьютер и понаблюдайте за его работой. Учтите, что после этого изменения возможны продолжительные зависания системы в случае, если видеокарта не будет отвечать. Изменение реестра поломку не исправит, но оно даст видеокарте больше времени на то, чтобы «прийти в себя», прежде чем система выкинет белый флаг и принудительно перезагрузится из-под синего экрана смерти.
Если вы смогли исправить ошибку VIDEO_TDR_FAILURE не упомянутыми в этой статье методами, расскажите о них в комментариях. Помощь сообщества приветствуется стоя.
There’s nothing worse than getting ready to play a video game with your friends only to get interrupted by a Blue Screen of Death (BSOD) message that takes over your computer, shuts down everything, and prevents you from doing anything except restart.
BSOD errors vary and they indicate the exact issue that’s causing your computer to shut itself off and prevent hardware corruption and major data loss. The problem is that error codes can be difficult to decipher without technical knowledge.
For example, VIDEO TDR FAILURE is a BSOD stop code that can occur on computers with NVIDIA graphics cards. Your entire screen turns blue, shows the Your PC ran into a problem and needs to restart message, and indicates nvlddmkm.sys as the problematic file. nvlddmkm.sys is a driver, and its full name is NVIDIA Windows Kernel Mode Driver.
Before finding a workaround for the VIDEO TDR FAILURE error, it’s a good idea to create a system restore point. If anything happens and you need to undo all changes, you can easily roll back Windows 10 to a checkpoint and start troubleshooting from ground up.
1. nvlddmkm.sys failed? Start Windows 10 in Safe Mode
If you’re having a hard time using your computer because the system immediately crashes, shows the blue screen and enters a reboot loop, you can start Windows 10 in Safe Mode:
- Turn your PC on and off three times to trigger the Windows 10 troubleshooting mode
- Go to Troubleshoot > Advanced options > Startup Settings
- Click Restart and wait a bit
- Press F5 to enable Safe Mode with Networking
- After Windows boots, check if you still get the nvlddmkm error. If you still do, follow the steps above to reach the Safe Mode options and opt for F4 to enable Safe Mode without networking features
2. Run a clean boot
If Safe Mode turned out to be the key in stabilizing your operating system and preventing it from showing BSOD errors, you can clean-boot Windows 10 to disable the startup and services which may be malfunctioning and causing the VIDEO TDR FAILURE error.
- Follow the steps in Solution 1 to start Windows 10 in Safe Mode
- Click the Start button, search for System Configuration, and launch this app
- In the General tab, choose the Selective startup option
- Disable Load system services and Load startup items
- Click Apply and go to the Startup section
- Click Open Task Manager
- Choose an application with the Enabled status and click Disable. Make this happen for all apps with the Enabled status
- Reboot your PC and inspect results
3. Check for system updates
If you haven’t used Windows Update for a long time, you might have missed on critical updates designed to fix system errors. Since it’s such an important OS component, Windows Update should run in the background and prompt you whenever there’s a pending update. But, if automatic system updates were disabled on your device, they should be manually launched.
- Press the Win key, type Check for updates, and hit Enter
- Click Check for updates and wait
- If Windows finds anything, click Download
- Patiently wait until the new system updates are downloaded and installed
- Restart your computer
4. Disable overclocking software
People use memory overclocking tools to improve their gaming experience. However, if the computer is not accompanied with a cooler that’s powerful enough to sustain the extra heat, Windows will eventually shut itself off and show a blue screen message like VIDEO TDR FAILURE to prevent HDD corruption and data loss.
Unless you know exactly what you’re doing, you should disable any overclocking software tools, such as MSI Afterburner, CPU-Z or GPU-Z, and reset the computer’s clock settings to default. If you configured overclocking in BIOS, check out the next solution on this list.
5. Reset BIOS to default
The computer’s BIOS contains a wide range of customization settings designed to improve your system performance. Unfortunately, this plan could easily backfire if you or someone else with access to your computer has aimlessly changed BIOS settings, such as overclocking and caching.
It could even lead to blue screen errors like nvlddmkm.sys. The easiest way to solve this problem is by resetting BIOS to default.
- Turn on your PC
- Before Windows boot, quickly press the key shown on the screen to access BIOS setup
- Access the advanced BIOS section
- Find and enable the option that resets BIOS configuration data to default
- Save the current settings and exit
6. Update BIOS
If you haven’t updated BIOS for a long time or have never done this, you should get on it right away. You just need a USB flash drive and an Internet connection.
- Connect a USB flash drive to your PC
- Boot your system and press the key shown on the screen to enter BIOS setup
- In the main BIOS section, you can find out the BIOS manufacturer, version, and date of installation
- Using this information, start Windows on the malfunctioning PC or use another computer with Internet access, open a web browser, and visit the BIOS manufacturer’s website
- Locate and download the latest BIOS version that’s compatible with your operating system
- Unzip the downloaded file to the USB flash drive
- Return to the BIOS menu, create a backup of the current BIOS version for safekeeping, and save the backup to the USB flash drive
- Run the system firmware update and make sure to not shut down or restart the PC during this time
7. Restore the nvlddmkm.sys file
NVIDIA has a backup of the nvlddmkm.sys file somewhere on your computer, so all you have to do is find it, copy it, and overwrite the corrupt nvlddmkm.sys file.
- Open Windows Explorer by pressing Win key + E
- In the address bar, type
%SystemRoot%\System32\Drivers - Locate the nvlddmkm.sys file and rename it to nvlddmkm.sys.old
- In the Windows Explorer navigation pane, click This PC
- Click inside the Search This PC field and search for nvlddmkm.sy_
- Copy the nvlddmkm.sy_ file
- Press Win key + R, type cmd, and press Enter to open Command Prompt
- Run
chdir desktop - Then, run
expand -r nvlddmkm.sy_ nvlddmkm.sys - Exit Command Prompt
- Go to your desktop and copy the nvlddmkm.sys file
- Return to
%SystemRoot%\System32\Driversand paste the file - Restart your computer and check for BSOD errors
8. Clear system cookies and temp files
Windows saves cookies and temporary files, which should get deleted regularly to clear the system cache and make room for new data. If it doesn’t happen, this could lead to system stability issues and Blue Screen of Death errors like VIDEO TDR FAILURE.
To fix this problem, you just have to clear the system cookies and temporary files using specialized tools like CCleaner. Or, if you don’t want to install any third-party applications, you can turn to the built-in Disk Cleanup utility.
How to use Disk Cleanup:
- Click the Start button, search for Disk Cleanup, and open this app
- Pick the drive where Windows is installed (usually C:) and click OK
- Select the following files to delete:
- Downloaded Program Files
- Temporary Internet files
- Temporary files
- Click OK and Delete Files to confirm
9. Reinstall the graphics adapter
Your graphics display might not have been properly installed on your computer. However, you can easily fix this from Device Manager.
- Right-click the Start button and select Device Manager
- Expand the Display adapters category
- Right-click your display adapter and select Uninstall device
- Restart your PC. Windows will automatically install the missing adapters
10. Update the GPU drivers
Outdated graphics drivers could cause video card issues, gaming problems, and even blue screen errors like nvlddmkm.sys. But you can update the obsolete GPU driver with minimum effort.
- Open Device Manager, right-click your display adapter, and select Update driver
- Click Search automatically for drivers
- If you get the The best drivers for your device are already installed message, click Search for updated drivers on Windows Update. However, if you have already checked your system for updates, there’s no need to do it again
- Restart your computer if the driver was successfully updated
Unfortunately, Windows often fails to find newer drivers in its database or by using the Windows Update component. In that case, you can double-click the GPU adapter in Device Manager, switch to the Driver tab, and find out the driver manufacturer, version, and date of installation. Using this information, visit the website’s manufacturer to download and install the latest driver.
However, if you find this process difficult or don’t want to risk downloading an unsupported driver, you can turn to a driver updater that automatically detects all obsolete drivers on your PC and offers to install the latest versions right away. And you won’t risk getting incompatible drivers either.
11. Roll back unsupported GPU drivers
Speaking of incompatible GPU drivers, many PC users download them from unknown sources without actually knowing whether or not they work on their computers.
If you’re one of these users, you should immediately roll back the unsupported display driver to restore the stability of your computer, eliminate recurring system crashes, and proceed with a correct driver update.
- Go to Device Manager and double-click the GPU adapter
- Switch to the Driver section
- Click Roll Back Driver and follow the on-screen instructions. If the button’s greyed out, it means that no previous driver version is saved on your PC, so you can skip this entire solution
12. Run the Hardware and Devices troubleshooter
Windows 10 has internal troubleshooters for fixing common problems happening to various PC components, including hardware and devices. Normally, you should be able to locate it in Troubleshoot settings. However, if the Hardware and Devices troubleshooter is missing from that section, here’s how you can run it right away:
- Press the Win key + R and run
msdt.exe -id DeviceDiagnostic - Click Next and wait until the troubleshooter scans your PC
- If it finds any workarounds, click Apply this fix
- Reboot your PC when it finishes and check for BSOD errors
13. Disable hardware acceleration
Numerous software applications use hardware acceleration to improve your experience, whether we’re talking about gaming, web browsing, streaming, or something else. If you noticed that your computer shows the BSOD error after launching a particular application, inspect the program’s settings and look for a hardware acceleration option to turn it off. Here are some suggestions.
How to disable hardware acceleration in Google Chrome:
- In Chrome, open the More menu and go to Settings
- Select Advanced > System (or go to
chrome://settings/system) - Disable Use hardware acceleration when available
- Restart Chrome
How to disable hardware acceleration in Mozilla Firefox:
- In Firefox, open the ≡ menu and go to Options (or visit
about:preferences) - In General, locate the Performance section
- Disable Use recommended performance settings
- Also disable Use hardware acceleration when available
- Restart Firefox
How to disable hardware acceleration in Microsoft Edge:
- In Edge, open the More menu and select Settings
- Go to System (or visit
edge://settings/system) - Disable Use hardware acceleration when available
- Restart Edge
14. Analyze the crash dumps
If you’re the type of user who doesn’t shy away from the computer’s technical aspects, you can analyze the crash dumps left behind by the VIDEO TDR FAILURE error, in order to find out the exact driver that’s giving you trouble. Event Viewer is a great assistant for this role.
How to use Event Viewer:
- Restart your PC after a system crash
- Immediately press the Win key, search for Event Viewer, and open this app
- In the navigation pane on the left side, go to Windows Logs > System
- Select the first entry that says Error
- Inspect the information from the General and Details tab
You can use this data to perform a Google search or get in touch with the Microsoft support team. However, if you find Event Viewer to be intimidating, we suggest using BlueScreenView instead. It has the same role but it’s wrapped in a simpler interface and has more intuitive options for analyzing minidump files.
15. Use Display Driver Uninstaller
Display Driver Uninstaller (DDU) is an awesome application that can reset your GPU software and drivers. If display driver nvlddmkm stopped responding on your Windows 10 PC, you can use DDU to safely troubleshoot the BSOD error.
- Make sure to create a system restore point if you haven’t so far
- Download Display Driver Uninstaller from the official website
- Unzip the downloaded archive and open the DDU file
- Start Windows 10 in Safe Mode with Networking (see Solution 1 from this list)
- Open Display Driver Uninstaller.exe
- When prompted with the configuration window, leave everything as is and click OK to continue
- Select GPU and NVIDIA from the two menus on the right side
- Then, click Clean and restart
16. Remove and reseat the GPU card
It’s possible that your graphics card needs to be reattached to your computer unit. If it’s not properly connected, this could trigger Blue Screen of Death errors like the VIDEO TDR FAILURE stop code.
Shut down your desktop, unplug all cables, remove the computer chassis, and carefully detach the GPU card. Then, put it back in the same slot firmly but without using force. Turn on your computer and see if anything changed.
17. Try the GPU card on another computer
If your graphics card is malfunctioning and needs to be replaced, then all your efforts at attempting to resolve the blue screen problem at the software level will have been in vain.
A simple way to test this is by removing the GPU card from your computer and inserting it into another PC, preferably with a clean Windows installation. If the system starts glitching, it should be pretty clear that you need to replace your hardware. Check out the best GPU cards for gaming.
18. Check system memory
System memory issues can affect the entire computer, leading to blue screen errors like nvlddmkm.sys. You can easily run a check-up by turning to Windows Memory Diagnostic, a tool that comes bundled with Windows 10.
How to use Windows Memory Diagnostic:
- Save your current work and close all programs
- Press Win key + R, type
mdsched.exe, and hit the Enter key - Click Restart now and check for problems
Your operating system will reboot and start running memory tests. It runs a standard test by default. However, if you have a bit of time on your hands, we suggest switching to the Extended test in order to obtain more accurate information about any potential RAM issues.
Press F1 to open the options section, select Extended, and press F10 to apply this setting. The entire memory test can take a long time, so you can leave your PC unattended since your intervention will not be required. Once the test is complete, Windows 10 boots as usual and shows the test results in the notifications center.
19. Use Startup Repair
If Windows 10 is experiencing boot problems, this can lead to all sorts of computer issues, including BSOD errors with the VIDEO TDR FAILURE stop code. But you can fix startup issues by running the Startup Repair tool from the Advanced Startup menu. Before doing so, you need an empty USB flash drive and Internet access to set up a system installation disk.
How to create a Windows 10 installation media disk:
- Plug a USB flash drive into the PC and make sure to save any important files saved there since the drive will be formatted
- Download Media Creation Tool from the official website
- Open Media Creation Tool and follow the steps to create a Windows 10 installation media disk on the USB flash drive
How to run Startup Repair:
- Make sure the USB flash drive with the Windows 10 installation media is plugged into the PC
- Click the Start button and open the menu with the power options
- While holding down the Shift key, click Restart to boot Windows 10 to the troubleshoot menu
- Go to Troubleshoot > Advanced options > Startup Repair
- Select your administrator account and enter your password to continue
- Follow the given instructions to complete the startup repair sequence
20. Fix HDD issues
Your hard drive may have corrupt files or bad sectors which prevent Windows from operating normally, But you can fix HDD issues without having to use a third-party software application, thanks to CHKDSK (Check Disk).
- Press Win key + R, type CMD, and press Ctrl + Shift + Enter to open Command Prompt with administrator rights
- If your OS is installed on the C: drive, run
chkdsk c: /f /r. Else, replacec:with the correct partition letter- If you don’t know Windows’ whereabouts, choose a drive letter when entering the run command (e.g.
run d:) and view its containing folders (run dir). Keep listing folders for multiple drive letters until you see the Windows directory
- If you don’t know Windows’ whereabouts, choose a drive letter when entering the run command (e.g.
- When asked to confirm scheduling CHKDSK during the next system reboot, type y and press Enter
- Restart your computer and wait for CHKDSK to do its job
21. Repair corrupt system files
Not only hard disk problems but also damaged, modified, or missing OS files can cause blue screen errors on your computer. To restore system files on Windows 10, you can run DISM (Deployment Image Servicing and Management) and SFC (System File Checker).
- Start Windows 10 in Safe Mode with Networking (see Solution 1)
- Click the Start button, type cmd, and open Command Prompt
- Run
DISM.exe /Online /Cleanup-image /RestoreHealth. However, if the Windows Update component is broken, this command won’t work. Instead, you can create a Windows 10 installation media disk (see Solution 19) and set it as the repair source:DISM.exe /Online /Cleanup-Image /RestoreHealth /Source:C:\RepairSource\Windows(replaceC:\RepairSource\Windowswith the full path to your Windows 10 installation media disk) - After DISM does its job, run SFC (
sfc /scannow). If SFC is successful, it shows the Windows Resource Protection did not find any integrity violations message
22. Disable Fast Startup
Fast Startup is a Windows component that boots your operating system faster by pre-loading drivers. Unfortunately, it’s known to cause serious PC problems. If drivers are not properly shut down and restarted, it could trigger blue screen errors like nvlddmkm.sys.
To solve this problem, you can disable Fast Startup:
- Press the Win key, search for Control Panel, and open this app
- Double-click Power Options
- Click Choose what the power buttons do
- Click Change settings that are currently unavailable (admin rights are required)
- Disable Turn on fast startup and click Save changes
- Restart your computer
23. Disable the PCI Express power option
Many users reported that turning off the PCI Express power option helped fix the VIDEO TDR FAILURE error on their computer. Here’s what you need to do:
- Click the Start button, type edit power plan, and press Enter
- Click Change advanced power settings
- Expand the PCI Express group
- Set Link State Power Management to Off
- Click Apply
- Restart your computer
24. Run a malware scan
Malware infections can be severe enough to corrupt critical system files and prevent you from running system tools like Task Manager or Command Prompt. If you suspect that your computer was recently infected with a virus, you should run a scan to eliminate any threats and regain the control of your PC.
How to run a malware scan with Windows Defender:
- Press the Windows key, type Windows Security, and launch this tool
- Select Virus & threat protection
- Click Scan options
- Choose Quick scan and press Scan now
- If the computer search reveals nothing, select Windows Defender Offline scan and click Scan now
- Allow Windows Defender to remove or quarantine any threats. If you think it has wrongfully detected safe files as malware, make sure to add them to the whitelist in order to exclude the items from future scans
25. Fix the system registry
Missing, modified, corrupt, or incorrect registry settings can be devastating for your operating system and can even trigger blue screen errors like nvlddmkm.sys. But you can restore the original registry configuration from Command Prompt before system boot.
- Click the Start button and open the power menu
- Hold down the Shift key and click Restart to reboot Windows in Advanced Startup mode
- Select Troubleshoot > Advanced options > Command Prompt
- Pick your admin account and enter your password
- Run these commands (press Enter after each line):
-
cd %SystemRoot%System32\config
-
ren %SystemRoot%System32\config\DEFAULT DEFAULT.old
-
ren %SystemRoot%System32\config\SAM SAM.old
-
ren %SystemRoot%System32\config\SECURITY SECURITY.old
-
ren %SystemRoot%System32\config\SOFTWARE SOFTWARE.old
-
ren %SystemRoot%System32\config\SYSTEM SYSTEM.old
-
copy %SystemRoot%System32\config\RegBack\DEFAULT %SystemRoot%System32\config\
-
copy %SystemRoot%System32\config\RegBack\DEFAULT %SystemRoot%System32\config\
-
copy %SystemRoot%System32\config\RegBack\SAM %SystemRoot%System32\config\
-
copy %SystemRoot%System32\config\RegBack\SECURITY %SystemRoot%System32\config\
-
copy %SystemRoot%System32\config\RegBack\SYSTEM %SystemRoot%System32\config\
-
copy %SystemRoot%System32\config\RegBack\SOFTWARE %SystemRoot%System32\config\
-
- Start Windows as usual
26. Unplug external devices
If you have recently attached new hardware components into your desktop or laptop, such as a webcam, a USB flash drive, a microphone, headphones, or a wireless network adapter, it’s possible that the device is experiencing compatibility issues with your Windows 10 PC, triggering the VIDEO TDR FAILURE stop code as a result.
You can easily test this by unplugging all external devices from your PC, except for your keyboard and mouse, in order to inspect results. If the keyboard and mouse are also brand new, try replacing them if you have others.
27. Use System Restore
System Restore allows you to revert Windows 10 to a checkpoint that was recorded before you started experiencing blue screen errors. However, it means that System Restore must be enabled on your computer and at least one restore point must have been created prior to the BSOD event.
Even if you didn’t manually set up a restore point, it’s possible that some of your applications did, such as driver updaters, so it doesn’t hurt to at least check.
How to use System Restore:
- Sign in to Windows 10 using an administrator account
- Press the Win key, type Control Panel, and launch this app
- Go to Recovery
- Click Open System Restore
- Select a restore point or click Show more restore points to evaluate more options. You can also click Scan for affected programs to find out which applications you will have to reinstall after restore
- Click Next and follow the instructions. Your PC will reboot
28. Reset Windows 10
If everything failed up until this point, you should prepare Windows 10 for factory reset in order to uninstall all programs and restore system settings to default. The good news is that your personal files will be left untouched.
But make sure to write down all applications you will have to install, save program preferences, and get hold of serial keys required for reactivation. Then, proceed to the following steps:
- Right-click the Start button and go to Settings
- Select Update & Security
- Choose Recovery and click Get started
- Click Keep my files and follow the remaining instructions
Stop code VIDEO TDR FAILURE (nvlddmkm.sys) can be fixed on Windows 10
To recap, VIDEO TDR FAILURE is a BSOD error that indicates a problem with your video settings. If it’s accompanied by the nvlddmkm.sys file, it means that you can troubleshoot the file errors to get rid of system crashes.
To fix this problem, you can start Windows 10 in Safe Mode, run a clean system boot, check for system updates, disable overclocking software, reset and update BIOS, restore the nvlddmkm.sys file, clear system cookies and temp files, reinstall the graphics adapter, as well as update or roll back GPU drivers.
It’s also a good idea to run the Hardware and Devices troubleshooter, disable hardware acceleration, analyze crash dumps, use Display Driver Uninstaller, remove and reseat the GPU card, try the GPU card on another computer, check system memory, use Startup Repair, or fix HDD issues and corrupt system files.
In addition, you can disable Fast Startup and the PCI Express power option, run a computer malware scan, fix the system registry, unplug external devices, and use System Restore to roll back Windows 10 to a previous checkpoint. If all these solutions fail, you can go to the last resort, which means resetting Windows 10 to factory settings.
How did you manage to fix the nvlddmkm.sys file and VIDEO TDR FAILURE stop code? Tell us all about it in the comments section below.

What does the Video_TDR_Failure BSOD mean? How to fix it?
“I am getting a video TDR failure error in a laptop. The laptop constantly keeps restarting. How do I fix it? ”
How to fix stop code video TDR failure? With top-notch videos and games available everywhere on the internet, staying amused has never been simpler than it is right now. But for these activities, powerful graphics cards must be used extensively. While these graphic cards typically work without a hitch, occasionally, they can develop problems owing to outdated drivers, leading to one of those annoying blue screen video tdr failure issues that can take hours to fix.
The BSOD can occur for various causes, but what’s most worrisome is that when it does, other strange problems may appear in other programmes. For example, one of the many problems customers encounter after a BSOD is the Video TDR Failure error. It happens whenever someone tries to play a video file, play a game, or perform any other action on the computer that requires video output. How to fix TDR video failure? The good news is that, as was covered in this essay, numerous alternatives are available for correcting such problems.
- Part 1: What Is Video TDR Failure Error
- Part 2: What Causes Video TDR Failure in Windows 10/11
- Part 3: How to Fix the Stop Code Video TDR Failure in Windows
- Way 1: Quickly Repair Blue Screen via 4DDiG Windows Boot Genius HOT
- Way 2: Use System Files Utility Checker
- Way 3: Change Graphics Settings for Intel HD Graphics
- Way 4: Run a Startup Repair
- Way 5: Reinstall the Drivers by Launching the PC in Safe Mode
- Way 6: Update Your Display Cards
- Way 7: Reinstall an Older Version of Drivers
- Part 4: FAQ
Part 1: What Is Video TDR Failure Error
The «Video TDR Failure» issue, «Timeout Detection and Recovery Failure,» appears on Windows operating systems. It suggests that the graphics card or its drivers are malfunctioning. The system causes this error and restarts the machine when it notices that the graphics card has stopped responding within a predetermined time. An outdated or faulty graphics card, overheating, hardware problems, or obsolete or flawed graphics drivers are common causes.
Part 2: What Causes Video TDR Failure in Windows 10/11
Why does video TDR failure while installing Windows? The video TDR failure typically happens when you attempt to play a video file, but your computer crashes instead of playing it. The following are some of the most frequent causes of stop code video TDR failure:
- Faulty or outdated graphics card drivers.
- Issues with the graphics card’s technical aspects.
- Running many programmes at once.
- Corrupt system files.
- Components of computers are becoming too hot.
- Heating of the system.
- Incompatible or Overclocking component.
No matter what causes video TDR failure error, you can diagnose and fix it using the solutions provided in this article.
Part 3: How to Fix the Stop Code Video TDR Failure in Windows
Your machine may restart repeatedly if video tdr failure nvlddmkm.sys occurs. It may stop you from accessing your data, and debugging may be time-consuming if your computer is stuck in the boot loop. As a result, you need to work on the problem immediately. Here are the top 6 solutions to the problem.
Way 1: Quickly Repair Blue Screen via 4DDiG Windows Boot Genius HOT
Getting a blue screen video TDR failure on your Windows computer might be annoying and bothersome. However, you can easily fix the problem and get your system back up and running properly with the help of 4DDiG Windows Boot Genius. This software offers a thorough approach to identifying and resolving various Windows faults, including blue screen failures like the Video TDR Failure.
The programme is intended to identify and fix various system problems, such as driver issues, corrupted files, and startup errors. 4DDiG Windows Boot Genius can successfully address the underlying causes of blue screen failures and restore system stability thanks to its sophisticated diagnostic and repair skills.
- Auto repair Windows issues like Blue/Black screen, system crash in minutes.
- Boot up any computers that won’t start properly.
- Recover data from even unbootable hard disks.
- Reset Windows local and domain password.
- Easily backup/restore/manage partitions.
-
Run the program and insert prepared CD/DVD disk into the CD-ROM drive or connect USB flash drive into a USB port on computer. Then click «Create boot disk now» to start burning repair disk.
-
Choose the operating system you wish to repair, followed by selecting the drive you use to create the bootable media. Afterward, click on «Next» to initiate the download of the repair environment ISO.
-
Now, wait for Boot Genius to download repair environment ISO and make sure the network is well connected. After the boot disk is created successfully, turn to your blue screen of death computer to start booting.
Way 2: Use System Files Utility Checker
How to solve video TDR failure windows 10? Your computer’s corrupted system files could cause the issue you are experiencing. The crucial system files more frequently get corrupted (typically after an upgrade) or replaced by the wrong files.
Utilising the included «System Files Utility Checker» is a simple way to determine whether your system contains any corrupted system files. The system file checker that comes pre-installed with Windows systems will check for all necessary system files and will automatically replace any that are damaged with healthy ones.
Here’s how to check for and repair damaged system files using the Windows system file checker.
- Press «Windows+X» to open the Administrator Command Prompt.
- Press enter after typing «sfc /scannow».
- Once you click this, your computer will run a system-wide scan to identify and replace all damaged files. Be patient since it can take a while to finish this process.
-
Restart your PC and see if the stop code video TDR failure returns.
Way 3: Change Graphics Settings for Intel HD Graphics
You can experiment with resolving VIDEO TDR FAILURE on Windows 10 by altering the graphics settings for Intel HD graphics if you are using Intel Graphics.
The Intel Driver Update Utility must first be downloaded and installed from the company’s official website. Once launched, you may use it to check for updates to the graphics driver. If there is, update it using the instructions.
After that, you can modify the Intel HD graphics settings as follows:
- To access graphics properties, right-click the Windows desktop and choose it.
- From the control panel, choose 3D.
- Under the Optimal Application section, click Enable.
- Under Anti-Aliasing, choose Use Application settings.
- Deactivate Conservative Morphological Anti-Aliasing.
- Go to general settings and select Balance mode.
Go back to the Graphics Control panel and carry out the following actions:
- The Video settings option.
- Choose Application Settings from the list of Standard Colour Correction options.
- Under the Input range, click the Application Settings link.
- To save your profile, click Apply.
Way 4: Run a Startup Repair
If you keep getting the problem, it was probably brought on by a startup programme that wasn’t loading fully. The best action in this situation is to carry out a startup repair. Although it might sound complicated, starting repair is a simple procedure.
How to solve video TDR failure windows 10? To do startup repair on your Windows 10/11 PC, adhere to the following procedures.
- Choose «Update & Security» from the «Settings» menu. Choose «Recovery» from the left side panel. Click «Restart Now» on the Advanced Startup tab.
- Select «Troubleshoot» and press «Advanced Options» while you are in the «Advanced Startup» window.
- Enter the account password and then select «Startup Repair».
-
Your system will automatically discover and fix all corrupt startup programmes as soon as this starts the startup repair process. You won’t experience the video TDR failure on your machine.
Way 5: Reinstall the Drivers by Launching the PC in Safe Mode
You might need to replace the display drivers if updating them doesn’t work by starting your PC safely. A built-in troubleshooting function called «safe mode» enables you to start your computer with the bare minimum of hardware needs, enabling you to analyse and resolve any issues that arise during a normal startup.
Follow these steps to restart your computer safely and install the display drivers again.
- When the «Run» window appears, press «Windows+R» to open it, then type «msconfig» to access System Configuration.
- Check the «Safe Boot» box under the «Boot» tab and then press «OK.» Your computer will automatically start in «Safe Mode» when you restart it. Press «Windows+X» to launch Device Manager.
- «Uninstall» can be chosen by right-clicking the Driver. Your current Driver will be deleted as a result.
- Go to the manufacturer’s website now to get the Driver that best suits your system settings.
-
You won’t have the same problem again if you restart your computer in normal mode.
Way 6: Update Your Display Cards
One of the most frequent causes of the stop code video_tdr_failure on a Windows system is outdated display drivers. So make sure to update your display card drivers before doing anything else.
To update the display drivers on your computer, follow these steps.
- Select «Device Manager» by pressing «Windows+X».
- Click the arrow next to «display adapters» to expand the option.
- «Update Driver» can be chosen by right-clicking on the specific Driver.
- The best drivers will be found by your system, which will also automatically install them.
-
Restart your computer after the Driver has been updated and installed to see if the problem still exists.
Way 7: Reinstall an Older Version of Drivers
The latest driver version could potentially bring on the stop mode video tdr failure nvlddmkm sys so that you can restore the old Driver and roll back the upgrades. The easy steps are: Right-click the specialised Driver in Device Manager, then select Update.
- Choosing «Browse my computer for drivers.»
- «Let me choose from a list of Available Drivers on My Computer» should be clicked.
- Click Next after choosing the older driver file.
Part 4: FAQ
Q1: Is Video TDR Failure Bad?
Video TDR Failure is regarded as a major problem. It suggests an issue with the graphics card or its drivers, which might cause instability and system failures. Quick troubleshooting is advised to address the underlying causes and avoid further system harm.
Q2: Why Do I Get Video TDR Failure Every Time?
Witnessing Video TDR Numerous difficulties, including out-of-date graphics card drivers, hardware problems, excessive background processes, or overheating, might contribute to persistent failure. The persistent problem can be resolved by locating the precise cause and performing the necessary actions, such as updating drivers and optimising system resources.
Conclusion
How to fix stop code video TDR failure? Outdated graphics card drivers, a machine that is too hot, or improper power settings can all cause video TDR failure. Even though there are manual workarounds you can try, if they don’t work, 4DDiG Windows Boot Genius can successfully address the root causes of blue screen difficulties and restore system stability. By selecting 4DDiG Windows Boot Genius, you obtain a dependable tool that can successfully address the issue and assist you in returning your PC to peak performance.

Running into a Blue Screen error can be more frightening than frustrating. That’s because it leaves you clueless about what needs to be done. For instance, the Video_TDR_Failure blue screen error is faced by many Windows users while watching a video or playing a game.
If that’s you, worry not; by the end of this post, you will be able to fix the issue. But first, let’s know the possible reasons for the “Windows stop code video TDR failure” error.
What Causes Video_TDR_Failure?
Multiple reasons can trigger the video TDR failure stop code. The most common ones are listed below:
- Issues with your graphics card (For example, the Intel(R) UHD Graphics).
- Outdated or corrupted graphics driver.
- Multiple apps are running in the background.
- System overheating.
- Overclocked PC components. This could be one of the many signs you need a PC upgrade.
- Corrupt system files.
Best Ways To Resolve Stop Code Video_TDR_Failure On Windows?
1. Tweak Power Management Settings
Sometimes, inappropriate power management settings can cause problems, such as Video_TDR_Failure, when playing games. Here are the steps to tweak your power management settings –
- Open Control Panel by typing Control in your Windows search bar and clicking on Open from the right-hand side.
- Head to Hardware and Sound and click on Power Options from the right.

- Click on Change plan settings.
- Click on Change advanced power settings.
- In the Power Options window, expand PCI Express.

- Turn Link State Power Management off.
- Click on Apply.
- Restart your computer.


After your computer boots up, check whether this is the video TDR failure error solution.
2. Update Graphics Drivers
Outdated graphics drivers are often the culprit behind the issue at hand. You can either update your graphics driver manually or opt for a safer and more convenient option – employ a driver updater tool like Advanced Driver Updater, which has all the qualities you’d expect from a driver updater software.
- Download, install and run Advanced Driver Updater.
- Click on the Start Scan Now button.

- Locate your outdated graphics card driver and click on the checkbox on the left of the driver’s name.
- Click on the Update Driver option on the right.


How Else Can Advanced Driver Updater Help Me Fix Video_TDR_Failure Error On Windows?
Advanced Driver Updater can also help you –
- Take a backup of drivers before you update them.

- You can restore a previous backup version in case something goes wrong.
- Additionally, you can schedule driver scans at your desired time and even exclude drivers from the scan.


3. Run SFC Scan
As mentioned, corrupted system files can also lead to the video_TDR_failure error on your PC. To fix corrupted system files, run an SFC scan. Here are the steps to do that –
- Type cmd in the Windows search bar and click on Run as administrator from the right-hand side.
- When the Command Prompt opens, type sfc /scannow and press Enter.

- Let the scan complete.

Check if the issue persists.
4. Rename Atikmpad.Sys
If you dive deeper into this screen BSOD error, you’ll find the line – What failed: atikmpag.sys. In this case, you can try renaming this file and running a small command in the Administrative Command Prompt, as shown in the steps below –
- Open This PC.
- In the address bar, navigate to C:\windows\drivers\
- Locate the file atikmpag.sys and rename it to atikmpag.sys.old.
- Reinstall the driver or replace it with another one on your computer.
- Open Administrative Command Prompt using the steps mentioned above.
- Type chdir desktop or expand -r atikmdag.sy_ atikmdag.sys.
5. Disable Intel HD Graphics Driver
You can disable the Intel HD Graphics driver and see if that fixes the issue. To do that, follow the below-mentioned steps –
- Open the Run dialog box as shown above.
- Type devmgmt.msc and press Enter.
- Expand Display Adapters.
- Right-click on the Intel HD Graphics driver and click on Disable device.


6. Run CHKDSK
Check disk is a system utility in Windows that can help scan your hard drive for file system issues. So, if one of your drives has already been giving you problems, this command can help testify and fix that –
- Open Administrative Command Prompt using the steps mentioned above.
- When the Command Prompt opens, type the following command –
chkdsk/ f /r C: and press Enter.
Please note: Here, the letter “C” denotes the letter of the problematic drive. So, in case the drive “D” is creating issues, the command will be chkdsk/ f /r D:
- Press Y and press Enter again.
7. Perform a Startup Repair
Likely, a startup program isn’t loading correctly, hence, you are facing the abovementioned issue. A Startup Repair might help you out –
- Open Settings.
- Click on Update & Security.
- From the left, click on Recovery.
- Under Advanced startup, click on Restart now.

- Under Troubleshoot, click on Advanced options.
- Click on Startup Repair.


After this, your computer will begin identifying and fixing all corrupt startup programs.
Stop Code Video TDR Failure – Fixed
We hope you can fix the Windows blue screen error “Video_TDR_Failure.” If yes, which of the above solutions worked out for you? Do let us know in the comments section. For any troubleshooting-related content, keep reading Systweak Blogs.
Next Read :
Solved – Driver Power State Failure Error in Windows 10 and 11