
Listening ports are ports that are currently in use by the computer. Ports are used to establish network connections between computers. Although the process of opening, listening, and closing network ports is seamless, identifying currently open or listening ports can help troubleshoot network-related problems.
Two major commands in Windows are used to check for open ports:
- Netstat (Command Prompt)
- Get-NetTCPConnection (PowerShell)
These commands can be a lifesaver for IT Pros and Sysadmins. This article describes how you can check for open and listening ports with Command Prompt and PowerShell.
Types of listening ports
Before moving forward, it’s important to understand a few concepts about ports.
Open or listening ports are the ports that are being used by an application or program on your computer to establish a connection with another computer on the network.
There are two types of port connections in a Windows computer:
- Transmission Control Protocol (TCP)
- User Datagram Protocol (UDP)
Different applications on a computer open different ports, some TCP and some UDP. UDP is less secure, but faster. TCP is slower but more secure.
Find listening ports with Netstat (CMD)
To check for open and listening ports, open Command Prompt as an administrator, and run the Netstat command as follows:
netstat -aOr
netstat -aon-a switch displays all active connections including TCP and UDP connections which the computer is listening to.
-o switch displays the process ID (PID) for each process.
-n switch displays IP addresses and port numbers in numerical form.
 Ports With NetStat And PowerShell 1")
The output of this command shows the following items:
- Protocol (TCP or UDP)
- Local address (Your computer)
- Foreign address (Remote computer)
- State (Listening, Established, Time_Wait, Close_Wait)
- PID (Process ID of the process that has opened the port)
Under Local Address, the number after the colon (:) is the port number. If you only want to show the listening ports, you can run the following command:
netstat -aon | findstr /i listeningThis command lists the ports in the listening state.
 Ports With NetStat And PowerShell 2")
When you see “0.0.0.0:0” in the foreign address field, this means that this port is used in broadcasting. This can help in troubleshooting different network issues.
You can use the following switches with the Netstat command:
| Switch | Description |
|---|---|
| -a | Display all connections including TCP and UDP. |
| -n | Display addresses and port numbers in numerical form. |
| -o | Display process ID (PID) |
| -p | Show connections for a specific protocol. |
| -r | Show kernel routing table. |
| -s | Display stats by protocol. |
| -t | Display currently active connections. |
| -f | Resolves the IP addresses to fully qualified domain names (FQDN) |
| -e | Display network stats including errors, number of bytes, packets sent and received, etc. |
| interval | Time in seconds after which the command will run again automatically. |
Find listening ports with PowerShell
Get-NetTCPConnection cmdlet is the PowerShell equivalent of the Netstat command. It shows similar information to Netstat. You can find the following information using the Get-NetTCPConnection cmdlet:
- Local address
- Local port
- Remote Address
- Remote Port
- State
If you want to filter information, you can use the Where-Object filter which is similar to “findstr“.
Get-NetTCPConnection | Where-Object {$_.State -eq 'Listen'} Ports With NetStat And PowerShell 3")
Alternatively, you can also filter the connection list by state using the -State parameter:
Get-NetTCPConnection -State ListenThis will show all the ports that are in the “listening” state.
Similarly, you can also apply the filter with a port number. Here is an example:
Get-NetTCPConnection -LocalPort 22You can run the following command for detailed information about each connection. Note that this generates a long list of information on every port.
Get-NetTCPConnection | Select-Object -Property * Ports With NetStat And PowerShell 4")
The main difference between Netstat and Get-NetTCPConnection is that Get-NetTCPConnection can be invoked remotely using the Invoke-Command cmdlet.
PowerShell also gives another command if you want to find open or listening ports on operating systems other than Windows, like Linux. GetNetStat is a cross-platform module that can be run on multiple computers where PowerShell is installed.
Once you have identified the open and listening ports, you can use this guide to close listening ports or block or allow websites, ports, and IP addresses with Windows Firewall. You can also find and close the app that has opened the relevant port.
This guide is for checking listening ports on a local computer only. You can follow this guide to check if the remote network port is open.
Connections between applications work much like conversations between humans. The conversation is started by someone speaking. If no one is listening, then the conversation doesn’t get far. How do you know who’s listening on a Windows PC? The Netstat command-line utility and the PowerShell Get-NetTCPConnection cmdlet.
Not a reader? Watch this related video tutorial!
Not seeing the video? Make sure your ad blocker is disabled.
In this tutorial, you will learn how to inspect listening ports and established TCP connections on your Windows computer with Netstat and the native PowerShell command Get-NetTCPConnection.
Prerequisites
If you’d like to follow along with examples in this tutorial, be sure you have:
- A Windows PC. Any version will do. This tutorial is using Windows 10 Build 21343.1
- PowerShell. Both Windows PowerShell and PowerShell 6+ should work. This tutorial us using PowerShell v7.2.0-preview.2
Using Netstat to Find Active and Listening Ports
Netstat is one of those command-line utilities that seems like it’s been around forever. It’s been a reliable command-line utility to inspect local network connections for a long time. Let’s check out how to use it to find listening and established network connections.
Netstat has many different parameters. This tutorial will only use three of them. To learn more about what netstat can do, run
netstat /?.
Assuming you’re on a Windows PC:
1. Open up an elevated command prompt (cmd.exe).
2. Run netstat -a to find all of the listening and established connections on the PC. By default, netstat only returns listening ports. Using the -a parameter tells netstat to return listening and established connections.
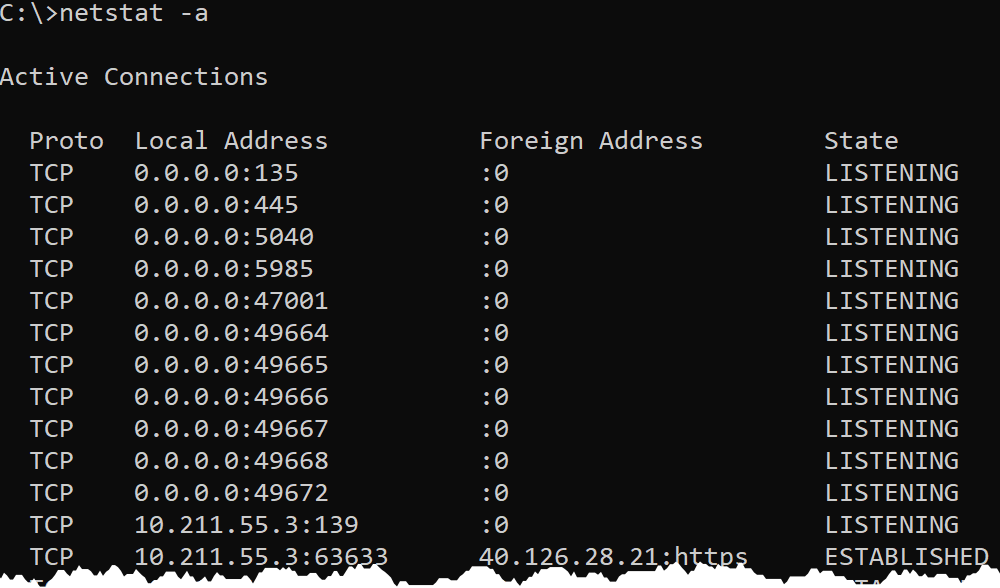
The output above is broken out into four columns:
Proto– shows either UDP or TCP to indicate the type of protocol used.Local Address– shows the local IP address and port that is listening. For many services, this will be 0.0.0.0 for the IP part, meaning it is listening on all network interfaces. In some cases, a service will only listen on a single Network Interface (NIC). In that case, netstat will show the IP address of the NIC. A colon separates the IP address from the port that it is listening on.Foreign Address– shows the remote IP address the local connection is communicating with. If theForeign Addressis0.0.0.0:0, the connection is listening for all IPs and all ports. For established connections, the IP of the client machine will be shown.State– shows the state the port is in, usually this will beLISTENINGorESTABLISHED.
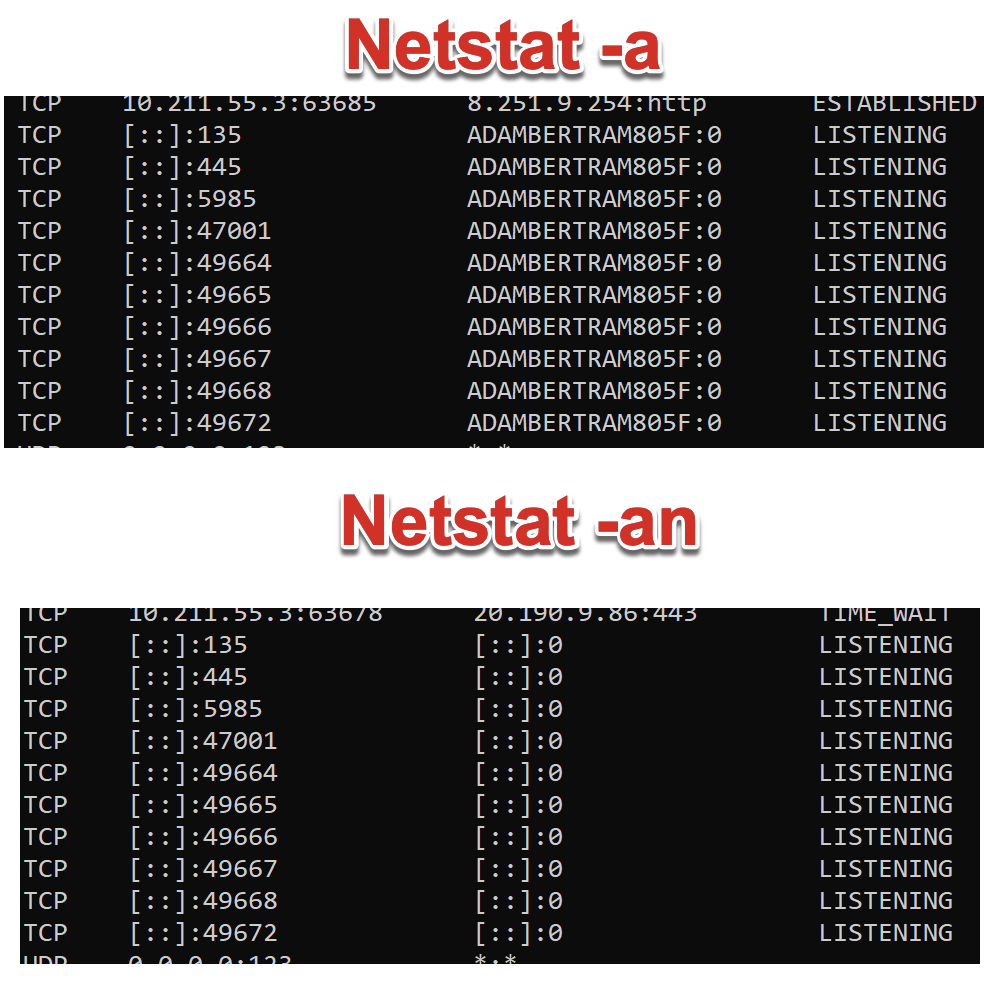
3. Now run netstat -an. You should now see that any names in the output have been turned into IP addresses. By default, netstat attempts to resolve many IP addresses to names.
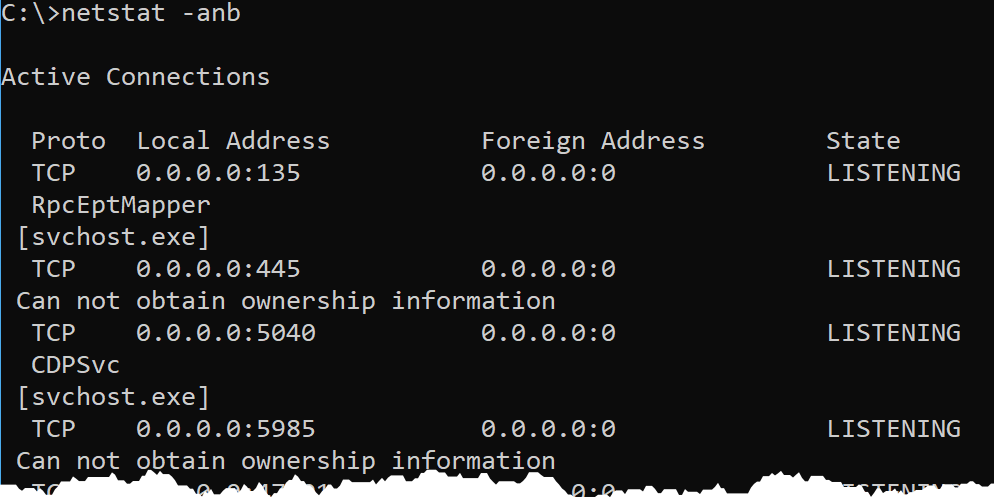
4. Finally, perhaps you’d like to know the Windows processes that are listening or have these connections open. To find that, use the -b switch.
Using the
-bswitch requires an elevated command prompt or PowerShell prompt. You will get the errorThe requested operation requires elevationif you use the-bswitch in a non-elevated prompt.
Using PowerShell to Find Active and Listening Ports
Now that you’ve got a chance to see how the old-school netstat utility shows active and listening ports, let’s see how to do it in PowerShell.
Using PowerShell gives you a lot more control to see just what you want, rather than having to scroll through long lists of output. The Get-NetTCPConnection cmdlet is much more specific than netstat about what you want to see.
This tutorial isn’t going to cover all of the parameters that come with the
Get-NetTCPConnectioncmdlet. If you’re curious, runGet-Help Get-NetTCPConnection -Detailedto discover more examples.
On your Windows PC:
1. Open up a PowerShell console as administrator.
The only reason you need to elevate a PowerShell console is to see the program that owns the connection (like the netstat
-bparameter).
2. Run Get-NetTcpConnection. You’ll see output similar to what netstat provided. Instead of just a big string of output, Get-NetTcpConnection returns a list of PowerShell objects.
You can now see the same general information that netstat provided you by now; by default, you have information on the OwningProcess (the -b switch on netstat) and the AppliedSetting field, which relates to the network profile the connection is a part of.
Unlike netstat, the
Get-NetTCPConnectioncmdlet will now show listening UDP connections.

3. Pipe the output to Select-Object showing all properties. You’ll see PowerShell returns a lot more information that netstat did.
Get-NetTCPConnection | Select-Object -Property *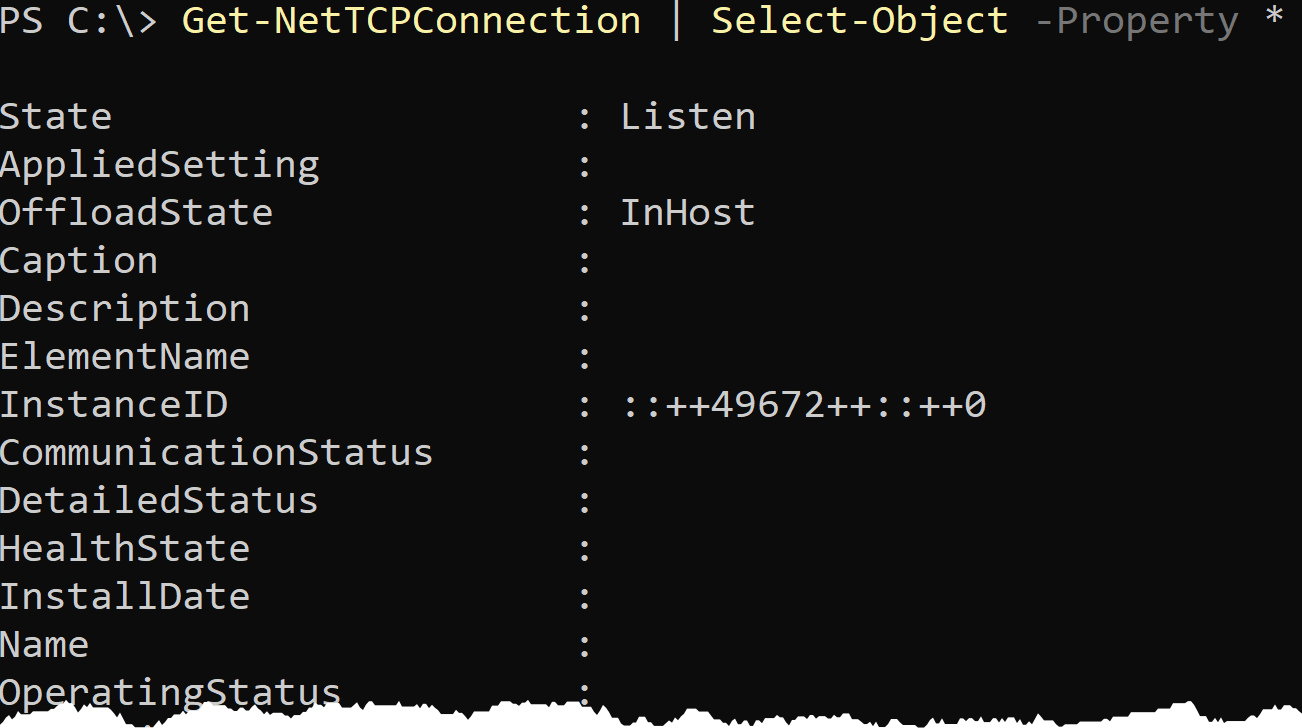
4. Now, narrow down the output to just listening ports.
Get-NetTCPConnection -State Listen
5. Now, find the process names for the OwningProcess fields. To do that, run the Get-Process cmdlet and provide the process ID as shown below.

If you’d like to create another property for the process name, you could optionally use a Select-Object calculated field.
Get-NetTCPConnection | Select-Object -Property *,@{'Name' = 'ProcessName';'Expression'={(Get-Process -Id $_.OwningProcess).Name}}6. Narrow down the states to a bit more by finding Listening and Established states by defining the State parameter value as a comma-delimited list.
Get-NetTCPConnection -State Listen,Established7. Finally, limit the connections down by the port the connection is connected to with the RemotePort parameter.
Use the
LocalPortparameter to filter connections by local port.Get-NetTCPConnection -RemotePort 443
Get-NetTCPConnection -RemotePort 443
Conclusion
You have now seen how the Netstat utility and the Get-NetTCPConnection PowerShell cmdlet help you find local network connections.
Now that you can show the processes running on a server combine this with the Test-NetConnection PowerShell cmdlet to get an end-to-end view of connectivity between a client and server.
Checking open TCP/IP ports on your Windows computer is crucial for managing network security and ensuring smooth connectivity. Certain apps and processes in Windows may face issues due to closed or misconfigured ports, often caused by firewalls or private IP addresses. This guide will walk you through step-by-step methods to check whether a TCP port is open or closed using built-in tools and third-party utilities.
Why You Should Check TCP/IP Ports?
Here are some common scenarios where checking ports is necessary:
- Troubleshooting connectivity issues for applications or services.
- Configuring firewalls to ensure necessary connections are allowed.
- Detecting suspicious activity that might indicate a security breach.
Methods to Check Open TCP/IP Ports
There are several ways to check open TCP/IP ports in Windows. Here are a few options:
Method 1. Using Telnet Client
Step 1: Check whether the telnet client feature is ON or not. In order to check, open the Turn Windows feature on or off settings from the search bar. OR press the ‘window’ key and type ‘windows’ features. Then press on “Turn Windows features on or off”.
-660.png)
Windows Features Option
A new prompt will be opened. Search for “Telnet Client” and check the box in front of ‘telnet Client’.

Windows Features
Step 2: Open the command prompt. Press the ‘windows’ key and type ‘cmd’. Press “Command Prompt”.
-660.png)
Command Prompt Option
Step 3: On the command prompt, type the command “telnet + IP address or hostname + port number” and check the status of the provided TCP port.
-660.png)
Telnet Command
Step 4: If only the blinking cursor is visible, then the port is open.
-660.png)
Port is Open
Step 5: If you get the message “connection failed” then the port is closed.
-660.png)
Port is close
Method 2: Using built-in netstat command-line utility:
Step 1: Open the command prompt.
Step 2: Run the following command:
netstat -an

Method 3. Using TcpView
Another option is to use the TcpView utility from Microsoft’s Sysinternals suite of tools. This utility provides a more user-friendly interface for viewing active TCP/IP connections, along with additional information such as the process ID and process name for each connection. Steps to be followed:
Step 1: Download the TcpView utility from the Microsoft Sysinternals website. You can find the download link on the TcpView page of the Sysinternals website.
-660.png)
Download Page
Step 2: Extract the downloaded file and run the TcpView.exe file to launch the TcpView utility. This will open the TcpView window, which shows a list of all active TCP/IP connections on your machine.

Extracted FIles
Step 3: Open the tcpview.exe (application).
By default, TcpView will display the following columns in the list of connections:
Protocol: Shows the protocol being used for the connection (TCP or UDP)
Local Address: Shows the local address and port being used for the connection
Remote Address: Shows the remote address and port being connected to
State: Shows the current state of the connection (e.g. Established, Listen, etc.)
You can use the “Local Address” and “Remote Address” columns to see which ports are being used by which applications. For example, if you see a connection with a local address of “127.0.0.1:80”, this means that the local application is using port 80 for outgoing connections.
Method 4. Using Windows PowerShell
You can also use Windows PowerShell to check open TCP/IP ports. To do this, use the Get-NetTCPConnection cmdlet, which allows you to view a list of active TCP/IP connections and the local and remote addresses and ports being used. For example, you can run the following command to view a list of all active TCP/IP connections:
Get-NetTCPConnection |
Select-Object LocalAddress,
LocalPort, RemoteAddress, RemotePort

Get-NetTCPConnection cmdlet
Method 5. Using Nmap
To install Nmap in the Windows command line, follow these steps:
Step 1: Download the latest version of Nmap from the Nmap website. You can find the download link on the Nmap download page:
https://nmap.org/download.html
Step 2: Extract the downloaded file to a location on your computer. This will create a new folder containing the Nmap files.
Step 3: Open a command prompt and navigate to the directory where you extracted the Nmap files. For example, if you extracted the files to the C:\nmap directory, you would run the following command:
cd C:\nmap
Step 4: Once you are in the Nmap directory, you can install Nmap by running the nmap.exe file. To do this, run the following command:
nmap.exe -V
This will display the version number of Nmap, indicating that it has been installed successfully.
Step 5: To use nmap to scan for open TCP/IP ports, run the “nmap -sT” command, followed by the IP address or hostname of the machine you want to scan.
nmap -sT localhost

This will scan the specified host or IP address and display the results. You can also use the -h option to view a list of available options and arguments for the nmap command. Overall, installing Nmap in the Windows command line is a straightforward process. You can download the latest version of Nmap from the Nmap website, extract the files, and then run the nmap.exe file to install it. Once it is installed, you can use the nmap command to scan hosts and IP addresses and view the results.
Common Issues That Close Ports
- Applications not functioning as expected.
- Misconfigured firewall rules blocking connections.
- IP addresses improperly set as private.
Troubleshooting Common Issues
Here are some common issues that may occur during opening TCP/IP Ports in Windows:
- Telnet Not Listed in Features: Ensure your system version supports Telnet or enable it via PowerShell.
- Firewall Blocking Ports: Temporarily disable the firewall to test port connectivity.
- Command Not Recognized: Verify tool installation and environment variables.
Conclusion
Checking open TCP/IP ports on your Windows computer is an important step for maintaining your system’s security and efficiency. By regularly monitoring these ports, you can identify any unwanted or suspicious connections that might put your computer at risk. Windows provides several simple tools, like Command Prompt and PowerShell, which make it easy to see which ports are open and what applications are using them. Taking the time to check your open ports helps ensure that your computer runs smoothly and stays protected from potential threats. Staying proactive about monitoring your network connections is a key part of keeping your digital environment safe and reliable.
При запуске новых сервисов в Windows, вы можете обнаружить что нужный порт уже занят (слушается) другой программой (процессом). Разберемся, как определить какая программ прослушивает определенный TCP или UDP порт в Windows.
Например, вы не можете запустить сайт IIS на стандартном 80 порту в Windows, т.к. этот порт сейчас занят (при запуске нескольких сайтов в IIS вы можете запускать их на одном или на разных портах). Как найти службу или процесс, который занял этот порт и завершить его?
Чтобы вывести полный список TCP и UDP портов, которые прослушиваются вашим компьютером, выполните команду:
netstat -aon| find "LIST"
Или вы можете сразу указать искомый номер порта:
netstat -aon | findstr ":80" | findstr "LISTENING"
Используемые параметры команды netstat:
- a – показывать сетевые подключения и открытые порты
- o – выводить идентфикатор професса (PID) для каждого подключения
- n – показывать адреса и номера портов в числовом форматер
По выводу данной команды вы можете определить, что 80 порт TCP прослушивается (статус
LISTENING
) процессом с PID 16124.

Вы можете определить исполняемый exe файл процесса с этим PID с помощью Task Manager или с помощью команды:
tasklist /FI "PID eq 16124"
Можно заменить все указанные выше команды одной:
for /f "tokens=5" %a in ('netstat -aon ^| findstr :80') do tasklist /FI "PID eq %a"
С помощью однострочной PowerShell команды можно сразу получить имя процесса, который прослушивает:
- TCP порт:
Get-Process -Id (Get-NetTCPConnection -LocalPort 80).OwningProcess - UDP порт:
Get-Process -Id (Get-NetUDPEndpoint -LocalPort 53).OwningProcess

Можно сразу завершить этот процесс, отправив результаты через pipe в командлет Stop-Process:
Get-Process -Id (Get-NetTCPConnection -LocalPort 80).OwningProcess| Stop-Process
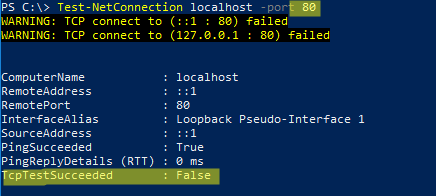
Проверьте, что порт 80 теперь свободен:
Test-NetConnection localhost -port 80
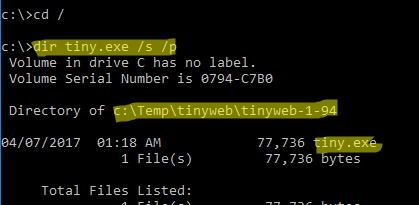
Чтобы быстрой найти путь к исполняемому файлу процесса в Windows, используйте команды:
cd /
dir tiny.exe /s /p
Или можно для поиска файла использовать встроенную команду where :
where /R C:\ tiny
В нашем случае мы нашли, что исполняемый файл
tiny.exe
(легкий HTTP сервер), который слушает 80 порт, находится в каталоге c:\Temp\tinyweb\tinyweb-1-94
December 28, 2020 updated by
Leave a reply »
Is there a way to determine which application is listening on a certain port? How do I see if a particular port is in use on a windows PC? In this tutorial we’ll show you how to find out which process is listening on a given port in Windows 10, by using Command Prompt or PowerShell.
Part 1: Find the ID of the Process Using a Given Port
To get started, open the elevated Command Prompt and run the following command:
netstat -aon
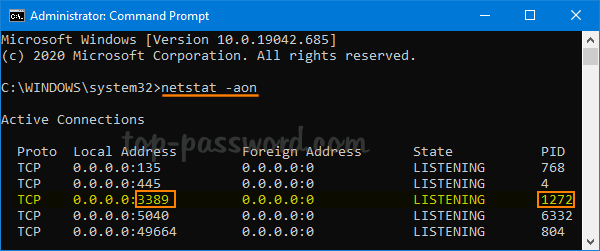
It will display a list of TCP and UDP ports currently listening on your computer. In our case, the TCP port 3389 is used by a process whose process ID (PID) is 1272.
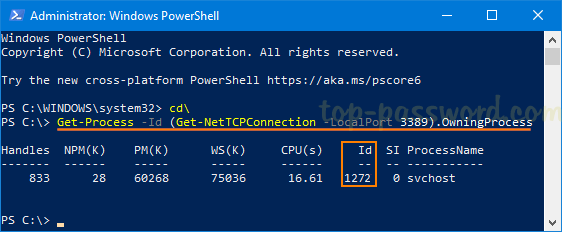
You can also use PowerShell to find out which process is listening on the TCP port 3389. Just enter this command:
Get-Process -Id (Get-NetTCPConnection -LocalPort Your_Port_Number).OwningProcess
For UDP port, use this command instead:
Get-Process -Id (Get-NetUDPEndpoint -LocalPort Your_Port_Number).OwningProcess
Part 2: Get Process Name by its ID
In order to find the process name by its process ID, open Task Manager and go to the Processes tab. Sort the list of process by clicking the column header that is labeled “PID“. In our case, the process associated with the PID 1272 is Remote Desktop Services.
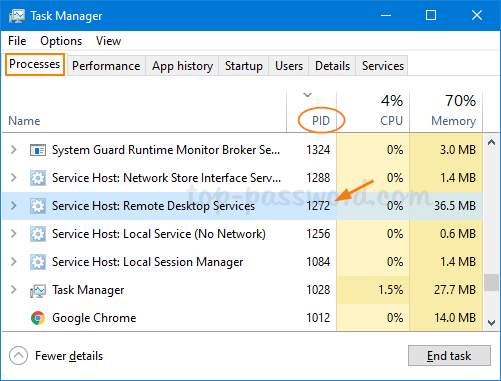
If you do not see a PID column, right-click the header of any column and select the PID option.
Conclusion
That’s how you can find out which process is listening on a given port in Windows 10, by using Command Prompt or PowerShell. If you would rather use a third-party software to check ports in use, TCPView should be your good choice.
- Previous Post: 3 Ways to Disable Aero Shake in Windows 10
- Next Post: How to Close a TCP / UDP Port Using Windows Firewall