
Sometimes, you may need to extract a list of all the user accounts on a Windows computer. What if you want to see all the hidden user accounts that exist alongside your user account? Can you use graphical tools in Windows to learn all that? Can you list all users with Windows’ CMD? Moreover, which Windows PowerShell CLI command can be used to list the users within local groups on a given computer? These are all answers you might need, so to help you out, here are seven methods you can use to see all the users in Windows:
NOTE: This guide covers Windows 11 and Windows 10. Most instructions are the same in both operating systems, so I’m mainly using screenshots from Windows 11. When things differ, you’ll find separate sections for Windows 11 and Windows 10.
1. How to list all users in Windows’ CMD (or PowerShell)
This method works both in the Command Prompt and PowerShell. Open the command-line app that you prefer, and run this command:
net user
After you press Enter on your keyboard, the net user command lists the users that have accounts configured on a Windows PC, including hidden ones or disabled user accounts. The user accounts are listed by their internal names that Windows uses behind the scenes, not by their full display name, seen when you sign in to Windows.
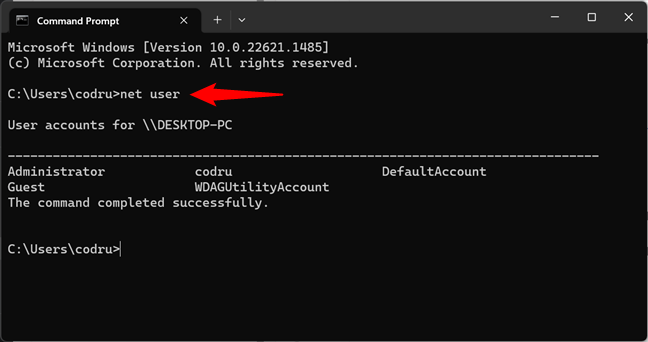
Run net user to make Windows CMD show users
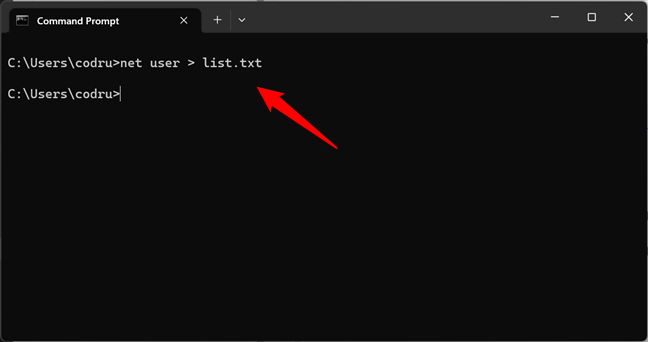
You can also ask the net user command to store the list of users in a text file that opens in Notepad or any other text editor. To do that, specify the file name after the command, like this:
net user > filename.txt
Then, a file with the name you provided is created under “C:\Users\Your User Name.”
Save the net list of users to a file using net user
If you want to export the CMD list of users to a text file that’s saved in a location you choose, run the net user command like this:
net user > «path\filename.txt»
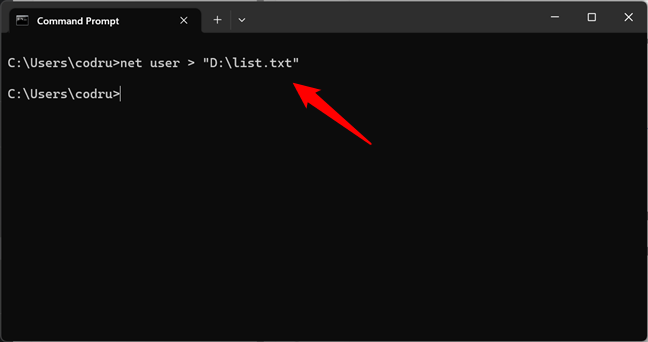
Export the CMD list of users to a file at a specified location
A neat trick is using this command to find information about a specific user account. You can do it using the command like this:
net user username
Once you press Enter, Windows displays helpful information about that user account, like the date its password was last set, when it expires (if it’s set to expire), and the groups it’s a part of.
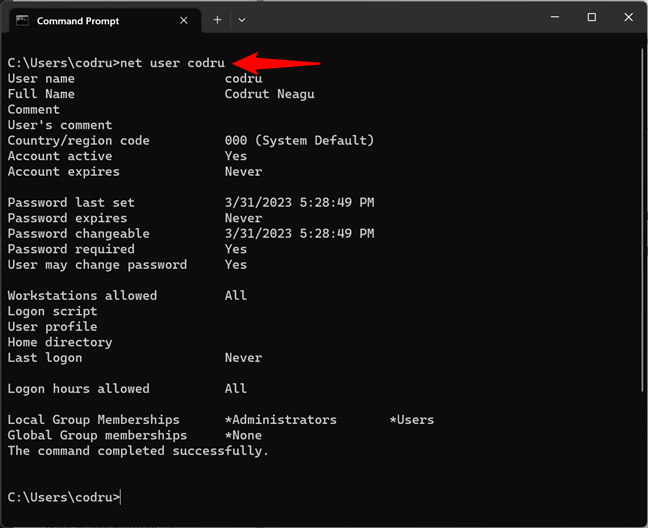
Getting details about a user account in CMD, using the net user command
If you want to know more about this command and all its parameters, access this documentation page: Net user command.
2. How to use PowerShell to get all users on a computer
PowerShell offers an alternative way of finding all the users on your computer. If this is your favorite CLI (command-line interface), you might prefer using the next commands:
2.1. Which Windows PowerShell CLI command can be used to list the users on a given computer?
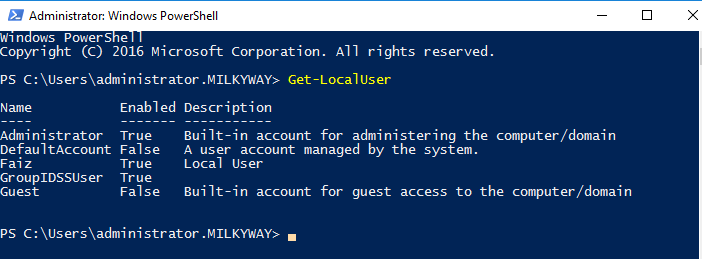
While you can also use the net user command in PowerShell, the best command to view all users in Windows 11 and Windows 10 in this CLI is:
get-localuser
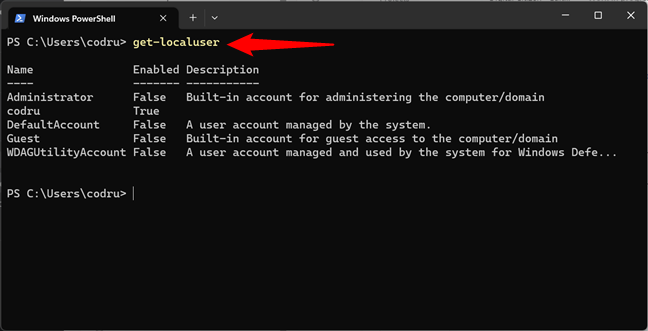
Using PowerShell to get all users on a computer
Another alternative is to use this command:
Get-WmiObject Win32_UserAccount -filter «LocalAccount=True» | Select-Object Name,FullName,Disabled
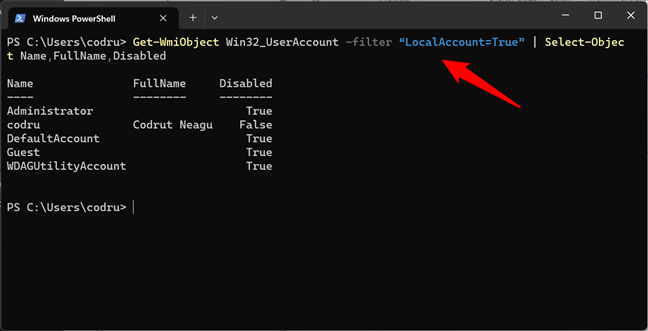
An alternative way to list all users in PowerShell
However, if you have many user accounts configured on your computer, this command is slower than the get-localuser one.
2.2. Which Windows PowerShell CLI command can be used to list the users within local groups on a given computer?
In addition to the get-localuser command, PowerShell also offers another command that I think you might find useful: Get-LocalGroupMember. This command allows you to list all the users from a local group on your PC. For instance, if you’d like to see what other users are administrators on your Windows computer, you can run the command like this:
Get-LocalGroupMember -Group «Administrators»
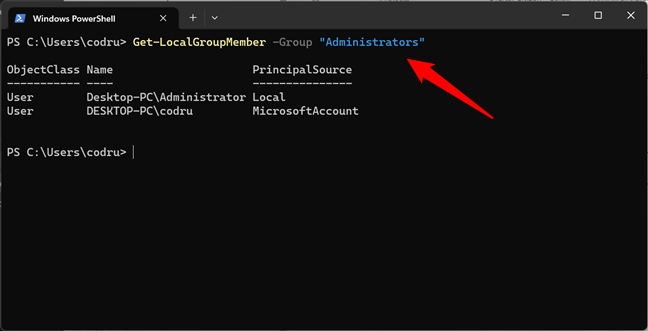
List local group members in PowerShell
Replace the Administrators group in my example with any other group to list its users. And by the way, if you need to see the local user groups configured on your PC, you can run this command:
Get-LocalGroup
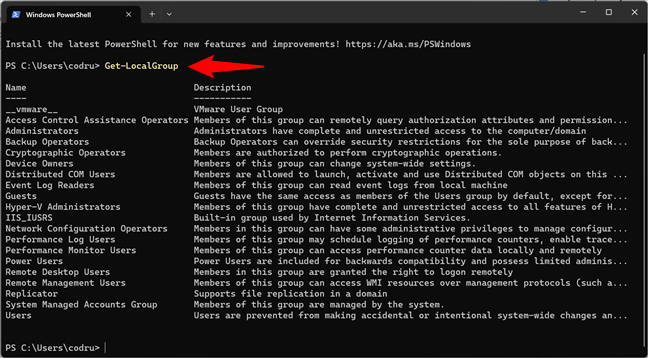
Command to see local groups
Now that we’ve seen the PowerShell CLI commands for listing users let’s move on to the easier methods. And by easier, I mean graphical. 🙂
3. How to see the list of all user accounts in Computer Management
A click-or-tap method that displays all user accounts, including hidden users or disabled ones, involves using Computer Management. Open Computer Management, and go to Local Users and Groups > Users. On the right side, you get to see all the user accounts, their names as used by Windows behind the scenes, their full names (or their display names), and, in some cases, a description as well.
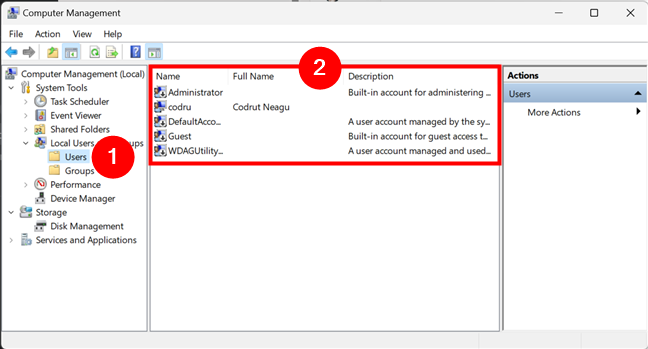
Windows list of users displayed in Computer Management
Double-click or double-tap on a user account to learn more about its properties and settings, including the user groups that it is part of.
4. How to see the list of active user accounts in Windows 11’s Settings
If all you want is to find out who are the active users of your Windows 11 PC, you don’t actually need to use the command-line or advanced snap-ins like Computer Management. You can simply see them in the Settings app. Press Win + I on the keyboard to launch it, select Accounts on the left sidebar and click or tap Other users on the right side of the app.
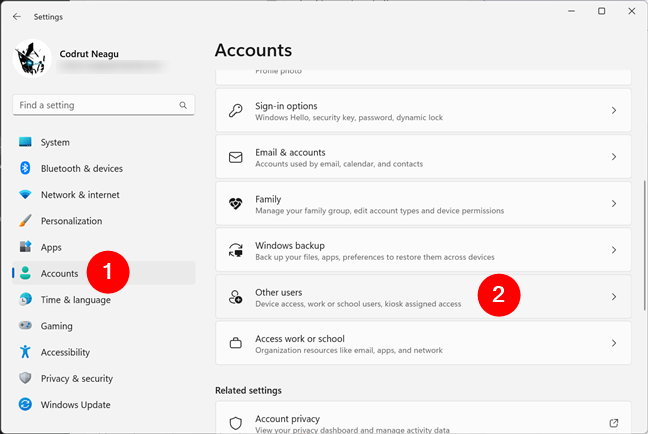
Head to Other users in Settings’ Accounts section
Then, you can see the list of users with access to your Windows 11 computer beside you.
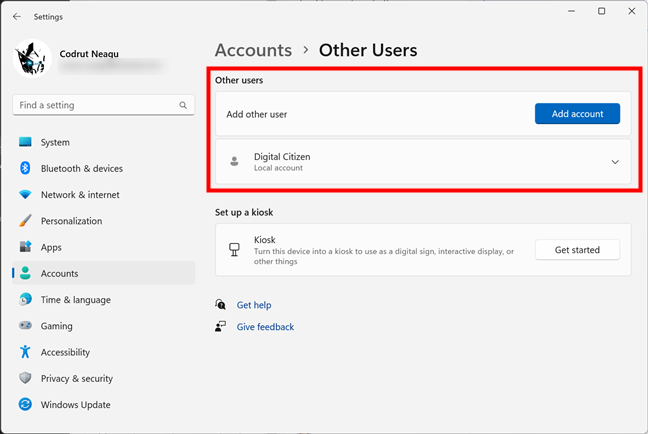
See the list of active users in Windows 11
The drawback of this method is that it doesn’t tell you anything about hidden or disabled user accounts.
5. How to see the list of active user accounts in Windows 10’s Settings
Windows 10 also lets you find the active user accounts on your computer without having to run commands or use the advanced Computer Management application. You can simply use Settings for that. Open the Settings app (a quick way is to click on its Start Menu button), and head to Accounts.
Go to Accounts in Windows 10’s Settings
Select Family & other users on the left sidebar and check the list of active users on your PC on the right. You’ll find all of them listed under Other users.
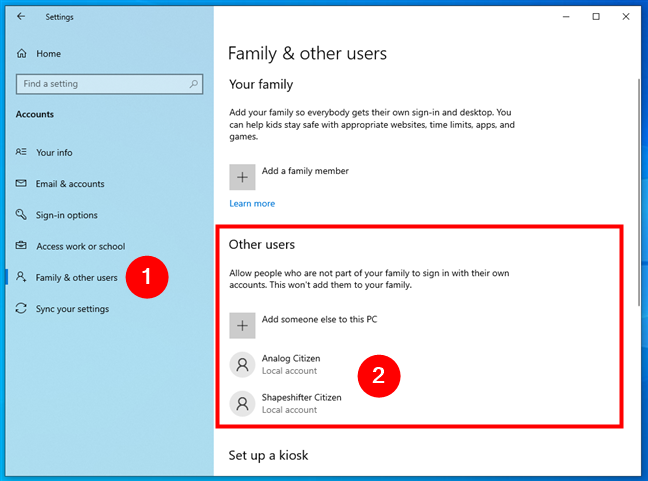
See the list of active users in Windows 10
The disadvantage of using this method is that it doesn’t show you hidden or disabled user accounts.
6. How to see the list of active user accounts using the Control Panel
An old-fashioned method that you can use to get the list of active user accounts involves opening the Control Panel. After launching it, go to User Accounts.
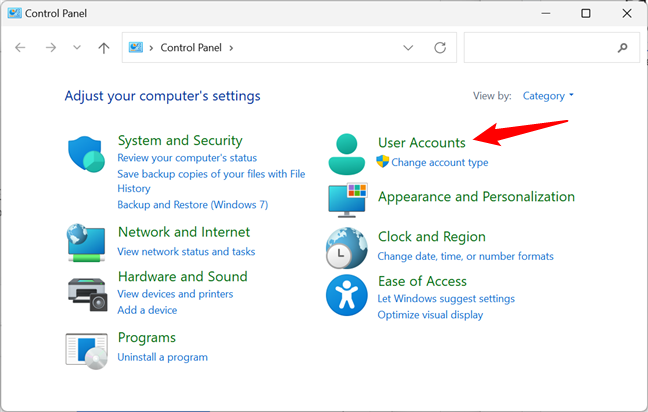
The User Accounts entry from the Control Panel
Then, click or tap on User Accounts.
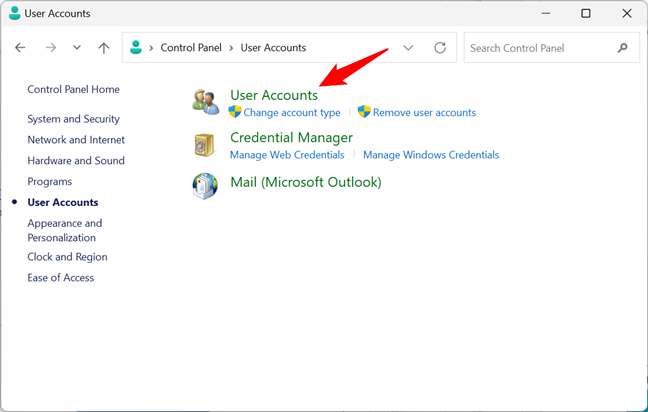
Opening the User Accounts settings
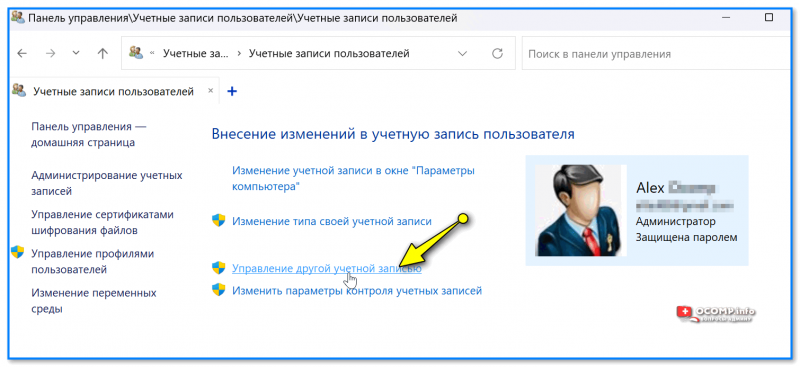
You now see your user account, information about it, and several links. Click or tap the “Manage another account” link.
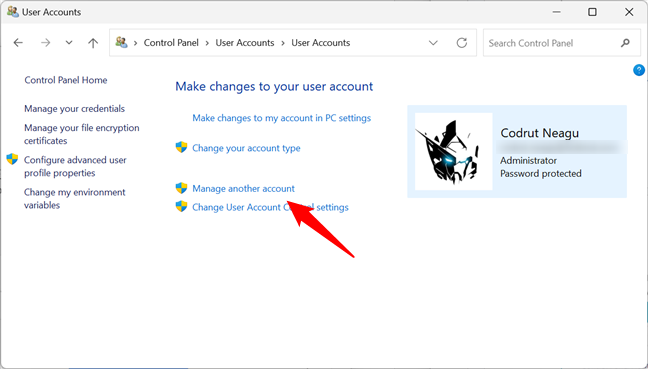
Manage another account
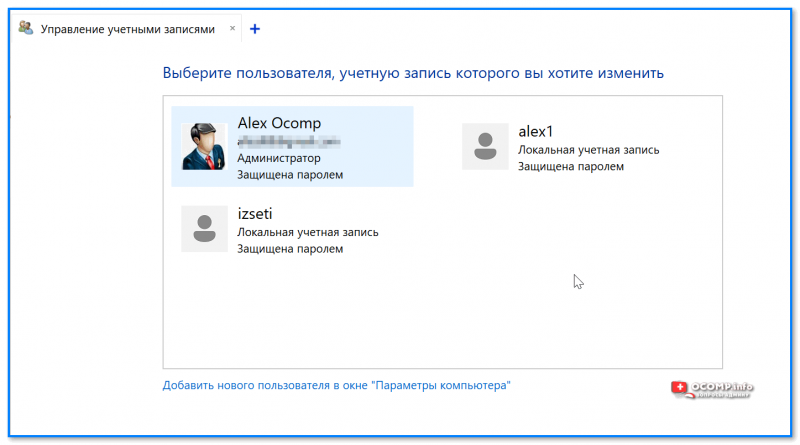
Now you see the active, not-hidden user accounts in Windows, whether they are local accounts, administrators, etc.
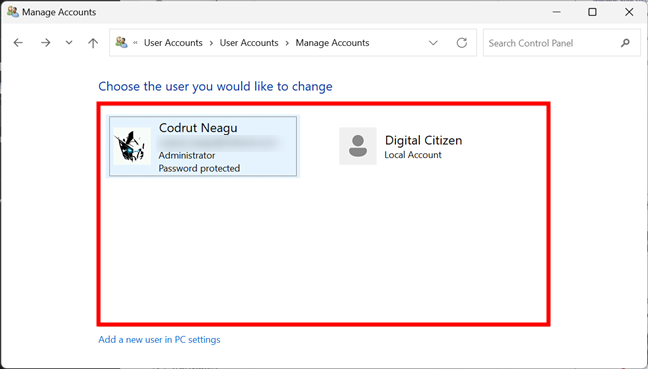
Control Panel shows the list of users on a Windows computer
With this method, you cannot see hidden or disabled user accounts either.
7. How to see the list of active user accounts on the Windows sign-in screen
The obvious and most straightforward method is to look at the sign-in screen before logging into Windows. On this screen, you should see all the active (not hidden) user accounts that exist in Windows. Both in Windows 11 and Windows 10, this list is shown in the bottom-left corner of the sign-in screen.
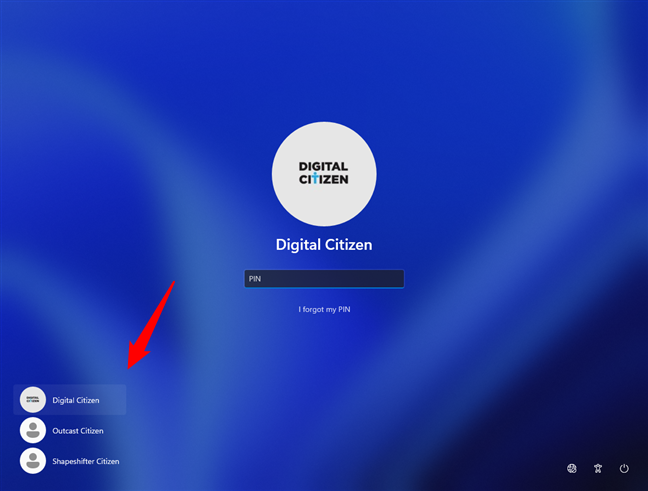
Windows list of users shown on the sign-in screen
The downside of this method is that you cannot see hidden or disabled user accounts.
Did you find many hidden user accounts on your Windows PC?
We highly recommend trying the first three methods for identifying all the user accounts that exist on your Windows computer or device. You may be surprised to see that some of your apps created hidden user accounts that you had no idea existed. Before closing this tutorial, share in a comment whether you found hidden user accounts on your PC and how many of them were there. We are curious to know, so tell us your story.
Windows — многопользовательская система, что означает, что в ней могут относительно независимо работать несколько пользователей. Помимо пользовательских учетных записей, создаваемых при установке и после, в системе предусмотрено несколько скрытых системных учетных записей. При необходимости вы можете получить список и тех и других.
В этой простой инструкции подробно о способах посмотреть список пользователей Windows 11 или Windows 10, большинство из которых подойдёт и для предыдущих версий системы. Если вам требуется получить список пользователей без входа в систему, обратите внимание на последний раздел этого материала.
Windows PowerShell или Терминал Windows
Если по той или иной причине вам потребовалось получить список всех пользователей Windows 11, Windows 10 или одной из предыдущих версий системы — сделать это можно как в графическом интерфейсе, так и средствами командной стройки или PowerShell.
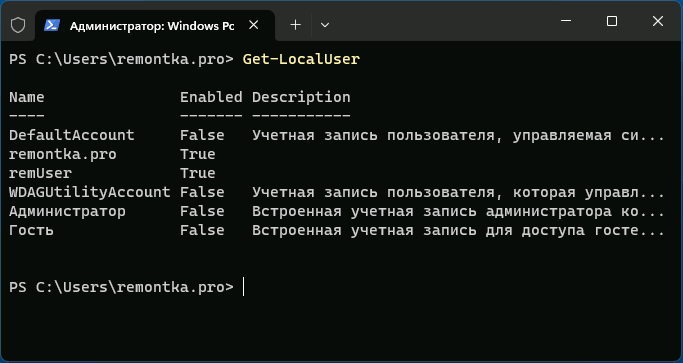
Я рекомендую начать с PowerShell, так как он позволяет быстро получить максимум информации об учетных записях пользователей:
- Запустите Windows PowerShell или Терминал Windows от имени администратора, для этого можно нажать правой кнопкой мыши по кнопке «Пуск» и выбрать нужный пункт контекстного меню.
- Введите команду
Get-LocalUser
и нажмите Enter.
- В результате вы получите полный список учетных записей пользователей, а также информацию, включена ли учетная запись в столбце «Enabled».

Обратите внимание, некоторые учетные записи могут вызвать вопросы, ответы на них можно найти в статьях:
- Как включить скрытую системную учетную запись Администратор в Windows 11 (подойдет и для Windows 10)
- Для чего нужна учетная запись WDAGUtilityAccount в Windows 11/10
Командная строка
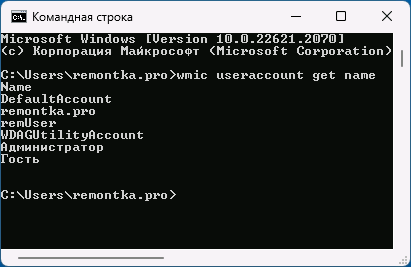
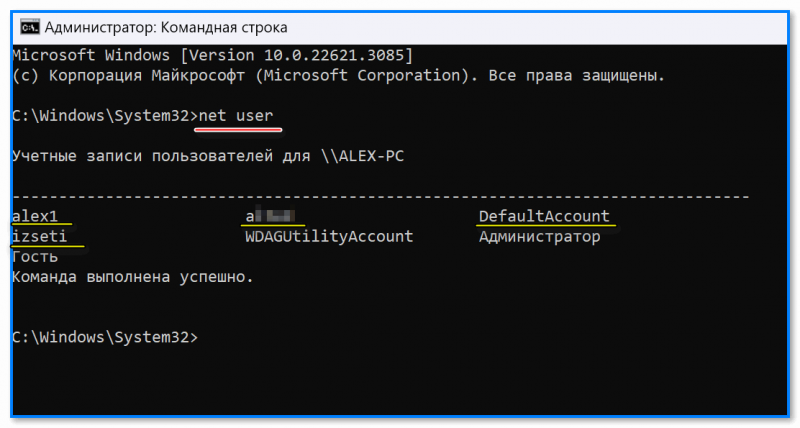
Список пользователей Windows можно получить с помощью командной строки:
- Запустите командную строку (права администратора не обязательны).
- Введите команду
net user
и нажмите Enter, чтобы получить список всех пользователей.

- Ещё одни вариант команды:
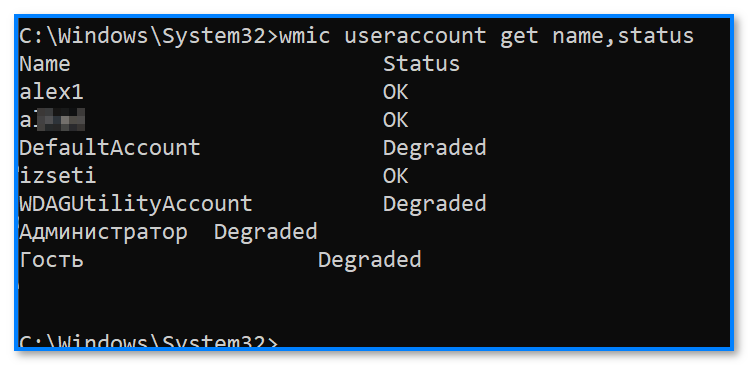
wmic useraccount get name


Оба варианта отобразят как активных, так и отключенных (скрытых) пользователей, но без информации, о том, что это за учетная запись и включена ли она. Второй вариант команды допускает следующую модификацию:
wmic useraccount get name,status
для просмотра информации о статусе учетных записей (для включенных — Ok, для отключенных — Degraded).
Параметры Windows 11 и Windows 10
«Основной», но не идеальный метод просмотра списка пользователей в графическом интерфейсе — приложение «Параметры»:
- Откройте «Параметры».
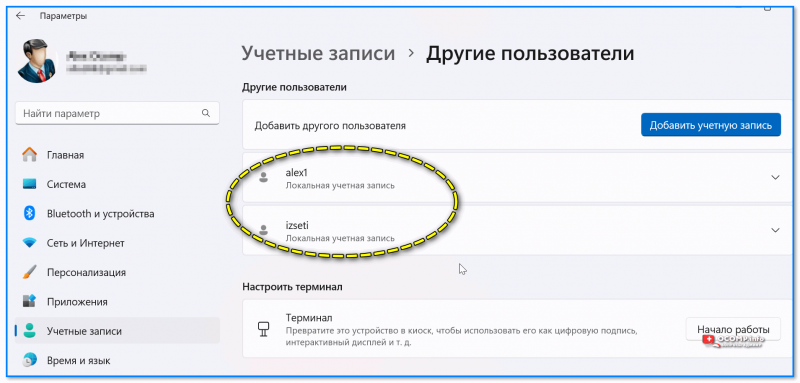
- В Windows 11 откройте раздел «Учетные записи» — «Другие пользователи» для того, чтобы посмотреть список пользователей, помимо текущего (и без отключенных и системных учетных записей).

- Если вы используете семейную группу (например, для родительского контроля Windows), пользователи, добавленные в семью, будут показаны не в «Другие пользователи», а в «Учетные записи» — «Семья».

- В Windows 10 откройте «Параметры» — «Учетные записи» — «Семья и другие пользователи». На открывшемся экране будут показаны пользователи компьютера (за исключением текущего), а также члены семейной группы при их наличии.


Как в Windows 11, так и в Windows 10 в «Параметрах» вы не увидите отключенные учетные записи.
Локальные пользователи и группы
Ещё один вариант просмотра пользователей в графическом интерфейсе — оснастка «Локальные пользователи и группы».
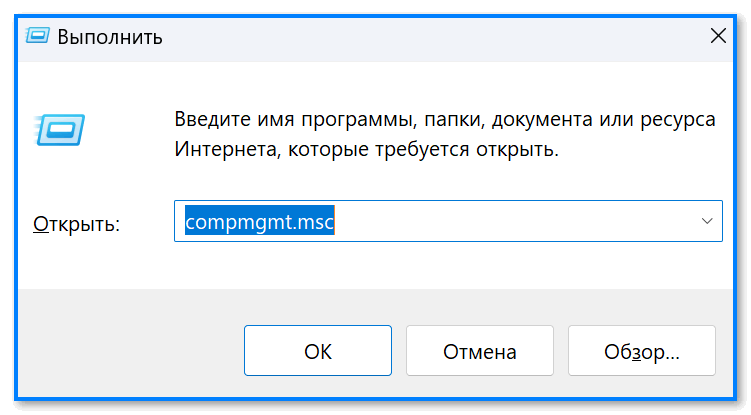
- Нажмите клавиши Win+R на клавиатуре, либо нажмите правой кнопкой мыши по кнопке «Пуск» и выберите пункт «Выполнить». Введите lusrmgr.msc в диалоговое окно «Выполнить» и нажмите Enter.
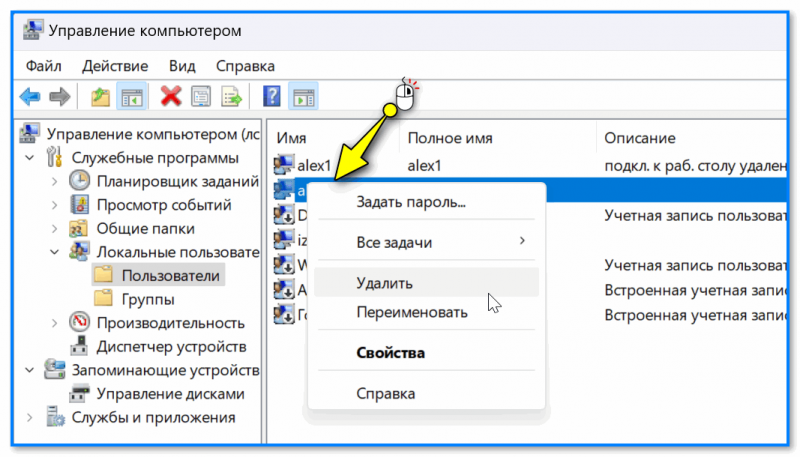
- В открывшемся окне «Пользователи» вы сможете посмотреть список пользователей текущей системы, их статус (если рядом со значком отображается стрелка — пользователь отключен).

- Дважды нажав по учетной записи пользователя, можно изменить её параметры (например, включить или отключить пользователя) и посмотреть описание.


Некоторые дополнительные детали, которые могут пригодиться в части получения списка пользователей:
- Если при использовании способов получения списка пользователей в командной строке или PowerShell вам требуется вывести список в файл, просто добавьте «> путь_к_файлу» через пробел после команды, например:
wmic useraccount get name,status > spisok.txt
Учитывайте, что путь (папка) в которую сохраняется файл должен существовать, а если для сохранения файла в указанном расположении требуются права администратора, консоль следует запускать с соответствующими правами.
- При необходимости получить список пользователей без входа в систему в случае, если он невозможен, либо если система не запускается, вы можете использовать утилиты с WinPE, те же самые, которые описаны в последней части инструкции про сброс пароля Windows 11 (подойдет и для других версий системы).
Если у вас остаются вопросы, касающиеся просмотра списка пользователей Windows, вы можете задать их в комментариях ниже, описав ситуацию и задачу в деталях.
To list all users on a Windows system using the command prompt, you can utilize the `net user` command. Here’s the syntax:
net user
Understanding CMD Commands
What is CMD?
CMD, or Command Prompt, is a powerful command-line interface built into the Windows operating system that allows users to execute commands via text input. Unlike graphical user interfaces that require mouse clicks and visual navigation, CMD provides a straightforward text-based approach to interact with the system. This interface can perform a wide range of functions, from navigating files to managing user accounts, making it an invaluable tool for both administrators and advanced users.
Basics of CMD Syntax
Before diving into how to list all users in Windows CMD, it’s important to understand basic CMD syntax. Commands typically consist of the command verb followed by parameters and switches. For instance:
command_name [options] [parameters]
- Command Name: This is the main instruction you want to execute.
- Options: Modifiers that change the command’s behavior.
- Parameters: Inputs required by the command.
Understanding this structure will help you effectively use commands, including those for managing user accounts.

List Users in Cmd: A Quick Guide for Beginners
Listing Users in Windows CMD
Why List Users?
Managing user accounts is crucial in a multi-user environment. Whether you are an IT administrator or a home user, knowing how to list all users in Windows CMD can assist you in tasks like monitoring user access, troubleshooting issues, or simply managing your system more effectively.
Using the «net user» Command
Command Overview
The `net user` command is a powerful tool for managing user accounts in Windows. This command allows you to create new users, delete existing ones, and importantly, to list all user accounts registered on your system.
How to List All Users
To list all users in CMD, simply use the following syntax:
net user
When you execute this command, you’ll receive a list of all user accounts on the local machine. The output typically displays usernames and whether they have administrative privileges.
Example Output:
User accounts for \\COMPUTER_NAME

-------------------------------------------------------------------------------
Administrator             User1
DefaultAccount            Guest
User2
The command completed successfully.
In this output, you clearly see the usernames listed, indicating the accounts available on your system.
Alternative Methods to Show Users
Using WMIC (Windows Management Instrumentation Command-line)
WMIC is another command-line interface that interfaces with Windows Management Instrumentation (WMI). Using WMIC allows for an alternative method to list users, often more succinctly. Here’s how:
wmic useraccount get name
This command will return a list of all user accounts on the system, displaying just the usernames without additional details.
Example Output:
Name
Administrator
Guest
User1
User2
This is particularly useful when you just need a simple list.
Using PowerShell from CMD
If you have a preference for PowerShell, you can run PowerShell commands directly from CMD for enhanced functionality. To list users using PowerShell, you can execute the following command:
Get-LocalUser
This command provides a detailed view of both local users and their status, offering more context about each account.

Sleep Windows Cmd: Mastering Sleep Commands in Cmd
Understanding User Types
Local Users vs. Domain Users
When managing users, it’s important to distinguish between local users and domain users. Local users are accounts that only exist on a specific machine, whereas domain users are part of a network-controlled framework, managed by a server. Understanding this distinction will aid in effective user management for both environments.
Admin Users vs. Standard Users
Users can also be classified into admin users and standard users. Admin users possess elevated privileges, capable of making system-wide changes, while standard users are restricted to their own accounts. Identifying these user types can help maintain system security and stability.
Copy Folder Windows Cmd: A Quick How-To Guide
Additional CMD Commands for User Management
Viewing User Properties
If you require specific details on a user account, you can use the following command format:
net user [username]
Replace `[username]` with the actual username. For example:
net user User1
This command reveals detailed information about the user account, including password status, group memberships, and account expiration details.
Deleting and Creating Users
Creating a New User
If you need to create a new user account, CMD makes it straightforward. Use the command:
net user username password /add
For example, if you want to create a user named “NewUser” with the password “Password123”, you would enter:
net user NewUser Password123 /add
This command facilitates account creation in a single step.
Deleting a User
If you need to delete a user account, ensure you fully understand the implications, as this action cannot be undone. Use the command:
net user username /delete
Example:
net user User1 /delete
Confirm deletion to maintain security and prevent unauthorized access.

List All Drives in Cmd: Quick Guide to Drive Management
Best Practices for User Management via CMD
Regular Audits
Regularly auditing user accounts helps maintain security and effective management. Make it a habit to list all users periodically, examining whether each account is necessary and monitoring access levels.
Security Considerations
Managing user privileges and roles effectively is vital for minimizing potential security threats. Always be aware of how many admin accounts you have and strive to limit their number to reduce security vulnerabilities.
List Folders in Cmd: A Quick Guide to Navigation
Conclusion
Being able to list all users in Windows CMD empowers users and administrators alike to effectively manage accounts and maintain system integrity. The commands and methods discussed provide essential tools for anyone looking to streamline their user management practices in a Windows environment. Remember to continuously practice and utilize these commands to enhance your CMD proficiency and overall system management skills.
List All Files in Cmd: Your Quick Guide
Resources and Further Reading
- Official Microsoft documentation for CMD commands.
- Online tutorials and community forums that cover advanced CMD usage.
- Additional guides on user management best practices to stay informed on the latest methods and techniques.
Native Auditing
Netwrix Auditor for Windows Server
Steps
How to check users in Windows 10 and Windows 11 using PowerShell
- Create a file containing the computer list → Open the PowerShell ISE by clicking on the Start button and typing “PowerShell ISE”→ Run the following script, adjusting the file name and path for the export:
$computers=Get-Content-PathC:\data\computers.txt
Get-WmiObject-ComputerName$computers-ClassWin32_UserAccount-Filter»LocalAccount=’True'»|SelectPSComputername,Name,Status,Disabled,AccountType,Lockout,PasswordRequired,PasswordChangeable,SID|Export-csvC:\data\local_users.csv-NoTypeInformation
- Open the file produced by the script in MS Excel.
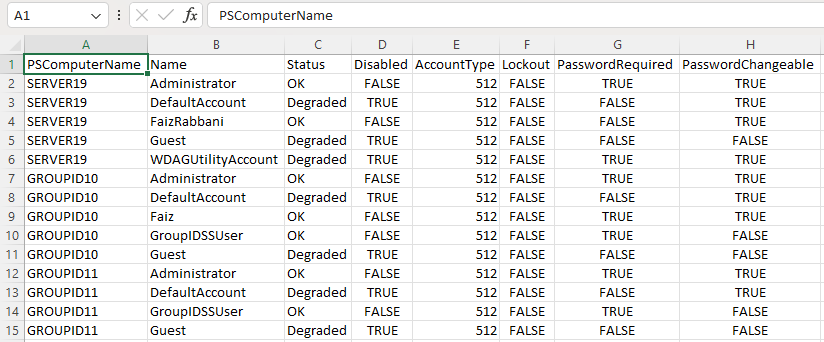
The PowerShell script does not produce an output because we save the results in a CSV file. To see the results in the PowerShell window, remove the last part where we save the output in CSV, and add the switch format table, like below.
Get-WmiObject-ComputerName$computers-ClassWin32_UserAccount-Filter»LocalAccount=’True'»|SelectPSComputername,Name,Status,Disabled,AccountType,Lockout,PasswordRequired,PasswordChangeable,SID|format-table
Without the help of a format-table switch, the results would be shown user-by-user, expanding to multiple pages. Using the switch, the result will be formatted in a tabular form and will give you the output as below.

Get-LocalUser
The Get-LocalUser PowerShell cmdlet retrieves information about local user accounts on a Windows system. You can run this command in a PowerShell window to list local user accounts and their properties, including name, description, and status as enabled or disabled.
Get-LocalUser
This will display a list of local user accounts on the system in a row-wise manner; CMD lacks this by showing them randomly in one or two rows. Type “Get-LocalUser” in PowerShell and press Enter.
List local users in CMD
If you want to list Windows users who are currently logged in or have accounts on the system, you can use the net user command in the command prompt. This will list all user accounts on the system. Below is how to list users in cmd.
net user

This Windows command line will show users in cmd.
- Run Netwrix Auditor → Navigate to «Reports» → Expand the «Windows Server» section → Go to «Windows Server – State-in-Time» → Select «Local Users and Groups» → Click «View.». You can also search for reports.
- To save the report, click the «Export» button → Choose a format from the dropdown menu → Click «Save».

How to Check User Groups in Windows to Reduce Your Attack Surface Area
If an attacker or malware compromises a local user account, all resources the user can access across the network are vulnerable. Administrators limit the reach of attackers and malware by ensuring that users have access to only the resources they need to do their jobs, enhancing security. You can use native tools to get insight into local accounts and their properties. The easiest way is to use the “Computer Management” console for local users and groups. Another way is to get a list of Windows users with command line entries, but you must check user groups in Windows machines one at a time by entering ‘net user’ at the command line. Or, if you have the time and skills, you can create, test, and run a PowerShell script to get all local users on all Windows systems on your domain.
Netwrix Auditor for Windows
Netwrix Auditor for Windows Server provides complete visibility into local users and groups across your entire IT environment, eliminating the need to use the command prompt on each computer or undertake time-consuming scripting. The software provides a comprehensive report that lists all local users on each server, the status of each user (enabled or disabled), and additional properties that give you more insight into potential security gaps, such as passwords that never expire, so you can take action to minimize your attack surface.
Содержание статьи:
- Просмотр списка пользователей
- Способ 1
- Способ 2
- Способ 3
- Способ 4
- Способ 5
- Вопросы и ответы: 0
Вводная (описание задачи): при диагностике и настройке ОС Windows иногда требуется посмотреть всех пользователей, которые есть в системе (кстати, среди них могут быть и скрытые учетные записи, которые вы сами не создавали). Сделать это можно разными способами, некоторые из них приведу ниже.
*
Примечание: в заметке приведены как универсальные способы, так и сугубо для современных Windows 10/11. Если у вас не работает один из них — попробуйте другой!
*
Просмотр списка пользователей
Способ 1
- нажать Win+R, чтобы появилось окно «Выполнить» (как на скрине ниже);
- ввести команду compmgmt.msc и нажать Enter (прим.: эта команда откроет окно управления компьютером);

compmgmt.msc — управление компьютером
- далее необходимо открыть вкладку «Локальные пользователи и группы -> Пользователи»: в ней будет представлен весь список пользователей + описание;

Локальные пользователи и группы
- если какая-то учетная запись вам не нужна — ее можно удалить (для вызова соотв. опции — просто нажмите по учетной записи правой кнопкой мыши…). Важно: при удалении учетной записи — все файлы и документы, которые были с ней связаны, тоже будут удалены! См. скрин ниже. 👇

Щелчок ПКМ для удаления ненужной учетной записи

*
Способ 2
- сначала открыть командную строку от имени администратора (Win+R, команда CMD и нажать Ctrl+Shift+Enter);
- в открывшемся «черном окне» необходимо ввести net user и нажать Enter. Далее увидите список всех пользователей (см. рис. ниже).

команда net user покажет пользователей \\ командная строка
- кстати, можно воспользоваться и др. командой: wmic useraccount get name,status

Пользовать + статус (командная строка) // Статус Degraded обычно означает, что учетная запись существует, но вход в систему не выполнен (т.е. учетная запись ∼откл.).
*
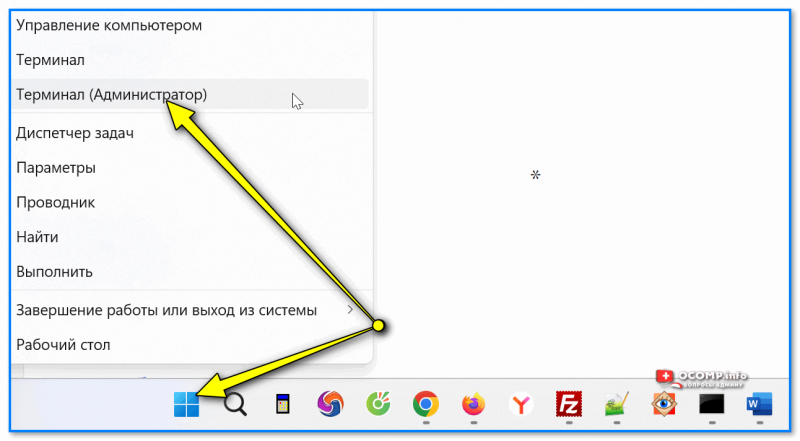
Способ 3
- открываем терминал (можно кликнуть ПКМ по меню ПУСК…);

ПКМ по пуску — терминал
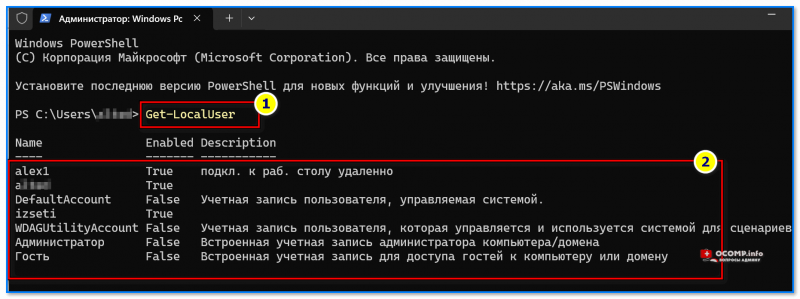
- далее вводим команду Get-LocalUser и нажимаем Enter: через 1-2 сек. получаем список (с описанием и статусом).

Терминал Windows — Get-LocalUser
*
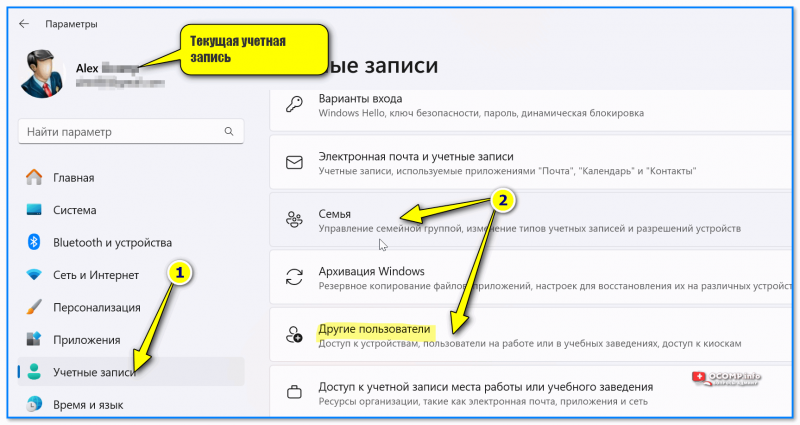
Способ 4
- открываем параметры системы Windows 10/11 (обычно, достаточно нажать сочетание Win+i);
- переходим в раздел «Учетные записи / другие пользователи» (также можно заглянуть во вкладку «Семья», см. рис. ниже 👇);

Параметры системы Windows 11 — учетные записи
- обратите внимание, что Windows покажет только активных пользователей (т.е. учетные записи со статусом «OK». Других пользователей — см. предыдущими способами).

Другие пользователи
*
Способ 5
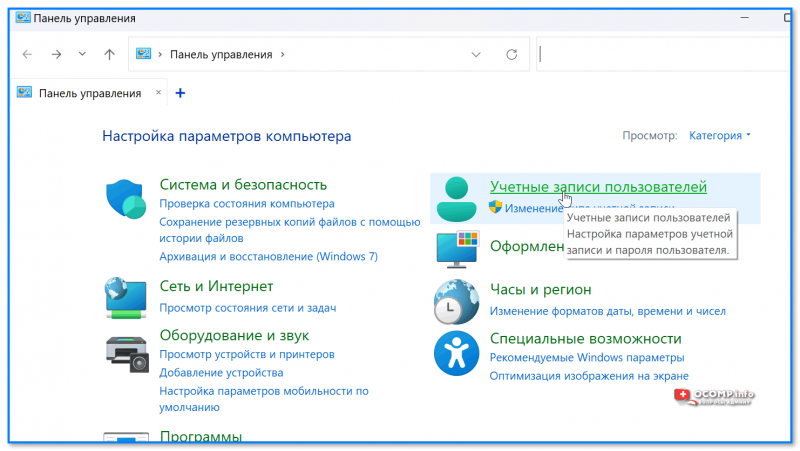
- сначала потребуется открыть контрольную панель (Win+R, команда control);
- далее перейти в раздел «Учетные записи пользователей»;

Контрольная панель — учетные записи пользователей
- в нем будет ссылка «Управление другой учетной записью» — делаем по ней ЛКМ;

Управление другой учетной записью
- ву-а-ля! Список активных учетных записей перед нами… Кстати, из этого же окна вы можете изменить имя учетной записи, ее пароль, тип (и даже удалить!).

Управление учетными записями
*
Дополнения и комментарии по теме — можно оставить через спец. форму ниже.
Всего доброго!
👋