
-
Star
(4)
You must be signed in to star a gist -
Fork
(1)
You must be signed in to fork a gist
-
Clone this repository at <script src="https://gist.github.com/joswr1ght/b4453fc2ba5f6f01e14e43978208b7fa.js"></script>
- Save joswr1ght/b4453fc2ba5f6f01e14e43978208b7fa to your computer and use it in GitHub Desktop.
Clone this repository at <script src="https://gist.github.com/joswr1ght/b4453fc2ba5f6f01e14e43978208b7fa.js"></script>
Wi-Fi Scanning at the Windows Command Prompt, FOR loop style
This file contains hidden or bidirectional Unicode text that may be interpreted or compiled differently than what appears below. To review, open the file in an editor that reveals hidden Unicode characters.
Learn more about bidirectional Unicode characters
| FOR /L %N IN () DO @netsh wlan show networks mode=bssid | findstr «^SSID Signal« && ping -n 16 127.0.0.1 >NUL && cls |
Never used Command Prompt before? Don’t worry. Using it is as simple as typing out the commands you’ll see below.
If you’re ready to continue, here are some of the most useful networking commands to know for managing and troubleshooting your home network.
1. Ping
«Ping» is one of the most basic yet useful network commands to utilize in the command prompt application. It tells you whether your computer can reach some destination IP address or domain name, and if it can, how long it takes data to travel there and back again.
Sample usage and output:

The command works by sending out multiple data packets and seeing how many of them return. If some of them don’t return, it’ll tell you («lost»).
Packet loss leads to poor performance in games and streaming, and this is a nifty way to test. So if you’re running into a performance drop, you can use much of the same strategies for how to fix packet loss on Discord for Windows.
By default, it sends 4 packets, each one waiting 4 seconds before timing out. You can increase the number of packets like this:
ping www.google.com -n 10
And you can increase the timeout duration like this (value is in milliseconds):
ping www.google.com -w 6000
2. Tracert
«Tracert» stands for Trace Route. And much like «ping,» it sends out a data packet as a way to troubleshoot any network issues you might have, but it instead tracks the route of the packet as it hops from server to server. Sample usage:
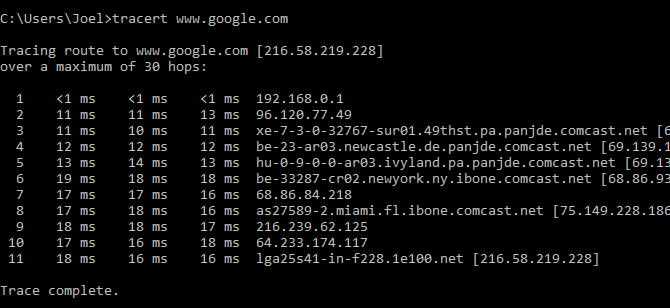
The command outputs a line-by-line summary of each hop, including the latency between you and that particular hop and the IP address of that hop (plus domain name if available).
Why do you see three latency readings per-hop? The tracert network command sends out three packets per hop to cover packet loss or slowdowns. Just remember that it doesn’t represent your true latency. It’s best practice to average the three.
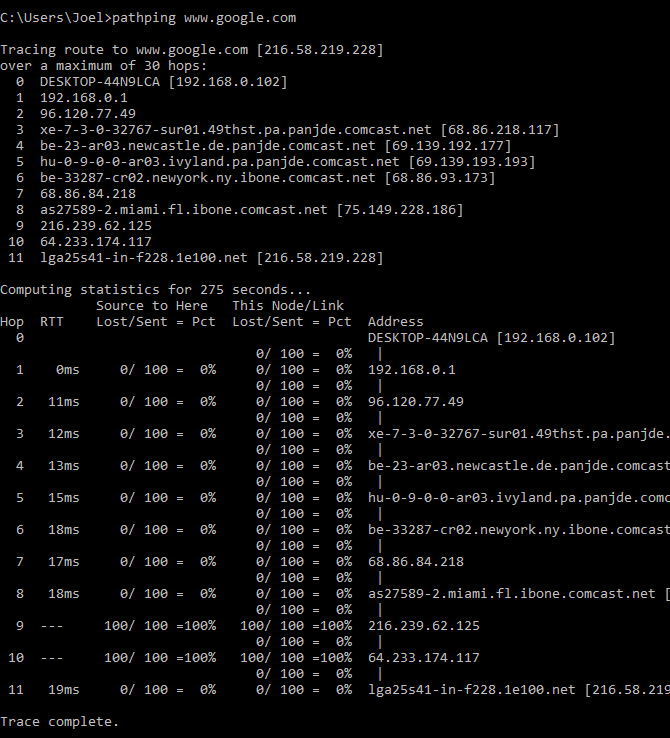
3. Pathping
«Pathping» is similar to «tracert,» except it’s more informative and takes a lot longer to execute. After sending out packets from you to a given destination, it analyzes the route taken and computes packet loss on a per-hop basis.
Sample usage and output:
4. Ipconfig
«Ipconfig» often comes up as the most-used networking command on Windows. Not only is it useful for the information it provides, but you can combine it with a couple of switches to execute certain tasks.
Sample usage and output:
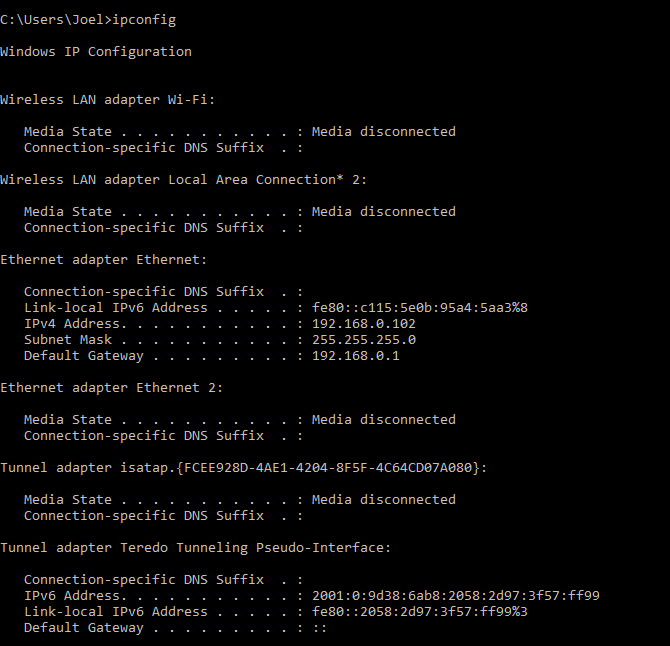
The default output shows every network adapter on your system and how they resolve. The IPv4 Address and Default Gateway details under the Wireless LAN Adapter and Ethernet Adapter sections are the most important to know.
Use this switch to flush your DNS cache:
ipconfig /flushdns
Flushing the DNS cache can help when your internet is working, but a specific website or server is unreachable for some reason (e.g. a website times out and won’t load). If flushing the DNS cache doesn’t solve your connectivity issues, check for the stability of your internet connection on Windows.
5. Getmac
Every device that’s compliant with IEEE 802 standards has a unique MAC address (Media Access Control). The manufacturer assigns MAC addresses and stores them in the device’s hardware. Some people use MAC addresses to limit which devices can connect to the network.
Sample usage and output:
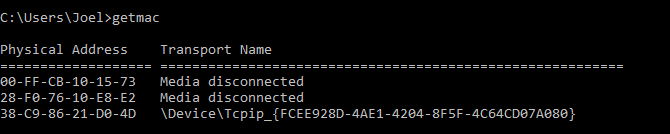
You may see more than one MAC address depending on how many network-related adapters are on your system. For example, Wi-Fi and Ethernet connections would have separate MAC addresses. If you would like to know more, check out these differences between an IP and MAC address.
6. Nslookup
«Nslookup» stands for Name Server Lookup. It packs a lot of power, but most users won’t need that power. For regular folks like you and me, its main use is finding out the IP address behind a certain domain name.
Sample usage and output:

Note that certain domain names aren’t tied to a dedicated IP address, which means that you may get different IP addresses every time you run the command. This is normal for bigger websites because they spread their workload across many different machines.
If you want to convert an IP address into a domain name, just type it into your browser and see where it leads. Not all IP addresses lead to domain names though, and many IP addresses aren’t reachable over the web.
7. Netstat
«Netstat» is a tool for network statistics, diagnostics, and analysis. It’s powerful and complex but can be simple enough if you ignore the advanced aspects that you don’t need to know about (assuming you aren’t managing a massive business or campus network, for example).
Sample usage and output:

By default, the command shows all «active connections» on your system whether those connections are on LAN or across the internet. An active connection doesn’t mean data moving occurs — it could just mean a port that’s open and ready to accept a connection.
Indeed, «netstat» is useful to regular users for its ability to show port information, and that can come in handy when you need to forward ports.
But the command also has about a dozen switches that change what kind of information is displayed, such as the
-r
switch which shows a routing table instead.
8. Netsh
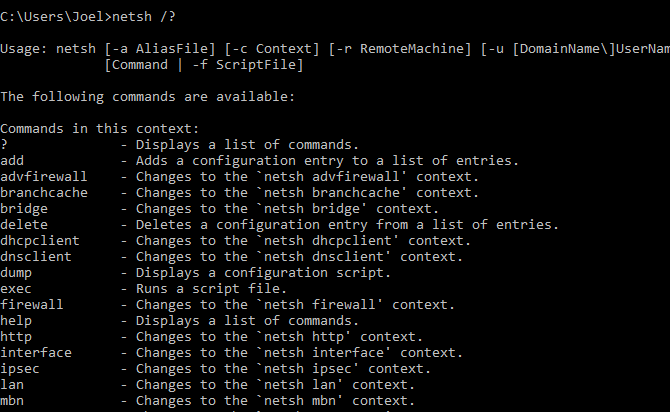
«Netsh» stands for Network Shell. It’s a cmd command for networking that lets you view and configure pretty much every network adapter on your system in more detail and granularity than any of the preceding commands.
Running the netsh command on its own will shift the Command Prompt into network shell mode. There are several different «contexts» within this shell, including one for routing-related commands, one for DHCP-related commands, and one for diagnostics, among others. But you can use it to run individual commands, too.
To see all network shell contexts:
And to see all commands within a context:
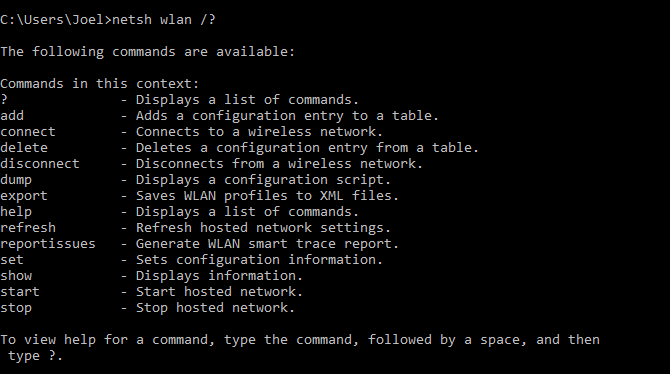
You can drill down one more layer to find all of the subcommands within those commands:
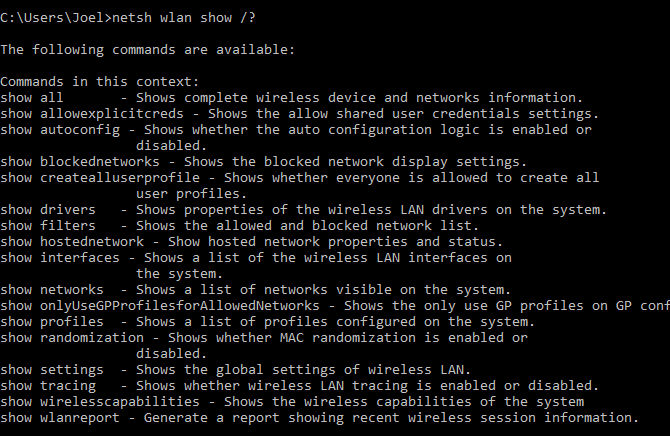
So for example, you can run this netsh wlan command to view all the wireless network drivers on your system and their properties:
netsh wlan show drivers
Network Shell’s complex enough to deserve an entire article of its own. Just know that if you want to get real technical with your network configuration, you’ll probably need to use this command-line utility and explore netsh commands for Wi-Fi.
If Network Shell left you wanting to explore more than cmd network commands for your system, try these basic cmd commands every user should know.
Network Commands and Other Networking Solutions
For anyone new to Windows networking commands, a cheat sheet comes in handy. With some reference, you can use a variety of cmd commands for gleaning information on your network, Wi-Fi, and the Internet. With a bit of practice, you’ll be using Windows’ command line network tools naturally.
Still, using cmd commands for your networking isn’t always necessary for the specific problem you’re having. You don’t always need a cmd fix for your internet connection before checking your physical network connections. But if you do need to dig deeper into commands, be sure to try out Windows Terminal for a better experience.
How to connect, delete and manage WiFi networks using command prompt (cmd) in your Windows PC/laptop using netsh wlan commands
Nowadays internet connectivity is everything. For the Internet, we have Wi-Fi connections that we manage and use through the network settings on Windows 7/8.1/10 computers.
You can also connect, manage, and delete your WiFi networks using the command prompt.
In fact, the command prompt offers many more features than the standard network connection settings in Windows 10.
Also Read- A-Z Windows CMD Commands List
To do this we only require a CMD(Command Prompt) with Administrator privileges and will have to use netsh wlan commands.
Table Of Contents
- How to connect to wifi using cmd with netsh wlan commands-
- 1# View various wireless network profiles saved on your PC
- 2# View WiFi adapter driver information
- 3# View wireless adapter settings
- 4# Recover your WiFi password from any of the WiFi connection profiles saved on your PC
- 5# Connecting to a WiFi network using command prompt
- 6# Stop your PC connecting automatically to a wireless network out of range
- 7# Delete wireless network profile stored on your PC
- 8# Export and import wireless network profiles
- 9# Generate a complete report of the wireless adapters on your PC/laptop
How to connect to wifi using cmd with netsh wlan commands-
Before we dive into the guide. You’ll need to open the Command Prompt with administrator rights to perform most of the commands. To do this, use the Windows key + X keyboard shortcut, and select Command Prompt (Admin).
Or search cmd and right click run as administrator
1# View various wireless network profiles saved on your PC
Command > Netsh WLAN show profiles
Every time you connect to a wireless access point, the operating system creates a “wireless network profile”, and it’s stored on your computer, you can view all these profiles using the following command line on the Command Prompt Netsh WLAN show profiles.
Alternatively, you can use the “interface” parameter to show the list of profiles for a particular wireless adapter:
Netsh WLAN show profiles interface=”your WiFi interface name”
2# View WiFi adapter driver information
Command > Netsh WLAN show drivers
When you need to get driver information about your computer’s wireless adapter, you can use the the above command. The result will show the exact drivers being used, the WiFi radios on your PC/laptop alongwith driver version number.
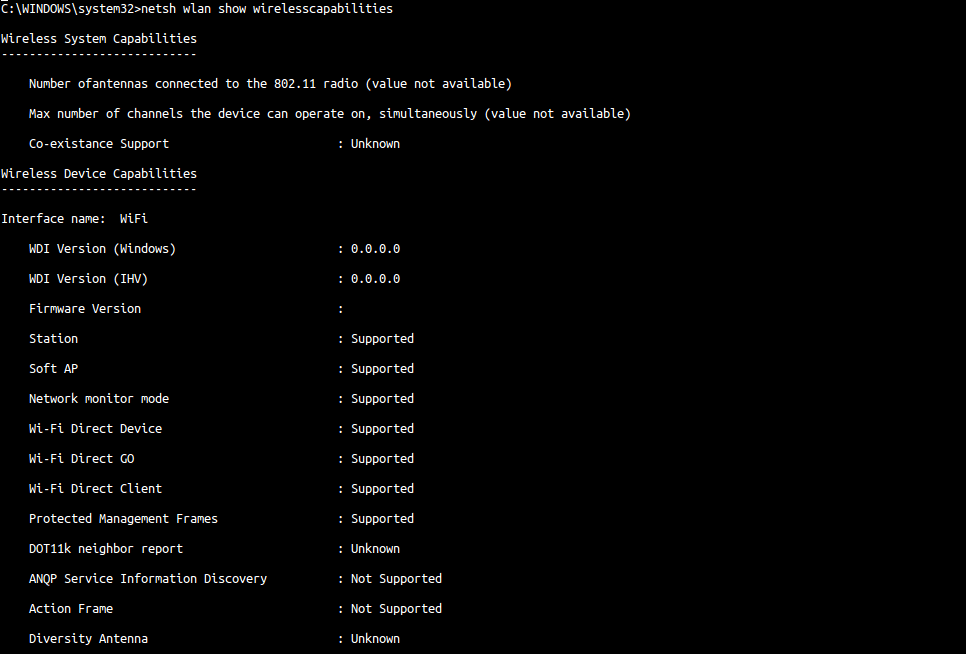
You can further use this command to check your WiFi capabilities. Type in the following command
C:\Netsh WLAN show wirelesscapabilities
The results will show you exactly what your WiFi connection is capable of including WiFi Direct service capabilities.
3# View wireless adapter settings
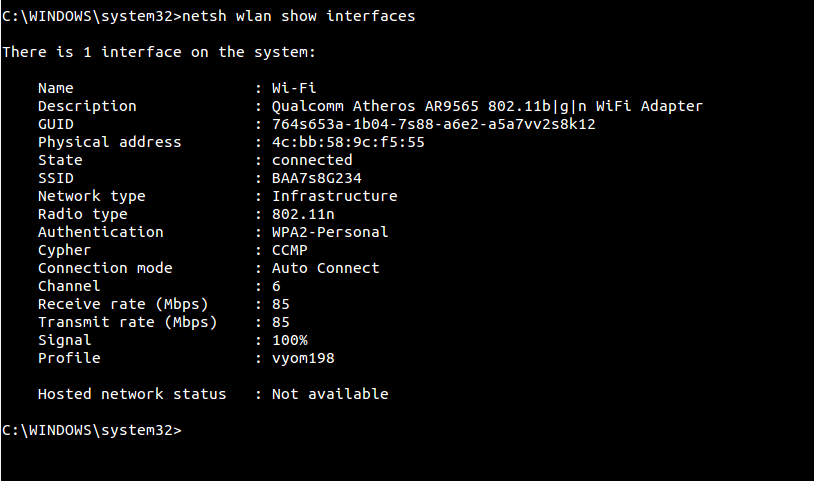
Command > Netsh WLAN show interfaces
You can see the details of your WiFi interfaces using above command. The results will show you description of the interface, SSID, BSSID, Cipher, authentication type, channel, average receive and transmit rate and radio type.
If you have multiple WiFi connections saved on your PC, the “Show interfaces” command will display the information for all the wireless adapters on your computer. If you only need to see the information for one adapter, you can use the following command:
Netsh WLAN show interface name=”your wifi connection name”
4# Recover your WiFi password from any of the WiFi connection profiles saved on your PC
Command > Netsh WLAN show profile name=”your WiFi connection name” key=clear
If you lost and cannot remember your network security key to connect another device to a particular Wi-Fi access point, you can use the above command to view your WiFi password. You can also use this command to see the data limits if you have set them.
5# Connecting to a WiFi network using command prompt
Command > netsh wlan set hostednetwork mode=allow ssid=”your WiFi connection name” key=”your WiFi connection password”
You can use the above command to sign into your WiFi network. The above command is particularly useful if your WiFi settings in Windows 10 is not visible/cannot be connected due to some reasons. The additional commands are C:\netsh wlan start hostednet and C:\netsh wlan stop hostednetwork These two commands will start and stop your WiFi hotspot connection.
6# Stop your PC connecting automatically to a wireless network out of range
Command > Netsh WLAN set profileparameter name=”your WiFi connection name” connectionmode=manual
Normally, you would have configured your Windows 10 PC to connect to different WiFi networks automatically. While this is the best way to connect, sometimes notice that your laptop connects automatically to a WiFi connection that has zero or poor connectivity instead of an available full network WiFi connection. In such a case you can use the above command to prevent your computer from connecting to different networks automatically. If you want to move again to the automatic mode use the following command C:\Netsh WLAN set profileparameter name=” your WiFi connection name” connectionmode=auto
7# Delete wireless network profile stored on your PC
Command > Netsh WLAN delete profile name=”the WiFi connection you want to delete”
When you no longer need to connect to a particular wireless network, the access point is no longer available, or you need to reset the network profile settings, you can also use Netsh WLAN to delete any profile stored on your computer using the above command. If you can’t remember the name of the network profile, you can use the C:\Netsh WLAN show profiles command to list all the available profiles and select the one you want to delete.
8# Export and import wireless network profiles
Command > Netsh WLAN export profile key=clear folder=”the folder you want to save this report”
Sometimes you need to export and import wireless profiles. The above command exports all your wireless network profiles available on your PC. If you want to export a specific WiFi connection profile to a specific location, use this command > C:\Netsh WLAN export profile name=”your WiFi connection name” key=clear folder=”the folder you want to save this report”
9# Generate a complete report of the wireless adapters on your PC/laptop
Command > Netsh WLAN show WLANreport
Trouble shooting WiFi connection problems is very difficult as Internet has lots of conflicting tutorials and troubleshooting guide. Also you should know the exact problem you are facing while connecting to WiFi.
Using the above command will generate a full detailed WiFi networks report to the following location > C:\ProgramData\Microsoft\Windows\WLANReport\WLAN-report-latest.html.
Once the WLAN report has been created, copy and paste the path into your web browser’s address bar to open the report.
You can use this report to troubleshoot the problems, ask help on tech forums. The WLAN reports contain a graph with details of the connectivity status, including information, such as when the connection started, when it got disconnected, errors, and more.
The report also summarizes network adapters information configured on your system, session success/failures, disconnect reasons, and a lot more. It’s a very detailed report that can help you to ping point many Wi-Fi connectivity issues.
ALSO READ:
- How to Hack WiFi Password Using New WPA/WPA2 flaw
- How To Find WiFi Password When Forgot It
CONCLUSION:
So this was how to connect to wifi using cmd (command prompt) with netsh wlan commands
If you are using a Windows 10 computer with a wireless network connection, you can use the Settings app and Control Panel to manage various aspects of your wireless network connections.
However, you may need to perform some advanced tasks such as show wireless network profile information, generate wireless connection report, and find the security key from different Wi-Fi profiles. In these cases, you can not perform those tasks offered by the Settings app and Control Panel.
For these reasons, Microsoft offers a Netsh command-line utility to manage your wireless and wired network settings. You can view, troubleshoot, and configure virtually every network adapter on a local or remote computer using this utility.
You can use Netsh WLAN command to view your wireless settings, generate reports, import, export and delete wireless profiles from your computer.
In this tutorial, we will show you how to use Netsh WLAN command-line tool to manage Wireless connections in Windows 10.
View Wireless Adapter Settings
You can see the detailed information about your wireless adapter including, radio type, channel, wireless signal, and type of authentication your computer is currently using with the netsh wlan command.
First, log in to Windows 10 with an Administrator account. Open Start menu, search for Command Prompt, right-click on the search result and select the Run as administrator.
Now, run the following command:
netsh wlan show interfaces
You should see the detail information of your wireless adapter in the following screen:
View Wireless Driver Information
In some cases, you may also need to get driver information about your computer’s wireless adapter. You can get it with the following command:
netsh wlan show drivers
You should see the following screen:
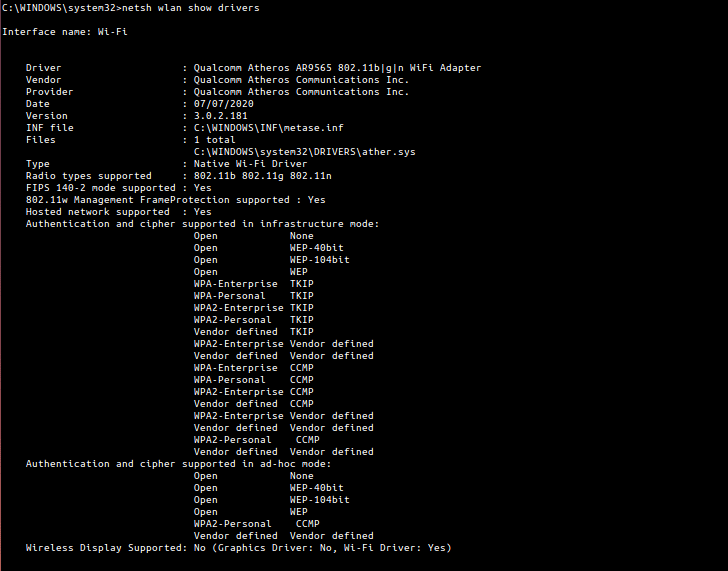
You will get relevant information about the driver currently installed on your system, including vendor, version, radio type, and wireless display support, and much more.
Wireless Adapter Capabilities
You can also use the following command to view all supported wireless adapter capabilities:
netsh wlan show capabilities
You should see the detail information in the following screen:
View Wireless Network Profiles
When you connect to any wireless network, windows creates a wireless network profile and store it on your computer.
You can view all these profiles stored in your computer with the following command:
netsh wlan show profiles
You should see the following screen:

If you want to delete any wireless network profile, run the following command:
netsh wlan delete profile name=[profile name]
You can also remove all profiles with the following command:
netsh wlan delete profile *
Export and Import Wireless Profile
You can export your wireless network profile to the XML file with the following command:
netsh wlan export profile name="profile name" key=clear folder=c:\
If you want to import the wireless profile from the XML file, run the following command:
netsh wlan add profile filename="path_and_filename.xml" interface="interface_name"
Find/View Wireless Network Password (no Software needed)
Some times, you may need to find your wireless network password if you forgot it or would like to share your wi-fi password with another user in your network.
If you forgot your wireless network password then you can recover it from the wireless network profile saved in your computer.
You can display it with the following command:
netsh wlan show profile name="vyom198" key=clear
You should see the following screen:
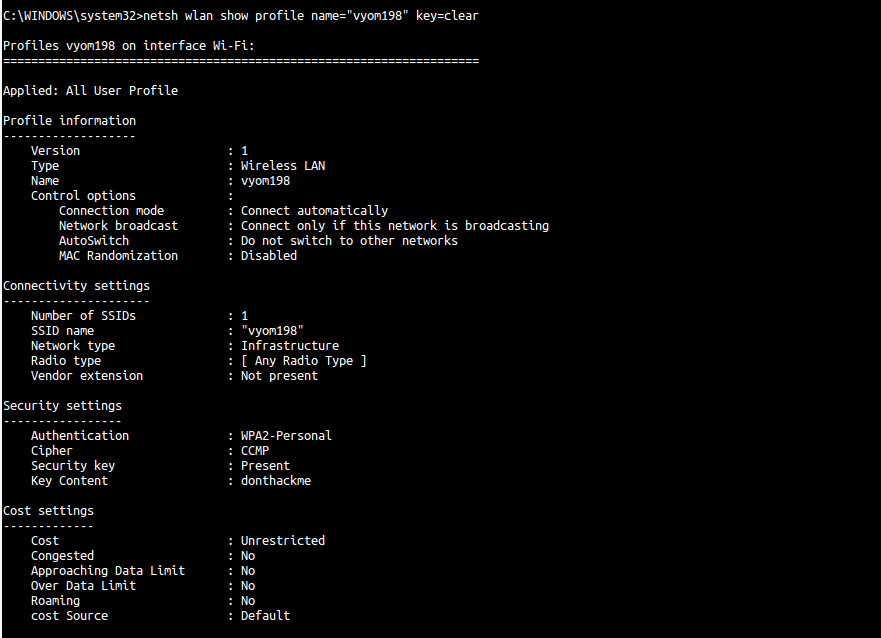
You can see the Wi-fi password/key in the Key Content field above.
Generate Wireless Adapter Report
If you have any wireless connectivity issue then you can troubleshoot it by generating a detailed report with many important details.
You can create a wireless report with the following command:
netsh wlan show wlanreport
This will generate a report and save in the WlanReport folder.
You can view this report in your web browser. The reports contain a graph with much useful information such as, connectivity status, errors, summery of the network adapter, session success/failures, disconnect reasons, and a lot more.
Netsh WLAN Help
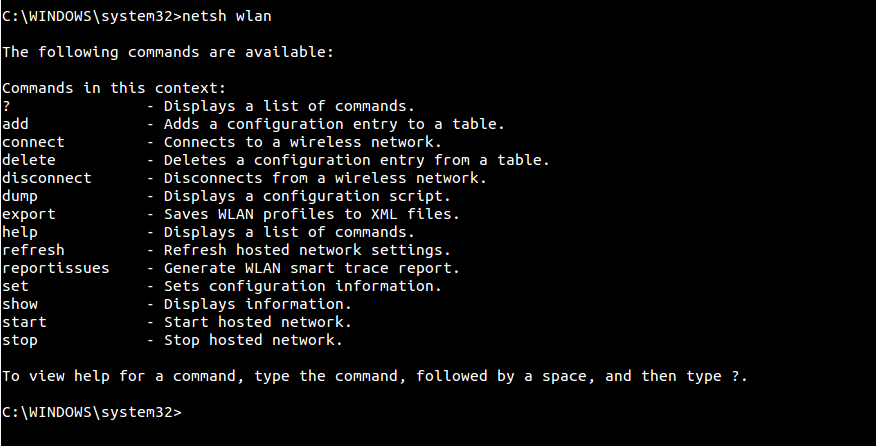
Netsh is a simple and very powerful utility that comes with many useful options. If you don’t remember all commands, you can list all available options with the following command:
netsh wlan
You should see the following screen:
Conclusion
In this tutorial, you learned how to manage a wireless network with netsh command on Windows 10. We hope this will help you troubleshoot wireless network issues and perform day-to-day tasks.
ServerWatch content and product recommendations are editorially independent. We may make money when you click on links to our partners. Learn More.
Netsh is a command-line utility for configuring and monitoring the status of various network communication server roles and components on Windows Server computers. It helps users interact with the networking stack in Windows and control various network aspects, including Wi-Fi.
This article will demonstrate the usage of netsh commands for managing wireless networks in Windows 11. While some basic settings and functionalities can be managed using the Windows Network or the Control Panel, some tasks may require alternative steps. For such situations, Windows 11 users can use the netsh CLI to manage Wi-Fi settings and configurations.
How to Manage Wi-Fi Networks in Windows 11
To manage Wi-Fi networks in Windows 11, you first need to open the command prompt. Windows 11 provides two ways to use the netsh commands. You can either open the command prompt or netsh run command to initiate the netsh commands for wireless management.
The only difference between these two approaches is that you’ll have to use “netsh” before every command when using the command prompt.
Follow these steps to open the netsh run command.
- Click the search icon in the taskbar and enter “netsh” (without quotation marks) in the search box.
- Select Run as administrator, and the netsh command prompt will open.
To start managing Wi-Fi settings, you’ll want to get a clear view of the wireless profiles in Windows.
To do this, run the following netsh command to show the wireless network profiles.
wlan show profilesIf you’re using the command prompt, run the following command:
netsh wlan show profilesNow that you know how to view saved network profiles using the netsh command, let’s explore other commands to manage wireless networks in Windows 11.
Connect to the Wireless Network
To connect to the wireless network in Windows 11, run the following command:
wlan connect ssid=YOUR-WIFI-SSID name=PROFILE-NAMEFind the Security Key of the Network
If you want to retrieve the security key of your network, run this command:
wlan show profiles name=profile name key=clearCheck Network Interface Status
Here’s the command to check the network interface status of your wireless network:
interface show interfaceCheck All Available Wireless Connections
Run the following command to check all the available Wi-Fi connections:
wlan show networksDisconnect from the Connected Wireless Device
Run the following command to disconnected from the wireless device:
wlan disconnectDelete Wi-Fi Network Profiles
To delete a network profile, you can run the following command:
wlan delete profile name=profile nameAnalyze the Wireless Network Report
To analyze the wireless network report, you’ll need to run this command from the command prompt with administrator privileges:
Netsh wlan show wlanreportImport and Export Wi-Fi Network Files
You can’t modify network profiles in Windows directly. However, the wireless settings allow you to export a profile, make changes to its XML file, and then import it back to modify the profile settings without directly modifying the profile itself.
Export Wireless Network Files
Here’s the command to export wireless network files:
wlan export profile name=profile nameImport Wireless Network Files
You can then import them back in with this command:
wlan add profile filename=path_and_filename.xml interface=interface-nameStop Automatically Connecting to a Wi-Fi Network
Here’s the command to stop a device from automatically connecting to a network:
wlan set profileparameter name=profile name connectionmode=manualChange the Priority of Wi-Fi Networks
This command can rearrange connection priorities:
wlan set profileorder name=profile name interface=interface_name priority=1How to Create an Ad Hoc Wi-Fi Connection in Windows 11
A wireless ad hoc network (WANET) is a local area network (LAN) that can be established without traditional network infrastructure equipment such as a wireless access point or a router. It allows multiple wireless devices connecting each other instantly.
Windows 7, 8, 10, and 11 enable you to create WANETs. They are usually created temporarily to share files, presentations, or an internet connection among multiple devices. However, saving an ad hoc network profile for frequent use is also possible.
For this, your computer or laptop should have a wireless network adapter installed to create or join a WANET. Also, WANETs are wireless only, and devices connected to the network must be within 30 feet of range.
There are different ways to set up an ad hoc network in Windows 11. You can either create an ad hoc network through the Windows control panel or use the command prompt to run netsh commands.
Here, we will use the command prompt to create an ad hoc network on Windows 11.
Set the Ad Hoc Connection
Open the command prompt with administrator privilege and type the following command to configure your ad hoc network:
netsh wlan set hostednetwork mode=allow ssid=network_name key=passwordReplace network_name with your desired ad hoc network and password with a secure password.
Start the Network
Once the network is created, run the following command to start the network:
netsh wlan start hostednetworkStop the Network
To stop the ad hoc network, run the following command:
netsh wlan stop hostednetworkRetrieve the Network
You can get the details of your ad hoc network by running the following command:
netsh wlan show hostednetworkModify the Network Details
To change the network details of the hosted wireless network, you can run this command:
netsh wlan set hostednetwork parameter parameter_name valueModify the Hosted Wireless Network’s Password
Run the following command to change the password of your wireless hosted network:
netsh wlan set hostednetwork key=new_passwordIf you want to check the new password, use this command for retrieving the wireless-hosted network mentioned above.
netsh wlan show profile name="Wi-Fi-Profile" key=clearTo enable internet access for users on this network via the Wireless Hosted Network, activate Internet Connection Sharing (ICS) first.
3 Top Tools for Network Configuration Management in Windows
Network configuration involves managing network settings, policies, and controls for devices connected to the network, as well as installing software and sharing internet connectivity.
In addition, network configuration management involves keeping track of any changes made to the configuration that may pose a security risk, system failure, or operational disruption. Network administrators use specialized software for network configuration management to mitigate these risks and to make bulk changes efficiently while minimizing the likelihood of errors.
Here are three of the top tools for network configuration management in Windows.
1. SolarWinds Network Configuration Manager
Best for customizability
SolarWinds Network Configuration Manager (NCM) is a very useful network configuration management tool for network administrators that enhances network reliability and security while saving time. The software manages changes, configurations, and compliance for various network devices from industry-leading manufacturers such as Cisco, HP, Dell, F5, Rukus, and others.
It’s an industry-leading solution for bulk configurations in mid-to-large businesses. It automates configuration backup and restores points, has multi-vendor capabilities, and has an automated alert system.
Pricing
Subscription-based pricing for SolarWinds NCM starts at $1,894, with a perpetual license starting at $3,671. You can get a quote for your particular use case. Subscription and perpetual licensing are available with a 30-day free trial option.
Pros
● Decreased troubleshooting time
● Software and hardware inventory tracking
● Easy-to-use dashboard
● Availability of audit module highlighting security compliance
Cons
● Administrators may face a learning curve
● High cost compared to other tools
2. ManageEngine NCM
Best for ease of use
ManageEngine NCM provides a comprehensive set of basic and advanced features that cater to organizations’ NCM needs. This tool facilitates efficient management of network devices and configurations while offering capabilities such as automated configuration backup, compliance management, and enhanced network security.
With its robust reporting capabilities, the tool helps companies generate insightful reports on changes, compliances, and inventory. Moreover, the monitoring and assessment capabilities of this tool allow businesses to track current changes, predict future changes, and prevent unexpected changes in the future.
Pricing
There is a free personal-use edition for two devices, a professional edition starting at $595 for 10 devices, and an enterprise edition starting at $8,395 for 250 devices. Custom-designed quoting options are available with a 30-day free trial period.
Pros
● Automated configuration backup is available
● Automatic scanning to detect unauthorized changes made
● Scalable platform
● Enhanced network stability
Cons
● The free version is limited to two devices only
3. Kiwi CatTools
Best for small businesses
SolarWinds Kiwi CatTools is a cost-effective yet robust network automation and configuration management tool designed to cater to the needs of small businesses. This tool provides a range of features that simplify device management, including a built-in Trivial File Transfer Protocol (TFTP) server for scheduling backups, automated configuration change alerts and reports for analysis, and bulk configuration change capabilities that can be easily performed or reversed. Kiwi CatTools also offers the convenience of automated settings for a hassle-free experience.
In addition to these key features, Kiwi CatTools generates comprehensive HTML and text-based reports on basic configuration changes related to port, MAC, ARP, and other critical network parameters. These reports can be directly emailed to key stakeholders, facilitating streamlined communication and decision-making processes.
Pricing
A perpetual license costs $947 for unlimited devices after a 14-day trial.
Pros
● Reduced network downtime
● Execute bulk configuration reports
● Automated network backup
● Enhanced security
Cons
● Limited scripting capability
● Very basic UI
Bottom Line: Using Netsh Commands for Wi-Fi Management in Windows 11
Effective wireless network management is crucial for ensuring seamless connectivity and optimal performance of devices. With netsh commands, Windows 11 users can easily troubleshoot and manage their wireless network connections.
For IT departments needing greater depth and granularity, NCM tools like ManageEngine NCM and SolarWinds NCM provide powerful features that simplify device management, automate configuration changes, and generate detailed reports for analysis.
Take a deep dive into configuration management with our complete guide.