
In the past it was not possible to create Zip files and Unzip archives in Windows without installing third-party programs like WinZip and 7-Zip.
But now Windows has a built-in capability to Zip files and folders and Unzip archives from the command line using PowerShell.
Starting from Windows 8 with PowerShell 3.0 and .NET Framework 4.5 installed by default, it is possible to use a kind of zip and unzip commands from the command line.
Cool Tip: Download a file using PowerShell! Read more →
Zip/Unzip From The Command Line In Windows
Depending on the version of PowerShell there are different ways to Zip files and folders and Unzip archives in Windows from the command line.
To determine a version of PowerShell on your machine, execute:
PS C:\> $PSVersionTable.PSVersion
PowerShell 5.0 (Windows 10) and greater
Starting from PowerShell 5.0 (Windows 10), it is possible to Zip files and folders and Unzip archives in Windows using Compress-Archive and Expand-Archive PowerShell commands.
Zip a file or a folder from the command line in Windows:
PS C:\> Compress-Archive -Path 'C:\input' -DestinationPath 'C:\output.zip'
Zip all files in a folder:
PS C:\> Compress-Archive -Path 'C:\folder\*' -DestinationPath 'C:\output.zip'
Unzip an archive from the command line in Windows:
PS C:\> Expand-Archive -Path 'C:\input.zip' -DestinationPath 'C:\output'
PowerShell 3.0 (Windows  and greater
 and greater
Starting from PowerShell 3.0 (Windows 8), it is possible to Zip folders and Unzip archives in Windows from the command line using the special methods in PowerShell.
Zip all files in a folder from the command line in Windows:
PS C:\> Add-Type -A 'System.IO.Compression.FileSystem';
[IO.Compression.ZipFile]::CreateFromDirectory('C:\folder', 'C:\output.zip')
Unzip an archive from the command line in Windows:
PS C:\> Add-Type -A 'System.IO.Compression.FileSystem';
[IO.Compression.ZipFile]::ExtractToDirectory('C:\input.zip', 'C:\output')
Was it useful? Share this post with the world!
To unzip files using the command prompt (cmd) in Windows, you can use the built-in `expand` command with the appropriate syntax. Here’s an example:
expand example.zip -F:* C:\destination_folder\
This command extracts all files from `example.zip` to `C:\destination_folder\`.
Understanding ZIP Files
What is a ZIP File?
A ZIP file is a compressed file format that allows multiple files to be packaged together into a single file while reducing its overall size. This makes it easier to store and share a collection of files, saving time and bandwidth during transfer. ZIP files are widely utilized in both personal and professional settings, often for distributing software, sharing documents, or archiving data.
Advantages of Using the Command Line for File Management
Using the command line, particularly through `cmd`, offers several significant advantages over traditional graphical user interface (GUI) methods. First and foremost, it provides efficiency and speed; experienced users can perform file operations much faster by typing in commands rather than navigating through folders. Additionally, `cmd` is highly scriptable, allowing users to automate repetitive tasks, making it a powerful tool for system administrators and developers alike. Furthermore, working directly in the command line can help troubleshoot issues without needing to rely on a graphical interface.
Mastering Cmd Cipher: Quick Guide to Command Encryption
Pre-requisites for Using cmd to Unzip Files
Ensuring You Have the Correct Version of Windows
Before you can begin unzipping files using `cmd`, it’s critical to ensure that you have an appropriate version of Windows. Most modern versions of Windows—including Windows 10 and Windows 11—come equipped with built-in tools for file extraction. If you’re running older versions, check for compatibility with the relevant commands.
Checking for Command Prompt Access
To unzip files using `cmd`, you need to ensure you have access to the Command Prompt. You can open `cmd` by searching for «cmd» in the Start Menu or Run dialog (Win + R). Remember that certain file operations may require Administrator access, so it’s advisable to run `cmd` as an Administrator. This can be done by right-clicking on the Command Prompt icon and selecting “Run as Administrator.”

Master Cmd Scripts with Ease: A Quick Guide
Basic cmd Unzip Command
Overview of Built-in Tools for ZIP Extraction
Windows includes a couple of built-in tools that can facilitate the extraction of ZIP files. The most common way to unzip files directly from the command line involves the use of PowerShell commands.
Using Command Prompt to Unzip Files
To extract files from a ZIP archive using the `cmd`, you can utilize the following PowerShell command:
PowerShell -Command "Expand-Archive -Path 'C:\path\to\yourfile.zip' -DestinationPath 'C:\destination\folder'"
Step-by-step Breakdown of the Example
- PowerShell: This prefix indicates that you are invoking a PowerShell command from the command line.
- Expand-Archive: This is the command used in PowerShell to extract ZIP files.
- -Path: This parameter specifies the location of the ZIP file you want to unzip.
- -DestinationPath: This option indicates where you want the extracted files to be placed.
With this method, you can efficiently decompress your ZIP files straight from the command line.

Mastering Cmd: Exploring Ipconfig/All Secrets
Advanced ZIP Extraction Commands
Using 7-Zip via Command Line
While the built-in options offer basic functionality, for more advanced features, many users opt for a third-party utility like 7-Zip.
Introduction to 7-Zip
7-Zip is a free, open-source file archiver that supports a wide range of file formats, including ZIP. It is highly regarded for its compression capabilities and efficiency.
Installation Instructions
To use 7-Zip from the command line, first, download and install it from the official website. Ensure it is properly installed before proceeding to use it from the cmd.
Syntax for 7-Zip to Unzip Files
Once 7-Zip is installed, you can extract ZIP files using the following command syntax:
"C:\Program Files\7-Zip\7z.exe" e "C:\path\to\yourfile.zip" -o"C:\destination\folder"
Explanation of the 7-Zip Command Structure
- 7z.exe: This is the executable file for 7-Zip.
- e: This command stands for “extract.”
- -o: This parameter is used to specify the output directory for the extracted files.
Extracting Specific Files from a ZIP Archive
You may not always need to extract all files from a ZIP archive. You can specify particular files to extract using the following command:
"C:\Program Files\7-Zip\7z.exe" e "C:\path\to\yourfile.zip" filename.txt
This extracts only `filename.txt` from the specified ZIP file. You can even utilize wildcards (e.g., `*.txt`) if you want to extract multiple files of a certain type.
Cmd Run Powershell: A Quick Command Guide
Troubleshooting Common Issues when Unzipping with cmd
Error Messages
When using commands to unzip files, you may encounter various error messages. Here are a couple of common issues and their solutions:
- “Access Denied”: This may occur if you do not have the necessary permissions to access the file or folder. Running the command prompt as an Administrator can often resolve this issue.
- “Invalid ZIP file format”: This indicates that the ZIP file may be corrupted or not properly formatted. Try using another tool or downloading the ZIP file again.
Directory Permissions
It’s essential to ensure that you have adequate permissions to perform extraction operations in your chosen destination directory. To check and modify folder permissions, right-click the folder, select Properties, and navigate to the Security tab. Here, you can view and adjust permissions as necessary.

Mastering Cmd in Powershell: A Quick Guide
Conclusion
Mastering the use of `cmd unzip` commands can greatly enhance your productivity when working with files on Windows. By understanding the different methods available to extract ZIP files, users can optimize their workflow, whether through built-in Windows utilities or advanced tools like 7-Zip. As you continue to practice using the command line for file management, you will find increasing comfort and efficiency in these operations. Feel encouraged to dive deeper into the world of `cmd` and explore more advanced tutorials to further develop your skills!
Mastering The Cmd IP Command: Quick And Simple Guide
Additional Resources
For more reading on command-line utilities and file management tips, consider browsing through various online forums, documentation, or our internal resources. Tools like 7-Zip and others can also provide additional functionalities that help in managing your files effectively.
Disclaimer
Whenever using command line tools, remember the potential risks involved, such as unintentional data loss or mismanagement of files. Always back up important data before executing commands that modify or delete files.
Sign in to your MUO account

Are you running out of space on your Windows PC? The best thing you can do to free up some space is to compress big files through zipping. There are plenty of third-party tools that can come in handy in this situation.
However, if you prefer to use Command Prompt or Windows PowerShell over anything else, there are commands you can use in these utilities to zip or unzip files. So, let’s check out how to zip or unzip files using Command Prompt and Windows PowerShell.
How to Zip Files Using Command Prompt
You can zip files through Command Prompt using the tar command. It’s a command line tool that helps you to extract files and create archives. However, this command only works in Windows 10 or later.
Here’s how to zip files using Command Prompt:
- Open the Start Menu by pressing the Win key.
- In the search bar, type Command Prompt and Run as administrator from the right pane.
-
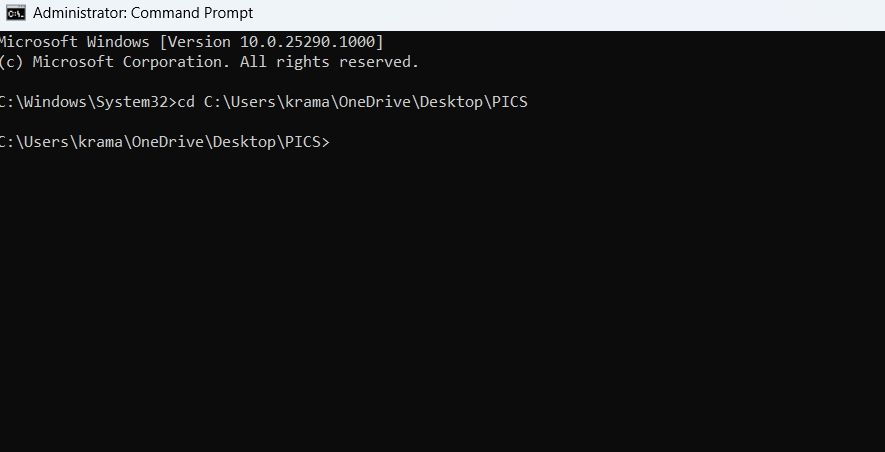
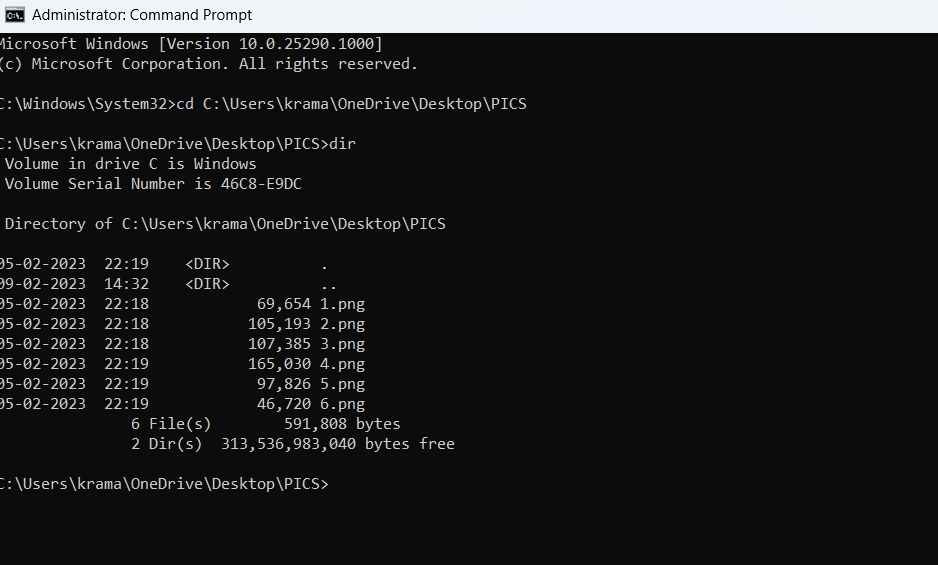
In the console, type the following command and press Enter. Replace ‘Place’ with the location of the file.
cd Place
-
Type dir and press Enter. It’ll show the files inside the selected folder.

-
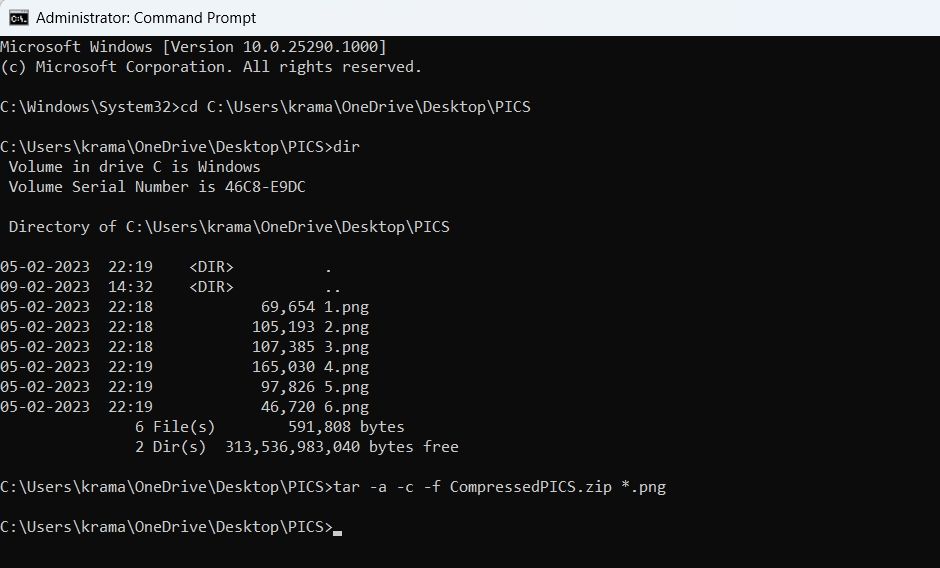
To zip all the files inside the selected folder, type the following command and press Enter. Replace ‘Compressed‘ with the name you want to give your folder where the zip file will be stored. Also, replace ‘FileExt‘ with the extension of the file you’re zipping.
tar -a -c -f Compressed.zip *.FileExt
-
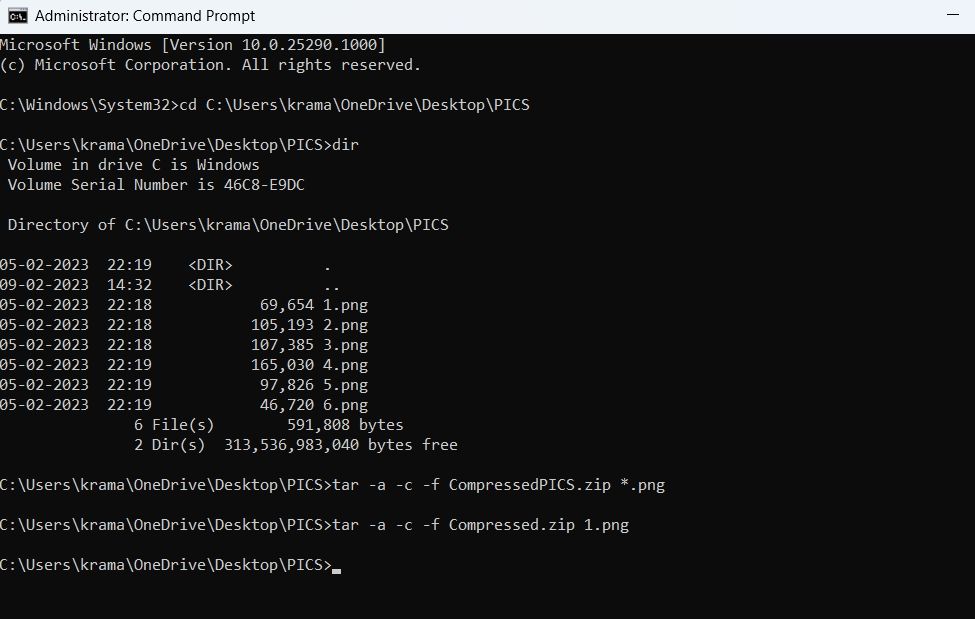
To zip a single file, execute the following command. Again, replace ‘Compressed‘ with the name you want to give your folder where the zip file will be stored, ‘FileExt‘ with your file’s extension, and ‘FileName‘ with the name of the file you want to zip.
tar -a -c -f Compressed.zip FileName.FileExt
How to Zip Files Using Windows PowerShell
There are several viable ways to create zip files on Windows. One of these is through Windows PowerShell. However, the tar command doesn’t work in Windows PowerShell; we’ll use another command to get the work done.
Here’s how to zip files using Windows PowerShell:
- Open the Start Menu, type Windows PowerShell, and choose Run as administrator from the right pane.
-
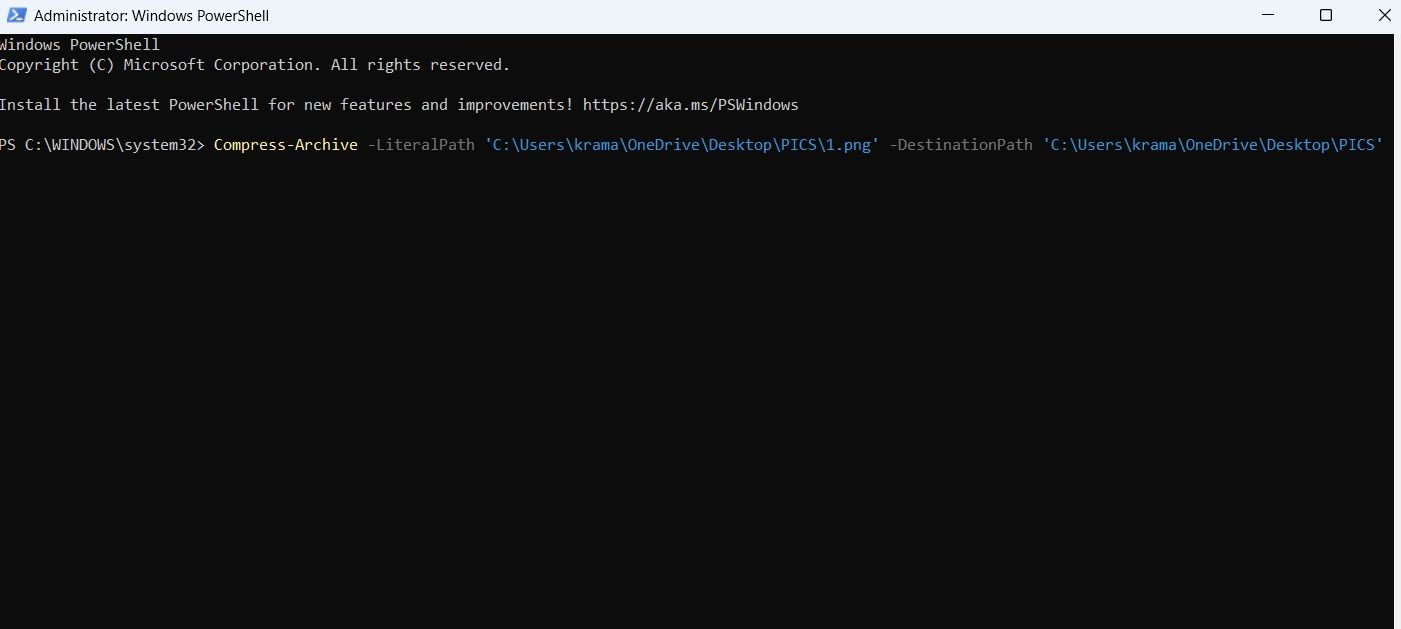
In the console, type the following command and press Enter. Ensure to replace file destination and target location with the location of the file and the place where you want the file to be zipped, respectively. Also, replace file name with the name of the file you want to zip and destination name with the destination folder name.
Compress-Archive -LiteralPath 'file destination\file name' -DestinationPath 'target location\destination name'
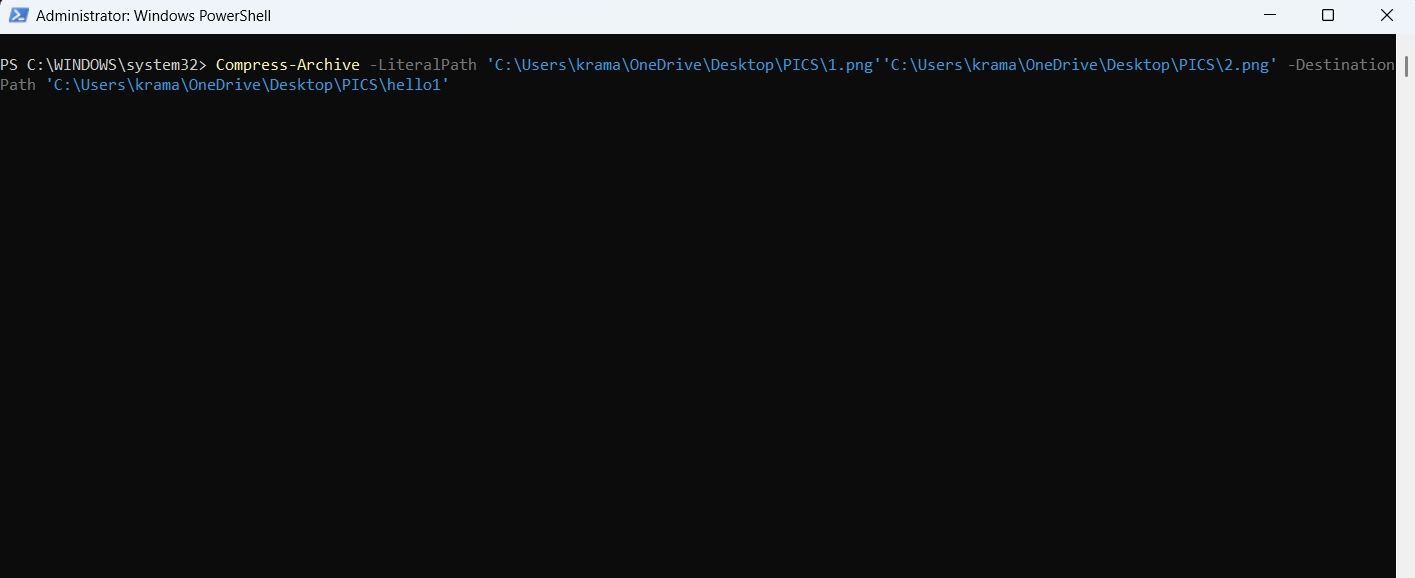
If you want to zip multiple files, execute the following command. Replace file destination and file destination 1 with the location of the first and second files, respectively. And replace file name and file name 2 with the first and second file names.
Compress-Archive -LiteralPath 'file destination\file name', 'file destination 1\file name 2 -DestinationPath 'target location\destination name'
How to Unzip Files Using Command Prompt
There may be situations where you want to unzip files on your Windows computer. Fortunately, you can do that as well using Command Prompt. Here’s how:
- Launch Command Prompt with admin privileges.
- Use the cd command to head toward the zip file’s location.
-
Type the following command and press Enter. Replace ‘Name‘ with the name of the zip file.
tar -xf Name.zip
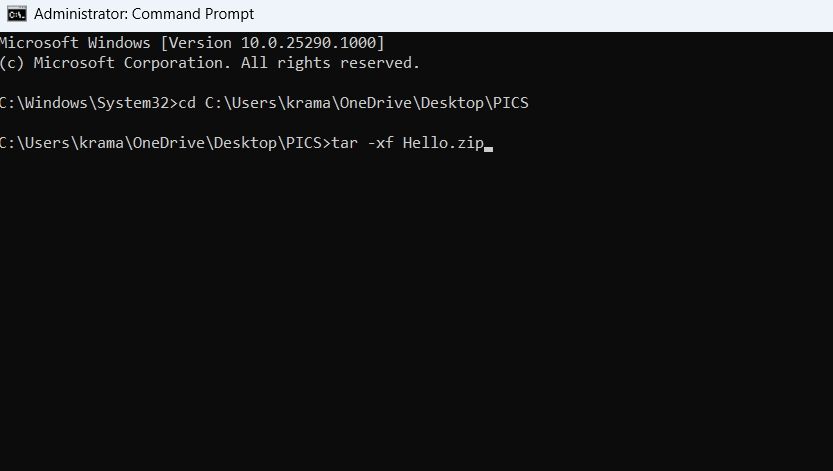
You’ve successfully unzipped the file.
How to Unzip Files Using Windows PowerShell
Windows PowerShell lets you quickly unzip files on your computer. Here’s how to do that:
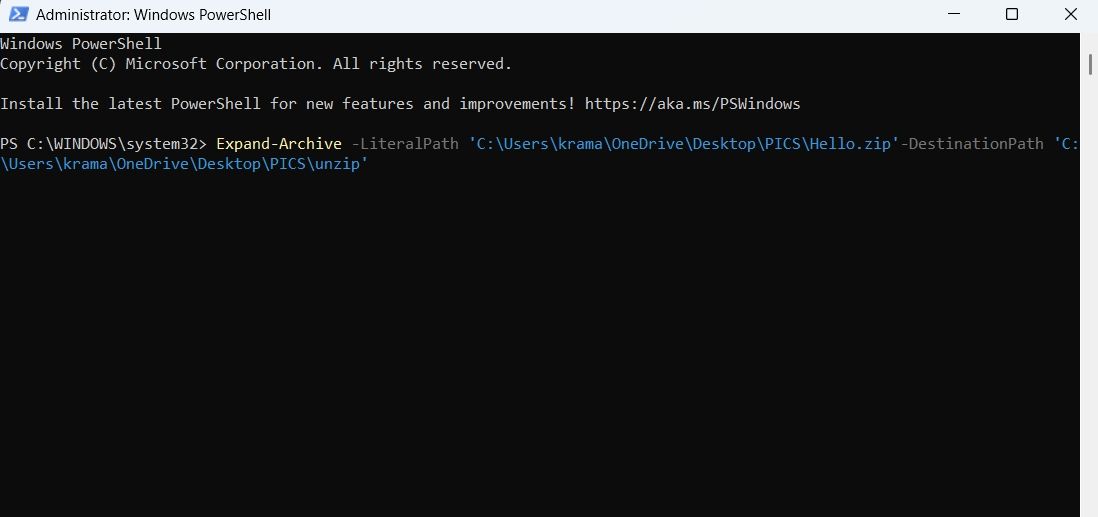
- Open Windows PowerShell with admin rights.
-
Type the following command and press Enter. Make sure to replace <file destination> and <target location> with the location of the zip file and the place where you want the file to be unzipped, respectively.
Expand-Archive -LiteralPath <file destination> -DestinationPath <target location>
Save Up Space on Windows 11 by Zipping Your Files
As a Windows user, you will always come across situations where you want to zip or unzip files. However, if you don’t want to use a third-party tool, you can use Command Prompt and Windows PowerShell to quickly zip and unzip files on Windows using the above methods.
Meanwhile, you might be interested in learning a few important Command Prompt commands.

Do you need to extract ZIP files but don’t want to use the mouse or open browser windows? If you prefer to work directly from the console or need to automate processes with scripts, unzip ZIP files from the command line. commands en Windows It’s a very useful skill. In this article, we’ll explain all the possible ways you can do this, from using tools built into the operating system itself to third-party programs that extend its functionality.
Whether for practicality, technical necessity, or simply curiosity, using the command console (DCM o PowerShell) to manage ZIP files can save you a lot of time on certain repetitive tasks. You’ll see that you don’t need to be an expert to achieve this, just know the right commands and how to apply them correctly.
What tools are available in Windows to unzip ZIP files using commands?
Windows, especially in its most recent versions like Windows 10 and Windows 11, has significantly improved its capabilities from the command line. Below, we show you the main ways you can work with ZIP files from the terminal.
1. Using the TAR tool in Windows 10 and 11
Since the April 2018 Update, Windows 10 includes the ‘tar’ command in PowerShell by default., which was previously exclusive to systems Unix o LinuxThis tool allows you to both compress and decompress files without having to install anything.
To unzip a ZIP file with tar, simply do the following:
tar -xf archivo.zip -C ruta\de\destinoQuick explanation:
- -x: indicates that it is going to be extracted.
- -F: specifies the file.
- -C: defines the directory where the files will be extracted (optional).
This command is ideal because it doesn’t rely on external software and works quite well if you only need to perform basic extractions.
2. Using Windows Explorer from the command prompt
Another way to do this, although more indirect, is through commands that simulate file explorer actions. From Windows you can open and extract ZIP files automatically with the ‘explorer’ command.:
explorer archivo.zipThis opens the file as if you double-clicked on it. From there you can drag files or create a script to move the extracted files to another folder, although it is not the most practical for decompressing directly without user intervention.
3. ‘Compact’ command: limited but functional
Many users confuse the ‘compact’ command, believing it is for working with ZIP files. In reality, ‘compact’ is used to compress and decompress files on the file system NTFS, but it does not work directly with ZIP.
Still, it’s interesting to know that you can compress or decompress files internally (not ZIP) with this command. To decompress, for example:
compact /u /s:ruta\carpetaThis removes previously applied NTFS compression using the modifier /u (uncompress). While this isn’t what we’re looking for when dealing with .zip files, it can be useful in other contexts.
Third-party utilities to unzip ZIP from CMD
In many cases, built-in tools don’t offer the flexibility or advanced options you might need. Fortunately, there are free third-party programs such as 7-Zip, WinRAR, or Zipware which allow you to unzip files from the command line with many more options. For a more detailed comparison, you can check out 7-Zip vs WinRAR.
1. Unzip ZIP with 7-Zip from the terminal
7-Zip is one of the most popular and powerful programs for managing compressed files. It offers a simple graphical interface, but also You can use its 7z.exe executable from CMD to extract ZIP. You just need to have it installed and add its path to your PATH or specify it directly.
Usage example:
"C:\Program Files\7-Zip\7z.exe" x archivo.zip -oC:\ruta\de\extraccionOptions details:
- x: extract the contents of the ZIP file.
- -either: defines where to save the extracted files (no space after -o).
Additionally, 7-Zip supports multiple formats and high compression, making it great if you also need to compress efficiently. For more information on 7-Zip, see This article about 7-Zip.
2. Using WinRAR from CMD
WinRAR also allows work from the console using the unrar.exe fileThe basic command would be something like:
"C:\Program Files (x86)\WinRAR\UnRAR.exe" x archivo.zip C:\ruta\de\extraccionHowever, please note that if you try to use the ZIP version of ‘unrar.exe’ it may not work properly. The tool focuses primarily on .rar files, although the application itself supports other formats from the graphical interface.
On some forums, such as Stack Overflow, several users have reported errors like «No files to extract» when trying to use ‘unrar.exe’ on ZIPs, so It is recommended to use 7-Zip or a specific alternative for ZIP. You can also check other applications for working with ZIP files.
3. Zipware: Another option for Windows
Zipware is perhaps less known, but it also allows Manage ZIP and other formats with options from their context menuWhile it doesn’t have as much command-line support as 7-Zip, it’s useful if you work from the graphical interface and want to automate tasks with PowerShell scripts combined.
Your options include:
- Extract to this folder: to save the content in the same place.
- Extract to a folder with the zip name
- Extract to another location: : if we need to organize them better.
Advanced Automation and Scripting with CMD
One of the great advantages of working with the command line is the possibility of create .bat or .cmd scripts to automate tasksIf you work in corporate or technical environments, this can help you save a lot of time.
Basic script example to unzip multiple ZIPs with 7-Zip:
@echo off
for %%f in (*.zip) do (
   "C:\Program Files\7-Zip\7z.exe" x "%%f" -o"C:\extracciones\%%~nf"
)
This goes through all the ZIP files in the directory and extracts them into folders with the same name inside ‘C:\extractions’. Ideal for processing large volumes of files without human intervention.
Frequently Asked Questions about ZIP and CMD in Windows
Can you extract a ZIP without installing anything extra?
Yes, you can use ‘tar’ or File Explorer from commands in Windows 10/11. Of course, these options are more limited.
What is the advantage of using 7-Zip from CMD?
Increased speed, advanced automation, and support for multiple formats. Ideal for professional or technical use.
Can I password protect a ZIP from CMD?
7-Zip allows it, but you have to specify it with the modifier -p. Example: 7z a -pcontraseña archivo.zip archivo.txt
What if I have file names with spaces?
Always enclose paths and names in double quotes: "C:\Mi Carpeta\archivo.zip"
The Windows command line has evolved more than many realize. Between native tools and third-party tools like 7-Zip, unzipping ZIP files from CMD is not only possible, but also fast, efficient, and practical. Whether you’re automating tasks, working in environments without a graphical interface, or simply out of personal preference, the options Windows offers cover most needs. You can choose between built-in commands like ‘tar’ or more powerful solutions like 7-Zip, depending on the level of complexity you need to implement.
Related article:
7 Best Apps to Open ZIP Files
Passionate writer about the world of bytes and technology in general. I love sharing my knowledge through writing, and that’s what I’ll do on this blog, show you all the most interesting things about gadgets, software, hardware, tech trends, and more. My goal is to help you navigate the digital world in a simple and entertaining way.
In today’s fast-paced world, time is key and when it comes to sharing files over the internet, you can get irritated because you have to wait. But what if I tell you that you can reduce the size of your files without compromising their integrity? Yes! You can do it using the “Zipping” method.
The “Zipping” method refers to creating the compressed files in the “.zip” format. In Windows, you can utilize multiple methods to create a “.zip” file with reduced size to save disk space and bandwidth while sharing.
Today’s guide explores the methods to “Zip” or “Unzip” files using the Windows Command Line.
Content Overview
By following this guide, you will learn:
- Zip and Unzip Files Via the Command Prompt
- Zip and Unzip Files Via the Windows PowerShell
Let’s dive into the details of the above.
Zip and Unzip Files Via the Command Prompt
For zipping and unzipping files via the Command Prompt, follow these approaches:
- The “tar” Command
- The “7zip” Utility
Zip and Unzip Files Using the “tar” Command on Windows
The “tar” is originally a *nix command-line utility, but now in the latest versions of Windows, it is officially supported. The use of the “tar” command to zip or unzip files in Windows Command Line is as follows:
Zip Files Using the “tar” Command as follows:
tar -c -f ZipFileName.zip File-To-ZipHere,
- The “tar” invokes the “tar” command.
- The “-c” flag stands for “Create” which means creating the archive.
- The “-f” flag specifies the name of the output archive.
Below is the execution of the command, but first you must navigate to the specified directory and list files using the following commands:
cd <Path to the Specified Directory>
dir
Now use the following command to create a “.zip” file for the “file.txt”:
tar -c -f files.zip file.txt
Unzip Files Using the “tar” Command
To unzip the files using the “tar” command on Windows, run the following command and replace files.zip with the name or the path to the zipped file you want to extract:
tar -xf files.zip
dir
Zip and Unzip Files Using the “7zip” Utility on Windows
The “7zip” is a popular and open-source cross-platform file management utility that lets you create and extract zip files. To use it on Windows, execute the following command in Windows PowerShell to install Chocolatey – A PowerShell utility to install and manage Windows apps:
Set-ExecutionPolicy Bypass -Scope Process -Force; [System.Net.ServicePointManager]::SecurityProtocol = [System.Net.ServicePointManager]::SecurityProtocol -bor 3072; iex ((New-Object System.Net.WebClient).DownloadString('https://community.chocolatey.org/install.ps1'))After installing the “Chocolatey” use the below-mentioned command to install “7zip”:
choco install 7zip.install -y
Now to create a zip file of all the text files in the navigated directory using the “7zip”, execute this command:
7z a -t7z files.7z *.txt
Note: You can remove the * from the above command and insert a file name as well.
For unzipping the files using the “7zip”, you need to execute the below command and replace “files.7z” with the file’s name you want to unzip:
7z e files.7z
Note: You can use the “7zip” and “tar” in Windows PowerShell in the same way as the Command Prompt.
Zip and Unzip Files Via the Windows PowerShell
We have already discussed zipping and unzipping the files using the Command Prompt (the same can be used in Windows PowerShell). However, in Windows PowerShell, you can use the “Compress-Archive” cmdlet to zip and “Expand-Archive” to unzip the files.
The “Compress-Archive” is used to create the zip files, as illustrated in the below command:
$compress = @{
>>   Path = "C:\Users\Ali\Documents"
>> CompressionLevel = "Fastest" >> DestinationPath = "C:\Archives\Draft.zip" >> } >> Compress-Archive @compress PS C:\WINDOWS\system32> 
Now check the contents of the directory in which the zipped file is stored:
dir C:\Archives
To unzip the files using the “Expand-Archive” cmdlet, run the following command:
Expand-Archive -Path C:\Archives\Draft.zip -DestinationPath C:\Users\Ali\Documents
That’s all for this post to zip and unzip files in Windows Command Line.
Final Words
To zip and unzip files in Windows Command Line, use the “tar” or “7zip” utilities in either Command Prompt or Windows PowerShell. Additionally, you can use the “Compress-Archive” cmdlet to create a zipped file and “Expand-Archive” to unzip it. This guide has discussed the methods to zip and unzip files using the Windows PowerShell and Command Prompt.