
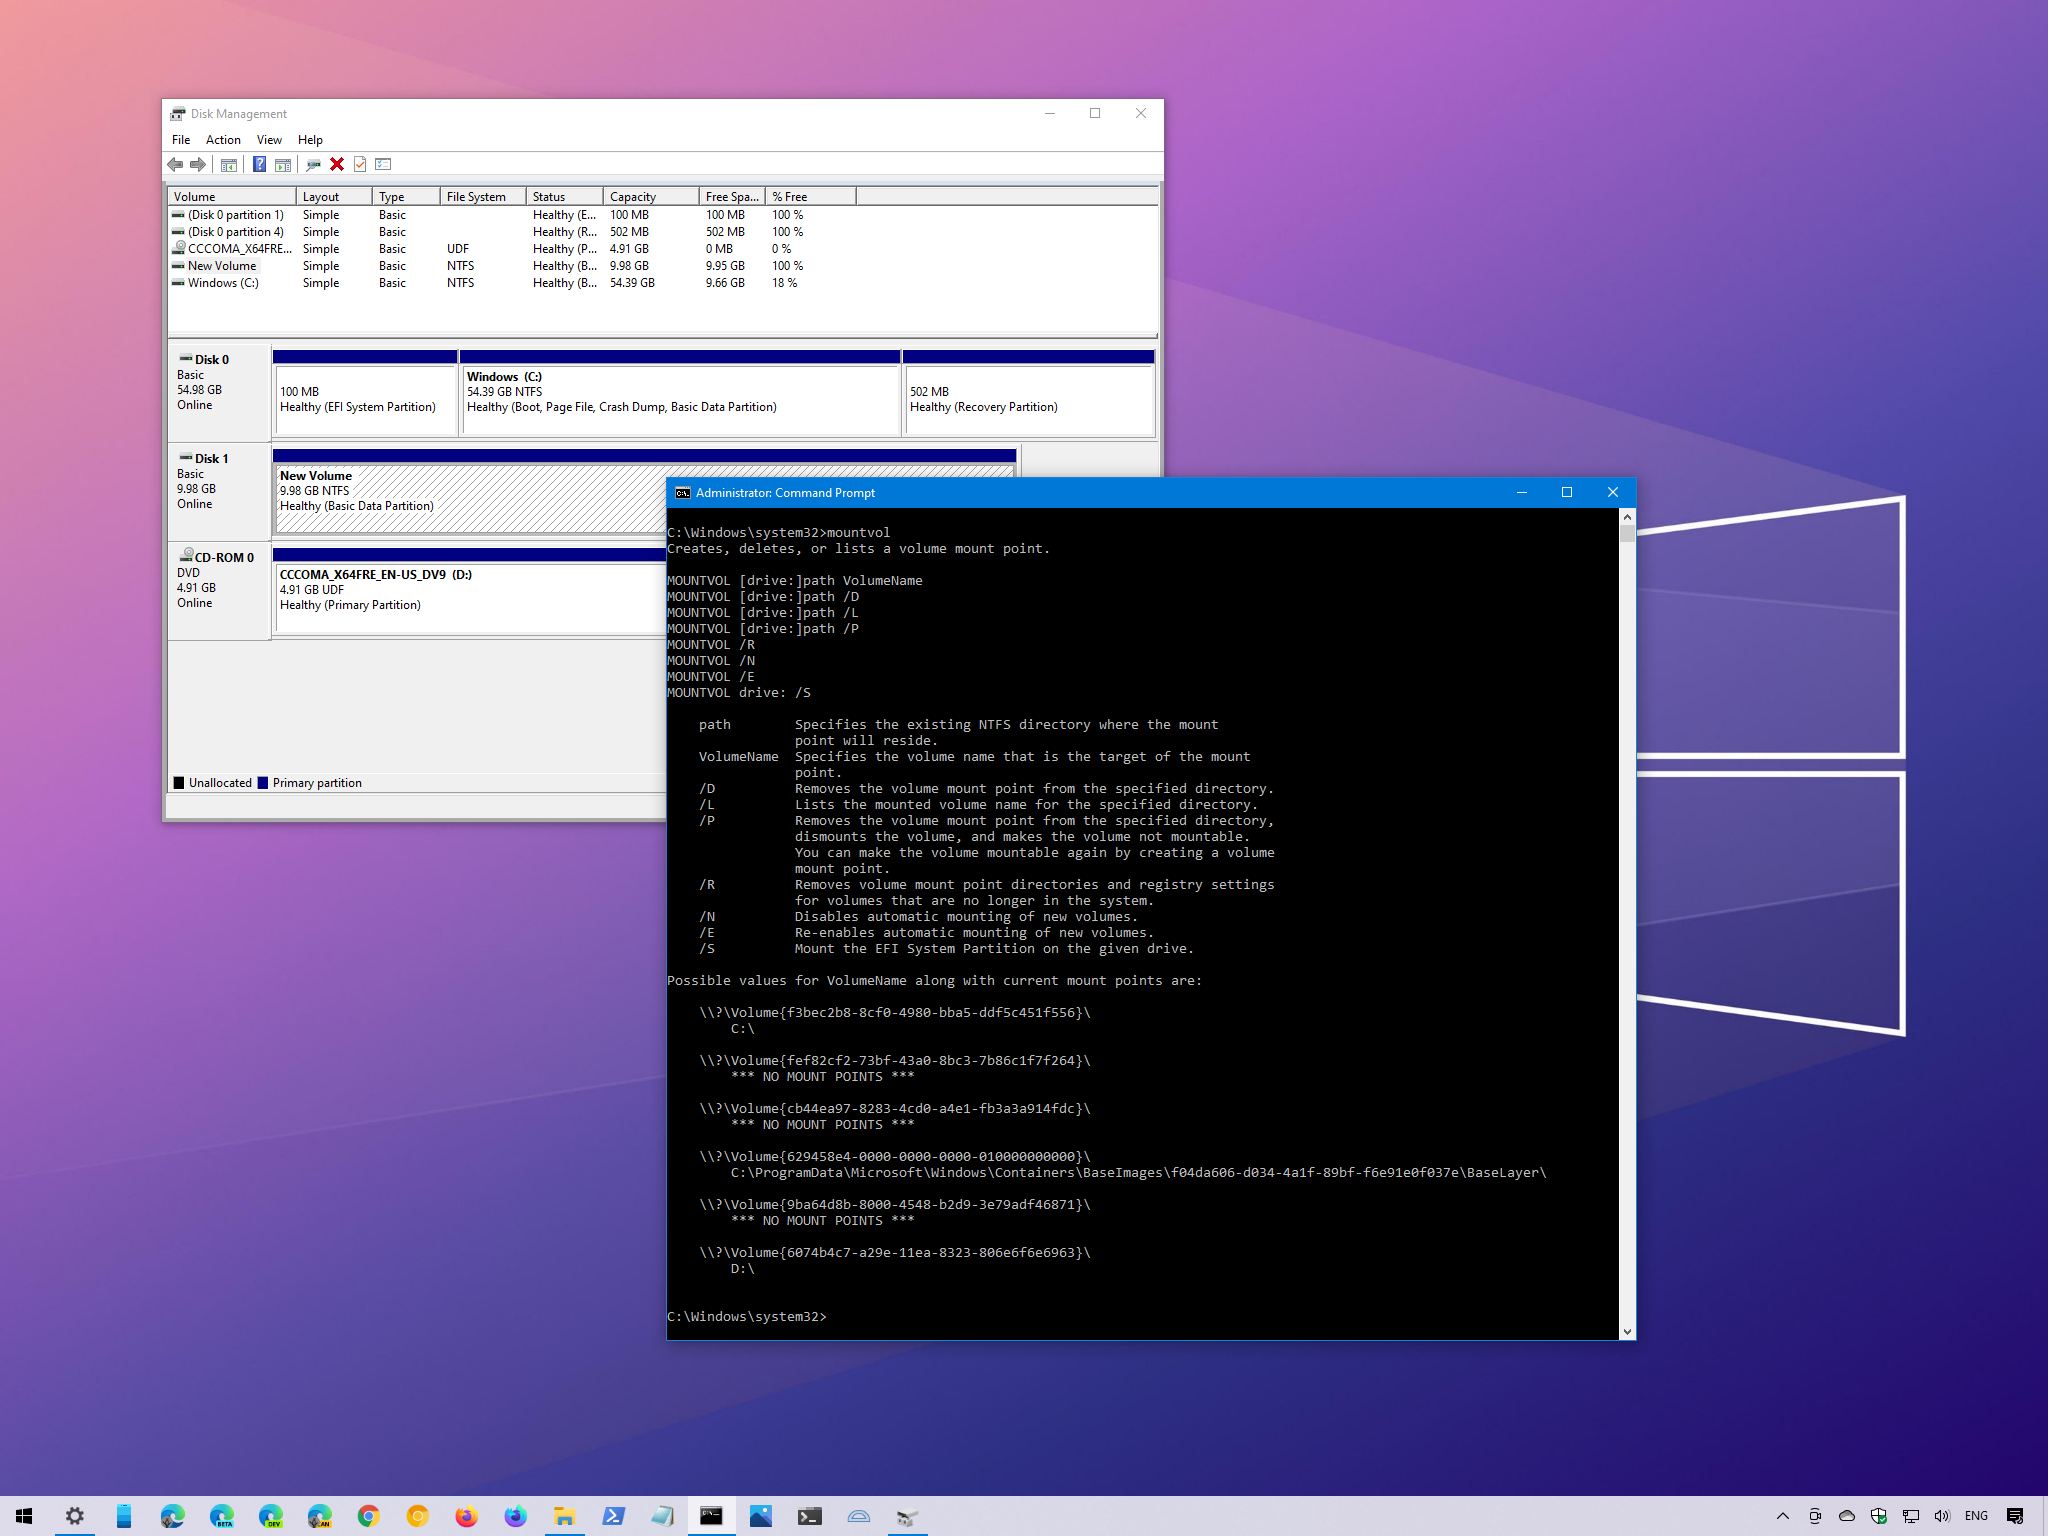
(Image credit: Windows Central)
Although Windows 10 can automatically mount a drive, the ability to mount and unmount a drive manually can come in handy in many scenarios. For example, when the system does not automatically assign a drive letter upon connecting a new storage device. You formatted a drive using commands, and you did not specify a mount point. Or you need to unmount a device’s storage to make it permanently inaccessible to users.
Whatever the reason it might be, Windows 10 allows you to quickly mount or unmount a drive using a graphical interface with Disk Management or with command-line using the mountvol and DiskPart tools in Command Prompt.
In this Windows 10 guide, we will walk through the steps to mount and unmount a drive (or volume) using the Disk Management graphical console and mountvol and DiskPart command-line tools available with Command Prompt.
- How to mount drive on Windows 10
- How to unmount drive on Windows 10
How to mount drive on Windows 10
On Windows 10, when you mount a drive manually, you will create a mount point with a drive letter that will make the storage available to users and allow the system to automatically mount the drive with the same drive letter.
You can complete this process in at least three ways with the Disk Management console and the mountvol and DiskPart command-line tools.
Mount drive with Disk Management
To use Disk Management to mount a drive on Windows 10, use these steps:
- Open Start.
- Search for Create and format hard disks partitions and click the top result to open Disk Management.
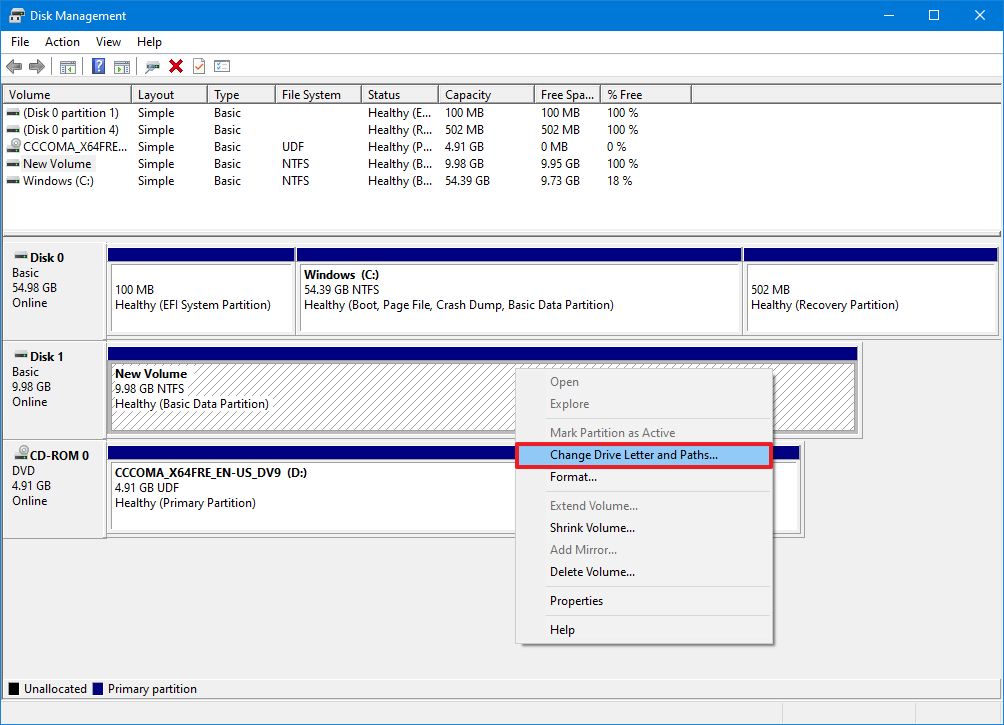
- Right-click the drive and select the Change Drive Letter and Path option.
- Click the Add button.
- Select the Assign the following drive letter option.
- Use the drop-down menu and select one of the available letters.Quick tip: When assigning a letter manually, it’s best to start with the last available letter to have a point of reference to determine if the volume was mounted manually or automatically.
Once you complete the steps, the drive will mount and appear in the system to store data.
All the latest news, reviews, and guides for Windows and Xbox diehards.
Mount drive with mountvol
To use mountvol to mount a drive, use these steps:
- Open Start.
- Search for Command Prompt, right-click the top result, and select the Run as administrator option.
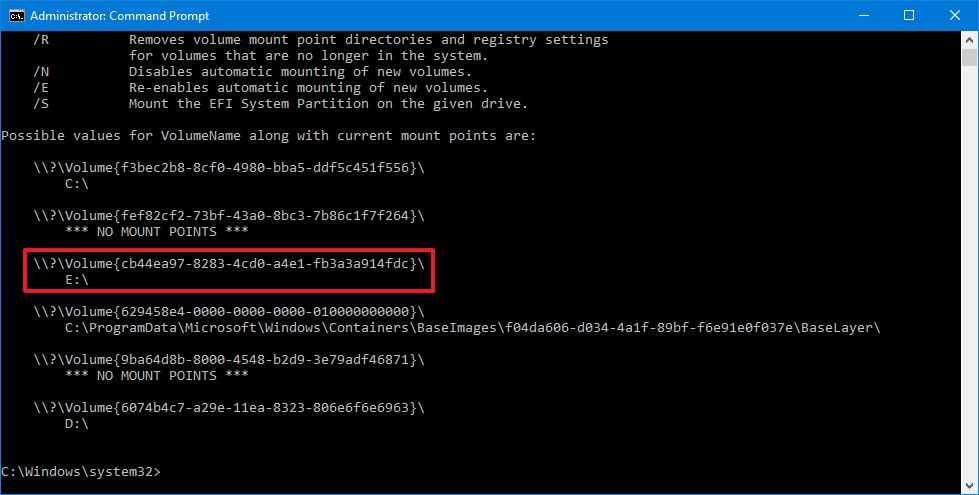
- Type the following command to list all the available mount points and press Enter:
mountvol
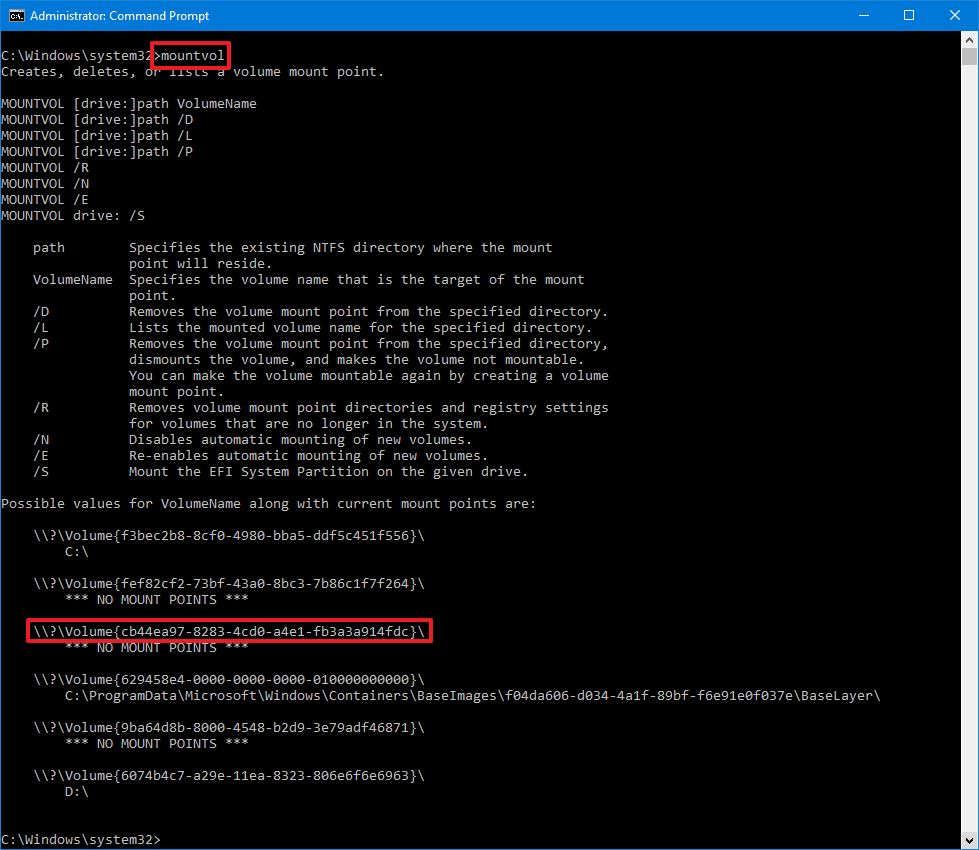
- Select the mount point path to copy the information to the clipboard.Quick note: Usually, the volume may or may not be listed with the «Not mountable until a volume mount point is created» label. If you cannot identify the volume, then use the Disk Management console instead.
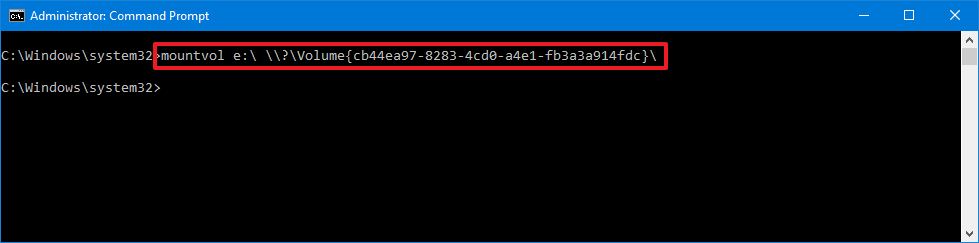
- Type the following command to mount the volume and press Enter:
mountvol DRIVE-LETTER:\ VOLUME-NAMEIn the command, make sure to replace DRIVE-LETTER and VOLUME-NAME with the appropriate information.For example, this command mounts the\\?\Volume{cb44ea97-8283-4cd0-a4e1-fb3a3a914fdc}\with theedrive letter:mountvol e:\ \\?\Volume{cb44ea97-8283-4cd0-a4e1-fb3a3a914fdc}\
After you complete the steps, the volume will be accessible through File Explorer and across the experience.
Mount drive with DiskPart
Alternatively, you can also accomplish the task using DiskPart with these steps:
- Open Start.
- Search for Command Prompt, right-click the top result, and select the** Run as administrator** option.
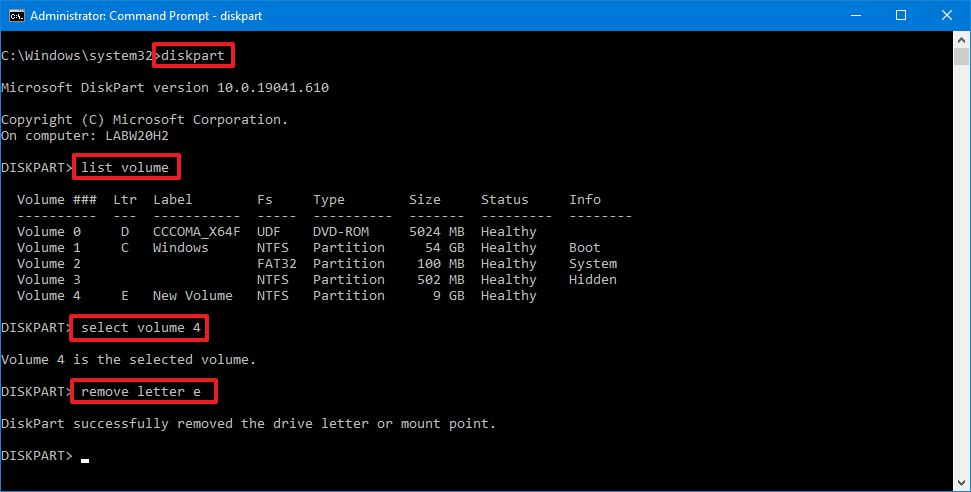
- Type the following command to start the tool and press Enter:
diskpart - Type the following command to list all the available volumes and press Enter:
list volume - Confirm the volume you want to mount.
- Type the following command to select the drive and press Enter:
select volume VOLUME-NUMBERIn the command, replace VOLUME-NUMBER with the number of the drive (volume) you want to mount.For example, this command selects volume number four:select volume 4

- Type the following command to mount the drive on Windows 10 and press Enter:
assign letter DRIVE-LETTERIn the command, replace DRIVE-LETTER with the letter you want to mount and access the storage.For example, this command mounts the drive and assigns theedrive letter:assign letter e
How to unmount drive on Windows 10
When you unmount a drive manually, you will remove the mount point making the storage inaccessible. Also, the system will no longer try to mount it automatically. If you want to make the drive mountable again, you will need to revert the changes (see above steps).
If you want to unmount a drive, you can also use the same Disk Management, mountvol, and DiskPart tools.
Unmount drive with Disk Management
To unmount a drive with Disk Management, use these steps:
- Open Start.
- Search for Create and format hard disks partitions and click the top result to open Disk Management.
- Right-click the drive and select the Change Drive Letter and Path option.
- Click the Remove button.
- Click the Yes button.
Once you complete the steps, the drive will no longer be accessible on Windows 10.
Unmount drive with mountvol
To dismount a drive (or volume) with mountvol, use these steps:
- Open Start.
- Search for Command Prompt, right-click the top result, and select the Run as administrator option.
- Type the following command to list all the available mount points and press Enter:
mountvol
- Type the following command to dismount a drive and press Enter:
mountvol DRIVE-LETTER:\ /pIn the command, make sure to change DRIVE-LETTER with the correct drive letter of the mount point you are trying to dismount.For example, this command unmounts thee:\mount point:mountvol e:\ /pQuick note: The/poption will unmount the drive and remove the drive letter. The tool also offers the/doption, but it is only meant to remove mount points individually.

After you complete the steps, the mount points will be removed, making the storage inaccessible to users.
Unmount drive with DiskPart
You can also dismount a drive with DiskPart using these steps:
- Open Start.
- Search for Command Prompt, right-click the top result, and select the** Run as administrator** option.
- Type the following command to start the tool and press Enter:
diskpart - Type the following command to list all the available volumes and press Enter:
list volume - Confirm the volume you want to unmount.
- Type the following command to select the drive and press Enter:
select volume VOLUME-NUMBERIn the command, replace VOLUME-NUMBER with the number of the drive (volume) you want to mount.For example, this command selects volume number four:select volume 4
- Type the following command to unmount the drive on Windows 10 and press Enter:
remove letter DRIVE-LETTERIn the command, replace DRIVE-LETTER with the letter of the storage you want to unmount.For example, this command dismounts theedrive:remove letter e
Also, do not confuse mounting a drive with mounting a drive as a folder, which is something different. You can use these instructions to mount a drive as a folder.
Mauro Huculak has been a Windows How-To Expert contributor for WindowsCentral.com for nearly a decade and has over 15 years of experience writing comprehensive guides. He also has an IT background and has achieved different professional certifications from Microsoft, Cisco, VMware, and CompTIA. He has been recognized as a Microsoft MVP for many years.
Windows automatically mounts any connected drive. When needed, you can mount or unmount a drive in Windows manually. Here’s how.
If you turn on the computer and open File Explorer, you will see all the available drives ready to use. This is because Windows automatically mounts all the drives or volumes connected to the system. Of course, the drive’s file system should be compatible. That way, you can access all the files and programs in those drives right from the start—no need to manually mount drives on each reboot.
Though this is a good thing, there might be a time when you need to unmount a drive in Windows. For example, maybe the drive is causing errors, you no longer need the drive to appear in the File Explorer, etc. On the other hand, you might want to manually mount a drive in Windows if it is not mounting automatically.
No matter the reason, if you ever needed it, Windows makes it easy to mount and unmount a drive. All it takes is a few clicks or a couple of commands, depending on your use case.
This simple Windows how-to guide shows you the steps to mount and unmount a drive in Windows without ado.
Table of contents:
- How to mount a drive in Windows
- Using the Disk Management tool
- Using Command Prompt
- How to unmount a drive in Windows
- Using the Disk Management tool
- Using Command Prompt
If a specific drive does not mount automatically, you can use the disk management or Command Prompt tool to mount it. It is pretty easy to do. I will show both methods, and they achieve the same thing. Follow the one you think is easy. Generally, if you want a point-and-click method, follow the Disk Management method. Follow the Command Prompt method if you want to dabble with commands or create a script.
Using the Disk Management tool
The Disk Management application is the built-in tool to manage drives or volumes in Windows. Follow the steps below to mount a Windows drive using the Disk Management tool.
- Open the Start menu.
- Search and open “Create and format hard disk partitions.”
- Identify the unmounted volume.
- Right-click on the unmounted drive.
- Choose the “Change Drive Letter and Paths” option.
- Press the “Add” button.
- Select the “Assign the following drive letter” radio option.
- Choose a drive letter from the dropdown menu.
- Press the “Ok” button.
- With that, the drive/partition is mounted.
- You can close the Disk Management tool.
- Open the File Explorer to see the newly mounted drive.

Using Command Prompt
You can also mount a drive using the Command Prompt with just a few commands. Here’s how.
Open the Command Prompt window with admin rights. To do that, search for “Command Prompt” in the Start menu and choose the “Run as administrator” option.

Next, execute the below command to list all the drives or volumes.
mountvolThe above command lists all the mounted and unmounted volumes with their respective GUIDs. Identify the unmounted volume and copy the respective Volume GUID.
A volume GUID looks something like “\\?\Volume{cf8ec040-28a9-43c6-bc10-3152b85b34cd}\.” You should copy the entire thing.

Next, execute the below command while replacing the “DriveLetter” with the drive letter you want to assign and the “VolumeGUID” with the actual string you copied earlier.
Important note: Make sure there is a space between the drive letter’s “:” and the volume GUID. Otherwise, the command won’t get executed. The drive letter you use in the command should not already be in use.
mountvol DriveLetter: VolumeGUIDThe actual command looks something like this:
mountvol E: \\?\Volume{cf8ec040-28a9-43c6-bc10-3152b85b34cd}\
As soon as you execute the command, Windows mounts the target volume with the drive letter.
How to unmount a drive in Windows
You can unmount a drive in Windows using the Disk Management tool or Command Prompt. Both methods are easy. Follow the one you think is easy. For beginners, I recommend following the Disk Management tool. If you are not afraid of commands or want to create custom scripts, follow the Command Prompt method.
Using the Disk Management tool
Follow these steps to unmount a drive in Windows using the Disk Management tool.
- Open the Start menu.
- Search and open “Create and format hard disk partitions.”
- Identify the drive you want to unmount.
- Right-click on the drive.
- Choose the “Change Drive Letter and Paths” option.
- Press the “Remove” button.
- Press “Yes” in the warning window.
- With that, the drive/partition is unmounted.
- You can close the Disk Management tool.
- Open the File Explorer, and you will no longer see the unmounted drive.

Using Command Prompt
You can unmount a drive in Windows using Command Prompt with a single command. It is pretty neat and easy to use. Let me show you how.
Press the Start key, search for “Command Prompt,” and choose the “Run as administrator” option to open the CMD window with admin rights.
Execute the below command while replacing the “DriveLetter” with the actual drive letter of the drive you want to unmount. For example, if I want to unmount the E: drive, I will relace “DriveLetter” with “E.”
mountvol DriveLetter: /P
Close the Command Prompt window after executing the command. You will no longer see the unmounted drive in File Explorer.
–
That is all. It is that simple to mount or unmount a drive in Windows.
I hope this simple Windows how-to guide helped you.
If you are stuck or need some help, comment below, and I will try to help as much as possible.
- To mount a drive as a folder on Windows 11, open Settings > System > Storage > Disks & volumes, click “Properties” for the drive, click “Add,” and choose the folder mount point.
- You can perform this configuration for a drive that is already formatted or through the partition wizard.
- Alternatively, you can mount a drive to a folder from Disk Management or Command Prompt (the same steps will work on PowerShell).
On Windows 11 (and 10, including older versions), it’s possible to mount a drive as a folder, and in this guide, I will explain how to complete this configuration.
If you have a computer with multiple drives or partitions, instead of assigning a drive letter to each storage, you can mount it as a folder within another location on your system. This approach can be useful for organizing your storage or accessing data in a specific way without using a lot of letter assignments.
Regardless of the reason, Windows offers different ways to mount a drive as a folder through the Disk Management tool and Command Prompt. On Windows 11, you can also use the “Disks & volumes” settings to perform this configuration.
In this guide, I will explain the different ways to mount a drive as a folder on Windows 11 as well as on Windows 10. You can also refer to these instructions on older versions of the operating system, including Windows 8.1, Windows 7, and older.
- How to mount a drive as a folder from Settings app
- How to mount a drive as a folder from Disk Management
- How to mount a drive as a folder from Command Prompt
How to mount a drive as a folder from Settings app
On Windows 11 (and higher releases), you can mount a drive as a folder in at least two ways from the “Disks & volumes” experience from the Settings app.
From formatted drive with data
To mount a hard drive as a folder on Windows 11 from the Settings app, use these steps:
-
Open Settings.
-
Click on System.
-
Click the Storage page.
-
Click “Advanced storage settings” under the “Storage management” section.
-
Click the “Disks & volumes” setting.

-
Click on the hard drive with the partition to mount.
-
Click the Properties button.

-
Click the Add button for the “Paths” settings.
-
Click the Browse button.
-
Open the empty folder to mount the drive.
Quick tip: Windows 11 offers multiple ways to create a new folder through File Explorer, Command Prompt, and PowerShell.
-
Click the Select Folder button.
-
Click the OK button.


From new drive without data
To mount a new partition as a folder from the Settings app, use these steps:
-
Open Settings.
-
Click on System.
-
Click the Storage page.
-
Click “Advanced storage settings” under the “Storage management” section.
-
Click the “Disks & volumes” setting.
-
Click on the hard drive with the partition to mount.
-
Choose the “Create Simple Volume” option for unallocated space.
-
(Optional) Choose the “None” option for the “Drive Letter” setting.
-
Select the appropriate settings for the new volume (as applicable).
-
Open the Advanced settings.
-
Click the Browse button.

-
Open the empty folder to mount the drive.
-
Click the Select Folder button.
-
Click the Format button.


Once you complete the steps, the storage will appear as another folder in File Explorer. Using this approach, you can still assign a drive letter to a partition, but it’s not required since you can access the storage from the mount point.
If you want to remove the folder mount point, open Settings > System > Storage > Disks & volumes, click “Properties” for the drive, click on the mount point, and click the “Remove” button.
How to mount a drive as a folder from Disk Management
The Disk Management tool is available for both Windows 11 and 10 (and even for older versions), and it allows you to mount a hard drive as a folder similar to the “Disks & volumes” settings.
From formatted drive with data
To mount a drive as a folder from the Disk Management tool, use these steps:
-
Open Start.
-
Search for Create and format hard disk and click on the top result to open the Disk Management tool.
-
Right-click the volume to mount as a folder and choose the “Change Drive Letter and Paths” option.

-
Select the current drive letter.
Quick note: The Disk Management tool doesn’t allow the mounting of a drive as a folder when a drive letter has already been assigned. As a result, you will have to remove the drive letter before mounting the storage as a folder.
-
Click the Remove button.
-
Click the Yes button.
-
Right-click the volume to mount as a folder and choose the “Change Drive Letter and Paths” option.
-
Click the Add button.
-
Choose the “Mount in the following empty NTFS folder” option.
-
Click the Browse button.
-
Select the empty folder to mount the drive.
-
Click the OK button.
-
Click the OK button again.


From new drive without data
To mount a new partition as a folder from the Disk Management app, use these steps:
-
Open Start.
-
Search for Create and format hard disk and click on the top result to open the Disk Management tool.
-
Right-click the Unallocated space for the drive to mount as a folder and choose the “New Simple Volume” option.
-
Click the Next button.
-
Choose the volume size in megabytes.

-
Click the Next button.
-
Choose the “Mount in the following empty NTFS folder” option.
-
Click the Browse button.
-
Select the empty folder to mount the drive.
-
Click the OK button.
-
Click the Next button.
-
Select the appropriate settings for the new volume (as applicable).
-
Click the Next button.
-
Click the Finish button.


After you complete the steps, the storage should now be accessible from the folder location you specified in the wizard.
If you want to remove the folder mount point, open Disk Management, right-click the volume to mount as a folder, choose the “Change Drive Letter and Paths” option, select the current folder mount point, and click the “Remove” button.
How to mount a drive as a folder from Command Prompt
On Windows 11, 10, and older versions, you can also use Command Prompt to mount a hard drive as a folder.
From formatted drive with data
To mount a drive as a folder from Command Prompt, use these steps:
-
Open Start.
-
Search for Command Prompt, right-click the top result, and select the Run as administrator option.
-
Type the following command to start diskpart and press Enter:
diskpart
-
Type the following command to view the available volumes and press Enter:
list volume
-
Type the following command to select the volume to mount as a folder and press Enter:
select volume 1
In the command, change “1” for the number of volumes to mount.
-
Type the following command to mount a hard drive as a folder and press Enter:
assign mount=C:\MyDriveFolder
In the command, change
C:\MyDriveFolderfor the path to the folder mount point.

If you want to remove the mount point to a folder, you can use the same instructions, but in step 6, run the remove mount=C:\MyDriveFolder command. You can also assign a new drive letter to the partition on Windows 11 if you want to access the storage.
From new drive without data
To mount a new partition as a folder from Command Prompt, use these steps:
-
Open Start.
-
Search for Command Prompt, right-click the top result, and select the Run as administrator option.
-
Type the following command to start diskpart and press Enter:
diskpart
-
Type the following command to view the available drives and press Enter:
list disk
-
Type the following command to select a disk and press Enter:
select disk 0
In the command, change “0” to the disk number you want to partition.
-
Type the following command to create a primary partition and press Enter:
create partition primary

-
(Optional) Type the following command to view the available volumes and press Enter:
list volume
-
Type the following command to format the partition with the NTFS file system and press Enter:
format fs=ntfs quick
-
Type the following command to mount a hard drive as a folder and press Enter:
assign mount=C:\MyDriveFolder
In the command, change
C:\MyDriveFolderfor the path to the folder mount point.


Once you complete the steps, the hard drive will be accessible from the folder mount point you assigned in Command Prompt.
If you want to remove the mount point to a folder, follow the “From formatted drive” instructions, but in step 6, run the remove mount=C:\MyDriveFolder command.
This process won’t delete the data already on the partition when assigning a mount point or changing the drive letter. However, it’ll break the connection to any app installation hosted in that particular storage, but usually, this is not the case as apps are typically installed on the main system hard drive.
Provide feedback
Saved searches
Use saved searches to filter your results more quickly
Sign up
Appearance settings
- SS64
- CMD
- How-to
DiskPart.exe
Disk Administration, Partition a disk.
Syntax
      DISKPART

      DISKPART /s scriptname.txt

      DISKPART /s scriptname.txt > logfile.txt

Key
   /s scriptname.txt (one command per line)
         To create a diskpart script, create a text file scriptname.txt containing the Diskpart commands that you
         want to run, one command per line, and no empty lines. Start a line with REM to make the line a comment.

Commands you can issue at the DISKPART prompt or in a text file:

 ACTIVE  On basic disks, mark the partition with focus as active.

         DiskPart does not check the contents of the partition. If you mistakenly mark a partition as active
         and it does not contain the Operating System startup files, your computer might not start.
         This informs the basic input/output system (BIOS) or Extensible Firmware Interface (EFI) that
         the partition or volume is a valid system partition or system volume.
         Only partitions can be marked as active. A partition must be selected for this operation to succeed.
         Use the select partition command to select a partition and shift the focus to it.

 ADD disk=n [align=n] [wait] [noerr]
         Mirror the simple volume with focus to the specified disk.

 ASSIGN  [{LETTER=D  | mount=path}] [noerr]
         Assign a drive letter or mount point to the volume with focus. (Only Server 2012-2022)

         If no drive letter or mount point is specified, the next available drive letter is assigned.
         By using the assign command, you can change the drive letter associated with a removable drive.
         You cannot assign drive letters to system volumes, boot volumes, or volumes that contain the paging file.
         In addition, you cannot assign a drive letter to an Original Equipment Manufacturer (OEM) partition
         or any GUID Partition Table (gpt) partition other than a basic data partition.
         A volume must be selected for this operation to succeed.
         Use the select volume command to select a volume and shift the focus to it.
         ## Example To assign the letter E to the volume in focus, type: assign letter=e

 ATTRIBUTES DISK [{set | clear}] [readonly] [noerr]
 ATTRIBUTES VOLUME [{set | clear}] [{hidden | readonly | nodefaultdriveletter | shadowcopy}] [noerr]
         Display, set, or clear the attributes of a disk or volume.

 AUTOMOUNT [enable] [disable] [scrub] [noerr]
         Enable or disable the automount feature.

 BREAK disk=n [nokeep] [noerr]
         Break the mirrored volume with focus into two simple volumes.

 CLEAN [all]       (Server 2012-2022)
         Remove any and all partition or volume formatting from the disk with focus, 'all' will Zero the disk.
         See also the PowerShell cmdlet clear-disk

 COMPACT vdisk       (Windows Server 2008R2-2022)
         Reduce the physical size of a dynamically expanding virtual hard disk (VHD) file.
         This parameter is useful because dynamically expanding VHDs increase in size as you add files, but they do
         not automatically reduce in size when you delete files.

 CONVERT Convert file allocation table (FAT) and FAT32 volumes to the NTFS file system.

 CREATE partition efi [size=n] [offset=n] [noerr]
 CREATE partition extended [size=n] [offset=n] [align=n] [noerr]
 CREATE partition logical [size=n] [offset=n] [align=n] [noerr]
 CREATE partition msr [size=n] [offset=n] [noerr]
 CREATE partition primary [size=n] [offset=n] [id={ byte | guid }] [align=n] [noerr]
         Create a partition.

 CREATE volume raid [size=n] disk=n,n,n[,n,...] [align=n] [noerr]
 CREATE volume simple [size=n] [disk=n] [align=n] [noerr]
 CREATE volume stripe [size=n] disk=n,n[,n,...] [align=n] [noerr]
 CREATE volume mirror [size=n] disk=n,n[,n,...] [align=n] [noerr]
         Create a volume.

 CREATE vdisk file=filepath {[type={fixed|expandable}] | [parent=filepath] | [source=filepath]}
                      [maximum=n] [sd=SDDL] [noerr]
         Create a virtual disk (VHD).

 DELETE disk [noerr] [override]
 DELETE partition [noerr] [override]
 DELETE volume [noerr]
         Delete a partition, volume or a dynamic disk from the list of disks.

 DETAIL Disk
 DETAIL Partition
 DETAIL volume
         Display properties of the selected disk/volume/partition, display the disks on which the current volume resides:

 EXIT    Exit Diskpart

 EXPAND vdisk maximum=n
         Expand the max size (in MB) available on a virtual disk (Windows Server 2008R2-2022).

 EXTEND [size=n] [disk=n] [noerr]
 EXTEND filesystem [noerr]
         Extend a volume or partition with focus and its file system into free space on a disk.
            size= The space in MB.
            disk= The disk on which the volume or partition is extended. Default = current disk.

 FILESYSTEMS
         Display the current and supported file systems on the volume (Use 'Select Volume' first)

 FORMAT [[FS=FS] [REVISION=X.XX] | RECOMMENDED] [LABEL="label"] [UNIT=N]
            [QUICK] [COMPRESS] [OVERRIDE] [DUPLICATE] [NOWAIT] [noerr]
         Format a disk for use with Windows.

 GPT attributes=n     (Windows Server 2012-2022)  OEM use only.
      On basic GUID partition table (gpt) disks, this command assigns the gpt attribute(s) to the partition with focus.
      Gpt partition attributes give additional information about the use of the partition.
      Some attributes are specific to the partition type GUID.
      This might cause your basic data volumes to fail to be assigned drive letters, or to prevent the file system from mounting.

 HELP [command]

 IMPORT
         Imports a transportable shadow copy from a loaded metadata file into the system.
         Before you can use import, you must load a DiskShadow metadata file using the load metadata command.

 INACTIVE
         On basic master boot record (MBR) disks, marks the system partition or boot partition
         with focus as inactive [don’t boot]. Use 'Select Partition' first.
         Your computer might not start without an active partition.

 LIST Disk
 LIST Partition
 LIST Volume
 LIST vdisk
 LIST writers [metadata | detailed | status]
 LIST shadows {all | set SetID | id ShadowID}
 LIST providers
         Display a list of objects
            SetID List shadow copies that belong to the specified Shadow Copy Set ID.
         ShadowID List any shadow copy with the specified shadow copy ID

 MERGE vdisk depth=n           (Windows Server 2008R2-2022)
         Merge a differencing virtual hard disk (VHD) with its corresponding parent VHD.
         depth=1 will merge with parent.
         The parent VHD will be modified to include the modifications from the differencing VHD.
         As a result, other differencing VHDs that are dependent on the parent will no longer be valid.
         You must choose and detach a VHD for this operation to succeed.
         Use the 'select vdisk' command to select a VHD and shift the focus to it.

 OFFLINE disk [noerr]
 OFFLINE volume [noerr]
         Take an online disk or volume to the offline state, use 'Select Disk' first)

 ONLINE disk [noerr]
 ONLINE volume [noerr]
         Take an offline disk or volume to the online state.

 RECOVER [noerr]
         Refresh the state of all disks in the selected pack, attempt recovery on disks in the invalid
         pack, and resynchronize mirrored volumes and RAID-5 volumes that have stale plex or parity data.
         Only applicable to dynamic disks.

 REM  (remark/comment)

 REMOVE letter=E [dismount] [noerr]    Remove drive letter E from the in-focus partition.
 REMOVE mount=path [dismount] [noerr]  Remove mount point from the in-focus partition.
 REMOVE all [dismount] [noerr]         Remove ALL current drive letters and mount points.
         Remove a drive letter or mount point from a volume.

 REPAIR disk=n [align=N] [noerr]
         Repair a RAID-5 volume with a failed member by replacing with a specified dynamic disk.
         align = N   Align all volume extents to the closest alignment boundary.
         Extent offsets will be a multiple of N.

 RESCAN  Locate new disks and volumes that have been added to the computer.
 RETAIN  Prepare an existing dynamic simple volume to be used as a boot or system volume.


 SAN [policy={OnlineAll | OfflineAll | OfflineShared}] [noerr]
         Display or set the SAN policy for the currently booted OS.
         Specifying onlineAll on a server that shares disks could lead to data corruption.
         Do not set this policy if disks are shared among servers unless the server is part of a cluster.

 SELECT Disk={ n | diskpath | system | next }
 SELECT Partition=n   (Volume number)
 SELECT Volume={ n | d } [noerr] (Volume number or Drive Letter)
 SELECT vdisk file=fullpath [noerr]
         Shift the focus to an object.

 SET ID={ byte | GUID } [override] [noerr]
         Change the partition type for the partition with focus (for OEM use):

 SHRINK [desired=n] [minimum=n] [nowait] [noerr]  (Reduce the size of the in-focus volume)
 SHRINK querymax [noerr]
         Reduce the size of the selected volume.
         Desired = Desired space in MB.
         Minimum = space in MB to reduce the volume by.
         QueryMax = Returns the maximum number of bytes that the volume can be reduced by.

 UNIQUEID disk [id={dword | GUID}] [noerr]
         Display or set the GUID partition table identifier or MBR signature for
         the (basic or dynamic) disk with focus.
         id= For MBR disks specify a 4-byte DWORD in hex form for the signature.

Commands to Manage Basic Disks:

 ASSIGN MOUNT=path  (Choose a mount point path for the volume)

 CREATE PARTITION Primary Size=50000  (50 GB)
 CREATE PARTITION Extended Size=25000
 CREATE PARTITION logical Size=25000
 DELETE Partition
 EXTEND Size=10000
 GPT attributes=n   (assign GUID Partition Table attributes)
 SET id=byte|GUID [override] [noerr]   (Change the partition type)

Commands to Manage Dynamic Disks:

 ADD disk=n   (Add a mirror to the in-focus SIMPLE volume on the specified disk
               see 'Diskpart Help' for more.)
 BREAK disk=n  (Break the current in-focus mirror)
 CREATE VOLUME Simple Size=n Disk=n
 CREATE VOLUME Stripe Size=n Disk=n,n,...
 CREATE VOLUME Raid Size=n Disk=n,n,...
 DELETE DISK
 DELETE PARTITION
 DELETE VOLUME
 EXTEND Disk=n [Size=n]
 EXTEND Filesystem [noerr]
 IMPORT [noerr]   (Import a foreign disk group, use 'Select disk' first)
 RECOVER [noerr]  (Refresh disk pack state, attempt recovery on an invalid pack,
                   & resynchronize stale plex/parity data.)
 REPAIR disk=n [align=n] [noerr]  (Repair the RAID-5 volume with focus, replace with the specified dynamic disk)
 RETAIN   (Prepare an existing dynamic simple volume to be used as a boot or system volume)
Prior to Windows 8/Server 2008 the DiskPart utility used a different syntax.
DiskPart can be used to automate disk-related tasks, such as creating volumes or converting disks to dynamic disks. Scripting these tasks is useful if you deploy Windows by using unattended Setup or the Sysprep tool, which do not support creating volumes other than the boot volume.
When using the DiskPart command as a part of a script, we recommend that you complete all of the diskpart operations together as part of a single diskpart script. To run consecutive diskpart scripts, allow at least 15 seconds between each script for a complete shutdown of the previous execution before running the DiskPart command again in successive scripts. Otherwise, the successive scripts might fail.
Add a pause between consecutive DiskPart scripts by adding a TIMEOUT /t 15 command to the batch file.
When setting up a new drive, create in this order: Create Partition, Format drive, Assign drive letter.
When selecting a volume or partition, you can use either the number or drive letter or the mount point path.
The Windows GUI interface can also be used to assign a mount-point folder path to a drive. In Disk Manager, right-click the partition or volume, and click Change Drive Letter and Paths, then click Add and then type the path to an empty folder on an NTFS volume.
The Windows Recovery Console, includes a simplified DISKPART command. It only provides functionality for adding and deleting partitions, but not for setting an active partition.
Always back up the hard disk before running DiskPart.
Examples
Convert an MBR disk to GUID partition table (GPT)
DISKPART
list disk
::Make a note of the MBR disk number that you want to convert to GPT format.
select disk #
:: where # is the disk to convert
clean
# clean will delete all partitions and volumes on the disk
convert gpt
Create a partition on a disk:
SELECT DISK=0
CREATE PARTITION PRIMARY
SELECT PARTITION=1
FORMAT FS=NTFS LABEL=»New Volume» QUICK
ASSIGN LETTER=E
EXIT
Bring a disk online:
The default SAN policy in Windows Server 2008 / R2 is now VDS_SP_OFFLINE_SHARED for all non boot SAN disks.
This means that the disks will be offline at server startup (even if the drive contains a paging file).This Disk Management error message indicates that the drive is offline:
«the disk is offline because of policy set by an administrator».
Query the current SAN policy to see if it is Offline Shared
DISKPART.EXE
DISKPART> san
SAN Policy : Offline SharedTo manually bring the disks online:
Computer Management ➞ Storage ➞ Disk Management, right-click the disk and choose Online.
If these are not part of a cluster, than an alternative is to make a SAN policy change, select the offline disk, clear its readonly flag and bring it online:
 DISKPART> san policy=OnlineAll
 DiskPart successfully changed the SAN policy for the current Operating System.

 DISKPART> LIST DISK
 Disk ### Status        Size    Free    Dyn Gpt
 -------- ------------- ------- ------- --- ---
 Disk 0   Online         80 GB     0 B
 * Disk 1 Offline        20 GB  1024 KB

 DISKPART> select disk 1
 Disk 1 is now the selected disk.

 DISKPART> ATTRIBUTES DISK CLEAR READONLY
 DISKPART> ONLINE DISK
 DiskPart successfully onlined the selected disk.
“Divide et impera” ~ Latin saying (Divide and conquer)
Related commands
docs.microsoft.com — Configure UEFI/GPT-Based Hard Drive Partitions using Windows PE and DiskPart.
docs.microsoft.com — Configure BIOS/MBR-Based Hard Disk Partitions using Windows PE and DiskPart.
FORMAT — Format a disk.
FSUTIL — File and Volume utilities.
DISKSHADOW — Volume Shadow Copy Service.
REAGENTC — Configure Windows Recovery Environment (Windows RE) and System Reset.
SYSPREP — (Generalize) a Windows installation.
PowerShell equivalents: clear-disk, get-disk, set-partition, get-volume, Initialize-Disk — Initialize a RAW disk for first time use.
Partition Wizard — GUI Disk Partition Manager.
Equivalent bash command (Linux): fdisk — Partition table manipulator for Linux.
Copyright © 1999-2025 SS64.com
Some rights reserved