
- SS64
- CMD
- How-to
Display or set a search path for executable files at the command line.
Syntax
      PATH path [;path] [;path] [;path]...[;%PATH%]]
      PATH
      PATH ;

Key
   path       A directory path to be added to %PATH%
   %PATH%     Optionally include %PATH% at the beginning or end to avoid overwriting the current PATH definition.
    ;         The command 'PATH ;' will clear the path
PATH without parameters will display the current path.
The %PATH% environment variable contains a list of folders. When a command is issued at the CMD prompt, the Operating System will first look for an executable file in the current folder, if not found it will scan %PATH% to find it.
Use the PATH command to display or change the list of folders stored in the %PATH% environment variable
The PATH environment variable uses semicolons: ; to separate directories. It will ignore spaces or commas.
You do not need to surround each part of the path with double quotes, PATH will automatically treat spaces as part of the filename.
A trailing backslash is accepted but is not required, each part of the PATH is always treated as a directory not a file.
PowerShell in particular will ignore any path node delimited by double quotes.
Early versions of Windows did not include a semicolon at the end of the path, but recent versions do.
Permanent Changes
Changes made using the PATH command are NOT permanent, they apply to the current CMD prompt only and remain only until the CMD window is closed.
To permanently change the PATH use
Control Panel ➞ System ➞ Advanced System settings ➞ Environment Variables.Alternatively, type environment variables into the Windows Search box.
The %PATH% variable is set as both a system and user variable, the two values are combined to give the PATH for the currently logged in user. Like several of the default environment variables it is constructed by combining Core+System+User environment variables.
[HKLM\System\CurrentControlSet\Control\Session Manager\Environment]
[HKCU\Environment]Be wary of using commands like SETX to modify the PATH, the User path can be edited, but the System path remains read-only for most users. If you try to delete an old value and add a new one it is very common for the ‘delete’ to fail and the ‘add’ to succeed, resulting in duplicate values being added to the path.
To programatically modify the PATH there are a few traps to consider:
Stray quotation marks or semi-colon delimiters in the current path, Duplicate entries in the user and system paths, also duplicates in either one (Windows does not check or warn about this), the maximum length of the system path (roughly 2 KB or just 7 paths of the maximum 260 characters), and lastly checking for any dependencies in other applications (if the path you are adding or removing could be used by them).To modify the path to add settings for a single application, one method is to use a second variable:
e.g.SetX MYAPP «C:\Program Files\My App» -m
Now include the new variable in the path like so …C:\Windows\system32;%MYAPP%
You can now easily change that one variable %MYAPP% at any time in the future and the PATH will reflect the new value.
- Changing a variable in the Control Panel will not affect any CMD prompt that is already open, only new CMD prompts will get the new setting.
- To change a system variable you must have administrator rights
- If your system has an AUTOEXEC.BAT file then any PATH setting in AUTOEXEC.BAT will also be appended to the %PATH% environment variable. This is to provide compatibility with old installation routines which need to set the PATH. All other commands in AUTOEXEC.BAT are ignored.
PathExt
If you start/run an application without a file extension (for example WinWord instead of WinWord.exe)then the PATHEXT environment variable will be read to determine
which file extensions to search for and in what order.The default value for the PATHEXT variable has changed over the years:
.COM;.EXE;.BAT;.CMD
to
.COM;.EXE;.BAT;.CMD;.VBS;.VBE;.JS;.JSE;.WSF;,WSH;.MSC
This can be changed with SETX and many will argue that the legacy IE scripting options should be dropped as they are almost exclusively used for drive-by malware.
Dpath
DPATH is an undocumented internal utility that allows the TYPE command to read data files in specified directories as if they were in in the current directory. On some OS’s this is also implemented as the now deprecated APPEND command. The list of directories is held in the %DPATH% environment variable which works just like the %PATH% variable, delimited with semicolons (not quotes). Syntax: DPATH pathname [;pathname]…
To type any file on the path:
C:\batch\> type win.ini
The system cannot find the file specified.
C:\batch\> dpath %path%
C:\batch\> type win.ini
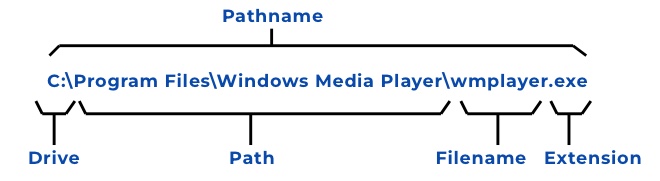
Terminology — filename, path, pathname
For a file stored as:
C:\Program Files\Windows Media Player\wmplayer.exe
So Drive + Path + Filename = Pathname.
If a file reference uses only the filename rather than a full pathname, then that will work to execute the file, only if the file is in the current directory or is listed in the PATH.
Paths for GUI Windows applications
The App Paths registry subkey is available to provide a location for specific executable filenames.
This can be used to populate the ‘Open With Dialog Box’ and also avoids the need to modify the system PATH environment variable.The keys can be found in the following two registry locations, for the Current User (strongly recommended) or all users.
Full documentation of this is on docs.microsoft.comHKEY_CURRENT_USER\Software\Microsoft\Windows\CurrentVersion\App Paths
HKEY_LOCAL_MACHINE\Software\Microsoft\Windows\CurrentVersion\App PathsThe filename used in App Paths to launch the application does not have to match the actual destination file.
Errorlevels
When CMD Command Extensions are enabled (the default):
If the PATH was successfully changed %ERRORLEVEL% = unchanged, typically this will be 0 but if a previous command set an errorlevel, that will be preserved (this is a bug).
If PATH could not be changed %ERRORLEVEL% = 1
PATH is an internal command.
Examples
To view each item in the path on a single line:
For %G in («%path:;=» «%») do @echo:%~G
Or in a batch file:
For %%G in («%path:;=» «%») do @echo:%%~G
Alternatively replacing the semicolons with ECHO: to generate a newline:
ECHO:%PATH:;=& ECHO:%
The above will fail in one case, if any of the paths include a semicolon [ ; ] which is normally only used to delimit items on the path.
A script to display
each item in the path on a single line even if they include semicolons can be found here on stackoverflow.
Add ‘My Application‘ to the end of the path, including the current %PATH% in the new setting:
PATH=%PATH%;C:\Program Files\My Application
Retrieve the path to the executable 7zip (if installed) from the registry and add it to the PATH for the current session:
For /F "tokens=1,2*" %%A in ('reg query HKLM\Software\7-Zip /v Path') do (
Set "PATH=%%C;%PATH%"
)
“If you do not love your job, change it. Instead of pushing paper, push ideas. Instead of sitting down, stand up and be heard. Instead of complaining, contribute. don’t get stuck in a job description” ~ Microsoft job advert
Related commands
SET — Display, set, or remove environment variables.
ePath — Edit the PATH environment System/User. (Bill Stewart).
Pathed — Edit the PATH environment System/User, part of the freeware gtools (Gerson Kurz).
PATHMAN — Edit the PATH environment System/User (old Resource Kit utility).
How to check if directory exists in %PATH%? — Stackoverflow.com
Dynamic-Link Library Search Order — docs.microsoft.com
Equivalent PowerShell: DIR Env: or «$Env:path» To add an item to the path for the current session: $env:path += «;C:\demo»
Equivalent bash command (Linux): env — Display, set, or remove environment variables — PATH/CDPATH/MAILPATH
Copyright © 1999-2025 SS64.com
Some rights reserved
To get the current directory path in the Command Prompt (cmd), you can use the `cd` command without any arguments. Here’s how it looks in a code snippet:
cd
Understanding Command Prompt Basics
What is Command Prompt?
Command Prompt, often abbreviated as CMD, is a command-line interface in Windows that allows users to execute commands to perform various tasks. Unlike graphical user interfaces, CMD operates through textual input, making it a powerful tool for advanced user control over file and system management. With CMD, users can interact with the operating system’s core functionalities directly, enabling scripting, automation, and more.
Why Use CMD?
CMD is invaluable for several reasons:
- It allows for quick navigation through the file system.
- Users can automate repetitive tasks using batch scripts.
- CMD can diagnose and solve system issues more efficiently than GUI methods.
- Learning CMD enhances overall computer management skills.

Cmd Get Current Directory: A Handy Guide
Getting Started: Open Command Prompt
How to Open CMD on Different Windows Versions
Opening Command Prompt varies slightly depending on the Windows version you’re using:
- Windows 10 and 11: Press Windows Key + X to open the Power User menu, then choose Command Prompt or Windows Terminal.
- Windows 8: Right-click the Start button and select Command Prompt or type «cmd» in the Start screen.
- Windows 7: Click on the Start menu, navigate to All Programs, choose Accessories, and click on Command Prompt.
Shortcut Keys for Quick Access
- Press Windows Key + R, type `cmd`, and hit Enter to launch Command Prompt immediately.

Mastering Cmd Current Directory with Ease
The Current Working Directory
Definition of Current Working Directory
The current working directory is the folder in which you’re currently working within the command prompt. It’s fundamental because it serves as the context for all file and directory operations you execute. Understanding your current path can significantly impact how you access files, run scripts, or change directories.
How to Check Your Current Path
To find out your current working directory, you can use the `cd` or `chdir` command.
- Command: `cd`
- Usage and Syntax:
cd - When you run this command, CMD simply prints out the current path. This output gives you an immediate view of your working environment, allowing you to navigate file systems more effectively.
- Usage and Syntax:
Mastering Cmd Exe Path: Your Quick Guide
Navigating the File System
Basic Navigation Commands
There are a few essential commands that can help you navigate your file system in CMD:
-
Listing Files and Directories: Use the `dir` command to view all files and directories in the current path.
- Example usage:
dir - This command outputs a list of files and folders, including additional details like sizes and dates modified.
- Example usage:
-
Changing Directories: The `cd [directory]` command allows you to move into a specified directory.
- Syntax and explanation:
cd Documents - This command takes you into the Documents folder if it exists within the current path.
- Syntax and explanation:
Understanding Relative vs. Absolute Paths
Understanding how paths work can enhance your command line proficiency.
- Relative Paths: These paths reference a directory’s location in relation to your current directory. For instance, if you’re in `C:\Users\YourName`, `cd Documents` refers to `C:\Users\YourName\Documents`.
- Absolute Paths: An absolute path specifies a location starting from the root of the file system. For example, `cd C:\Users\YourName\Documents` will take you directly to the Documents folder, regardless of your current location.

Cmd Echo Current Directory: A Simple Guide
Advanced Techniques
Combining `cd` with Other Commands
You can chain commands together to perform multitasking in CMD.
- Example Command:
cd && dir
- This command first changes to the specified directory and then lists all files and subdirectories in that newly active path. This technique can help verify your navigation quickly.
Using Environment Variables to Get the Current Path
Environment variables act as shortcuts to system information and can be incredibly useful within CMD.
- Command: `echo %cd%`
- How it works:
echo %cd% - By using this command, CMD will echo (or display) the currently active path. This is particularly useful within scripts or larger sets of commands, where you may want to programmatically reference the current working directory.
- How it works:

How to Cmd Show Current Directory in Style
Practical Applications
Scripting and Automation
Mastering the ability to get and display the current path can play a pivotal role in scripting within CMD.
-
For instance, if you’re writing a script that processes files, knowing your current path allows you to intelligently reference files without hardcoding paths in each command.
-
Sample script to automate tasks:
@echo off
echo Current Directory: %cd%
- When this script runs, it automatically outputs the directory it was executed from, enhancing user awareness and control over the scripting environment.
Incorporating Current Path in Batch Files
Batch files can be created to automate repetitive tasks using the current path context.
- Example batch file:
@echo off
echo You are currently in: %cd%
pause
- This simple script not only displays the current path but also holds the window open until a key is pressed, allowing users to see the output before it disappears.
Cmd Generator: Create Commands Effortlessly in Cmd
Conclusion
Recap of Key Points
Understanding how to use cmd get current path is a foundational skill within the Command Prompt environment. We’ve covered commands like `cd`, `chdir`, and `echo %cd%`, all of which are crucial for efficiently navigating and managing your file systems.
Encouragement to Explore Further
Now that you’ve familiarized yourself with acquiring the current path in CMD, challenge yourself to explore additional commands and functionalities. The more you experiment and practice, the more adept you’ll become. Command Prompt holds vast potential for users looking to harness the power of their Windows systems.

Cmd Alternative: Quick Commands for Your Productivity
Additional Resources
Useful CMD Commands for Beginners
Consider expanding your knowledge by exploring additional commands such as `copy`, `move`, and `del`. Relating these commands to the current path concept enhances your ability to manage files seamlessly.
Frequently Asked Questions
You may encounter various queries associated with CMD and obtaining the current path. Exploring community forums and discussions can provide insight into common pitfalls and advanced usage scenarios. Keep learning and experimenting!
Whether you’re troubleshooting software issues, setting up environment variables, or simply curious about where a program is installed, knowing how to find the executable path of an application in Windows is essential. This guide will walk you through several methods to locate the executable path in Windows 10 and Windows 11.
- Troubleshooting: Fix errors related to missing or corrupted files.
- Customization: Modify settings or configurations that require the full path.
- Development: Set up development environments that need executable paths.
- Security: Verify the legitimacy of running processes.
Method 1: Using Task Manager
Step 1: Open Task Manager
- Press Ctrl + Shift + Esc to open Task Manager directly.
- Alternatively, right-click on the Taskbar and select Task Manager.
Step 2: Locate the Application
- Click on the Processes tab.
- Find the application whose executable path you want to locate.
Step 3: Access File Location
- Right-click on the application and select Open file location.
Step 4: Copy the Path
- In the File Explorer window that opens, click on the address bar.
- Copy the full path displayed.
Method 2: Using Command Prompt
Step 1: Open Command Prompt
- Press Windows key + R, type
cmd, and press Enter.
Step 2: Use the where Command
- Type the following command and press Enter:
cmdwhere [application_name]- Replace
[application_name]with the name of the executable. For example: - cmd
where notepad
Step 3: View the Path
- The Command Prompt will display the full path to the executable.
Method 3: Using the Start Menu Shortcut
Step 1: Find the Application in Start Menu
- Click on the Start button.
- Scroll through the list of installed applications to find the one you need.
Step 2: Open File Location
- Right-click on the application.
- Select More > Open file location.
Step 3: Access the Executable Path
- In the File Explorer window, right-click on the application shortcut.
- Select Properties.
Step 4: View the Executable Path
- In the Shortcut tab, look at the Target field.
- The path listed is the executable path.
Method 4: Using PowerShell
Step 1: Open PowerShell
- Press Windows key + X and select Windows PowerShell or Windows Terminal.
Step 2: Use the Get-Command Cmdlet
- Type the following command and press Enter:
- powershell
Get-Command [application_name] | Select-Object Source Replace [application_name]with the name of the executable. For example:- powershell
Get-Command notepad | Select-Object Source
Step 3: View the Path
- The executable path will be displayed under the Source column.
Conclusion
Finding the executable path in Windows is a straightforward process that can be accomplished using various methods. Whether you prefer graphical interfaces like Task Manager and File Explorer or command-line tools like Command Prompt and PowerShell, you have multiple options to choose from.
Additional Tips
- Environment Variables: Some applications add their executable paths to system environment variables, making them accessible from any command prompt.
- Third-Party Tools: Utilities like Process Explorer provide more detailed information about running processes and their paths.
The which command in Linux is used to identify the location of executables.
The where command is a Windows which equivalent in a command-line prompt (CMD).
In a Windows PowerShell the alternative for the which command is the Get-Command utility.
In this note i will show how to find paths of executable commands in Windows.
Cool Tip: Windows lsusb command equivalent in PowerShell! Read more →
Find Executables – Windows ‘which’ Equivalent
Find the location of an executable command using Windows command-line prompt (CMD):
C:\> where <commandName>
- example -
C:\> where systeminfo
- sample output -
C:\Windows\System32\systeminfo.exe
Find the path of an executable command using Windows PoweShell:
PS C:\> Get-Command <commandName>
- or -
PS C:\> where.exe <commandName>
ℹ️ Note that the where command doesn’t display any output when running in PowerShell. Use where.exe instead.
Was it useful? Share this post with the world!
В этой статье вы узнаете, как эффективно найти расположение файла через командную строку, что особенно важно для системных администраторов и продвинутых пользователей. Представьте ситуацию: важный документ или конфигурационный файл потерялся в глубинах файловой системы, а графический интерфейс не помогает в его поиске. Командная строка становится мощным инструментом в таких случаях, позволяя быстро находить нужные файлы даже на больших дисках. Мы подробно разберем различные методы поиска, их особенности и эффективность применения в разных операционных системах. В результате чтения вы получите практические навыки использования командной строки для поиска файлов и сможете применять эти знания в своей работе.
Основные методы поиска файлов через командную строку
Существует несколько ключевых подходов к поиску файлов через командную строку, каждый из которых имеет свои особенности и области применения. Рассмотрим наиболее распространенные методы, которые используются как в Windows, так и в Linux-системах. Все эти методы базируются на специальных командах, которые позволяют выполнять поиск по различным параметрам: имени файла, расширению, размеру, дате создания или изменения.
Первый метод основан на использовании команды dir в Windows и ls в Linux. Эти базовые команды просмотра содержимого директорий можно дополнить различными параметрами для более точного поиска. Например, команда dir /s /b позволяет рекурсивно просматривать все подкаталоги начиная с текущей директории, выводя только пути к найденным файлам. Однако этот метод подходит лишь для простых случаев, когда известно точное имя файла или его часть. Более сложные задачи требуют применения специализированных команд, таких как find в Windows и find/find locate в Linux, которые обеспечивают гораздо более гибкие возможности поиска.
Особую эффективность демонстрирует использование команды where в современных версиях Windows и locate/updatedb в Linux-системах. Эти инструменты работают с предварительно созданной базой данных файлов, что значительно ускоряет процесс поиска. При этом важно понимать, что такие команды могут не показывать самые свежие файлы, так как база данных обновляется не мгновенно. Для получения актуальной информации лучше использовать find или аналогичные команды прямого поиска, которые сканируют файловую систему в реальном времени.
Каждый из этих методов имеет свои преимущества и ограничения. Простые команды быстрее в освоении и применении, но менее гибки. Специализированные команды требуют больше времени на изучение, зато предоставляют широкие возможности для тонкой настройки параметров поиска. Выбор конкретного метода зависит от характера задачи, объема данных и требуемой скорости выполнения.
Сравнительная характеристика методов поиска
| Метод | Преимущества | Недостатки |
|---|---|---|
| dir /s | Простота использования, не требует дополнительных инструментов | Медленная работа на больших дисках, ограниченные возможности фильтрации |
| find | Гибкость в настройке параметров, возможность поиска по содержимому | Требует времени на освоение синтаксиса, может быть медленным |
| where | Быстрый поиск, удобный вывод результатов | Только для Windows, ограниченная функциональность |
| locate | Очень быстрый поиск, простой синтаксис | Не показывает новые файлы, требует периодического обновления базы |
Практика показывает, что профессионалы часто комбинируют различные методы в зависимости от ситуации. Например, для быстрого поиска известного файла используется locate, а для детального анализа директории применяется find с набором специальных параметров. Такой подход позволяет максимально эффективно использовать возможности командной строки при поиске расположения файлов.
Пошаговая инструкция поиска файлов в Windows
Рассмотрим подробную пошаговую инструкцию поиска файлов через командную строку в операционной системе Windows. Первым делом необходимо запустить командную строку от имени администратора – это обеспечит доступ ко всем каталогам системы. Нажмите клавиши Win+X и выберите “Командная строка (администратор)” или “Windows PowerShell (администратор)”, в зависимости от вашей версии Windows.
Для начала определите стартовую директорию поиска. Используйте команду cd для перехода в нужный каталог. Например, если вы хотите искать файлы начиная с диска C:, введите cd C:. Это важный шаг, так как он задает область поиска и влияет на производительность команды. Теперь можете применить команду dir с необходимыми параметрами. Основные варианты использования включают: dir /s /b filename.* для поиска файла по имени во всех подкаталогах, где * заменяет любое расширение; dir /s /b *.txt для поиска всех текстовых файлов; dir /s /b /a-d для поиска только файлов без папок.
Более продвинутый метод использует команду where, которая работает аналогично Unix-команде which. Формат команды: where /r path filename, где /r означает рекурсивный поиск, path – начальный путь поиска, filename – имя искомого файла. Например, where /r C:Users username.txt найдет все файлы username.txt в папке пользователя и её подпапках. Особенностью этой команды является возможность использования масок поиска и указания нескольких имён файлов одновременно.
Если вам нужно найти файлы по содержимому, используйте команду findstr. Её формат: findstr /s /m “искомый_текст” *.txt, где /s означает поиск во всех подкаталогах, /m выводит только имена файлов с совпадениями, “искомый_текст” – текст для поиска, *.txt – маска файлов для проверки. Эта команда особенно полезна при поиске конфигурационных файлов или логов, содержащих определенную информацию.
Важно отметить несколько ключевых моментов при работе с командной строкой Windows. Во-первых, регистр символов обычно не имеет значения, но некоторые параметры могут быть чувствительны к нему. Во-вторых, длинные пути могут вызывать проблемы – если путь превышает 260 символов, могут возникнуть ошибки. Для работы с длинными путями используйте префикс \? перед путём. В-третьих, всегда следите за правильным экранированием специальных символов, используя символ ^ или кавычки.
Продвинутые пользователи могут комбинировать команды через конвейер (|) для создания сложных цепочек поиска. Например, dir /s /b *.log | findstr “error” найдет все лог-файлы, содержащие слово “error”. Такие комбинации позволяют создавать мощные инструменты для автоматизации поиска файлов и анализа их содержимого. Кроме того, результаты поиска можно перенаправлять в файл для последующего анализа: dir /s /b > results.txt сохранит все найденные пути в текстовый файл results.txt.
Пошаговая инструкция поиска файлов в Linux
В Linux-системах поиск файлов через командную строку предлагает ещё более широкие возможности благодаря развитым инструментам и гибкости shell-среды. Начнем с самого универсального инструмента – команды find, которая позволяет осуществлять поиск по множеству критериев. Базовый синтаксис выглядит как find [путь] [параметры], где путь указывает начальную директорию поиска, а параметры определяют условия. Например, find /home -name “*.txt” найдет все текстовые файлы в домашней директории и её подкаталогах.
Особую ценность представляет возможность комбинирования различных условий поиска. Можно искать файлы по размеру (find . -size +100M), по времени модификации (find /var/log -mtime -7 для файлов, измененных за последние 7 дней), по типу (find / -type d для поиска только директорий). Дополнительные параметры -exec позволяют сразу выполнять действия над найденными файлами. Например, find . -name “*.tmp” -exec rm {} ; удалит все временные файлы в текущей директории и подкаталогах.
Альтернативным методом является использование команды locate, которая работает значительно быстрее благодаря предварительно созданной базе данных файлов. Однако эта база обновляется не мгновенно – обычно раз в день через cron-задачу updatedb. Поэтому для поиска новых файлов лучше использовать find. Пример использования: locate filename.txt найдет все файлы с таким именем в системе. Команда locate также поддерживает регулярные выражения и другие параметры для тонкой настройки поиска.
Для поиска по содержимому файлов существует команда grep, которая часто комбинируется с find для создания мощных цепочек поиска. Например, find /etc -name “*.conf” -exec grep -l “search_term” {} ; найдет все конфигурационные файлы, содержащие указанную строку. Дополнительные параметры grep, такие как -r (рекурсивный поиск) и -i (игнорирование регистра), делают этот инструмент ещё более гибким.
Linux предоставляет также специализированные утилиты для конкретных задач. Например, which и whereis помогают находить исполняемые файлы и связанные с ними документы. Команда which program_name покажет путь к исполняемому файлу программы, а whereis добавит информацию о связанных man-страницах и исходных кодах. Эти команды особенно полезны при работе с системными утилитами и программным обеспечением.
Важным аспектом работы с командной строкой в Linux является использование правильных прав доступа. Многие системные директории требуют root-прав для просмотра содержимого. В таких случаях следует использовать sudo перед командой поиска или запускать терминал с правами суперпользователя. Однако стоит помнить о безопасности – не рекомендуется постоянно работать с повышенными привилегиями, чтобы избежать случайного повреждения важных системных файлов.
Примеры комплексного поиска в Linux
- Поиск всех исполняемых файлов в /usr/bin, измененных за последние 2 дня: find /usr/bin -type f -executable -mtime -2
- Поиск файлов с расширением .log больше 10MB в /var/log: find /var/log -name “*.log” -size +10M
- Поиск всех файлов, принадлежащих пользователю www-data: find / -user www-data
- Поиск файлов с установленным битом SUID: find / -perm -4000
- Поиск всех пустых файлов в домашней директории: find ~ -empty
Экспертное мнение: Александр Петров, системный администратор с 15-летним опытом
Александр Петров, сертифицированный специалист Red Hat и Microsoft Certified Systems Engineer, подчеркивает важность владения командной строкой для эффективного поиска файлов. “За годы работы я столкнулся с тысячами ситуаций, когда графические интерфейсы были бесполезны, а командная строка спасала положение,” – рассказывает эксперт. Его профессиональный опыт включает администрирование крупных корпоративных сетей и облачных инфраструктур.
По словам Александра, ключевым моментом является понимание особенностей файловой системы и выбор оптимального метода поиска. “Например, при работе с большими файловыми системами я всегда начинаю с команды locate, если время создания файла не критично. Но для точного поиска критически важных файлов использую find с детальной настройкой параметров.” Он также рекомендует обязательно учитывать права доступа и потенциальное влияние на производительность системы при выполнении ресурсоемких операций поиска.
Из практики эксперта: “Однажды мне потребовалось найти источник утечки конфиденциальных данных на сервере с терабайтами информации. Используя комбинацию find с grep и дополнительными фильтрами по времени модификации и размеру, удалось сузить круг поиска до нескольких подозрительных файлов всего за несколько минут. Без командной строки эта задача заняла бы часы.”
Александр советует начинающим администраторам сосредоточиться на освоении базового набора команд и постепенно расширять свои знания. “Главное – понимать принципы работы каждой команды и её параметров. Тогда вы сможете легко комбинировать их для решения самых сложных задач.”
Часто задаваемые вопросы о поиске файлов через командную строку
- Как найти файл, если неизвестно точное имя? Используйте маски поиска (*, ?). Например, find . -name “report*.doc” найдет все документы Word, начинающиеся на “report”. В Windows можно применить where /r C: report*.doc.
- Что делать, если поиск занимает слишком много времени? Ограничьте область поиска конкретной директорией вместо всего диска. В Linux используйте locate вместо find для быстрого поиска, предварительно обновив базу командой updatedb.
- Как найти файлы определенного размера? В Linux используйте find с параметром -size (+100M для файлов больше 100MB). В Windows применим dir с дополнительной фильтрацией через forfiles: forfiles /P C:path /S /M *.txt /C “cmd /c if @fsize GEQ 1048576 echo @path”.
- Можно ли искать файлы по содержимому? Да, используйте findstr в Windows или grep в Linux. Например, grep -rl “password” /etc/* найдет все файлы в /etc, содержащие слово “password”.
- Как автоматизировать поиск файлов? Создайте batch-файл в Windows или shell-скрипт в Linux, объединяющий нужные команды. Добавьте его в cron (Linux) или планировщик задач Windows для регулярного выполнения.
Распространенные ошибки и их решения
При поиске файлов через командную строку пользователи часто сталкиваются с типичными проблемами. Одна из самых частых ошибок – неправильное указание пути поиска. Например, использование обратного слэша () вместо прямого (/) в Linux или наоборот в Windows может привести к ошибкам. Решение: внимательно проверяйте формат пути для вашей операционной системы и используйте двойные обратные слэши (\) в Windows при необходимости.
Другая распространенная проблема – игнорирование прав доступа. Попытка поиска в системных директориях без соответствующих привилегий приведет к неполному результату или ошибке доступа. Рекомендуется использовать sudo в Linux или запускать командную строку от имени администратора в Windows, но при этом строго контролировать выполняемые команды во избежание случайных изменений в системных файлах.
Многие пользователи забывают об ограничении длины пути в Windows (260 символов). Если файл находится в глубоко вложенной директории, стандартные команды могут его не найти. Решение: используйте префикс \? перед путем или примените специальные утилиты для работы с длинными путями. В Linux такой проблемы нет благодаря более гибкой файловой системе.
Ошибки синтаксиса при использовании масок поиска также встречаются часто. Например, find . -name *.txt без кавычек может привести к неправильной интерпретации команды. Всегда заключайте маски поиска в кавычки (“*.txt”) или экранируйте специальные символы. Это правило особенно важно при поиске файлов со специальными символами в имени.
Проблема с кодировкой может возникнуть при поиске по содержимому файлов, особенно в Windows. Команда findstr может некорректно обрабатывать файлы в UTF-8 без BOM. Решение: явно указывайте кодировку с помощью параметра /G: или используйте сторонние утилиты, поддерживающие Unicode.
Заключение и практические рекомендации
Владение навыками поиска файлов через командную строку – это необходимый инструмент каждого IT-специалиста и продвинутого пользователя. Мы подробно рассмотрели различные методы поиска как в Windows, так и в Linux-системах, разобрали практические примеры и выявили основные подводные камни. Главное преимущество командной строки – это скорость и точность поиска, возможность автоматизации рутинных задач и доступ к расширенным параметрам фильтрации.
Для успешного освоения этих навыков рекомендуется начать с простых команд и постепенно переходить к более сложным конструкциям. Создайте себе шпаргалку с часто используемыми командами и их параметрами. Практикуйтесь на тестовых директориях, чтобы понять, как работают различные фильтры и параметры поиска. Особенно полезно будет создать несколько собственных скриптов для типовых задач поиска.
Если вы хотите углубить свои знания, попробуйте комбинировать различные команды через конвейеры и перенаправление вывода. Изучите регулярные выражения – они значительно расширяют возможности поиска. Также рекомендуется ознакомиться с документацией по командам (man в Linux, help в Windows) для полного понимания всех доступных параметров.
Начните применять полученные знания уже сегодня – создайте несколько команд поиска для ваших текущих задач. Помните, что постоянная практика – ключ к мастерству. Со временем работа с командной строкой станет для вас естественной и эффективной частью рабочего процесса.