
,
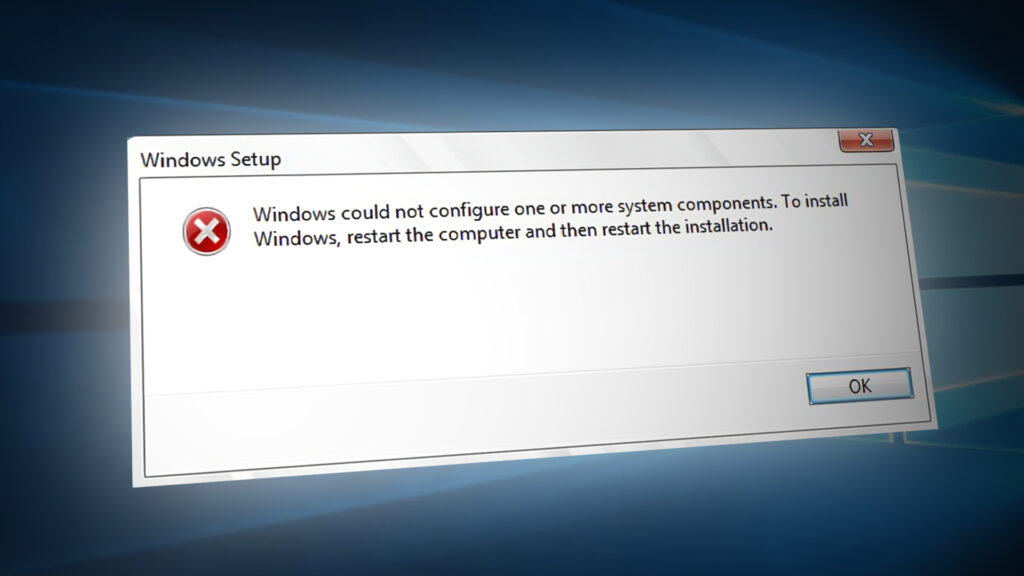
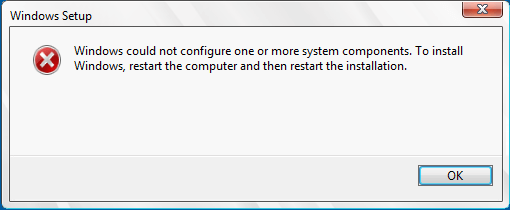
This tutorial contains instructions on how to fix the following problem when upgrading Windows 10: the Windows Setup fails at 60% and displays the error «Windows could not configure one or more system components. To install Windows, restart the computer and then restart the installation.»

The error «Windows could not configure one or more system components» in Windows 10 upgrade, commonly occurs in machines where the IIS (Internet Information Services) feature has installed. In other cases, the problem occurs when ESET Antivirus is installed with SSL scanning enabled.
How to FIX: Windows could not configure one or more system components in Windows 10 Upgrade.
Method 1. Disable the SSL Scanning on Antivirus program.
Method 2. Uninstall Internet Information Services (IIS).
Method 3. Re-Create the ‘MachineKeys’ folder.
Method 4. Force Windows to re-create the Windows Update Store folder.
Method 5. Update Windows 10 using the Update Assistant.
Method 1. Disable the SSL Scanning in Antivirus program.
If you have the ESET Antivirus installed, then proceed and disable the SSL scanning. *
* Note: If you don’t have ESET proceed as follows:
a. Check if your AV product has a similar setting to disable the SSL scanning.
b. Temporarily disable or uninstall any third-party Antivirus program and try to install the update.
c. If the update fails again, proceed to the next method.
To Turn off the SSL/TLS protocol filtering in ESET:
1. Open the ESET AV main program and navigate to Advanced setup. (F5)
2. Click WEB AND EMAIL, at the left and then expand the SSL/TLS settings.
3. At Enable SLS/TLS Protocol filtering mode, drag the slider to OFF and then click OK.
4. Restart your PC and try to install the Windows 10 update.

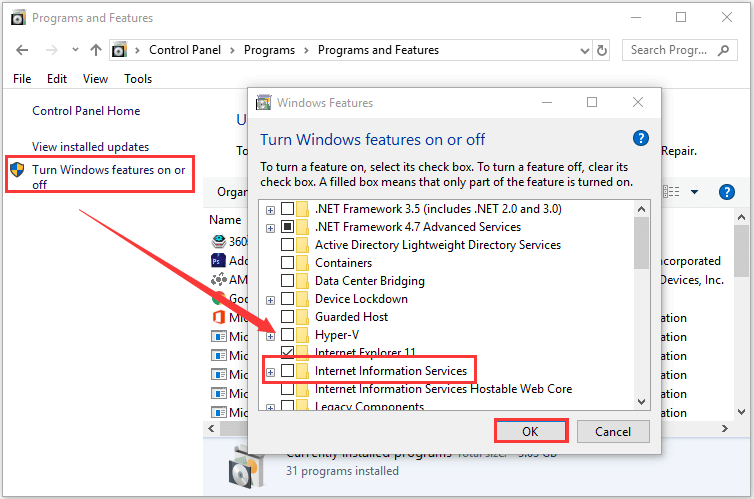
Method 2. Uninstall Internet Information Services (IIS)
The second method to resolve the error «Windows could not configure one or more system components» in Windows 10 upgrade, is to uninstall the IIS feature *. To do that:
* Note: If you ‘re using the IIS, reinstall it after updating Windows.
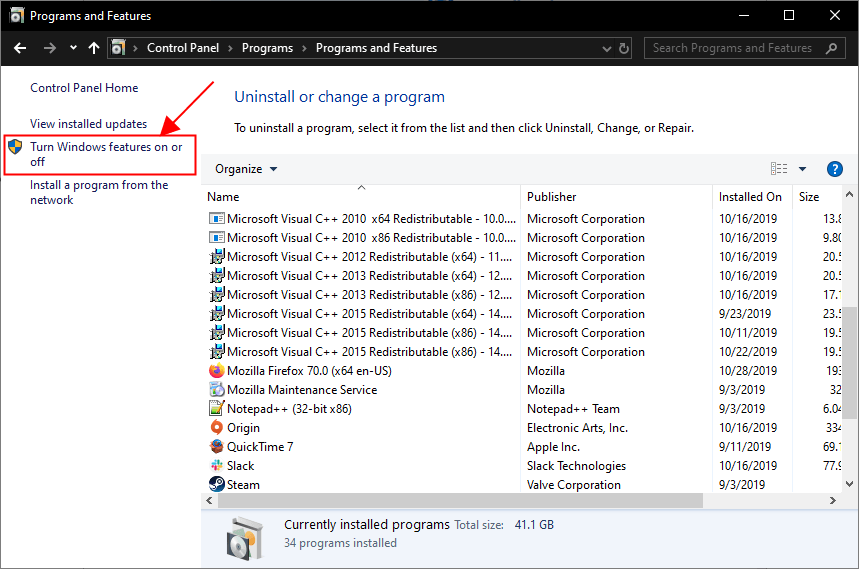
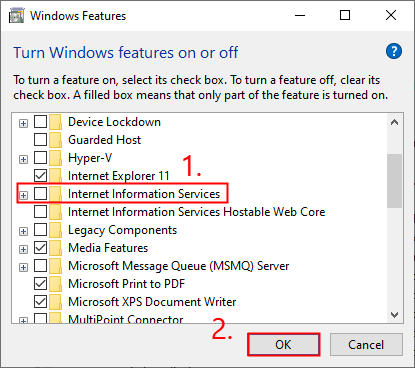
1. From Control Panel open Programs and Features.
2. Click Turn Windows features on or off.

3. Unselect the Internet Information Services and click OK. *
* Note: If you receive any error, after disabling IIS, proceed to the next method.

4. Restart the computer and try to install the Update.
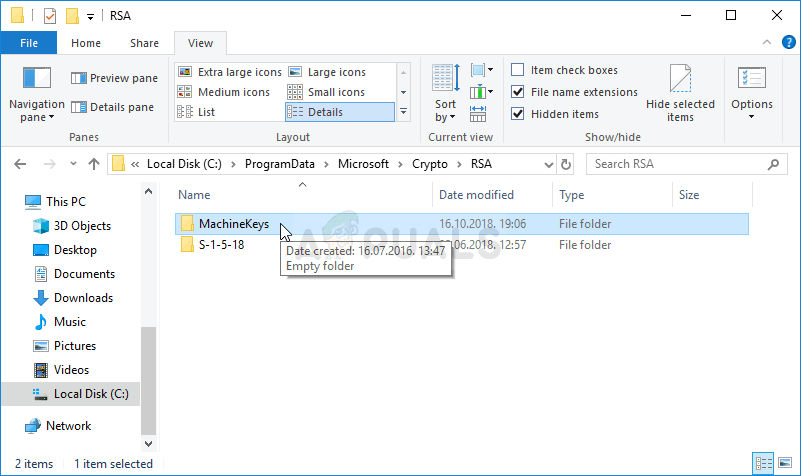
Method 3. Re-Create the ‘MachineKeys’ folder.
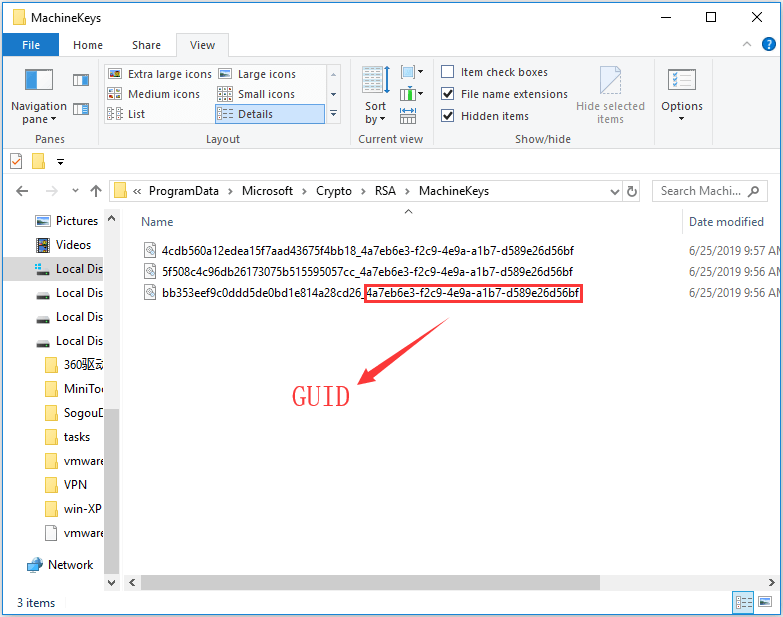
The third method to fix the Windows 10 upgrade error «Windows could not configure one or more system components» is to recreate the «C:\ProgramData\Microsoft\Crypto\RSA\MachineKeys» folder.
* Info: The ‘MachineKeys’ folder is the store location for the certificate keys used by IIS, Internet Explorer or other services. Some times, the ‘MachineKeys’ folder (or one of the contained keys) becomes corrupted, and prevent the Windows installer to upgrade Windows.
Step 1. Start Windows 10 in Safe Mode.
1. Press Windows + R keys to load the Run dialog box.
2. Type msconfig and press Enter.
3. At the Boot tab, check the Safe Boot option.
4. Click OK and restart your computer. *
* Note: In order to boot Windows normally again, open the System Configuration utility again and uncheck the «Safe Boot» option.

Step 2. Delete the Certificate keys.
1. Open Windows Explorer.
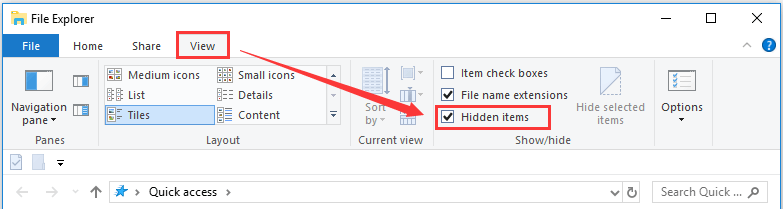
2. From the View menu, check the Hidden items box.

3. Now navigate to the following folder:
-
C:\ProgramData\Microsoft\Crypto\RSA\
4. Rename the MachineKeys folder to MachineKeys.OLD
5. Create a new folder and name it MachineKeys
(At the end of the process you should have a similar screen)

6. Now, navigate to the following folder:
-
C:\Windows\System32\
7. Rename the folder inetsrv to inetsrv.old

Step 3. Start Windows normally.
1. Run the ‘msconfig’ utility again.
2. At General tab, select the Normal startup and click OK.

Step 4. Uninstall IIS.
1. Follow the steps in method-2 above, to uninstall IIS.
2. Restart the computer and try to install the update.
Method 4. Force Windows to re-create the Windows Update Store folder.
The next method to fix problems with the updates in Windows 10, is to recreate the Windows Update Store folder («C:\Windows\SoftwareDistribution«), which is the location where Windows stores the downloaded updates. To do that:
1. Simultaneously press the Windows + R keys to open run command box.
2. In run command box, type: services.msc and press Enter.
3. Right click on Windows Update service and select Stop.

4. Open Windows Explorer and navigate to C:\Windows folder.
5. Select and Delete the «SoftwareDistribution» folder.*
(Click Continue at «Folder Access Denied» window).
* Note: The next time that the Windows Update will run, a new empty SoftwareDistribution folder will be automatically created by Windows to store updates.

6. Restart your computer.
7. Download and run the Windows Update Troubleshooter for Windows 10 from Microsoft’s support site.
8. Reboot your computer.
9. Check and install Windows updates.
Method 5. Update Windows 10 using the Update Assistant.
1. Navigate to Windows 10 download site and click the Update now button.

2. When asked, click to Run the downloaded file in order to start the installation immediately, or click the Save button to run the installer later.

3. Finally click the Update Now button and follow the on screen prompts to install the Update.

That’s it! Which method worked for you?
Let me know if this guide has helped you by leaving your comment about your experience. Please like and share this guide to help others.
If this article was useful for you, please consider supporting us by making a donation. Even $1 can a make a huge difference for us in our effort to continue to help others while keeping this site free:
- Author
- Recent Posts
Konstantinos is the founder and administrator of Wintips.org. Since 1995 he works and provides IT support as a computer and network expert to individuals and large companies. He is specialized in solving problems related to Windows or other Microsoft products (Windows Server, Office, Microsoft 365, etc.).
Download Windows Speedup Tool to fix errors and make PC run faster
If you receive an error message Windows could not configure one or more system components, while installing or upgrading Windows 11/10, then this post will be able to help you. Some of the users have also reported the following error message:
Windows could not configure one or more system components. To install windows restart the computer and then restart the installation.
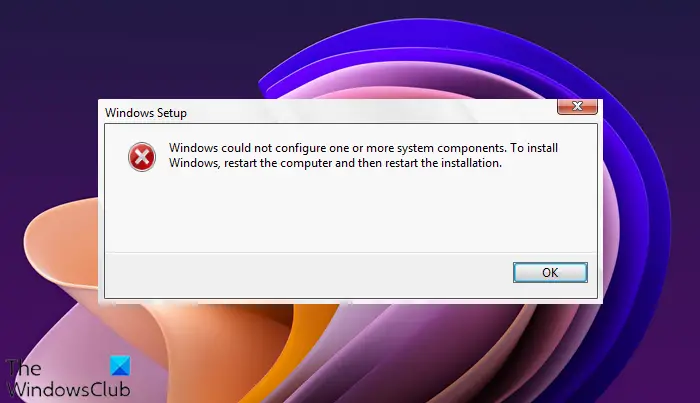
If you analyze the Windows Rollback log, you may find a part with “iissetup.exe” in connection with the abort. The upgrade process usually completes over 50% and then gets stuck, and later rolls back, generating these error logs.
This particular error – Windows could not configure one or more system components, appears during Windows Upgrade and is related to IIS or Internet Information Services on Windows 11/10. For some reason, it restricts installation, causing a bottleneck. Let’s see how we can fix this error:
- Remove IIS from Windows Features
- Rename inetsrv Folder
- Move IIS related folders to another drive
Follow all three steps, one after the other.
1] Remove IIS from Windows Features
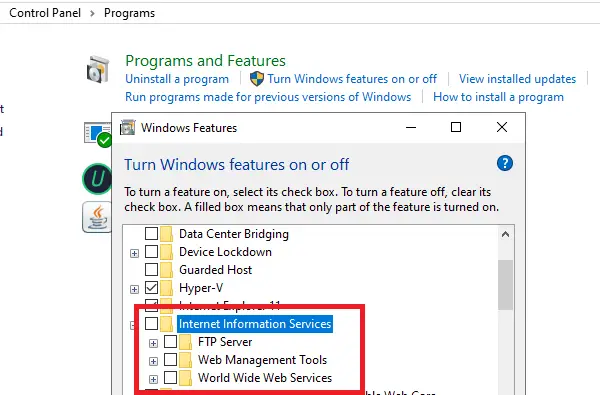
IIS is installed from Windows Features. Available at Control Panel > Programs. Go there, and then uncheck the box next to Internet Information Services.
Click on the OK button to confirm. The process will remove all related programs, services, and folders from Windows. If you wish, you can install it later from here or using an offline installer from the Microsoft website.
2] Rename inetsrv Folder

When you uninstall IIS from Windows features, it should remove the folders as well. If it doesn’t, we will have to delete any folder which is related to the service manually.
Boot into Advanced Recovery Mode, and then open Command Prompt
Rename the folder C:\Windows\system32\inetsrv to anything like, say, inetsrv.old by using the below command-
rename C:\Windows\system32\inetsrv inetsrv.old
The iissetup.exe program, which is responsible for all IIS services in Windows, is located in this folder.
3] Move IIS related folders to another drive

- Type services.msc in the Run prompt and hit Enter key to open the Windows Services manager.
- Locate the Application Host Helper Service, and stop it.
- Next, take ownership of the WinSxS folder.
- Then move the *windows-iis*.* folders to a backup folder on another drive.
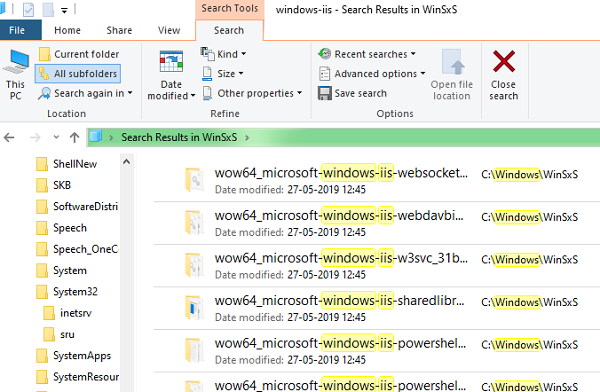
You can make a search using *windows-iis*.* Keyword in the search box. The search result will look like the image above. Once the search output is complete, use Ctrl + X, and paste it to some other older, e.g., windows-iis-backup folder.
Once done, start the Windows Update process, and you should be able to complete it this time. During the update, it may so happen that the Updater may roll back to a certain percentage and then progress ahead.
After the update is complete, delete the C:\Windows\System32\inetsrv.old folder and the backup folder windows-iis-backup folder. If required, Windows will recreate these folders or when IIS is installed again.
We hope these steps were easy to follow and that you were able to complete the Windows Update or Feature upgrade without any issues.
Does Windows Update need administrator permission?
Administrator privileges are required to restart or shut down a computer after a Windows Update.
Ashish holds a Bachelor’s in Computer Engineering and is a veteran Windows. He has been a Microsoft MVP (2008-2010) and excels in writing tutorials to improve the day-to-day experience with your devices.
Recently a lot of users have reported the error message Windows could not Configure One or More System Component while updating or upgrading their Windows system. If you are met with the same situation, don’t worry. It’s often not hard to fix at all…
Fixes for Windows could not Configure One or More System Component
Here are five fixes that have helped other users resolve the Windows could not Configure One or More System Component error. You may not have to try them all; just work your way down the list until you find the one that works for you.
- Remove IIS
- Remove some files
- Update your device drivers
- Disconnect external devices
- Run Media Creation Tool
Fix 1: Remove IIS
Internet Information Services, or IIS is a web server software package that is used to host website content. According to user report, it’s one of the cause for the Windows could not configure one or more system components error. So you should try removing IIS to see if you can fix the error.
Here is how to do it:
1) On your keyboard, press the Windows logo key and R at the same time, then type control and press Enter to open Control Panel.
2) In View by, select Category. Then click Uninstall a program.
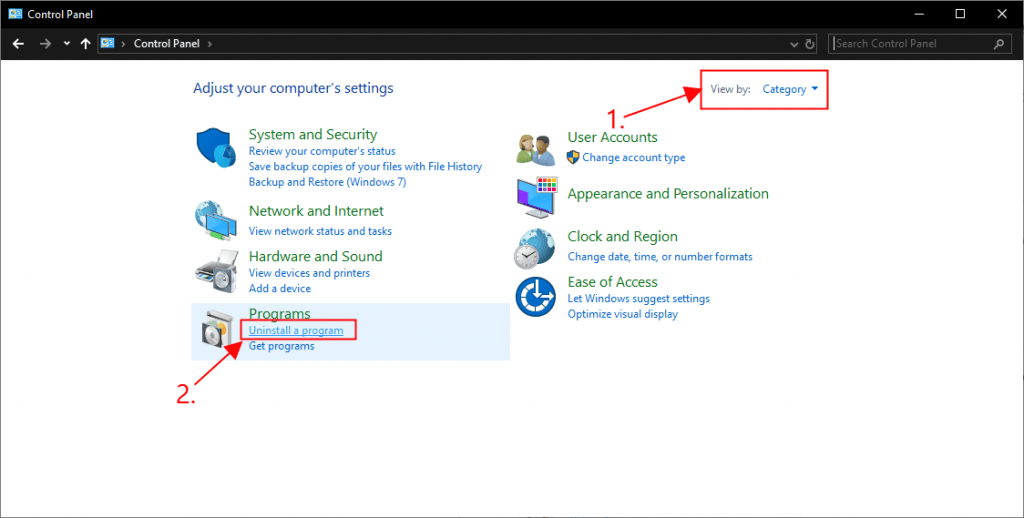
3) Click Turn Windows features on or off.
4) In the window that pops up with a list of Windows features, un-tick the box for Internet Information Services and click OK to apply the changes.
5) Try running the installation again to see if the error is resolved. If yes, then great! If the error still appears, please move on to Fix 2, below.
Fix 2: Remove some files
This error may also occur if the keys used to encrypt the configuration store is missing or corrupt. If this is the case, you should remove these files to make sure the upgrade process the smooth. (And don’t worry about the deleted files though, as they will be recreated when you run the Windows installer again)
Here are the steps:
1) On your keyboard, press the Windows logo key and R at the same time, then type C:\ProgramData\Microsoft\Crypto\RSA\MachineKeys and press Enter.
2) Delete the files that start with a sequence of numbers and end with GUID.
3) Start the Windows update or upgrade process again to see if the Windows could not Configure One or More System Component is resolved. If yes, then congrats! If the issue persists, please try Fix 3, below.
Fix 3: Update your device drivers
Another common cause of the error message is missing or outdated device drivers. So you should update your drivers to see if it fixes your problem. If you don’t have the time, patience or skills to update the driver manually, you can do it automatically with Driver Easy.
Driver Easy will automatically recognize your system and find the correct drivers for it. You don’t need to know exactly what system your computer is running, you don’t need to be troubled by the wrong driver you would be downloading, and you don’t need to worry about making a mistake when installing. Driver Easy handles it all.
You can update your drivers automatically with either the FREE or the Pro version of Driver Easy. But with the Pro version it takes just 2 steps (and you get full support and a 30-day money back guarantee):
1) Download and install Driver Easy.
2) Run Driver Easy and click the Scan Now button. Driver Easy will then scan your computer and detect any problem drivers.

3) Click the Update button next to a flagged driver to automatically download the correct version of that driver, then you can manually install it (you can do this with the FREE version).
Or click Update All to automatically download and install the correct version of ALL the drivers that are missing or out of date on your system. (This requires the Pro version which comes with full support and a 30-day money back guarantee. You’ll be prompted to upgrade when you click Update All.)
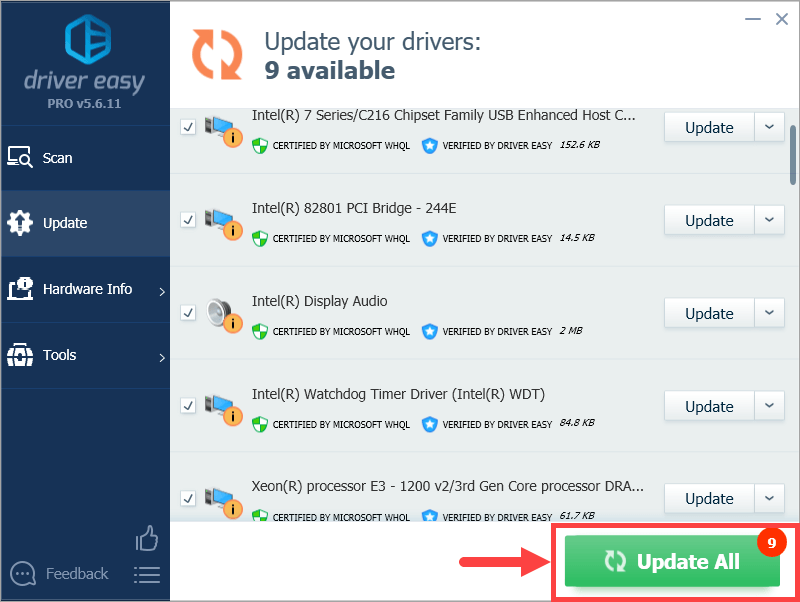
4) Restart your computer for the changes to take effect.
5) Start the Windows updating or upgrading process and see if the Windows could not Configure One or More System Component pops up. If no, then you have fixed the problem! If it still occurs, please try Fix 4, below.
Fix 4: Disconnect external devices
The system update or upgrade progress may not run smoothly if there are external devices plugged in. So if you have any of these external devices, such as a USB, DVD or SD card reader, you can remove them.
Still no joy? Please move on to Fix 5, below.
Fix 5: Run Media Creation Tool
If all else fails, then something is probably wrong with your update/upgrade installer. You can download Microsoft’s official tool Media Creation Tool to run the update or upgrade to see if the error still throws up.
Here is how to do it:
1) Go to Microsoft’s official website and download Media Creation Tool.
2) Run the tool and follow the on-screen instructions to continue your update or upgrade.
Hopefully the article has pointed you in the right direction in resolving the Windows could not Configure One or More System Component issue. If you have any questions, ideas or suggestions, please let me know in the comments. Thanks for reading!
5
5 people found this helpful
This error code ‘Windows could not Configure One or More System Components‘ appears to users running Windows on their computers and it appears when trying to update their PCs to the latest available build of Windows. The full error message goes like:
"Windows could not configure one or more system components. To install windows, restart the computer and then restart the installation."
Despite the need for a restart, it has barely helped anyone and people are desperate for a real solution. We have decided to gather the most successful solutions which have actually helped people online and present them in a detailed manner. Good luck with solving your problem!
What Causes the “Windows could not configure one or more system components” Error?
There are several things to look out for if you want to stay away from this annoying error code. Here is the full list:
- Faulty or missing keys used to encrypt the configuration store for the AES Provider
- Old and outdated wireless drivers (or drivers in general)
- Misconfigured or faulty Internet Information Services tool which needs to be uninstalled
Solution 1: Remove Certain Files From Your Computer
If your computer’s keys that IIS (Internet Information Server) uses to encrypt the configuration store using the AES Provider are somehow missing or corrupted, then the provider instantiation will fail.
Because of the fact that the Window 10 installer will also try to install IIS (Internet Information Server), and this fails, the upgrade fails and is rolled back. The correct way to solve this problem is to remove certain files from your computer. They will be recreated once you run the Windows 10 installer.
- Navigate to the following location on your computer by opening the Windows Explorer and clicking on This PC:
C:\ProgramData\Microsoft\Crypto\RSA\MachineKeys
- If you are unable to see the ProgramData folder, you may need to turn on the option which enables you to view hidden files and folders. Click on the “View” tab on File Explorer’s menu and click on the “Hidden items” checkbox in the Show/hide section.
- Here are the files you should look for. The name of the file will begin with the first sequence of numbers and letters and end with the GUID of your machine (different for each user:
6de9cb26d2b98c01ec4e9e8b34824aa2_GUID      iisConfigurationKey

d6d986f09a1ee04e24c949879fdb506c_GUID      NetFrameworkConfigurationKey

76944fb33636aeddb9590521c2e8815a_GUID      iisWasKey
- Select these files, right-click on them, and choose the Delete option which will appear from the context menu. The files will be recreated when you run the Windows updater or Windows installation and the problem should be gone.
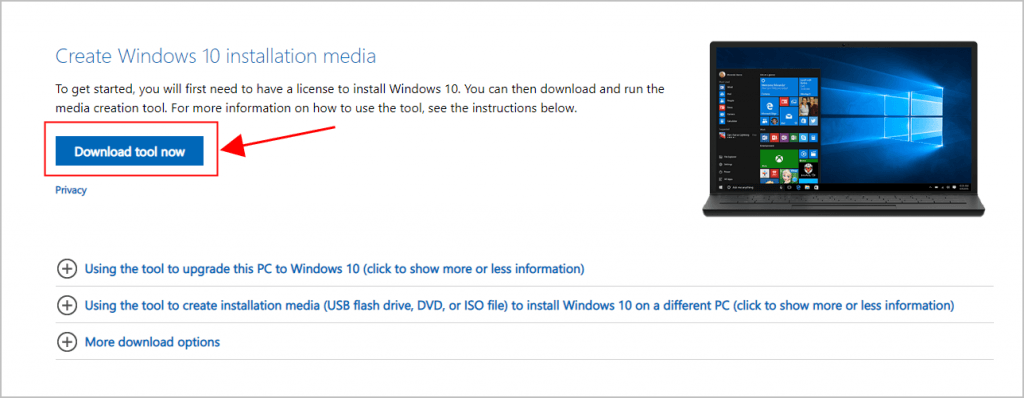
Solution 2: Try Using the Media Creation Tool
If an update was released for Windows 10 and you tried to install it the conventional way before you received the error code, you might want to try an alternative which consists of using the Windows Media Creation Tool. This is a file you download from Microsoft’s official website. You will be given the option to update Windows to the latest build after you download it.
- Download the Media Creation Tool executable from Microsoft’s website and wait for the download to complete. Double-click on the downloaded file in your Downloads folder called MediaCreationTool.exe in order to open the setup. Tap Accept at the first screen.
- Select the “Upgrade this PC now” option by enabling its radio button and click on the Next button to continue. The tool will download certain files, check for updates, and scan your PC to see if it is ready so please stay patient.
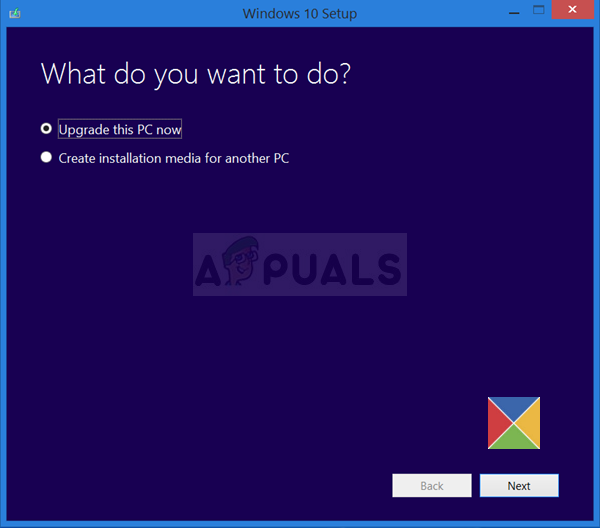
- Accept the license terms from the next window if you want to continue with the installation and wait again to communicate with Microsoft for updates (again).
- After that, you should already see the Ready to install screen with Install Windows and Keep personal files and apps options being listed. This has been chosen automatically since you are already running Windows 10 and you want to keep everything. The install should now proceed so your computer should be updated after the tool finishes with its process and the error should no longer appear.
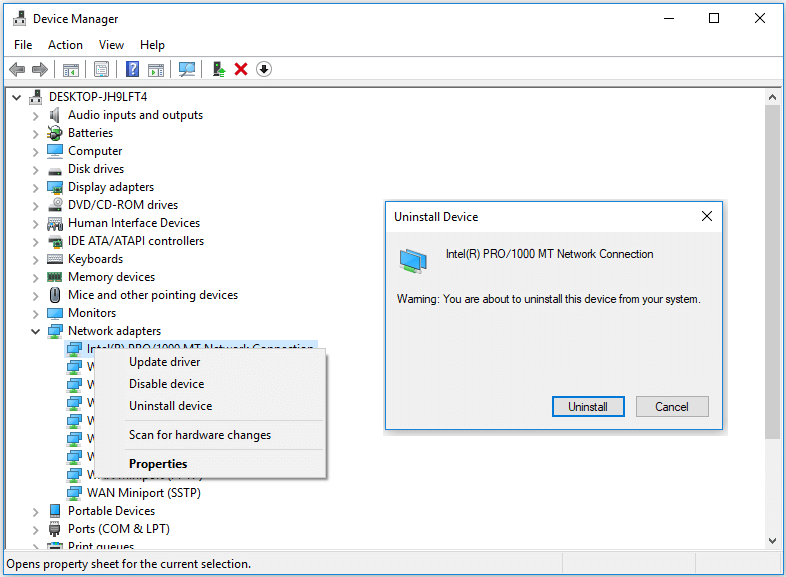
Solution 3: Uninstall Your Old Wi-Fi Drivers and Update Others
Old and outdated drivers are also a known cause for this issue. There are several different ways in which the drivers are to blame. Some users claim that their old Wi-Fi driver was to blame and they were able to solve the problem by uninstalling it.
Others claim that they needed to update all of their drivers before proceeding. Try out both of these methods and see which one works the best for you!
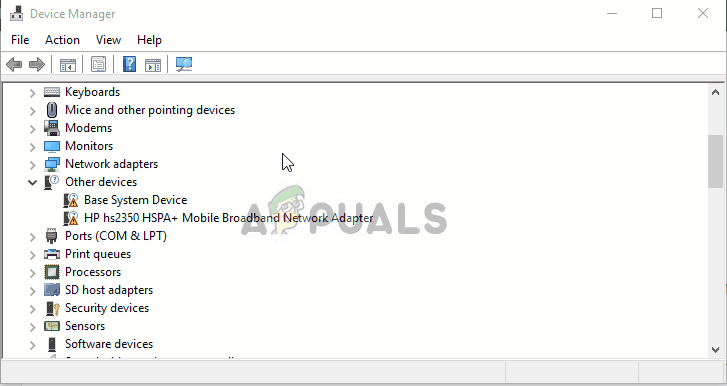
- Click the Start menu button at the lower left part of your screen, type in Device Manager, and click its entry from the list of results at the top.
- You can also use the Windows Key + R combination by clicking both of these keys simultaneously in order to bring up the Run dialog box. Type in “devmgmt.msc” in the box and click OK.
- Locate the wireless adapter driver under Network adapters, right click on it, and select Uninstall device from the drop-down menu which will appear. Confirm any prompting dialogs.
- Right-click on other devices on your computer where the driver needs to be updated and choose Update driver from the drop-down menu. There are tools which can automate the process for you if you want.
- After you have updated your drivers and gotten rid of the wireless driver, try running the installation and check to see if the “Windows could not configure one or more system components” error still appears!
https://social.technet.microsoft.com/Forums/en-US/1b5b24b7-a0f0-4955-9f44-32a977643aef/windows-10-fall-creator-upgrade-1709-stops-at-45-with-quotwindows-could-not-configure-one-or-more?forum=win10itprosetup
Solution 4: Uninstall IIS
Internet Information Services (IIS, formerly Internet Information Server) is an extensible web server created by Microsoft for use with the Windows NT family. IIS supports HTTP, HTTP/2, HTTPS, FTP, FTPS, SMTP and NNTP.
If you are not using it, you should know that it could be the culprit behind your frustrations regarding this error and you should consider uninstalling it immediately!
- On your keyboard, use the Windows Key + R key combination to open the Run dialog box. Also, you can search these directly in the Start menu if your Windows OS supports it.
- Type in Control Panel and click OK in order to open it. Make sure you change the view in Control Panel to View by: Category and click on Uninstall a program under the Programs section.
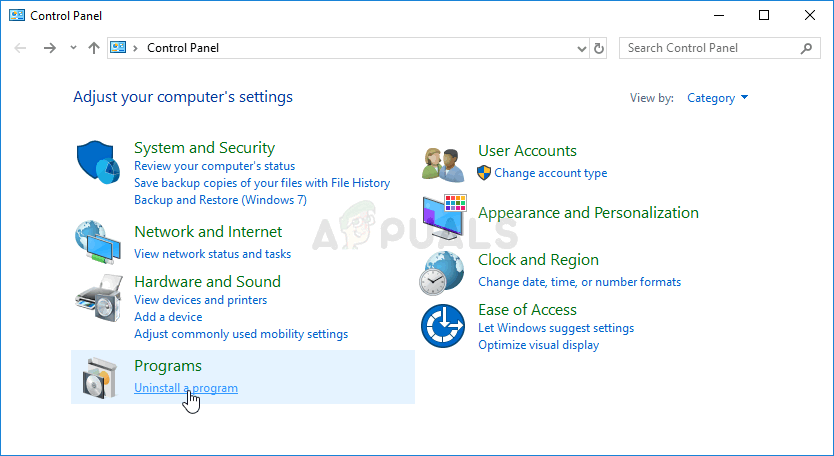
- At the right side of the screen which opens, click on Turn Windows features on or off and locate the Internet Information Services entry on the list. Uncheck the box next to it and click the OK button in order to apply the changes. Check to see if the error is gone!
Solution 5: Unplug your SD Card Reader
This might be an odd way to solve the problem but plenty of users suggested that the problem has automatically fixed itself after users have disconnected the SD card from their respective computers. You can reconnect if after the update finishes or after you install Windows successfully!
Kevin Arrows
Kevin Arrows is a highly experienced and knowledgeable technology specialist with over a decade of industry experience. He holds a Microsoft Certified Technology Specialist (MCTS) certification and has a deep passion for staying up-to-date on the latest tech developments. Kevin has written extensively on a wide range of tech-related topics, showcasing his expertise and knowledge in areas such as software development, cybersecurity, and cloud computing. His contributions to the tech field have been widely recognized and respected by his peers, and he is highly regarded for his ability to explain complex technical concepts in a clear and concise manner.
-
Home
-
Partition Manager
- Solved: Windows Could Not Configure One Or More System Components
By Amanda |
Last Updated
If you receive the error message that Windows could not configure one or more system components on your Windows PC, this post will be of great help for you. MiniTool prepares 5 solutions in this post to help you effectively remove this error.
The error message “Windows could not configure one or more system components” might appear when you try to update your PC to the latest available build of Windows.
You may wonder why this error occurs. There are some potential reasons for this error listed below:
- The keys used to encrypt the configuration store for the AES Provider are faulty or missing.
- The wireless drivers (or drivers in general) are old and outdated.
- Internet Information Services (IIS) tool is misconfigured or faulty.
When the error occurs, you will get the full error message which goes like the following screenshot. It prompts you to restart your computer and then restart the Windows installation.
However, many people complain that the error cannot be removed despite they have performed restarting. If you encounter the same problem, just set your heart at rest as there are 5 effective resolutions prepared for you. Let’s see the detailed steps.
Fix 1: Delete Certain Files
If the keys used by IIS to encrypt the configuration store for the AES Provider are corrupted or missing, you will fail to install or upgrade Windows and receive the error mentioned above.
To solve the problem in this case, you should delete certain files under MachineKeys folder which is hidden on your computer.
Step 1: Press Windows key + E shortcut to open your File Explorer. Then, switch to View tab and check Hidden items option in the Show/hide section.
Step 2: Then, you need to open your C drive and navigate to the following location: C:ProgramDataMicrosoftCryptoRSAMachineKeys.
Step 3: Click the MachineKeys folder to open it. You will see some files whose names begin with a sequence of numbers and letters and end with the GUID of your machine. The GUID is different for each user.
Step 4: Delete these files. This will not bring damages to your system, as they will be recreated when you update or install Windows. In this way, Windows could not configure system components error should be gone.
Alternatively, you can try using Windows Media Creation Tool to remove this error.
After downloading this tool from Microsoft’s official website, you are allowed to upgrade your computer using this tool. To do that, you can refer to the post: A Complete Guide to Windows 10 Media Creation Tool: How to Use. According to the step-by-step tutorial with screenshots, you can easily upgrade your PC.
After that, the error mentioned above should no longer appear.
Fix 3: Uninstall Your Old Wi-Fi Drivers and Update Others
Your old and outdated drives are also a cause for this error. Sometimes you can fix it by uninstalling your old Wi-Fi drivers, and you need to update all your drivers in some cases.
Step 1: Press Windows +R to open Run dialog. Type in devmgmt.msc in the box and click OK to run Device Manager.
Step 2: Locate your old wireless adapter driver under Network adapters. Right-click it and select Uninstall device from the context menu. Then, click Uninstall in the pop-up window.
Step 3: As for the other drivers you need to update, just right-click them and select Update driver. The selected drivers will be updated automatically.
After completing the operation, just run the Windows upgrade or installation again to see whether the error is removed.
Fix 4: Disable IIS
As the Internet Information Services (IIS) can lead to “windows could not configure one or more system components”, you should consider disabling it if you are not using it.
To do that, you need to navigate to Programs on the Control Panel window -> Programs and Features and click Turn Windows features on or off from the left pane. When you get the pop-up window, locate Internet Information Services and uncheck it. Then, click OK to confirm this operation.
Fix 5: Remove Your SD Card
It seems like an odd method to remove your SD card. But plenty of Windows users reported that they have fixed the error by disconnecting the SD card from their computer. You can have a try. After you install or upgrade Windows successfully, you can connect it to your computer again.
Hope you can resolve “Windows could not configure one or more system component” with the methods introduced above. Also, wish you can install or upgrade Windows without any issue.
About The Author
Position: Columnist
Amanda has been working as English editor for the MiniTool team since she was graduated from university. She enjoys sharing effective solutions and her own experience to help readers fix various issues with computers, dedicated to make their tech life easier and more enjoyable.
Amanda has published many articles, covering fields of data recovery, partition management, disk backup, and etc. In order to provide more useful tips and information, she is still committed to expand her technical knowledge.