
Applies ToWindows 11 Windows 10
Note: If your issue prevents you from booting into Windows, you won’t be able to follow the steps in this article. After the device tries to restart a few times, it should automatically enter the Windows Recovery Environment. To find information about restoring your device in this scenario, please visit the article, Windows Recovery Environment.
Summary
A «clean boot» starts Windows with a minimal set of drivers and startup programs, so that you can determine whether a background program is interfering with your game or program. This is similar to starting Windows in Safe Mode, but provides you more control over which services and programs run at startup to help you isolate the cause of a problem.
How to perform a clean boot
These steps might look complicated at first glance, but following them in order, step-by-step, will help get you back on track.
-
Sign in to the computer as an administrator. See Manage user accounts in Windows to learn more about configuring a user account as an administrator.
-
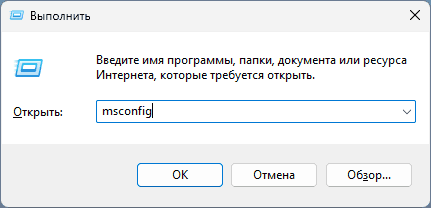
Select Search , type msconfig , and then select System Configuration from the list of results.
Important: If the computer is connected to a network, network policy settings might prevent you from following these steps. Only use the System Configuration utility to change the advanced boot options on the computer with guidance from a Microsoft support engineer. Using the System Configuration utility might make the computer unusable.
-
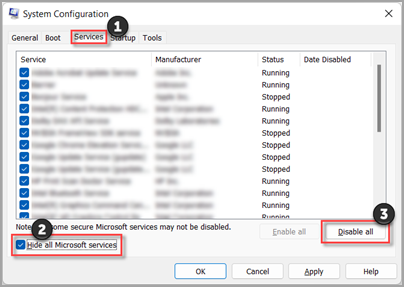
On the Services tab of System Configuration, select Hide all Microsoft services, and then select Disable all. Select Apply.

-
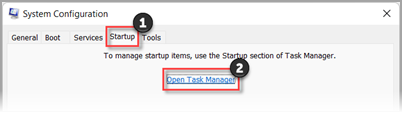
On the Startup tab of System Configuration, select Open Task Manager.

-
On the Startup apps tab in Task Manager, for each Enabled startup item, select the item and then select Disable. (Keep track of which items have been Disabled. You will need to know this later.)
-
Close Task Manager.
-
On the Startup tab of System Configuration, select OK. When you restart the computer, it will be in a clean boot environment. You can now try to troubleshoot your problem by trying the troubleshooting steps in the section, Install, uninstall, or run an application.
Warning: Your computer might temporarily lose some functionality while in a clean boot environment.
-
Once you are done troubleshooting your problem and want to return your computer to a normal startup, follow the steps in the section, Reset the computer to start normally after clean boot troubleshooting.
Install, uninstall, or run an application
After you restart the computer, you’ll have a clean boot environment. Then, do one of the following, as appropriate for your situation:
Note: If you receive the error, «The Windows Installer service could not be accessed», you’ll need more information. Follow the steps in the section, How to start the Windows Installer service when system services are not loaded. Then try installing or uninstalling the app or update again.
If the installation or uninstallation is successful, your issue is resolved. To return your computer to a normal startup, follow the steps in the section, Reset the computer to start normally after clean boot troubleshooting.
If the installation or uninstallation still fails, that means this issue is not caused by interference from a service or an app. You might need to contact the program manufacturer for more specific support.
If the app runs correctly while in a clean boot environment, then your problem was caused by interference from another app or service. You can find out which app or service is causing the issue by following the steps in the section, How to determine what is causing the problem after you do a clean boot.
If your app still doesn’t run as expected while in a clean boot environment, then your problem is not caused by interference from another app or service. You might need to contact the program manufacturer for more specific support.
If you run a Setup program without starting the Windows Installer service, you might receive the following error message:
The Windows Installer service could not be accessed. Contact your support personnel to verify that the Windows Installer service is properly registered.
The Windows Installer service doesn’t start if you clear the Load system services check box in the System Configuration utility. To use the Windows Installer service when system services are not loaded, start the service manually. Here’s how:
-
Select Search , then type computer management. Select Computer Management from the list of results.
-
In the console tree, select the arrow to expand Services and Applications, and then select Services.
-
In the details pane, right-click Windows Installer, and then select Start.
How to determine what is causing the problem after you do a clean boot
If your problem does not occur while the computer is in a clean boot environment, then you can determine which startup app or service is causing the problem by systematically turning them on or off and restarting the computer. While turning on a single service or startup item and rebooting each time will eventually find the problematic service or application, the most efficient way to do this is to test half of them at a time, thus eliminating half of the items as the potential cause with each reboot of the computer. You can then repeat this process until you’ve isolated the problem. For detailed steps for how to do this, expand the following section:
-
Sign in to the computer as an administrator. See Manage user accounts in Windows to learn more about configuring a user account as an administrator.
-
Select Search , then type msconfig. Select System Configuration from the list of results.
-
Select the Services tab, and then select Hide all Microsoft services.
-
Select each of the check boxes in the upper half of the Service list.
-
Select OK, then restart Windows.
-
After the computer restarts, determine whether the problem still occurs.
-
If the problem still occurs, one of the checked items is the problematic service. Repeat steps 1 through 6, but in Step 4, clear the lower half of the boxes in the Service list that you selected in your last test.
-
If the problem doesn’t occur, the checked items are not the cause of the problem. Repeat steps 1 through 6, but in Step 4, turn on the upper half of the boxes that you cleared in the Service list in the last test.
-
Repeat these steps until you’ve either isolated the problem to a single service, or until you’ve determined that none of the services are the cause of the problem. If you experience the problem when only one service is selected in the Service list, then that startup service is the one causing the problem, and you should go to step 9. If none of the services cause the problem, go to step 7.
-
-
Select the Startup tab, then select Open Task Manager. On the Startup apps tab on Task Manager, one at a time, select the upper half of the items you Disabled earlier, then select Enable.
-
Restart Windows.
-
If the problem still occurs, repeat step 7, but this time disable the lower half of the items you enabled in your last test.
-
If the problem does not occur, repeat step 7, but disable everything you enabled in your last test and enable the other half of the items you disabled.
-
If you still experience the problem after only one Startup item is enabled, then the enabled item is the one causing the problem, and you should go to step 9. If no Startup item causes the problem, there might be a problem with a Microsoft service. See Recovery options in Windows.
-
-
After you determine the startup item or the service that causes the problem, contact the program manufacturer to determine whether the problem can be resolved, or run Windows with the service unchecked or the Startup item disabled.
Reset the computer to start normally after clean boot troubleshooting
After you finish troubleshooting, follow these steps to reset the computer to start normally.
-
Select Search , then type msconfig. Select System Configuration from the list of results.
-
On the General tab, select Normal Startup.
-
Select the Services tab, clear the check box beside Hide all Microsoft services, select Enable all, then select Apply.
-
Select the Startup tab, then select Open Task Manager.
-
In Task Manager, Enable all of the startup programs you had disabled before, and then select OK.
-
When you’re prompted to restart the computer, select Restart.
Need more help?
Want more options?
Explore subscription benefits, browse training courses, learn how to secure your device, and more.
Чистая загрузка в Windows 11, Windows 10 и предыдущих версиях системы (не путать с чистой установкой, под которой понимается установка ОС с флешки или диска с удалением предыдущей системы) позволяет выявить и исправить проблемы с системой, вызванные неправильной работой сторонних служб, программ, конфликтами ПО, драйверов и служб Windows.
В этой инструкции подробно о том, что такое чистая загрузка Windows, как её выполнить и дополнительная информация, которая может оказаться полезной.
Как выполнить чистую загрузку Windows
Чистая загрузка (clean boot) схожа с безопасным режимом, но не является тем же самым. В случае входа в безопасном режиме, в Windows отключается почти всё, что не является обязательным для запуска, а для работы используются «стандартные драйвера» без аппаратного ускорения и других функций, что может быть полезно при исправлении проблем с оборудованием и драйверами.
При использовании чистой загрузки Windows, предполагается, что с сама операционная система и оборудование работают исправно, а при запуске не загружаются лишь компоненты от сторонних разработчиков. Данный вариант запуска подходит для тех случаев, когда нужно выявить именно проблемное или конфликтующее программное обеспечение, сторонние службы, мешающие нормальной работе ОС, что случается сравнительно часто.
Для того, чтобы выполнить чистую загрузку Windows 11/10, достаточно использовать следующие шаги (важно: для того, настройки чистой загрузки вы должны быть администратором в системе):
- Нажмите клавиши Win+R на клавиатуре, либо нажмите правой кнопкой мыши по кнопке «Пуск» и выберите пункт «Выполнить», введите msconfig и нажмите Enter.

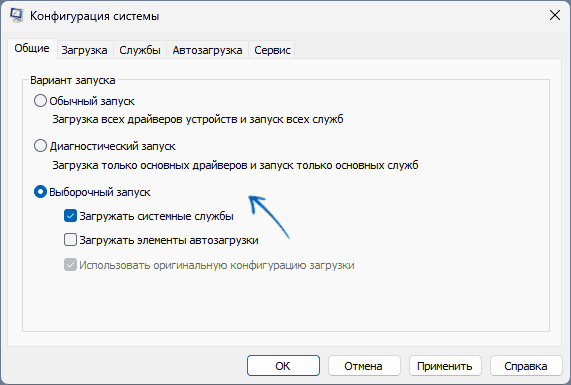
- На вкладке «Общие» выберите «Выборочный запуск» (скорее всего пункт уже будет выбран) и снимите отметку с «Загружать элементы автозагрузки».

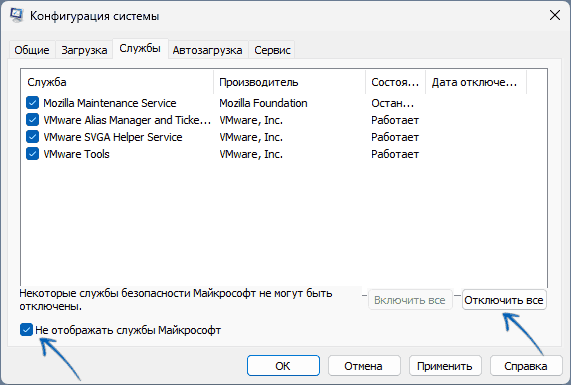
- На вкладе «Службы» поставьте отметку «Не отображать службы Майкрософт», а затем, при наличии сторонних служб, нажмите кнопку «Отключить все».
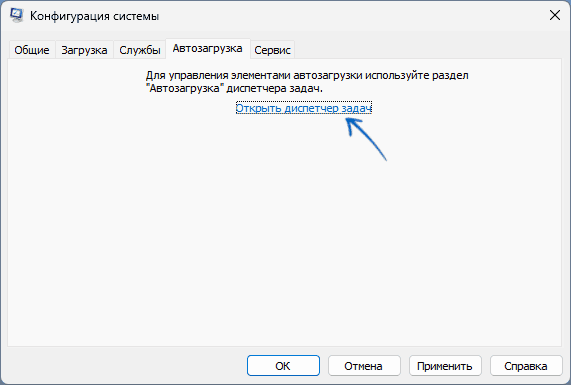
- Перейдите на вкладку «Автозагрузка» и нажмите «Открыть диспетчер задач».
- Диспетчер задач откроется на вкладке «Автозагрузка». Кликните по каждому из пунктов в списке правой кнопкой мыши и выберите «Отключить» (или сделайте это с помощью кнопки внизу списка для каждого из пунктов).Предвидя вопрос о том, зачем мы дважды отключаем элементы автозагрузки: дело в том, что простое снятие отметки «Загружать элементы автозагрузки» выключает не все автоматически загружаемые программы.

- Закройте диспетчер задач и нажмите «Ок» в окне конфигурации системы.

После этого перезагрузите компьютер — произойдет чистая загрузка Windows, без сторонних служб и программ. В дальнейшем, чтобы вернуть обычную загрузки системы, верните все сделанные изменения в исходное состояние.
Дополнительная информация
Возможные сценарии, когда чистая загрузка Windows может пригодиться:
- Появляются необъяснимые ошибки при работе системы, причиной которых потенциально может быть стороннее ПО. В этом случае диагностика может быть долгой — начинаем с чистой загрузки, и, если ошибка не проявляется, пробуем по одной включать сторонние службы, а затем программы автозапуска, перезагружаясь каждый раз, чтобы выявить элемент, вызывающий проблемы.
- Не удается установить программу или удалить ее через встроенный деинсталлятор в обычном режиме (может потребоваться ручной запуск службы Установщик Windows).
- Не запускается программа в обычном режиме по неясным причинам (не отсутствие необходимых файлов, а что-то еще, при этом диагностировать причины проблемы не удается).
- Не удается совершить действия над какими-то папками или файлами, так как они используются (на эту тему см. также: Файл или папка уже используется, Как удалить файл или папку, которые не удаляются).
И некоторые дополнительные нюансы:
- Некоторые автоматически загружаемые элементы могут продолжить запускаться, например, если их запуск прописан в планировщике заданий. Здесь может помочь Process Explorer из Sysinternals Suite.
- Если войти в режим чистой загрузки не получается или он также работает с проблемами, попробуйте безопасный режим.
- Вирусы и другое вредоносное ПО могут игнорировать ваши попытки чистой загрузки. При подозрении на них можно начать с KVRT или Kaspersky Rescue Disk.
- Если есть подозрение на проблемы с самой Windows, начать стоит с точек восстановления и восстановления системных файлов, а если не поможет — прибегнуть к «Обновлению на месте».
И еще один момент: если в Windows 11/10 вы не можете вернуть «обычную загрузку» в msconfig, то есть всегда после перезапуска конфигурации системы там стоит «Выборочный запуск», не стоит переживать — это нормальное поведение системы, если вы настраивали вручную (или с помощью программ) запуск служб и убирали программы из автозагрузки. Также может пригодиться официальная статья по чистой загрузке Windows от Microsoft.
Learn how to perform a clean boot in Windows 11, 10, 8, and 7. This guide explains the step-by-step process to troubleshoot software conflicts and resolve performance issues using a clean boot.

Why You Should Perform a Clean Boot?
A clean boot in Windows is an effective troubleshooting method to isolate software conflicts, startup issues, and performance problems.
By performing a clean boot, Windows starts with a minimal set of drivers and startup programs, which helps you pinpoint whether a background service or startup item is causing issues.
Performing a clean boot is essential for:
- Diagnosing Software Conflicts: Some programs or services may conflict with each other, causing errors or slow performance.
- Resolving Startup Problems: A clean boot helps identify startup programs that are causing delays or crashes.
- Improving System Performance: Reducing unnecessary background services can resolve performance-related issues.
- Troubleshooting Errors: If you experience Blue Screen of Death (BSOD) or random freezes, a clean boot can help isolate faulty software or drivers.
How to Perform a Clean Boot in Windows 11

- Open System Configuration: Press
Win + R, typemsconfig, and press Enter. - Hide Microsoft Services: Go to the Services tab and check Hide all Microsoft services.
- Disable Non-Microsoft Services: Click Disable all to turn off non-Microsoft services.
- Disable Startup Programs: Go to the Startup tab and click Open Task Manager. Disable all unnecessary startup programs.
- Restart Your Computer: Click OK and restart to enter clean boot mode.
How to Revert to Normal Boot in Windows 11
- Open the System Configuration tool again.
- Go to the General tab and choose Normal startup.
- Restart your system.
Once you’ve completed your troubleshooting, return to normal boot by reopening System Configuration, choosing Normal startup, and restarting.
Note: If your computer is connected to a network, network policy settings might prevent you from following the steps outlined in this guide. Only use the System Configuration utility to change the advanced boot options on your computer with guidance from a Microsoft support engineer.
How to Perform a Clean Boot in Windows 10
- Open System Configuration: Press
Win + R, typemsconfig, and hit Enter. - Hide Microsoft Services: In the Services tab, check the box for Hide all Microsoft services.
- Disable Non-Microsoft Services: Click Disable all to prevent third-party services from running.
- Disable Startup Programs: In the Startup tab, open Task Manager and disable all startup items.
- Restart: Apply the changes and restart your computer.
While in this environment, you can troubleshoot or install/uninstall applications. Some functionality might be temporarily disabled. After troubleshooting, reset your computer to normal startup by opening System Configuration, selecting Normal startup, and restarting.
How to Perform a Clean Boot in Windows 8 and 7
For both Windows 8 and 7, the clean boot process is nearly identical to Windows 10:

- Open System Configuration by typing
msconfigin the Run dialog (Win + R). - In the Services tab, check Hide all Microsoft services and click Disable All.
- Switch to the Startup tab in System Configuration (Windows 8 users may need to open Task Manager for this step).
- Disable all unnecessary startup programs.
- Restart the system.
Benefits of Performing a Clean Boot
- Isolate software conflicts.
- Speed up startup and performance.
- Identify faulty applications.
- Troubleshoot hardware or driver issues.
How to Determine What is Causing the Problem After You Perform a Clean Boot
If your problem doesn’t occur in a clean boot environment, you can pinpoint the problematic service or startup program by systematically re-enabling them in batches and restarting your computer each time. Start by enabling half the services and testing, then continue enabling or disabling in halves until you identify the faulty program. This method efficiently narrows down the cause. Once isolated, you can decide whether to contact the software vendor for a solution or leave the item disabled to avoid the issue.
For detailed steps, you can refer to Microsoft’s official guide.
FAQs About Clean Boot in Windows
1. What is the difference between clean boot and safe mode?
While both clean boot and safe mode are used for troubleshooting, a clean boot only disables non-Microsoft services and startup programs, allowing more features to run. Safe mode, on the other hand, disables most drivers and essential services to load only basic functions of the OS.
2. Will I lose my files after performing a clean boot?
No, performing a clean boot doesn’t delete your files. It simply prevents third-party services and programs from running during startup.
3. How often should I clean boot my system?
You only need to perform a clean boot when troubleshooting software conflicts, performance issues, or startup problems. It is not recommended to perform it regularly.
4. Can I still use my installed programs in clean boot?
Yes, your programs are still installed, but some might not work until you revert to a normal boot since certain services may be disabled in clean boot.
5. How do I know if a clean boot solved my issue?
If the problem doesn’t occur after performing a clean boot, it’s likely caused by one of the disabled services or programs. You can narrow it down by selectively enabling services one by one until the issue reappears.
Conclusion
Performing a clean boot in Windows 11, 10, 8, or 7 is a straightforward and highly effective way to troubleshoot software conflicts and performance issues. By following the steps outlined above, you can isolate the cause of system problems without affecting your data or permanently disabling essential programs.
Visit Our Post Page: Blog Page
Windows comes preloaded with different settings, programs and drivers that interact simultaneously to make your PC run smoothly. Unfortunately, this mixed environment typically leads to compatibility issues and software conflicts that manifest in different ways.
The result is that updates may fail to install, or Windows may struggle to start up properly, often leading to slowdowns, freezing, BSODs or crashes.
Performing a clean boot disables all non-essential services to help you find any underlying software conflicts or issues in your PC. In this guide, we’ll define a clean boot, when to use it and how to clean boot in Windows 10.

What Is a Clean Boot?
A clean boot is a diagnostic approach that involves disabling non-essential services in Windows and starting the system with a minimal set of essential startup programs and drivers. This way, you can determine and isolate what app or program is causing the issues you’re experiencing while using your PC.
Performing a clean boot is akin to starting Windows in Safe Mode. A clean boot gives you more control over which programs and services run at startup. It also helps isolate the elements of the normal boot process that are causing performance problems without deleting your personal files. Safe Mode, on the other hand, is recommended when your PC has issues related to software, hardware or drivers.
When Should You Perform a Clean Boot in Windows 10?
A clean boot is useful in the following instances:
- When your computer doesn’t start normally
- If you receive errors at startup that you can’t identify
- When an official Windows Update won’t install properly
- When you’re experiencing frequent app crashes
To diagnose the problem, perform a clean boot and then enable one service at a time (followed by a reboot) until you find the service that is causing your issue.
Before performing a clean boot, you must be signed in as an administrator on your PC to access the settings mentioned below. If you don’t have an administrator account, check out our guide on how to change the administrator on Windows 10.
Follow the steps below in order to perform a clean boot in Windows 10.
- Type msconfig in the search box and select System Configuration.

- Select Hide all Microsoft Services under the Services tab and select Disable all.

- Next, select Open Task Manager on the Startup tab.

- Right-click each startup item under Startup in Task Manager, select Disable and exit the Task Manager.

Next, select OK on the Startup tab and restart your computer. Once your PC restarts, it will be in a clean boot environment.
How to Reset Your PC to Start Normally After a Clean Boot
Once you’re done with the clean boot process and have found the cause of the problem, you can reset your PC to get it back to running normally.
- Open System Configuration by typing msconfig in the search box on the taskbar. You can also right-click Start > Run, type msconfig and press Enter.
- Select Normal Startup on the General tab.

- Next, select Services and then uncheck the box next to Hide all Microsoft services.

- Select Enable all.

- Next, select Startup > Open Task Manager.

- RIght-click each startup program in Task Manager, select Enable and then select OK.
- Select Restart if you’re prompted to restart your PC.
How to Start Windows Installer Service After Performing a Clean Boot in Windows 10
If you clear the Load system services checkbox in the System Configuration utility, the Windows Installer service won’t start. You can start the Windows Installer service manually if you want to use it when system services are not loaded on your PC.
- Type Computer Management in the search box on the taskbar and select Open under Computer Management in the search results.

- Select Services and Applications in the console tree.

- Next, select Services.

- Right-click on Windows Installer in the details pane and then select Start.

Your computer should restart and function normally again without any issues.
Get Your PC Running Normally Again
Windows 10 is a large, complex operating system with many processes, programs and settings competing for resources. In such a varied environment, you’re bound to run into software conflicts and other problems at startup or when installing apps and updates. Performing a clean boot helps resolve most, if not all such issues so you can use your PC normally again.
Were you able to fix your PC using a clean boot? Share your solution with us in a comment.
Related Posts
- How to Fix a “This file does not have an app associated with it” Error on Windows
- How to Fix an Update Error 0x800705b4 on Windows
- How to Resolve “A JavaScript error occured in the main process” Error on Windows
- How to Fix the Network Discovery Is Turned Off Error on Windows
- How to Change Folder Icons in Windows
Does your computer need a fresh start? Launching a clean boot is a good way to identify any software conflicts or issues that are causing your system to slow down or behave erratically.
Running a clean startup process can help you identify software conflicts by reducing your computer’s processes to the bare minimum. In this comprehensive guide, we’ll explore the steps for how to perform a clean boot in various Windows versions, as well as provide tips and troubleshooting techniques to ensure a healthy clean boot process.
A clean boot in Windows refers to starting your computer with only the essential services and drivers required for it to function. It allows you to isolate the problems by disabling unnecessary startup programs or services that might be causing interference. If performing the clean boot resolves the issue that you were experiencing, you can then gradually reenable the system’s services and startup programs one by one to identify the specific one causing the problem.
What is the difference between clean boot and safe mode?
Performing a clean boot is similar to, yet distinct from, launching your computer in safe mode. While both modes serve the purpose of troubleshooting and resolving system issues, they have distinct functionalities.
Safe mode
Safe mode is designed to start your computer with only the most basic drivers and services necessary to run the operating system. It disables unnecessary programs and drivers, making it easier to diagnose and fix problems. Safe mode is particularly helpful when you encounter issues related to malware infections, driver conflicts, or problematic updates.
Clean boot
On the other hand, a clean boot, or clean startup, goes a step further by disabling all third-party applications and services, leaving only the essential Microsoft services and drivers active. It helps in identifying software conflicts caused by non-Microsoft programs, making it an effective method to troubleshoot issues such as slow startup, freezes, or crashes.
The differences between clean boot and safe mode can be summed up as follows:
- Use cases: Clean boot is used for suspected conflicts with third-party software or services, while safe mode is used for suspected conflicts with core Windows components or drivers.
- Access: Clean boot is launched through the System Configuration utility in Windows, while safe mode is accessed through the Windows startup process (e.g., by pressing a specific key).
- Components: Clean boot disables all non-Microsoft services and startup programs, while safe mode loads a minimal set of drivers and services.
How to perform a clean boot in Windows (7/8/10/Vista)
Performing a clean boot may vary slightly depending on the version of Windows you are using. Here, we’ll guide you through the steps to perform a clean boot in Windows Vista, Windows 7, Windows 8, and Windows 10.
Windows Vista/7/8
- Press the Windows key and type “msconfig” in the search bar.
- Click on the “System Configuration” option from the search results.
- In the System Configuration window, navigate to the “General” tab.
- Under the “Selective startup” section, uncheck the box that says “Load startup items.”
- Head to the “Services” tab and check the box that says “Hide all Microsoft services.”
- Click on the “Disable all” button to disable all non-Microsoft services.
- Once done, go to the “Startup” tab and click on “Open Task Manager.”
- In the Task Manager, disable all startup items by right-clicking on each item and selecting “Disable.”
- Close the Task Manager and click “OK” in the System Configuration window.
- Restart your computer to initiate the clean boot process.
Windows 10
- Press the Windows key and type “msconfig” in the search bar.
- Click on the “System Configuration” option from the search results.
- In the System Configuration window, navigate to the “Services” tab.
- Check the box that says “Hide all Microsoft services.”
- Click on the “Disable all” button to disable all non-Microsoft services.
- Head to the “Startup” tab and click on “Open Task Manager.”
- In the Task Manager, disable all startup items by right-clicking on each item and selecting “Disable.”
- Close the Task Manager and click “OK” in the System Configuration window.
- Restart your computer to initiate the clean boot process.
Tips and troubleshooting for a healthy clean Windows boot process
Knowing how to perform a clean boot of your Windows computer is an effective way to identify and resolve software conflicts and system performance issues. To ensure a healthy clean boot process, consider the following tips and troubleshooting techniques.
Identify software conflicts
After performing a clean Windows boot, monitor your system’s performance and gradually enable the disabled services and startup items one by one. By enabling them individually, you can identify any software conflicts that may be causing problems. If an issue arises after enabling a particular service or startup item, it is likely the source of the conflict. Disable or uninstall the conflicting software and try launching the full version of Windows.
Regularly update the operating system and drivers
Keeping your operating system and device drivers up-to-date is crucial for a smooth and stable clean boot process. Outdated software may contain bugs or compatibility issues that can interfere with the clean boot functionality. Regularly check for updates from Microsoft and your hardware manufacturers to ensure you have the latest patches and drivers installed.
Optimize startup programs
Even after you’ve performed a clean Windows boot, optimizing your startup programs can be beneficial for the system’s performance and boot time. Start by opening the Task Manager and navigating to the “Startup” tab. In here, you can disable any unnecessary programs that you don’t need to launch during startup.
Use system tools
Windows provides built-in system utilities that can help optimize and maintain a clean boot. Use tools such as Disk Cleanup to remove unnecessary files, Disk Defragmenter to optimize your hard drive, and System File Checker to scan and repair corrupted system files. Perform these maintenance tasks at regular intervals to keep your system running smoothly.
Restoring normal startup after a clean boot
Once you’ve identified and resolved any software conflicts by launching a clean boot, you’ll want to restore full functionality to your computer in normal startup mode. To do this, follow the same steps mentioned earlier to access the System Configuration window:
- Press the Windows key and type “msconfig” in the search bar.
- Click on the “System Configuration” option from the search results.
Under the “General” tab, select the “Normal startup” option and click “OK.” Restart your computer, and it will boot with all services and startup items enabled.
Should you perform a clean Windows boot?
Performing regular clean boots when you encounter IT issues will help you perform system maintenance and contribute to a smoother and more efficient computing experience. If you’re struggling to troubleshoot computer problems or crashes, follow the steps above to launch a Windows clean boot—your computer will thank you for it!