Posted On December 30, 2018
Update: 3/18/24 — Added fact: the C2WTS is deprecated in SharePoint Server Subscription Edition.
Update: 3/31/22 — Added a reference to a related post from my colleague Mike: Unable to start the C2WTS
Facts:
1. In SharePoint Server Subscription Edition (SPSE), the C2WTS has been deprecated. The service still shows up in Central Administration, but the backing Windows service is not installed. Trying to start the service in Central Admin will result in this error: SPWindowsTokenServiceInstance: could not find c2wtshost.exe.config. Please edit the configuration manually.
SPSE replaced Windows Identity Foundation (WIF) 3.5 with WIF 4.5, in which the Claims to Windows Token Service (c2wts) and its associated classes in the Microsoft.IdentityModel.WindowsTokenService namespace are removed. See Guidelines for Migrating an Application Built Using WIF 3.5 to WIF 4.5 for more info. In other words, SPSE no longer uses the C2WTS. If you have custom solutions that depend on it, you may have some adjustments to make.
2. In SharePoint 2019 and below, the Claims to Windows Token Service (from here on denoted as “C2WTS”) is only used when SharePoint needs to get data from an external system that does not understand claims. Examples of features that can be configured to use C2WTS include, but are not limited to:
- SQL Server Reporting Services (SSRS)
- Excel Web Services (EWS)
- PowerPivot / Power View
- Business Data Connectivity (BDC) / Business Connectivity Services (BCS) / External Content Types (ECT) / External Lists.
- Other SharePoint “BI” stuff.
- Custom Code that does user impersonation.
Normal SharePoint stuff (browsing sites, working in native lists / libraries, etc) does not use the C2WTS.
— I’ve seen many cases where we’ve spent a lot of time configuring the C2WTS to try to fix some authentication or permissions issue, when in fact, the C2WTS doesn’t even come into play in those scenarios.
3. The C2WTS can only be accessed on the local server, so when you are using it, the service must be running on all of your WFEs and any other server that will access the external data.
4. Out of the box, it only works for Windows-Claims web apps. It does not work for Trusted Provider / SAML claims (ADFS, Ping, SiteMinder, etc). Even if you pass UPN as one of your claims, it will not work**.
See this: https://technet.microsoft.com/en-us/library/ee806870.aspx#section2
Excerpt: “It is important to understand that these service applications can use the C2WTS only if the incoming authentication method is either Windows claims or Windows classic mode. Service applications that are accessed through web applications and that use Security Assertion Markup Language (SAML) claims or forms-based authentication claims do not use the C2WTS. Therefore, they cannot translate claims to Windows credentials.”
** I found that certain custom claim providers may also contain the custom code necessary to make C2WTS work with their SAML claims. For example, the Okta farm-level solution contains such code. In that case, you must be passing UPN as one of the claims, and you must have custom farm-level property “MapUpnToWindowsUser” set. Reference.
5. This is not necessarily an “error”:
11/09/2017 17:55:14.15 w3wp.exe (0x1A88) 0x2978 SharePoint Foundation Claims Authentication bz7l Medium SPSecurityContext: Could not retrieve a valid windows identity for username ‘CONTOSO\User1’ with UPN ‘User1@contoso.com’. UPN is required when Kerberos constrained delegation is used. Exception: System.ServiceModel.FaultException`1[System.ServiceModel.ExceptionDetail]: WTS0003: The caller is not authorized to access the service. (Fault Detail is equal to An ExceptionDetail, likely created by IncludeExceptionDetailInFaults=true, whose value is: System.UnauthorizedAccessException: WTS0003: The caller is not authorized to access the service.
Many times we see the above in the SharePoint ULS logs because there is some custom code in the master page or in a web part that calls an “impersonate” method, which results in calling into the Claims to Windows Token Service (C2WTS). But C2WTS may not be required for that code to work, so even though it throws the above error, it causes no actual problem.
Before digging into this “error”, you must ask yourself: “Does what I’m troubleshooting even use the C2WTS?” (see Fact #2 above).
Proper Permission Configuration:
Most C2WTS issues I see are a problem with configuring the service, more specifically with properly configuring permissions for the account that runs it.
Here’s a summary of how you should configure it:
Permissions Check list:
Reference here: https://technet.microsoft.com/en-us/library/hh231678(v=sql.110).aspx
Note: The end-to-end configuration for C2WTS will include setting up delegation on the C2WTS account. These steps vary depending on what you’re trying to get C2WTS to pull data from, and therefore are beyond the scope of this post. However, here’s an example of setting it up for SSRS.
• For Users calling the service
By “calling the service”, I mean any user browsing the SharePoint page, web part, SSRS report, Excel spreadsheet, etc that connects to some back-end service that utilizes the C2WTS. These users directly call the service and need permission to do so.
Edit c2wtshost.exe.config at C:\Program Files\Windows Identity Foundation\v3.5\ and make sure all users have access to call the service. — Adding “NT AUTHORITY\Authenticated Users” to the allowed callers list ought to take care of that.
<allowedCallers>
<clear/>
<add value=”NT AUTHORITY\Network Service” />
<add value=”NT AUTHORITY\Local Service” />
<add value=”NT AUTHORITY\System” />
<add value=”NT AUTHORITY\Authenticated Users” />
</allowedCallers>
• For the account running the C2WTS service (in services.msc):
-
On the SharePoint boxes running C2WTS:
- Add to the local Administrators group
-
Add to the local security policy (Start > Administrative Tools > Local Security Policy > Local Policies > User Rights Assignment),
- Act as part of the operating system
- Impersonate a client after authentication
-
Log on as a service
-
On the domain(s):
-
Needs to have the “Read tokenGroupsGlobalAndUniversal” permission to all the users in the domain.
- To give this permission, we need to add it to the “Windows Authorization Access Group” builtin domain group, which should have this permission to all domain accounts by default.
- The account needs these permissions on every domain that contains the users that are calling the service. So if you have a number of domain / forest trusts, and users from these other domains are browsing your SharePoint sites and using stuff that invokes the C2WTS, then you need to add your C2WTS service account to the “Windows Authorization Access Group” in every one of those domains.
-
Other notes for configuring C2WTS:
This service can only be accessed locally, so it needs to be running on all the machines in the farm that require it. For example, in the case of SSRS, it needs to be running on the servers running the SSRS service. Because it may not immediately be clear where you need the service in each scenario, you may choose to just run it on all servers in the farm.
Keep in mind that the c2wtshost.exe.config file edit, and the local security policy changes listed above need to be made on every server running C2WTS.
If you stop the C2WTS and start it again in Central Administration | Manage Services on Server, that will cause the c2wtshost.exe.config file to revert to its out-of-box version, and your users won’t be allowed access anymore. If you want to restart the service, just restart the Windows service within services.msc:

Important: If the Claims to Windows Token Service won’t start at all, you may have a problem within the c2wtshost.exe.config file. See this post from my colleague Mike Lee: Unable to start the C2WTS
Troubleshooting:
If you have configured permissions properly as described above but are still getting C2WTS errors, you can use the C2WTS tester tool:
https://rodneyviana.com/troubleshooting-claims-to-windows-nt-token-service-c2wts-in-sharepoint-2010-may-be-difficult-if-you-dont-know-where-to-start/
It’s called “c2WTSTest.zip” and you can download it here:
https://github.com/rodneyviana/blogdemos/blob/master/c2WTSTest.zip
— Here’s what the C2WTS tester tool looks like:
-By default, the tool runs as the logged-on user, but you can run it as another user by simply supplying a user name and password.
Note: This account is the user calling the service, which is different from account running the service.
-You also specify the UPN to try to convert to a Windows token. This can be the UPN for the user running the tool, or some other UPN altogether.
-Here’s what a successful run of the tool looks like:

— As you can see, it checks that the caller has permission per the “allowedCallers” tag in the c2wtshost.exe.config file, that the user can log in, and that the service account has permission to create the Windows token.
— And here’s an example of a failure:

Error Text:
***** c2WTS could not provide a valid Windows Token. Reason: Access is denied.
Server stack trace:
at System.ServiceModel.Channels.ServiceChannel.ThrowIfFaultUnderstood(Message reply, MessageFault fault, String action, MessageVersion version, FaultConverter faultConverter)
at System.ServiceModel.Channels.ServiceChannel.HandleReply(ProxyOperationRuntime operation, ProxyRpc& rpc)
at System.ServiceModel.Channels.ServiceChannel.Call(String action, Boolean oneway, ProxyOperationRuntime operation, Object[] ins, Object[] outs, TimeSpan timeout)
at System.ServiceModel.Channels.ServiceChannelProxy.InvokeService(IMethodCallMessage methodCall, ProxyOperationRuntime operation)
at System.ServiceModel.Channels.ServiceChannelProxy.Invoke(IMessage message)
Exception rethrown at [0]:
at System.Runtime.Remoting.Proxies.RealProxy.HandleReturnMessage(IMessage reqMsg, IMessage retMsg)
at System.Runtime.Remoting.Proxies.RealProxy.PrivateInvoke(MessageData& msgData, Int32 type)
at Microsoft.IdentityModel.WindowsTokenService.S4UClient.IS4UService_dup.UpnLogon(String upn, Int32 pid)
at Microsoft.IdentityModel.WindowsTokenService.S4UClient.<>c__DisplayClass1.<UpnLogon>b__0(IS4UService_dup channel)
at Microsoft.IdentityModel.WindowsTokenService.S4UClient.CallService(Func`2 contractOperation)
at c2WTSTest.Form1.button2_Click(Object sender, EventArgs e)
— It can be useful to take a Netmon (Network Monitor 3.4) trace while running the tester tool.
-The C2WTS uses Kerberos calls, so if you filter like tcp.port == 88, then you will see the request.
Here’s an example of a failing sequence:

— We can see it fails with “KDC_ERR_C_PRINCIPAL_UNKNOWN” which means “Client not found in Kerberos database”. The “client” in this case is the user we tried to generate a token for.
— See: http://support.microsoft.com/kb/2009157
As specified above, the service account running the C2WTS needs to have the “Read tokenGroupsGlobalAndUniversal” permission to all the users in the domain (or at least all users that want to be able to invoke it and render their favorite SSRS reports, or whatever you’re using C2WTS for).
To give this permission, we need to add it to the “Windows Authorization Access Group” builtin domain group.
By default, the “Windows Authorization Access Group” has the “Read tokenGroupsGlobalAndUniversal” permission to all accounts in the domain. If that has been removed for some reason, we’ll need to add it or the equivalent permissions back. One way to check permissions in AD is to go to Active Directory Users and Computers | Properties for a user | Security | Advanced | Effective Access. Choose the C2WTS service account and make sure it has (at least) the “Read tokenGroupsGlobalAndUniversal” permission.

Here’s an example where my service account (m1garandservice) does not have the correct permission to the User1 user account:


— In this case, I reproduced this behavior with an explicit deny on the Read tokenGroupsGlobalandUniversal permission for the User1 account, but out in the wild, you’d likely see this because the C2WTS service account is not in the “Windows Authorization Access Group” for all applicable domains. Have I mentioned that’s an important permission yet?
Full SharePoint ULS log example for the Access Denied error:
SPSecurityContext.WindowsIdentity: Could not retrieve a valid windows identity for NTName=’CONTOSO\User1′, UPN=’user1@contoso.com’. UPN is required when Kerberos constrained delegation is used. Exception: System.ServiceModel.Security.SecurityAccessDeniedException: Access is denied.
Server stack trace:
at System.ServiceModel.Channels.ServiceChannel.ThrowIfFaultUnderstood(Message reply, MessageFault fault, String action, MessageVersion version, FaultConverter faultConverter)
at System.ServiceModel.Channels.ServiceChannel.HandleReply(ProxyOperationRuntime operation, ProxyRpc& rpc)
at System.ServiceModel.Channels.ServiceChannel.Call(String action, Boolean oneway, ProxyOperationRuntime operation, Object[] ins, Object[] outs, TimeSpan timeout)
at System.ServiceModel.Channels.ServiceChannelProxy.InvokeService(IMethodCallMessage methodCall, ProxyOperationRuntime operation)
at System.ServiceModel.Channels.ServiceChannelProxy.Invoke(IMessage message)
Exception rethrown at [0]:
at System.Runtime.Remoting.Proxies.RealProxy.HandleReturnMessage(IMessage reqMsg, IMessage retMsg)
at System.Runtime.Remoting.Proxies.RealProxy.PrivateInvoke(MessageData& msgData, Int32 type)
at Microsoft.IdentityModel.WindowsTokenService.S4UClient.IS4UService_dup.UpnLogon(String upn, Int32 pid)
at Microsoft.IdentityModel.WindowsTokenService.S4UClient.<>c__DisplayClass1.<UpnLogon>b__0(IS4UService_dup channel)
at Microsoft.IdentityModel.WindowsTokenService.S4UClient.CallService(Func`2 contractOperation)
at Microsoft.SharePoint.SPSecurityContext.GetWindowsIdentity().Throwing Microsoft.ReportingServices.Diagnostics.Utilities.ClaimsToWindowsTokenException: , Microsoft.ReportingServices.Diagnostics.Utilities.ClaimsToWindowsTokenException: Cannot convert claims identity to windows token. —> System.InvalidOperationException: Could not retrieve a valid Windows identity. —> System.ServiceModel.Security.SecurityAccessDeniedException: Access is denied.
Server stack trace:
at System.ServiceModel.Channels.ServiceChannel.ThrowIfFaultUnderstood(Message reply, MessageFault fault, String action, MessageVersion version, FaultConverter faultConverter)
at System.ServiceModel.Channels.ServiceChannel.HandleReply(ProxyOperationRuntime operation, ProxyRpc& rpc)
at System.ServiceModel.Channels.ServiceChannel.Call(String action, Boolean oneway, ProxyOperationRuntime operation, Object[] ins, Object[] outs, TimeSpan timeout)
at System.ServiceModel.Channels.ServiceChannelProxy.InvokeService(IMethodCallMessage methodCall, ProxyOperationRuntime operation)
at System.ServiceModel.Channels.ServiceChannelProxy.Invoke(IMessage message)
Exception rethrown at [0]:
at System.Runtime.Remoting.Proxies.RealProxy.HandleReturnMessage(IMessage reqMsg, IMessage retMsg)
at System.Runtime.Remoting.Proxies.RealProxy.PrivateInvoke(MessageData& msgData, Int32 type)
at Microsoft.IdentityModel.WindowsTokenService.S4UClient.IS4UService_dup.UpnLogon(String upn, Int32 pid)
at Microsoft.IdentityModel.WindowsTokenService.S4UClient.<>c__DisplayClass1.<UpnLogon>b__0(IS4UService_dup channel)
at Microsoft.IdentityModel.WindowsTokenService.S4UClient.CallService(Func`2 contractOperation)
at Microsoft.SharePoint.SPSecurityContext.GetWindowsIdentity()
— End of inner exception stack trace —
at Microsoft.SharePoint.SPSecurityContext.GetWindowsIdentity()
at Microsoft.ReportingServices.ServiceRuntime.WcfUserContext.GetWindowsIdentity()
— End of inner exception stack trace —;
Okay, this will hopefully be the longest titled post I ever write, but I wanted to make sure it covered all the relevant technologies being discussed. This is an area that I’ve heard a more rumbling about recently, which is really all about how can I take a SAML claims user and get a Windows context to access some other application. SharePoint 2010 has limited support for use of the Claims To Windows Token Service (hereafter referred to as c2wts), but only for Windows claims users with a small number of service applications. A common question is why can’t it use a SAML claims users with a valid UPN claim, and there really isn’t a technological reason why you cannot. So between the limitation in authentication types as well as the limitation in service apps that can use it, you may very well find yourself in a position where you need to build a way to connect SAML users to other applications as their underlying Windows account. This post will hopefully help you understand the basics of how it can be done.
The basic approach this scenario is going to take is to create a WCF Services Application that processes all the end user requests for data from the other application, which in our case is SQL Server. So I want to take a SAML user that is hitting the SharePoint site, and make a request as the Windows account for that SAML user when I retrieve data from SQL Server. NOTE: Even though this article is about SAML claims users, the same exact methodology can be used for Windows claims users; they get a UPN claim by default when they log in. Here’s a diagram of what the whole process looks like:
Configuring SQL Server
Let’s start on the SQL Server side. In my scenario, SQL Server is running on a server called “SQL2”. The SQL service itself is running as Network Service. This means that I do not need to create a SPN for it; if it was running as domain account then I would need to create a SPN for that service account for MSSQLSvc. For this particular scenario, I’m going to use the old Northwinds database to retrieve data. I want to easily demonstrate the identity of the user that is making the request, so I modified the Ten Most Expensive Products stored procedure so it looks like this:
CREATE procedure [dbo].[TenProductsAndUser] AS
SET ROWCOUNT 10
SELECT Products.ProductName AS TenMostExpensiveProducts, Products.UnitPrice, SYSTEM_USER As CurrentUser
FROM Products
ORDER BY Products.UnitPrice DESC
The key thing to note here is that I added SYSTEM_USER to the SELECT statement; all that does is return the current user in the column. That means when I execute a query and get the results back, I’ll see a column in my grid that contains the current user name so I’ll be able to easily see if the query executed as the current user’s identity or not. In this particular scenario I granted three Windows users rights to execute this stored procedure; any other user will not be able to do so (which will also be a useful example in the final output).
Creating the WCF Services Application
The next thing I did was to create a WCF Services Application that retrieved the data from SQL. I followed the guidelines I’ve described previously in the CASI Kit posting part 2 (http://blogs.technet.com/b/speschka/archive/2010/11/06/the-claims-azure-and-sharepoint-integration-toolkit-part-2.aspx); I did this to establish the trust between the SharePoint farm and the WCF application. That was necessary so that I could get the claims of the user making the request. You wouldn’t want to just pass the UPN claim value as a parameter, for example, because then anyone could spoof any other person’s identity by just passing in a different UPN claim value. Once the trust was configured correctly between the WCF and SharePoint, then I could go ahead and write my method that will:
- Extract the UPN claim
- Impersonate the user using the c2wts
- Retrieve the data from SQL as that user
Here is the code that I used to do that:
//the following added for this code sample:
using Microsoft.IdentityModel;
using Microsoft.IdentityModel.Claims;
using System.Data;
using System.Data.SqlClient;
using System.Security.Principal;
using Microsoft.IdentityModel.WindowsTokenService;
using System.ServiceModel.Security;
public DataSet GetProducts()
{
DataSet ds = null;
try
{
string conStr = “Data Source=SQL2;Initial Catalog=
Northwind;Integrated Security=True;”;
//ask for the current claims identity
IClaimsIdentity ci =
System.Threading.Thread.CurrentPrincipal.Identity as IClaimsIdentity;
//make sure the request had a claims identity attached to it
if (ci != null)
{
//see if there are claims present before running through this
if (ci.Claims.Count > 0)
{
//look for the UPN claim
var eClaim = from Microsoft.IdentityModel.Claims.Claim c in ci.Claims
where c.ClaimType == System.IdentityModel.Claims.ClaimTypes.Upn
select c;
//if we got a match, then get the value for login
if (eClaim.Count() > 0)
{
//get the upn claim value
string upn = eClaim.First().Value;
//create the WindowsIdentity for impersonation
WindowsIdentity wid = null;
try
{
wid = S4UClient.UpnLogon(upn);
}
catch (SecurityAccessDeniedException adEx)
{
Debug.WriteLine(“Could not map the upn claim to ” +
“a valid windows identity: ” + adEx.Message);
}
//see if we were able to successfully login
if (wid != null)
{
using (WindowsImpersonationContext ctx = wid.Impersonate())
{
//request the data from SQL Server
using (SqlConnection cn = new SqlConnection(conStr))
{
ds = new DataSet();
SqlDataAdapter da =
new SqlDataAdapter(“TenProductsAndUser”, cn);
da.SelectCommand.CommandType =
CommandType.StoredProcedure;
da.Fill(ds);
}
}
}
}
}
}
}
catch (Exception ex)
{
Debug.WriteLine(ex.Message);
}
return ds;
}
Ultimately it’s really not very complicated code, so here’s a brief rundown on what’s going on. The first I do is make sure that we have a valid claims identity context, and if we do then I query the list of claims looking for the UPN claim. Assuming I find the UPN claim, I extract the value out of it and I make the call to the c2wts to do a S4U login as that user. If that login is successful, it returns a WindowsIdentity. I then take that WindowsIdentity and create an impersonation context. Once I’m impersonating the user, I then create my connection to SQL Server and retrieve the data. Here are a couple of quick troubleshooting tips to look out for:
- If you haven’t configured the c2wts to allow your app pool to use it, then you will get an error that’s trapped in the outer catch block. The error will be something like “WTS0003: The caller is not authorized to access the service.” I’ll give you details and a link for configuring the c2wts below.
- If Kerberos constrained delegation is not set up correctly, then when you try and execute the stored procedure with the da.Fill(ds); line of code, it will throw an exception that says anonymous user does not have rights to execute this stored procedure. I give a few tips on configuring constrained delegation for this scenario below.
Configuring the C2WTS
The c2wts is configured by default to a) start manually and b) not permit anyone to use it. I changed it so that a) it starts automatically and b) the application pool for my WCF Services Application is authorized to use it. Rather than go into the details of how to configure this authorization, I recommend that you read this article; the configuration information is at the end: http://msdn.microsoft.com/en-us/library/ee517258.aspx. That’s really all you need to do to get going. For more background information on c2wts I also recommend that you take a look at http://msdn.microsoft.com/en-us/library/ee517278.aspx.
NOTE: There is one HUGE mistake in this last article; it recommends that you create a dependency for the c2wts by running this code: sc config c2wts depend=cryptosvc. DO NOT DO THIS!! This is a typo and “cryptosvc” is not a valid service name, at least not on Windows Server 2008 R2. If you do that, then your c2wts will no longer start because it will say the dependency is marked for deletion or cannot be found. I found myself in this situation and changed the dependency to be iisadmin (which is logical because in my case at least my WCF host has to be running for me to use c2wts); otherwise I was stuck.
Configuring Kerberos Constrained Delegation
Okay, before anyone gets too freaked out by this topic let me just say this:
- I’m not going into nitty gritty details on getting kerb constrained delegation working. There are tomes on the topic out there.
- For what it’s worth, this part actually worked pretty smoothly when I wrote this up.
So let’s walk through the things we need for delegation. First, as I mentioned above, my SQL Server service is running as Network Service, so I don’t need to do anything there. Second, my WCF application pool is running as a domain account called vbtoys\portal. So I need to do two things for it:
- Create an HTTP SPN for it, using both the NetBIOS name and fully qualified name of the server from which it will be delegating. In my case my WCF server is called AZ1, so I created two SPNs that looked like this:
- setspn -A HTTP/az1 vbtoys\portal
- setspn -A HTTP/az1.vbtoys.com vbtoys\portal
- I need to configure my account to be trusted for Kerberos constrained delegation to the SQL Server services running on the server “SQL2”. To do that I went into my domain controller and opened up Active Directory Users and Computers. I double-clicked on the vbtoys\portal user then clicked on the Delegation tab to configure this trust. I set it up to trust delegation for specific services only, using any kind of authentication protocol. Here’s a link to a picture of what that delegation configuration looked like:
Third, I needed to configure my WCF application server to be trusted for constrained delegation. Fortunately, the process is exactly the same as I described above for the user; you just find the computer account in Active Directory Users and Computers and configure it in there. Here’s a link to a picture of what its configuration looked like:
And with that, all of the non-SharePoint stuff is setup, configured and ready to go. The last thing needed is a web part to test it.
Creating the SharePoint Web Part
Creating the web part is a fairly straight-forward; I just followed the pattern I described previously for making WCF calls to SharePoint and passing the current user’s identity (http://blogs.technet.com/b/speschka/archive/2010/09/08/calling-a-claims-aware-wcf-service-from-a-sharepoint-2010-claims-site.aspx). I could have also used the CASI Kit to make the connection and call the WCF, but I decided to do it manually so to speak to make things easier to illustrate. The basic steps for creating the web part were:
- Create a new SharePoint 2010 project in Visual Studio 2010.
- Create a Service Reference to my WCF Services Application.
- Add a new web part
- Add the code to the web part to retrieve the data from the WCF and display it in a grid.
- Add all the information in the app.config that is generated in the Visual Studio project to the <system.ServiceModel> section of the web.config file for the web application in which my web part is going to be hosted.
NOTE: The app.config will have an attribute in it called decompressionEnabled; you MUST DELETE THAT BEFORE ADDING IT TO THE WEB.CONFIG FILE. If you leave it in there your web part will throw an error when trying to create an instance of your service reference proxy.
In terms of the steps above, all of them should be pretty self-evident other than #4, so I won’t cover the others in any detail. Here is the code for the web part however:
private DataGrid dataGrd = null;
private Label statusLbl = null;
protected override void CreateChildControls()
{
try
{
//create the connection to the WCF and try retrieving the data
SqlDataSvc.SqlDataClient sqlDC = new SqlDataSvc.SqlDataClient();
//configure the channel so we can call it with FederatedClientCredentials
SPChannelFactoryOperations.ConfigureCredentials<SqlDataSvc.ISqlData>(
sqlDC.ChannelFactory, Microsoft.SharePoint.SPServiceAuthenticationMode.Claims);
//create the endpoint to connect to
EndpointAddress svcEndPt =
new EndpointAddress(“https://az1.vbtoys.com/ClaimsToSqlWCF/SqlData.svc”);
//create a channel to the WCF endpoint using the
//token and claims of the current user
SqlDataSvc.ISqlData sqlData =
SPChannelFactoryOperations.CreateChannelActingAsLoggedOnUser
<SqlDataSvc.ISqlData>(sqlDC.ChannelFactory, svcEndPt);
//request the data
DataSet ds = sqlData.GetProducts();
if ((ds == null) || (ds.Tables.Count == 0))
{
statusLbl = new Label();
statusLbl.Text = “No data was returned at ” + DateTime.Now.ToString();
statusLbl.ForeColor = System.Drawing.Color.Red;
this.Controls.Add(statusLbl);
}
else
{
dataGrd = new DataGrid();
dataGrd.AutoGenerateColumns = true;
dataGrd.DataSource = ds.Tables[0];
dataGrd.DataBind();
this.Controls.Add(dataGrd);
}
}
catch (Exception ex)
{
Debug.WriteLine(ex.Message);
}
}
Again, I think this is pretty self-explanatory. The first part is about making the connection to the WCF service in a way that will pass along the current user’s claims; for more details see the link above to my previous blog post on this topic. The rest of it is just getting a dataset back and binding it to a grid if there’s data, or showing a label that says there’s no data if it fails. To illustrate all of these pieces working together, below are three screenshots: the first two show it working for two different users, which you can see in the CurrentUser column. The third shows it for a user who was not granted rights to execute the stored procedure.
That pretty much wraps it up; I’ve attached the code for the WCF Service Application and web part to this posting, along with the original Word document in which I wrote this up since the formatting of these posts so routinely stinks.
You can download the attachment here:
Print | posted on Tuesday, June 02, 2015 9:05 PM
Recently I’ve done a few pieces of work with SharePoint 2013 Business Intelligence and I have also delivered the “legendary”* Kerberos and Claims to Windows Service talk a few times this year. This reminded me to post my Windows PowerShell snippets for the required Active Directory configuration.
This topic area is perhaps one of the most misunderstood areas of SharePoint Server, and there is an utterly staggering amount of misinformation, out of date information, single server documentation and good old fashioned 100% bullshit out there. That’s a surprise with SharePoint stuff, huh?
Every guide or document out there that I could find talks to configuring Delegation using Active Directory Users and Computers (ADUC). They all also reference configuring Local Security Policy manually, or via Group Policy (without providing the details).
Of course there’s nothing wrong with doing it that way, and it sure makes for a better explanation of the concepts. However back in 2009 when we were working on pre-release materials I put together some Windows PowerShell to achieve the same configuration. So here they are in all their very simple glory.
* “Legendary” – I don’t know about that so much, but the Kerberos talks and in particular the AuthN+Z module of the SharePoint 2007, 2010 and 2013 MCM programs were recently described to me as such by five different SharePoint luminaries with rock solid credibility. Those people know who they are.
Every time I give this talk I get hassled for the “magic scripts”. They aren’t magic, but they always seem to surprise people as there is a misconception that delegation settings cannot be set using Windows PowerShell!
As you should be aware, in order to configure identity delegation for a Web Application in Claims mode within SharePoint Server 2010 or 2013 we must configure Kerberos Constrained Delegation with Protocol Transition. No ifs, no buts. It’s the only way it can work because in Claims mode there is no identity with which to perform either impersonation, basic delegation or true Constrained Delegation using Kerberos.
Thus, we make use of a component of the Windows Identity Framework, the Claims to Windows Token Service (C2WTS) to mock real delegation using a Windows Logon Token. C2WTS itself makes use of Service For User (S4U). S4U does NOT perform real delegation, it cannot because there are no user credentials to delegate. It instead grabs a bunch of SIDs for the user (in this case a service identity). What all this means is that there is a hard requirement to use Protocol Transition. Protocol Transition is named in the UI of ADUC as “Use any authentication protocol”.
Thus, in order to set things up, our settings in Active Directory for the C2WTS service identity and the application pool identity of the service application endpoint must be configured to perform Kerberos Constrained Delegation using Protocol Transition to the back end services.
In the example below I am allowing the C2WTS account to delegate to SQL Server Database Services and SQL Server Analysis Services using the SPNs which already exist on their service accounts. I of course repeat the exact same configuration on the application pool identity of the service application endpoint.

In order to complete this configuration using ADUC we are told we must create a “mock” or “fake” Service Principal Name (SPN) on the accounts first. Otherwise the Delegation tab in the account properties does not show up.
The reality is we can easily configure the attributes we are interested in using ADUC in Advanced Features mode, or ADSIEdit. However, there must be an SPN for the delegation to succeed. So it’s not a “mock” SPN at all. It’s not just about exposing the delegation tab. We must have a SPN!
It’s a complete breeze to configure the same settings using the Active Directory module for Windows PowerShell.
- The services to delegate to are exposed by the AD schema extended attribute msDS-AllowedToDelegateTo. This can be manipulated using the standard Set-ADUser –Add pattern. As can the SPN itself.
- The setting for Protocol Transition is actually a UserAccountControl attribute. It’s enumeration is ADS_UF_TRUSTED_FOR_DELEGATION or 524288. Remember this attribute is a cumulative bitmask. But the thing is we DON’T need to care! We don’t need some stinky “library” or utility function to manage the bitmask stuff or any of that noise. It can all be handled with the Set-ADAccountControl cmdlet with the –TrustedToAuthForDelegation parameter.
- Note TrustedToAuthForDelegation == Protocol Transition, –TrustedForDelegation == Kerberos Only
And that’s it. Two cmdlets basically. A complete snap. Now as always, there’s some slinging needed to do this neatly for real requirements and perform end to end configuration. Here’s the Windows PowerShell script I use for basic setups:
<#
    Configures accounts in Active Directory to support identity delegation
    spence@harbar.net
    February 16th 2009

    1. Configures SPNs for SQL DB and SQL AS
       - does not check for duplicates
    2. Configures SPNs for SharePoint service identities
       (C2WTS and Service App Endpoint Identity)
    3. Configures Kerberos Constrained Delegation with
       Protocol Transition to SPNs in #2

#>
Import-Module ActiveDirectory

## VARS
$sqlDBaccount = "sqldb"
$sqlASaccount = "sqlas"
$c2wtsAccount = "c2wts"
$servicesAccount = "sppservices"

$c2wtsSpn = "SP/c2wts"
$servicesSpn = "SP/Services"
$sqlDbSpns = @("MSSQLSvc/fabsql1.fabrikam.com:1433", "MSSQLSvc/fabsql1:1433")
$sqlAsSpns = @("MSOLAPSvc.3/fabsql1.fabrikam.com", "MSOLAPSvc.3/fabsql1")
$delegateToSpns = $sqlDbSpns + $sqlAsSpns
## END VARS

$delegationProperty = "msDS-AllowedToDelegateTo"

Write-Host "Configuring SPNs for SQL Server Services..."
$account = Get-ADUser $sqlDBaccount
$sqlDbSpns | %  {Set-AdUser -Identity $account -ServicePrincipalNames @{Add=$_}}
$account = Get-ADUser $sqlASaccount
$sqlAsSpns | %  {Set-AdUser -Identity $account -ServicePrincipalNames @{Add=$_}}

function ConfigKCDwPT($account, $spn) {
    $account = Get-ADUser $account
    $account | Set-ADUser -ServicePrincipalNames @{Add=$spn}
    $account  | Set-ADObject -add @{$delegationProperty=$delegateToSpns}
    Set-ADAccountControl $account -TrustedToAuthForDelegation $true
}

Write-Host "Configuring KCDwPT for C2WTS and Services Account..."
ConfigKCDwPT $c2wtsAccount $c2wtsSpn
ConfigKCDwPT $servicesAccount $servicesSpn

Write-Host "KCDwPT configuration complete!"
OK, so that’s the AD account configuration settings all taken care of. What about the C2WTS itself?
If we run C2WTS as it’s default identity, LocalSystem, we don’t need to do anything. But that’s a really stupid configuration. Why? Because in a real farm you have more than one machine running C2WTS. That means multiple points of configuration (on each computer object in AD). In addition any mistakes you make during configuration (say you fat finger the SPN) require a machine restart for corrections to take effect. Thus there is a compromise between manageability, configuration approach and security.
The reality is that the security element of the compromise is completely null and void from a technical or information security perspective. The old arguments about TCB are now completely out-dated, and besides were invented by people who didn’t know information security and were designed for single server solutions! However, if you are unlucky enough to work with those customers with out-dated security policies it remains part of the compromise on those grounds alone.
Everyone else with any sense will change the identity to a named service account. If we do this, we also have to grant additional User Rights Assignments to the account in order for it to be able to call S4U. These are Act as part of the Operating System and Impersonate a Client after Authentication. The account must also be a member of the Local Administrators group on each server it runs. All of this can be done via Computer Management and Local Security Policy, or properly via Group Policy.
However it’s also a complete snap to configure this stuff using Windows PowerShell, making use of an old school utility NTRights from the Windows Server Resource Kit or the Carbon library. Here’s the script:
<#
    Configures C2WTS service identity with appropriate user rights
    spence@harbar.net
    February 16th 2009

    1. Configures Local Admins memebership
    2. Configures User Rights Assignments using NTRights
       (update with path to WSRK)
    3. Configures User Rights Assignments using Carbon
       (http://sourceforge.net/projects/morgansource/files/
       Third-Party-Sources/Carbon-1.6.0.zip/download)

#>
asnp Microsoft.SharePoint.PowerShell

## VARS
$user = "fabrikam\c2wts"
$CarbonDllPath = "C:\Tools\Carbon-1.6.0\Carbon\bin\Carbon.dll"
## END VARS


# adds user to local admins group
NET LOCALGROUP Administrators $user /ADD

# sets up the neccessary local user rights assignments using NTRights
C:\Tools\rk\NTRights.exe +r SeImpersonatePrivilege -u $user
C:\Tools\rk\NTRights.exe +r SeTcbPrivilege -u $user

# sets up the neccessary local user rights assignments
[Reflection.Assembly]::LoadFile($CarbonDllPath)
[Carbon.Lsa]::GrantPrivileges($user, "SeImpersonatePrivilege")
[Carbon.Lsa]::GrantPrivileges($user, "SeTcbPrivilege")
Note we do NOT have to set the c2wts account to Logon as a Service, as this User Rights Assignment is granted when we change the service identity within SharePoint…..
On a related note, I’ve also been asked for my snippets for managing the C2WTS process identity. TechNet has incorrect scripts for this work, which will only ever work on a single server farm (ooops!). Here’s how to change it properly, and also how to reset it back to LocalSystem (properly!).
<#
    Configures C2WTS service identity
    spence@harbar.net
    February 16th 2009

    1. Sets dependency
    2. Sets desired process identity
#>
asnp Microsoft.SharePoint.PowerShell

## VARS
$accountName = "FABRIKAM\c2wts"
$serviceInstanceType = "Claims to Windows Token Service"
## END VARS

sc.exe config c2wts depend=CryptSvc

# configure to use a managed account
# Should use farm, otherwise in multi server farm you have an array of objects!
$farmServices = Get-SPFarm
$c2wts = $farmServices.Services | Where {$_.TypeName -eq $serviceInstanceType}
$managedAccount = Get-SPManagedAccount $accountName
$c2wts.ProcessIdentity.CurrentIdentityType = "SpecificUser";
$c2wts.ProcessIdentity.ManagedAccount = $managedAccount
$c2wts.ProcessIdentity.Update();
$c2wts.ProcessIdentity.Deploy();
$c2wts.ProcessIdentity

# reset to local system
# Should use farm, otherwise in multi server farm you have an array of objects!
$farmServices = Get-SPFarm
$c2wts = $farmServices.Services | Where {$_.TypeName -eq $serviceInstanceType}
$c2wts.ProcessIdentity.CurrentIdentityType=0; #LocalSystem
$c2wts.ProcessIdentity.Update();
$c2wts.ProcessIdentity.Deploy();
$c2wts.ProcessIdentity
Note I use this script to also configure the missing dependency on the Windows Service itself. We can of course start the C2WTS easily as well:
# start c2wts on server(s)
$servers = @("FABSP1", "FABSP2")
foreach ($server in $servers)
{
    Get-SPServiceInstance -Server $server | Where {$_.TypeName -eq $serviceInstanceType} | Start-SPServiceInstance
}
Nice and easy. No pointy clickity click click or “Working on it…” needed. The entire end to end configuration in Windows PowerShell takes less than 90 seconds.
s.
Preface
This document will guide you through the steps to provide Microsoft Exchange Claims Based Authentication Using ADFS to the Outlook on the Web (OWA) and Exchange Admin Center (EAC) of Exchange 2016 Server. The ADFS server configured in this tutorial is deployed on top of Windows Server 2016. Click here to go to the Microsoft website for How to Web Deploy from Visual Studio
In a big picture, the user request token from ADFS (here ADFS is used as Identity Provider) and once it receives the request, the security token provider must authenticate the user. The user claims will be verified with the account store, and in this example, it is Active Directory. The token will be sent to the user after the user is authenticated with the security token service provided by ADFS. The user now has a token to send it to the Exchange Server. The Exchange server checks the token signature and verifies the token issuer which is ADFS. Once the token signature checked and claims verified Exchange server would authenticate the user. The configuration of this process outlined in the tutorial comprises the installation and configuration of the ADFS server and setting up Exchange Server to authenticate using claims-based authentication with the help of federated authentication.
Step by Step
The
following steps are involved in implementing Exchange Server claims-based
authentication using ADFS. We assume Exchange Server already installed and
authenticating using Forms-based authentication for the active directory users.
If you are doing it on the test network, please install and configure Exchange
Server 2016 before following this step by step document. This document can also
be used to implement for Exchange Server 2013 or Exchange Server 2019. As I
already mentioned, the ADFS server installed for this demonstration is Windows
Server 2016. The Steps are given in the following points.
- Install ADFS Server role on Windows
Server 2016 - Create Group Managed Service Account
(gMSA) - Configure Federation Service
- Add Relying Party Trust on AD FS
Management Console - Add Relying Party Trust for OWA
- Add Relying Party Trust for ECP
- Add Claim Issuance Policies for OWA
Trust - Add Claim Issuance Policies for ECP
Trust - Export Token Signing Certificate
from AD FS server to Import it to Exchange Server - Import the Token-Signing Certificate
to Exchange Server - Configure Exchange Organization to
authenticate using ADFS - Configure ECP and OWA virtual
directories with ADFS Authentication - Test OWA and ECP claims based
authentication
Install ADFS Server role on Windows
Server 2016
We are going to install the Active Directory Federation Services role on
Windows Server 2016. To begin with, start Server Manager windows and click Add
roles and features, and Add Roles, and Features Wizard will begin, and we can
go through this wizard to complete the Active Directory Federation Services
role installation.

The Add Roles and Features wizard requirements and description outlined in the “Before you begin page” if you have not selected Skip this page by default checkbox before you would see this page; otherwise, the wizard would start from the installation type selection page. Click Next to continue.
Exchange Server Claims Authentication Using ADFS

In this wizard, we are going to use the role-based
installation to add this role, so select Role-based or Feature-based
Installation to begin with and click Next to continue.

Make sure the local server in the server pool and select it
and click Next.

On the
select roles page, select Active Directory Federation Services, and click Next.

On the
Select Features page, leave the selection and no additional selection needed on
this page and click next to continue.

On the page
with the title, AD FS shows the details of AD FS server roles and goes through
this page for a better understanding of the role AD FS and Click Next when you
have completed reading.

The
confirmation page shows the role that we have selected, and this is the end of
Add Roles and Features Wizard and click Install to start the installation of AD
FS role services.

Once the AD
FS role services installation completed you would have an option to configure
the AD FS role, but wait a moment before starting the configuration we need a
prerequisite when we configure it, we need group managed service account (gMSA)
to assign as service account so that next step will be creating gMSA account,
so go to your domain controller and start the steps provided next. Click close
to end the wizard, but remember you always have an option to start the
configuration of AD FS from the Server Manager notification drop down, so we
are good to close the wizard for now.

Related:
Create Group Managed Service Account (gMSA)
Exchange Server Claims Authentication Using ADFS
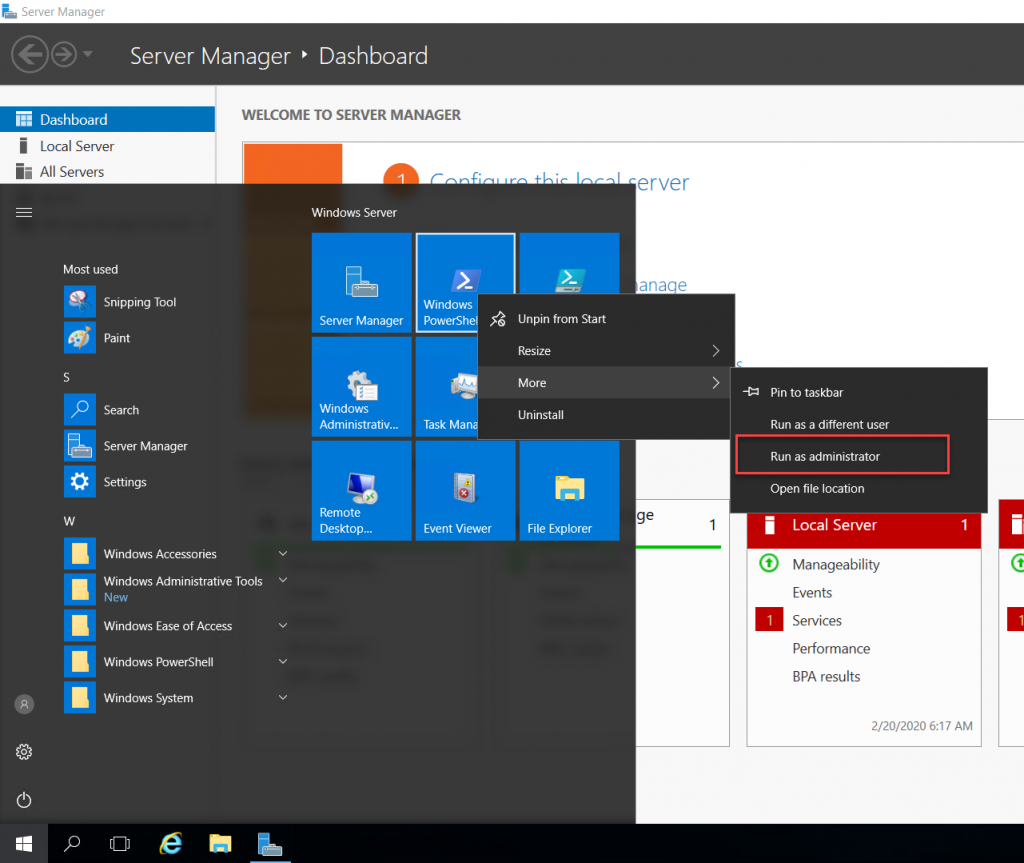
We need a group managed service account as the service account for AD FS service. This gMSA account has to be created on the Domain Controller and start an elevated Windows PowerShell window to create the one. The elevated PowerShell prompt can be launched at the Start button and select Windows PowerShell and select run as an administrator, as in the screen below.
Domain Controllers (DC) require a root key to begin
generating gMSA passwords. The domain controllers will wait up to 10 hours from
the time of creation to allow all domain controllers to converge their AD
replication before allowing the creation of a gMSA. To immediate effectiveness,
run the command below
Add-KdsRootKey
-EffectiveTime (Get-Date).AddHours(-10)
A GUID will
be shown on the successful completion of the command above. The next command to
run is to create the gMSA account using the New-ADServiceAccount, modify the
command to match your service account name and DNS Host Name for the AD FS
server on your environment. You would see the command will go to the next
prompt without any information, and no information means the command completed
successfully.
New-ADServiceAccount
-Name adfs-gMSA -DnsHostName adfs.mrigotechno.club -ServicePrincipalNames
http/adfs.mrigotechno.club
The output
of the commands will be something like below screen.

Configure Federation Service
Exchange Server Claims Authentication Using ADFS
Now we have come back to Server Manager to start the configuration of the AD FS role that we left off in the previous AD FS role installation step. Go to Notification and select Configure Federation Services o the Server to begin the AD FS configuration wizard.

It is a new
installation of the AD FS server role and only server in that AD FS farm, so
select the “Create the first federation server in the federation server farm”
radio button to create the server farm with this server as the first federation
server. Click Next to continue.

The AD FS
runs on Active Directory, to connect to the active directory we need to use an
Administrator account, the logged-on user will be selected by default
considering as an administrator on the Active Directory domain, if the account
is correct to go to next otherwise click change and select the one with
administrative access. Click Next to continue.

The next
page is to import the certificate to the AD FS certificate store; I already
have a public CA certificate, which is a wildcard certificate of my domain and
has it ins pfx format. If you don’t have a certificate generated yet, recommend a third-party CA certificate with
the single hostname or SAN or wildcard certificate, whichever is chosen and
ready with the certificate in pfx format, so that can be imported as mentioned
in the step below. Once the pfx file is ready, click Import to import the
certificate.

Browse to
certificate file location and select the certificate file and click open.

If the pfx
certificate has a password assigned to it, you would be prompted for the
password, type the password and click OK.
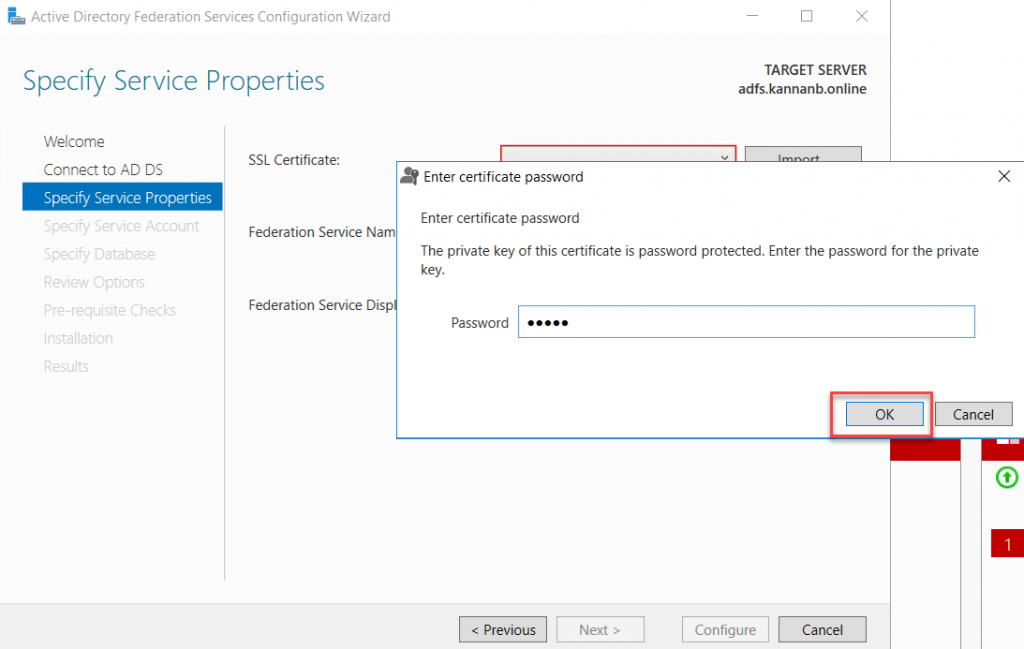
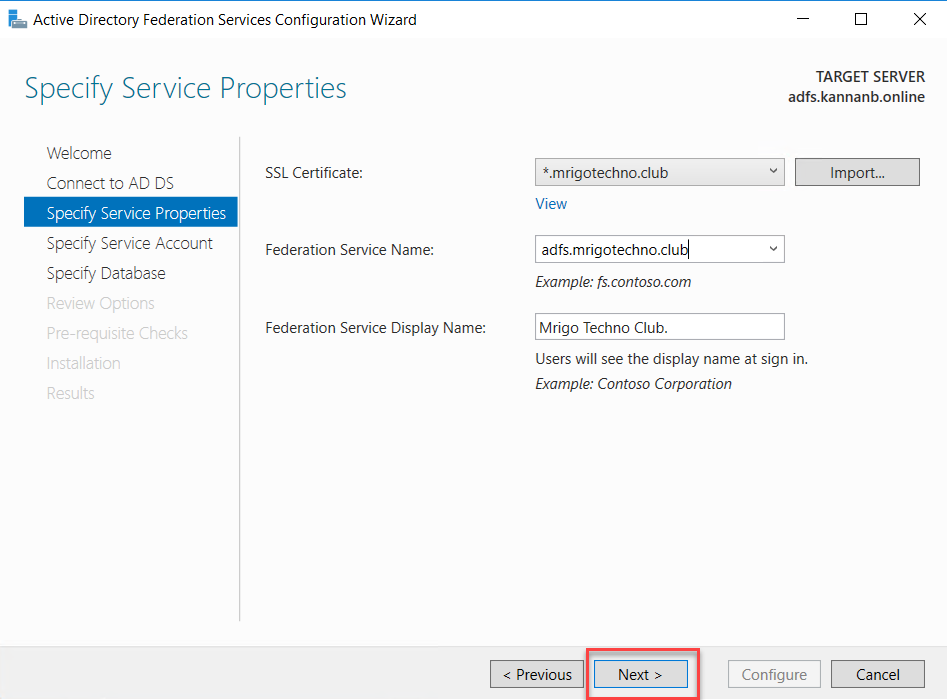
Once the
certificate has been imported, in the box in the middle with Federation service
name type the AD FS external server name. In my scenario, it is
adfs.mrigotechno.club. Also, on the next box with the Federation Service
Display Name type, a name describes the name of the organization or something
similar. This name will be shown at the sign-in page.
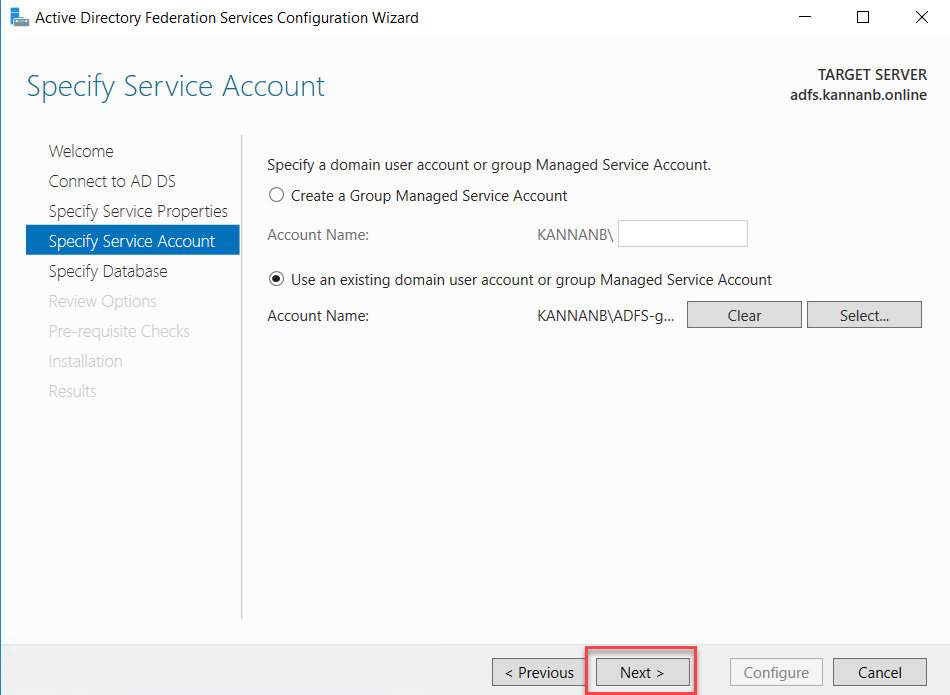
On the next
Specify Service Account page, select the service account that we created
previously.
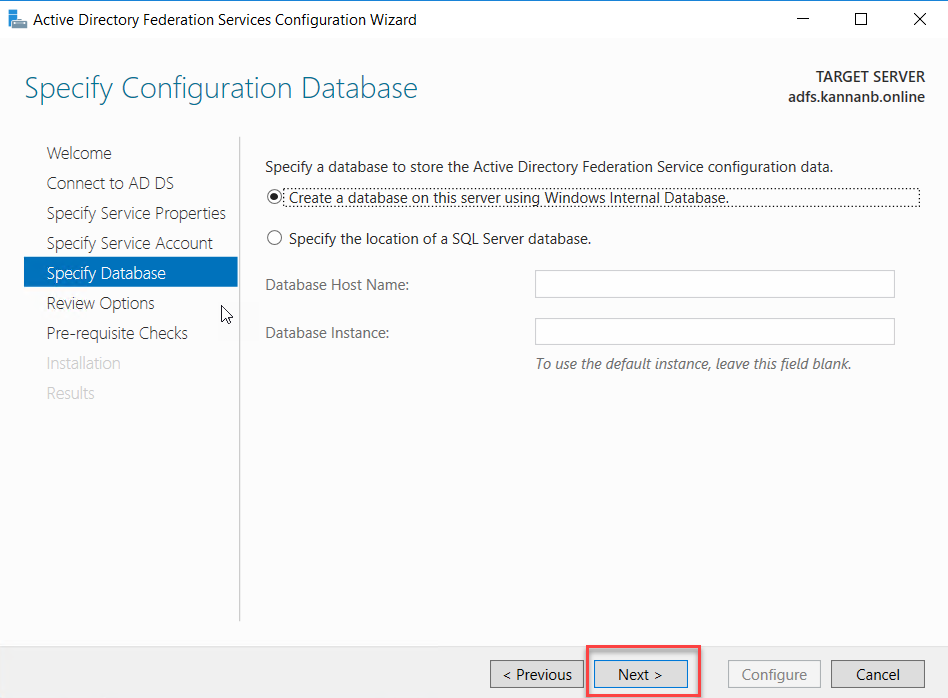
We are
using Windows Internal Database for this demo configuration, and if you have
SQL server installed on your network and want to use that you can select the
second option, for this demonstration, I select Create a database on this
server using Windows Internal Database radio button. Click Next to continue.
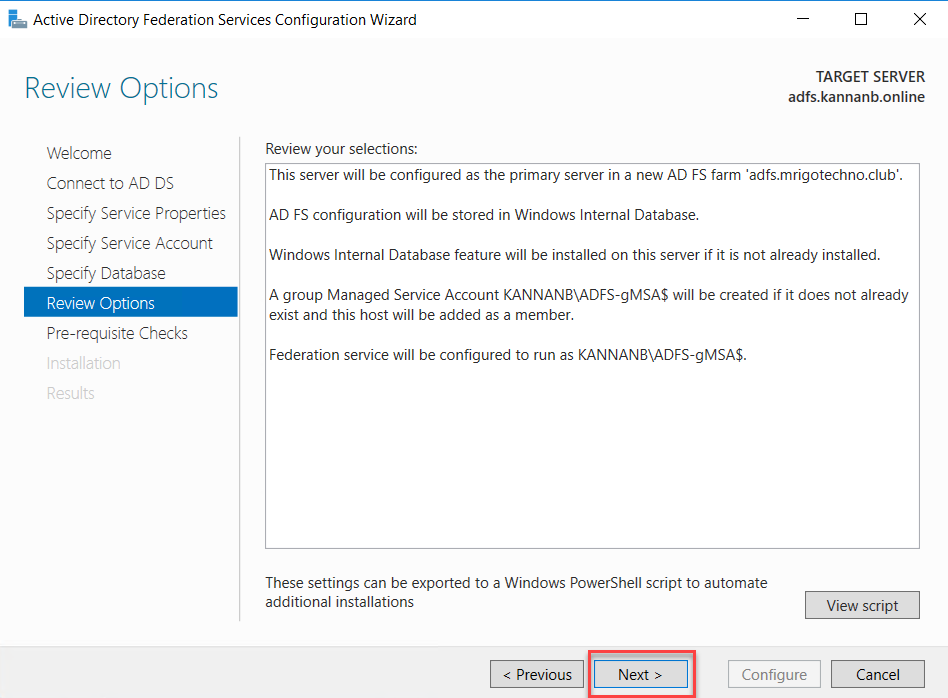
Review the
options selected and click next to continue.
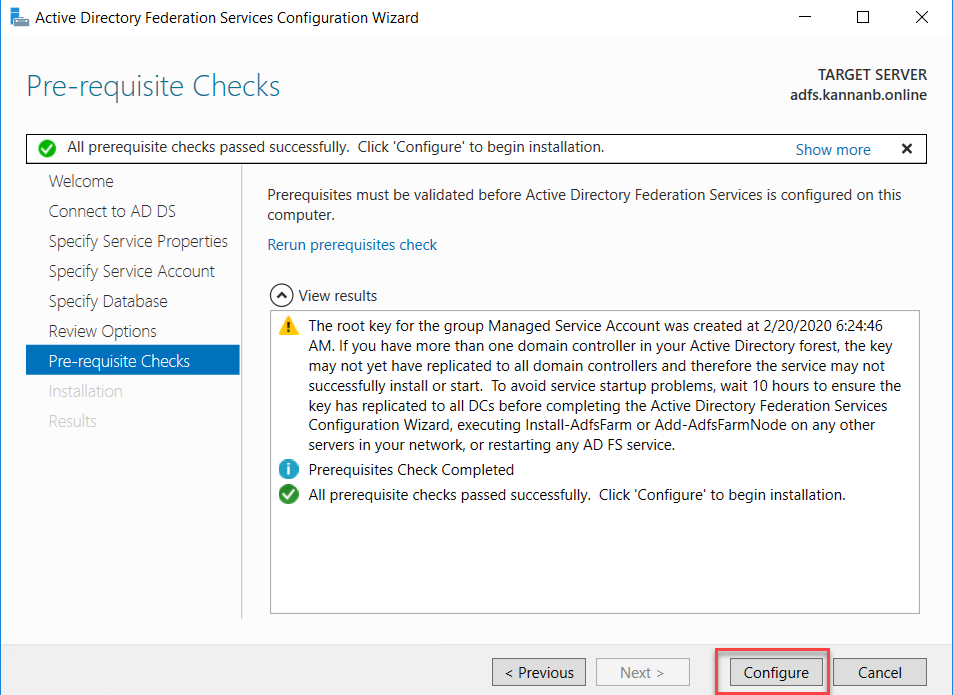
If the
configuration is correct till this moment, you will get a green tick mark with
“All prerequisite checks passed successfully. Click ‘Configure’ to begin the
installation.”
Once the
Configuration is successful, you would see a green tick with “This server was
successfully configured” message. Click ‘close’ to close the wizard.

Add Relying Party Trust on AD FS Management
Console
Exchange Server Claims Authentication Using ADFS
We have completed the installation and configuration of Active Directory Federation Services role. The next step is to add relying party trust for OWA and ECP URL.
Add Relying Party Trust for OWA
Go to
Server Manager, on the Tools menu select Active Directory Federation Service.
The ADFS Management console will be opened and where we can add Relying Party
trust.
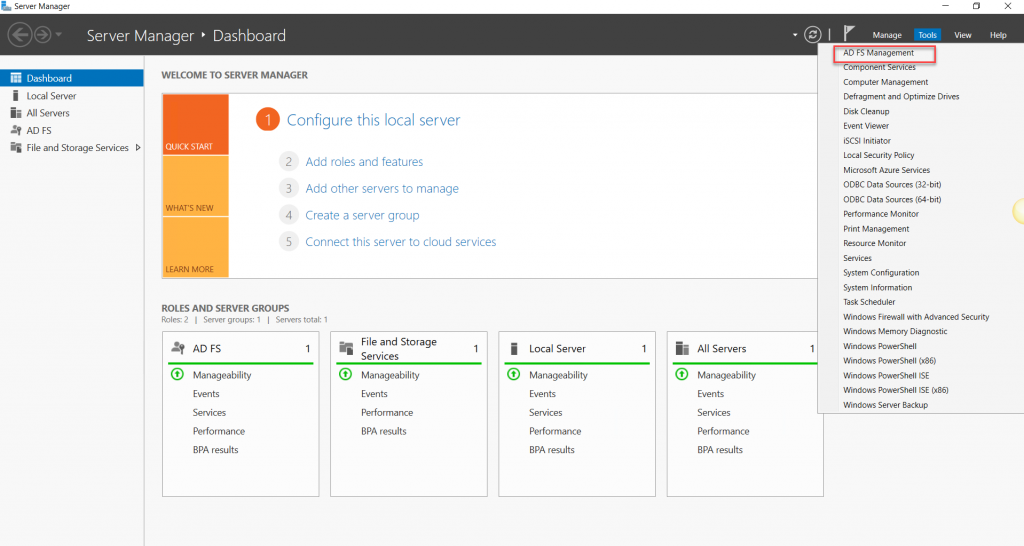
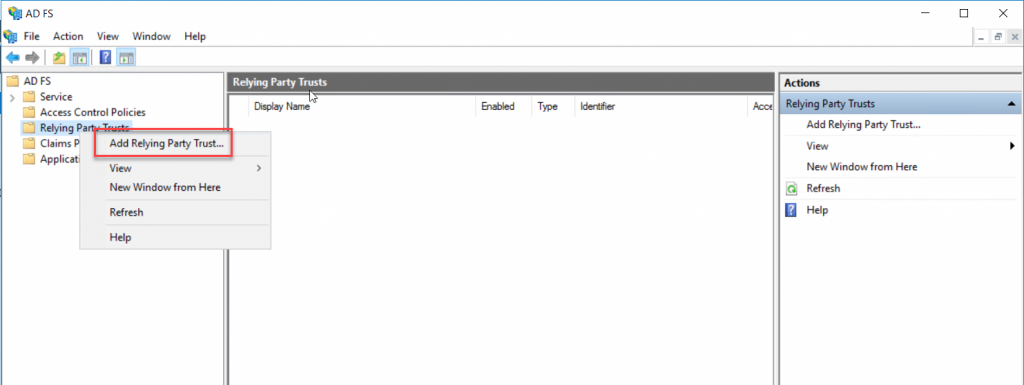
On the AD
FS Console, either right-click Relying Party Trusts and select Add Relying
Party Trust or select Relying Party Trusts and on the action pane click Add
Relying Party Trust.
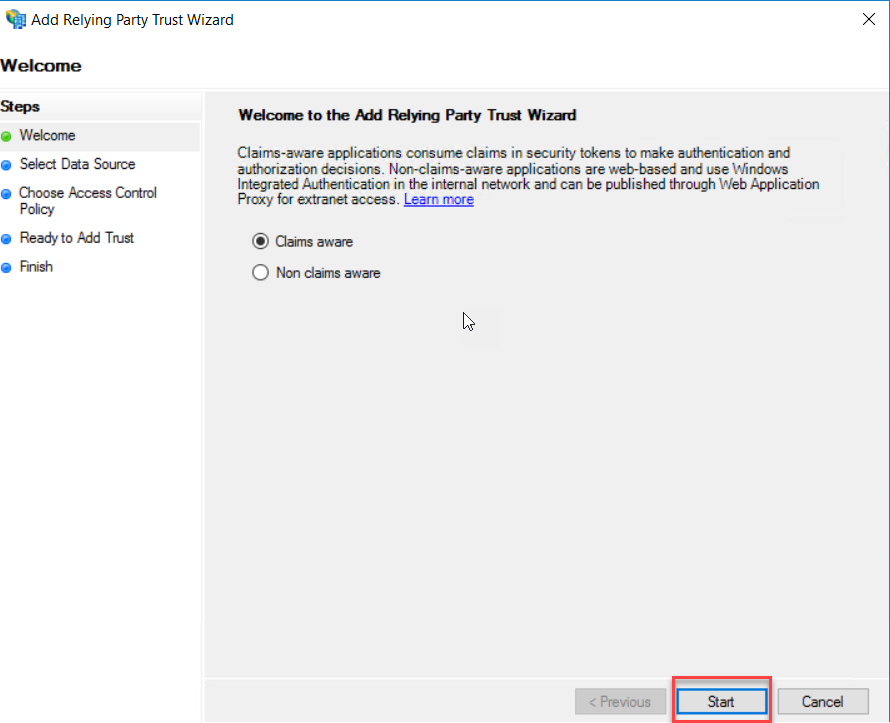
On the Welcome
page, select Claims aware radio button and click start.
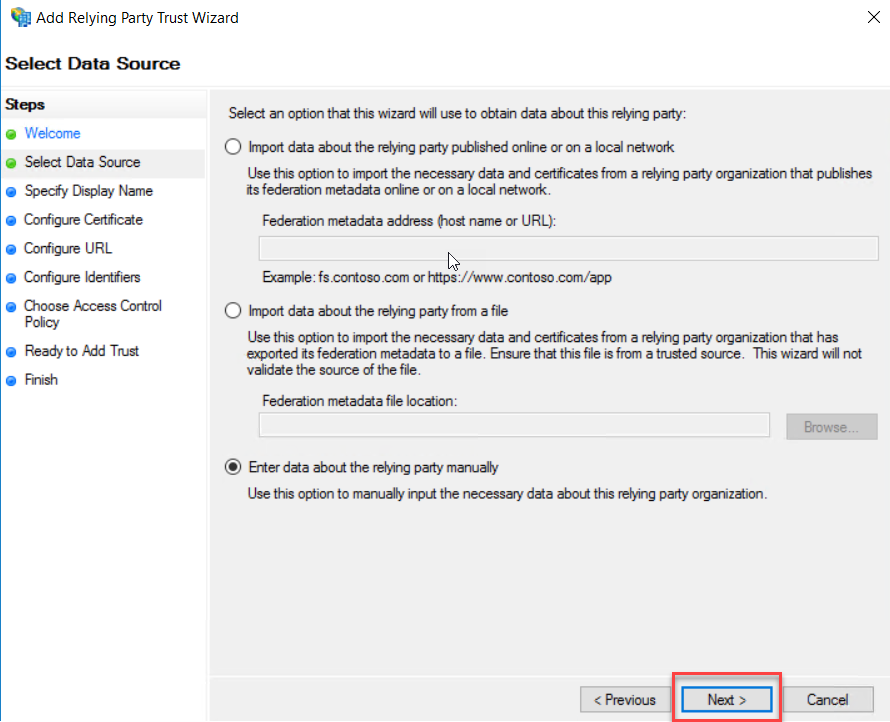
On the next
page, select “Enter data about the relying party manually” and click Next.
Type a
Display Name and description as you want. This first relying party trust is for
the outlook on the web, so I typed Display name as “OWA” for this
demonstration. Click Next to continue.

On the Configure
Certificate page, leave the default and click Next.

On
Configure URL, select “Enable support for the WS-Federation Passive Protocol”
and type the OWA external URL as per your Exchange Server OWA external URL.
Click Next.

Make sure
the OWA URL has added a “Relying party trust identifiers” in the configure
Identifiers page and click Next.

On the Choose
an access control policy, choose a policy that relevant to you for this
demonstration purpose. I choose to Permit everyone. Click Next to continue.

On the
ready to add trust page, click Next to add trust.

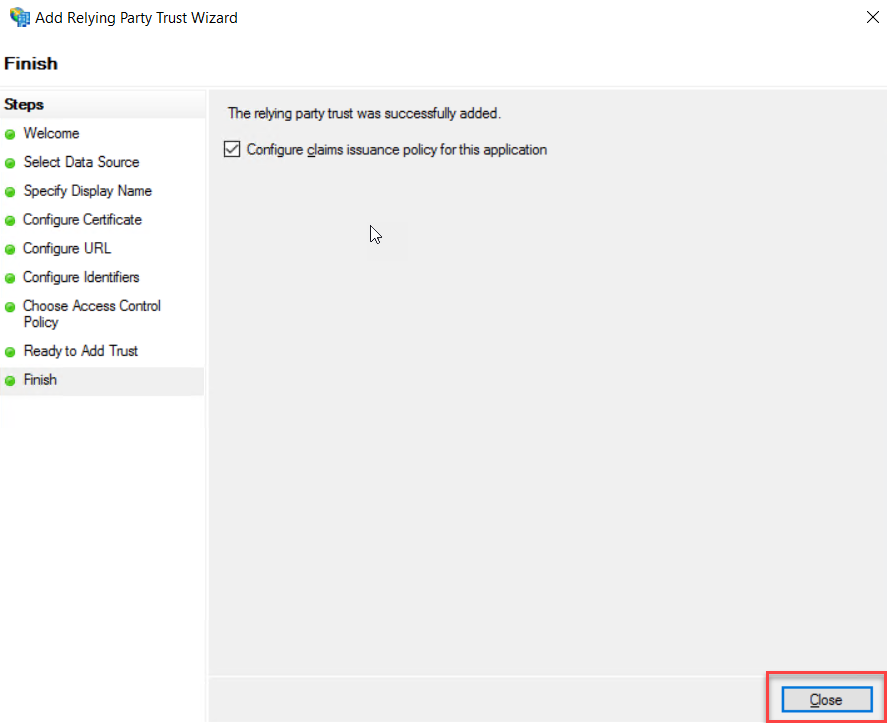
Click Close
to end the Add Relying Party Trust wizard.

Add Relying Party Trust for ECP
Exchange Server Claims Authentication Using ADFS
We are
going to go through the same step that we had gone through for Add Relying Party
Trust for OWA, but with the purpose of the ECP URL instead of the OWA URL this
time, the steps are the same as above.
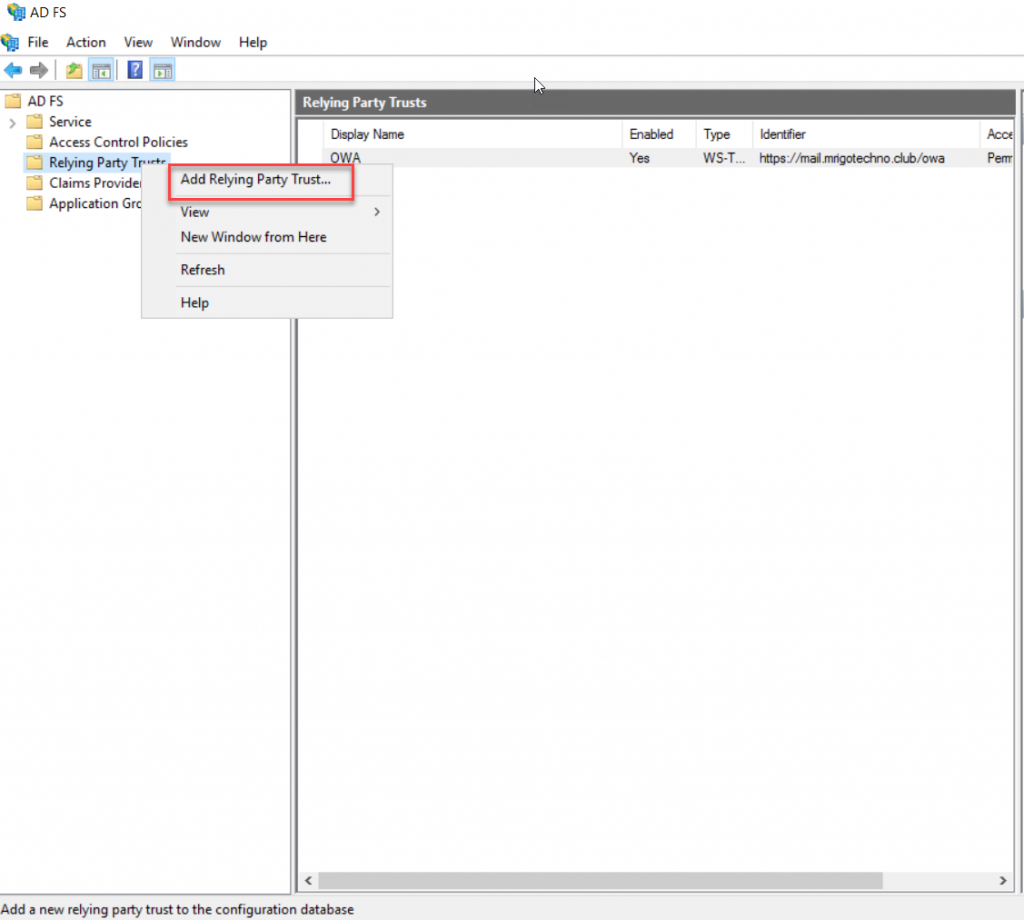
On the AD
FS Console, either right-click Relying Party Trusts and select Add Relying
Party.
On the
Welcome page, select Claims aware radio button and click start.

On the next
page, select “Enter data about the relying party manually” and click Next.

Type a
Display Name and description as you want. This second relying party trust is
for Exchange Admin Center, so I typed Display name as “ECP” for this
demonstration. Click Next to continue.

On the Configure
Certificate page, leave the default and click Next.

On
Configure URL, select “Enable support for the WS-Federation Passive Protocol”
and type the ECP external URL as per your Exchange Server ECP external URL.
Click Next.

Make sure
the ECP URL is added a “Relying party trust identifiers” in the configure
Identifiers page and click Next.

On the Choose
an access control policy, choose a policy that relevant to you for this
demonstration purpose. I choose to Permit everyone. Click Next to continue.

On the
ready to add trust page, click Next to add trust.

Click Close
to end the Add Relying Party Trust wizard.
Add Claim Issuance Policies for OWA Trust
Exchange Server Claims Authentication Using ADFS
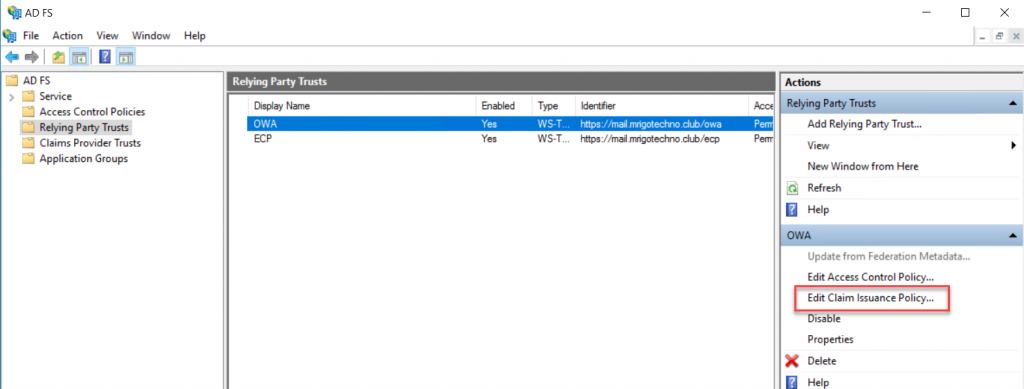
On the
Relying Party Trusts middle pane, select OWA trust, and click Edit Claim
Issuance Policy to add rules.
We are
going to add two issuance policy rules for OWA Policy. On the Issuance,
Transform rules click add Rules to start the wizard.

On the
Claim rule template drop-down, select “Send Claims Using a Custom Rule” and
click Next.

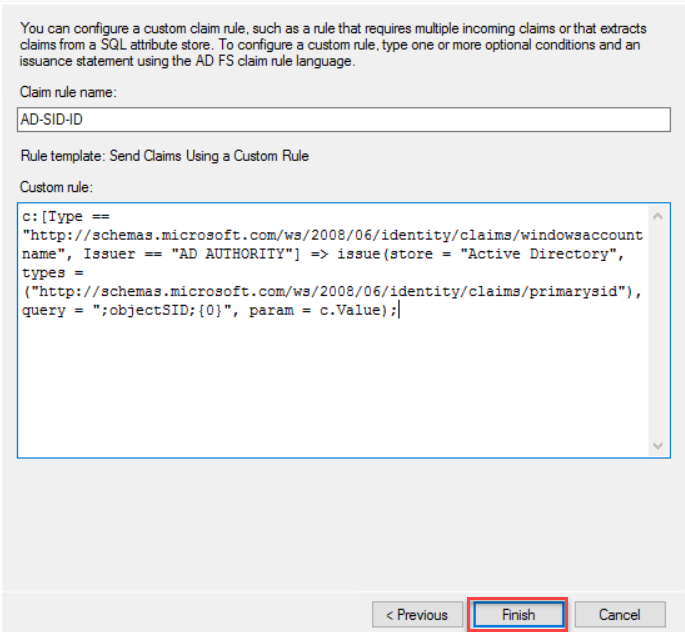
Type a
claim rule name, this rule is for Active Directory SID identifier, so I have
named it AD-SID-ID. On the custom rule area, type following rule
c:[Type == "http://schemas.microsoft.com/ws/2008/06/identity/claims/windowsaccountname", Issuer == "AD AUTHORITY"] => issue(store = "Active Directory", types = ("http://schemas.microsoft.com/ws/2008/06/identity/claims/primarysid"), query = ";objectSID;{0}", param = c.Value);
Click
Finish to End rule wizard.
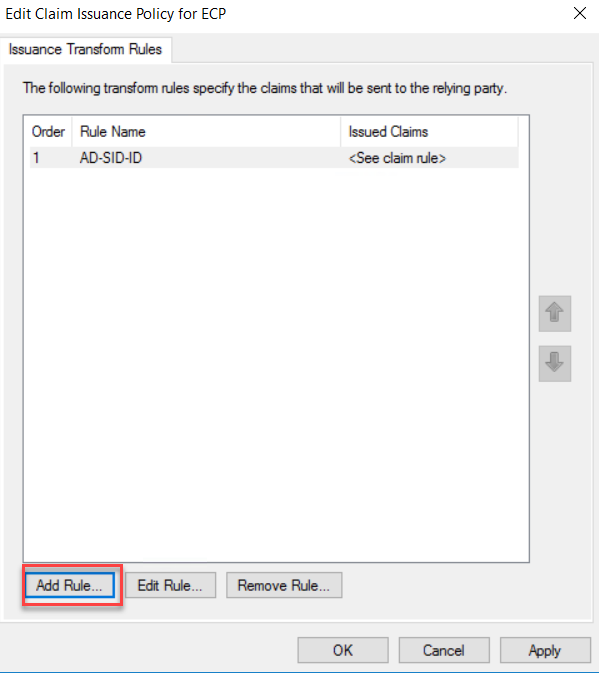
Next, we
are going to add one more rule for UPN. Click Add Rule.
On the
Claim rule template drop-down, select “Send Claims Using a Custom Rule” and
click Next.
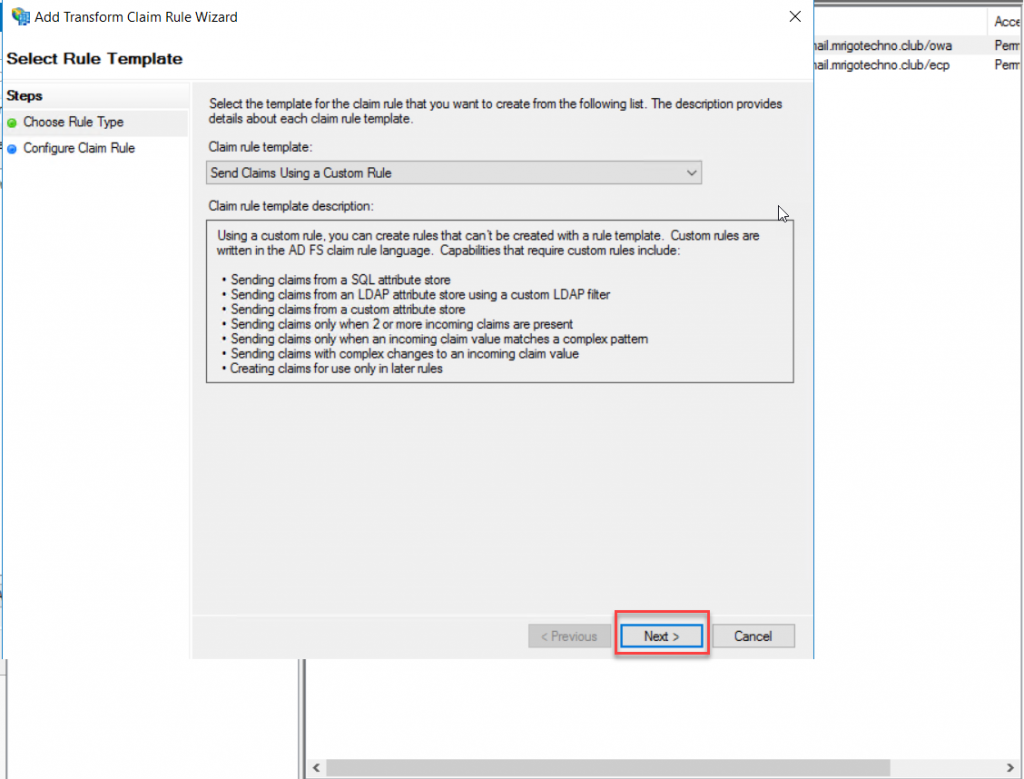
On the Claim
Rule Name, type a name for the Claim Rule, this rule is for Active Directory
UPN, so I have typed name as AD-UPN. On Claim Rule Area copy and paste the
following rule
c:[Type == "http://schemas.microsoft.com/ws/2008/06/identity/claims/windowsaccountname", Issuer == "AD AUTHORITY"] => issue(store = "Active Directory", types = ("http://schemas.xmlsoap.org/ws/2005/05/identity/claims/upn"), query = ";userPrincipalName;{0}", param = c.Value);
Click
Finish to end the Rule wizard.
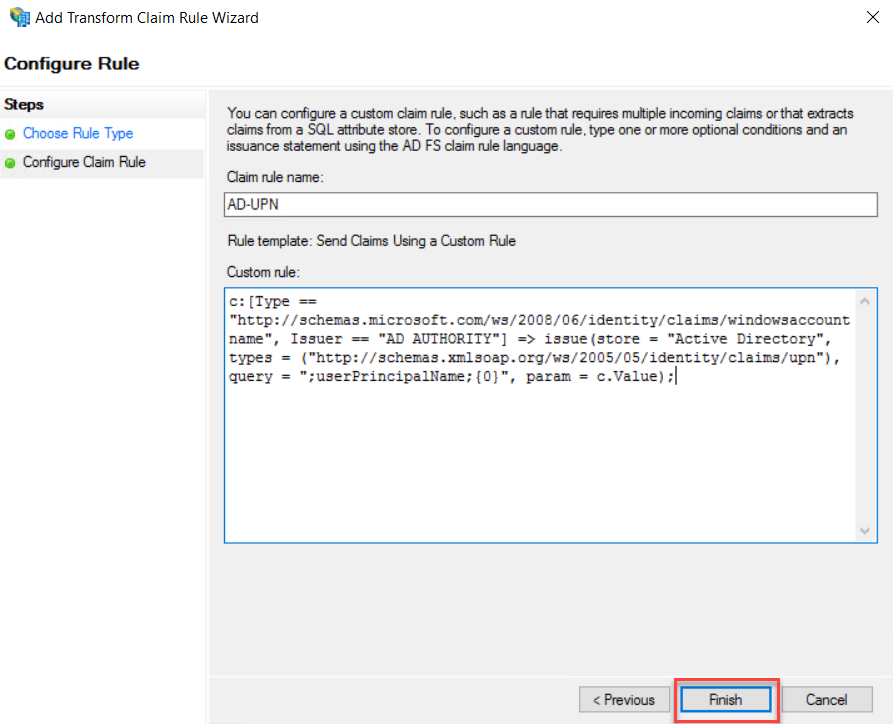
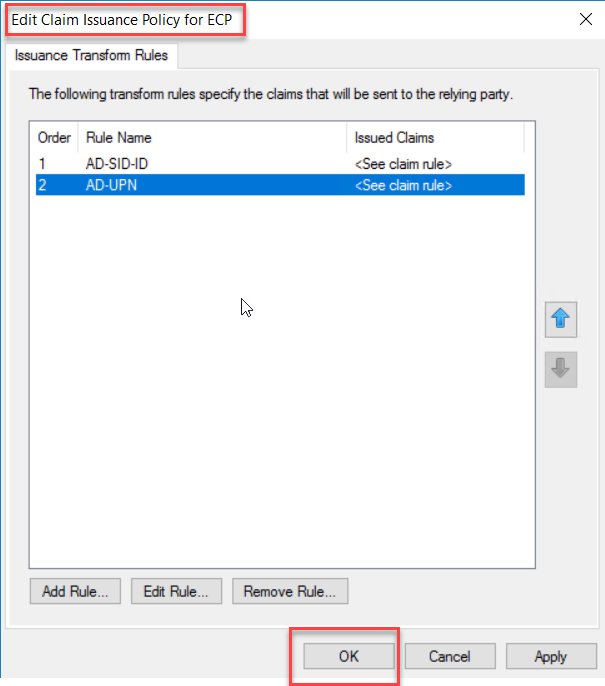
On the Edit
Claim Issuance Policy window, click OK
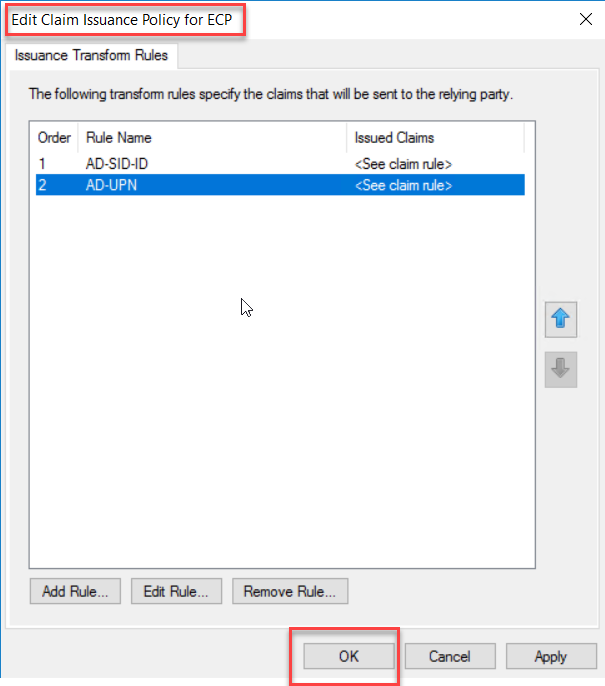
.
Add Claim Issuance Policies for ECP Trust
Exchange Server Claims Authentication Using ADFS
We are
going to replicate the steps that we did for OWA Relying Party Trust to ECP Relying
Party Trust, so we are going to duplicate the steps above.
On the
Relying Party Trusts middle pane, select OWA trust, and click Edit Claim
Issuance Policy to add rules.
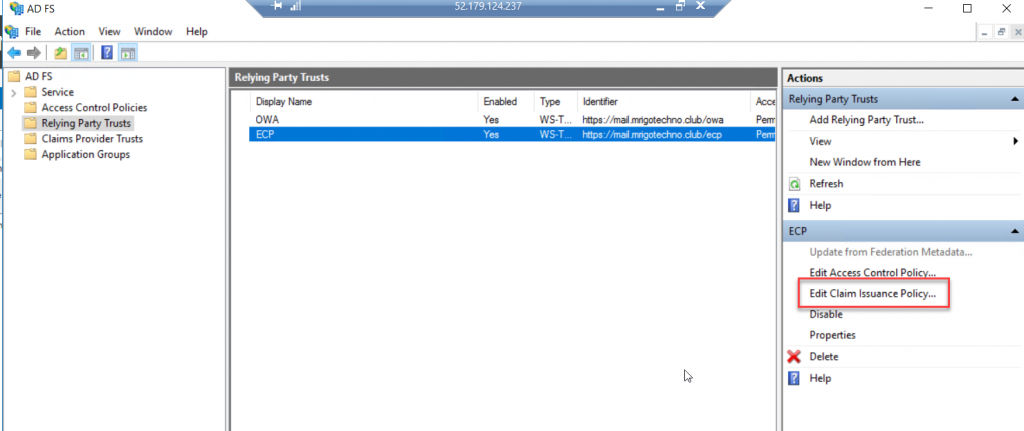
We are
going to add two issuance policy rules for ECP Policy. On the Issuance,
Transform rules click add Rules to start the wizard.
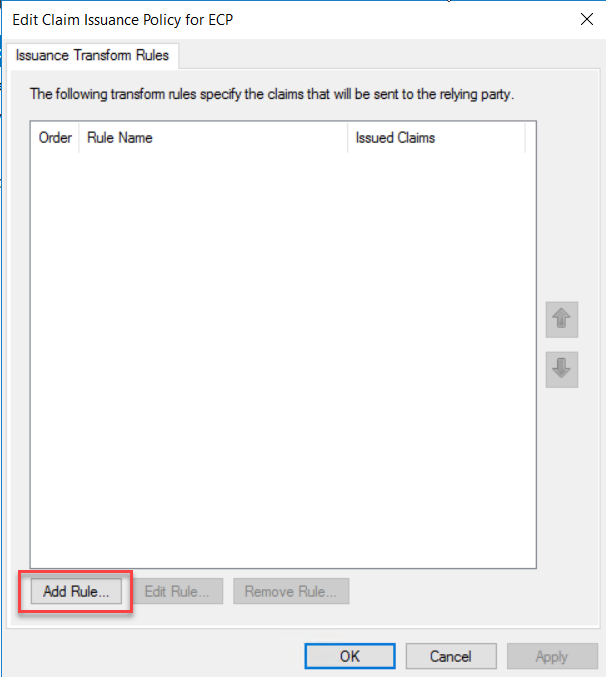
On the
Claim rule template drop-down, select “Send Claims Using a Custom Rule” and
click Next.
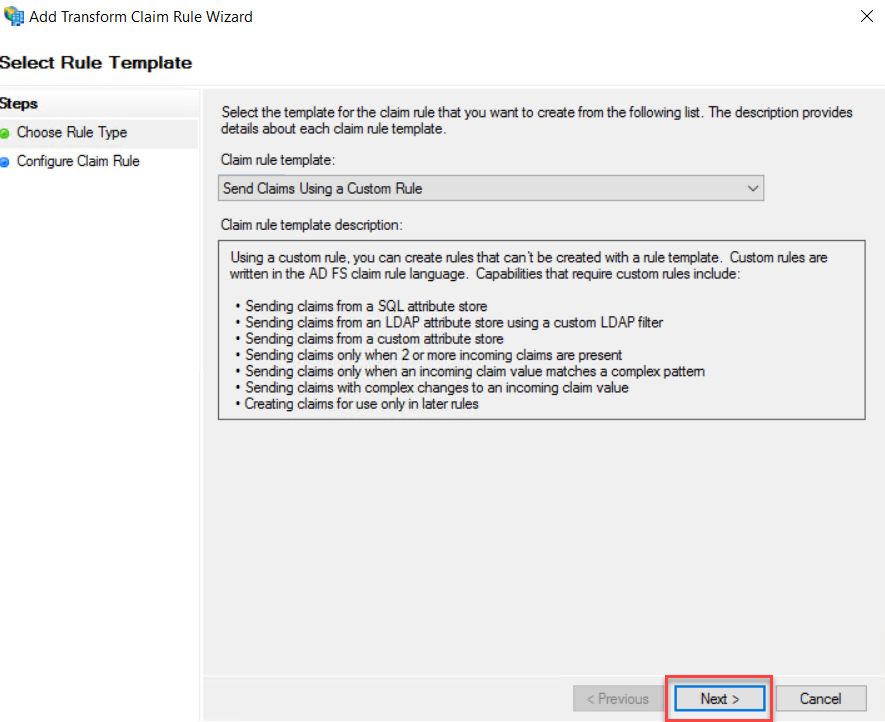
Type a
claim rule name, this rule is for Active Directory SID identifier, so I have
named it AD-SID-ID. On the custom rule area, type following rule
c:[Type == "http://schemas.microsoft.com/ws/2008/06/identity/claims/windowsaccountname", Issuer == "AD AUTHORITY"] => issue(store = "Active Directory", types = ("http://schemas.microsoft.com/ws/2008/06/identity/claims/primarysid"), query = ";objectSID;{0}", param = c.Value);
Click
Finish to End rule wizard.
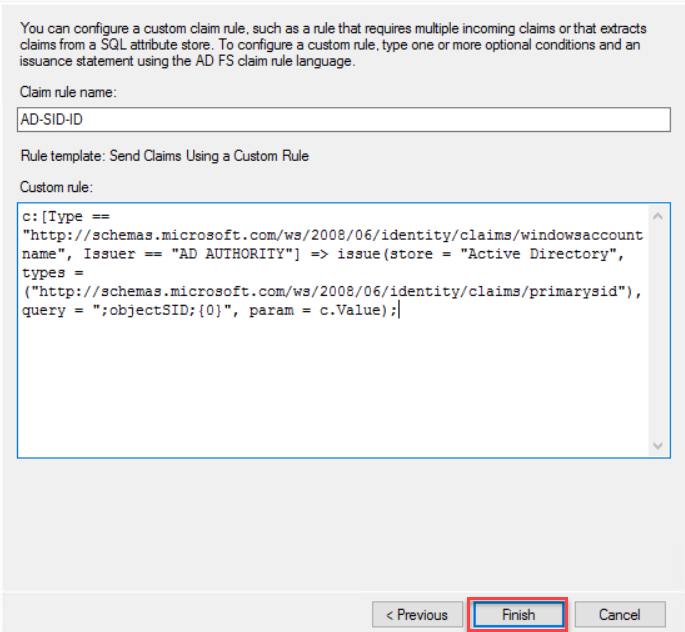
Next, we
are going to add one more rule for Active Directory UPN. Click Add Rule.
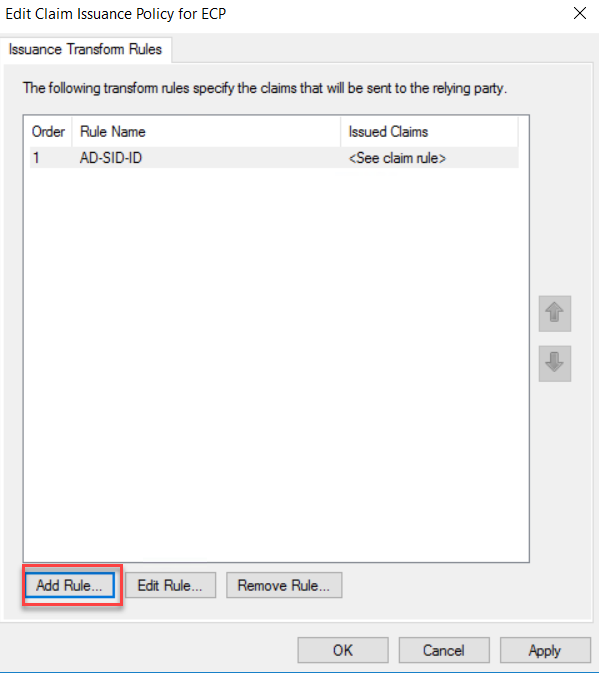
On the
Claim rule template drop-down, select “Send Claims Using a Custom Rule” and
click Next.
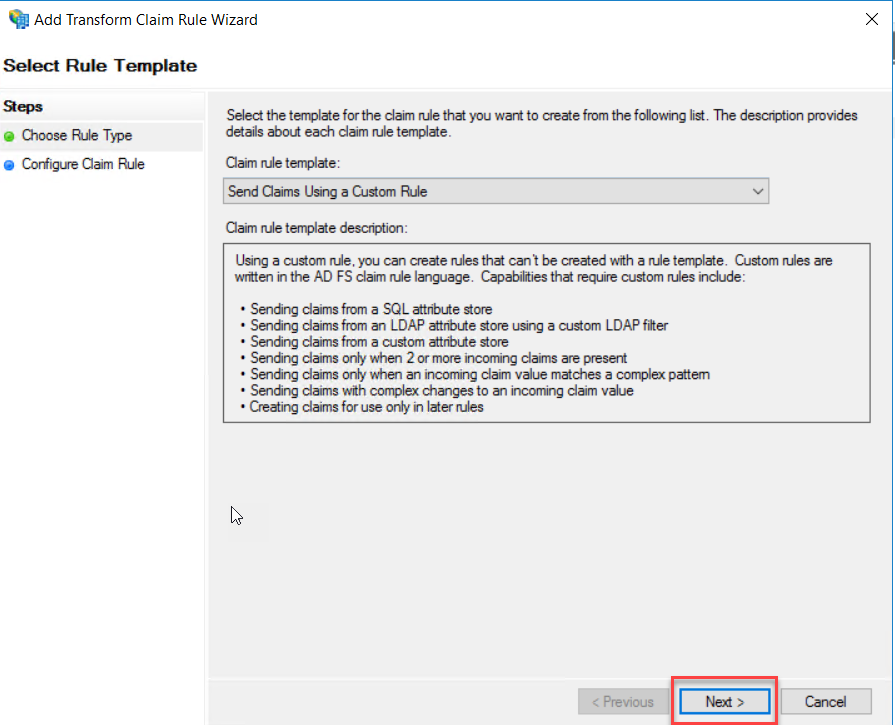
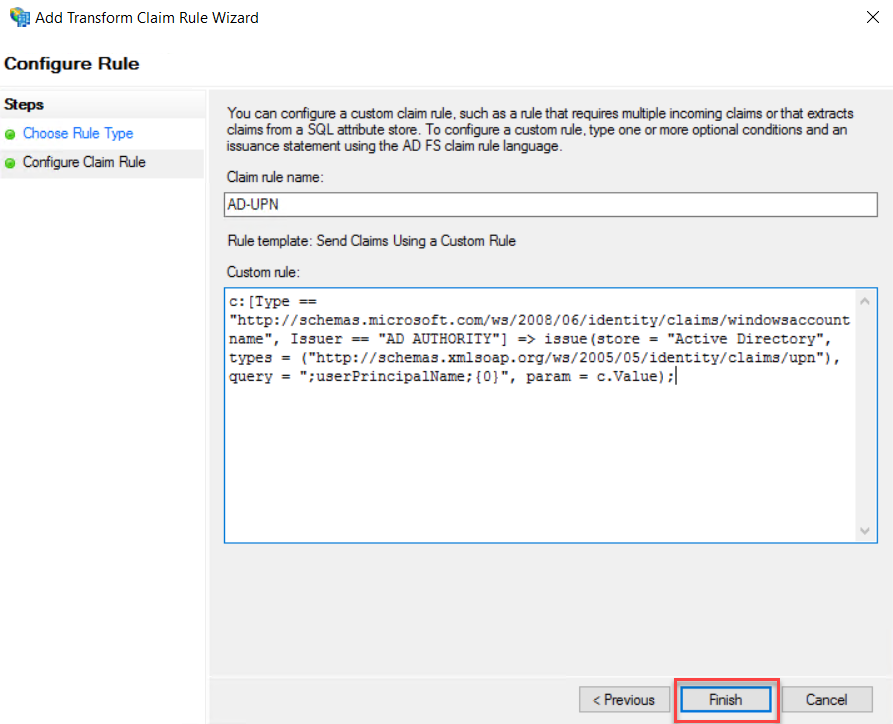
On the
Claim Rule Name, type a name for the Claim Rule, this rule is for Active
Directory UPN, so I have typed name as AD-UPN. On Claim Rule Area copy and
paste the following rule
c:[Type == "http://schemas.microsoft.com/ws/2008/06/identity/claims/windowsaccountname", Issuer == "AD AUTHORITY"] => issue(store = "Active Directory", types = ("http://schemas.xmlsoap.org/ws/2005/05/identity/claims/upn"), query = ";userPrincipalName;{0}", param = c.Value);
Click
Finish to end the Rule wizard.
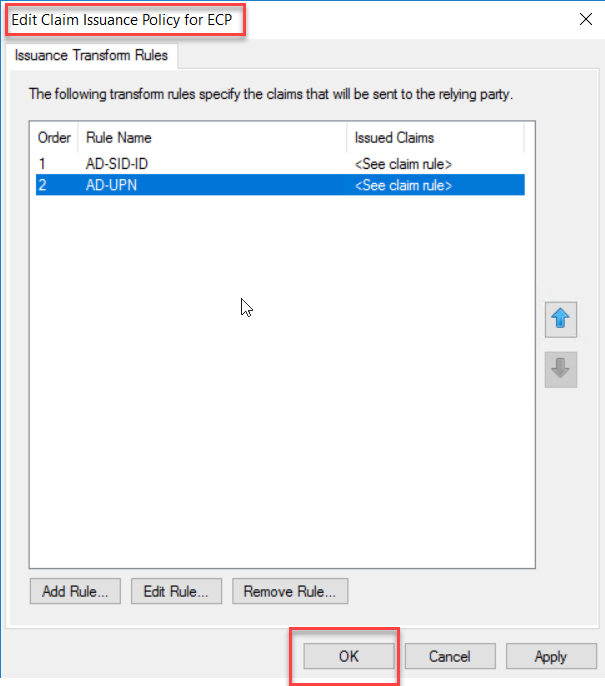
On the Edit
Claim Issuance Policy window, click OK.
Export Token Signing Certificate from AD FS server to Import it to Exchange Server
Exchange Server Claims Authentication Using ADFS
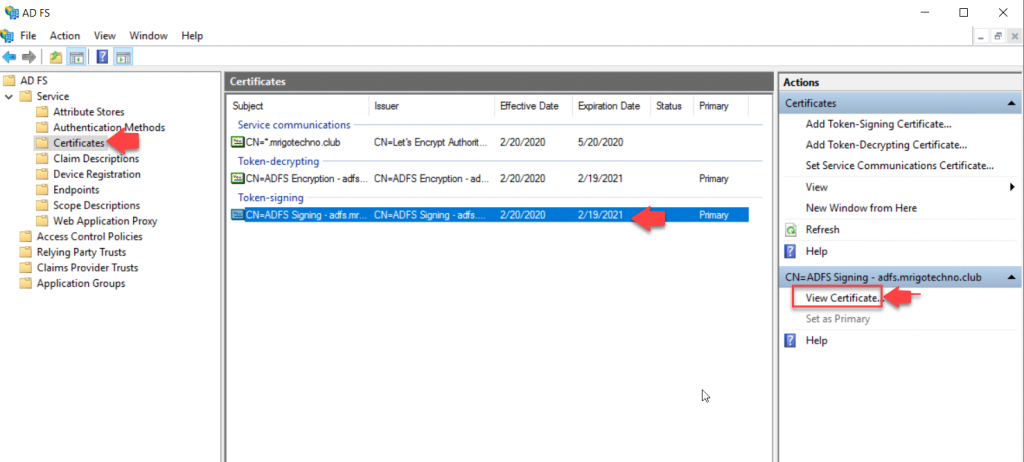
Go to AF FS Management Console and select certificates under Service. On the middle (Certificates) pane, select the subject CN=ADFS Signing; and on the action pane, click View Certificate.
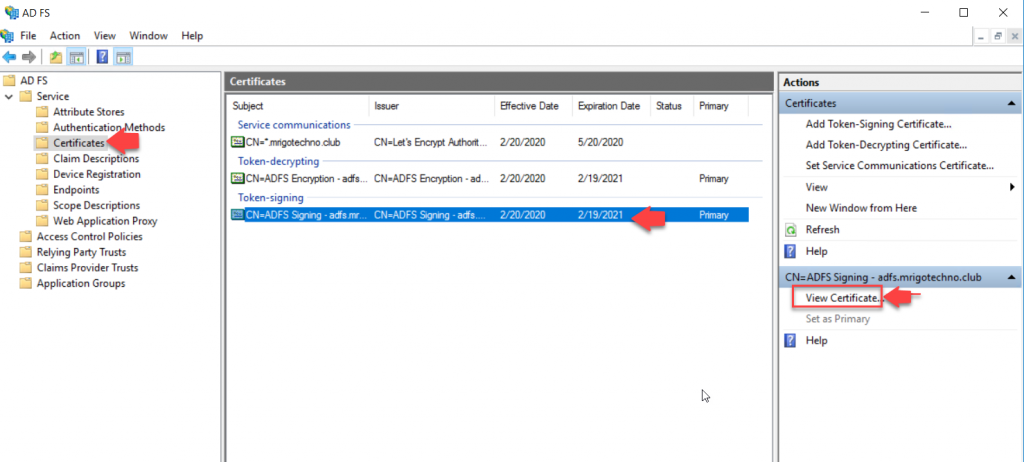
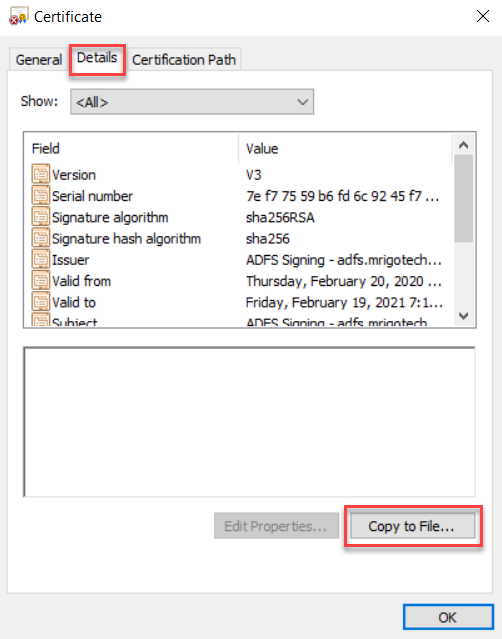
Select the Details tab and click Copy to File in the bottom.
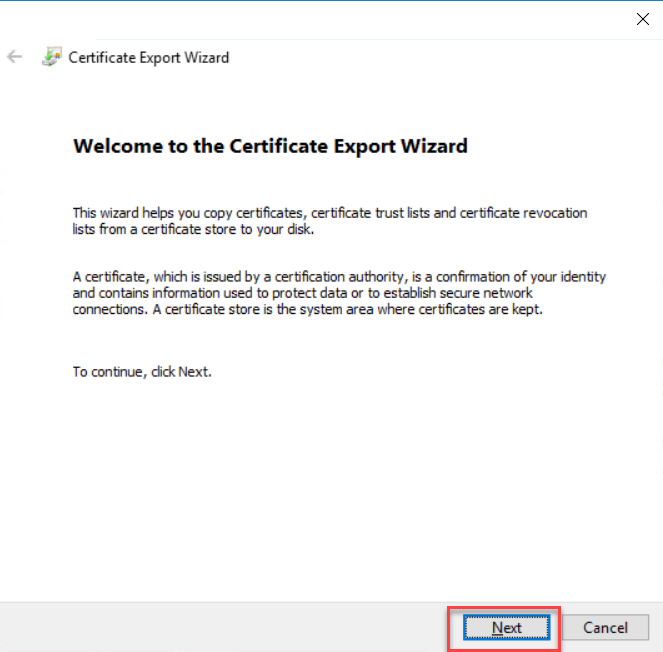
Click Next on the certificate export wizard welcome screen.
Select the
Details tab and click Copy to File in the bottom.
Click Next
on the certificate export wizard welcome screen.
On the
export file format, choose the Base-64 encoded X.509 (.CER) file format, Click
Next.

Click
Browse and select a certificate file path and a name with .CER extension. Click
Next to continue.

Click
Finish to complete the certificate export wizard. Copy the exported file to
Exchange Server to Import.

Import the Token-Signing Certificate to Exchange Server
Exchange Server Claims Authentication Using ADFS
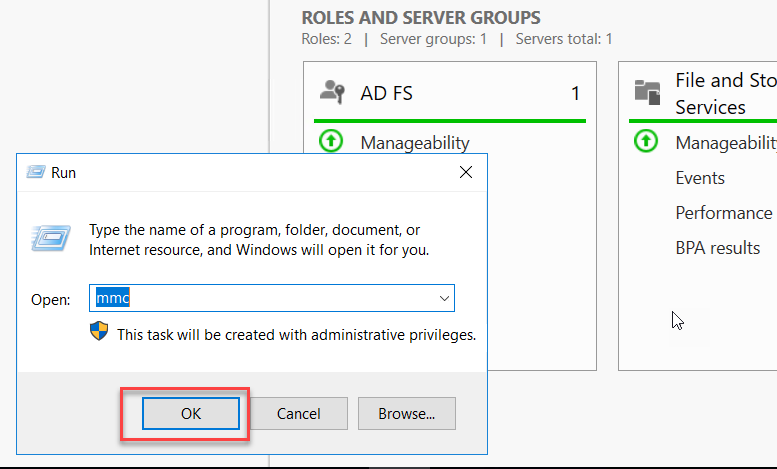
Go to StartàRun and type MMC and click OK
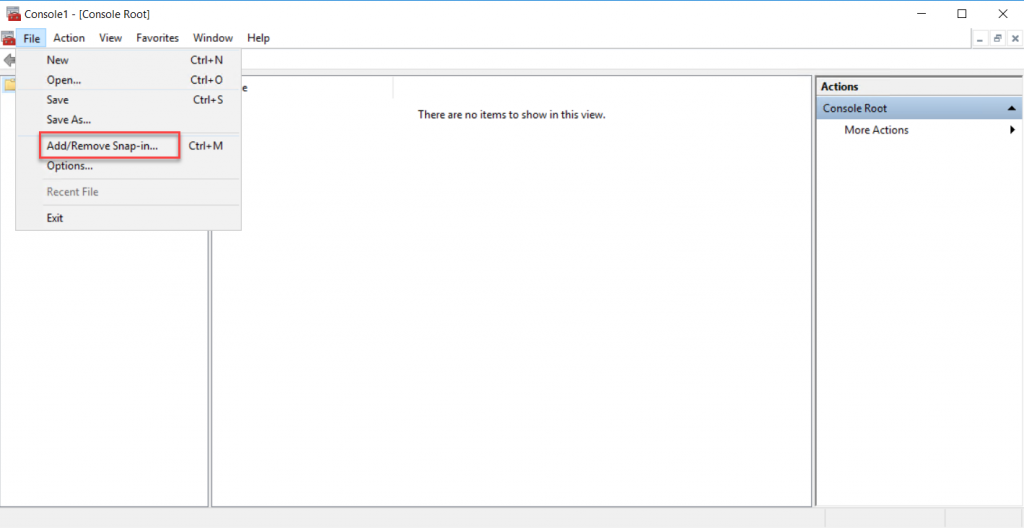
On the
Microsoft Management Console(MMC), click the file menu, and Add Remove snap-in.
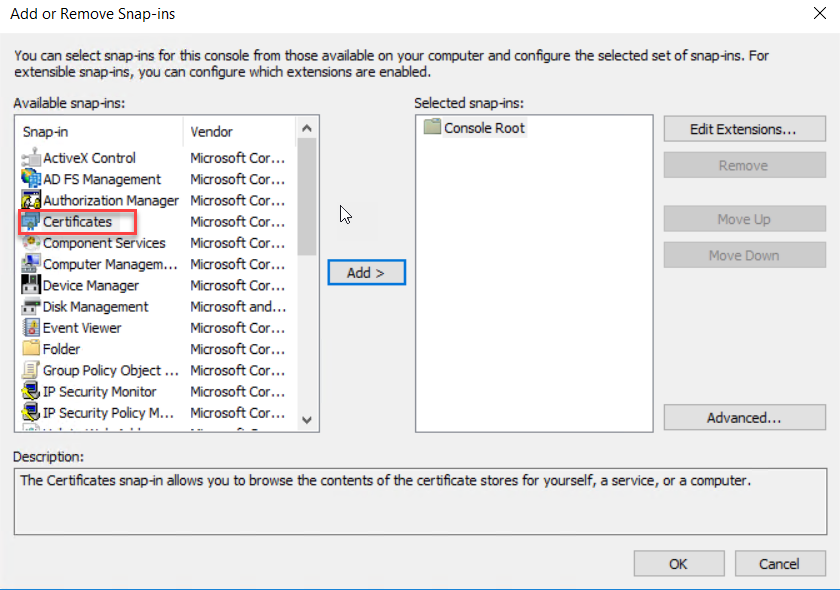
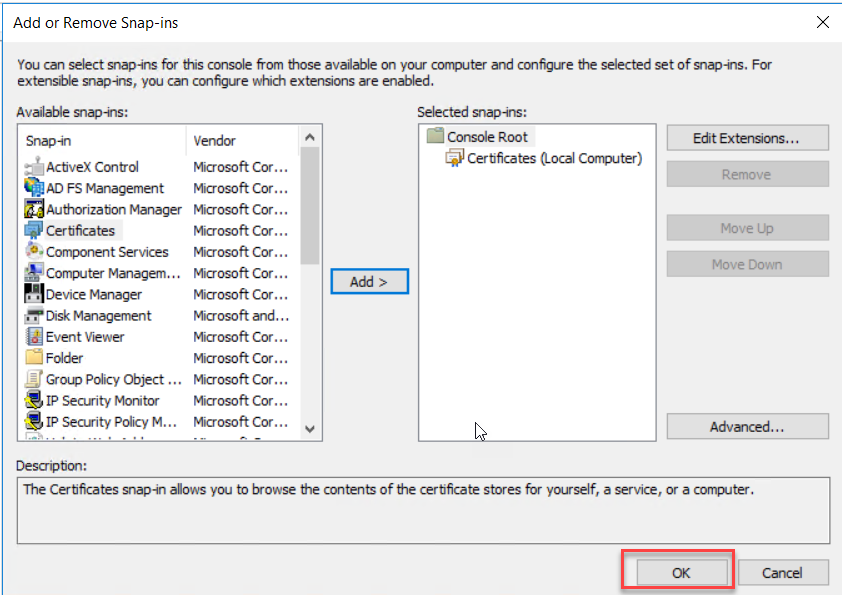
On the Add
or Remove snap-ins select Certificate snap-in from the available snap-ins and
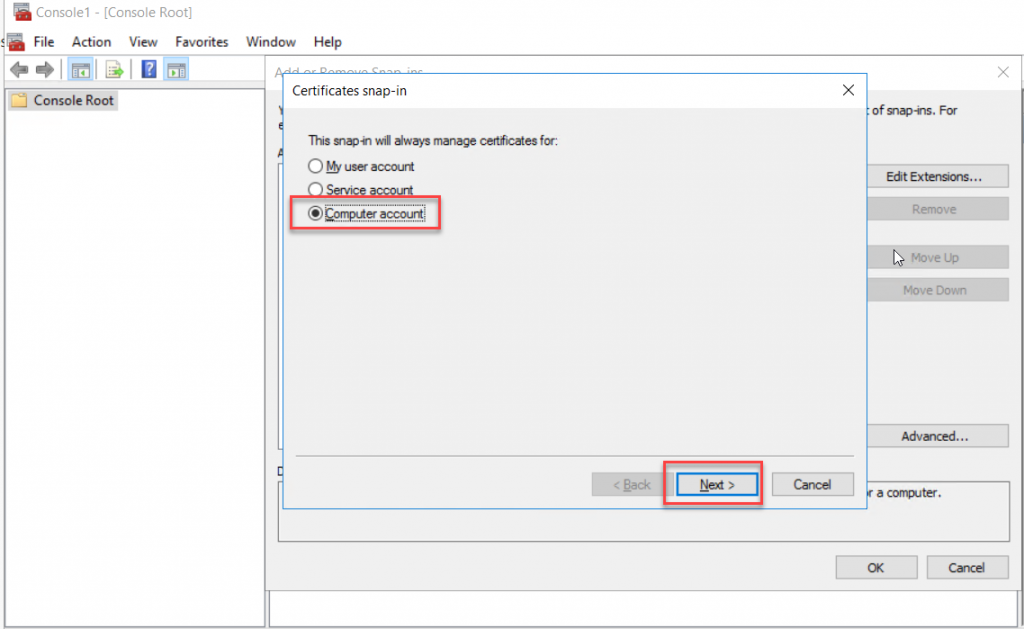
click add.
On the
Certificate snap-in wizard select Computer Account and click Next
Select
Local Computer on the manage snap-in computer page and click Finish to end the
snap-in wizard.
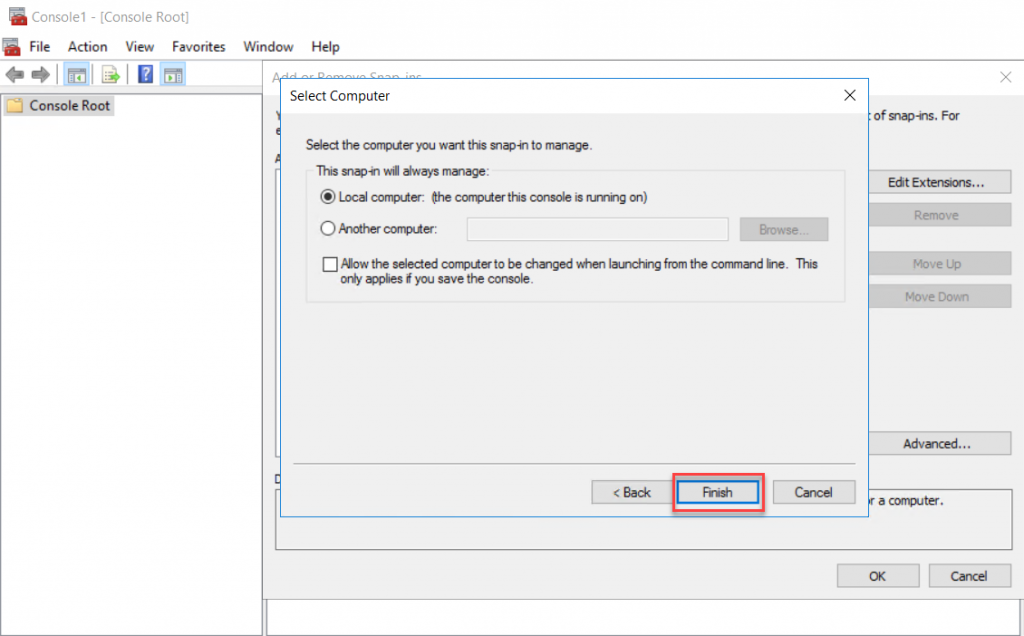
As the
Certificate snap-in selected, click OK to open the Certificates Console.
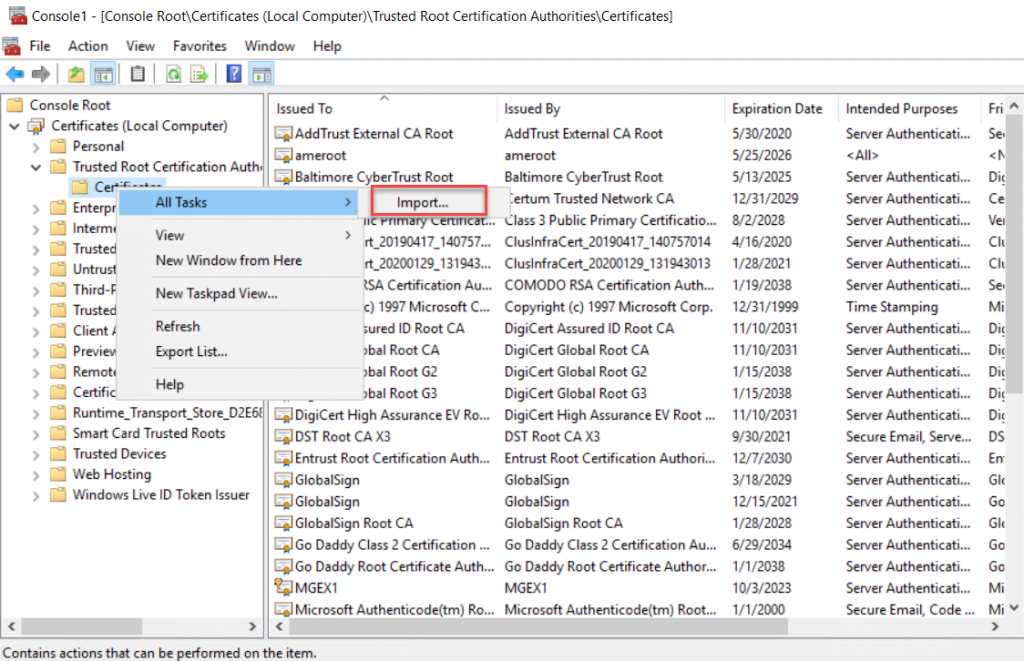
Right-Click
Certificates on Console Root/Trusted Root Certification Authority/Certificates,
and click “Import” under All Tasks.
Click Next
on the Certificate Import Wizard welcome screen. Click Next to continue

Select the
token-signing.cer file that we exported from the AD FS server and copied to the
Exchange server. Click Next to continue.

Click
Finish on Certificate Importing wizard.

Click the OK
button on the “The import was Successful” popup message.
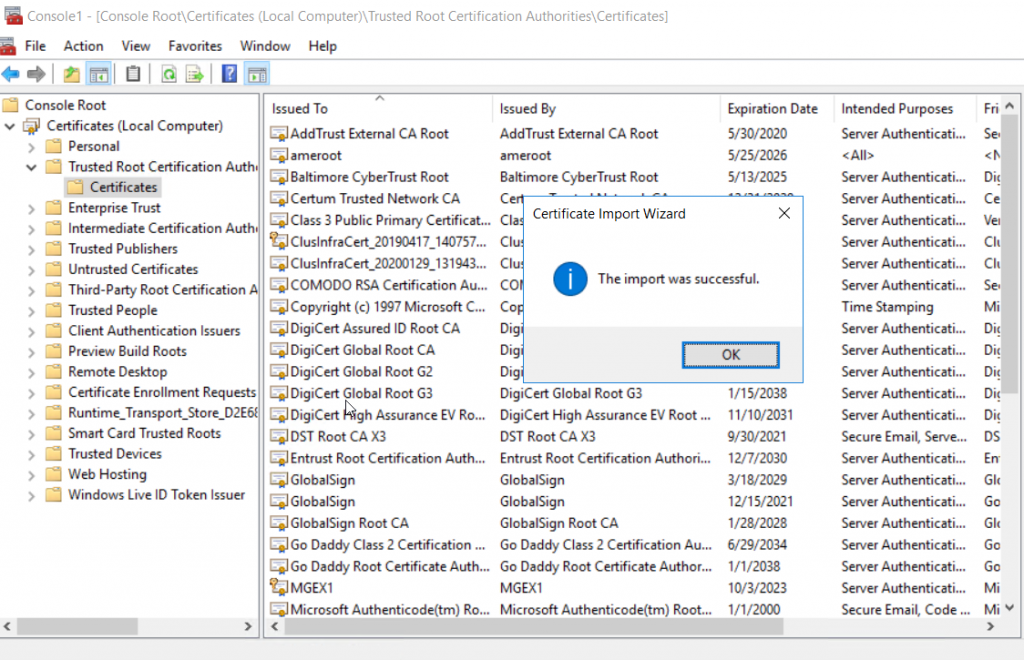
Configure Exchange Organization to authenticate using ADFS
Exchange Server Claims Authentication Using ADFS
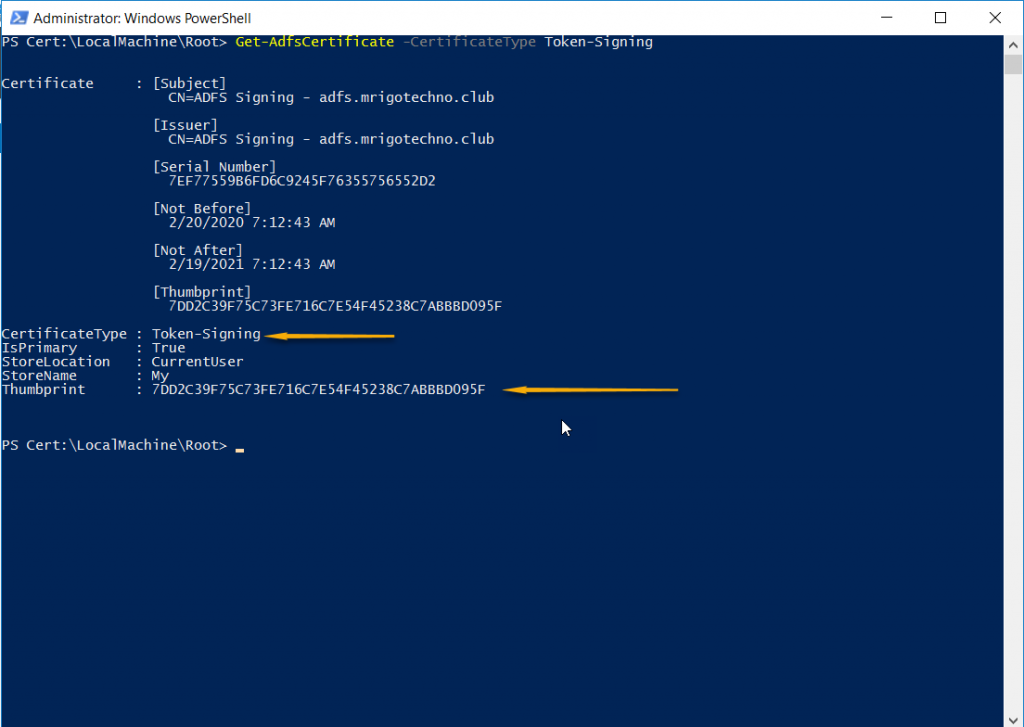
On AD FS
server launch PowerShell prompt and type the following command to get the token
signing certificate thumbprint
Get-AdfsCertificate –CertificateType token-signing
Start
Exchange Management Shell on Exchange server, from StartàExchange Server 2016, right-click
Exchange Management Shell, and click Run as Administrator to start elevated
EMS.

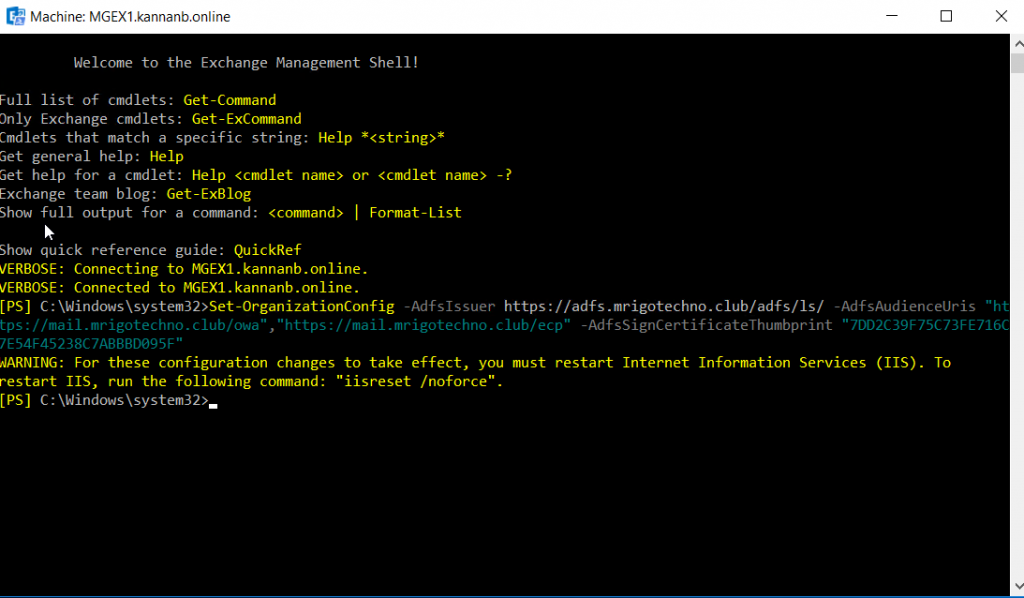
Construct
the set-organizationconfig command with 1. ADFS Issuer Uri 2. ADFS Audience
Uris (OWA and ECP Uris) and 3. AD FS sign certificate thumbprint (In the
previous step, we took thump print of ADFS Signing certificate).
Set-OrganizationConfig -AdfsIssuer https://adfs.mrigotechno.club/adfs/ls/ -AdfsAudienceUris "https://mail.mrigotechno.club/owa/","https://mail.mrigotechno.club/ecp/" -AdfsSignCertificateThumbprint "7DD2C39F75C73FE716C7E54F45238C7ABBBD095F"
Configure ECP and OWA virtual directories with
ADFS Authentication
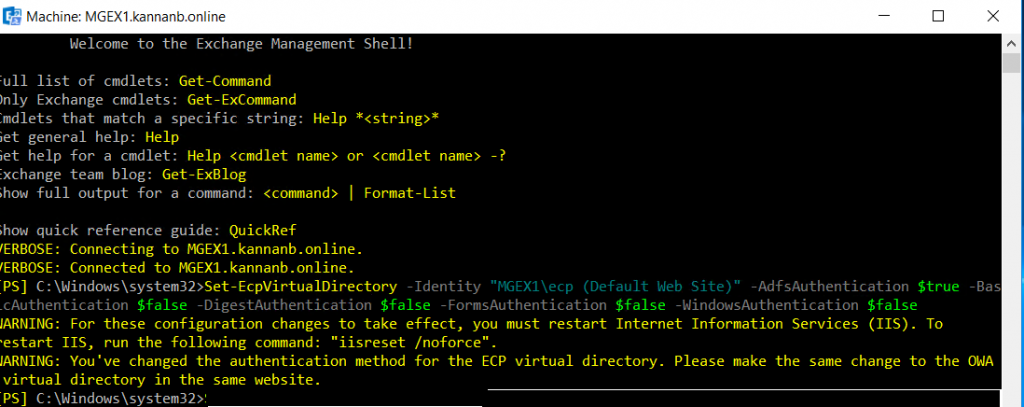
Run
Set-ECPVirtualDirectory command on Exchange management shell to set ECP
authentication. The -identity on the command is “ServerName\ecp (Default
Web site)” type your server name. Also, except Adfs authentication, set
all other authentication to false (make it off).
Set-EcpVirtualDirectory -Identity "MGEX1\ecp (Default Web Site)" -AdfsAuthentication $true -BasicAuthentication $false -DigestAuthentication $false -FormsAuthentication $false -WindowsAuthentication $false
Run
Set-OwaVirtualDirectory command on Exchange management shell to set OWA authentication.
The -identity on the command is “ServerName\owa (Default Web site)”
type your server name. Also, except Adfs authentication, set all other
authentication to false.
Set-OwaVirtualDirectory -Identity "MGEX1\owa (Default Web Site)" -AdfsAuthentication $true -BasicAuthentication $false -DigestAuthentication $false -FormsAuthentication $false -WindowsAuthentication $false

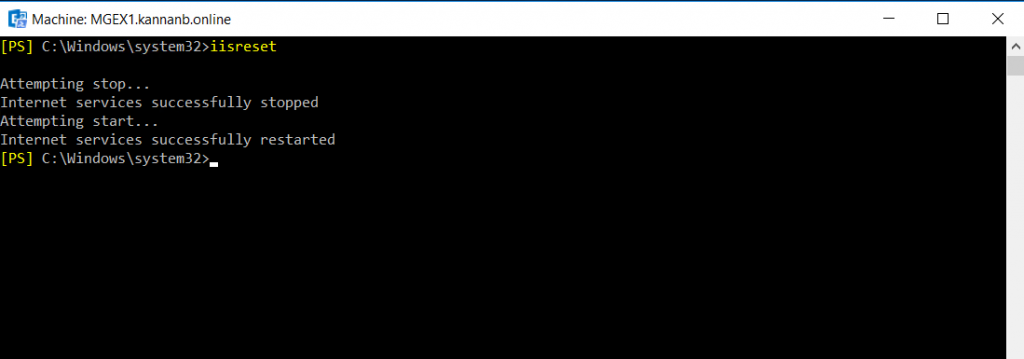
Once the OWA
and ECP virtual directories configured, restart Internet Information Services.
Test OWA and ECP claims based authentication
Open a
browser window and type Exchange Admin Center(ECP), or Outlook on the web (OWA)
URL

The browser
will redirect to the Federation services login page, type the username and
password.
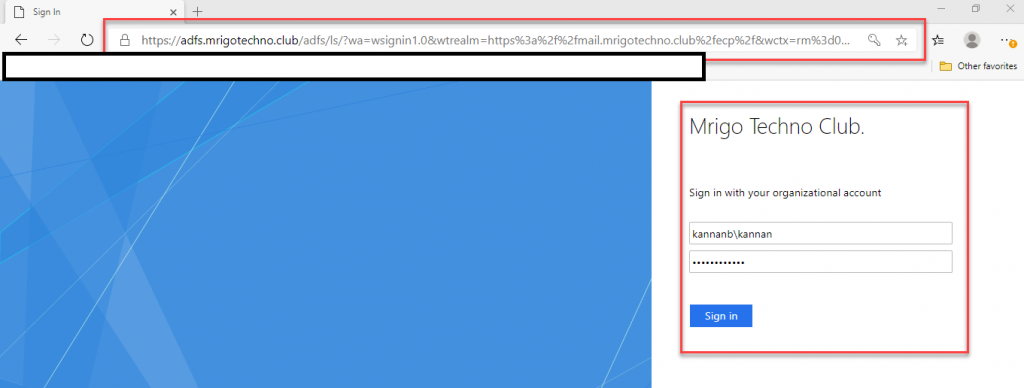
After
authentication with AD FS, the URL will redirect back to ECP
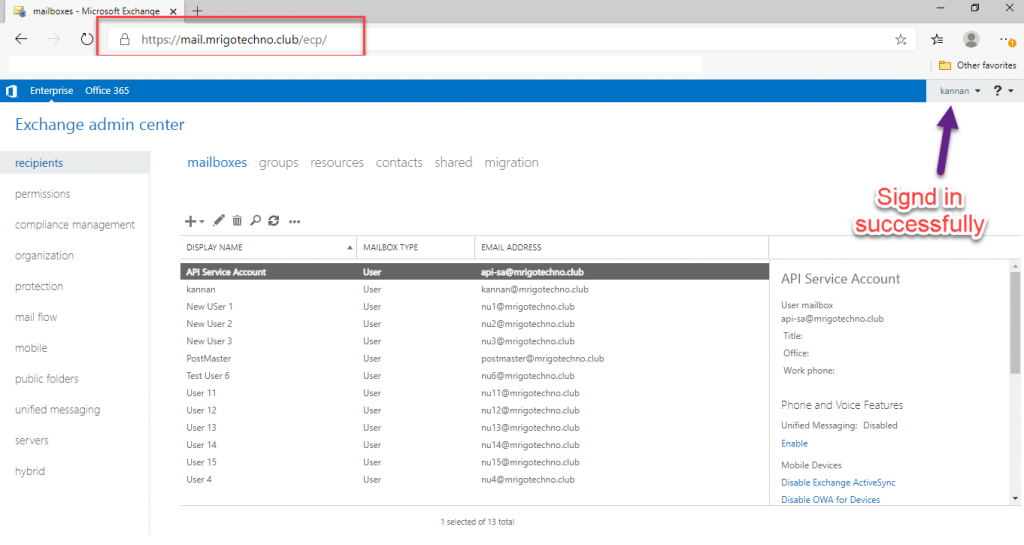
Conclusion
In this
article, we have gone through how to setup claims-based authentication for
Exchange Server OWA and ECP URLs on the ADFS server installed on Windows server
2016. We have covered how to install and configure Active Directory Federation
service (AD FS), configured Relying party trusts, and Claim issuance rules for OWA
and ECP URLs. We configured Exchange organization to authenticate to AD FS and
configured ECP and OWA virtual directories and then demonstrated AD FS
authentication by login to ECP site.
I hope this article gives all the details to set up an
Exchange environment to implement claims-based authentication for Exchange
Server OWA and ECP using AD FS. You may have some questions or feedback to
share with me, please click the comments below and share your thoughts. I’m so
happy to answer your questions.
Chapter 10
Securing WCF Services Using the Windows Identity Foundation (WIF)
by Dominick Baier
If you are a software security geek like me, the world of distributed applications is one of the most exciting places to be. You can encounter a multitude of client types, network and authentication protocols, credential types, and requirements. In other words, you have just the complexity you need to feel like a real expert — or a little lost.
Although, in theory, the Windows Communication Foundation (WCF) has all the features you need to build even the most complex distributed systems, as always, complexity is the biggest enemy of security. That’s the reason why Microsoft gave WCF security (and .NET security, in general — but more on that later) a refresh that enables you to build these systems with better abstraction layers and less error-prone code. This refresh is called the Windows Identity Foundation (WIF), and this chapter examines how to use this technology with WCF Simple Object Access Protocol (SOAP) and Representational State Transfer (REST) services.
The sample code used in this chapter, as well as the Thinktecture.IdentityModel library, is part of the code available for download on this book’s companion website (www.wrox.com). Parts of the code are based on the movie database service described in Chapter 9.
Identity in .NET Applications
Since the first release of the .NET Framework, Microsoft wanted to give developers a standard and unified way to represent identity and access control in applications.
This section provides a brief history of the approaches Microsoft took, and how WCF changed the game. It concludes with a description of the concepts that WIF adds, and, more important, why WIF is the new (and preferred) way to model identity in your applications.
Especially when it comes to concepts such as claims, tokens, and federation, this chapter cannot provide a full introduction. Look at the free guide to identity and access control from Microsoft’s Patterns & Practices group at http://tinyurl.com/claimsguide. For a more WIF API-centric book, check out Programming Windows Identity Foundation by Vittorio Bertocci (Redmond, Washington: Microsoft Press, 2010).
Identity in the Base Class Library
The System.Security.Principal.IPrincipal interface provides a standard way to do role-based access checks and, in turn, wrap an instance of the IIdentity interface that holds the username and information about the authentication method. In addition, there is a per-thread storage “slot” to store that principal on Thread.CurrentPrincipal. Listing 10.1 shows this interface.
Listing 10.1: IPrincipal and IIdentity
interface IPrincipal
{
IIdentity Identity { get; }
bool IsInRole(string roleName);
}
interface IIdentity
{
bool IsAuthenticated { get; }
string AuthenticationType { get; }
string Name { get; }
}
This enables writing standard plumbing to query authentication and authorization information for the current user. (Because the principal is stored on a thread-static property, it enables scenarios in which multiple concurrent clients use the application — such as WCF or ASP.NET.) Examples of such standard plumbing would be Base Class Library (BCL) classes such as PrincipalPermission, or ASP.NET’s URL Authorization.
These interfaces are deliberately minimal to provide common ground, and are meant for customization to adapt to different authentication types and application scenarios. The framework itself includes a number of implementations for such common scenarios as the following:
· WindowsPrincipal/WindowsIdentity — Represents a Windows user and groups
· GenericPrincipal/GenericIdentity — Represents a generic user (for example, backed by a custom user database)
· FormsIdentity — Represents an ASP.NET Forms Authentication user and information in the corresponding cookie
Other common credential types such as an X.509 certificate, unfortunately, don’t have an IPrincipal representation.
On the other hand, because so many different implementations exist (and each comes with its own optimization for the concrete authentication type to make it more useful), it was difficult to write applications that should support multiple authentication and credential types. This could be especially challenging for independent software vendors (ISVs) who must write generic software without a priori knowledge of the security and authentication system of their customers.
Another consequence of the IPrincipal interface design is the focus on role-based security for authorization. This is not a bad thing because roles are extremely useful for coarse-grained authorization. But when you want to do more fine-grained security decisions (or maybe even just personalization), you must come up with your own custom implementations (which not always helps the greater good).
Identity in WCF
WCF was designed a few years later than the BCL. While retaining some backward compatibility with the original IPrincipal idea, WCF also featured a brand new security system to cater for the vast amount of scenarios it was built for.
WCF security was built around the notion of security tokens and claims. The WCF team created a completely new object model centered on the ServiceSecurityContext type for that purpose.
Security Tokens and Claims
WCF introduced important security concepts into the .NET Framework. One is the notion of a security token. A token is the outcome of an authentication process and describes a credential. WCF comes with a number of implementations of security tokens (all derived from the abstract base class called SecurityToken), such as for Kerberos, usernames and passwords, X.509 certificates, and Security Assertion Markup Language (SAML). One interesting aspect of security tokens is that they can be serialized and transferred between services (even across traditional security boundaries). This is important when it comes to security token services, SAML, and federation.
In a nutshell, a claim is a statement about an entity, typically a user in your system. A claim consists of three pieces of information: the type of the statement, the statement itself, and the issuer of that statement. When translated into the role mindset, this is a claim, such as “dominick is a domain administrator (says the domain controller).” But claims go further than roles because they enable more than just simple yes/no decisions, such as, “dominick’s e-mail address is dominick.baier@thinktecture.com (says our directory service).” Claims can be hydrated from the contents of a security token, or you have application local logic that adds claims to the client’s security context.
Both tokens and claims can be accessed in WCF via ServiceSecurityContext.Current (WCF’s version of Thread.CurrentPrincipal).
This new system was more powerful and flexible compared to the standard .NET facilities — but this came with a price. First, programming against and extending the new system was more difficult and often required an intimate knowledge of the inner workings of WCF to succeed. But even worse, this new system broke backward compatibility to the BCL system in a lot of areas. (Thread.CurrentPrincipal is only available in certain situations in WCF.) When you were in a situation in which you needed to maintain both ASP.NET and WCF code, you often ended up duplicating security-related code to work against both security systems. Again, this could lead to errors and complexity.
Windows Identity Foundation
The purpose of the WIF library is to combine the power of the WCF security concepts with the simplicity and pervasiveness of the BCL IPrinpical approach.
This is achieved by introducing a class called Claim (and a corresponding ClaimCollection):
public class Claim
{
public virtual string ClaimType { get; }
public virtual string Value { get; }
public virtual string Issuer { get; }
// rest omitted
}
This enables packaging an arbitrary number of statements about the current user. To attach these statements to the current thread of execution in your application, claims-aware versions of IPrincipal and IIdentity have been created. They are called IClaimsPrincipal and IClaimsIdentity, and enable coupling a collection of claims with the current principal:
interface IClaimsPrincipal : IPrincipal
{
ClaimsIdentityCollection Identities { get; }
// rest omitted
}
interface IClaimsIdentity : IIdentity
{
ClaimCollection Claims { get; }
// rest omitted
}
Deriving from IPrincipal and IIdentity has the handy side effects that you can start using Thread.CurrentPrincipal again (regardless of ASP.NET or WCF), and that “legacy” code won’t break when enabling WIF (because this code can simply see the standard BCL versions of the interfaces, which behave the same for backward-compatibility reasons). Also, because the IClaimsIdentity is generic and can hold arbitrary information, there is less (to no) need to provide custom implementations of the principal and identity.
Layering WIF on top of the WCF (and ASP.NET) security system has several benefits:
· Claims become a first-class citizen in every .NET application. Although WIF provides the plumbing to “claim-enable” arbitrary applications, you can find out-of-the-box support for WCF and ASP.NET.
· A number of new easy-to-use extensibility points are included. And, even more important, the same extensibility exists for ASP.NET and WCF, which means that you must write that code only once, and it works the same in both environments.
· The handling of credentials types and security tokens has been dramatically simplified (especially when compared to WCF’s native programming model).
· By providing a single abstraction (the claims collection) over arbitrary authentication protocols and credential types, your code becomes agnostic to these low-level details. That effectively means that you can decouple your application logic from the low-level security details, which is huge.
In addition to replacing the principal/identity with a claims-aware version, WIF adds three other important concepts: security token handlers, claims transformation, and claims—based authorization. The following sections provide a brief description of the mechanisms. You use them later in the sample so that you can see them in action.
WIF is a single assembly called Microsoft.IdentityModel. When installed, it is serviced by Windows Update. You can also redistribute the assembly yourself if you like.
Security Token Handlers
Security token handlers are the glue between claims and security tokens. They have two purposes:
· Serialize and deserialize tokens (ReadToken and WriteToken)
· Turn a token into an IClaimsIdentity, and vice versa (CreateToken and ValidateToken)
When a token arrives in WCF, the first thing that WIF does is hand it over to the token handler for claims validation and claims extraction. WIF already ships with a number of token handlers to handle common token types, including the following:
· Kerberos service tickets
· Username/password
· X.509 certificates
· SAML 1.1 and 2.0
You can find them in the Microsoft.IdentityModel.Tokens namespace.
If you need to add support for a new token type, you have to write “only” a token handler for that specific token. WIF takes care of integrating that into the WCF runtime (more on that later). This might still not be a trivial task, but it is much easier compared to WCF’s native extensibility points.
More common is that you might want to customize how an existing token handler handles a token. In this case, you can simply derive from that existing token-handler, and override an existing method, or inject your own logic. The whole token-handler design explicitly enables such customization. (Kudos to the WIF team!)
The SAML 1.1 Token Handler
A nice example of the customizability of the built-in token handlers is the handler for SAML 1.1 tokens. The CreateToken method is part of the SecurityTokenHandler base class and is used by WIF plumbing (or by yourself when you write your own WIF plumbing). The CreateToken method itself uses a pipeline of virtual methods that actually creates the security token. You are free to override every aspect of this pipeline. It looks as follows:
· CreateStatements — Creates the SAML subject, attribute, and authentication statements. This method calls out to the following:
o CreateSamlSubject — Looks for a name identifier claim and uses this to create the SAML subject. Additionally, if this claim has properties that describe the name format and qualifier, these values will be added to the subject. The last step is to set the proof key identifier and subject confirmation method (holder of key/bearer).
o CreateAttributeStatement — Creates the attribute statement based on the supplied claims.
o CreateAuthenticationStatementFromAuthenticationInformation — Creates the authentication statement based on the authentication information.
· CreateConditions — Sets the token lifetime and audience URIs restrictions.
· CreateAdvice — Creates the SAML advice. By default, no advice is created.
· CreateAssertion — Creates the SAML assertion based on the statements, the conditions, and the advice.
· GetSigningCredentials — Returns the credential used to sign the token.
· GetEncryptingCredentials — Returns the credential used to encrypt the token. If this method returns null, the token will not be encrypted.
Claims Transformation
An important concept of claims-based systems is transformation. By default, WIF turns incoming security tokens into claims (or an IClaimsPrincipal, to be exact). This is the job of the token handler.
The information inside the security token may or may not be directly usable by the application (typically not). So, for example, a Windows token contains the Windows account name and the security identifiers (SIDs) of the groups this account is a member of. An X.509 security token contains things such as public keys or serial numbers. This is typically not the information your application cares about. Rather, it cares about things such as authorization or personalization information such as a shopping cart limit, or trivial things such as the first name of the user.
This is where claims transformation comes in. The outcome of the security token handler’s work is passed to a ClaimsAuthenticationManager. WIF passes the IClaimsPrincipal into the Authenticate method. In there, you can now do whatever modification to that principal you want to do (or even create a new one). You then return that modified principal back to WIF so that it can travel further toward application code.
Listing 10.2 shows an example of claims transformation.
Listing 10.2: Claims Transformation with ClaimsAuthenticationManager
class ClaimsTransformer : ClaimsAuthenticationManager
{
public override IClaimsPrincipal Authenticate(string resourceName,
IClaimsPrincipal incomingPrincipal)
{
// extract some unique identifier from the incoming token
var user = incomingPrincipal.Identities.Single().Name;
// build claims principal and return to WIF
return CreatePrincipal(user);
}
}
Claims-Based Authorization
Earlier, you learned that .NET’s IPrincipal interface was designed for role-based security via the IsInRole method. This often led to code like what is shown in Listing 10.3.
Listing 10.3: Role-based Authorization with IsInRole
public void AddCustomer(Customer customer)
{
if (Thread.CurrentPrincipal.IsInRole(«Sales»))
{
// add customer
}
}
This code has a fundamental flaw — it mixes business logic with (security) infrastructure, which is a clear violation of separation of concerns. Practically speaking, this can lead to two issues:
· Whenever the security requirements change (like another role should have access, too), you must recompile, retest, and reship the whole application (or business logic).
· These IsInRole calls (or PrincipalPermission/Attribute) are sprinkled all over your code base. Whenever changes occur, you must ensure that you don’t miss a call while updating the application.
WIF advocates a slightly different approach that helps to keep both concerns separate. As opposed to embedding security-related information directly in your business code, you describe only what the current code tries to do (via a resource/operation pair), and hand it off to a separate component to make the security decision, as shown in Listing 10.4.
Listing 10.4: Claims-Based Authorization
// coarse grained and declarative
[ClaimsPrincipalPermission(SecurityAction.Demand,
Resource = «Customer», Operation = «Add»)]
public void AddCustomer(Customer customer)
{
// fine grained and imperative
ClaimsPrincipalPermission.CheckAccess(
«AddCustomerInRegion»,
Customer.Region);
// add customer
}
This triggers a call to the ClaimsAuthorizationManager. The CheckAccess method has a single argument of type AuthorizationContext. The context, in turn, holds the supplied resource and action, as well as the IClaimsPrincipal of the user. It is now the job of the authorization manager to check these values against some authorization policy, as shown in Listing 10.5.
Listing 10.5: ClaimsAuthorizationManager
public class AuthorizationManager : ClaimsAuthorizationManager
{
public override bool CheckAccess(AuthorizationContext context)
{
// extract required values from context
var action = context.Action.First().Value;
var resource = context.Resource.First().Value;
var client = context.Principal.Identities.First();
// evaluate against authorization policy
return CheckAuthorizationPolicy(action, resource, client);
}
}
An interesting detail about AuthorizationContext is that the resource and operation is modeled as a collection of claims. This enables describing these two “values” in an arbitrarily complex way — for example, “the user tries to print on a printer (but this printer is a color laser printer with 50 pages/minute on floor 3).”
In addition to invoking the authorization manager imperatively, WCF (or, rather, the WIF extensions to WCF) also calls the CheckAccess method for every incoming request. This time, the endpoint address and SOAP action (or HTTP verb for REST services) is passed in. This serves as a replacement for the “old” WCF ServiceAuthorizationManager.
This generic authorization extensibility also enables third parties to plug in authorization systems that operate at a higher abstraction layer. Think of graphical designers or digital simulation languages (DSLs).
Recapping the Building Blocks
You just learned about the three basic building blocks of WIF — token handlers, claims transformation, and authorization. Strictly speaking, these are three independent mechanisms — but typically, WIF combines them to a pipeline that plugs into a hosting platform such as WCF and ASP.NET:
· Turn an incoming security token into claims using a token handler.
· Transform those token-based claims into application claims.
· Do per-request (or explicit) authorization.
· Set IClaimsPrincipal on Thread.CurrentPrincipal.
The actual WIF pipeline is more complex, and a lot of extensibility points have not been mentioned. Look at the WIF SDK under “Building Relying Party Applications” for more information.
WCF and WIF
Now that you know why WIF exists, and what its fundamental building blocks are, start using it in a simple WCF service.
The following sections are based on the SimpleDemo sample from code available for download on this book’s companion website (www.wrox.com). If you want to follow along, there is a “before” solution (which is plain WCF) and an “after” solution (which uses WIF and the extensibility points discussed here).
Prerequisites
The first thing you should do is download WIF and the SDK. Although WIF contains the library, the SDK gives you additional tools such as IntelliSense for the configuration file, as well as some wizards.
After downloading these packages, you can start using WIF by adding a reference to Microsoft.IdentityModel and System.IdentityModel (in addition to the typical WCF libraries like System.ServiceModel).
You must also register a new configuration section. Add the following to your app.config/web.config file:
<configSections>
<section name=»microsoft.identityModel»
type=»Microsoft.IdentityModel.Configuration.
MicrosoftIdentityModelSection, Microsoft.IdentityModel,
Version=3.5.0.0, Culture=neutral,
PublicKeyToken=31bf3856ad364e35″/>
</configSections>
Now you are ready to start configuring and enabling WIF in the WCF service.
Configuring and Enabling WIF
When you enable WIF in a WCF service, the following things change:
· WCF’s native ServiceSecurityContext is disabled. All client identity information can now be consistently found on Thread.CurrentPrincipal (as an IClaimsPrincipal).
· All token processing now is done by WIF’s internal pipeline and the security token handlers.
· As a consequence of the previous point, ClaimsAuthenticationManager and ClaimsAuthorizationManager are invoked as part of the request processing.
You enable WIF by calling FederatedServiceCredentials.ConfigureServiceHost and passing in your WCF service host. This is the easiest option for situations like self-hosting or for a service host factory.
You can also enable WIF using the WCF configuration. In this case, add the <federatedServiceHostConfiguration /> behavior to the service behavior section. You get this new behavior by registering the following behavior extension in the <system.serviceModel> configuration section:
<extensions>
<behaviorExtensions>
<add name=»federatedServiceHostConfiguration»
type=»Microsoft.IdentityModel.Configuration.
ConfigureServiceHostBehaviorExtensionElement,
Microsoft.IdentityModel, Version=3.5.0.0,
Culture=neutral, PublicKeyToken=31bf3856ad364e35″/>
</behaviorExtensions>
</extensions>
WIF Internals: FederatedServiceCredentials.ConfigureServiceHost
WIF is built on top of public WCF extensibility points. When you do some WCF customization, it might be interesting to see how WIF manages to add its own processing pipeline and IClaimsPrincipal into the WCF runtime.
When you call ConfigureServiceHost (or use the behavior in configuration), the following things happen under the cover:
· WIF replaces the standard WCF ServiceCredential with its own FederatedServiceCredential. This replaces WCF’s internal security token processing with the WIF pipeline.
o FederatedSecurityTokenManager replaces the standard SecurityTokenManager.
o The security token handler collection replaces the internal WCF security token provisioning, serialization, and authentication mechanisms.
· WIF also replaces the WCF internal claims generation by replacing the standard service authorization manager with the IdentityModelServiceAuthorizationManager.
o By setting the WCF PrincipalPermissionMode to Custom, this new service authorization manager is allowed to set Thread.CurrentPrincipal. This is how the claims coming from the security token handler make their way onto the thread static property, and into the WCF service code.
The following sections describe some typical WCF and WIF configuration settings for common scenarios.
Windows Authentication
Because Windows authentication is always the default in WCF, no special configuration is necessary for WIF as well. The token handler for Windows authentication produces three claim types: name (the Windows account name of the client); primarysid (the SID of the user); and groupsid (the SID of the groups the user is member of).
If you must translate SIDs to display names (such as group names), you can use the SecurityIdentifier and NTAccount classes from the BCL. The following code translates all groupsid claims to strings containing the Windows group names:
var id = Thread.CurrentPrincipal.Identity as IClaimsIdentity;
Console.WriteLine(«\nWindows groups:»);
id.Claims.Where(claim => claim.ClaimType ==
ClaimTypes.GroupSid).ToList().ForEach(c =>
{
var sid = new SecurityIdentifier(c.Value);
var acc = sid.Translate(typeof(NTAccount)) as NTAccount;
Console.WriteLine(acc);
});
Another specialty with Windows authentication is that you get a more specialized version of IClaimsPrincipal and IClaimsIdentity. They are called WindowsClaimsPrincipal and WindowsClaimsIdentity, and derive from the standard WindowsPrincipal and WindowsIdentity. The benefit is that you also get the Windows-centric functionality of the base classes like the Win32 token handle or the capability to impersonate the account.
WIF also includes a special service called the Claims to Windows Token Service (C2WTS). This service enables creating a WindowsIdentity without having to know the actual password of the account. This is useful in multihop scenarios in which you must access a Windows-secured resource (such as SQL Server) somewhere in the call chain. This is a highly privileged service (as you can imagine), and thus, is disabled by default. Consult the WIF documentation for more information.
Username/Password Authentication
WIF includes standard security token handlers for username- and password-based authentication when the credential validation is based either on Windows accounts or a membership provider.
Windows authentication is the standard for Username endpoints in WCF, but in case you need to do some custom validation and happen to have a membership provider, you must simply replace the standard token handler, as shown here:
<microsoft.identityModel>
<service>
<securityTokenHandlers>
<!— use the membership provider to authentication UserName tokens —>
<remove type=»Microsoft.IdentityModel.Tokens.
WindowsUserNameSecurityTokenHandler, Microsoft.IdentityModel,
Version=3.5.0.0, Culture=neutral,
PublicKeyToken=31BF3856AD364E35″ />
<add type=»Microsoft.IdentityModel.Tokens.
MembershipUserNameSecurityTokenHandler, Microsoft.IdentityModel,
Version=3.5.0.0, Culture=neutral,
PublicKeyToken=31BF3856AD364E35″>
<userNameSecurityTokenHandlerRequirement
membershipProviderName=»MembershipProviderName» />
</add>
</service>
</microsoft.identityModel>
When you already have an existing (nonmembership) password validation library, or want to do some customization, you can write your own (specialized) username security token handler. This is easier than it sounds and is mostly boilerplate code.
You basically start by deriving from UserNameSecurityTokenHandler and implementing the ValidateToken method. To be a “good” token handler, you must behave in a certain way (like checking configuration, checking for replay detection, or bootstrap tokens). You end up writing standard code where only the password validation logic is application-specific, as shown in Listing 10.6.
Listing 10.6: Generic UserName Security Token Handler
public class GenericUserNameSecurityTokenHandler : UserNameSecurityTokenHandler
{
public override ClaimsIdentityCollection ValidateToken(SecurityToken token)
{
if (token == null)
{
throw new ArgumentNullException(«token»);
}
if (base.Configuration == null)
{
throw new InvalidOperationException(«No Configuration set»);
}
UserNameSecurityToken unToken = token as UserNameSecurityToken;
if (unToken == null)
{
throw new ArgumentException(«The SecurityToken is not
a UserNameSecurityToken», token);
}
// ValidateUserNameCredential is app specific logic
if (!ValidateUserNameCredential(unToken.UserName, unToken.Password))
{
throw new SecurityTokenValidationException(unToken.UserName);
}
var claims = new List<Claim>
{
new Claim(ClaimTypes.Name, unToken.UserName),
new Claim(ClaimTypes.AuthenticationMethod,
AuthenticationMethods.Password),
AuthenticationInstantClaim.Now
};
var identity = new ClaimsIdentity(claims);
if (base.Configuration.SaveBootstrapTokens)
{
if (this.RetainPassword)
{
identity.BootstrapToken = unToken;
}
else
{
identity.BootstrapToken = new UserNameSecurityToken(
unToken.UserName, null);
}
}
return new ClaimsIdentityCollection(new IClaimsIdentity[] { identity });
}
public override bool CanValidateToken
{
get
{
return true;
}
}
}
Code file [GenericUserNameSecurityTokenHandler.cs] available for download at Wrox.com.
You would then implement the ValidateUserNameCredential method and replace the built-in token handler with this custom one. Typically, username token handlers produce only a single username claim (besides the standard authentication method and instant claims).
You can also configure and add token handlers programmatically. The following code snippet adds the custom token handler and opens the service host:
ServiceHost host = new ServiceHost(typeof(ClaimsService));
// retrieves configuration
var wifConfiguration = new ServiceConfiguration();
// replace built-in username token handler
wifConfiguration.SecurityTokenHandlers.AddOrReplace(
new GenericUserNameSecurityTokenHandler();
// add WIF to service host and open
FederatedServiceCredentials.ConfigureServiceHost(host, wifConfiguration);
host.Open();
X.509 Certificate Authentication
In the case of X.509 client certificate authentication, the standard X509SecurityTokenHandler is used. This handler produces a number of standard claims such as the thumbprint, distinguished name, public key, or serial number.
Certificate validation is a two-step process in WIF. First, the token handler uses the standard WCF certificate validation mechanism. You have the choice between chain trust, peer trust, and no validation. You can specify the validation mode in the <microsoft.identityModel> configuration section (either at the global level, or the handler level). You can also write a custom validator by deriving from X509CertificateValidator.
After successful validation, the WIF token handler also uses the issuer name registry to determine if the issuer of that certificate is trusted in your service. WIF ships with one standard implementation of such a registry called the ConfigurationBasedIssuerNameRegistry. As the name implies, this enables adding trusted certificate authorities (CAs) by registering the certificate thumbprint through configuration. The value of the name attribute is then used by the token handler to set the Issuer property on the Claim class.
<microsoft.identityModel>
<service>
<!— that’s the default setting —>
<certificateValidation certificateValidationMode=»ChainTrust» />
<!— registers trusted CAs —>
<issuerNameRegistry type=»Microsoft.IdentityModel.Tokens.
ConfigurationBasedIssuerNameRegistry, Microsoft.IdentityModel,
Version=3.5.0.0, Culture=neutral,
PublicKeyToken=31bf3856ad364e35″>
<trustedIssuers>
<add thumbprint=»xyz»
name=»Internal CA» />
</trustedIssuers>
</issuerNameRegistry>
</service>
</microsoft.identityModel>
The combination of both facilities enables an easy implementation of the typical pattern where you first check the validity of an incoming certificate using chain validation, and then narrow down your trusted certificates by providing a registry list.
Because you can provide your own issuer name registry implementation, you have total freedom to determine what is “trusted” in your service. Listing 10.7 shows a sample issuer name registry that does no checking against a list, but simply returns the thumbprint of the issuer certificate. This is sometimes useful for testing — but don’t use it in production environments.
Listing 10.7: Test Issuer Name Registry
public class TestIssuerNameRegistry : IssuerNameRegistry
{
public override string GetIssuerName(SecurityToken securityToken)
{
if (securityToken == null)
{
throw new ArgumentNullException(«securityToken»);
}
X509SecurityToken token = securityToken as X509SecurityToken;
if (token != null)
{
return token.Certificate.Thumbprint;
}
throw new SecurityTokenException(
securityToken.GetType().FullName);
}
}
Code file [TestIssuerNameRegistry.cs] available for download at Wrox.com.
SAML Token Authentication
WIF has built-in support for SAML 1.1 and 2.0 tokens. The token handlers decrypt and validate incoming SAML tokens, and turn the various statements into claims. But you must supply various configuration values to make this happen:
· The decryption key (private key) to decrypt incoming tokens
· A list of trusted token issuers
· A list of accepted audience URIs
This is typically done using the <microsoft.identityModel /> configuration section, but, as always, you can also supply the configuration via code. It’s a little confusing that you can also configure some aspects using the standard WCF configuration, and ConfigureServiceHost has some intelligence to parse both configuration sections and merge them. However, in general, I would recommend moving everything into the WIF configuration section.
Listing 10.8 shows a sample WIF configuration for SAML tokens.
Listing 10.8: Sample WIF Configuration for SAML Tokens
<microsoft.identityModel>
<service>
<!— list of accepted audience uris —>
<audienceUris>
<add value=»https://server/service.svc» />
</audienceUris>
<!— specifies how the issuer certificates get validated —>
<certificateValidation certificateValidationMode=»ChainTrust» />
<!— key used to decrypt incoming tokens —>
<serviceCertificate>
<certificateReference findValue=»CN=Service»
x509FindType=»FindBySubjectDistinguishedName»
storeLocation=»LocalMachine»
storeName=»My» />
</serviceCertificate>
<!— registers trusted token issuers
similar to x.509 certificate authentication,
the certificate used to sign the token
gets passed into the registry —>
<issuerNameRegistry type=»Microsoft.IdentityModel.Tokens.
ConfigurationBasedIssuerNameRegistry, …»>
<trustedIssuers>
<add thumbprint=»xyz»
name=»Internal Identity Provider» />
</trustedIssuers>
</issuerNameRegistry>
</service>
</microsoft.identityModel>
Sessions
WIF builds on top of the WCF session feature (or, more specifically, the WS-SecureConversation support). When WS-SecureConversation is turned on (that’s the establishSecurityContext attribute on the binding configuration), the outcome of the claims transformation process on the first request gets cached on the server, and a unique identifier gets round-tripped using a SOAP header. On subsequent requests, this identifier is used to rehydrate the cached IClaimsPrincipal. The SAML security token handler and the ClaimsAuthenticationManager don’t get called anymore. Because claims transformation is potentially expensive (for example, making round trips to data stores), sessions can improve performance.
But sessions also have downsides:
· Introducing state at the protocol level makes the client programming model more difficult. You must deal with things such as timeouts, faulted channels, and re-creating proxies.
· Sessions are, by default, incompatible with load balancing.
In the case in which you want to use WIF’s session management in a load-balanced environment, you must put WIF into “cookie mode.” This means that the complete IClaimsPrincipal from ClaimsAuthenticationManager is serialized and round-tripped (as opposed to keeping the principal on the server side, and round-tripping an identifier). In this mode, the WCF client proxy sends the complete principal on each request, and the receiving node can rehydrate the principal from the SecureConversation header.
Unfortunately, the standard bindings don’t expose that option directly — you need a custom binding for that. The “trick” here is to set requireSecurityContextCancellation to false — which is just a fancy way to say “serialize the session token (also known as the principal) into the message.” The following custom binding mimics the WS2007FederationHttpBinding in TransportWithMessageCredential security mode:
<customBinding>
<binding name=»federation_cookie»>
<security authenticationMode=»SecureConversation»
messageSecurityVersion=»WSSecurity11
WSTrust13
WSSecureConversation13
WSSecurityPolicy12
BasicSecurityProfile10″
requireSecurityContextCancellation=»false»>
<secureConversationBootstrap authenticationMode=»IssuedTokenOverTransport»
messageSecurityVersion=»WSSecurity11
WSTrust13
WSSecureConversation13
WSSecurityPolicy12
BasicSecurityProfile10″>
<issuedTokenParameters>
<issuerMetadata address=»https://…» />
</issuedTokenParameters>
</secureConversationBootstrap>
</security>
<textMessageEncoding />
<httpsTransport />
</binding>
</customBinding>
But that’s not the complete story. When you round-trip the principal back to the user, it must be protected. Otherwise, the client could simply change the claims and resubmit the modified session token.
The standard WIF behavior is to use the DPAPI user key to protect the principal. This key cannot easily be shared between nodes in a cluster. Another more explicit (and practical) option is to use an RSA key. Most typically, you would use your SSL certificate, or the certificate used to decrypt incoming tokens, to protect the serialized principal.
Fortunately, WIF makes it easy to customize such low-level details. You must derive from SessionSecurityTokenHandler and modify the transforms. (Think of transforms as a mini pipeline for serializing the session token that contains the principal.) Listing 10.9 shows an example.
Listing 10.9: Session Security Token Handler for Load-Balanced Scenarios
public class LoadBalancedSessionSecurityTokenHandler : SessionSecurityTokenHandler
{
public LoadBalancedSessionSecurityTokenHandler(X509Certificate2
protectionCertificate)
: base(CreateRsaTransforms(protectionCertificate))
{ }
private static ReadOnlyCollection<CookieTransform> CreateRsaTransforms
(X509Certificate2 protectionCertificate)
{
var transforms = new List<CookieTransform>()
{
new DeflateCookieTransform(),
new RsaEncryptionCookieTransform
(protectionCertificate),
new RsaSignatureCookieTransform
(protectionCertificate),
};
return transforms.AsReadOnly();
}
}
You would then replace the built-in session token handler with this new one:
ServiceHost host = new ServiceHost(typeof(ClaimsService));
// retrieves configuration
var wifConfiguration = new ServiceConfiguration();
// replace built-in username token handler
wifConfiguration.SecurityTokenHandlers.AddOrReplace(
new LoadBalancedSessionSecurityTokenHandler
(wifConfiguration.ServiceCertificate);
// add WIF to service host and open
FederatedServiceCredentials.ConfigureServiceHost(host, wifConfiguration);
host.Open();
You can see that there is a lot of custom code and configuration necessary to get sessions up and running for nonsingle-server scenarios. Regardless of clustering, I personally prefer to turn off sessions altogether and do my own server-side caching in ClaimsAuthenticationManager. Using products such as AppFabric Caching or memcached, you can also do distributed caching across multiple cluster nodes.
Recapping Configuring and Enabling
WIF supports a lot of scenarios and configuration options out-of-the-box. Generally, you start by creating your normal WCF endpoints and binding configuration, and then you call ConfigureServiceHost before opening the WCF service host. Typically, the WIF runtime can take care of the rest, and your service code calls the IClaimsPrincipal on Thread.CurrentPrincipal.
In general, you should keep your WCF endpoint configuration as simple as possible. Use mixed-mode security (that’s the TransportWithMessageCredential security mode) whenever possible because it can give you the best performance combined with the expressiveness of WS-Security tokens. Also, try to avoid sessions.
Furthermore, have a look at the following three blog entries to learn more about the WIF configuration system in general, as well as its extensibility:
· www.leastprivilege.com/WIFConfigurationNdashPart1ServiceConfiguration.aspx
· www.leastprivilege.com/WIFConfigurationNdashPart2SecurityTokenHandlerConfiguration.aspx
· www.leastprivilege.com/WIFConfigurationNdashPart3Extensibility.aspx
Transforming and Accessing Claims
Adding claims transformation to a WCF service is a matter of deriving from ClaimsAuthenticationManager and implementing the Authenticate method. (See the previous explanation of claims transformation.)
After that, you can register the authentication manager using configuration (or code):
<microsoft.identityModel>
<service>
<claimsAuthenticationManager type=»MyAuthenticationManager, Assembly» />
</service>
</microsoft.identityModel>
Claims Transformation
I typically start by defining what the client identity should “look like” — in other words, on which claims the service or business logic can rely. I then make sure that the ClaimsAuthenticationManager can provide exactly these claims; otherwise, the request should fail.
This also involves removing claims that are not needed (or even better, creating a new principal with exactly the required claims that you have defined earlier).
Also, try to keep the claim set as minimal as possible — just enough claims so that the service can do its work. Remember that you also have the ClaimsAuthorizationManager abstraction that provides a lot of flexibility to couple authorization information with a principal.
The claims collection on IClaimsIdentity was explicitly designed to be LINQ-friendly. This enables you to use the query syntax or the extensions methods to query claims, and provides a lot of expressiveness.
I prefer the extensions methods because it is easy to clearly state your expectations. For example, the following query demands an e-mail claim to be present:
var email = id.Claims.First(c => c.ClaimType == ClaimTypes.Email);
You can even go one step further and demand that a claim exists only once in the claims collection. Being that explicit might reveal bugs in complex transformation scenarios in early stages:
var dob = id.Claims.Single(c => c.ClaimType == ClaimTypes.DateOfBirth);
You can also build convenience wrappers around the LINQ queries. When you have a look at the Thinktecture.IdentityModel library that is part of the code available for download from this book’s website (www.wrox.com), you can see a couple of extension methods for IClaimsPrincipal andIClaimsIdentity that give you methods such as FindClaims, GetClaimValue, DemandClaim, and so on.
Accessing Claims
It’s okay for low-level code like transformation or authorization (and sometimes façades) to work directly on the IClaimsPrincipal.
Business code should use an abstraction like a User class with properties that, in turn, queries the claims collection. This way, the technical details don’t blur into your business logic, and you can also change the underlying implementation independently of the business code (and vice versa).
Also, keep in mind that you might want to inject principals in your code to make unit testing easier.
Authorization
You have already learned about the concept of claims-based authorization in WIF. You add an authorization manager either via code or configuration, as shown here:
<microsoft.identityModel>
<service>
<claimsAuthorizationManager type=»MyAuthorizationManager, Assembly» />
</service>
</microsoft.identityModel>
From that point on, your authorization manager will be automatically called on a per-request basis. The authorization context will be populated with the SOAP action as the action, and the endpoint address as the resource. For REST services, it will be the HTTP verb as the action, and the resource URL as the resource. In all cases, these are represented as single-name claims.
This enables doing coarse-grained authorization based on the endpoint and operation the client tries to call. When you return false from the CheckAccess method, a SecurityException is triggered. WCF automatically translates security exceptions into an access-denied fault message. On the WCF client side, these types of fault messages are turned into a SecurityAccessDeniedException that the client can explicitly catch.
Those who know about the underlying native WCF ServiceAuthorizationManager, also know that this mechanism enables inspecting the contents of the incoming message during per-request authorization. This feature was rarely used and didn’t make it in the WIF authorization abstraction. If you need this feature, have a look at the Thinktecture.IdentityModel library, which contains a sample of how to resurface message inspection.
For triggering the authorization manager from within your code, WIF has the ClaimsPrincipalPermission class (and a corresponding attribute as well). The attribute is similar to per-request authorization — the authorization manager is called automatically when the client invokes the operation. But you have control over the values for action and resource.
If you need more fine-grained control over resources and actions, you can use ClaimsPrincipalPermission.CheckAccess. This method wraps the resource and action into name claims, and passes them on as an authorization context to the registered authorization manager. In the case of a negative outcome, a SecurityException fires.
The built-in WIF API for authorization has two shortcomings:
· Because per-request authorization and calls to ClaimsPrincipalPermission both generate name claims, it is tedious to distinguish between them in your authorization manager code.
· CheckAccess always triggers a SecurityException when authorization fails. A way to branch code using a Boolean return value is missing.
You can work around both issues thanks to the WIF extensibility model.
The key to all customizations and domain-specific additions you want to make to authorization is grabbing the registered authorization manager and calling the CheckAccess method yourself. This enables you to create your own AuthorizationContext object, which, in turn, gives you full control over shape and form of your action and resource claims.
WIF puts an instance of the current configuration onto a message property called ServiceConfiguration. From there, you can reach into the ClaimsAuthorizationManager. Listing 10.10 shows an example.
Listing 10.10: Accessing WIF Configuration (Works in Both WCF and ASP.NET)
public static class IdentityModelConfiguration
{
/// <summary>
/// Gets the current WIF service configuration.
/// </summary>
/// <value>The service configuration.</value>
public static ServiceConfiguration ServiceConfiguration
{
get
{
if (OperationContext.Current == null)
{
// no WCF
return FederatedAuthentication.ServiceConfiguration;
}
// search message property
if (OperationContext.Current.IncomingMessageProperties
.ContainsKey(«ServiceConfiguration»))
{
var configuration = OperationContext.Current
.IncomingMessageProperties[«ServiceConfiguration»]
as ServiceConfiguration;
if (configuration != null)
{
return configuration;
}
}
// return configuration from configuration file
return new ServiceConfiguration();
}
}
}
Code file [IdentityModelConfiguration.cs] available for download at Wrox.com.
Invoking CheckAccess is now a matter of the following:
var authZ =
IdentityModelConfiguration.ServiceConfiguration.ClaimsAuthorizationManager;
if (authZ.CheckAccess(…))
{
// code
}
The Thinktecture.IdentityModel library contains code to further customize authorization based on this sample. This makes it easy to use claim types from namespaces that you control, thus making them easy to spot inside the authorization manager.
A well-hidden feature of WIF is that some parts of the configuration system can be extended. This also applies to claims authorization. It is possible to append an arbitrary XML fragment to the <claimsAuthorizationManager /> section. This way, you can declaratively pass in a hint to an authorization policy file, or add some other configuration entries. The WIF SDK has a sample that shows how to append an authorization policy that can be parsed at startup time (see Samples\Extensibility\Claims Based Authorization).
Tracing
Tracing in WCF is essential for troubleshooting. WIF adds a new trace source that you should absolutely enable during development and for testing.
You can register for the trace source using the following configuration snippet:
<system.diagnostics>
<source name=»Microsoft.IdentityModel»
switchValue=»Verbose» >
<listeners>
<add name=»IdentityModelTraceListener» />
</listeners>
</source>
</sources>
<sharedListeners>
<add initializeData=»wif.svclog»
type=»System.Diagnostics.XmlWriterTraceListener, System,
Version=4.0.0.0,
Culture=neutral,
PublicKeyToken=b77a5c561934e089″
name=»IdentityModelTraceListener»
traceOutputOptions=»Timestamp»>
</add>
</sharedListeners>
<trace autoflush=»true» />
</system.diagnostics>
Possible Solutions for Securing the Movie Database SOAP Service
To see WIF in action, use the movies WCF service from Chapter 9 to add some security features. Start with an intranet-based scenario and later add federation.
The movie service has three types of clients:
· A website that uses the back-end services to provide read-only content to browser-based users.
· Internal users who must view, review, update, and create new content.
· At a time, certain movie genres will be outsourced to external content providers. These external providers can directly add content to the system using the WCF services.
The first two client types use Windows authentication to access the movie services. The external providers get access via a federation gateway using SAML tokens.
Internal Users
For enabling internal users, the course of events is as follows:
1. Add a service endpoint that does Windows authentication.
2. Enable and configure WIF.
3. Establish an identity via claims transformation.
4. Add authorization instrumentation and policy.
Adding Windows Authentication
The first step is to add a Windows authenticated endpoint to the movies service. Use mixed-mode security with a disabled session for that. That means you must first enable SSL. Exactly how this works depends on the hosting environment. You either have to bind SSL to an endpoint using IIS, or use the netsh command-line tool for self-hosting. In the case of self-hosting, you must also add a new base address to the WCF configuration:
<service name=»MovieService» behaviorConfiguration=»soapBehavior»>
<host>
<baseAddresses>
<add baseAddress=»net.tcp://localhost:7776″/>
<add baseAddress=»http://localhost:8888″/>
<add baseAddress=»https://localhost:8889″/>
</baseAddresses>
</host>
</service>
To add the actual endpoint, you must add code to the MoviesServiceFactory in the SetupMoviesServiceHost method:
var secureIntranetBinding = new WS2007HttpBinding(SecurityMode.
TransportWithMessageCredential);
secureIntranetBinding.Security.Message.ClientCredentialType =
MessageCredentialType.Windows;
secureIntranetBinding.Security.Message.EstablishSecurityContext = false;
host.AddServiceEndpoint(
typeof(IMovieService),
secureIntranetBinding,
«binary»);
To see if the client is actually authenticated, add a bit of tracing code to MovieService in the ListMovies method:
public List<MovieData> ListMovies(PagedDataRequest request)
{
trace.TraceEvent(TraceEventType.Information, 0, «List Movies…»);
if (Thread.CurrentPrincipal.Identity.IsAuthenticated)
{
var info = string.Format(«{0} ({1})»,
Thread.CurrentPrincipal.Identity.Name,
Thread.CurrentPrincipal.Identity.GetType().Name);
trace.TraceInformation(info);
}
else
{
trace.TraceInformation(«Anonymous request»);
}
// rest omitted
}
The next step is to change the Windows client to use the authenticated endpoint. This means that you must add the same binding to the client configuration, as well as change the endpoint address the client uses:
<client>
<endpoint name=»default»
address=»https://localhost:8889/binary»
binding=»ws2007HttpBinding»
bindingConfiguration=»IntranetSecure»
contract=»MovieServiceContracts.IMovieService» />
</client>
…
<ws2007HttpBinding>
<binding name=»IntranetSecure»>
<security mode=»TransportWithMessageCredential»>
<message clientCredentialType=»Windows»
establishSecurityContext=»false» />
</security>
</binding>
</ws2007HttpBinding>
That’s it! When you now run the client, the service can trace the client’s Windows account name in the ListMovies call. But when you have a closer look at the Common Language Runtime (CLR) type of the client identity, you see WindowsIdentity.
To get claims, the last step is to enable WIF. Insert a call to FederatedServiceCredentials.ConfigureServiceHost(host) into the host (or the host factory for IIS hosting). When you rerun the client, the identity is now of type WindowsClaimsIdentity (which means WIF is doing its work).
Claims Transformation
The next step is to establish an identity for the client that the service can rely on. This is done in the claims authentication manager. For this scenario, the identity of the clients should have the claims shown in Table 10.1.
Table 10.1 Client Identity
|
Claim |
Description |
|
Name |
Name of the client. |
|
Company |
Identifier for an external content provider. “Internal” refers to internal users. |
|
Role |
A user can have the following roles: Viewer, Reviewer, and Author. |
|
Genre |
Optionally, a user can be restricted to work only on specific genres (only relevant for reviewers and authors). Internal users have access to all genres by default. |
In the case of Windows users, you expect certain groups in Active Directory (AD) to be in place. The claims transformation process then parses these group memberships and turns them into application roles.
As shown in Listing 10.11, the implementation of ClaimsAuthenticationManager distinguishes between internal users and external ones. You add the logic for external users in a later step.
Listing 10.11: ClaimsAuthenticationManager
public class ClaimsTransformer : ClaimsAuthenticationManager
{
public override IClaimsPrincipal Authenticate(string resourceName,
IClaimsPrincipal incomingPrincipal)
{
// internal user
var windowsUser = incomingPrincipal.Identity as WindowsClaimsIdentity;
if (windowsUser != null)
{
return CreatePrincipalForWindowsUser(windowsUser);
}
return base.Authenticate(resourceName, incomingPrincipal);
}
private IClaimsPrincipal
CreatePrincipalForWindowsUser(WindowsClaimsIdentity windowsUser)
{
var claims = new List<Claim>
{
new Claim(ClaimTypes.Name, windowsUser.Name),
new Claim(MovieClaimTypes.Company, «Internal»)
};
using (var principal = new WindowsClaimsPrincipal(windowsUser))
{
// check Windows groups and turn them into roles
if (principal.IsInRole(«Users»))
{
claims.Add(new Claim(ClaimTypes.Role, «Viewer»));
}
if (principal.IsInRole(«MovieAuthors»))
{
claims.Add(new Claim(ClaimTypes.Role, «Author»));
}
if (principal.IsInRole(«MovieReviewers»))
{
claims.Add(new Claim(ClaimTypes.Role, «Reviewer»));
}
}
// internal users have access to all genres
claims.Add(new Claim(MovieClaimTypes.Genre, «All»));
return ClaimsPrincipal.CreateFromIdentity(new ClaimsIdentity(claims));
}
}
Because all information is extracted directly from the Windows token and no database round trips are necessary here, there is no need for a caching layer.
Authorization
After you establish a security context and identity for the current user, you can annotate your code with authorization requirements.
At a coarse-grained level, you can either use the per-request authorization or add authorization attributes to the service façade — this gives you “is the user allowed to call this operation” semantics. Use the imperative approach described earlier when you need more detailed information before you call the authorization manager. Listing 10.12 shows an example.
Listing 10.12: Service Façade with Authorization Annotations
[ApplicationClaimPermission(SecurityAction.Demand,
Operation = «Add»,
Resource = «Movie»)]
public void AddMovie(MovieDetailsData movie)
{ … }
[ApplicationClaimPermission(SecurityAction.Demand,
Operation = «List»,
Resource = «Movie»)]
public List<MovieData> ListMovies(PagedDataRequest request)
{ … }
[ApplicationClaimPermission(SecurityAction.Demand,
Operation = «GetDetails»,
Resource = «Movie»)]
public MovieDetailsData GetMovie(string movieId)
{ … }
The access control for genres is an example for an authorization decision that needs more knowledge than that the user is invoking a certain operation. In this case, the ListMovies operation would probably use the genre’s claims to construct a query. The GetMovie and AddMovie operations, in turn, would return an Access Denied message when users try to request or add a movie that they are not authorized for. Listing 10.13 shows how to do this.
Listing 10.13: Sample Imperative Authorization
[ApplicationClaimPermission(SecurityAction.Demand,
Operation = «GetDetails»,
Resource = «Movie»)]
public MovieDetailsData GetMovie(string movieId)
{
trace.TraceEvent(TraceEventType.Information, 0, «Get Movie…»);
try
{
var movie = movieManager.GetMovie(movieId).MapAll();
// check if user is allowed
var genreClaim = new Claim(
Constants.ClaimTypes.Genre, movie.Genre);
if (ApplicationClaimPermission.CheckAccess(
Constants.Actions.GetDetails,
Constants.Resources.Genre, genreClaim))
{
return movie;
}
trace.TraceEvent(TraceEventType.Error, 401, string.Format(
«Authorization failed for user: {0} / genre: {1}»,
Thread.CurrentPrincipal.Identity.Name,
movie.Genre));
throw new SecurityException();
}
catch (MovieNotFoundException mnfex)
{
trace.TraceEvent(TraceEventType.Error, 0, mnfex.Message);
throw new FaultException<NoSuchMovieFault>(
new NoSuchMovieFault { MovieId = movieId });
}
}
Listing 10.14 shows a simple implementation of an authorization manager that enforces the access policy.
Listing 10.14: Authorization Manager
public class AuthorizationManager : ClaimsAuthorizationManager
{
public override bool CheckAccess(AuthorizationContext context)
{
// distinguish between per-request authZ and app authZ
if (!IsApplicationAuthorization(context))
{
return base.CheckAccess(context);
}
// check which resource the client tries to access
var resource = context.Resource.First().Value;
switch (resource)
{
case Constants.Resources.Movies:
return AuthorizeMovieAccess(
context.Action, context.Principal);
case Constants.Resources.Genre:
var genre = context.Resource.First(c =>
c.ClaimType == Constants.ClaimTypes.Genre).Value;
return AuthorizeGenreAccess(genre, context.Principal);
}
return false;
}
private bool IsApplicationAuthorization(
AuthorizationContext context)
{
return (context.Action.FirstOrDefault(claim =>
claim.ClaimType == ApplicationClaimPermission.ActionType)
!= null);
}
private bool AuthorizeMovieAccess(
Collection<Claim> actions, IClaimsPrincipal principal)
{
var action = actions.First().Value;
switch (action)
{
case Constants.Actions.List:
return principal.IsInRole(Constants.Roles.Viewer);
case Constants.Actions.GetDetails:
return principal.IsInRole(Constants.Roles.Viewer);
case Constants.Actions.Add:
return principal.IsInRole(Constants.Roles.Author);
}
return false;
}
private bool AuthorizeGenreAccess(
string genre, IClaimsPrincipal principal)
{
if (principal.ClaimExists(Constants.ClaimTypes.Genre, «All»))
{
return true;
}
return principal.ClaimExists(
Constants.ClaimTypes.Genre, genre);
}
}
Adding an External Content Provider
Because WCF and WIF also support SAML tokens, it is easy to grant external users access to the movie service. This is typically accomplished by providing a federation gateway that the external parties can use to request a token for the services they want to access. In a Microsoft-oriented environment, the Active Directory Federation Services 2 (ADFS 2) product would be such a federation gateway.
The setup and configuration of ADFS 2 is out of scope of this book, and actually not relevant. But some interesting points affect the service design:
· External partners use the federation gateway to request a token for the service.
· The federation gateway knows who the external partner is and has rules for how to transform the incoming claims to claims that the service can process.
· The gateway can generate a token with the following claims:
o A claim containing the unique username of the external client
o A claim containing the company name (or identifier)
· The service transforms these incoming claims to the client identity the service code expects. This can, for example, involve querying a database to query the roles and to find out which genres the external user has access to.
This way, you can provision external users with minimal effort. As you’ll see, you’ll have to slightly modify only the claims transformation logic. All the service and authorization code can stay the same. Compared to “traditional” approaches, this is a huge simplification.
Adding the Service Endpoint for External Users
For accepting issued tokens, you must add a new endpoint in the service host factory. This endpoint advertises the address of the federation gateway in its metadata so that the external clients know how to request tokens for the service:
// endpoint for external users
var fedEndpoint = new
EndpointAddress(«https://gateway/adfs/services/trust/mex»);
var externalBinding = new WS2007FederationHttpBinding(
WSFederationHttpSecurityMode.TransportWithMessageCredential);
externalBinding.Security.Message.EstablishSecurityContext = false;
externalBinding.Security.Message.IssuerMetadataAddress = fedEndpoint;
host.AddServiceEndpoint(
typeof(IMovieService),
externalBinding,
«issuedtokens»);
Next, you must configure WIF so that it can process the issued tokens. This involves the following:
· Registering the federation gateway as a trusted issuer of tokens. This is accomplished using the issuer name registry mechanism of WIF.
· Specifying a certificate for decrypting incoming tokens. For example, this could be the SSL certificate.
· Specifying allowed audience URIs. This is a value that must be coordinated between the federation gateway, the service, and the client. Think of it as a logical (sometimes also physical) name for the service.
Consider the following example:
<microsoft.identityModel>
<service>
<claimsAuthenticationManager type=»Security.ClaimsTransformer,
SecurityPlumbing»/>
<claimsAuthorizationManager type=»Security.AuthorizationManager,
SecurityPlumbing»/>
<!— audience URI of movie service application —>
<audienceUris>
<add value=»https://moviedb/» />
</audienceUris>
<!— certificate for token decryption —>
<serviceCertificate>
<certificateReference storeLocation=»LocalMachine»
storeName=»My»
x509FindType=»FindBySubjectDistinguishedName»
findValue=»CN=Service» />
</serviceCertificate>
<!— registers the federation gateway as a trusted token issuer —>
<issuerNameRegistry type=»Microsoft.IdentityModel.Tokens.
ConfigurationBasedIssuerNameRegistry,
Microsoft.IdentityModel, Version=3.5.0.0,
Culture=neutral, PublicKeyToken=31bf3856ad364e35″>
<trustedIssuers>
<add thumbprint=»d1 c5 b1 25 97 d0 36 94 65 1c e2 64 fe 48 06
01 35 f7 bd db»
name=»FederationGateway» />
</trustedIssuers>
</issuerNameRegistry>
<!— only federation gateway allowed anyways, so no extra certificate
validation —>
<certificateValidation certificateValidationMode=»None» />
</service>
</microsoft.identityModel>
Adjusting Claims Transformation
The only code modification you must make is in the claims authentication manager. Two things need to happen here:
· It is mandatory that external users have a username and a company claim.
· Role information and allowed genres for external users are stored in a database. This information must be turned into claims.
From a service and business logic point of view, there is no difference between internal and external users now.
The new authentication manager looks like this (with parts removed):
public class ClaimsTransformer : ClaimsAuthenticationManager
{
TraceSource trace = new TraceSource(«mdb.Movies»);
public override IClaimsPrincipal Authenticate(
string resourceName, IClaimsPrincipal incomingPrincipal)
{
trace.TraceInformation(«Client: » + incomingPrincipal.Identity.Name);
// internal user
var windowsUser = incomingPrincipal.Identity as WindowsClaimsIdentity;
if (windowsUser != null)
{
trace.TraceInformation(«internal user»);
return CreatePrincipalForWindowsUser(windowsUser);
}
trace.TraceInformation(«external user»);
return CreatePrincipalForExternalUser(resourceName, incomingPrincipal);
}
private IClaimsPrincipal CreatePrincipalForExternalUser(
string resourceName, IClaimsPrincipal incomingPrincipal)
{
// make sure required claims exist
var name = incomingPrincipal.GetClaimValue(ClaimTypes.Name);
var company = incomingPrincipal.GetClaimValue
(Constants.ClaimTypes.Company);
var claims = new List<Claim>
{
new Claim(ClaimTypes.Name, name),
new Claim(Constants.ClaimTypes.Company, company)
};
GetRolesForUser(name, company).ForEach(
role => claims.Add(new Claim(ClaimTypes.Role, role)));
GetGenresForUser(name, company).ForEach(
genre => claims.Add(new Claim(Constants.ClaimTypes.Genre, genre)));
return ClaimsPrincipal.CreateFromIdentity(new ClaimsIdentity(claims));
}
}
The Client
Because of the design of the movie service client, all WCF specifics are encapsulated in the service agent library. This is where you add the code for token-based authentication.
The logic for setting up the communication channel to the service is as follows:
1. The client authenticates with its local identity provider and requests a token. This is done using Windows authentication.
2. The client then uses its identity token to request a service token from the federation gateway.
3. The service token is attached to the service channel factory, which, in turn, generates the client proxy.
WIF includes the necessary plumbing to request tokens from token services. It is implemented as a specialized WCF channel factory called WSTrustChannelFactory. For attaching tokens to service channels, WIF also includes extension methods that make this operation simple. The initialization could look as follows:
public class MovieClient : IMovieClient, IDisposable
{
public MovieClient()
{
// request token from idp (windows authentication)
var idpToken = GetIdPToken();
// request token from federation gateway (using idp token)
var serviceToken = GetServiceToken(idpToken);
// setting up channel factory
var movieServiceClientFactory = new
ChannelFactory<IMovieServiceChannel>(«default»);
movieServiceClientFactory.ConfigureChannelFactory();
movieServiceClientFactory.Credentials.SupportInteractive = false;
movieServiceClient = movieServiceClientFactory
.CreateChannelWithIssuedToken<IMovieServiceChannel>(serviceToken);
}
private SecurityToken GetIdPToken()
{
var factory = new WSTrustChannelFactory(
new WindowsWSTrustBinding(SecurityMode.TransportWithMessageCredential),
new EndpointAddress(idpUrl));
factory.TrustVersion = TrustVersion.WSTrust13;
var rst = new RequestSecurityToken
{
RequestType = RequestTypes.Issue,
AppliesTo = new EndpointAddress(fedGwUrl),
KeyType = KeyTypes.Symmetric
};
var channel = factory.CreateChannel();
return channel.Issue(rst);
}
private static SecurityToken GetServiceToken(SecurityToken idpToken)
{
var binding = new IssuedTokenWSTrustBinding();
binding.SecurityMode = SecurityMode.TransportWithMessageCredential;
var factory = new WSTrustChannelFactory(
binding,
fedGwUrl);
factory.TrustVersion = TrustVersion.WSTrust13;
factory.Credentials.SupportInteractive = false;
var rst = new RequestSecurityToken
{
RequestType = RequestTypes.Issue,
AppliesTo = new EndpointAddress(realm),
KeyType = KeyTypes.Symmetric
};
factory.ConfigureChannelFactory();
var channel = factory.CreateChannelWithIssuedToken(idpToken);
return channel.Issue(rst);
}
}
Assessing the Solution
You have just seen that you can add claims-based identity to an existing service without having to do major surgery on the architecture or code structure. This provides the benefit of having a more expressive representation of identity, as well as the decoupling of authorization from business logic flow.
As a “side effect,” it was easy adding support for external users and third-party authentication.
Possible Solutions for Securing the Movie Database REST Service
The (security) situation is a little different in the REST world (and I use this term in a fuzzy way) compared to SOAP. SOAP has WS-Security, which is a powerful (sometimes too powerful) protocol for authentication and message protection. On the other hand, REST has no standard mechanisms that go beyond standard HTTP-based authentication (for example, basic authentication — maybe Windows authentication for certain scenarios). Still, you can use WIF to move your REST services to the claims-based model.
In the spirit of the last section, start with securing the REST service using Windows authentication. Then move to custom authentication methods (such as SAML), which is a great opportunity to show you how to use the WIF core API to claims-enable service scenarios not supported out-of-the-box.
Internal Users
The good news is that WIF supports WCF REST services with HTTP authentication out-of-the-box. That means that you can reuse all the code and infrastructure you created earlier.
All you must do is enable Windows authentication on the binding and WebClient, and enable WIF in the web service host. From that point, your claims transformation code for Windows clients will be called, and the same authorization manager will be invoked. Job done!
If you don’t like to share these components between your services, you don’t have to, of course. In this case, you can use the <service /> element in the WIF configuration to create several named independent configuration settings. The call to ConfigureServiceHost has an overload that accepts the name of such a named configuration.
Token-Based Authentication
As stated earlier, there are no real standards around token-based authentication and REST services. But most authentication schemes out in the wild have one thing in common. The authentication information (from simple username/password to tokens) is typically transmitted using the HTTP authorization header.
The exact layout of that header (such as token format or encoding) is often simply defined by the service provider. Because there are no clear standards at the moment, WIF does not include direct support for these “homegrown” authentication handshakes, but the WIF API can be used to implement the support yourself. For the purpose of this example, add support for a SAML bearer token.
A number of emerging standards exist for token-based authentication for REST services. The most promising and complete seems to be OAuth 2, which is currently under development. As soon as the specifications are finalized, it is expected that WIF will also directly support these new protocols.
In a nutshell, following are the necessary steps to add your own SAML support to a WCF web service host:
1. Parse the incoming HTTP request, and extract the authorization header.
2. Extract the SAML token from the header, and validate it.
3. Turn the token into an IClaimsPrincipal, and set Thread.CurrentPrincipal.
4. Wrap this functionality in a WCF ServiceAuthorizationManager.
5. Wrap the authorization manager in a service host and factory.
This sounds like a lot of work, but luckily most of the heavy lifting is done by WIF. You need to provide only the header parsing code and the plumbing; WIF takes care of all token-related processing. Again, you can also share your claims transformation and authorization code.
A (shortened) version of such an ServiceAuthorizationManager could look like this:
public class FederatedWebServiceAuthorizationManager
: ServiceAuthorizationManager
{
protected override bool CheckAccessCore(OperationContext operationContext)
{
var properties = operationContext.ServiceSecurityContext
.AuthorizationContext.Properties;
var to = operationContext.IncomingMessageHeaders.To.AbsoluteUri;
// parse HTTP header and turn SAML token into IClaimsPrincipal
IClaimsIdentity identity;
if (TryGetIdentity(out identity))
{
// call claims transformation and set the IClaimsPrincipal
var principal = _configuration.ClaimsAuthenticationManager
.Authenticate(
to,
ClaimsPrincipal.CreateFromIdentity(identity));
properties[«Principal»] = principal;
// call claims authorization manager
return CallClaimsAuthorization(principal, operationContext);
}
else
{
SetUnauthorizedResponse();
return false;
}
}
Turning the SAML token string into an IClaimsPrincipal is accomplished with the help of WIF’s security token handlers:
private IClaimsIdentity GetSamlIdentityFromHeader(string header)
{
var token = header.Substring(«SAML access_token=».Length);
var samlToken = _configuration.SecurityTokenHandlers.ReadToken(
new XmlTextReader(new StringReader(token)));
return _configuration.SecurityTokenHandlers.ValidateToken(samlToken).First();
}
On the client side, you can reuse the code for requesting tokens for the SOAP service. The only difference is that you must request a bearer token (see the movie sample client). This token then must be placed on the authorization header so that the service-side plumbing can pick it up.
Also, look at the samples called “REST” and “OData” in the Thinktecture.IdentityModel library.
Summary
This chapter was a whirlwind tour through several important security topics: WCF security, claims-based identity, and federation.
WCF is the foundation for everything here. It provides the runtime and messaging system, as well as the hooks to extract security information from incoming messages. WCF also has the federation functionality already built in, but it isn’t accessible and easy to use all the time.
WIF sits on top of WCF and makes claims a first-class citizen via the IClaimsPrincipal abstraction. It furthermore streamlines the WCF security stack by providing more easy-to-use hooks in the form of security token handlers. And, finally, WIF adds the concepts of claims transformation and claims-based authorization.
As you have seen, when used in combination, this allows building logic on a nice abstraction layer so that even onboarding the external users could be accomplished with minimal code changes (and zero code changes to the actual business logic).
You should always use WIF when building distributed systems — federated or not. The claims-based model provides more expressiveness and better abstractions than the native WCF security system. It also makes you ready for whatever security scenarios you might have to implement in the future.
About the Author
Dominick Baier is an internationally recognized expert on security of .NET and Windows applications. He supports companies worldwide with design and implementation of security features in their software as a security consultant at thinktecture (www.thinktecture.com). As one of the few “Developer Security” Microsoft MVPs, he works directly with various security teams in Redmond, Washington. Offshoots of this cooperation are the books Developing More Secure Microsoft ASP.NET 2.0 Applications (Redmond, Washington: Microsoft Press, 2006) and Guide to Claims—based Identity & Access Control (Redmond, Washington: Microsoft Press, 2010). Baier also leads the security, WCF, and Azure curriculum at DevelopMentor (www.develop.com). You can find a wealth of security-related resources, as well as conference slide decks and tools/sample code, at his blog atwww.leastprivilege.com.
