
How to Check Connected USB Devices in Windows 11
Windows 11 has introduced several improvements and features that enhance user experience, making tasks like managing USB devices easier and more efficient. USB devices are essential in our daily activities; from keyboards, mice, and external hard drives to smartphones and cameras, they connect seamlessly to our PCs. Occasionally, users need to monitor or troubleshoot these devices, whether for identity confirmation, performance issues, or security concerns. In this guide, you will learn various methods to check connected USB devices in Windows 11.
Understanding USB Devices
Before diving into the process of checking connected USB devices, it’s important to understand what they are and how they operate. USB (Universal Serial Bus) is an industry standard that allows communication between devices and a host controller, such as a computer. USB devices can be classified into several categories, including:
- Storage Devices: Flash drives, external hard drives, and SSDs.
- Input Devices: Keyboards and mice.
- Output Devices: Printers and scanners.
- Multimedia Devices: Cameras, microphones, and speakers.
- Networking Devices: USB Wi-Fi adapters and Ethernet adapters.
Having a grasp of these categories can help you identify problems when they arise, as it will also make troubleshooting much easier.
Method 1: Using Device Manager
Device Manager is a built-in Windows tool that allows users to manage hardware devices and their drivers.
-
Accessing Device Manager:
- Right-click on the Start Menu.
- Select Device Manager from the list.
-
Finding USB Devices:
- In Device Manager, expand the category labeled Universal Serial Bus controllers.
- You will see a list of all USB drivers relating to connected devices. Each entry corresponds to a USB port or device.
-
Checking Device Status:
- Right-click on any USB entry and select Properties to view detailed information, including status, driver details, and power management options.
This method enables you to see all USB devices connected to your computer, including those that may not be functioning properly.
Method 2: Using Windows Settings
Windows 11 has revamped settings that allow users to view connected devices easily.
-
Accessing Windows Settings:
- Click on the Start Menu and select Settings (the gear icon).
- Navigate to Devices in the sidebar.
-
Viewing Connected Devices:
- Under the Bluetooth & devices section, you’ll see connected devices, including USB keyboards, mice, and other accessories.
-
Managing Device Options:
- Click on the individual devices listed to see more options. From there, you can modify settings or remove the device.
This method is straightforward and user-friendly, making it easy for users who prefer a graphical interface.
Method 3: Using the Command Prompt
For advanced users, the Command Prompt can be a powerful tool to check for connected USB devices.
-
Opening Command Prompt:
- Press Windows + R to open the Run dialog box.
- Type
cmdand hit Enter.
-
Executing Commands:
- Type the following command and press Enter:
wmic path Win32_USBControllerDevice get /format:list - This command will provide a detailed list of USB devices connected to your computer.
- Type the following command and press Enter:
-
Analyzing the Output:
- The output will contain various details, including device IDs, names, and more. This information can be useful for detailed inspections and troubleshooting.
Using the Command Prompt provides comprehensive details that are beneficial for users who require precise information for troubleshooting.
Method 4: Using PowerShell
PowerShell offers more advanced scripting capabilities and can also list USB devices.
-
Launching PowerShell:
- Search for PowerShell using the Start Menu and open it.
-
Running the Command:
- Execute the following command to list connected USB devices:
Get-PnpDevice -PresentOnly | Where-Object { $_.InstanceId -like "USB*" } - This command filters all connected devices to show only those using USB.
- Execute the following command to list connected USB devices:
-
Interpreting Results:
- The list will provide information similar to Device Manager but in a more script-oriented format.
PowerShell is suited for users who need more functionalities and command-line capabilities than traditional interfaces can offer.
Method 5: Third-Party Applications
If you prefer a more graphical interface with comprehensive details, consider using third-party applications. Software like USBDeview or HWMonitor can provide information regarding connected USB devices with more user-centric displays.
-
USBDeview:
- Download and install USBDeview from NirSoft or another trusted source.
- Launch the application, and it will automatically scan and list all USB devices currently connected to your computer.
-
HWMonitor:
- HWMonitor provides information on various computer components, including USB devices. Download and install the software, and look for USB devices under the connected categories.
Using third-party applications can enhance your ability to monitor and manage USB devices effectively, especially for users requiring advanced options and more detailed statistics.
Troubleshooting Common USB Issues
While checking connected USB devices, it may lead to discovering issues that require immediate attention. Here’s a list of common USB problems and their solutions:
- Device Not Recognized: Ensure the USB device is operational by testing it on another device. If the problem persists, try different USB ports or reboot your computer.
- Driver Problems: Navigate to Device Manager, right-click on the USB device, and select Update Driver to install the latest driver. If updating doesn’t work, consider uninstalling the device and rebooting your PC; Windows should automatically reinstall it.
- Power Issues: USB devices may draw excessive power. Using a powered USB hub can solve this. Check the power management settings in Device Manager by right-clicking on your USB Controller and ensuring that the option to «Allow the computer to turn off this device to save power» is unchecked.
Securing your USB Connections
Security is a crucial aspect when it comes to using USB devices, particularly with removable media. Here’s how you can enhance security for your USB devices:
- Use Antivirus Software: Install a reputable antivirus program that checks USB devices when connected.
- Encrypt Sensitive Data: If you’re using USB drives for sensitive data, consider encrypting the data. Tools like BitLocker or third-party encryption software can protect your files.
- Disable USB Ports: If necessary, you can disable unused USB ports through BIOS settings or through group policy settings in Windows, ensuring that unauthorized devices cannot connect.
Conclusion
Managing USB devices in Windows 11 can be straightforward with various built-in tools and additional third-party software options. Whether you’re a casual user or a seasoned tech enthusiast, understanding how to check and troubleshoot USB devices can significantly enhance your user experience and maintain the security of your systems. Employ these methods to manage your USB devices effectively, and remember to keep security at the forefront of your USB usage practices. With knowledge and the right tools, you can easily navigate the connected USB landscape in your Windows 11 environment.
Если вам требуется узнать, какие устройства подключены с использованием USB в Windows 10 или предыдущих версиях системы, диспетчер устройств — не самый удобный инструмент для этого, однако существуют сторонние утилиты, которые позволяют быстро получить список всех таких устройств: как подключенных вами внешних, так и «внутренних», использующих тот же интерфейс (например, тачпад, камера, кард-ридер на ноутбуке).
В этом обзоре о двух простых утилитах для получения списка USB устройств вашего компьютера в Windows 10, 8.1 или Windows 7 — обе программы бесплатные и от одного разработчика. Эти же инструменты могут быть полезны для решения некоторых распространенных проблем, например, чтобы выяснить, что вызывает постоянный звук отключения и подключения устройства.
- USB Devices View
- USB Drive Log
- Видео
USBDeview
Первая из программ — USBDeview, доступная для скачивания на официальном сайте https://www.nirsoft.net/utils/usb_devices_view.html (на той же странице есть файл русского языка для программы, достаточно скопировать его в папку с исполняемым файлом программ).
USBDeview не требует установки на компьютер — достаточно распаковать архив в удобное расположение и запустить утилиту.
- Сразу после запуска вы увидите список всех обнаруженных в системе USB-устройств (не только подключенных в настоящий момент, но и ранее подключавшихся к компьютеру), при этом активные в настоящий момент будут выделены зелёным цветом.

- По двойному клику на любое из устройств вы можете получить подробную информацию о нём — используемый драйвер, дату первого подключения, путь к экземпляру устройства и другие.

- Открыв контекстное меню устройства, вы можете выполнить дополнительные действия: например, запретить его подключение в дальнейшем, изменить букву диска, если речь идёт о накопителе, открыть раздел реестра, где заданы параметры этого устройства.


Дополнительно в программе поддерживается экспорт списка выбранных устройств, перезапуск USB-концентратора (может быть полезно при решении проблем с подключенным устройством), быстрый переход к окну свойств устройства в диспетчере устройств Windows.
USBDriveLog
USBDriveLog от NirSoft доступна для скачивания на странице https://www.nirsoft.net/utils/usb_drive_log.html, там же вы найдёте файл с русским языком интерфейса, его использование аналогично таковому для предыдущей программы.
В отличие от USBDeview в USBDriveLog отображаются только USB-накопители: флешки и внешние жесткие диски или SSD, как подключенные в настоящий момент времени, так и ранее подключавшиеся к этому компьютеру или ноутбуку.

По двойному нажатию по любому накопителю вы можете получить более подробную информацию, например дату и время подключения и отключения.

Утилита проще, чем предыдущая, но тоже может оказаться полезной. К сожалению, удалить ранее подключавшиеся устройства с её помощью не получится, но для этой цели существуют другие инструменты, описывавшиеся в инструкции Что делать, если компьютер не видит флешку.
Видео
In the world of technology, USB devices play a vital role in connecting various peripherals to our computers. Whether it’s a mouse, keyboard, external hard drive, or a printer, managing these devices efficiently in Windows 10 is essential for smooth operations. In this article, we will explore how to check USB connections, utilize the Device Manager, and troubleshoot common issues that may arise with your computer peripherals.
Understanding USB Devices
USB (Universal Serial Bus) devices are hardware components that connect to computers through USB ports. They are designed to communicate with the computer and transfer data, power, or both. Common examples of USB devices include:
- USB Flash Drives
- External Hard Drives
- Printers
- Webcams
- Keyboards and Mice
- Audio Interfaces
Knowing how to check the status of these USB devices in Windows 10 is crucial for effective hardware management.
How to Check USB Connection in Windows 10
Checking the status of USB devices in Windows 10 can be done through a few simple steps. Here’s a detailed guide:
Step 1: Open Device Manager
The Device Manager is a built-in Windows tool that allows users to view and manage all hardware devices connected to their computers. To open it:
- Right-click on the Start button.
- Select Device Manager from the menu.
Step 2: Locate USB Devices
In the Device Manager, you’ll see a list of all the hardware components. To find your USB devices:
- Expand the section labeled “Universal Serial Bus controllers.”
- Here, you will see a list of all connected USB devices.
Step 3: Check Device Status
To check the status of a specific USB device:
- Right-click on the USB device you want to inspect.
- Select Properties from the context menu.
- In the Properties window, check the Device status under the General tab.
If the device is functioning properly, you’ll see a message stating, “This device is working properly.” If there is an issue, you may see an error message that can guide your troubleshooting efforts.
Troubleshooting USB Device Issues
Sometimes, USB devices may not function as expected. Here are some common troubleshooting tips:
1. Restart Your Computer
A simple restart can resolve many connectivity issues. Make sure to unplug the USB device, restart your computer, and then reconnect it.
2. Check the USB Port
Sometimes the problem lies with the USB port itself. Try connecting the device to a different USB port to see if it works.
3. Update Device Drivers
Outdated drivers can lead to connectivity issues. To update your drivers:
- Open the Device Manager.
- Right-click on the problematic USB device.
- Select Update driver.
- Choose Search automatically for updated driver software.
4. Uninstall and Reinstall the USB Device
If updating the driver doesn’t help, try uninstalling the device:
- In the Device Manager, right-click the USB device.
- Select Uninstall device.
- After uninstalling, disconnect the device and then reconnect it. Windows should reinstall the driver automatically.
5. Run the Hardware Troubleshooter
Windows 10 has a built-in troubleshooter that can help detect and fix hardware issues:
- Go to Settings > Update & Security > Troubleshoot.
- Select Additional troubleshooters.
- Run the Hardware and Devices troubleshooter.
Advanced USB Device Management Techniques
For advanced users, there are additional tools and methods to manage USB devices effectively:
Using Windows PowerShell
For tech enthusiasts, Windows PowerShell can provide detailed information about USB devices connected to your computer. To use PowerShell:
- Search for PowerShell in the Start menu and open it as an administrator.
- Enter the following command:
Get-PnpDevice -Class USB - This command will list all connected USB devices along with their status.
Third-Party Software
There are various third-party applications available that can provide more detailed analysis and management of USB devices. Some popular choices include:
- USBDeview – A small utility that lists all USB devices currently connected to your computer.
- PassMark USB 3.0 Performance Test – A tool to test the performance of USB devices.
Best Practices for USB Device Management
To ensure optimal performance and longevity of your USB devices, consider the following best practices:
- Safely Remove Hardware: Always eject USB devices using the “Safely Remove Hardware” option before unplugging them.
- Keep Drivers Updated: Regularly check for driver updates to ensure compatibility and performance.
- Use Quality Devices: Invest in high-quality USB devices from reputable manufacturers to avoid issues.
- Limit Power Usage: Be mindful of the number of devices connected, as too many can overload the USB power supply.
Conclusion
In conclusion, managing and troubleshooting USB devices in Windows 10 is an essential skill for anyone using a computer. From checking the USB connection through the Device Manager to troubleshooting issues and implementing best practices, understanding how to effectively manage your computer peripherals can enhance your productivity and ensure a smooth computing experience.
By following the steps outlined in this guide, you can confidently check and troubleshoot your USB connections, ensuring that your devices function optimally. Remember, whether you are a casual user or a tech enthusiast, staying informed about your hardware management practices will always serve you well.
For more tech tips and insights, feel free to explore our comprehensive guides on managing computer peripherals.
This article is in the category Tech Tips & Troubleshooting and created by USB C to HMDI Team
How to See USB Devices on Windows 10
If you’re trying to check which USB devices are connected to your Windows 10 computer, it’s pretty simple. You can use built-in tools to quickly spot them. This can help you troubleshoot issues or just keep track of what’s plugged in. Here’s a quick guide to get you started.
Following these steps will show you how to easily find a list of all USB devices currently connected to your Windows 10 machine.
Step 1: Open Device Manager
First, you need to open the Device Manager.
You can do this by right-clicking on the Start button and selecting «Device Manager» from the context menu. This tool displays all hardware currently installed on your computer.
Step 2: Expand the Universal Serial Bus Controllers Section
Next, expand the ‘Universal Serial Bus controllers’ section.
Click the arrow next to it. This will drop down a list of all the USB controllers and devices that are plugged in.
Step 3: Check for USB Devices
Look through the list for any unfamiliar or unrecognized devices.
Each of these entries represents a USB device connected to your computer. If you see anything you don’t recognize, you can right-click it and select ‘Properties’ to get more details.
Step 4: Use USBDeview for More Details (Optional)
For even more detailed information, you can use a third-party tool like USBDeview.
This free software gives you a more comprehensive list of USB devices, including those that were previously connected.
Step 5: Safely Remove Devices
If you need to unplug a device safely, you can do it from the Device Manager.
Right-click the device and select ‘Uninstall device’ to safely remove it from your computer before unplugging.
Once you complete these steps, you’ll have a clear view of all USB devices connected to your Windows 10 computer. This can help you troubleshoot issues or simply keep track of what’s connected.
Tips for Seeing USB Devices on Windows 10
- Keep Device Manager Handy: Pin Device Manager to your taskbar for easy access.
- Update Drivers: Make sure all your USB drivers are up to date to avoid compatibility issues.
- Use USBDeview: For more in-depth details, USBDeview is a handy tool.
- Unplug Safely: Always use the ‘Safely Remove Hardware’ option to avoid data loss.
- Check Device Properties: If a device isn’t working, check its properties for error messages.
Frequently Asked Questions
How do I open the Device Manager?
Right-click the Start button and select «Device Manager» from the menu.
What if a USB device isn’t showing up?
Try unplugging it and plugging it back in, or check if the device drivers need updating.
Can I see USB devices that were previously connected?
Yes, using a tool like USBDeview will show you a history of connected USB devices.
Why should I update my USB drivers?
Outdated drivers can cause compatibility issues and malfunctioning devices.
How do I uninstall a USB device safely?
Right-click the device in Device Manager and select ‘Uninstall device’, then physically disconnect it.
Summary
- Open Device Manager
- Expand the Universal Serial Bus Controllers Section
- Check for USB Devices
- Use USBDeview for More Details (Optional)
- Safely Remove Devices
Conclusion
Knowing how to see USB devices on Windows 10 can save you a lot of headaches. From troubleshooting to simply keeping track, it’s a handy skill to have. By following the steps in this guide, you’ll be able to manage your USB connections easily. Make sure to keep your drivers updated and use tools like USBDeview for even more insights. If you run into any issues, the FAQ section should help you out. So go ahead, dive in, and take control of your USB devices! For more detailed guides, keep checking back or subscribe to our newsletter for the latest tips and tricks.
Matt Jacobs has been working as an IT consultant for small businesses since receiving his Master’s degree in 2003. While he still does some consulting work, his primary focus now is on creating technology support content for SupportYourTech.com.
His work can be found on many websites and focuses on topics such as Microsoft Office, Apple devices, Android devices, Photoshop, and more.
You can find and list all connected USB devices in Windows 10 using any of the methods reviewed in this post. We will see how it can be done with and without third-party tools.
It is a well-known fact that when the user wants to manage devices connected to his Windows computer, they need to go to Device Manager. That may not be the case if you need to find the list of all USB devices connected to your PC. Device Manager in Windows does quite a poor job showing that list without the ability to copy or save it. Also, its default view needs to be changed.
Finding all the connected USB devices in Windows 10 is a relatively simple process. You can use one of the many free third-party tools or a single command in PowerShell or Windows Terminal. Here is how to find a list of all connected USB devices in Windows 10.
Tip: You can use this article with other Windows versions, such as Windows 8, Windows 7, or even the upcoming Windows 11.
- Launch PowerShell or Windows Terminal with the ‘PowerShell’ profile. Either of those will do the job for you.
- Enter the following command:
Get-PnpDevice -PresentOnly | Where-Object { $_.InstanceId -match '^USB' }.
- That command will show a list of all present USB devices.

«Status OK» means that a device is currently plugged in and works properly. You can also use the Class and Friendly Name columns to find and better recognize the devices you see listed.
Find all connected USB devices with USBDeview
If you need a bit more information about your USB devices, there is a free utility called USBDeview by Nirsoft. You can download it from the official website using this link. Launch the file you have downloaded (the app does not require installation.)
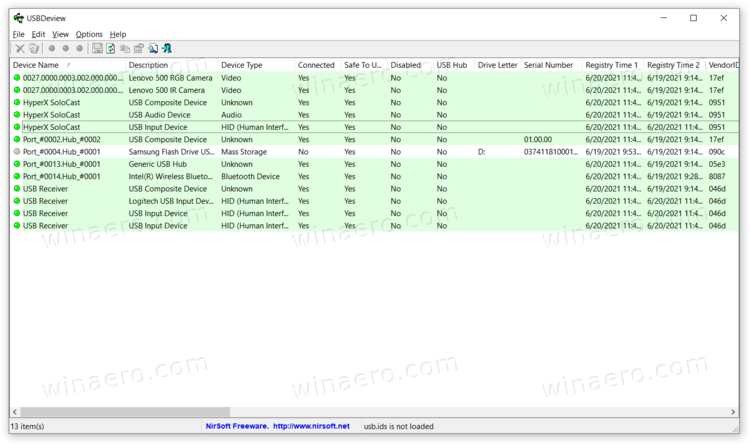
Now you can see a complete list of all USB devices connected to your Windows computer. The app marks currently active devices green, so you can easily sort out disconnected peripherals. You can also double-click any entry to reveal additional information: first connection time, recent connection time, vendor, friendly name, power consumption, USB protocol, driver version, etc.
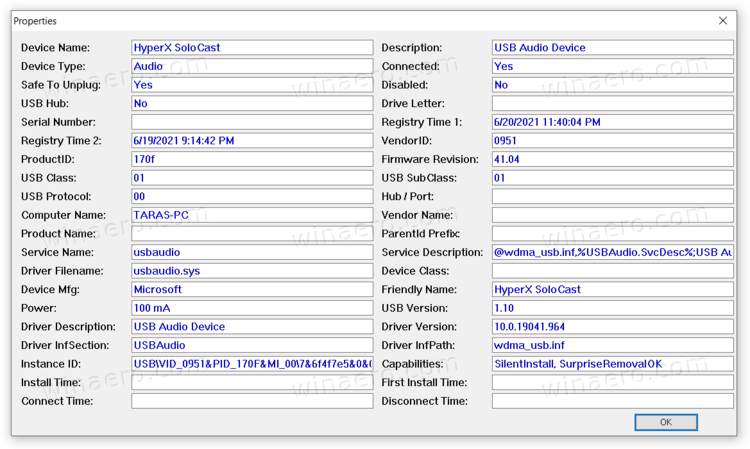
In addition to providing you with all the available information about your USB devices, USBDeview offers some advanced features. For example, you can prevent connecting specific devices to your computer, browse INF files, jump to registry entries, restart USB controllers, etc.
USBDriveLog
Finally, the same developer offers a slightly less complex tool that only shows USB Mass Storage Devices. It is called USBDriveLog, and you can download it from the official website using this link.
Support us
Winaero greatly relies on your support. You can help the site keep bringing you interesting and useful content and software by using these options:
If you like this article, please share it using the buttons below. It won’t take a lot from you, but it will help us grow. Thanks for your support!