
Современные версии Windows собирают информацию о состоянии жестких дисках компьютера через SMART и могут оповестить пользователя о наличии проблем. Рассмотрим, как выглядит уведомление Windows о физических проблемах с жестким диском и как с помощью PowerShell и командной строки получить SMART информацию о здоровье ваших дисков через встроенные WMI классы.
Большинство современных жестких дисков (в том числе HDD, SSD, NVMe SSD) поддерживает технологию базового самотестирования и анализа состояния S.M.A.R.T (Self-Monitoring, Analysis and Reporting Technology). Контроллер диска оценивает состояние физических характеристик диска, и Windows может получить доступ к этим данным через WMI.
Содержание:
- Ошибка “Windows обнаружила неполадки жесткого диска”
- Получение SMART параметров жесткого диска через WMI класс
Информация SMART доступна только для локальных физических дисков (ATA /SATA устройств). Внешние LUN, подключенных через Fiber Channel, iSCSI, RAID или сетевые диски в основном не сообщают статус SMART.
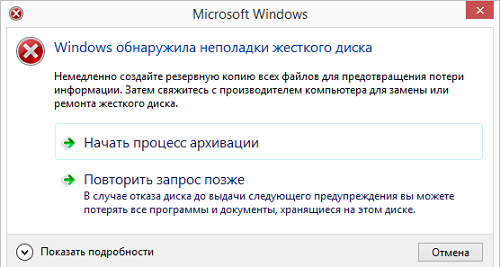
Ошибка “Windows обнаружила неполадки жесткого диска”
В Windows по умолчанию включен мониторинг дисков службами диспетчера дилогических дисков (Logical Disk Manager) и Diagnostic Policy Service. И если один из дисков возвращает статус Predictive Failure, ОС запускает задание планировщика Microsoft-Windows-DiskDiagnosticResolver (\Microsoft\Windows\DiskDiagnostic), которое выводит сообщение:
Windows обнаружила неполадки жесткого диска
Немедленно создайте резервную копию всех файлов для предотвращения потери информации. Затем свяжитесь с производителем компьютера для замены или ремонта жесткого диска.
Windows detected a hard disk problem
Back up your files immediately to prevent information loss, and then contact the computer manufacturer to determine if you need to repair the disk.
В журнале событий при этом появляются сообщения вида:
The driver has detected that device \Device\Harddisk1\DR1 has predicted that it will fail. Immediately back up your data and replace your hard disk drive. A failure may be imminent.
Windows Disk Diagnostic detected a S.M.A.R.T. fault on disk .......... (volumes E:\). This disk might fail; back up your computer now. All data on the hard disk, including files, documents, pictures, programs, and settings might be lost if your hard disk fails. To determine if the hard disk needs to be repaired or replaced, contact the manufacturer of your computer. If you can't back up (for example, you have no CDs or other backup media), you should shut down your computer and restart when you have backup media available. In the meantime, do not save any critical files to this disk.
Статус
Predictive Failure
говорит о том, что одна из характеристик диска (например, механический износ) не соответствует эталонным значениям и велика вероятность отказа этого диска в будущем.
В этом случае рекомендуется выполнить резервное копирование данных с этого диска на отдельный носитель. Затем выполните проверку диска с помощью штатной SMART утилиты от производителя (или универсальными утилитами типа CrystalDiskInfo), проверьте носитель с помощью chkdsk.
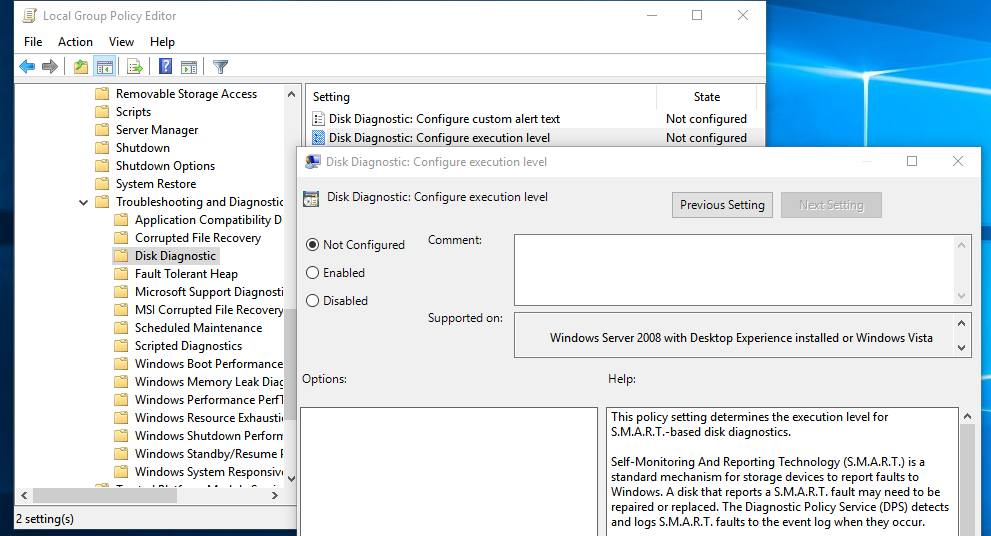
Вы можете включить или отключить вывод этого сообщения пользователя с помощью специального параметра групповой политики Disk Diagnostic: Configure execution level в разделе GPO Administrative Templates -> System -> Troubleshooting and Diagnostics -> Disk Diagnostics.
Чаще всего для получения информации о состоянии дисков в Windows используют сторонни программы (например, CrystalDiskInfo, HDTune и т.д.). Такие программы, действительно позволяют получить много информации о дисках.
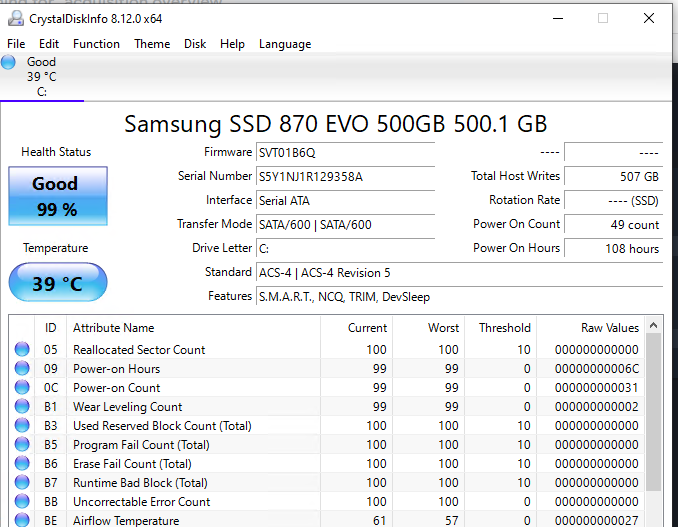
Например, я могу узнать оставшийся ресурс SSD. Текущее значение Total Host Writes – 507 Gb. Производитель гарантирует максимальный ресурс записи (TBW)для этой модели SSD 300 Тб. Значит диск изношен менее чем на 0.2%. Срок использования диска всего 108 часов.
Получение SMART параметров жесткого диска через WMI класс
В Windows вы можете получить доступ к данным SMART дисков с помощью встроенных средств.
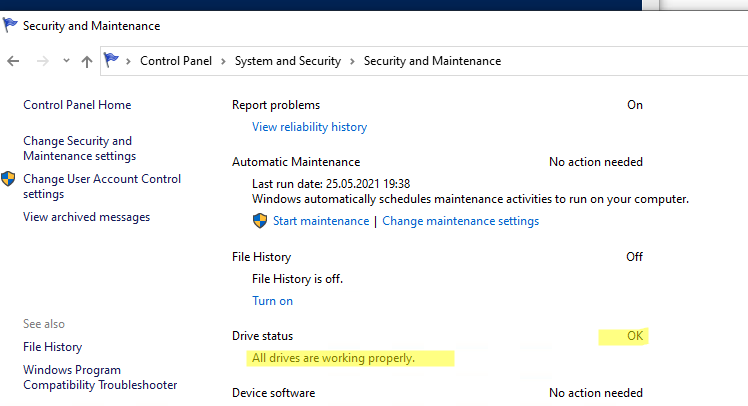
Информацию о состоянии дисков компьютера можно посмотреть через панель управления Control Panel\System and Security\Security and Maintenance (в этом же разделе есть информацию о состоянии службы Windows Error Reporting).
В моем случае с дисками все ОК, т.к. в разделе Drive Status указано:
OK, All drives are working properly
.
Как мы уже говорили выше, Windows собирает информацию SMART с дисков и позволяет получать к ней доступ через WMI.
В BIOS/UEFI для дисков должна быть включена поддержка SMART.
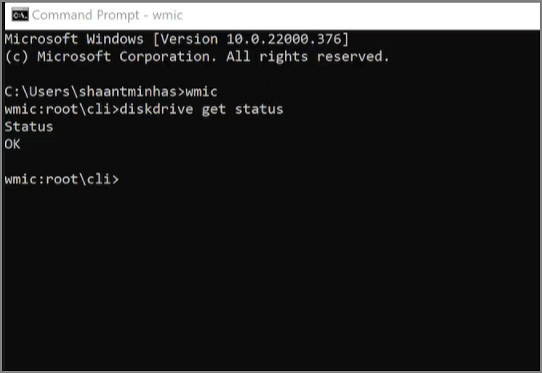
Откройте командную строку с правами администратора и выполните следующую команду чтобы получить состояние всех дисков:
wmic diskdrive get status

В данном случае с дисками все хорошо. Если нет – будет статус bad, unknown или caution.
Получить информацию о вероятном отказе жесткого диска можно через WMI класс MSStorageDriver_FailurePredictStatus:
wmic /namespace:\\root\wmi path MSStorageDriver_FailurePredictStatus

Если контроллер диска не видит проблем с диском, значение PredictFailure должно быть равно FALSE.
Этот же класс можно опросить с помощью PowerShell:
Get-WmiObject -namespace root\wmi –class MSStorageDriver_FailurePredictStatus
Если значение PredictFailure = True, обратите внимание на причину ошибки, код которой указывается в параметре Reason. Расшифровка кода ошибки PredictFailure зависит от вендора. Информацию по некоторым кодам ошибок можно найти в wiki (https://en.wikipedia.org/wiki/S.M.A.R.T.#ATA_S.M.A.R.T._attributes).
Значения некоторых счетчиков надежности дисков можно получить с помощью следующего кода PowerShell:
Get-Disk | foreach { $_ | Get-StorageReliabilityCounter | Format-List }
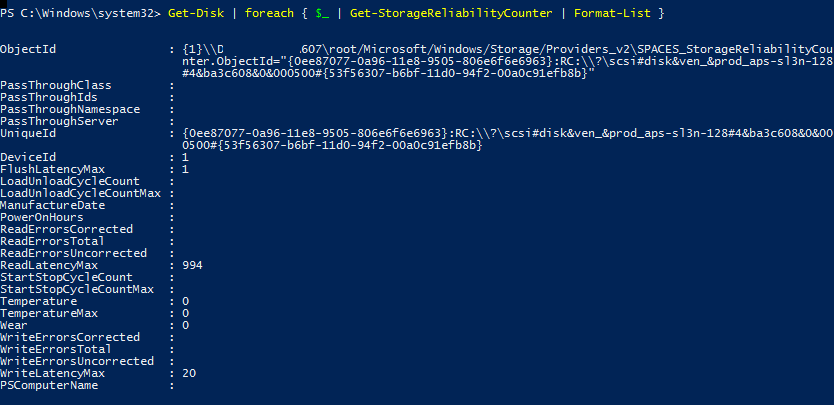
Можно вывести информацию только об определенных характеристиках:
Get-PhysicalDisk | Get-StorageReliabilityCounter | Select-Object -Property DeviceID, Wear, ReadErrorsTotal, ReadErrorsCorrected, WriteErrorsTotal, WriteErrorsUncorrected, Temperature, TemperatureMax | FT
Также можно вывести общую информацию о дисках через Get-PhysicalDisk:
$(Get-PhysicalDisk | Select *)[0]
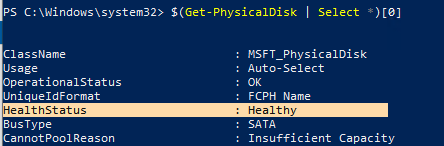
Ранее мы показывали как с помощью Get-PhysicalDisk получить информацию о неисправном диске в Windows Server S2D и заменить его:
Get-PhysicalDisk | Where-Object {$_.HealthStatus -ne ‘Healthy’}
С помощью данных WMI классов и командлетов PowerShell можно настроить сбор данных о состоянии дисков на компьютерах пользователей для проактивного мониторинга. Можно создать алерты для вашей системы мониторинга (например, zabbix, nagios, icinga и т.д.), compliance отчет SCCM через Configuration Baseline для или PowerShell Desired State Configuration (DSC), опрашивать состояние SMART на удаленных компьютерах скриптом через PowerShell Remoting (командлет Invoke-Command) или использовать что-то свое.
Updated on Apr 28, 2025
This article will show you how quickly and easily check the SMART status of Windows 10 to see if your hard drive is still reliable or on the verge of hardware failure.
What does SMART status mean? Automatic hard drive failure detection is made possible by the Self-Monitoring, Analysis, and Reporting Technology (SMART). The system is designed to alert you to any issues it finds. Checking SMART status regularly has a lot of benefits, such as:
- Discover and report on various reliability indicators to anticipate impending hardware failures.
- Alerts users of potential impending drive failure so that steps can be taken to avoid data loss and replace failed drives to preserve data integrity.
Therefore, it is crucial to check your SMART status regularly. However, how to check the SMART status of your hard drive? Continue to read the next part.
How to Check SMART Status on Windows 10 — 2 Ways
There are two techniques to check the SMART status in Windows 10, as given below:
Way 1. Check SMART Status on Windows 10 via EaseUS Partition Master — Easy
Way 2. Check SMART Status on Windows 10 via CMD — Difficult
When comparing options to CHKDSK commands, EaseUS Partition Master stands out as a reliable substitute. Let’s go through each of the ways in detail.
Way 1. Check SMART Status on Windows 10 via EaseUS Partition Master
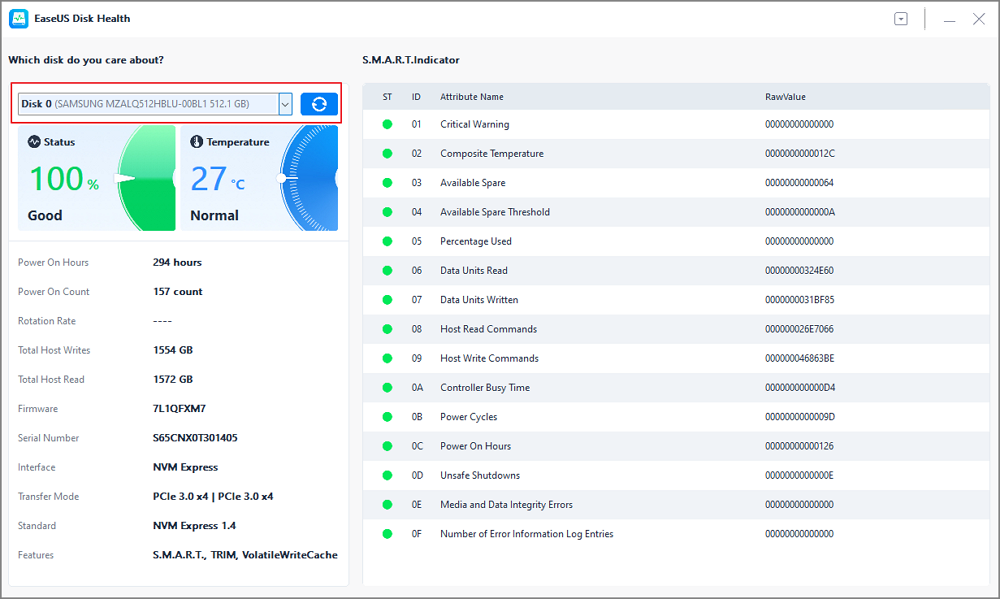
The total number of host writes and reads and the number of powered-on hours can be displayed, along with other disk-related metrics. EaseUS Partition Master works with Windows 10, 8.1, 8, 7, XP, and Vista, among others. You may now download this tool and determine if your SSD/hard drive is in good working order in just two easy clicks.
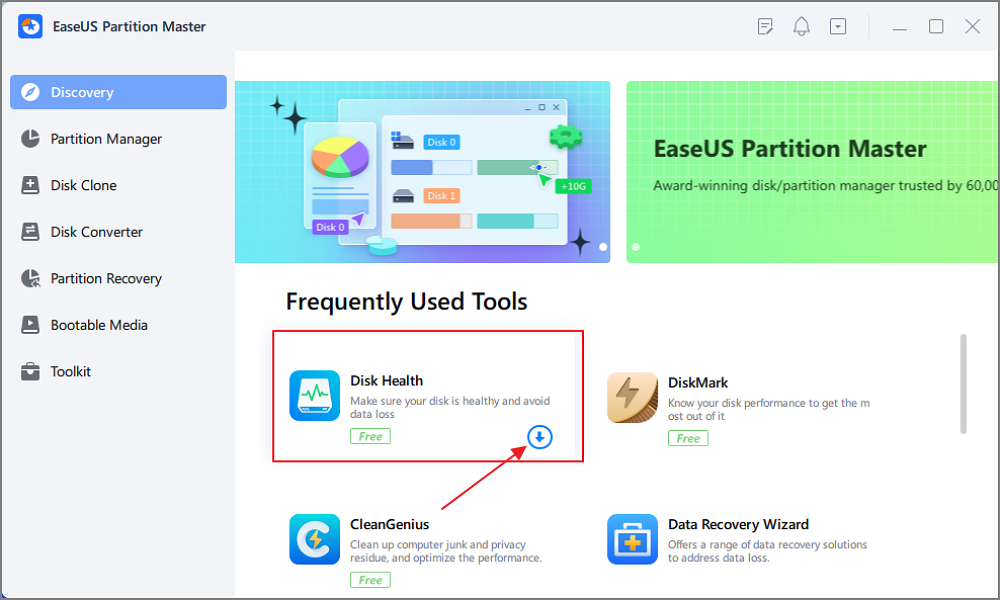
Step 1. Launch EaseUS Partition Master and click the blue arrow to activate the «Disk Health» feature under the «Discovery» section.
Step 2. Select the target disk and click the «Refresh» button. Then, you can see the health condition of your disk.
A clear indication of whether or not your SSD/HDD is in good shape is a powerful tool in the fight against SSD failure. Many more capabilities are available in EaseUS Partition Master, and we will explore those today.
EaseUS Partition Master key features:
- Check if disk is healthy
- Run SD card speed test
- Check SSD health Windows 10
- Speed up hard drive and computer
- Check hard drive health on Windows 7
- Resize/create/delete/move partitions
- Check SSD temperature on Windows 10
EaseUS Partition Master has many valuable features for SSD management. Download it and give it a shot.
Way 2. Check SMART Status on Windows 10 via CMD
Follow these procedures to quickly determine SMART status using the Windows Management Instrumentation Command Prompt (WMIC) tool:
Step 1. Open Start.
Step 2. Type cmd in the search box, right-click the Command Prompt, and select «Run as administrator.»
Step 3. To verify whether your hard drive is failing, type the following commands and press Enter:
- wmic
- diskdrive get status
Step 4. Under the «Status» column, confirm that the result is OK.
- Notice:
- If the result of your efforts is an «OK» message, then you’re good to go. The hard disc is about to fail physically, or the command is having trouble asking the status from the drive’s firmware if the status returns «bad,» «unknown,» or «caution.»
View the video to learn more information and solutions to check your hard drive health:

By the way, you may also like:
Conclusion
In this article, we have discussed how easily you can check the smart status on Windows 10 in two simple ways. In Windows 10, it is crucial to check the SMART status regularly to ensure your data integrity, privacy, and games. While EaseUS Partition Master’s competition, Command Prompt, can do a simple health check, EaseUS Partition Master is still the superior choice due to its intuitive UI and robust extra capabilities.
Check SMART Status on Windows 10 FAQs
To keep our device secure, we must perform regular disc checks. Here are some more concerns about using CMD to examine the state of an SSD in Windows 10.
1. How do I check my SMART hard drive status in Windows 10?
- Open Start
- To launch Command Prompt as an administrator, enter its name into the search bar and then right-click the first result.
- To check if the hard drive fails, type wmic diskdrive, get status, and hit Enter.
2. What is a SMART status check?
SMART means Self-Monitoring, Analysis, and Reporting Technology. It was developed to monitor and detect indicators of a failing hard disc autonomously.
3. What is SMART status in BIOS?
The SMART protocol acts as a bridge between the platform BIOS and the hard drive. When the SMART feature is enabled in the BIOS (the norm), the system can analyze data sent by the storage device and decide whether to issue a warning about impending failure.
Reading time6 min
Views15K
If the hard disk is unstable or you have doubts as to its operability, it’s worth using Windows 10 tools to check on its SMART data and find out if it’s dying soon.
Introduction
In addition to checking the operating system regularly and fixing logical errors and other problems, Windows 10 users are recommended to run diagnostics for hard disk drives (HDD) or solid-state drives (SSD) from time to time for monitoring purposes, so that they can always know if the storage devices are healthy and can avoid unexpected hardware failures that may result in a sudden loss of data.
The only limitation to the process is that Windows 10 doesn’t have a feature that would monitor the status of hardware without the user’s participation. However, we can still use such preinstalled tools as Command Prompt, Windows PowerShell and Performance Monitor to access the information based on the self-monitoring, analysis and reporting technology (SMART) that is available in most storage devices, and always know if the hard disk is healthy or not, ready for work or suffering from hardware problems.
If the SMART data says the disk is about to fail soon, you will have a chance to look for a replacement and copy your data to the new disk before it’s too late.
Today’s tutorial will show you how to use built-in Windows 10 diagnostics and prediction features to advantage, and you will also learn a few quick methods to check the SMART readings and find out if your hard disk is healthy or nearing its doomsday.
An important note. Though most hard disks support the SMART technology, some models can’t fully benefit from that if you use the instructions we give here (SMART is a part of the ATA protocol, while USB flash drives are based on the SCSI protocol and don’t have this function).
How to detect a potential hard disk issue with the Command Prompt
With the command prompt console, you have at least two ways to check the SMART data and see if there are any hardware issues with your hard disks.
Get to know the disk status
To check the SMART status of a hard disk quickly with the Command Prompt using Windows Management Instrumentation (WMIC for short), follow these steps.
Open the Command Prompt with administrator rights in any way you know. For example, click on the Start button in the lower left corner of your desktop, on the Taskbar and open the main Windows menu. Use the scroll bar or the mouse wheel to navigate the list of all applications installed on this computer, find and open the section Windows System. Under this title, find and right-click on the line Command Prompt. In the context menu that appears, click on More; a new context menu appears, and the option Run as administrator is what you need.
In the Command Prompt window, type the following command for the operating system to check if the hard disk is having any issues, and press Enter on the keyboard to run the command (remember there must be no quotation marks):
wmic diskdrive get status
Windows 10 will analyze the disk data and display the result in the Status column; in my case, all the storage devices are healthy.
A bit of explanation. When every drive status is displayed as ОК, you can be sure that all storage devices are healthy and work properly. On the contrary, if there is any other status displayed (for example, bad, unknown or caution) it means there’s a potential problem or disk error, or the command has difficulty receiving information from the disk, which also suggests some sort of trouble.
Predict future disk errors
Here are the steps to take if you want to know the chances for possible failure of your storage device or to learn how healthy the disk is from the viewpoint of the operating system.
Just as before, you need to open the Command Prompt with administrator rights. Click the Search button fashioned like a magnifying glass on the Taskbar (you can find it in the lower left corner of the screen) to open the search panel. Type Command Prompt in the corresponding field. The system will run the search and the Best match section will show you the result you were looking for. Right-click on it and select Run as administrator from the context menu. Otherwise, click on the corresponding button in the right-side menu of the search panel, and the application will be launched.
Type the following command to read the SMART status data for the hard disks, and press the Enter key to run it (make sure there are no quotation marks):
wmic /namespace:\\root\wmi path MSStorageDriver_FailurePredictStatus
When the command is processed, you can see the result in the PredictFailure column. If the status is FALSE, then your hard disk is healthy and works correctly.
If the status is TRUE, it’s time to have a closer look at such hard disk because it means the SMART readings predict a failure soon. The Reason column may show a digit other than zero. If that’s the case, you should contact the hard disk manufacturer to explain the meaning of the code, as the actual meaning of this value differs depending on the manufacturer.
How to determine a possible hard disk failure with Windows PowerShell
Similarly to the Command Prompt, you can use another tool by Microsoft – Windows PowerShell – for the same purpose, to check your computer’s hardware and SMART reports. Step by step, here is what you should do to test your hard disk for possible issues.
There are several ways to open the Windows PowerShell app. The quickest one is to open the Power user menu. For example, right-click on the Start button that you can find on the Taskbar, in the left lower corner of the desktop, or press the keyboard shortcut Windows + X instead to open the context menu, and select the line Windows PowerShell (admin).
In the new window that opens, type (or paste) the following command to see if the hard disk is prone to failure, and press the Enter key (remember there should be no quotation marks):
Get-WmiObject -namespace root\wmi –class
SStorageDriver_FailurePredictStatus
View the report, and pay special attention to the line PredictFailure. If it says FALSE, your hard disk is fine and there is no reason to worry about possible failures yet.
n the contrary, if you see TRUE in the line PredictFailure, it means that the SMART data is bad enough to expect a failure anytime. Similarly to the case with the Command Prompt, if the field Reason contains a value other than zero, you should ask the manufacturer for explanation, as the meaning of this code may differ depending on the actual manufacturer of the hard disk you are using.
If you see that the hard disk has a problem or a failure should be expected anytime, the best solution would be to start looking for a new storage device to replace the faulty one. Whatever happens, today online stores offer a wide range of hard disks to choose from according to your preferences, so you can always find a model with the required performance rate, capacity and read/write speed at an affordable price.
How to analyze disk performance and health with Performance Monitor
Besides the two methods based on using the Command Prompt and Windows PowerShell apps that we have just described, there is one more tool to help you check the SMART data and detect hardware disk errors – Performance Monitor.
Here is what you do to see if your hard disk is about to fail with Performance Monitor.
First of all, the application can be started in one of the several ways. For example, click on the Start button in the lower left corner of your desktop, on the Taskbar, and open the search panel. Type Performance Monitor in the search field, and you will see the result under Best match. Click on it or on the Open button in the right panel, and the Performance Monitor app will be launched.
In the left-side panel, click on the right arrow sign in the line Data collector sets to display the nested elements.
As the new list unfolds, click on the right arrow again to open the nested options in the line System.
Now jump to System Diagnostics and right-click on it to bring out the context menu, then select Start.
Go down and click on the right arrow in the line Reports.
When another list unfolds, find the line System and open its contents by clicking on the right arrow.
One more time, click on the right arrow in the line System Diagnostics to see what’s inside.
Finally, click on the report the title of which contains your computer’s name. (You may have to wait a little while the operating system runs the diagnostics).
In the right panel of the Performance Monitor window you will see a detailed report. Find and open the section Warnings, then go to Basic System Checks and in the Tests column, click on the Plus (+) button next to Disk Checks, to see the hidden table containing test results.
In the table, find the line SMART Predict Failure Check. If the Failed column for this line contains zero, and the column Description next to it says Passed, then the hard disk has no issues for you to worry about.
By following the steps we have described, you can quickly find out if the hard disk in question is healthy, or should you expect it to fail at any moment.
If the SMART readings say failure is possible, and you can still access the faulty disk, the best solution would be to back up the important information from that disk so that you can prevent data loss. You can always copy important files to another disk which is healthy, or use the backup feature integrated into Windows 10.
Conclusion
To protect your data against unexpected loss you should check your hard disks regularly, especially if there are symptoms suggesting they are no longer as healthy as they used to be. Windows 10 operating system features several preinstalled tools that can determine how healthy your storage devices are and predict if it is going to fail in the nearest future. The methods we have described in this article are simple enough even for a novice user to take advantage of, and they will certainly help you save your files from a faulty hard disk and avoid loss of important data.
See the full article with all additional video tutorials.
Все способы:
- Функция S.M.A.R.T. накопителя
- Способ 1: AIDA64
- Способ 2: Speecy
- Способ 3: CrystalDiskInfo
- Способ 4: HDDScan
- Способ 5: Victoria
- Вопросы и ответы: 5
Уже много лет HDD снабжаются системой самодиагностики, которая может подсказать пользователю, насколько близок накопитель к выходу из строя. В излагаемом материале мы осветим тему проверки S.M.A.R.T. жёсткого диска.
Функция S.M.A.R.T. накопителя
Self-Monitoring, Analysis and Reporting Technology – это технология самодиагностики винчестера, которая производится с помощью встроенных в накопителей датчиков. Число атрибутов, которые при этом отслеживаются, находится в районе 70, и для того, чтобы описать хотя бы самые главные, необходима отдельная статья, поэтому мы не будем заострять на них внимание. С 1992 года считается хорошим тоном интегрировать эту функцию в устройства, чтобы пользователи могли самостоятельно оценивать состояние накопителей. С течением времени S.M.A.R.T. совершенствовалась, и сейчас вы сможете собрать значительно больше сведений, чем на заре этой новинки, благодаря специальным программам, о которых мы расскажем далее.
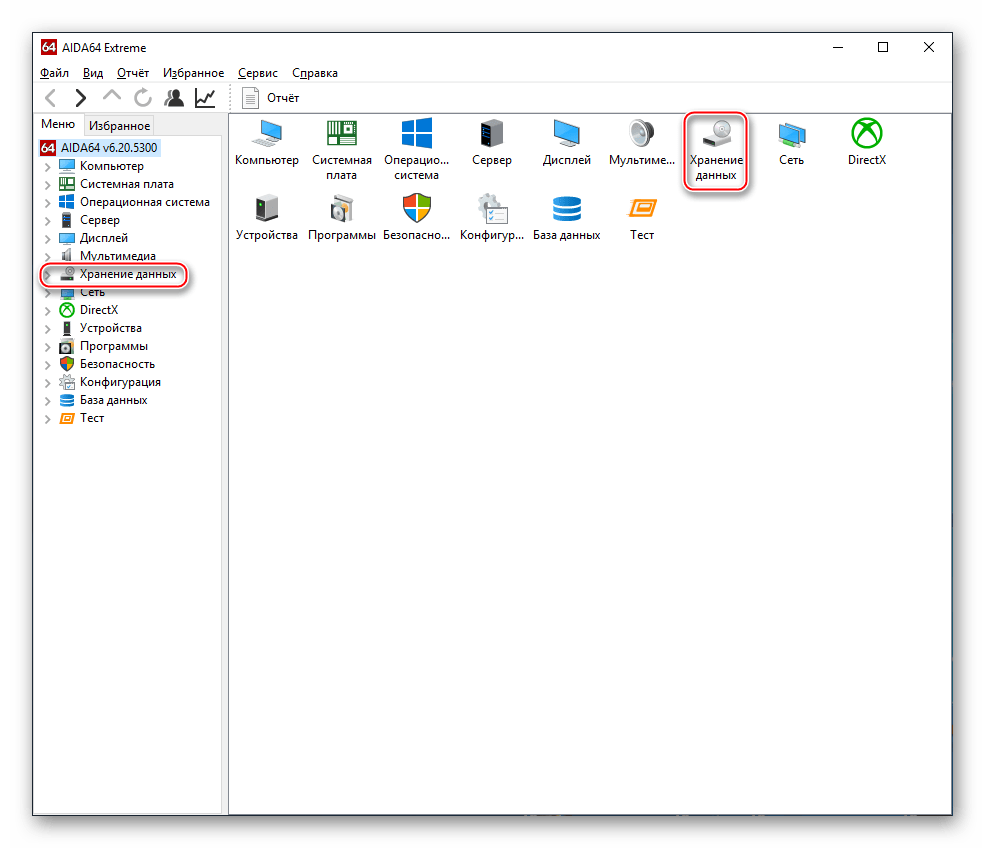
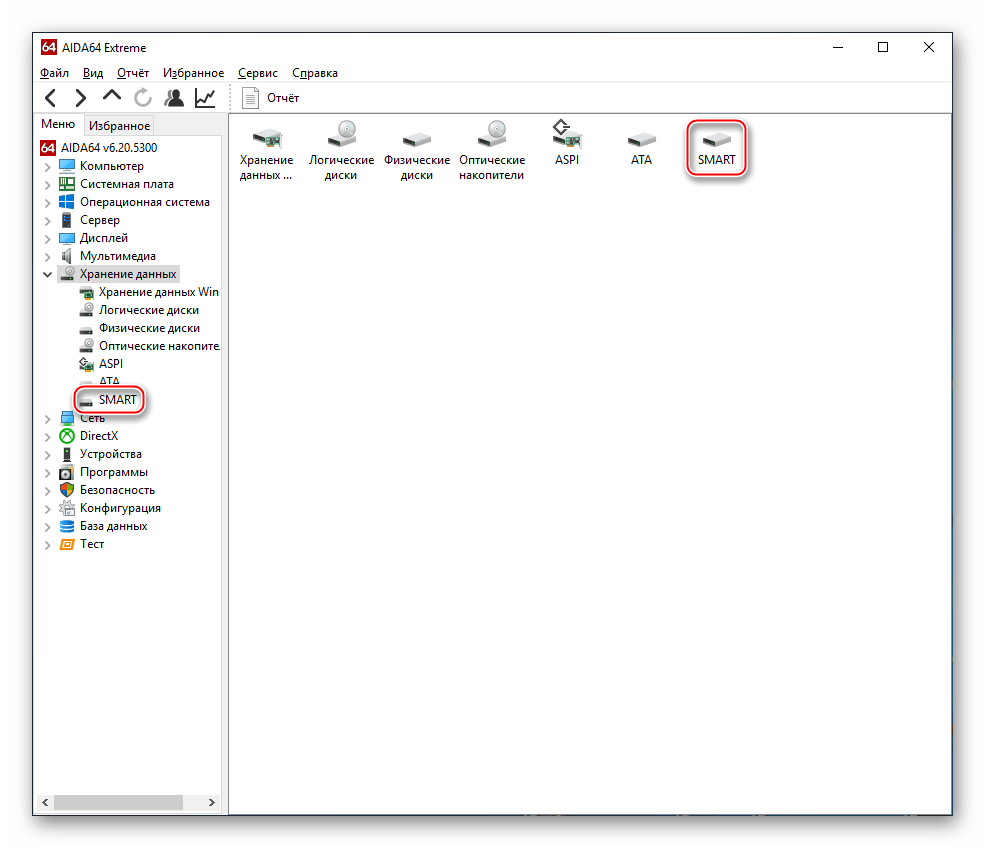
Способ 1: AIDA64
АИДА64 всё ещё пользуется огромной популярностью даже в таком деле как самодиагностика жёсткого диска. Для отображения сведений S.M.A.R.T. запустите программу и следуйте такой инструкции:
Скачать AIDA64
- Откройте вкладку «Хранение данных», кликнув на соответствующий значок или строку.
- Перейдите в раздел «SMART» таким же образом.
- Просмотрите данные S.M.A.R.T.

Как видите, первыми идут такие показатели как «Температура», «Оставшийся ресурс накопителя», «Записано за всё время» и «Общее время работы». На некоторых дисках показания последних трёх могут сбиваться до «N/A», но это не страшно. Если с ними было что-то не так, AIDA64 отследила бы это по какому-либо из оцениваемых атрибутов. Кстати, программа даёт свою оценку в колонке «Статус» и выводит там соответствующее качеству работы значение.
Примечание: AIDA64 умеет работать на только с HDD, но и с SSD по S.M.A.R.T. У твердотельных устройств ввиду новизны отражение атрибутов может быть получше, но учтите, что там совершенно другие параметры.

Способ 2: Speecy
Ещё одна программа общей диагностики, распространяющаяся на свободной основе. Через неё можно посмотреть сведения S.M.A.R.T. — для такой операции инициируйте её открытие и действуйте так:
Скачать Speccy
- Кликните левой кнопкой мышки по категории «Хранение данных».
- Просмотрите данные системы и «Атрибуты S.M.A.R.T.» по различным параметрам.
- При необходимости нажмите на ярлычок возле индикатора температуры и просмотрите температурный график.


В Speecy тоже можно увидеть основные атрибуты системы самодиагностики и оценку программы, причём на русском языке, чем не может похвастаться AIDA64. В минусы можно записать то, что для тех же твердотельных устройств такие данные недоступны.
Способ 3: CrystalDiskInfo
Эта специализированная программа отображает сведения S.M.A.R.T. и основную информацию об устройствах. Для того чтобы их увидеть, необходимо лишь открыть её:
Скачать CrystalDiskInfo
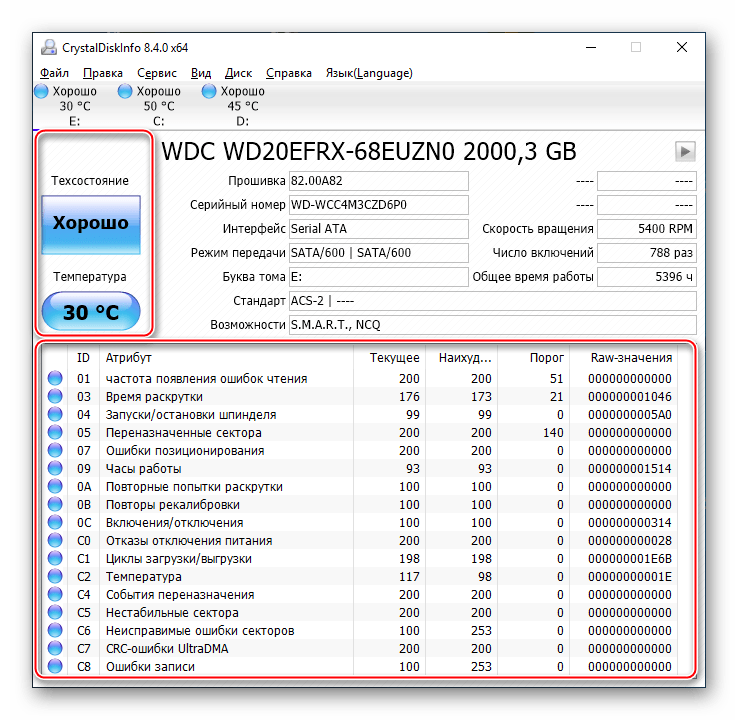
В главном окне вы увидите такие данные как «Техсостояние», «Температура» и набор атрибутов. Недостаток в том, что программа не даёт заключение по каждому параметру, как предыдущие. Если вы хотите оценить их по отдельности, придётся сверять вручную колонки «Текущее» и «Порог» или находить в сети обозначение конкретного «Raw-значения».
Способ 4: HDDScan
Ещё одна бесплатная программа, которая неплохо диагностирует жёсткие диски, выдаёт сведения S.M.A.R.T., а также имеет несколько дополнительных утилит и тестов.
Скачать HDDScan с официального сайта
- Распакуйте архив. Откройте программу и выберите вариант «SMART».
- Программа предоставит готовый к сохранению отчёт в формате HTML или TXT, который также можно и распечатать.
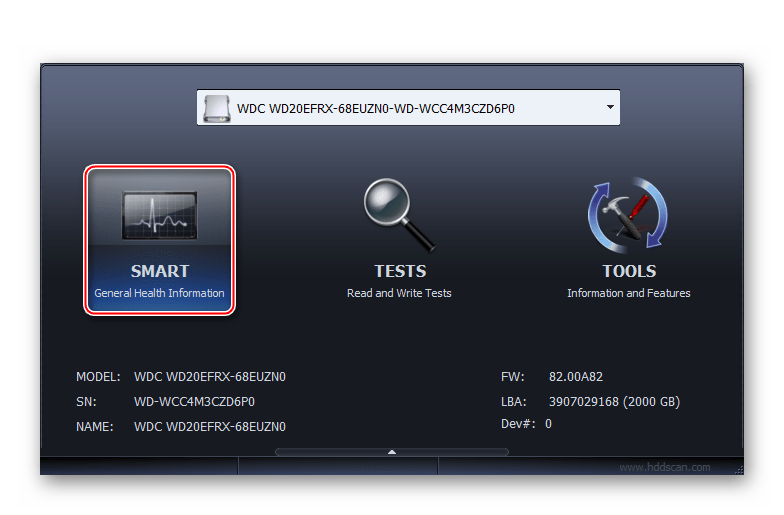

Как видите, всё строго и по делу: инфо о диске, его статус в виде цветовой индикации и набор атрибутов.
Способ 5: Victoria
Старая, но многофункциональная и работающая с дисками различных типов Victoria поможет нам в деле оценки по технологии S.M.A.R.T. Для этого отройте программу, а далее:
Скачать Victoria
- Нажмите на иноку «S.M.A.R.T.».
- Получите данные самодиагностики выбранного жёсткого диска.
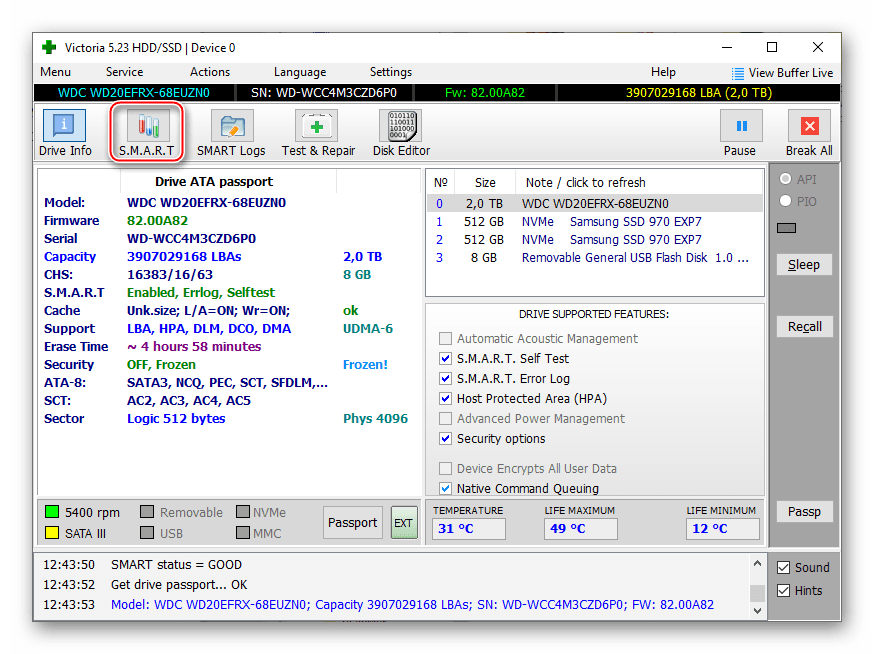

Следует отметить, Victoria выдаёт примерно тот же набор атрибутов, при этом присваивая определённый статус диску. Отличает её от других программ то, что она оценивает каждый отдельный атрибут по пятибалльной цветовой шкале.
В рамках изложенного материала мы рассмотрели проверку S.M.A.R.T. жёсткого диска. Для того чтобы её совершить, можно воспользоваться любой из вышеперечисленных программ, получив сведения максимум в три клика.
Наша группа в TelegramПолезные советы и помощь
Улучшенная поддержка RAID-массивов Intel, гаджет боковой панели Windows, звуковые уведомления, переработанное меню, версия Shizuku Edition с новым оформлением.
Новая ключевая версия лучшей бесплатной утилиты для контроля «здоровья» накопителей мониторингом температур и показателей S.M.A.R.T.

Список главных изменений CrystalDiskInfo 5.0.0:
- Добавлена версия
Shizuku Edition
(на скриншоте), в дополнение к обычной. - Улучшена поддержка RAID-массивов Intel.
- Добавлен звуковой сигнал тревоги.
- Добавлена тестовая версия гаджета в боковой панели Windows.
- Переработана структура меню.
- Справка стала онлайновой.
Обратите внимание, CrystalDiskInfo поддерживает массивы RAID только на официальных драйверах Intel Rapid Storage Technology, в которых имеется поддержка интерфейса CSMI. Сейчас точно поддерживается официальный драйвер Intel RST 10.8, а утекшая бета-версия Intel RST 11.5 Alpha не поддерживается, так как не работает с CSMI.
CrystalDiskInfo — бесплатная утилита для просмотра показателей S.M.A.R.T. и уведомления об их опасных изменениях. Наглядно показывает информацию о дисках: характеристики и текущие параметры, данные S.M.A.R.T. на русском. Температуры HDD и SSD отображаются в системном трее и контролируются, ведется график изменений за последний месяц. Умеет запускаться с задержкой, может управлять настройками Advanced Power Management и Automatic Acoustic Management (максимальная скорость либо тишина и экономия энергии). Входит в число немногих, поддерживающих внешние жесткие диски и карманы, RAID-массивы Intel.
CrystalDiskInfo 5.0.0 (Windows, open source)
- инсталлятор — CrystalDiskInfo5_0_0-en.exe (1,7 МБ)
- portable-версия — CrystalDiskInfo5_0_0.zip (1,5 МБ)
- инсталлятор Shizuku Edition —
CrystalDiskInfo5_0_0Shizuku-en.exe
(2,8 МБ)
Telegram-канал @overclockers_news — теперь в новом формате. Подписывайся, чтобы быть в курсе всех новостей!