
When it comes to working in the digital world, the question of files’ authenticity is of great importance. A checksum is data computed from data contained in the given file which can be used to check if the given file was modified or not. This article will help you how to find the checksum of a file and whether it is correct or not using Get-FileHash in Powershell in Windows.
What is Hash?
Hash is an alphanumeric string created by processing bytes of the file by some algorithm. This hash value is of significantly lower magnitude than the size of the actual file and is listed right alongside the file that you are downloading; allowing you to take your downloaded file, run your hash value against it, and check if the two hashes match.
The use of these hashmap values is different algorithms and utilities that are used that come with the programming languages. Every algorithm will provide another hash; however, the utility used for creating the hash will provide the same hash value when you select another algorithm.
What is a Checksum?
A checksum is a value created from the data within a file. This has the role of pointing at the file like a fingerprint. When a file is downloaded one can hash it and compare it to the checksum of the file given by the source to check if the file was modified.
Why Verify Checksums?
- Integrity Verification: Checks that the file has not been changed by anyone, especially before using or updating.
- Security: Prevents malicious modifications.
- Error Detection: Detects corrupted files if it is used during the downloading or transferring of files.
Using Get-FileHash in PowerShell
PowerShell is a scripting language and command-line interface to the operating system for administration. Get-FileHash is a cmdlet that calculates the hash value for a file using a named hash algorithm.
Step 1: Open PowerShell
Press Windows + X and select Windows PowerShell (or Windows PowerShell (Admin) if you need administrative privileges).
Step 2: Navigate to the File Directory
Use the cd (Change Directory) command to navigate to the directory where your file is located. For example, if your file is in C:\Users\YourName\Downloads, you would enter:
cd C:\Users\YourName\Downloads
Step 3: Calculate the File’s Checksum
To calculate the checksum of the file the Get-FileHash cmdlet needs to be run and the file path needs to be supplied. Indeed, by default, the hash of the image is calculated using the SHA-256 algorithm, but you can set what kind of hash to generate, for instance, MD5 or SHA-1.
For SHA-256:
Get-FileHash yourfile.ext
For MD5:
Get-FileHash yourfile.ext -Algorithm MD5
For SHA-1:
Get-FileHash yourfile.ext -Algorithm SHA1
Replace yourfile.ext with the actual name and extension of your file.
Example:
If you have a file named example.txt in the current directory:
Get-FileHash example.txt
The output will look something like this:
Algorithm       Hash                                                                   Path
---------       ----                                                                   ----
SHA256          D2D2D2D2D2D2D2D2D2D2D2D2D2D2D2D2D2D2D2D2D2D2D2D2D2D2D2D2D2D2D2D2      C:\Users\YourName\Downloads\example.txt

Step 4: Compare the Checksum
Compare the computed checksum with one that is given by the source. If they match, congratulations, your file is still safe. Otherwise, the file could be accidentally corrupted or modified in some way and the original lost.
(Get-FileHash C:\Users\YourName\Downloads\example.txt -A SHA256).hash -eq "YourHashCode"

The Output results as True, Its matched.
Detailed Explanation
1. Opening PowerShell:
- PowerShell is a specific shell in the network that is higher in terms of scripting capability than the Command Prompt.
- The users may employ the Windows + X command to open the PowerShell among the choices in the menu.
2. Navigating to the File Directory:
- The processor abbreviation for it is a shorthand of cd: ‘change directory,’ and it is used to get to different directories when working on the Windows command line.
- Make sure you are in the right directory where the target file is found to ease the command.
3. Calculating the File’s Checksum:
- Get-FileHash happens to be a PowerShell cmdlet which computes the hash value of a given file.
- Primarily, it has the SHA-256 algorithm integrated into it but you can use others by simply entering -Algorithm.
4. Comparing the Checksum:
- This should be cross-checked with the value for checksum expected from the source of the file.
- Values in parallel with those of the originals assure the file’s accurate condition, and different data point to the problem.
Common Hash Algorithms
- MD5 (Message Digest Algorithm 5): Generates a 128-bit hash value. Faster, but does not protect against collisions as effectively.
- SHA-1 (Secure Hash Algorithm 1): Creates a 160-bit result key or hash value. Safer than MD5 but currently not resistant to some kinds of attacks.
- SHA-256 (Secure Hash Algorithm 256): SHA-2 family member that creates the 256-bit hash value. It is highly secure and very commonly used in today’s world.
Here are a few items to be aware of:
- The more the file size is the more time is likely to consuming when calculating the hash. For example, I have observed that as large as 500GB images can sometimes may take couple of hours.
- The hash is given with respect to the content of the file and is not dependent on the date/time stamps, etc.
- For example, if you create a file called “HelloWorld. txt” and put “Hello World” in it, the hash is:For example, if you create a file called “HelloWorld. txt” and put “Hello World” in it, the hash is:
- A591A6D40BF420404A011733CFB7B190D62C65BF0BCDA32B57B277D9AD9F146E
- If you change the name of the file to a “GoodbyeWorld. txt”, the hash does not change.
- If you change the text inside the file to “Goodbye World” and save it, the hash is now:If you change the text inside the file to “Goodbye World” and save it, the hash is now:
- C96724127AF2D6F56BBC3898632B101167242F02519A99E5AB3F1CAB9FF995E7
- However, if I replace the content back to ‘Hello World’ the hash is equal to the previous hash value.
As mentioned above you can write some text in a file and use such a file as the location of a variable in Go, and in the same time get the same hash value. Hashes are calculated on the content to check their authenticity. You can try for instance, modifying the text from “Hello World” to “Hello world”(lowercase w on “world) Here, you will note that the hash that is generated is different.
LARGE FILES
In addition to simple checks when comparing the content, adjusted for the fact that downloaded files can be larger, a hash is useful when there are large copies.
For instance, just the other day I was working on a file transfer of a relatively big size where there was a rude interruption from the network. The transfer auto-resumed, but due to this network interruption I could not be certain there was no data corruption. I reverted the hash on both the source and the destination to check if there were any problems with the file; as a result, I saved an hour of downloading a file that did not need to be downloaded again.
VALIDATE AGAINST TAMPERING
Another use of this could be to perhaps guarantee that files were not altered. Of course, you can have good security measures in place, but there is always a way that someone can reach files that they should not.
If you want to be sure files were not touched at all, you can record the result of computation against all the files into a text file and put that into another location/into immutable media. And then any time you need to do validation, you can run another compute against those files and invariably, all is well. This will nicely suit the paranoid person within your organization to the extreme.
Conclusion
Checksum is an effective and very basic way of confirming that the content you are receiving or the physical storage media is indeed secure and has not been tampered with. By conducting this in PowerShell, the task is easy and quick because the Get-FileHash cmdlet can accomplish this. Thus, using the tips described in this article, you can effectively check the reliability of the files in Windows.
NOTE: Ensure that you always compare the checksum provided by the file source to detect any potential tampering or corruption. This practice is crucial for maintaining the security and reliability of your digital files.
Хэш или контрольная сумма файла — короткое уникальное значение, вычисляемое из содержимого файла и обычно использующееся для проверки целостности и соответствия (совпадения) файлов при загрузке, особенно если речь идет о больших файлах (образы системы и подобные), которые могут быть скачены с ошибками или есть подозрения о том, что файл был подменен вредоносным ПО.
На сайтах загрузок часто бывает представлена контрольная сумма, вычисленная по алгоритмам MD5, SHA256 и другим, позволяющая сверить загруженный файл с файлом, выложенным разработчиком. Для вычисления контрольных сумм файлов можно использовать сторонние программы, но есть способ сделать это и стандартными средствами Windows 10, 8 и Windows 7 (требуется версия PowerShell 4.0 и выше) — с помощью PowerShell или командной строки, что и будет продемонстрировано в инструкции.
Получение контрольной суммы файла средствами Windows
Для начала потребуется запустить Windows PowerShell: проще всего использовать поиск в панели задач Windows 10 или меню Пуск Windows 7 для этого.
Команда, позволяющая вычислить хэш для файла в PowerShell — Get-FileHash, а чтобы использовать ее для вычисления контрольной суммы достаточно ввести ее со следующими параметрами (в примере вычисляется хэш для образа ISO Windows 10 из папки VM на диске C):
Get-FileHash C:\VM\Win10_1607_Russian_x64.iso| Format-List

При использовании команды в таком виде, хэш вычисляется по алгоритму SHA256, но поддерживаются и другие варианты, задать которые можно с помощью параметра -Algorithm, например, для вычисления контрольной суммы MD5 команда будет выглядеть как в примере ниже
Get-FileHash C:\VM\Win10_1607_Russian_x64.iso -Algorithm MD5 | Format-List

При этом поддерживаются следующие значение для алгоритмов вычисления контрольной суммы в Windows PowerShell
- SHA256 (по умолчанию)
- MD5
- SHA1
- SHA384
- SHA512
- MACTripleDES
- RIPEMD160
Подробное описание синтаксиса команды Get-FileHash доступно также на официальном сайте https://technet.microsoft.com/en-us/library/dn520872(v=wps.650).aspx
Получение хэша файла в командной строке с помощью CertUtil

В Windows присутствует встроенная утилита CertUtil для работы с сертификатами, которая, помимо прочего, умеет высчитывать контрольную сумму файлов по алгоритмам:
- MD2, MD4, MD5
- SHA1, SHA256, SHA384, SHA512
Для использования утилиты достаточно запустить командную строку Windows 10, 8 или Windows 7 и ввести команду в формате:
certutil -hashfile путь_к_файлу алгоритм
Пример получения хэша MD5 для файла показан на скриншоте ниже.

Дополнительно: на случай, если вам требуются сторонние программы для вычисления хэшей файлов в Windows, можно обратить внимание на SlavaSoft HashCalc.
Если же требуется вычислить контрольную сумму в Windows XP или в Windows 7 без PowerShell 4 (и возможности его установить), вы можете использовать утилиту командной строки Microsoft File Checksum Integrity Verifier, доступную для загрузки на официальном сайте https://www.microsoft.com/en-us/download/details.aspx?id=11533 (формат команды для использования утилиты: fciv.exe путь_к_файлу — результат будет MD5. Также можно вычислить хэш SHA1: fciv.exe -sha1 путь_к_файлу)
Проверка контрольной суммы скачанного файла позволяет проверить его целостность и убедиться, что содержимое файла не было изменено. Чаще всего администраторы используют процедуру проверки чексуммы для загруженных дистрибутивов ОС и установочных образов ПО.
Идея контрольной суммы заключается в том, что для оригинального файла выполняется расчет некоего значения (хэша) по определенному алгоритму получения хэш-функции (чаще всего это MD5, SHA1 и SHA256), а пользователи потом могут выполнить такую же проверку для файла, который они скачали. Сравнение этих двух значений хэшей позволяет убедиться, что вы получили не модифицированный оригинальный файл. Если хэши файлов отличаются, значит файл был изменен или поврежден.
Для проверки контрольной суммы файла в Windows можно использовать встроенный PowerShell командлет Get-FileHash или утилиту certutil.
Например, чтобы получить значение хэша ISO образа, выполните команду:
Get-FileHash "F:\ISO\en-us_windows_10_enterprise_ltsc_2021_x64_dvd_d289cf96.iso"

Черех некоторое время (расчет может занять некоторое время в зависимости от размера файла), командлет вернет контрольную сумму файла по алгоритму SHA-256 (по умолчанию). С помощью атрибута
-Algorithm
можно задать другой алгоритм вычисления контрольной суммы
-
SHA1 -
SHA256
(по умолчанию) – наиболее популярный алгоритм с наименьшей вероятности возникновения коллизий (когда два разных файла имеют одинаковую контрольную сумму) -
SHA384 -
SHA512 -
MD5
– самый быстрый, но устаревший алгоритм хэширования
Аналогично можно получить хэш сумму файла с помощью certutil.exe:
certutil -hashfile F:\ISO\en-us_windows_10_enterprise_ltsc_2021_x64_dvd_d289cf96.iso SHA256

Где получить контрольные суммы оригинальных ISO файлов образов Windows?
Если у вас есть учетная запись Microsoft, вы можете найти контрольную сумму интересующего вас дистрибутива на сайте https://my.visualstudio.com/Downloads/. Для этого не обязательно иметь активную подписку MSDN. Информация о контрольной сумме образа доступна на вкладке с информацией о продукте.
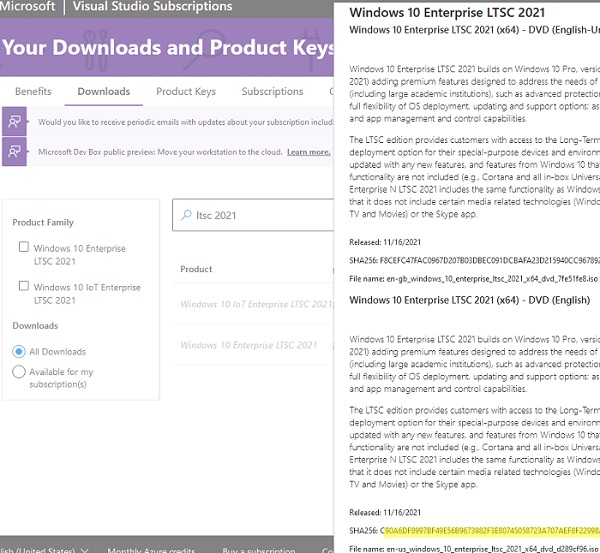
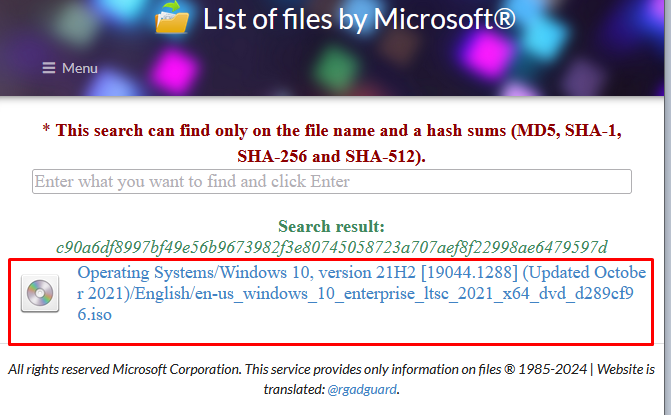
Также список всех оригинальных образов от Microsoft и их хэшей доступен в следующей сторонней онлайн базе https://files.rg-adguard.net/search. В отличии от сайта Microsoft, здесь можно искать сразу по значению хэша. Выполните поиск по полученному хэшу, чтобы убедиться, что вы скачали оригинальный файл образа.
Регистр символов в хэш сумме не имеет значения.
Для автоматизации проверки хэш сумму скачанного образа с оригинальным значением, можно использовать такой однострочник PowerShell:
((get-filehash .\ en-us_windows_10_enterprise_ltsc_2021_x64_dvd_d289cf96.iso).hash) -eq "c90a6df8997bf49e56b9673982f3e80745058723a707aef8f22998ae6479597d"

Команда вернет
True
, если контрольная сумма файла совпадает с эталонной.
This guide shows you how to check the MD5 or SHA256 checksum (or other hashing algorithms) of any file in Windows 11 or Windows 10 using only Command Prompt or Windows Terminal.
What is checksum and why do we use it?
A checksum is a unique set of numbers and letters generated for a file using a hash algorithm such as MD5 or SHA-256 (the most commonly used checksum algorithms) to verify if the file has not been modified during transmission (e.g. downloading the file).
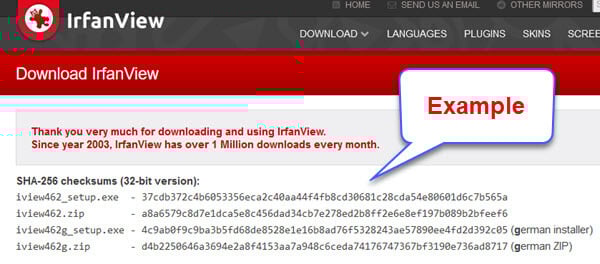
Most software vendors display the checksum of their downloadable files (such as installers and zip files) so that users can check the integrity of the file using the checksum after download. This is to ensure that the file has not been altered in any way during transfer.
After downloading a file, you can generate the checksum of the downloaded file and see if it matches the checksum provided by the software vendor. If it matches, this means that there were no errors or alternations during the transfer and that the files were identical before and after the transfer.
See also: How to Compare Two Folders in Windows 11
How to check MD5 or SHA256 checksum of a file in Windows 11
To verify the MD5 checksum or SHA256 checksum of a file in Windows 11, follow the steps below.
- First, right-click the file you want to verify the checksum for and select “Copy as path“. You will need this path later.

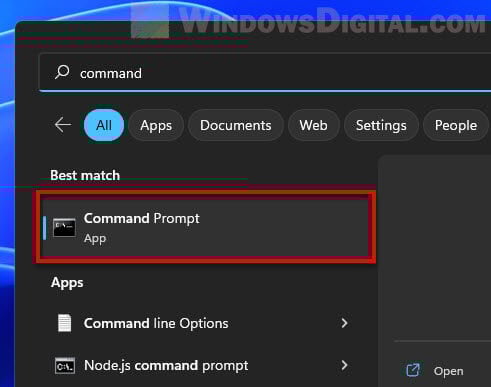
- Next, open Command Prompt (search for “CMD” via Start) or Windows Terminal (right-click Start and select Windows Terminal).

- To check the MD5 checksum of a file, type the following command in the Command Prompt or Windows Terminal window.
certutil -hashfile filepath MD5
Replace filepath with the actual path to the file that you want to check the checksum for. You can highlight the filepath and press Ctrl + V to paste the path you’ve copied in step 1. For example:
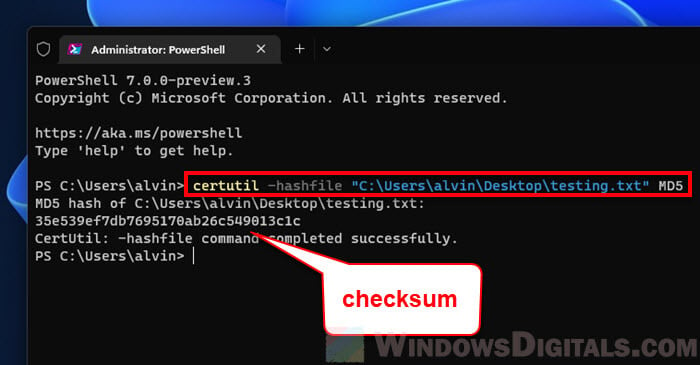
certutil -hashfile "C:\Users\alvin\Desktop\testing.txt" MD5

To check the SHA256 checksum of the file, replace MD5 with SHA256. For example:
certutil -hashfile "C:\Users\alvin\Desktop\testing.txt" SHA256

- Press Enter to execute the command. The checksum of the file will then be shown.


Related: How to Password Protect a Folder in Windows 11
Verify different checksum algorithms
To check the checksum of a file using a different hashing algorithm, replace the MD5 in the command line with the checksum algorithm that you want to use. The following are the hashing functions that the certutil command-line tool supports.
- MD2
- MD4
- MD5
- SHA1
- SHA256
- SHA384
- SHA512
What to do if the checksums do not match?
If the checksum of the file you generated on your computer do not match the one provided by the software vendor, it indicates that the file is corrupted, incomplete or has been altered.
In most circumstances, if the checksums do not match, you should not open the file because the data may have been tampered with and could pose a security risk if you run the file.
- If you suspect that the file is corrupted or incomplete, try to download the file again from the same source.
- If the checksum still does not match on your second try, you may want to contact and notify the source from which you download the file. The cause of the problem may be on their side.
- Try to download the file from a different trusted source.
- Clear your browser’s cache (if you use your browser to download the file) and history before downloading the file again. This is to ensure that the browser will request new download from the source again instead of re-downloading the corrupted file from your browser’s cache.
- Before you re-download the file, delete the old one whose checksum does not match.
Readers help support Windows Report. We may get a commission if you buy through our links.
Read our disclosure page to find out how can you help Windows Report sustain the editorial team. Read more
Some of our readers have recently requested to know how to verify a checksum on Windows to ensure a file is in good order.
Since there are possibilities of files getting tampered with on the internet by hackers through their nefarious acts, you can verify your MD5 or SHA256 checksum through the steps provided in this article.
Does Windows have a checksum?
Yes, Windows has and makes use of checksum. For those who do not know checksum, it is a short but unique string that results from running an encryption algorithm on a given file.
The algorithm looks through every bit that makes up a file and creates a checksum based on those unique bits. Some of the benefits include:
- Identifies changes in files – You can make sure your file hasn’t been damaged or modified after comparing two checksums.
- Protection for downloaded files – Checksum is a useful way to defend against file corruption or malicious interference in your downloads.
In case you need to quickly and easily verify the checksum or the hash sum of particular software on Windows, it is possible to perform these checks on Windows using certain available tools.
Where is checksum located?
You can locate and make use of checksum on Windows by making use of Certutil. The Certutil is a preinstalled command-line tool that comes with Windows and is a part of Certificate Services which also offers a switch -hashfile that allows you to generate the hash string using a specified algorithm.
The Certificate Services is responsible for request validation per the set policy and the issuance of the certificates.
You can use Windows PowerShell or Command Prompt to run the CertUtil command.
How do I verify a checksum on Windows [MD5 or SHA256]?
1. Use the Windows Command Prompt
- Press the Windows key +R to open the Run window, type cmd in the text field, and press Enter.
- Navigate to the folder that contains the file wherein the MD5 checksum you want to verify is.
- Type cd followed by the path to the folder e.g.:
cd Documents - Next, type this and press Enter.
certutil -hashfile <file> MD5
- Replace the <file> with the filename.
- Wait for it to load, then compare the resulting checksum with what is expected for the software.

You can also look at our detailed guide on adding the run command to the start menu. This will prevent the stress of taking multiple steps before accessing it.
2. Verify checksum by using your File Explorer
- Download HashTab from the developer’s official website, click on the downloaded file, and follow the on-screen instructions to install.
- After installation, right-click on the file you want to run a checksum.
- Then, select Properties from the context menu.

- Locate and click on the tab labeled File Hashes at the top of the window to see the MD5, SHA-1, and CRC32 hashes for your selected file.

- Copy the checksum you want to compare against and paste it into the Hash Comparison dialog box.

- If the hash matches, you will see a green check mark and a red X if it does not match.


- Recent Windows 11 update lets you disable profanity filter in voice typing
- Microsoft wants Windows 10 users to upgrade to Windows 11 or Copilot + PCs
- Windows 11 KB5055627 update makes File Explorer more fluid
3. Use Windows PowerShell
- Click on Start on your Taskbar and type Powershell and select Run as administrator under Windows PowerShell.
- Type the following and add a space:
Get-FileHash
- Drag the downloaded ZIP file onto the Windows PowerShell window after the Get-FileHash command. The path after the command should be similar to this:
C:\Users\UserName> Get-fileHash C:\Users\UserName\Downloads\cdq2019s14_Windows.zip
- Inspect the calculated hash value while comparing it with the original one. There will be a glaring difference in the checksum, even if there are only a few differences in the underlying file.


You can verify a checksum on Windows using the means provided above. Ensure to follow the steps strictly for optimal results.
Do not hesitate to use the comments section if you have any questions or comments.
Radu Tyrsina
Radu Tyrsina has been a Windows fan ever since he got his first PC, a Pentium III (a monster at that time).
For most of the kids of his age, the Internet was an amazing way to play and communicate with others, but he was deeply impressed by the flow of information and how easily you can find anything on the web.
Prior to founding Windows Report, this particular curiosity about digital content enabled him to grow a number of sites that helped hundreds of millions reach faster the answer they’re looking for.