
Материал из Xgu.ru
Перейти к: навигация, поиск
| Данная страница находится в разработке. Эта страница ещё не закончена. Информация, представленная здесь, может оказаться неполной или неверной. Если вы считаете, что её стоило бы доработать как можно быстрее, пожалуйста, скажите об этом. |
Содержание
- 1 TCP Tuning в Linux
- 2 TCP Tuning в FreeBSD
- 3 TCP Tuning в Solaris
- 4 TCP Tuning в Windows
- 5 TCP Tuning в Mac OS X
- 6 Полезные программы
- 7 Дополнительная информация
[править] TCP Tuning в Linux
- Источник: TCP Tuning Guide
There are a lot of differences between Linux version 2.4 and 2.6, so first we’ll cover the tuning issues that are the same in both 2.4 and 2.6. To change TCP settings in, you add the entries below to the file /etc/sysctl.conf, and then run «sysctl -p».
Like all operating systems, the default maximum Linux TCP buffer sizes are way too small. I suggest changing them to the following settings:
 # increase TCP max buffer size
 net.core.rmem_max = 16777216
 net.core.wmem_max = 16777216
 # increase Linux autotuning TCP buffer limits
 # min, default, and max number of bytes to use
 net.ipv4.tcp_rmem = 4096 87380 16777216
 net.ipv4.tcp_wmem = 4096 65536 16777216
Note: you should leave tcp_mem alone. The defaults are fine.
Another thing you can try that may help increase TCP throughput is to increase the size of the interface queue. To do this, do the following:
ifconfig eth0 txqueuelen 1000
I’ve seen increases in bandwidth of up to 8x by doing this on some long, fast paths. This is only a good idea for Gigabit Ethernet connected hosts, and may have other side effects such as uneven sharing between multiple streams.
Linux 2.4
Starting with Linux 2.4, Linux has implemented a sender-side autotuning mechanism, so that setting the opitimal buffer size on the sender is not needed. This assumes you have set large buffers on the recieve side, as the sending buffer will not grow beyond the size of the recieve buffer.
However, Linux 2.4 has some other strange behavior that one needs to be aware of. For example: The value for ssthresh for a given path is cached in the routing table. This means that if a connection has has a retransmition and reduces its window, then all connections to that host for the next 10 minutes will use a reduced window size, and not even try to increase its window. The only way to disable this behavior is to do the following before all new connections (you must be root):
sysctl -w net.ipv4.route.flush=1
More information on various tuning parameters for Linux 2.4 are available in the Ipsysctl tutorial .
Linux 2.6
Starting in Linux 2.6.7 (and back-ported to 2.4.27), BIC TCP is part of the kernel, and enabled by default. BIC TCP helps recover quickly from packet loss on high-speed WANs, and appears to work quite well. A BIC implementation bug was discovered, but this was fixed in Linux 2.6.11, so you should upgrade to this version or higher.
Linux 2.6 also includes and both send and receiver-side automatic buffer tuning (up to the maximum sizes specified above). There is also a setting to fix the ssthresh caching weirdness described above.
There are a couple additional sysctl settings for 2.6:
  # don't cache ssthresh from previous connection
  net.ipv4.tcp_no_metrics_save = 1
  # recommended to increase this for 1000 BT or higher
  net.core.netdev_max_backlog = 2500
  # for 10 GigE, use this
  # net.core.netdev_max_backlog = 30000
Starting with version 2.6.13, Linux supports pluggable congestion control algorithms . The congestion control algorithm used is set using the sysctl variable net.ipv4.tcp_congestion_control, which is set to Reno by default. (Apparently they decided that BIC was not quite ready for prime time.) The current set of congestion control options are:
- reno: Traditional TCP used by almost all other OSes. (default)
- bic: BIC-TCP
- highspeed: HighSpeed TCP: Sally Floyd’s suggested algorithm
- htcp: Hamilton TCP
- hybla: For satellite links
- scalable: Scalable TCP
- vegas: TCP Vegas
- westwood: optimized for lossy networks
For very long fast paths, I suggest trying HTCP or BIC-TCP if Reno is not is not performing as desired. To set this, do the following:
sysctl -w net.ipv4.tcp_congestion_control=htcp
More information on each of these algorithms and some results can be found here.
Note: Linux 2.6.11 and under has a serious problem with certain Gigabit and 10 Gig ethernet drivers and NICs that support «tcp segmentation offload», such as the Intel e1000 and ixgb drivers, the Broadcom tg3, and the s2io 10 GigE drivers. This problem was fixed in version 2.6.12. A workaround for this problem is to use ethtool to disable segmentation offload:
ethtool -K eth0 tso off
This will reduce your overall performance, but will make TCP over LFNs far more stable.
More information on tuning parameters and defaults for Linux 2.6 are available in the file ip-sysctl.txt, which is part of the 2.6 source distribution.
And finally a warning for both 2.4 and 2.6: for very large BDP paths where the TCP window is > 20 MB, you are likely to hit the Linux SACK implementation problem. If Linux has too many packets in flight when it gets a SACK event, it takes too long to located the SACKed packet, and you get a TCP timeout and CWND goes back to 1 packet. Restricting the TCP buffer size to about 12 MB seems to avoid this problem, but clearly limits your total throughput. Another solution is to disable SACK.
Linux 2.2
If you are still running Linux 2.2, upgrade! If this is not possible, add the following to /etc/rc.d/rc.local
  echo 8388608 > /proc/sys/net/core/wmem_max
  echo 8388608 > /proc/sys/net/core/rmem_max
  echo 65536 > /proc/sys/net/core/rmem_default
  echo 65536 > /proc/sys/net/core/wmem_default
[править] TCP Tuning в FreeBSD
Add these to /etc/sysctl.conf and reboot.
kern.ipc.maxsockbuf=16777216
net.inet.tcp.rfc1323=1
net.inet.tcp.sendspace=1048576
net.inet.tcp.recvspace=1048576
For more info see the: FreeBSD Network Tuning Performance Tuning Guide
FreeBSD version before 4.10 don’t have SACK implemented, which limits its throughput considerably compared to other operating systems. You should upgrade to 4.10 or higher.
[править] TCP Tuning в Solaris
For Solaris create a boot script similar to this (e.g.: /etc/rc2.d/S99ndd)
- !/bin/sh
- increase max tcp window
- Rule-of-thumb: max_buf = 2 x cwnd_max (congestion window)
ndd -set /dev/tcp tcp_max_buf 4194304
ndd -set /dev/tcp tcp_cwnd_max 2097152
- increase DEFAULT tcp window size
ndd -set /dev/tcp tcp_xmit_hiwat 65536
ndd -set /dev/tcp tcp_recv_hiwat 65536
[править] TCP Tuning в Windows
Change the following using the Windows Registry editor:
- turn on window scale and timestamp option: HKEY_LOCAL_MACHINE\SYSTEM\CurrentControlSet\Services\Tcpip\Parameters\Tcp1323Opts=3
- set default TCP window size (default = 16KB): HKEY_LOCAL_MACHINE\SYSTEM\CurrentControlSet\Services\Tcpip\Parameters\TcpWindowSize=131400
- and maybe set this too: (default = not set): HKEY_LOCAL_MACHINE\SYSTEM\CurrentControlSet\Services\Tcpip\Parameters\GlobalMaxTcpWindowSize=16777216
The default for Tcp1323 is «No value»; the default behavior is do not initiate options, but if requested provide them.
You can use setsockopt() in your program to set your buffers to any size up to GlobalMaxTcpWindowSize, or you can use TcpWindowSize to set the default send and receive buffers for ALL sockets to this size. Its probably not a good idea to set this too large, but setting it up to 128K should be OK.
More information is available in the following Microsoft Documents:
 # TCP Configuration Parameters
 # TCP/IP Implementation Details
This article may also be useful:
# Windows 2000/XP Registry Tweaks
[править] TCP Tuning в Mac OS X
Mac OSX tuning is similar to FreeBSD.
sysctl -w kern.ipc.maxsockbuf=16777216
sysctl -w net.inet.tcp.sendspace=1048576
sysctl -w net.inet.tcp.recvspace=1048576
Apple also provides a Broadband Tuner patch that does a less agressive version of this for Mac OS X 10.4 and above.
[править] Полезные программы
Some useful Network Measurement Tools
- Iperf : nice tool for measuring end-to-end TCP/UDP performance
- pathrate/pathload : tools to measure available bandwidth and capacity
- pipechar: hop-by-hop bottleneck analysis tool
- UDPmon: Network performance measurement tool
- synack: ping replacement for sites that block ping
Some useful Network Testing Tools
- NDT: Web100 based Network Configuration Tester
- tcpdump: dump all TCP header information for a specified source/destination
- tcptrace: format tcpdump output for analysis using xplot
- NLANR TCP Testrig : Nice wrapper for tcpdump and tcptrace tools
[править] Дополнительная информация
- The Transmission Control Protocol
- Linux TCP Tuning Guide (англ.)
- TCP Stacks Testbed
- TCP Tuning and Network Troubleshooting на O’Reilly
- Pathrate tutorial
The differences between IP
MTU, TCP windows size and MSS are sometimes not clear enough but most of the
times the correct chosen values influence the throughput (here more details ) of
the link. Again, these values are vendor, hardware and operating system
dependent.
The IP MTU is considered to
be the maximum IP packet size which can be transmitted over the interface
without the need of IP fragmentation.
The TCP window size is
consider being how many TCP segments can be transmitted without waiting for a
TCP acknowledgment, or I say it to be a burst of unacknowledged TCP segments or
a burst of MSS.
The MSS is the Maximum
Segment Size of one TCP segment; it is actually the maximum amount of Data
which can be sent in 1 TCP segment, not including the Ethernet, IP and TCP
headers.
If you want to read more
details about MTU, you can find Almighty-MTU
As you have noticed (I hope)
in all my previous diagram I have put in all Ethernet frame Data field IP and
TCP header leaving the actual Data (which is the MSS) in another column, now
you can see below how a IEEE 802.3 frame with 3 MPLS Headers looks like (in
data filed encapsulating a TCP/P frame):

Theoretically we have the
following relationship between the MTU and MSS:
ETHERNET MTU > MPLS MTU > IP MTU > MSS
Again, theoretically the MSS
can be calculated with the following formula, defined in the RFC 879
MSS = MTU – IP Header (+ Options if present) – TCP Header (+
Options if present)
IP Header = 20 / 60 bytes without / with Options
TCP Header = 20 / 60 bytes without / with Options

1. Windows default MSS – 1460 bytes
The default MSS for Windows
OS is 1460 byes (considering in both IP and TCP Headers are not present any
Options), and the default TCP Windows size is 12 x default MSS = 17520 bytes.
The MSS value can be adjusted modifying the registry key:
HKEY_LOCAL_MACHINE\SYSTEM\CurrentControlSet\Services
Find Tcpip\Parameters TcpWindowSize
2. Linux default MSS – 1460 bytes
The default MSS for Linux OS
(check your kernel version it could be different) is 1460 bytes (considering in
both IP and TCP Headers are not present any Options), and the default TCP
Windows size is 10 x default MSS = 14600 bytes.
The MSS value 0 (zero) shown in the netstat –nr command indicates that the
kernel will ignore this value and will calculate the MSS= MTU-40 when the TCP
connection is established.
The route mss can be changed
using the following command (the changed value is not persistent at server
reboot):
ip route add x.x.x.x/24 dev eth0 advmss [max-segment-size-bytes]
This
command only affects the packets received, not the packets transmitted, for
Linux OS there are 2 MSS values: transmitted and received. If there is no
received MSS value, by default the minimum MSS value (536 bytes) is considered.
3. Cisco default MSS – 1460 bytes
The default MSS for Cisco is
1460 bytes for the TCP connection which are passing through the device and 536
bytes for the TCP connection started or terminated on the device.
To change the MSS value for
the TCP SYN packets which are passing through the Cisco device, the following
command can be used:
ip tcp adjust-mss [max-segment-size-bytes]
To change the MSS value for
the TCP SYN originating or terminating on Cisco device, the following
command can be used:
ip tcp mss [max-segment-size-bytes]
To change the TCP windows
size of the TCP sessions originating or terminating on Cisco device, the
following command can be used, the default is 2144 bytes:
ip tcp window-size [bytes]
4. Juniper default MSS – 1460byte for routers and 1350 bytes for
firewalls
For Juniper router, the default MSS is 1460 bytes for the TCP
connection which are passing through the device and 536 bytes for the TCP
connection started or terminated on the device.
For Juniper firewalls, for the
TCP connection started or terminated on the device the default MSS is 1350
bytes.
It can be configured as fallow:
user@host# set system internet-options tcp-mss [max-segment-size-bytes]
5. Huawei default MSS – 1460byte
For Huawei router, the default
MSS is 1460 bytes for the TCP connection which are passing through the device
and 536 bytes for the TCP connection started or terminated on the device.
The
minimum TCP MSS is by default 216 bytes. The default window size is 8KB.
The MSS can be changed for VT
interface, VE sub-interface or Eth-Trunk sub-interface using the following
command, the default being 0:
tcp adjust-mss [mss-value-bytes]
Conclusion: The MSS can be configured sometimes,
but the defaults again are vendor, hardware and operating system dependent,
that’s why, before changing them, please consult your vendor for more details.
Also the TCP congestion avoidance mechanism is vendor and software dependent.
By Mihaela Paraschivu
The TCP/IP protocol sometimes shows its age.
It was invented in an era when networks were very slow and packet loss was high. So one of the main considerations in early protocol design was reliability.
The Transmission Control Protocol (TCP) has built-in mechanisms for reliability that include validating a checksum on every packet, as well as detection and retransmission of dropped or out-of-order packets.
These features were invented when WAN bandwidth of 56Kbps was fast and packet drop rates of 1% were not uncommon.
Today’s broadband networks are many orders of magnitude faster, as well as vastly more reliable. So it shouldn’t come as a surprise that the bulletproof reliability mechanisms designed into the protocol sometimes cause problems. One of them has to do with a feature called TCP windowing.
Learn about network visibility and why it matters in this ebook
From network asset management to performance monitoring, mapping and traffic visibility. Get explanations and examples to help
What’s a TCP window?
A key reliability feature of TCP is the acknowledgement (ACK) packet. Device A sends a bunch of data to device B. Then device B validates all the packet-level checksums and sends an ACK packet that says everything was received correctly.
If everything isn’t received, some or all of the data needs to be retransmitted. Each device maintains a buffer of all the data just in case it needs to send it again. Receiving the ACK packet means the device can flush that old data out of the buffer.
The TCP window is the maximum number of bytes that can be sent before the ACK must be received.
If the network is unreliable, it’s better to keep the window small. This way you don’t have to retransmit as much data if there’s a problem. But if the network is reliable, then the window can be quite large.
One of the most clever features of TCP is the concept of a sliding window. Devices can change the window size dynamically, making it smaller when there’s congestion and bigger when things are clear.
Each device sends the other a suggested window size that says how much data it wants to receive before getting an acknowledgement. You can even have different window sizes for the two traffic directions in the same conversation.
Where TCP windowing goes wrong
TCP windowing is a very clever mechanism. But consider what happens on a network with very high latency and high bandwidth.
You can easily transmit an entire window’s worth of data before the first packet is even received at the other end. Then the sender stops and waits for the acknowledgement. Eventually, the receiver receives the last packet in the burst and sends an acknowledgement—a single packet that has to cross the network—taking the same amount of time again.
Each device can only send packets in these relatively short bursts. Then it must wait for the acknowledgement from the other end.
The average amount of data getting through the network is a small fraction of the total bandwidth. In modern networks, drop rates are so low, this slow transmission rate isn’t justified. All it does is drag down network performance
How to fix TCP windowing
The TCP window size is controlled by the end devices, not by the routers, switches, or firewalls that happen to be in the middle. The devices actively and dynamically negotiate the window size throughout the session.
But as I mentioned earlier, the TCP mechanism was designed for network bandwidth that’s orders of magnitude slower than what we have today. So some implementations still enforce a maximum window size of 64KB. You can get around this by enabling TCP windows scaling, which allows windows of up to 1GB.
Windows scaling was introduced in RFC 1323 to solve the problem of TCP windowing on fast, reliable networks. It’s available as an option in any modern TCP implementation. The only question is whether it’s been enabled properly.
In all recent Microsoft Windows implementations, windows scaling is enabled by default. You‘ll find places on the Internet telling you to change registry values to increase your window size, but depending on the Windows version you’re using, these changes will have no effect. The values may no longer even exist. Bottom line, you don’t need to fix TCP windowing in Windows, either on clients or servers.
On Linux systems, you can check that full TCP window scaling is enabled by looking at the value in /proc/sys/net/ipv4/tcp_window_scaling.
On Cisco devices, you can adjust the window size using the global configuration command, “ip tcp window-size”. This command only affects sessions to the Cisco device itself. Network devices generally won’t change the parameters for sessions that merely pass through them.
From few simplifying test results on previous article «Internet Speed Issue – Why TCP window size is matter», indeed TCP window size made difference of TCP throughput and download & upload performance. Again, I don’t think everybody move forward to TCP window scaling option. If you don’t have high speed connections or unstable such as home users, don’t need this option. It might bring worse TCP throughput than before. However, certain circumstance, this option is very useful. For example, data replicating from location A and B that has dedicated Gigabit links all the way device to device. Tuned proper TCP window size will increase huge TCP throughput. Of course link condition should be well maintained by network administrator. Let’s how we can tune TCP window size on your device.
- Internet Speed Issue – Bandwidth VS. Throughput
- Internet Speed Issue – How to troubleshoot(FTP)
- Internet Speed Issue – How to troubleshoot(IPERF)
- Internet Speed Issue – Why TCP window size is matter
- Internet Speed Issue – How to use TCP window scaling option
- Internet Speed Issue – Optimal MTU size on VPN or others
Microsoft Windows OSs
Microsoft Operating Systems set window size in following guides. If none of the preceding sets the TCP window size, the default receive window size is set as follows:
- For a transmission below 1 megabit per second (Mbps), 8 KB.
- For a 1-100 Mbps transmission, 17 KB.
- For a transmission greater than 100 Mbps, 64 KB.
Reference : http://msdn.microsoft.com/en-us/library/ms819736.aspx
There are couples of way to change TCP window size. You can just edit Registry by Regedit form DOS prompt. But there are tons of utilities to automatically change it for you. One I am using is SG TCP Optimizer. It is free.
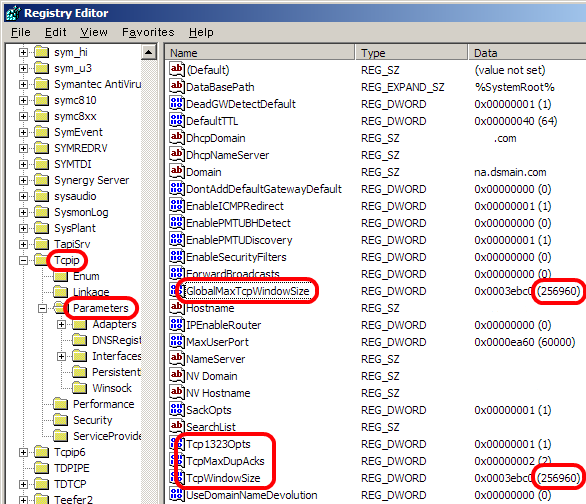
Once you execute the TCP window tuning software, below three parameters are configured.
The software has created below parameters under TCPIP > Parameters >.
– Tcp1323Opts ;
Value data= 1. (Hexadecimal)
This parameter is used for indicating the use of RFC 1323 Timestamp and Window Scale TCP options. Sender put flag bits as 0 means using window scaling, and bit 1 indicated TCP window scaling option will be used.
– TcpWindowSize;
Value data = 0 ~ 2^30-1 = 0 ~ 1073741823
Indication of the maximum TCP receive window size offered. Most of the cases, this Value data is match with a value data on GlobalMaxTcpWindosSize parameter.
– GlobalMaxTcpWindowSize;
Value data = 0 ~ 2^30-1 = 0 ~ 1073741823
This parameter can be used to set the receive window on a per-interface basis. Most of the cases, this Value data is match with a value data on TcpWindowSize parameter.
Below picture is screenshot of my testing device which was optimized by the above software. TCP window size is configured as 256 Kbytes. (Hexadecimal : 3ebc0)
Linux
Change below files with proper value on device you want to enable RFC1323.
1. /proc/sys/net/ipv4/tcp_window_scaling; Set «1» to activate window scaling option(RFC 1323)
2. /proc/sys/net/ipv4/tcp_timestamps; Set «1» to activate timestamps
3. /proc/sys/net/core/rmem_max; Set maximum size of TC receive window.
4. /proc/sys/net/core/wmem_max; Set maximum size of TCP transmit window.
5. /proc/sys/net/core/rmem_default; Set default size of TCP receive window.
6. /proc/sys/net/core/wmem_default; Set default size of TCP transmit window.
Cisco Router
In order to enable TCP window scaling option, TCP window size is set to a number greater than 65,535. The range of Window size is from 0 to 1,073,741,823 (2^30 – 1). The default value is 4128 bytes.
Router#conf t
Router(config)# ip tcp window-size 256000