
Если по какой-либо причине вам потребовалось поменять букву диска: внутреннего или внешнего HDD или SSD, флешки или другого накопителя, сделать это можно несколькими способами, предусмотренными в системе.
В этой инструкции для начинающих подробно о том, как поменять букву накопителя в Windows 11 с помощью утилиты «Управление дисками» или в командной строке, а также дополнительная информация, которая может быть полезной.
Управление дисками
Основной способ для смены буквы жесткого диска, SSD или USB-накопителя — встроенная утилита «Управление дисками». Шаги будут следующими:
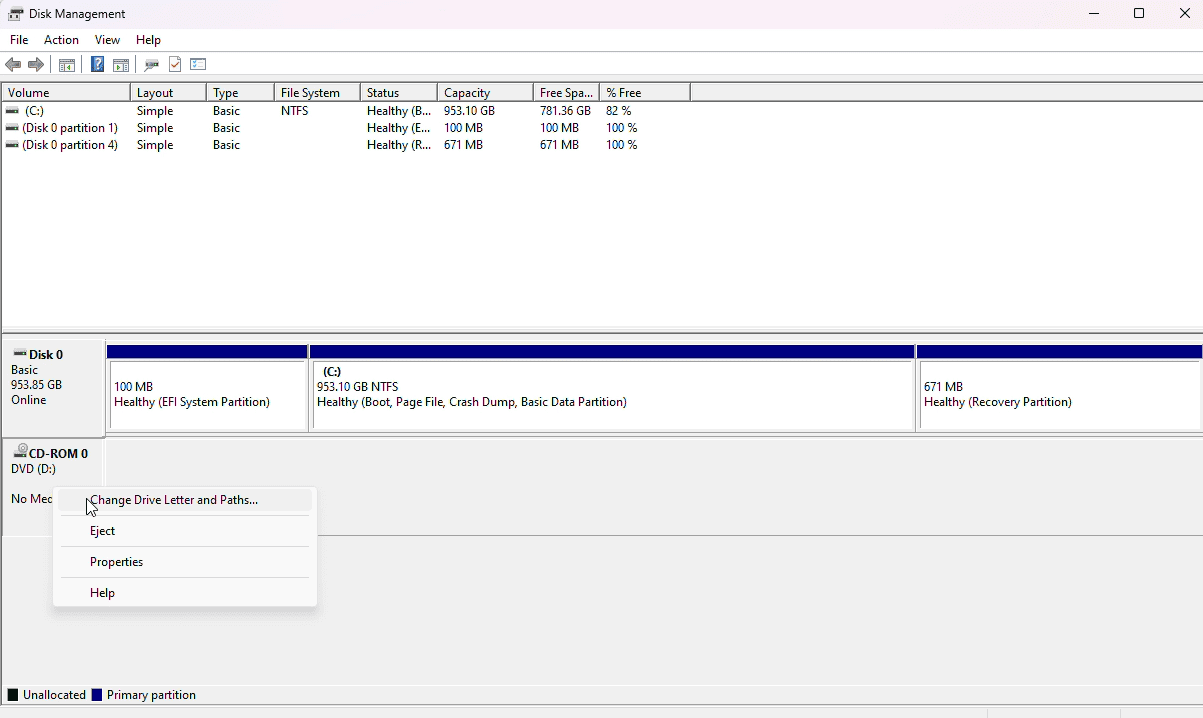
- Откройте «Управление дисками», сделать это можно через меню по правому клику на кнопке «Пуск», либо с помощью команды Win+R — diskmgmt.msc

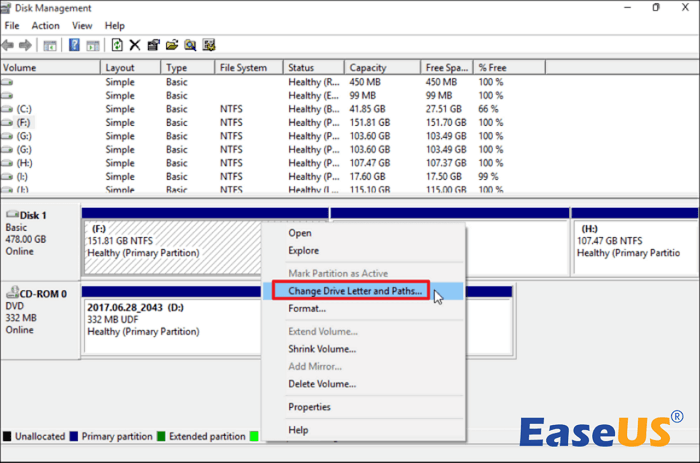
- В нижней части окна управления дисками нажмите по разделу на диске, для которого нужно выполнить изменение и выберите «Изменить букву диска или путь к диску» в контекстном меню. Если нужно поменять букву пустого привода, нажмите по его названию слева в нижней части окна «Управление дисками» и выберите аналогичный пункт меню.

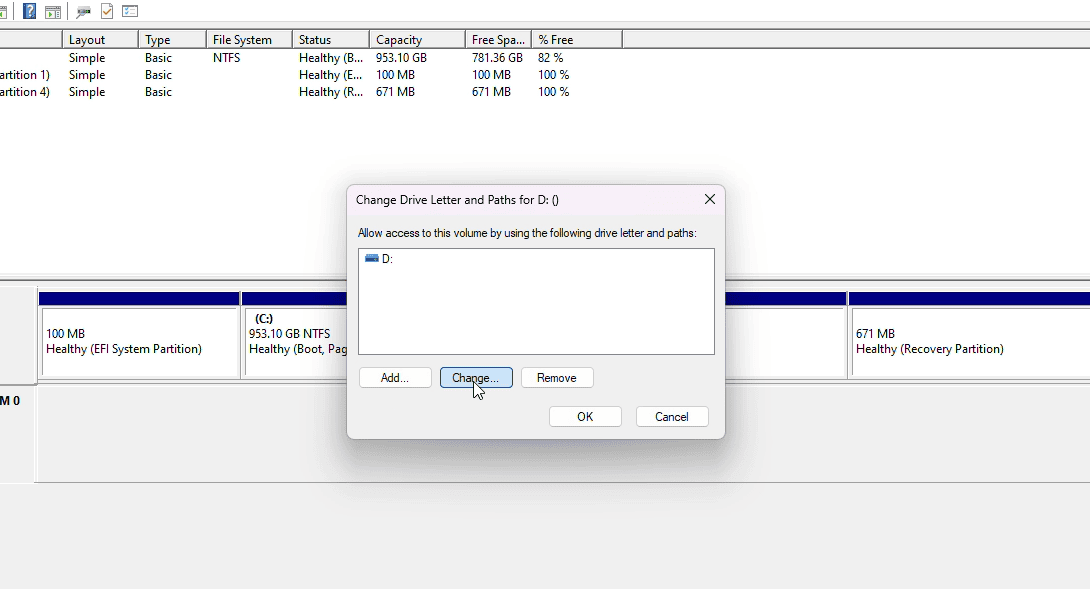
- В открывшемся диалоговом окне нажмите «Изменить».
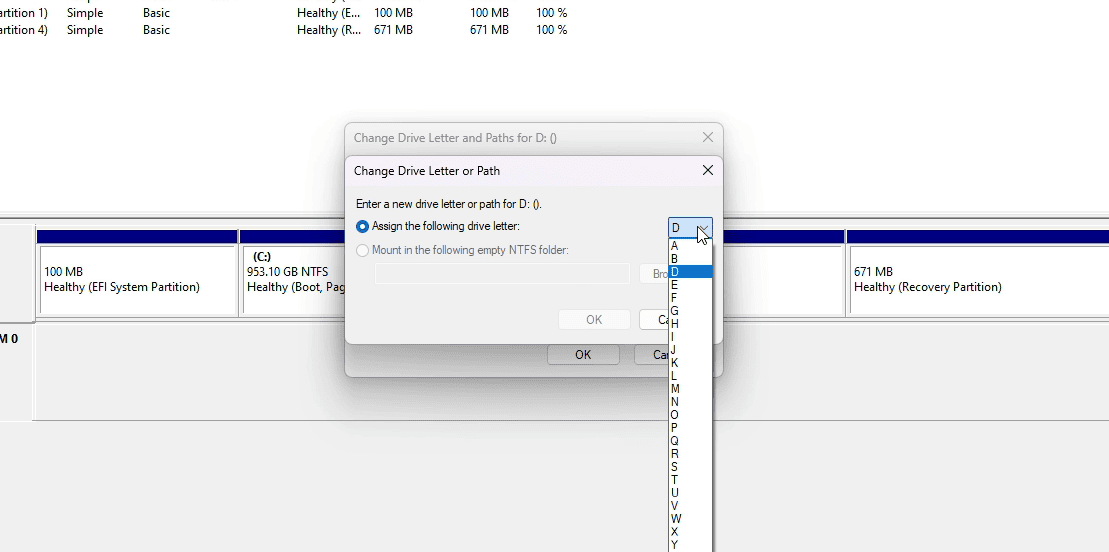
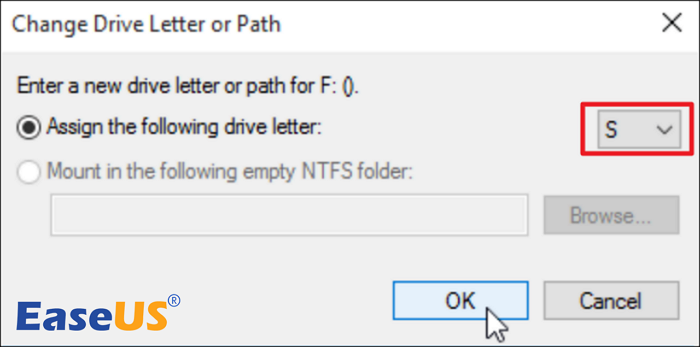
- Укажите новую букву диска в пункте «Назначить букву диска» и нажмите «Ок».
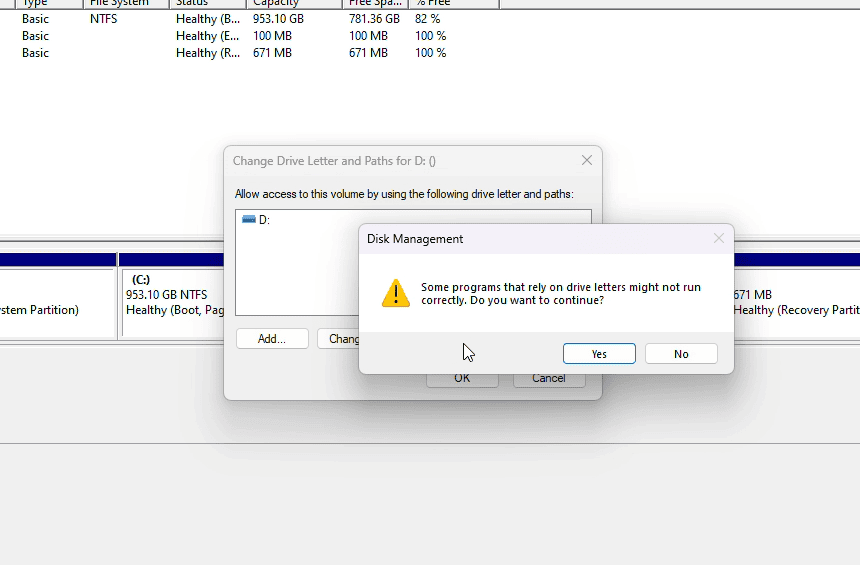
- Подтвердите изменение буквы диска.


Учитывайте, что не следует менять букву диска C: (системного раздела диска) — это может привести к проблемам с работой программ или ОС, те же проблемы могут возникнуть при изменении буквы диска, на который были установлены какие-то игры или программы.
В большинстве случаев этого способа бывает достаточно, однако иногда может пригодиться изменение буквы диска с помощью командной строки или PowerShell — например, для назначения букв тем дискам, для которых пункт «Изменить букву диска или путь к диску» в меню «Управления дисками» не отображается.
Параметры
Возможность смены, назначения или удаления буквы дисков есть и в «Параметрах». Порядок действий при их использовании:
- Откройте Параметры (клавиши Win+I) — Система — Память — Дополнительные параметры хранилища — Диски и тома.

- Нажмите «Свойства» справа от диска, который нужно подключить.
- Нажмите кнопку «Сменить букву диска».
- Укажите нужную букву диска, либо, если её нужно убрать выберите «Нет».
- Нажмите «Ок».


На этом всё, буква выбранного диска будет изменена.
Командная строка и Windows PowerShell
Второй способ изменить буквы накопителей и разделов на дисках — использование команд командной строки или Windows PowerShell. В первом случае шаги будут следующими:
- Запустите командную строку от имени администратора.
- По порядку введите следующие команды. В них потребуется заменить N на номер раздела, для которого изменяется буква, X — на текущую букву раздела (если она есть, иначе пропускаем 4-ю команду), а Z — на нужную новую букву диска:
diskpart
list volume
select volume N
remove letter=X
assign letter=Z
exit

Если требуется выполнить изменение буквы диска в PowerShell (Терминале Windows), можно использовать следующую команду от имени администратора:
Get-Partition -DriveLetter БУКВА| Set-Partition -NewDriveLetter НОВАЯ_БУКВА
Есть и другие варианты команд PowerShell, например, для изменения буквы оптического накопителя или буквы раздела, для которого она ещё не была установлена, подробное описание — в этой инструкции.
В завершение, некоторые дополнительные нюансы, которые могут быть полезными в контексте назначения букв дисков в Windows 11 и других версиях системы:
- Назначения букв хранятся в операционной системе, а не на самом диске, то есть при подключении накопителя к другому устройству буква может быть иной.
- Буквы A и B зарезервированы для использования с флоппи-накопителями, а буква C — для системного раздела диска текущей операционной системы.
- Изменение буквы диска возможно и в реестре в разделе
HKEY_LOCAL_MACHINE\SYSTEM\MountedDevices
Достаточно переименовать параметр с соответствующей буквой диска, однако я не рекомендую этот способ к использованию.


Сторонние программы для работы с разделами дисков также позволяют менять их буквы, однако для этой задачи использование таких утилит обычно излишне.
Changing drive letters in Windows can be a useful way to organize your storage devices and improve system navigation. The process involves using the built-in Disk Management tool or the Settings app to assign new letters to drives. This simple task can help you create a more logical system for your hard drives, SSDs, and removable media.
Windows offers multiple methods to change drive letters. The most common approach uses Disk Management, accessible through the Start menu search or by right-clicking the Start button. For newer versions of Windows, the Settings app provides an alternative route under the Storage section.
Modifying drive letters can affect how programs and shortcuts access files. It’s important to consider potential impacts before making changes. Backing up important data is always a good practice when altering system settings.
Managing Your Drive Letters in Windows
Changing drive letters in Windows is handy for organizing your drives or fixing conflicts. Here’s how to do it:
Using Disk Management
- Open Disk Management: Right-click the Start button and choose “Disk Management.”
- Find Your Drive: In the lower section, locate the drive you want to change.
- Right-click and Choose: Right-click the drive and select “Change Drive Letter and Paths…”
- Change or Add: If the drive has a letter, click “Change” and pick a new one. If it doesn’t, click “Add” and assign a letter.
- Confirm: Click “OK” and then “Yes” if prompted. Your drive letter is now changed!
Important Notes
- Don’t Change the System Drive: Avoid changing the letter of your main drive (usually C:), as this can cause problems.
- Be Careful with Programs: Some programs might rely on specific drive letters. Changing them could cause issues.
- Back Up Your Data: It’s always a good idea to back up important files before making changes like this, just in case.
Troubleshooting
| Problem | Solution |
|---|---|
| The “Change Drive Letter and Paths…” option is grayed out. | This might happen with system or recovery partitions. You usually can’t change their letters. |
| I get an error message when trying to change the letter. | The letter might already be in use by another drive. Try a different one. |
| A program stopped working after I changed the drive letter. | You might need to reinstall the program or change its settings to point to the new drive letter. |
Remember, changing drive letters is easy, but be cautious and back up your data first. With a few clicks, you can organize your drives and keep your system running smoothly.
Key Takeaways
- Changing drive letters helps organize storage devices in Windows
- Disk Management and Settings app are the main tools for this task
- Consider potential impacts on file access when modifying drive letters
Changing Drive Letters in Windows
Modifying drive letters in Windows can help organize storage devices and improve system navigation. This process can be done through various methods, each suited for different user needs and technical skill levels.
Using Disk Management
Disk Management is a built-in Windows tool for managing storage devices. To change a drive letter:
- Open Disk Management by typing “diskmgmt.msc” in the Start menu.
- Right-click the drive you want to change.
- Select “Change Drive Letter and Paths.”
- Click “Change” and pick a new letter.
- Confirm your choice.
This method works for internal and external drives. It’s user-friendly and doesn’t require advanced skills. Disk Management also lets users view all connected drives and their properties.
Utilizing Command Line Tools
Command line tools offer a text-based way to change drive letters. Two main options are available:
-
Command Prompt with Diskpart:
- Open Command Prompt as admin.
- Type “diskpart” and press Enter.
- Use “list volume” to see all drives.
- Select the volume you want to change.
- Use “assign letter=X” (replace X with desired letter).
-
PowerShell:
- Open PowerShell as admin.
- Use “Get-Partition” to list drives.
- Use “Set-Partition” to change the letter.
These methods are faster for users comfortable with command line interfaces. They’re also useful for remote management or scripting tasks.
Adjusting Drive Letters for External Devices
Changing letters for external drives is similar to internal ones. Here are some key points:
- Use Disk Management or command line tools.
- Ensure the device is connected and recognized.
- Be careful not to assign a letter already in use.
- Some devices may need to be reformatted if letter changes fail.
External drives include USB flash drives, external hard drives, and DVD drives. Letter changes for these devices are often temporary and reset when reconnected.
Advanced Method: Registry Editor
The Registry Editor allows for permanent drive letter changes. This method is for advanced users:
- Open Registry Editor by typing “regedit” in the Start menu.
- Navigate to HKEY_LOCAL_MACHINE\SYSTEM\MountedDevices.
- Find the entry for the drive you want to change.
- Modify the value data to reflect the new drive letter.
This method is risky and can cause system issues if done incorrectly. It’s best used when other methods fail or for specific system configurations.
System Considerations and Restrictions
Some important factors to keep in mind when changing drive letters:
- The system drive (usually C:) can’t be changed easily.
- Some programs may stop working if their installation drive letter changes.
- It’s best to change letters soon after adding a new drive.
- Back up important data before making changes.
- Avoid using letters A: and B: as they’re reserved for floppy drives.
Windows 10 and 11 both support drive letter changes through these methods. The process is largely the same across recent Windows versions.
Key Points
- How to change drive letters in Windows
- Disk Management
- Right-click Start → “Disk Management”
- Right-click the drive → “Change Drive Letter and Paths” → “Change”
- Command Prompt
diskpart→list volume→select volume X→assign letter=Y- Use
remove letter=Yto clear a letter
- Third-party software
- Tools like MiniTool Partition Wizard or AOMEI Partition Assistant for more complex tasks
- Disk Management
- How to assign drive letters to disconnected or external drives in Windows
- Disk Management → “Action” → “Change Drive Letter and Paths” → “Add” → pick a letter
- For removable drives, you can set a letter once and Windows often reuses it
Managing your computer’s storage can sometimes feel like organizing a chaotic library. One effective way to bring order to this digital chaos is learning how to change and assign drive letters in Windows 10. Whether you want to set a drive letter for a new disk, rename a drive letter of an existing one, or assign letters to disconnected drives, there are simple ways to accomplish each one.
Benefits of organizing drives with custom drive letters
Before diving into the how-to, look at why you might want to change drive letters in the first place. Customizing your drive letters can offer several advantages:
- Improved organization: By assigning specific letters to different types of drives (e.g., C for system, D for data, E for external), you can quickly identify the purpose of each drive.
- Consistency across multiple computers: If you use multiple machines, setting the same drive letters across all of them can make file management much easier.
- Software compatibility: Some older programs may expect certain files to be on specific drive letters. By changing drive letters, you can accommodate these requirements without physically moving files.
- Network mapping: When setting up network drives, using consistent drive letters can simplify access for all users.
Methods for changing and assigning drive letters
Now that you understand the benefits, you probably want to know, “How do I change drive letters in Windows 10?” There are several methods available, each with its own advantages.
Using Disk Management
Disk Management is a built-in Windows tool that provides a graphical interface for managing your drives. Here’s how to use it to set drive letters:
- Right-click on the Start button and select “Disk Management.”
- Right-click on the drive you want to modify.
- Choose “Change Drive Letter and Paths.”
- Click “Change” and select a new drive letter from the drop-down menu.
- Click “OK” to confirm the change.
The Disk Management tool is straightforward and doesn’t require any advanced technical knowledge. It’s perfect for most users who need to occasionally change or set drive letters for their disks.
Using Command Prompt
For those who prefer working with command-line interfaces, the Command Prompt offers a powerful way to set drive letters. Here’s how to do it:
- Open Command Prompt as an administrator.
- Type “diskpart” and press Enter.
- Type “list volume” to see all available volumes.
- Select the volume you want to modify by typing “select volume X” (replace X with the volume number).
- To assign a new letter, type “assign letter=Y” (replace Y with your desired letter).
- To remove a drive letter, type “remove letter=Y”.
While this method might seem more complex, it offers more flexibility and can be easily automated with scripts.
Using third-party software
There are also numerous third-party tools available that can help you change drive letters. These often provide additional features beyond what Windows offers natively. Some popular options include MiniTool Partition Wizard and AOMEI Partition Assistant. These tools can be particularly useful if you need to perform more complex drive management tasks alongside changing drive letters.
Best practices to set and rename drive letters
While changing drive letters is relatively straightforward, there are some best practices you should follow to retain system stability and maintain good organization:
Avoid frequently changing drive letters for system stability
Changing drive letters too often can lead to confusion and potential system instability. It may also disrupt software or scripts that rely on specific paths. Once you’ve set a drive letter, try to stick with it unless absolutely necessary to change it.
Use consistent naming conventions for better organization
Develop a system for assigning drive letters and stick to it. Consider reserving certain ranges of letters for specific types of drives. This can make it easier to identify the nature of a drive at a glance.
For example, you might use C for your system drive, D for data, E-H for external drives and I-Z for network drives. Consistent drive lettering not only helps with organization but also makes it easier to locate files and manage storage across multiple devices.
Confirm no conflicting drive letters across connected devices
When you connect a new drive, Windows automatically assigns it the next available letter. However, this can sometimes lead to conflicts, especially with network drives. Always check for potential conflicts when assigning new letters.
How to assign a letter to a disconnected drive
Sometimes, you may need to assign a letter to a disconnected drive. This can be useful for setting up network drives or preparing for a drive you plan to connect later. Here’s how to do it:
- Open Disk Management.
- Click on “Action” in the top menu.
- Select “Change Drive Letter and Paths.”
- Click “Add” and choose the letter you want to assign.
- Click “OK” to confirm.
Remember, this assigned letter will only take effect when the drive is connected.
Managing drive letters for external and removable drives
External and removable drives present unique challenges when it comes to drive letter management. Here are some tips:
- Consistency across computers: If you use the same external drive on multiple computers, try to assign it the same letter on each machine for consistency.
- Automatic assignment: Windows can automatically assign the same letter to a specific external drive each time it’s connected. To set this up:
- Connect the drive.
- Open Disk Management.
- Right-click on the drive and select “Change Drive Letter and Paths.”
- Click “Change” and select the desired letter.
- Check “Enable automatic drive letter assignment.”
- Disconnected drives: If you frequently connect and disconnect drives, you might want to leave certain letters unassigned for these drives to use.
Troubleshooting common issues
Even with careful planning, you might encounter some issues when you set drive letters. Here are some common problems and their solutions:
- “The drive letter is already in use”: This error occurs when you try to assign a letter that’s already taken. To resolve it, first change the letter of the conflicting drive, then assign the desired letter to your target drive.
- Unable to change system drive letter: Windows protects the system drive (usually C:) from being changed to prevent system instability. It’s generally not recommended to change this drive letter.
- Programs can’t find files after changing drive letters: Some programs store absolute file paths. After changing a drive letter, you may need to update these paths in the program settings.
- Network drives not showing up: If network drives aren’t appearing with their assigned letters, try disconnecting and reconnecting them or restarting your computer.
Advanced techniques for drive letter management
For power users and IT professionals, you have some advanced techniques for managing drive letters:
- Using Group Policy: In enterprise environments, you can use Group Policy to manage drive mappings across multiple machines.
- PowerShell scripting: PowerShell offers powerful scripting capabilities for automating drive letter management tasks.
- Registry editing: While not recommended for beginners, advanced users can directly edit the registry to manage drive letters.
Streamline your endpoint management today. Easily manage, patch and support all your endpoints with NinjaOne — the top choice for MSPs and IT teams everywhere. Don’t let complex systems hold you back; simplify your operations with NinjaOne. Try it for free and see the difference!

In the computer world, Windows 11 It has brought with it a series of new features that facilitate the management and customization of the operating system, but it also maintains classic features such as the use of letters to identify each unit of storage. Although this method has been implemented for decades, from floppy drives to modern units SSD, many users still find the process of change a drive letter or fail to fully understand its implications. Understanding how and why to do so can prevent errors, hassles when managing personal files, and compatibility issues with older applications.
In this article we will see all the possible ways to change the drive letter in Windows 11, from the simplest methods using native system utilities to the use of external applications, including alternatives such as commands de PowerShell y Symbol of the systemWe’ll also review the history and meaning of drive letters, tips for avoiding problems, limitations, and answers to frequently asked questions. Everything is explained clearly, with examples and warnings. If you’re looking to customize your system or need to reorganize your disks, here you’ll find the most comprehensive and up-to-date tutorial that covers any need related to this process.
Why do drives have letters in Windows?
For many years, Windows has identified your disks, partitions, and external devices using a system of lettersThis system is inherited from the old MS-DOS, where storage resource management was primarily alphabetical. Thus, each drive receives a different letter:
- A: Traditionally reserved for the first floppy disk drive.
- B: For a second floppy disk drive (something that is now uncommon, but was considered in the origins of the PC).
- C: It is the letter almost always assigned to the main hard drive, where the operating system is installed.
- The rest of the units, whether additional hard drives, optical drives, memory USB, card readers, etc., receive the next available letters in the alphabet, from D onwards.
The reason why C: It is the usual letter for the system, dating back to the fact that, in the past, computers used one or two floppy disk drives (A and B). When the hard drive became popular, the next free letter was C, thus establishing itself as the standard for the operating system and main programs.
What devices can have a drive letter?
The letter system covers all storage devices connected to your computer. This means you can find letters assigned to:
- Internal hard drives or SSDs
- Logical and primary partitions
- Optical drives such as DVD or CD-ROM
- USB flash drives and external hard drives
- Digital cameras when connected via USB
- SD card readers and similar
- Other removable or storage devices
Windows assigns letters automatically following clear rules: first to the main partitions, then to the logical partitions, and finally to the removable devices, always using the next available letter alphabetically. Sometimes the first letters (A and B) may be free, but the system almost never assigns them by default to modern hard drives or memory cards, unless the user decides otherwise.
Common reasons for changing a drive letter
You may wonder what the purpose of changing a drive letter is. There are several practical reasons for doing so:
- Avoid conflicts or duplicates: If you connect an external drive or USB drive that matches the letter of an existing drive, you may experience errors or difficulty accessing files.
- Organize the system to your liking: You can assign representative letters (for example, U: for your USB drives, B: for backups, or Z: for drives you only connect occasionally), making identification easier.
- Compatibility with older programs: Some applications require data to be found on a specific drive letter (e.g., older installers expect a CD drive on D:). Changing the drive letter helps these programs function correctly.
- Facilitate backup tasks or quick access: If you frequently use certain disks or memory sticks, giving them a fixed letter prevents their identification from changing between connections.
- Manage partitions and reorganizations: When you resize or create new partitions, you may need to reassign letters to maintain the order you prefer.
Important considerations before changing the font
Change the letter of a drive it is safe in most cases, but there are situations in which extreme caution is required:
- Do not change the drive letter where the operating system is installed. (usually C:), as this can cause serious errors and prevent Windows from Boot or that installed applications work correctly.
- If you change the drive letter of a drive where you have programs installed, those programs may stop working until you reinstall or adjust their paths.
- Before making the change, make sure there are no critical processes or files open on the drive whose ID you are changing.
- It is recommended to back up if you have important data, especially if the drive contains critical or rare information.
As long as you follow these recommendations, the process is reversible and Windows should not present any significant problems.
Different methods to change a drive letter in Windows 11

There are several ways to change a drive letter in Windows 11, using both built-in tools and third-party utilities. Below, we’ll explain each of them step by step:
1. Change a drive letter using Disk Management
The most convenient and common way is through the graphical tool known as Disk managementHere’s the detailed process:
- Right click on the icon Home on the taskbar and select Disk management (you can also search for «Create and forma tear hard disk partitions»).
- A new window will open showing all the disks and partitions on the computer, along with their assigned letters.
- Right click on the partition or drive whose letter you want to change and choose Change drive letter and paths….
- In the pop-up window, select the current letter, press Change…, and in the next window select the new letter for your drive from the drop-down menu.
- Confirm the action by pressing AcceptThe system will display a warning: accept if you are sure.
- Upon completion, it is recommended to reboot the system to ensure the changes are fully applied.
This method works for both internal and external hard drives, USB flash drives, card readers, and optical drives. It does not allow changing the letter of the system partition (C:). If you try to do so, the system itself will prevent it to protect the integrity of the operating system.
2. Assign letters from Windows 11 Settings
Another simple and visual way to modify the letter of a unit is to do it from the drive itself. System settingsYou can also check out this guide to adjust other aspects of system customization:
- Click on Home and enters Configuration.
- Choose System, then Storage and access Advanced storage settings → Disks and volumes.
- In the list, select the unit you want to modify and click on Properties.
- Press the option Change drive letter and choose the one you prefer.
- Save changes and exit setup.
This approach is especially useful for users who are less familiar with more technical tools, or for those who prefer a visual and integrated experience with the modern Windows 11 interface.
3. Change the letter with the Command Prompt (CMD)
For advanced users, these changes can be made using commands. You can learn more about this here. How to manage file extensions in Windows 11 and other advanced settings. The procedure is as follows:
- Open the Symbol of the system as administrator (search for “cmd”, then right click and “Run as administrator”).
- Enter the command diskpart and press Enter.
- Write list volume to display all partitions. Write down the number corresponding to the drive you want to change.
- Then write select volume X (replace X with your volume number).
- Finally, run assign letter = Y (where Y is the letter you want to assign).
- Exit diskpart and close the window.
This method is fast and flexible, although you need to be sure of the volume you are modifying to avoid errors.
4. Modifying letters with PowerShell
Another alternative route for users who prefer commands is PowerShell:
- Opens Windows PowerShell as administrator.
- Write Get Disk to see the list of disks and write down the number corresponding to your unit.
- Run Get-Partition -DiskNumber Set-Partition -NewDriveLetter And (replacing X with the disk number and Y with the letter you want to use).
In just a few seconds, the font is changed. For more information, check out our guide at How to adjust the font size in Chrome.
What happens if Windows runs out of drive letters?
Windows uses the 26 letters of the English alphabet, from A to Z. When the system runs out of free letters (which is rare), questions arise about how it handles new connections:
- In older versions, the system would use double combinations like AA, AB, etc., but this no longer happens in Windows 11.
- If you need more identifiers, you can mount partitions as empty folders instead of assigning them a letter, a practical solution for servers or advanced users.
However, in normal home use, you will rarely reach the limit of available letters.
What NOT to do when changing drive letters
There are some essential precautions before you start editing letters:
- Do not change the drive letter where Windows is installed. (usually C:), as this could damage the boot or system functionality.
- Avoid changing drive letters with installed programs unless strictly necessary, as many applications rely on absolute paths.
- If you have encrypted files, custom shortcuts, or automated scripts, check that everything is correctly redirected after the font change.
In any case, if the affected drive only contains data or other content that you use occasionally, change does not entail risks and you can reverse it whenever you want.
Passionate writer about the world of bytes and technology in general. I love sharing my knowledge through writing, and that’s what I’ll do on this blog, show you all the most interesting things about gadgets, software, hardware, tech trends, and more. My goal is to help you navigate the digital world in a simple and entertaining way.
Windows usually automatically assigns the drive letters for the partitions. Letters A and B are designed for the floppy drive and tape drives. For the system partition, the letter is typically assigned as C. Other partitions on your hard drive, USB drive, optical drive, or card reader will also be assigned a drive letter by Windows.

Assigning letters to drives in alphabetical order is an easy way to keep them organized. However, in Windows, the letters allocated to your hard disks, optical drives, and USB devices are not fixed. You may want to change drive letter for certain reasons.
You can change a drive letter for better and easier recognition of your programs or personal files. Another case is when you have connected an external drive, and Windows gives it an already-assigned letter. You will need to change the letter in this situation. Now, read this article from EaseUS to learn more information about changing drive letters for a PC or laptop.
For either convenience or to troubleshoot unique situations, you can learn how to operate in the following guide.
Method 1. Use EaseUS Partition Master
To change drive letters in an easy and fast way, you can download EaseUS Partition Master. It is a professional and dependable third-party tool. This tool provides you with the features you need. You are allowed to change drive letters on Windows 11/10/8/7 with the tool.
To do it without effort, download the software now and follow the steps below.
Step 1. Run EaseUS Partition Master, right-click the target partition, and choose «Change Drive Letter».
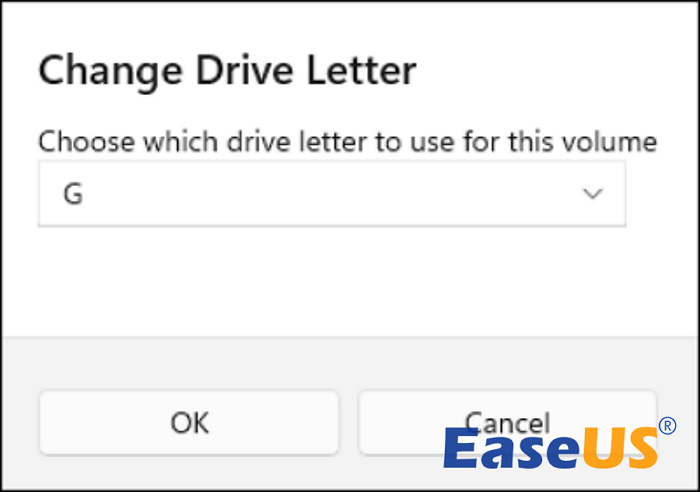
Step 2. In the new window, click the down arrow and choose a drive letter for the partition from the drop-down menu, then click «OK».
Step 3. Click the «Execute 1 Task(s)» button in the top-left corner, check the changes, and click «Apply» to change the drive letter of the selected partition.
Besides changing a drive letter, it also offers more advanced features like partitioning a hard drive, cloning a disk, migrating the operating system, Windows 10 password reset, and boot repair. Download and enjoy the convenience.
Share this article on your social media to help more people!
Method 2. Use Disk Management
A built-in tool called Disk Management can also change drive letters. It is a free tool provided by Microsoft. You can use it to partition hard drives, expand space for drives, and, of course, change a drive letter. It is appropriate for you if you are new to Windows.
Step 1. Hit «Windows + R» to open the Run box.
Step 2. Type in diskmgmt.msc and hit «Enter» to open Disk Management.
Step 3. You will see a list of drives in the window. Select the drive you want to change the letter of and right-click on it, then select «Change Drive Letter and Paths.»
Step 4. Click «Change», and another window will appear.

Step 5. Choose a letter for the drive from the list and click «OK».
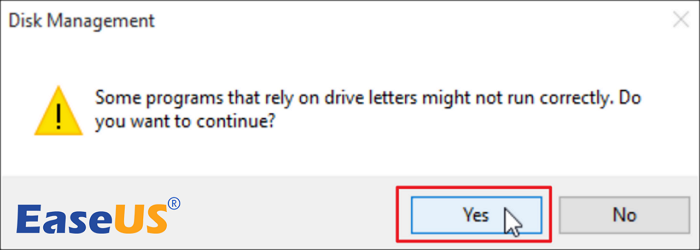
Step 6. Confirm the message and click «Yes».
Method 3. Use PowerShell
You can also use PowerShell to change a drive letter with a few steps. This tool requires only two commands. It might be a little difficult to do it with commands. However, the steps below are detailed, and you should be able to complete the process without problem.
Step 1. Open PowerShell.Press «Windows + S», and type in Windows PowerShell in the search box.
Step 2. Right-click Windows PowerShell, and click on «Run as administrator».
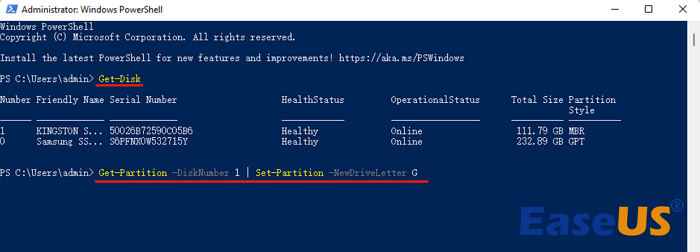
Step 3. Type Get-Disk and press «Enter».
Step 4. Select the drive, type in the command below, and hit «Enter» to assign a drive letter to the drive:
Get-Partition -DiskNumber 1 | Set-Partition -NewDriveLetter G
(Replace «1» with another number of the drive you want to format. Change the letter «G» as you prefer.)
Method 4. Use Command Prompt
The Command Prompt also has the ability to change drive letters. You can open the diskpart inside the Command Prompt and use it to execute the procedure. It is suitable for someone who likes commands. You are allowed to view partitions with all the details. Learn how to do so through the guide below.
Step 1. Press «Windows + S», and type in cmd in the search box.
Step 2. Right-click «command prompt», and then click on «Run as administrator».
Step 3. Type in diskpart and hit «Enter». Then type list volume and hit «Enter». A list of simple volumes will show up.
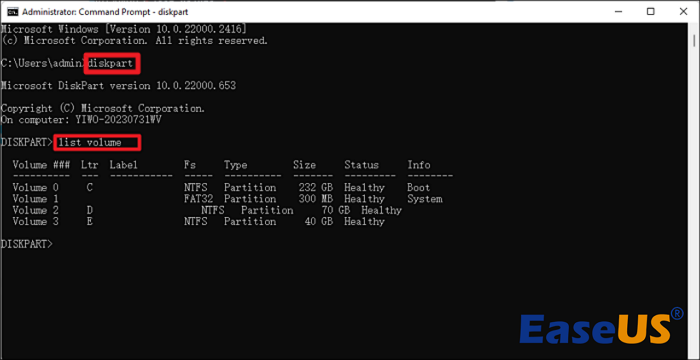
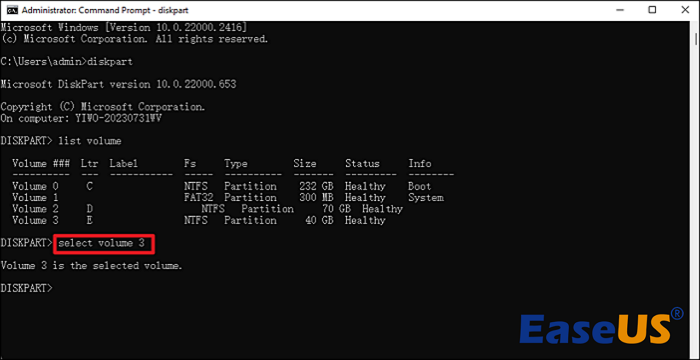
Step 4. Type select volume 3 to choose the one you want. (The number is based on your own decision.) Then, hit «Enter».
Step 5. Type assign letter=G and hit «Enter». (Choose an available letter from the alphabet yourself.)
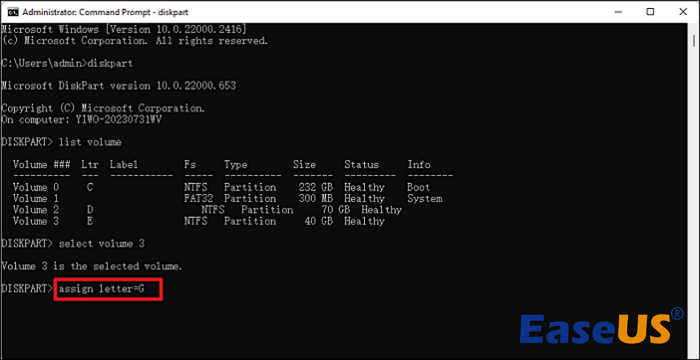
Close the Command Prompt tool and restart your computer. The new letter should be assigned to the drive now.
Method 5. Change Drive Letter in Settings
If you don’t want to download third-party software or use commands to change a drive letter, you can perform this task in settings. The drive letter changing process takes only a few steps. Try this method if you find others difficult to manage.
Step 1. Click «Start» and open Windows settings.
Step 2. Select «System > Storage > Advanced storage settings > Disk & volumes». (This is how Windows 11 accesses the settings. Windows 10/8/7 might differ from it.)
Step 3. Select the drive you want to change the letter for and click «Properties».
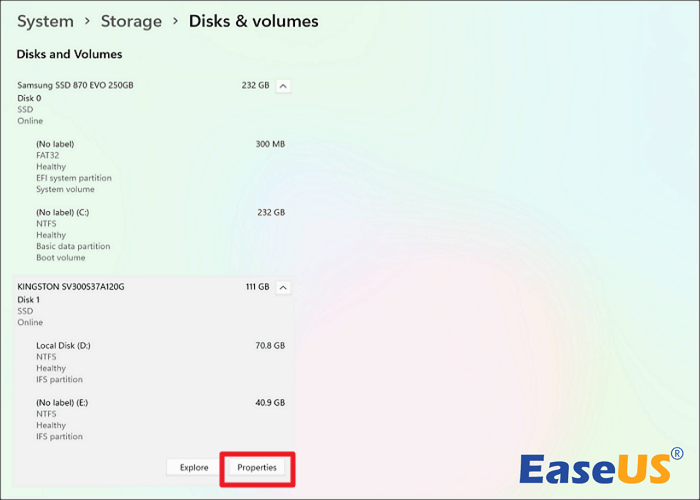
Step 4. Hit «Change drive letter» and choose a new letter for the drive. Then, click «OK».
During the drive letter changing process, you might encounter some related problems. Check the two articles below and see if they resolve your doubts.
Is It Safe to Change Drive Letter
It is safe to change a drive letter, but there are risks. Changing letters for drives is simply a way to identify different partitions by different letters. However, the incorrect operation will bring you troublesome issues. Below are two main problems that changing drive letters can cause.
- Changing the letter of a drive with installed software will cause the software to be unable to work. You might need to reinstall the software if you have done this.
- The operating system may be unable to find your files. Windows operating system might be confused about where your files are located if you change the letter.
Pro Tip: Do Not Change the OS Drive Letter
It is not recommended to change the drive letter where the Windows is installed. Doing so can cause serious consequences to your computer.
- If you change the OS drive letter, Windows will not be able to boot up because the corresponding encrypted files cannot be changed.
- If you try to change it with Disk Management, you will see a message saying, «Some programs that rely on drive letters might not run properly.»
Thus, if you do need to install Windows systems on another drive with a different letter, you must first perform a fresh install of Windows. Yet still, it is not a recommended thing to operate.
Conclusion
Above all the methods mentioned in this post, using a third-party tool like EaseUS Partition Master is certainly the easiest and safest way to change drive letters. Before you execute the changing process, you should always be careful with the drives you want to change letters for. An incorrect operation will cause critical results, and you might lose important data and programs.
FAQs on Change Drive Letter
Below are the questions that are frequently discussed. Read and see if they solve your doubts.
1. How many drive letters can Windows have?
Windows has only 26 letters that can be assigned to drives installed on a computer. Letters A and B are designed for floppy drives.
2. Does changing drive letter affect programs?
If you have already installed Windows or apps on that drive, changing the drive letter might cause trouble running or finding the drive. It is best not to change the drive letter of a drive that already has Windows or applications installed.
3. Can I remove a drive letter?
You can use Disk Management to remove the drive letter. However, if you do so, you will not be able to see and open the partition on the computer.
4. Can I change a drive letter without losing data?
If you only have the documents that you rarely use, changing the drive letter may result in small troubles rather than serious consequences. Thus, you can change the letter of an external drive without issues.