
You are here:
Home » Windows 10 » Change Default Installation Directory In Windows 10/8/7
By default, Windows installs all the programs in C:\Program Files or C:\Program Files (x86) directory depending on the type of Windows 10 and the program you are installing.
You might want to change the default installation directory if your “C” drive is running out of free space. While some programs allow you to select the install drive and directory, most programs don’t offer the option to select installation drive. For instance, setup of antivirus programs like Kaspersky Internet Security and Norton doesn’t offer an option to select the default installation directory during the product installation.
If you want to change the default installation location of programs in Windows 10/8/7, there is an easy workaround. You just need to edit the registry to change the default installation directory or path. And if you want to move installed programs, please refer to our how to move installed programs to another drive in Windows 10 guide.
To start with this guide, make sure you have enough free space in your new directory which you are going to make as default one.
You need to do a small registry change in order to change your default installation directory as follows:
Changing the default installation directory
IMPORTANT: We recommend you create a manual system restore point or backup registry so that you can easily restore original settings if required.
WARNING: This is an advanced guide. So, proceed at your own risk.
Step 1: Type Regedit in Start menu/taskbar search box or in the Run dialog box and hit enter key to continue.
Step 2: Navigate to the following registry key in the Registry Editor:
HKEY_LOCAL_MACHINE\SOFTWARE\Microsoft\Windows\CurrentVersion
Step 3: On the right side, locate the value named “ProgramFilesDir” and change the default value “C:\Program Files” to your new directory path (address).

Next, find ProgramFileDir (x86), double-click on it and change it value data to a location where you want to install programs by default.

Step 4: Finally, close the Registry Editor and reboot your system to apply the change. You might need to restart your computer to apply the change. Download a program and try to install it and check if it’s installed in the new installation directory.
If you are experiencing any issues, please restore Windows 10 to an earlier date using the previously created restore point.
PS: This tweak should work fine with Windows 7 and Windows 8/8.1 as well.
Don’t forget to check out how to move installed apps to another drive in Windows 10 guide.
Настройка переменных среды Windows может помочь сократить время, необходимое для набора команд в командной строке или, если вы часто пишете скрипты для собственных задач, сделать их более читаемыми. В большинстве случаев обычные пользователи добавляют записи в системную переменную среды PATH, хотя бывают и другие задачи.
В этой пошаговой инструкции базовая информация о том, как открыть переменные среды Windows 11 и Windows 10, создать или отредактировать их.
Что такое переменные среды
Переменные среды в Windows — записи о расположении системных папок, свойствах системы и другие, которые доступны для любой программы или скрипта.
Одна из наиболее часто используемых переменных среды — PATH, указывающая на папки, в которых выполняется поиск файлов, вызываемых в командной строке, терминале Windows, файле bat или из других источников. В качестве примера её назначения:
- Если вы откроете командную строку (или диалоговое окно «Выполнить»), введёте regedit и нажмете Enter — вы сможете запустить редактор реестра, не указывая полный путь к файлу regedit.exe, поскольку путь C:\Windows добавлен в переменную среды Path.
- Если же тем же образом в командной строке написать имя программы, путь к которой не добавлен в Path (chrome.exe, adb.exe, pip и другие), вы получите сообщение «Не является внутренней или внешней командой, исполняемой программой или пакетным файлом».
Если предположить, что вы часто используете команды adb.exe (например, для установки приложений Android в Windows 11), pip install (для установки пакетов Python) или любые другие то для того, чтобы не писать каждый раз полный путь к этим файлам, имеет смысл добавить эти пути в переменные среды.
Также вы можете добавлять и иные переменные среды (не обязательно содержащие пути), а в дальнейшем получать и использовать их значения в сценариях BAT (командной строки) или PowerShell. Пример получения и отображения значения системной переменной PATH для обоих случаев:
echo %PATH%
echo $Env:PATH
Получить список всех переменных среды в командной строке и PowerShell соответственно можно следующими командами:
set
ls env:
Редактирование переменных среды Windows 11/10
Прежде чем приступать, учтите: изменение системных переменных среды по умолчанию может привести к проблемам в работе системы, не удаляйте уже имеющиеся переменные среды. Возможно, имеет смысл создать точку восстановления системы, если вы не уверены в своих действиях.
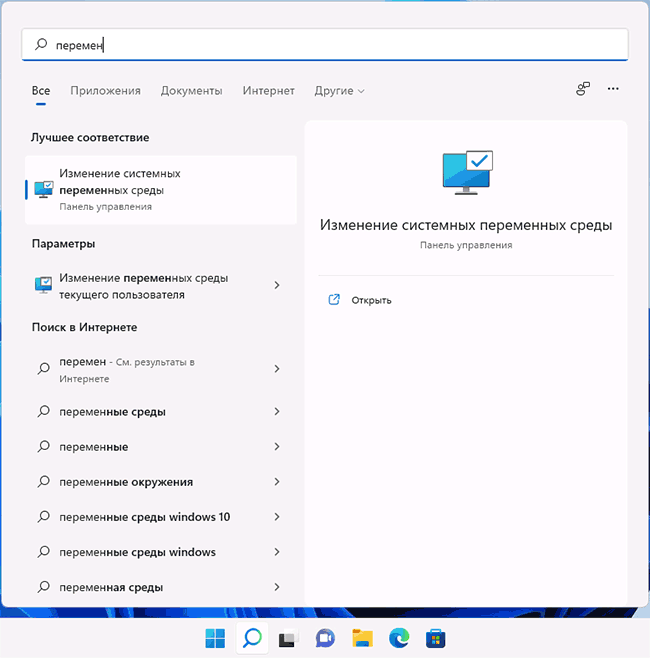
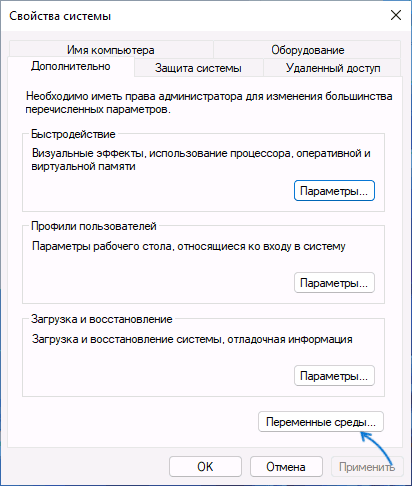
- Чтобы открыть переменные среды Windows вы можете использовать поиск в панели задач (начните вводить «Переменных» и откройте пункт «Изменение системных переменных среды») или нажать клавиши Win+R на клавиатуре, ввести sysdm.cpl и нажать Enter.

- На вкладке «Дополнительно» нажмите кнопку «Переменные среды…»

- В разделе «Переменные среды пользователя» (если требуется изменение только для текущего пользователя) или «Системные переменные» выберите переменную, которую нужно изменить и нажмите «Изменить» (обычно требуется именно это), либо, если необходимо создать новую переменную — нажмите кнопку «Создать». В моем примере — добавляем свои пути в системную переменную Path (выбираем эту переменную и нажимаем «Изменить»).

- Для добавления нового значения (пути) в системную переменную в следующем окне можно нажать кнопку «Создать», либо просто дважды кликнуть по первой пустой строке, затем — ввести нужный путь к папке, содержащей нужные нам исполняемые файлы.

- Также вы можете использовать кнопку «Изменить текст», в этом случае окно изменения системной переменной откроется в ином виде: имя переменной, а ниже — её значение. В случае указания путей значение будет представлять собой все пути, хранящиеся в переменной, разделенные знаком «точка с запятой».

- При создании новой переменной среды окно будет тем же, что и в 5-м шаге: необходимо будет указать имя системной переменной в верхнем поле, а её значение — в нижнем.


После создания или изменения переменной среды и сохранения сделанных настроек, переменная или обновленные значения сразу становятся доступны для текущего пользователя или в системе в целом в зависимости от того, какие именно переменные редактировались или создавались. Также есть методы добавления переменных среды в командной строке или PowerShell, подробнее в статье: Как добавить путь в переменную среды PATH
February 26, 2023 10:11
/
/
Geek Tips
Comments (0)
Are you having problems changing the location of your user files? Did you uninstall OneDrive, and now your personal folders are all screwed up. Here is how to manually change the default location of user files in Windows.

Being able to change the location of user files has to be one of the coolest features of Windows when it works. But there may be a time when you encounter an error when trying to move a folder location. The most common error is ‘Can’t move the folder because there is a folder in the same location that can’t be redirected. Access is denied‘. This error relates to the folder redirection done when OneDrive is used and often appears when you uninstall OneDrive.
Note: The following procedures require editing the registry. Incorrectly editing the registry can cause system instability and even failure to boot. If you do not feel comfortable editing the registry, please get in touch with a local computer technician for assistance.
Yes, truth be told, the special user folders are merely just registry entries and can be easily changed. But it is highly recommended to back up the registry first. So I want to show you how to back up the registry, change the location of your user files, and restore the registry if necessary.
How to open the Registry Editor in Windows
- Bring up the Run dialog box by either:
- Pressing the Windows logo key + R
- Right-click on the Windows logo on the Start Menu or press the Windows logo key + X and then select Run
- In the Run dialog box that appears, type regedit and select OK. If you’re prompted for an administrator password or confirmation, type the password or provide confirmation.
How to backup the registry
- With the Registry Editor open:
- Highlight Computer in the left-hand column to backup the complete registry.
- Highlight the key or value you want to backup.
- Left-click on the File pull-down menu and left-click on Export.
- Select the location and a descriptive file name for the backup file, then left-click on Save.
How to change the default user files location in the registry
- With the Registry Editor open:
- Navigate to the following key:
HKEY_CURRENT_USER\Software\Microsoft\Windows\CurrentVersion\Explorer\User Shell Folders

- In the right-hand column, right-click on the Name of the key you want to change and select Modify… from the context menu.
- Enter either the default settings for that folder from the table below or the path to the actual folder (C:\Example\Docs). Make sure the actual folder exists before changing the folder key.
- Log off or restart your computer for the registry change to take effect.
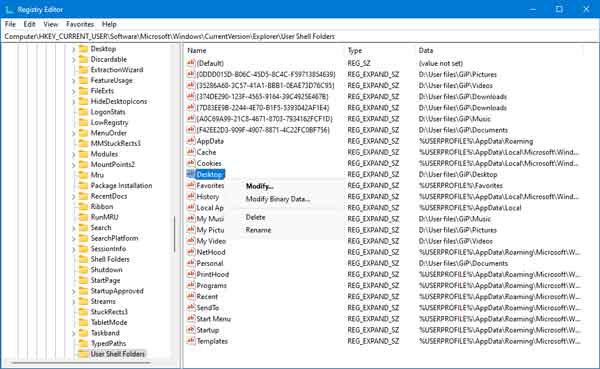
Default user shell folder settings
| Registry key name | Folder | Data (default value) |
|---|---|---|
| {374DE290-123F-4565-9164-39C4925E467B} | Downloads | %USERPROFILE%\Downloads |
| Desktop | Desktop | %USERPROFILE%\Desktop |
| Favorites | Favorites | %USERPROFILE%\Favorites |
| My Music | Music | %USERPROFILE%\Music |
| My Pictures | Pictures | %USERPROFILE%\Pictures |
| My Video | Videos | %USERPROFILE%\Videos |
| Personal | Documents | %USERPROFILE%\Documents |
How to restore the registry
- With the Registry Editor open:
- Left-click on the File pull-down menu and left-click on Import.
- Navigate to the location of the REG file you want to import and left-click on it.
- Left-click on the Open button. You should get a confirmation screen telling you successfully imported the file.
7a7e6c6e-fa37-4db0-9d2e-a2845d4b4b66|1|5.0|96d5b379-7e1d-4dac-a6ba-1e50db561b04
,
In Windows Vista and latest Operating Systems (Windows 7, 8 & 10) all user files are stored –by default- under several Personal folders (Documents, Downloads, Favorites, Music, Videos, Pictures, etc.), at the following location on the main disk (OS disk): C:\Users\<USERNAME>\.
In the case that your personal files exceeds main disk’s limits and you have an additional drive or partition on your system with enough free space, then you can move your files from your main disk into the additional drive by using the «Move» feature, but If you have problems when using the «Move» feature, then you can use Windows Registry to set a different location for your personal folders.
- Related Article: How to Move User Folders – Change Default Save Location (Windows Vista, 7, 8 & 10)
The Personal Folders settings –per user- are stored at the following registry key:
- HKEY_CURRENT_USER\SOFTWARE\Microsoft\Windows\CurrentVersion\Explorer\User Shell Folders

Below you can find the default path (location on your disk) for every User Shell folder:
{374DE290-123F-4565-9164-39C4925E467B} –> %USERPROFILE%\Downloads
Desktop –> %USERPROFILE%\Desktop
Favorites –> %USERPROFILE%\Favorites
My Music –> %USERPROFILE%\Music
My Pictures –> %USERPROFILE%\Pictures
My Video –> %USERPROFILE%\Videos
Personal –> %USERPROFILE%\Documents
Programs –> %USERPROFILE%\AppData\Roaming\Microsoft\Windows\Start Menu\Programs
Start Menu –> %USERPROFILE%\AppData\Roaming\Microsoft\Windows\Start Menu
Startup –> %USERPROFILE%\AppData\Roaming\Microsoft\Windows\Start Menu\Programs\Startup
Note: The %USERPROFILE% variable represents the path to the user’s profile folder. (C:\Users\<User Name>\)
In this tutorial you can find detailed instruction on how to change the location of any personal folder (Desktop, Documents, Downloads, Pictures, Music, Videos) to a different location (drive) on your computer.
How to Change the Default location of any Personal Folder from Registry.
Notice: This procedure doesn’t work on Windows 10.
In order to redirect the Save location of a personal folder, by using registry, then:
1. At the additional drive (or partition) create the folder(s) that you want to use as the new location.
2. Open Registry Editor: To do that:
- Simultaneously press “Windows” + “R” keys to open the RUN window.
- In “RUN” window “Open” box, type: regedit
- Press Enter.

3. Navigate to this key:
HKEY_CURRENT_USER\SOFTWARE\Microsoft\Windows\CurrentVersion\Explorer\User Shell Folders
4. At the right pane right-click at the personal folder that you want to change it’s default location and select Modify. *
* Note: If you cannot find the folder that you want to change its location on the list, then:
1. Right click on a empty space (at the right pane) and then select New –> Expandable String Value.

2. Type the name of the folder* that you want to change it’s default location.
* For example if you want to change the location of «Documents» folder then type «Personal» (without quotes).

5. Now at the value data box, type exactly the new path (location) for the selected folder (e.g.»E:\Backup\Documents») and click OK.
6. Close Registry Editor.

7. Restart your computer and you ‘re done!
Notice: You must manually move the contents (if you want) from the old location to the new location.
That’s all! Did it work for you?
Please leave a comment in the comment section below or even better: like and share this blog post in the social networks to help spread the word about this solution.
If this article was useful for you, please consider supporting us by making a donation. Even $1 can a make a huge difference for us.
- Author
- Recent Posts
Konstantinos is the founder and administrator of Repairwin.com. Since 1995 he works and provides IT support as a computer and network expert to individuals and large companies. He is specialized in solving problems related to Windows or other Microsoft products (Windows Server, Office, Microsoft 365, etc.).
Download Windows Speedup Tool to fix errors and make PC run faster
In Windows 11/10 OS, the software is installed on your System Drive, usually C drive, in the Program Files folder. The typical path in Windows 32-bit is C:\Program Files and in Windows 64-bit is C:\Program Files and C:\Program Files(x86).
Microsoft recommends the C:\Program Files folder for the default installation destination. It’s a convention that ensures proper inter-operation between your program and the OS’s application and security models. So, once software programs are installed, they go by default to C:\Program files on the computer.
This can, however, be changed by selecting another folder or location or partition. To change the default installation folder, the data must be modified in the ProgramFilesDir key and a new path must be chosen for the installation folder.
Windows uses the System Disk for installing any new applications; that is, if your Windows is installed on the C Drive, the default folder where all the applications you install would automatically show up as C:\Program Files, unless, of course, you change it manually while installing the application’s locations.
WARNING: Do note that Microsoft does not support changing the location of the Program Files folder by modifying the ProgramFilesDir registry value. It states that if you change the location of the Program Files folder, you may experience problems with some Microsoft programs or with some software updates. And so as such, we do not recommend you try it – as it has worked for some, and not for others – esp. on recent Windows 11/10 builds. If at all you decide to try this suggestion, we recommend that you back up your registry and create a system restore point first.
TIP: Windows 11/10 makes things easy. You can easily move Windows Apps to another Drive and change their Install location.
If you almost always prefer not to install on the System Disk, but instead on another partition, say, the D drive, then rather than changing the default location every time, you can edit the registry as follows:
Before you begin, create a system restore point first.
Now open Regedit and navigate to the following key:
HKEY_LOCAL_MACHINE\SOFTWARE\Microsoft\Windows\CurrentVersion

Now in the right pane, look for the value ProgramFilesDir and/or ProgramFilesDir (x86) depending on whether your Windows is 32-bit or 64-bit.
Double-click on it and in the box which opens up, change its Value data from C:\Program Files to say, D:\Program Files.
Click OK. Exit.
The default directory for installing all your programs shall now be D:\Program Files.
If you are using Windows 64-bit, you must change the value of ProgramFilesDir and ProgramFilesDir (x86).
Reads that will interest you:
- How to change the default location of the Documents folder or profile personal files
- How to change the default install location of Windows Store Apps.
Anand Khanse is the Admin of TheWindowsClub.com, a 10-year Microsoft MVP (2006-16) & a Windows Insider MVP (2016-2022). Please read the entire post & the comments first, create a System Restore Point before making any changes to your system & be careful about any 3rd-party offers while installing freeware.