
Download Article
Easy ways to set the JAVA_HOME environment variable
Download Article
- Windows
- Mac
- Linux
- Video
- Tips
|
|
|
|
Are you seeing Java errors like «JAVA_HOME is not defined correctly?» or «JAVA_HOME is set to an invalid directory?» If you’ve recently installed the Java Development Kit (JDK), you’ll need to set your JAVA_HOME variables and configure the path so applications know where to find Java. This wikiHow article will show you the easiest ways to change or set the Java home path on Windows, macOS, and Linux.
Setting Java Home: Fast Facts
- To set JAVA_HOME, you’ll need the full path to your JDK or JRE installation.
- On Windows, you’ll set JAVA_HOME in Advanced System Settings > Environment Variables.
- On a Mac, you’ll need to add the Java path to your .zshrc file in a Terminal.
- On Linux, you can add the Java path to your .bashrc.
-

Assuming that you didn’t change the path for the JDK during installation, it should be in a directory under C:\Program Files\Java. There are a few ways to find the full path:
- Open File Explorer, click This PC in the left panel, then navigate to C:\Program Files\Java. The directory you’re looking for should have the name of the JDK version, such as C:\Program Files\Java\jdk-23.
- You can also open the command prompt and run the command wmic product where "Name like '%%Java%%'" get installlocation,Name. This will tell you the full path of the JDK, even if you haven’t yet set JAVA_HOME.
-
Here’s how:
- Press the Windows key on your keyboard and type advanced system.
- Click View advanced system settings in the search results.
Advertisement
-
You’ll see it at the bottom-right corner of the System Properties window.
-
You’ll have two sections on this window—»User variables» and «System variables.» You’ll want to make sure you’re clicking New under the first box (User variables).
- If you have multiple JDK installations and want to change JAVA_HOME to your new installation, select the current JAVA_HOME user variable and click Edit… instead.
-
- If you’re editing the current JAVA_HOME path, you’ll already have JAVA_HOME here. So, you can skip this step.
-
For example, if the path is C:\Program Files\Java\jdk-23, enter that full path into the «Variable value» field.[1]
- If you’re adding a second path to JAVA_HOME, just type a semicolon (;) after the first path, then enter the second path.
- If you’re replacing an old JAVA_HOME path, just delete the current path and enter the new one.
-
This takes you back to the Environment Variables window.
-
You should already have a variable in the «User variables» section called «Path.» To make sure you can run the Java binaries, you’ll need to edit your path to add the location of the JDK bin directory.
- If you want other users on this PC to be able to access Java binaries from the command line, repeat this step for the «Path» variable under «System variables» as well.
-
You’ll already have at least one directory in your path, which needs to stay in place. Here’s how to add the Java bin directory:
- Click the New button at the top.
- Enter the full path to the JDK with \bin at the end. For example, C:\Program Files\Java\jdk-23.0.2\bin.
- Click OK.
-
This updates your JAVA_HOME variable and adds the Java binaries to your path.
- You won’t need to restart your computer for the changes to take effect, but you will need to relaunch any apps that were trying to access Java.
- Open a new command prompt window and run the command echo %JAVA_HOME% to display the new path to JAVA_HOME.
- Make sure this is a new command prompt window. If you still have the same window open, the command will fail because it doesn’t have the new environment variables.


Advertisement
-
To open Terminal, search for Terminal in Spotlight. You can also open Finder, click the Go menu, select Utilities, and choose the Terminal app.
-
This handy utility that comes preinstalled on macOS will tell you the full path to your Java installation, which you’ll need to set JAVA_HOME.
- If you have more than one Java installation and want to see the paths to all of them, use /usr/libexec/java_home -V instead.
-
Highlight the path to the Java installation you want to use as JAVA_HOME, press Cmd + V to copy it, then paste it into a sticky note or text file.
-
As long as you’re using macOS Catalina or later, you’ll be using the zsh shell by default, which means you’ll add JAVA_HOME and the path to your .zshrc file.[2]
If you’re using an earlier version of macOS (or prefer the bash shell), replace .zshrc with .bashrc in these commands instead. Here’s the easiest way to open the file:- Type cd ~ and press Return.
- Type open .zshrc and press Return. This should open the file in a text editor.
- If the file is not found, type echo > .zshrc and press Return. Then, run open .zshrc again.
-
Adding these lines ensures that JAVA_HOME will be set correctly even after you log off or open another window. If the file has existing contents, just scroll down past them to enter the following text on individual lines:
-
export JAVA_HOME=/Library/Java/JavaVirtualMachines/jdk-23.0.2.jdk/Contents/Home- Replace
/Library/Java/JavaVirtualMachines/jdk-23.0.2.jdk/Contents/Homewith the full path to the /Contents/Home directory of your Java installation if it’s different.
- Replace
export PATH=$JAVA_HOME/bin:$PATH- Save the file and exit the text editor when you’re finished.
-
-
Once you’ve edited your profile, this command ensures that your environment variables will be updated for the current terminal window (and any other windows you open from now on).
-
You should now see the full path to JAVA_HOME.
- If you have any other open windows attempting to find Java binaries, close and reopen them.


Advertisement
-
If you’re logged in to your desktop environment, you can press Ctrl + Alt + T to launch a terminal window.
- This method will work in just about any version of Linux, including Ubuntu and Redhat.
-
One way you might find the Java install location is to run the which javac command, but this will only give you a symbolic link. Instead, run this command to find the location of the executable file:
- readlink -f `which javac`
- If that doesn’t work, try running update-alternatives --list java.
- If neither of these commands works, run whereis java, which will usually result in a symbolic link like /usr/bin/java.
- Once you get the directory, find out where it links using ls -la /bin/java.
- If that points you to another directory, e.g., /etc/alternatives/java, run ls -la /etc/alternatives/java.
- At that point, you should see a much longer directory, which is actually the home to the Java binaries. For example, usr/lib/jvm/java-23-openjdk-arm64/bin/java. This is the directory you want.
-
Now that you have the location of Java, you can add the path to your .bashrc file (if you’re using the bash shell), .zshrc (for the zsh shell), or the equivalent for your shell.[3]
Run both of the following commands, replacing the path with the path to your JDK or JRE installation, and «bashrc» with your shell’s login script:echo "export JAVA_HOME=/usr/lib/jvm/java-23-openjdk-arm64" >> ~/.bashrcecho "export PATH=$PATH:$JAVA_HOME/bin" >> ~/.bashrc
-
Though you’ve already set the home for Java and added the path to its binaries permanently, the changes won’t take effect in your current terminal window until you run this command.
- At this point, you can run echo $JAVA_HOME to see the location of Java on your system.


Advertisement
Ask a Question
200 characters left
Include your email address to get a message when this question is answered.
Submit
Advertisement
Video
-
In Linux, you can set JAVA_HOME for all users by editing the global .bashrc, which is located at /etc/bash.bashrc. Just use echo and replace ~/.bashrc with /etc/bash.bashrc.
-
On both Linux and macOS, you can set the Java home in your .bash_profile or .zprofile if you prefer.
Thanks for submitting a tip for review!
Advertisement
About This Article
Thanks to all authors for creating a page that has been read 378,561 times.
Is this article up to date?
How do programs that need Java find it on your operating system? They search for JAVA_HOME. Here’s how to set it up on your Windows machine.
For Java-based programs such as Maven, Jenkins, Gradle or Tomcat to run, they need to know that Java’s JDK is installed. That’s the purpose of the JAVA_HOME environment variable. It tells programs where to find the Java installation.
3 ways to set JAVA_HOME on Windows
You can set JAVA_HOME on Windows in one of three ways:
- Allow the Java installer to do it.
- Use the environment variable editor.
- Set JAVA_HOME at the command line.
Automatically set JAVA_HOME
Java installers have come a long way over the years.
In the past to install Java one had to download ZIP files, with manual extractions and extensive configuration. Today, you can download an installer that not only installs Java but also configures the PATH and JAVA_HOME environment variables.
For example, with the Eclipse Temurin version of the JDK, setting JAVA_HOME is simply a matter of choosing the option to set or override the JAVA_HOME variable on the third step of the installer.
How to set JAVA_HOME through Windows
If you choose to install Java manually or you want to update the JAVA_HOME environment variable on Windows, the easiest route is to use the Windows environment variables editor. To do so, follow these steps:
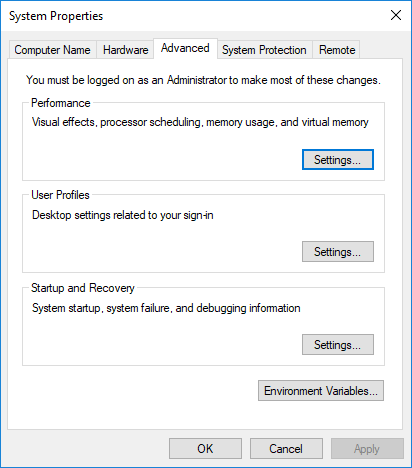
- Open the Windows System Properties window.
- Choose Advanced System settings.
- Click on the Environment Variables button.
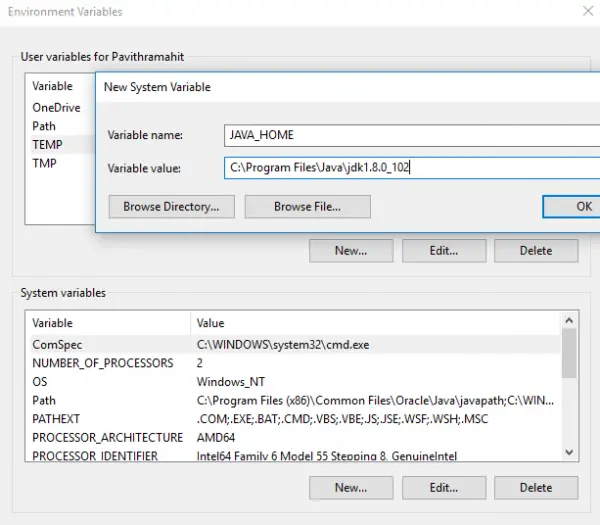
- Click on the New button under System Variables.
- Set JAVA_HOME as the environment variable name.
- Set the location of the JDK installation as the environment variable Value.
- Click OK and close the JAVA_HOME environment variable editor.
Remember that JAVA_HOME points to the root folder into which the JDK was installed. Do not point JAVA_HOME to the \bin directory of the install. The PATH variable points to \bin, while JAVA_HOME points to the root folder into which the JDK was installed.
How to set JAVA_HOME at the command line
For those who prefer to use the command line, you can easily set JAVA_HOME on Windows with any terminal window, be it PowerShell, the Command Prompt or even Git’s Bash shell.
The following command permanently points JAVA_HOME to the location you set:
setx JAVA_HOME -m «C:\_jdk25.0»
The option to manually set JAVA_HOME through the command line is especially useful if you need to quickly update JAVA_HOME to point to a newer installation of the JDK, or if you need to regularly switch between Java versions.
How to echo JAVA_HOME in Windows
After you set JAVA_HOME in Windows, it’s a good idea to verify the change has persisted. The easiest way to do this is to echo JAVA_HOME in a command prompt or a Bash shell.
To echo JAVA_HOME in a DOS prompt, simply bookend the variable with percentage signs, like so:
@REM How to echo JAVA_HOME in windows
echo %JAVA_HOME%
>> C:\_jdk25.0
If you use a Bash shell, or if you have set JAVA_HOME in an Ubuntu environment and need to echo JAVA_HOME in Linux, place a single dollar sign before the environment variable: echo $JAVA_HOME.
If the echo command returns the value you set for JAVA_HOME, you know your system is configured properly.
Cameron McKenzie has been a Java EE software engineer for 20 years. His current specialties include Agile development; DevOps; Spring; and container-based technologies such as Docker, Swarm and Kubernetes.
Dig Deeper on Core Java APIs and programming techniques
-

Install Java’s JDK on Ubuntu
By: Cameron McKenzie
-
How to download and install Java 21 on Windows
By: Cameron McKenzie
-
How to install Java 21 on Ubuntu
By: Cameron McKenzie
-
Tips for migrating to OpenJDK


Download Windows Speedup Tool to fix errors and make PC run faster
In Unix terminology, an Environment variable is a string that holds information such as drive name, pathname, filename, etc. JAVA_HOME is an environment variable which addresses to the directory where Java Runtime Environment or Java Development Kit is installed in the system. To be precise, say if you have installed Java in the path C:\Program Files\Java\jdk1.8.0_121 on your computer, then your Java_Home is C:\Program Files\Java\jdk1.8.0_121. Basically, JAVA_Home is simply an example used by Java-based programs like Apache Tomcat and other app server tools to find where Java is placed in the system.
These third-party programs make use of the environment variables that point to the directory of JDK or JRE. In simple words, it makes easy for the programs to locate the directory executable like javac in the computer. If you are not using these third-party programs, then it may not be mandatory for users to set up JAVA_Home in your system. In this article, we will explain in detail how to set JAVA_HOME as the environment variable in Windows 10.
Set JAVA_HOME environment variable & update the system path
Download and install Java from the official site – java.com.
After installation, Go to Start menu and type Advanced system settings.
Click on View advanced system settings from the list to open System Properties.
Go to Advanced tab and click on Environment Variables button.
In the Environment Variable window, click on New button under the System variable.
In the Edit System Variable, give the Variable name as JAVA_HOME and Variable value as the path to your JDK directory.
Click on OK.
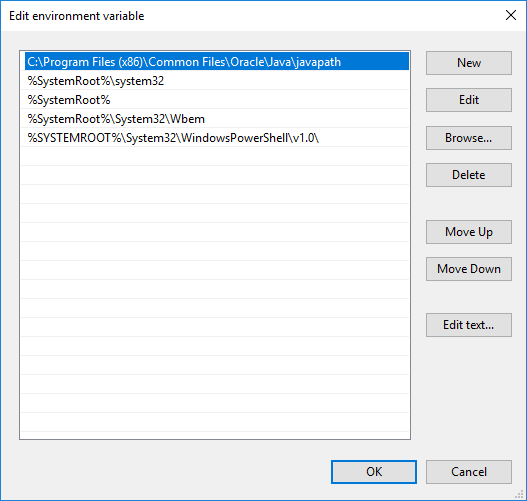
Now go back to the Environment Variable window and select Path under the System variable.

Click on Edit button to open Edit environment variable window.
Click on New button and type %JAVA_HOME%\bin.
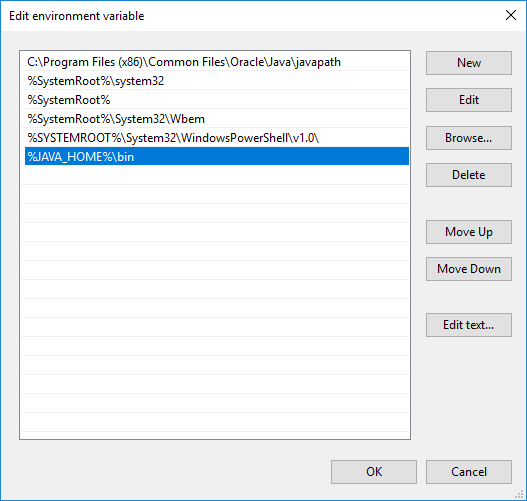
Click OK to apply the changes.
Check JAVA_HOME configuration setup using CMD
To test your configuration, open Command prompt.
Type echo %JAVA_HOME% and hit Enter. This should print the directory of the JDK which the JAVA_HOME is pointing. Instead, if you see a space, it means you have failed in setting up environment variable.

Next Type javac -version which should print the version of Java compiler.
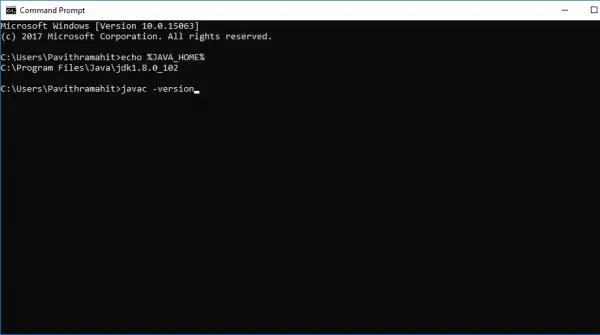
If not it will print a message that the javac is not recognized as an internal or external command. This means the path variable is not set correctly.
I hope this helps!
Related: How to download and install Java JDK on Windows 11.
Pavithra is a Windows enthusiast, who loves keeping abreast with the latest in the world of technology.
Пройдите тест, узнайте какой профессии подходите
Работать самостоятельно и не зависеть от других
Работать в команде и рассчитывать на помощь коллег
Организовывать и контролировать процесс работы
Быстрый ответ
Для конфигурации переменных среды Java в ОС Windows следуйте инструкциям ниже:
-
Укажите путь к установленной Java, например:
C:\Program Files\Java\jdk-18.0.1. -
Настройте переменную
JAVA_HOME: -
Добавьте путь к каталогу
binJava в переменнуюPath:
Теперь вы способны запустить инструменты Java (java, javac) из командной строки.

Полное руководство по переменным среды Java
Настройка JAVA_HOME и Path
Переменная JAVA_HOME указывает местоположение Java Development Kit (JDK):
Добавление пути к директории bin JDK к системной переменной Path разрешит вам обращаться к командам Java из любого места:
Установка JAVA_TOOL_OPTIONS
При помощи JAVA_TOOL_OPTIONS вы можете задать кодировку Unicode для вашего приложения:
Работа с Classpath
Не стоит устанавливать глобальную переменную CLASSPATH. Предпочтительнее управлять ею для каждого приложения индивидуально, используя ключи -cp или -classpath:
Проверка и устранение проблем
После изменения переменных убедитесь в правильности настройки:
Если вы столкнулись с проблемами, возможно, понадобится перезагрузка компьютера или переустановка JDK.
Визуализация
Принцип работы установки переменных:
JAVA_HOME— это место, где «живёт» Java, откуда начинается её работа.Path— это путь, по которому Java передвигается, выполняя задачи.
Правильно настроенные переменные среды выглядят так:
Такая конфигурация обеспечивает надёжное и ясное взаимодействие ваших программ.
Умные советы для опытных пользователей
Быстрый доступ к переменным среды
Для быстрого доступа к окну переменных среды используйте комбинацию Win + R, введите sysdm.cpl и перейдите к разделу «Дополнительные параметры системы».
«Rapid Environment Editor» облегчит редактирование переменных среды.
Временная настройка переменных
Вы можете временно переопределить путь в командной строке:
Персонализация опций Java
Воспользуйтесь различными опциями запуска Java для настройки под специфические требования вашего приложения:
Обновление JDK
При обновлении JDK не забудьте также обновить ссылки на него в JAVA_HOME и Path.
Полезные материалы
- Как установить переменные Path и среды в Windows — подробное руководство, демонстрирующее основы работы с переменными среды в ОС Windows.
- PATH и CLASSPATH (Справочник по Java™) — документация Oracle, объясняющая, как управлять переменной PATH.
- Обсуждение настройки переменных среды для Java в ОС Windows на Stack Overflow — полезная ветка форума со множеством примеров и советов.
- Руководство Microsoft по управлению переменными среды — актуально для всех версий ОС Windows.
- Настройка
JAVA_HOMEдля Apache Tomcat — описание процесса в контексте установки Tomcat. - Видеоурок по установке Java JDK на ОС Windows 10 с настройкой
JAVA_HOME— наглядное пособие для новичков. - Как установить Java Software Development Kit — пошаговое руководство с иллюстрациями от WikiHow.
Set the JAVA_HOME Variable
To set the JRE_HOME or JAVA_HOME variable:
-
Locate your Java installation directory
tip/resting
Created with Sketch.If you didn’t change the path during installation, it’ll be something like
C:\Program Files\Eclipse Adoptium\jdk-11.0.17.8-hotspot\orC:\Program Files\Java\jdk-17.0.4.1\You can also type
where javaat the command prompt. - Do one of the following:
Windows 7 – Right click My Computer and select Properties > Advanced
Windows 8 – Go to Control Panel > System > Advanced System Settings
Windows 10 – Search for Environment Variables then select Edit the system environment variables - Click the Environment Variables button.
- Under System Variables, click New.
- In the Variable Name field, enter either:
JAVA_HOMEif you installed the JDK (Java Development Kit)
orJRE_HOMEif you installed the JRE (Java Runtime Environment)
-
In the Variable Value field, enter your JDK or JRE installation path.

- Click OK and Apply Changes as prompted

You’ll need to close and re-open any command windows that were open before you made these changes, as there’s no way to reload environment variables from an active command prompt. If the changes don’t take effect after reopening the command window, restart Windows.
Set the JAVA_HOME variable via the command line
If you would prefer to set the JAVA_HOME (or JRE_HOME) variable via the command line:
- Open Command Prompt (make sure you Run as administrator so you’re able to add a system environment variable).
-
Set the value of the environment variable to your JDK (or JRE) installation path as follows:
setx /m JAVA_HOME "C:\Program Files\Java\jdk11.0.17.8"Restart Command Prompt to reload the environment variables then use the following command to check the it’s been added correctly.
-
You should see the path to your JDK (or JRE) installation.